SEARCH FINESCALE.COM

Enter keywords or a search phrase below:

FINISHED PICS!--Page 10--DML HORNISSE

51757 views
193 replies
1 rating 2 rating 3 rating 4 rating 5 rating
  • Member since
    January 2007
Posted by the doog on Thursday, January 15, 2009 1:33 PM
 psstoff995 wrote:
 the doog wrote:
 mmc wrote:

Will do. This may be a silly question, but what the hell.........is the interior the same colour as the exterior?

Mark

Absolutely--you can use mine for a reference.

Just a guess but was this done because of the fact that it was an open vehicle thus the interior needed to be just as "camouflaged" as the exterior?

Well, ummm....possibly. But regardless of the reason, no Hornisses or Nashorns were ever painted Grey, or white inside. Even the Wespe, which was often seen in grey, had a matching grey interior.

WHo knows? Maybe it was just expedient to paint the whole thing in one color/


  • Member since
    July 2004
  • From: Texas
Posted by wbill76 on Thursday, January 15, 2009 2:28 PM

The reason to paint the exposed interior on an open-topped vehicle to match the exterior was to avoid giving away the vehicle to aerial reconnaisance or jabos...nothing like looking down and seeing a great square of white surrounded by camoflage or fields to make you a big target! Wink [;)]

The reason for a light colored interior is to make it easier for the crew to see things in minimal lighting in an enclosed space...with an open-top that reason goes away...soooo take away the original reason for doing it and combine it with the target-enhancing reason above and you've now got 2 very good reasons for NOT painting the interior on an open-top vehicle anything different from the exterior. Some vehicles like the 234/4 did go through a period where the exposed portions were only painted in primer red but they are more the exception than the rule.

  • Member since
    September 2006
  • From: Dripping Springs, TX, USA
Posted by RBaer on Thursday, January 15, 2009 2:42 PM
Boy, I sure missed this one. A treat from the doogster, as always.Big Smile [:D]

Apprentice rivet counter.

  • Member since
    January 2007
Posted by the doog on Thursday, January 15, 2009 2:55 PM
 wbill76 wrote:

The reason to paint the exposed interior on an open-topped vehicle to match the exterior was to avoid giving away the vehicle to aerial reconnaisance or jabos...nothing like looking down and seeing a great square of white surrounded by camoflage or fields to make you a big target! Wink [;)]

The reason for a light colored interior is to make it easier for the crew to see things in minimal lighting in an enclosed space...with an open-top that reason goes away...soooo take away the original reason for doing it and combine it with the target-enhancing reason above and you've now got 2 very good reasons for NOT painting the interior on an open-top vehicle anything different from the exterior. Some vehicles like the 234/4 did go through a period where the exposed portions were only painted in primer red but they are more the exception than the rule.

Yup, good info there, Bill--and in some of the late Pz IV models and variants, when that primer red thing was tried late in the war, the crews complained so much so about the decreased visibility that they changed back to painting the interiors white at the factory.

That's too, RBaer, for the comments! 

  • Member since
    November 2005
Posted by Anonymous on Thursday, January 15, 2009 3:05 PM
Wow, doog---this build is the shit !!!  I mean and I really mean this, it could be IMO your best work I've seen !!! Thumbs Up [tup]Thumbs Up [tup]That shell rack and shells are awesome, so is the interior in general, and the camo is dead on...I hope you don't over-weather it...Whistling [:-^]
  • Member since
    August 2007
  • From: The Plains of Kansas
Posted by doc-hm3 on Thursday, January 15, 2009 4:31 PM
 Doog! Those shells look fantastic! As does the cannon, as does every little detail. Man this one is really Hot!Thumbs Up [tup]

All gave some and some gave all.

  • Member since
    January 2007
Posted by the doog on Thursday, January 15, 2009 6:15 PM

 Mansteins revenge wrote:
Wow, doog---this build is the shit !!!  I mean and I really mean this, it could be IMO your best work I've seen !!! Thumbs Up [tup]Thumbs Up [tup]That shell rack and shells are awesome, so is the interior in general, and the camo is dead on...I hope you don't over-weather it...Whistling [:-^]
LOL! "Over-weather it"?! Moi?! Whistling [:-^]...Wink [;)]

Don't worry, Manny!--I plan on going easy on my littte 'Nisse! It will have the standard dirty lower chassis and wheels, but it willl be relatively newer-looking! Thanks, for your enthusiatic comment! It means a lot! Big Smile [:D]

Thanks, too, doc! I appreciate your kind compliments too! 

  • Member since
    August 2007
  • From: Southeast Wisconsin
Posted by MaxSheridan on Thursday, January 15, 2009 9:10 PM

Doog, your work is AMAZING as usual....with a capital A-M-A-Z-I-N-G!Thumbs Up [tup]

I echo everyone elses comments on the ammo& racks.....awesome! I know next to nothing about the operations of any type of artillery, but I have a question. In a "real" hornisse, wouldn't it have been easier, possibly safer, and more efficient on the crew to have the ammo on the left side pointing forward? I mean, so they wouldn't have to flip it over in the heat of combat. I could be completely wrong, but that idea just popped into my head when I was looking at the pics.


-Mark

  • Member since
    January 2007
Posted by the doog on Thursday, January 15, 2009 9:24 PM
 MaxSheridan wrote:

Doog, your work is AMAZING as usual....with a capital A-M-A-Z-I-N-G!Thumbs Up [tup]

I echo everyone elses comments on the ammo& racks.....awesome! I know next to nothing about the operations of any type of artillery, but I have a question. In a "real" hornisse, wouldn't it have been easier, possibly safer, and more efficient on the crew to have the ammo on the left side pointing forward? I mean, so they wouldn't have to flip it over in the heat of combat. I could be completely wrong, but that idea just popped into my head when I was looking at the pics.


Mark--thanks for your compliments! Smile [:)]

As far as the ammo racks, do you know that I thought the same thing? But for some weird reason, the racks on that side are reversed!? I have numerous reference shots to prove it.

Actually, think of it this way--you're the crrewman, facing the left ammo bin. You have to grasp the shell, and in turning around to load it, you twist 180' to place the shell in the breech, shell-forward. On the right side, it actually seems counter-intuitive being tio-forward. I guess it has something to do with where the loader was standing?

  • Member since
    August 2007
  • From: Southeast Wisconsin
Posted by MaxSheridan on Thursday, January 15, 2009 9:32 PM
 the doog wrote:
 MaxSheridan wrote:

Doog, your work is AMAZING as usual....with a capital A-M-A-Z-I-N-G!Thumbs Up [tup]

I echo everyone elses comments on the ammo& racks.....awesome! I know next to nothing about the operations of any type of artillery, but I have a question. In a "real" hornisse, wouldn't it have been easier, possibly safer, and more efficient on the crew to have the ammo on the left side pointing forward? I mean, so they wouldn't have to flip it over in the heat of combat. I could be completely wrong, but that idea just popped into my head when I was looking at the pics.


Mark--thanks for your compliments! Smile [:)]

As far as the ammo racks, do you know that I thought the same thing? But for some weird reason, the racks on that side are reversed!? I have numerous reference shots to prove it.

Actually, think of it this way--you're the crrewman, facing the left ammo bin. You have to grasp the shell, and in turning around to load it, you twist 180' to place the shell in the breech, shell-forward. On the right side, it actually seems counter-intuitive being tio-forward. I guess it has something to do with where the loader was standing?

Well, there you go......that makes perfect sense....I guess that's where the phrase "it's all in the details" comes in!Big Smile [:D] I always find it amazing how engineers think of even the smallest details in their designs. Well, back to the stool in the corner for me!Dunce [D)]

Big Smile [:D]


-Mark

mmc
  • Member since
    February 2007
  • From: Newcastle upon Tyne, England
Posted by mmc on Friday, January 16, 2009 8:20 AM

Thanks for the info on the interior..........knew it was a silly question lol!!!!!!

Mark

  • Member since
    December 2003
  • From: Colorado
Posted by psstoff995 on Friday, January 16, 2009 2:24 PM
 wbill76 wrote:

The reason to paint the exposed interior on an open-topped vehicle to match the exterior was to avoid giving away the vehicle to aerial reconnaisance or jabos...nothing like looking down and seeing a great square of white surrounded by camoflage or fields to make you a big target! Wink [;)]

The reason for a light colored interior is to make it easier for the crew to see things in minimal lighting in an enclosed space...with an open-top that reason goes away...soooo take away the original reason for doing it and combine it with the target-enhancing reason above and you've now got 2 very good reasons for NOT painting the interior on an open-top vehicle anything different from the exterior. Some vehicles like the 234/4 did go through a period where the exposed portions were only painted in primer red but they are more the exception than the rule.

Thanks for the reference, also the cool tidbit about the 234/4 I hadn't seen it like that. Not a bad question Mark! Smile [:)]

-Chris

US Army Infantryman

  • Member since
    December 2005
  • From: Syracuse, NY
Posted by lexesbenz on Friday, January 16, 2009 3:31 PM
UPDATE Big Smile [:D] Lol, sorry Karl.
The flying hamster of doom rains coconuts on your pitiful city!!!!
  • Member since
    March 2007
  • From: NJ
Posted by JMart on Friday, January 16, 2009 4:15 PM
just catching up here... goodness,thats good! Thanks again for taking the time to document so many steps and build tips... cheers!


  • Member since
    January 2007
Posted by the doog on Friday, January 16, 2009 6:34 PM

Thanks, JMart! Thanks for looking in, and for your comments!

OK,OK! Here's a small update--tracks and lower hull stuff...

Real men paint their road wheels individually with a paintbrush, LOL! 

I used 502 oil color "Buff" to give the hull an overall wash, and and then used a combination of Medium Rust, Wash Brown, and Black on the bottom of the hull, which I drew upward with a clean brush. I also did the undergarriage the same way.

The muffler is coming alomg--still needs pigment though....

I went easy on the sag...

Coming along....

I'm working on the tracks now-should have them on tonight if I don't fall asleep first! LOL!

Watch this space! Big Smile [:D]

  • Member since
    December 2006
  • From: t.r.f. mn.
Posted by detailfreak on Friday, January 16, 2009 7:09 PM
ever gotten your hair tangled up in a roadwheel? LOL. not funny,did it on a creeper under a semi-truck once ,but never under a panzer IV... been a very informative build.thanks doog.

[View:http://s172.photobucket.com/albums/w1/g-earl828/]  http://i158.photobucket.com/albums/t104/cycledupes/1000Roadwheels4BuildBadge.jpg

  • Member since
    June 2005
  • From: San Tan Valley,AZ
Posted by smokinguns3 on Friday, January 16, 2009 10:12 PM

 detailfreak wrote:
ever gotten your hair tangled up in a roadwheel? LOL. not funny,did it on a creeper under a semi-truck once ,but never under a panzer IV... been a very informative build.thanks doog.

i did the same thing except i was under car and had tranny fluid in my hair when it got cought, talk about painful.

buy the way the weathering looks great.

Rob I think i can I think i can
  • Member since
    July 2004
  • From: Texas
Posted by wbill76 on Saturday, January 17, 2009 12:11 AM

Making good progress Karl...got to admire the dedication of an Optivisor and hand-painting the wheels...but you really ought to give the circle template method a try....you'll be amazed at the amount of time it saves you...not to mention no risk of hair entanglement! Laugh [(-D]

You've created a monster...the mob now demands regular sacrific...errr....updates now to keep them under control. Wink [;)] Propeller [8-]

  • Member since
    December 2005
  • From: Syracuse, NY
Posted by lexesbenz on Saturday, January 17, 2009 12:52 AM
Coming along great, love the sides of the hull.
The flying hamster of doom rains coconuts on your pitiful city!!!!
  • Member since
    August 2008
  • From: S.W. Missouri
Posted by Pvt Mutt on Saturday, January 17, 2009 9:54 AM

"Hair Entanglement"

Now that is funny, you just got my day off to a great start.Laugh [(-D]

Shoot Low Boys They're Ridin Ponys

  • Member since
    January 2007
Posted by the doog on Saturday, January 17, 2009 11:06 AM
 wbill76 wrote:

Making good progress Karl...got to admire the dedication of an Optivisor and hand-painting the wheels...but you really ought to give the circle template method a try....you'll be amazed at the amount of time it saves you...not to mention no risk of hair entanglement! Laugh [(-D]

You've created a monster...the mob now demands regular sacrific...errr....updates now to keep them under control. Wink [;)] Propeller [8-]

LOL! You're right, Bill--NOW YOU KIDS SETTLE DOWN AND LEAVE MY HAIR OUT OF THIS! lol!

I meant to try the template method, I really DID! But before I'm even thinking about painting, I'm assembling the wheel halves, as per instructios, and I just don't thik of it until it's too late!

It doesn't relaly bother me though--I'm a very patient person, and there's an almost zen-like quality to the process for me!  Whistling [:-^]....Big Smile [:D]

Thanks guys, for the enthusiasm, and the comments! 

  • Member since
    November 2006
  • From: Coastal Maine
Posted by dupes on Saturday, January 17, 2009 2:10 PM
Doog - really like the looks of the undercarriage - that "drawn up" wash technique is pretty sweet. Going to have to try that one! Thumbs Up [tup]
  • Member since
    January 2012
Posted by I make stuff on Saturday, January 17, 2009 6:34 PM

That undercarriage weathering is just amazing.  Really, the results you get are an inspiration, at least for me, and your sharing of techniques is just unreal.


I do feel a bit like the USSR when we rolled out the Stealth, I couldn't even copy that if you gave it to me.

Something to aspire to, though. Thanks as always for sharing. 


  • Member since
    January 2007
Posted by the doog on Saturday, January 17, 2009 8:06 PM

Thanks, dupes, and Billl!

You guys are gonna hate me though--I just got done weathering the tracks and hull with pigments, and I covered most of that work up! Whistling [:-^] Oh well, it doesn't hurt to have a great base on which to put the pigments!

Pictures tomorrow! Big Smile [:D]

  • Member since
    April 2008
  • From: Kristiansund, Norway
Posted by Huxy on Saturday, January 17, 2009 8:12 PM
 the doog wrote:

Real men paint their road wheels individually with a paintbrush, LOL! 


No, Doog... Only you paint roadwheels individually.... Disapprove [V]


Seriously tough, Looking great! I really like the look..     What shampoo do you use? Laugh [(-D] Laugh [(-D] Laugh [(-D] Laugh [(-D]


hahah!!    But the model, good. Looks really good!


-Huxy 

"Every War Starts And Ends With An Invasion".

  • Member since
    January 2007
Posted by the doog on Sunday, January 18, 2009 4:06 PM
 Huxy wrote:


 ...what shampoo do you use?

-Huxy 

Pantene Pro-V Extra Moisture--the only serious choice for serious modelers! Tongue [:P]

OK, here's a small weathering update--I have added some MIG dirt and mud on thelower hull. I knwo, I know--y'all liked that paint job, but I just intended it for a "base" for the rest of the mud.It never looks right to me to see mud pigments or dirt on an otherwise-pristine hull, so I wanted to get a good base to work upon. 

What I did was use a little bit of MIG Acrylic Resin, and mix a little paint in, and then some MIG powders of about 4 different shade. I put the darker colors in first, applied a layer of that, and then mixed up some lighter colors, and put them over the first. This gave some depth to the look.

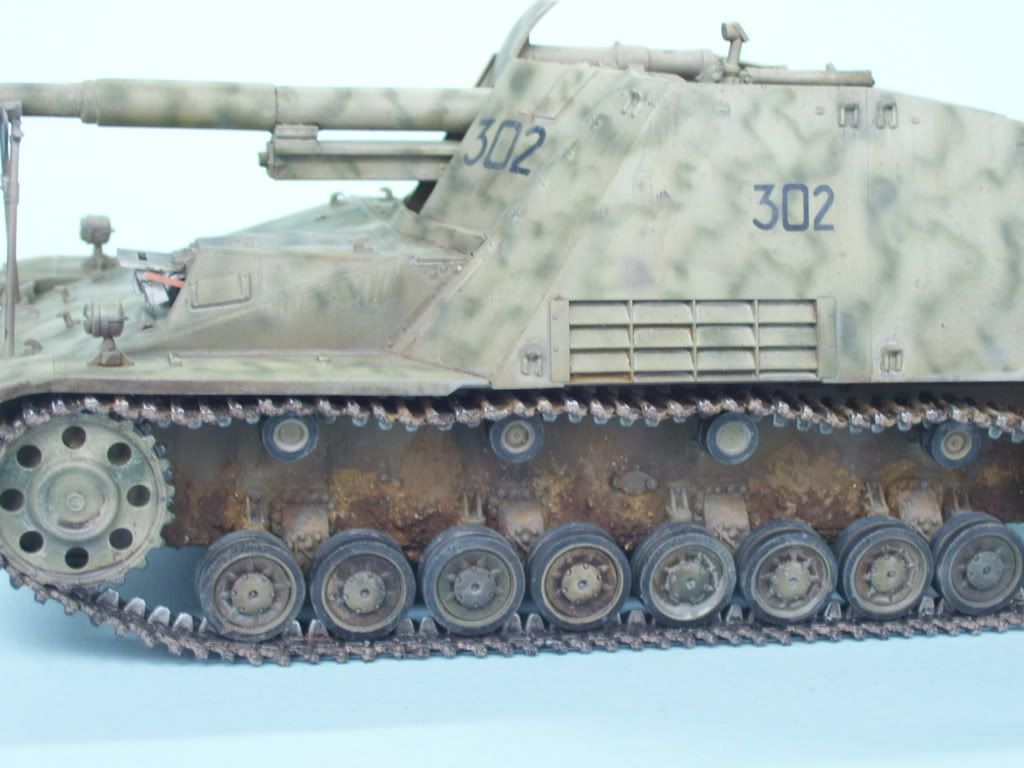
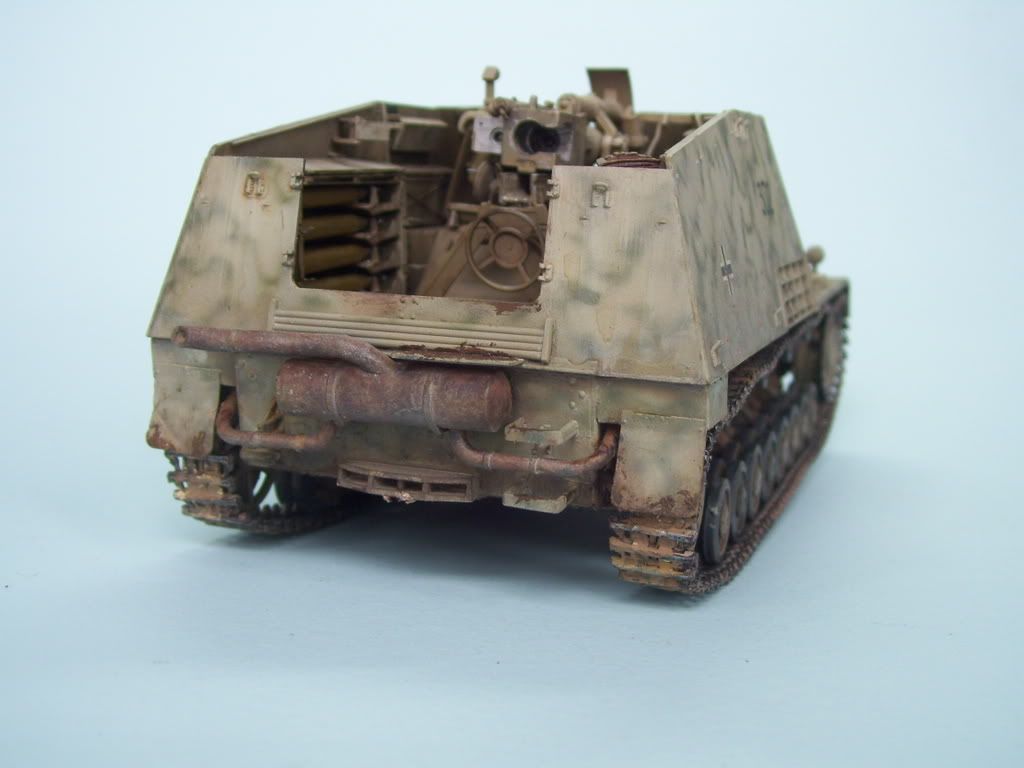
The rear mudgaurds also got some, as well as the steps and crew step.

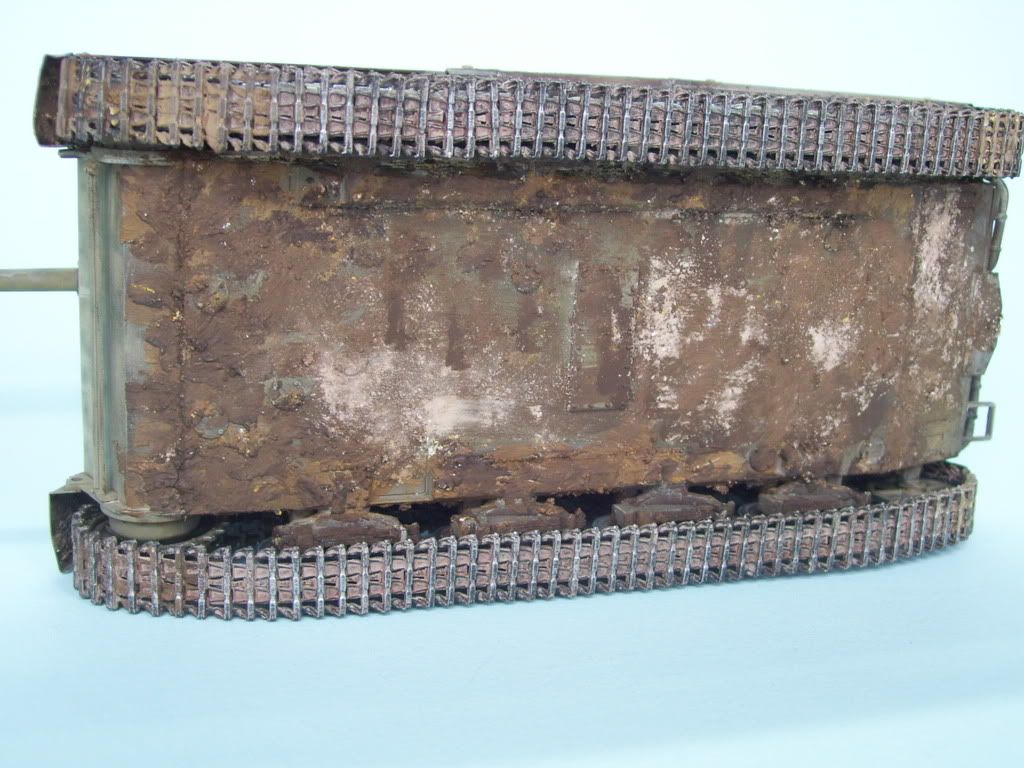
The bottom so far--I plan on adding a little more "dry" pigments here to even it out a bit...

Some more items and details have been added to the interior--the shrouded MG, and cases above it in the racks. Fire extingushers and an open resin map case, which was bent using some heat from a soldering iron.

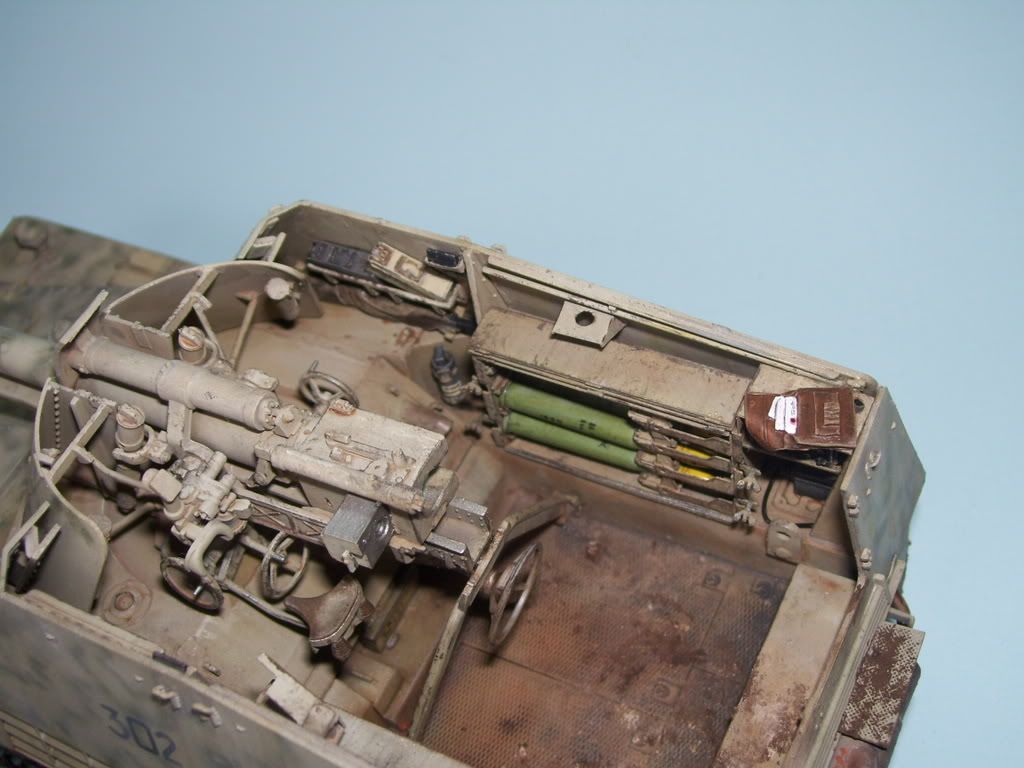
And lastly, I've attached the driver's visor after painting, and added a PE hinge.

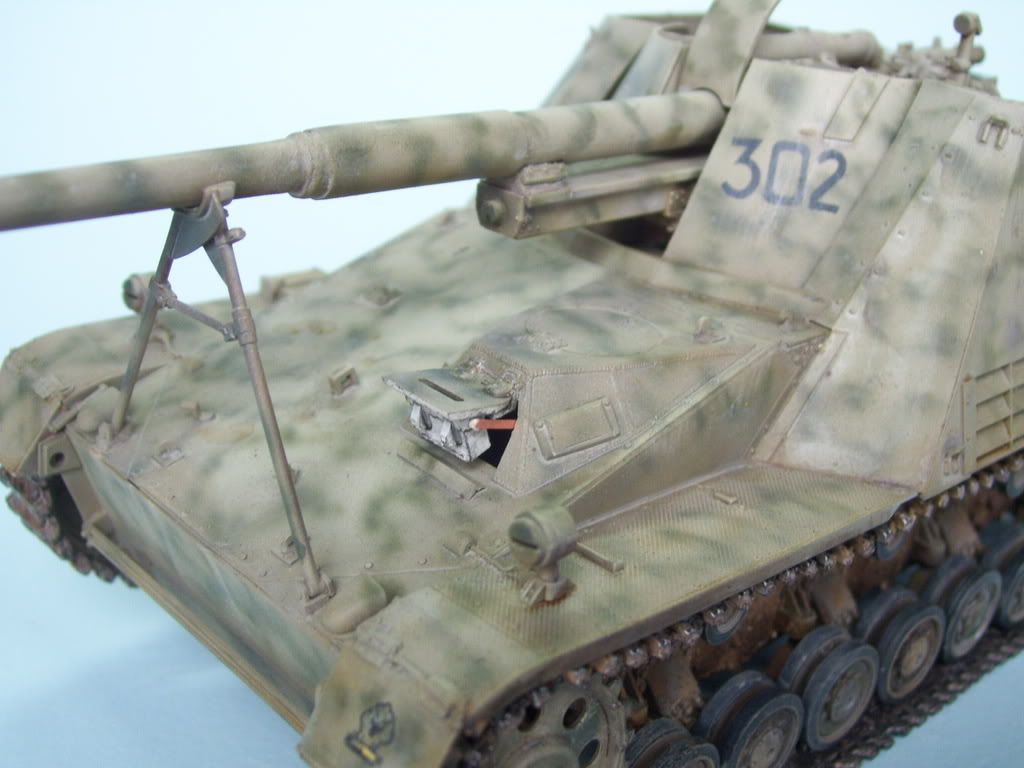
Time to work on the main exterior weathering now. I'm going to go rather light here; not too much chipping or rust.

Hopefully, another update soon! Big Smile [:D]

  • Member since
    December 2005
  • From: Syracuse, NY
Posted by lexesbenz on Sunday, January 18, 2009 4:21 PM
Wow that looks great!
The flying hamster of doom rains coconuts on your pitiful city!!!!
  • Member since
    October 2007
  • From: N.H.
Posted by panzerguy on Sunday, January 18, 2009 4:42 PM

    Fantastic work KarlBow [bow]. The build up of wet and dry mud on the lower hull looks perfect.

  I used to paint road wheels by hand but now that I use a template I don't dread tackling them anymoreBig Smile [:D]

"Happiness is a belt fed weapon"

  • Member since
    April 2005
  • From: Piscataway, NJ!
Posted by wing_nut on Sunday, January 18, 2009 4:46 PM
 the doog wrote:

Real men paint their road wheels individually with a paintbrush, LOL! 


I'm with you brother! (he say's flexing in some type of oiled up Schwarzeneggeresque pose) I haven't used a mask yet on a road wheel yet. And to compensate for that similarity... I am totally on the other end of the hair spectrumDisapprove [V]

It is a shame to have covered that lower hull weathering.  I really liked the look of that and will be happy to get remotely close to that... even though it will be covered by schurzen.

Marc  

  • Member since
    July 2004
  • From: Texas
Posted by wbill76 on Sunday, January 18, 2009 5:05 PM

Karl the lower hull weathering has "stacked' very nicely...I think the foundation you laid before was ideal for the end result you were looking for. Thumbs Up [tup] The other little details for the interior are nice touches too, especially the limp map case cover.

On the front driver's port, I believe that the armored glass block would've been removed when it was open to allow for the driver to have a better view. The holder would remain but the block itself stowed to allow the driver a mostly unobstructed view. Take a look at this pic from Allied&Axis #16, the portion sticking down at an angle is much smaller than what you've got on yours. Not sure if you're able to address it or not by perhaps cutting it down? It also looks like it opens upward at a higher angle as well vs. a 90-degree angle the way you've got it installed now, probably has a locking mechanism on the extender?


JOIN OUR COMMUNITY!

Our community is FREE to join. To participate you must either login or register for an account.

SEARCH FORUMS
FREE NEWSLETTER
By signing up you may also receive reader surveys and occasional special offers. We do not sell, rent or trade our email lists. View our Privacy Policy.