SEARCH FINESCALE.COM

Enter keywords or a search phrase below:

FINISHED! Page 7-the doog's BEST? Sdkfz 251/17 Ausf. D w/2cm Schwebelafette

98059 views
181 replies
1 rating 2 rating 3 rating 4 rating 5 rating
  • Member since
    January 2007
FINISHED! Page 7-the doog's BEST? Sdkfz 251/17 Ausf. D w/2cm Schwebelafette
Posted by the doog on Saturday, January 24, 2009 6:20 PM

Hi Guys--

Hey dooooods---Well, not slowing down here a bit; got a new one up on the workbench--the DML Sd.Kfz. 251/17 Ausf. D w/2cm Schwebelafette--try saying that three times fast!

First of all, here's step 1--totally, completely unnecessary! LOL!  In this photo you can see that there's some transmission parts and gas tank that are to be put in; trouble is, they're COMPLETELY hidden in a later step--so just ignore this step! For the life of me though, I cannot figure out why they would waste the money to put in parts that cannot possibly be seen?!


Here's a good lesson for noobs--the importance of planning your model by looking at the build sequence and part placement. I smelled this one; dont ask me how, but I was right, and I'm glad I caught itin time!

Step one also tells you to add these PE parts---moulding for the lower hull.

When you square up the front of the PE part, see how the remainder of the PE sits against the locating holes or the suspension parts? I had a sneaky suspicion that i they weren't perectly "square", that I would never get the parts #25 (12 of them!) to glue in correctly--I was right. The problem is that the PE part is too long by about 1-1.5mm! 

The trouble is, you don't find that out until step three!

When you it the parts, you then have to cut the PE nearer to the edge to have the edges "square" up against the hulll edge. I indicated where I cut it here--this cut can then be filled in with superglue, and sanded smooth; plus, it gets nicely hidden by the part that attaches to those two pins there.

The damned suspension arms are floppy as all heck--I resorted to sitting the hull on two lids/palettes here to hopefully level them. I'm not sure how good this is going to work. I hope I don't have to break some of these off i they don't sit right?

I'm working away again as you read this, but I've got a couple of busy next few days starting Monday, so BE PATIENT! (Tony! LOL!)

P.S.--this IS, by the way, the FIRST halftrack I've done! Big Smile [:D]


Sd.KfSd.Kfz. 251/17 Ausf. D w/2cm SchwebelafetteSd.Kfz. 251/17 Ausf. D w/2cm Schwebelafettez. 251/17 Ausf. D w/2cm Schwebelafette Sd1/17 Ausf. D w/2cm Schwebelafette

  • Member since
    July 2004
  • From: Texas
Posted by wbill76 on Saturday, January 24, 2009 6:51 PM

Karl,

Welcome to the wonderful world of DML halftracks! You've discovered one of the first rules about them...study the instructions VERY carefully. One to watch out for (may already be too late) is the alignment between the "halftrack" portion of the suspension arms vs. the front steerable wheels. It's always a good idea to install that first and test fit with the wheels to insure they don't "float" if you've set the suspension arms to sit too high (they shouldn't have too much play in them since there's a second pin that secures them to the hull but it's not a "tight" fit). When the time comes to add the hull sides, you'll want to do that at the same time as you add the hull top otherwise getting the correct angle alignments can be tricky. Last but not least, also watch out when you assemble the tracks as one side is going to need to be longer than the other due to the way the torsion bars offset each other.

Looking forward to seeing what you do with this one! Thumbs Up [tup]

  • Member since
    April 2008
  • From: Kristiansund, Norway
Posted by Huxy on Saturday, January 24, 2009 7:06 PM

This is pretty nice!!  I want a DML Halftrack, but have alot of other things to finish....  But I am doing a Tamiya 251 D soon! 


Looking forward for more, as usual... 

"Every War Starts And Ends With An Invasion".

  • Member since
    April 2007
Posted by tenthumbs on Saturday, January 24, 2009 7:47 PM
I don't have this kit .... yet, but, it's good to know this stuff. As good as the post are on this site, I don't know why I buy books. be interested in your progress. Dan
  • Member since
    December 2007
  • From: Bridgeview, Illinois
Posted by mg.mikael on Saturday, January 24, 2009 8:59 PM
Never seen a Sd.Kfz. 251/17 Ausf. D w/2cm Schwebelafette before. But it looks like your off to a good start doog. Lookin' forward to your next update!Smile [:)]

"A good plan executed now is better than a perfect plan next week." - George S. Patton

  Photobucket 

  • Member since
    September 2004
  • From: Denver
Posted by tankboy51 on Saturday, January 24, 2009 9:02 PM

I've built several of their halftracks, C and D versions, and he's absoluty correct on things.  Study the instructions ahead of time, and more than anything, test fit and watch out for alignment.  Especially the body sides.  They do fit, one way only and it's not alway obvious. Get one little thing off a little bit and ouch!  And those suspension arms, very touchy and flopy. 

By the way, I always add the gas tank and transmission.  Useless, but I know they're there.  I've even painted them.  Just incase I shrink to 1/35 scale, maybe it'll run!  WOW!  (Stupid and a waste of time, but I hate not using parts.)  That's my story and I"m sticking with it.

 PS.  I just finished the Sdkfz 251C/17, the one with the angled sides. 

Good Luck Doog.  Excellent job so far!

Doug

  • Member since
    November 2006
  • From: United States
Posted by ww2modeler on Saturday, January 24, 2009 9:06 PM

Looks like its going to be another great build, keep us posted.

David

On the bench:

1/35 Tamiya M26 Pershing-0%

1/144 Minicraft P-38J Lightning-50%

Numerous 1/35 scale figures in various stages if completion.


  • Member since
    April 2014
Posted by Carves on Saturday, January 24, 2009 9:15 PM
Ole... ole Karl....Headphones [{(-_-)}]
  • Member since
    August 2007
  • From: The Plains of Kansas
Posted by doc-hm3 on Saturday, January 24, 2009 9:35 PM

 Doog will be the scout on this one to point all of the idiosycnrocies(spell check! isle five). I've got two 3in1's in the stash. Go Karl go! I don't know which button I hit, but everything just blew up to 1,000 font.

All gave some and some gave all.

  • Member since
    January 2007
Posted by the doog on Saturday, January 24, 2009 10:04 PM

Hey, thanks, guys--and thanks for the "warnings" and tips, Bill and Doug! Big Smile [:D]

Well, thanks to Bill's sage advice, DISASTER HAS BEEN AVERTED! Luckily, I was able to get the necessary wheels and track sections assembled, and everything lined up--I was actually nearly 100% on; only the front wheels were dancing their own tune. I have them all even now, and just hardening over night with a tiny bit of weight on them.

All together now; "PHEW"!!! Big Smile [:D]

G'night, gents! Zzz [zzz]

  • Member since
    December 2005
  • From: Syracuse, NY
Posted by lexesbenz on Saturday, January 24, 2009 10:39 PM

Wow looking sweet Karl.....I'm patient lol, I'm going to be working on some of my own stuff, that is if I can find the space, my modeling desk area is pretty cramped up, plus if I want to build I have to take at least 10 kits of my desk chair, including a 1/6 Kubelwagen, and 1/16th T-34, its a good thing were moving soon.

Here's a "clearer" perspective.


The flying hamster of doom rains coconuts on your pitiful city!!!!
  • Member since
    March 2003
  • From: Rain USA, Vancouver WA
Posted by tigerman on Sunday, January 25, 2009 2:18 AM
Geez Karl, you barely got the Hornisse on the shelf and off you are onto another project. I salute your drive. I look forward to you working your magic on this guy. Are you going to emulate the whitewash on the box-top?

   http://i7.photobucket.com/albums/y269/wing_nut_5o/PANZERJAGERGB.jpg

 Eric 

  • Member since
    November 2004
Posted by snapdragonxxx on Sunday, January 25, 2009 3:33 AM

Looking good, Doog. Keep going man!

James

  • Member since
    October 2007
  • From: Louisville, KY
Posted by pordoi on Sunday, January 25, 2009 8:20 AM
 the doog wrote:

I have them all even now, and just hardening over night with a tiny bit of weight on them.

All together now; "PHEW"!!! Big Smile [:D]


Hey Doog, you have the pads attached to those tracks, don't you?  It's not clear from the picture.  If not, then you may run into trouble later because the rear will sit higher with pads attached, and this will cause the front wheels to float. 

 Don


  • Member since
    January 2009
  • From: Austin TX USA
Posted by atomicrob on Sunday, January 25, 2009 8:29 AM

"The damned suspension arms are floppy as all heck--I resorted to sitting the hull on two lids/palettes here to hopefully level them. I'm not sure how good this is going to work. I hope I don't have to break some of these off i they don't sit right


Doog, that is they way they were built at the factory!

  • Member since
    January 2007
Posted by the doog on Sunday, January 25, 2009 8:31 AM
 lexesbenz wrote:

Wow looking sweet Karl.....I'm patient lol, I'm going to be working on some of my own stuff, that is if I can find the space, my modeling desk area is pretty cramped up, plus if I want to build I have to take at least 10 kits of my desk chair, including a 1/6 Kubelwagen, and 1/16th T-34, its a good thing were moving soon.

Here's a "clearer" perspective.


Oh MY GOD, Tony! LOL! No wonder you go to Walts to build on Tuesday night! Laugh [(-D] You definitely need to expand!

Moving where?!

  • Member since
    January 2007
Posted by the doog on Sunday, January 25, 2009 8:34 AM
 pordoi wrote:


Hey Doog, you have the pads attached to those tracks, don't you?  It's not clear from the picture.  If not, then you may run into trouble later because the rear will sit higher with pads attached, and this will cause the front wheels to float. 

 Don


Actually Don--I do NOT! Banged Head [banghead] AAAAARRGGHHH!!!!

I'll have to check that today! If the pads make that much of a difference, I'll have to perform surgery! Thanke for that astute observation!!!

Tigerman---no, I'm all whitewashed-out after the "MIG" King Tiger; I'll be going with a 3-color on this one. Smile [:)]

  • Member since
    April 2005
  • From: Piscataway, NJ!
Posted by wing_nut on Sunday, January 25, 2009 11:33 AM

OUCH doog.  Gotta have those pads on there my friend.  I wanted to use you track method to hold everything in place to glue on the pads  but the guide horns are on the opposite side of the hinge overlap.  I made this jig with balsa wood to put the horn down and the hinge up.  A piece of double stick tape with a slit down the channel holds it all nice and tight.  Good looking progress. And you are right about the stuff under the floor.  Leave it out and charge less.

Marc  

mmc
  • Member since
    February 2007
  • From: Newcastle upon Tyne, England
Posted by mmc on Sunday, January 25, 2009 12:47 PM

Steady on Karl, you're making me dizzy!!!! 

I bought DML's 251/22 Pakwagon, so I'll be taking a great interest in this one, as I'm still a Dragon virgin.

Mark 

  • Member since
    January 2008
  • From: Bournemouth UK
Posted by Bodge on Sunday, January 25, 2009 1:54 PM

Hey Karl how you doin man. i wacth with great interest. I did a 251 a while back and loved it. I too did 3 tone camo mine was hard edge and i faded the paint and done a scratch tutorial on it. I loved the exsperiance and cant wait to do another. By the way ive just seen your Hornisse build, WOW looks great,words fail me. just one thing that crewman looks familier,he gets about a bit.


  • Member since
    July 2004
  • From: Texas
Posted by wbill76 on Sunday, January 25, 2009 2:22 PM

The other advantage that the DML 251 kits have is that the tracks can be constructed as workable tracks if you're careful with the glue on the cap block. So far as I know, these are the only kits (along with the 250 family) that DML includes workable tracks in. Wink [;)] I usually assemble mine in pairs, then start daisy chaining them together until I get a full run (2s into 4s, then 4s into 8s, etc.).

  • Member since
    November 2008
  • From: Central Florida
Posted by plasticjunkie on Sunday, January 25, 2009 2:40 PM
 lexesbenz wrote:


But I'll bet ya he knows where everything is at and can reach out for a specific paint or tool and find it in a couple of seconds.......... Then you organize everything in a neat and orderly fashion only to go crazy because you CAN'T find anything! Banged Head [banghead]

 GIFMaker.org_jy_Ayj_O


Too many models to build, not enough time in a lifetime!!

  • Member since
    December 2005
  • From: Syracuse, NY
Posted by lexesbenz on Sunday, January 25, 2009 4:22 PM
 the doog wrote:
 lexesbenz wrote:

Wow looking sweet Karl.....I'm patient lol, I'm going to be working on some of my own stuff, that is if I can find the space, my modeling desk area is pretty cramped up, plus if I want to build I have to take at least 10 kits of my desk chair, including a 1/6 Kubelwagen, and 1/16th T-34, its a good thing were moving soon.

Here's a "clearer" perspective.


Oh MY GOD, Tony! LOL! No wonder you go to Walts to build on Tuesday night! Laugh [(-D] You definitely need to expand!

Moving where?!

Just down the street, were trying to buy a house from across the post office, the bank is kind of giving us a hard time right now though, basically they are trying to go back on a contract.

The flying hamster of doom rains coconuts on your pitiful city!!!!
  • Member since
    July 2006
  • From: New Jersey
Posted by redleg12 on Sunday, January 25, 2009 5:45 PM

Karl - Between Bill and you, both are having fun with directions. I have figured it out. The directions were written be an alien. he comes from the 6th planet...you know:

STUPIDITER....  I can't understand how these "great" model companies can have such tight quality control on the plastic manufacture and then they let STUPIDITER write the directions. DA.......

Hang in there.

Rounds Complete!!

"The Moral High Ground....A Great Place to Emplace Artillery."

  • Member since
    December 2005
  • From: Syracuse, NY
Posted by lexesbenz on Sunday, January 25, 2009 8:27 PM
 plastickjunkie wrote:
 lexesbenz wrote:


But I'll bet ya he knows where everything is at and can reach out for a specific paint or tool and find it in a couple of seconds.......... Then you organize everything in a neat and orderly fashion only to go crazy because you CAN'T find anything! Banged Head [banghead]


Toooooo true!!!!

The flying hamster of doom rains coconuts on your pitiful city!!!!
  • Member since
    August 2006
  • From: Amherst, MA
Posted by M1 A1 A2 Tanker on Sunday, January 25, 2009 9:10 PM

Nice work so far, Doog.


Seeya


“Computers are like Old Testament gods; lots of rules and no mercy.”  ~ Joseph Campbell


  • Member since
    January 2007
Posted by the doog on Sunday, January 25, 2009 11:27 PM

Hey guys--thanks to everyone for their helpful comments regarding this build--Bill, that's great suggestion about the 2,4,8, etc.--It certainly is a good idea.

Marc-that's another great idea; the jig--I made one out of a strip of balsa wood, following your example!

Andy (Bodge)--that's one beautiful! And hey--is that Hanz' twin brother, Ranz? LOL! Nice job, all around!

Well, here's the "How to fix a stupid disaster that you shoulda known better than to create" portion of our program! Banged Head [banghead]

Well, as pordoi pointed out, bonehead doog forgot to add the track blocks, but before I got to adding the track blocks to the tracks, I discovered a nasty surprise--the Magic Tracks that were sent were the wrong parts!

There are two different type of tracks provided in the kit; Magic Tracks, which come in little baggies, and other typical indy links stuck to the sprues. Each has a different pattern. Well, the Magic Track tracks had the WRONG TYPE of blocks--they're supposed to be metal cleats, and the MT's had only rubber-style blocks! That meant I had to add another half hour to cutting the other tracks off the sprues, and clean them up! I planned to just use the MT blocks with them, as the two blocks styles which came in both patterns in the kit were the same--but, SURPRISE! The MT blocks had different attaching pins--they couldn't be used! Not only that, but the track blocks of the sprue-type were directional, if you can believe that?! I had to make sure each one was turned the right way, or the pattern of aligning holes wouldn't match up!

Add another half hour to cutting off the track blocks and cleaning them up! Then, I basically had to trash the links I had already made, and make correct tracks and blocks from what I now had as correct pairings! Anyone else have this problem?!

When I finally added them today, here's what I wound up with! FLOATERS!!!!! AAAAAARRRRGH!!! Banged Head [banghead]


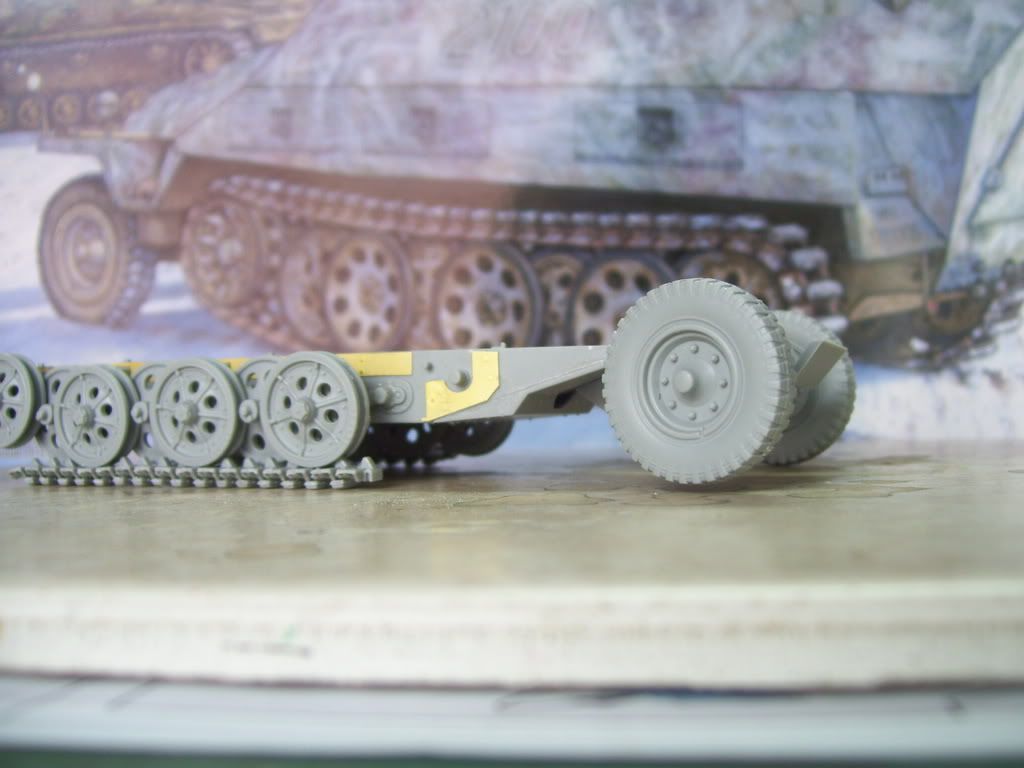
Well, I only knew this--I was NOT going to let that lie! Now, how to fix it?

Well, first, I had to move the arms. Snce they were already cemented into place, I decided to try to cut halfway through them with a medical scalpel. Dr Doog in the house!!!!


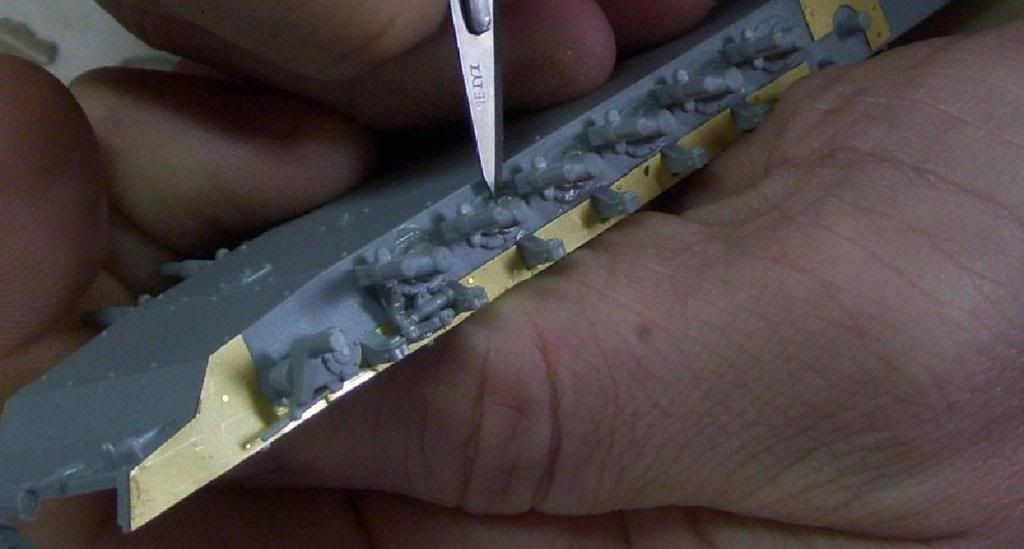
I scored hlafway through each arm, and wiggled them loose. I was able to move each one about 2mm without them snapping.

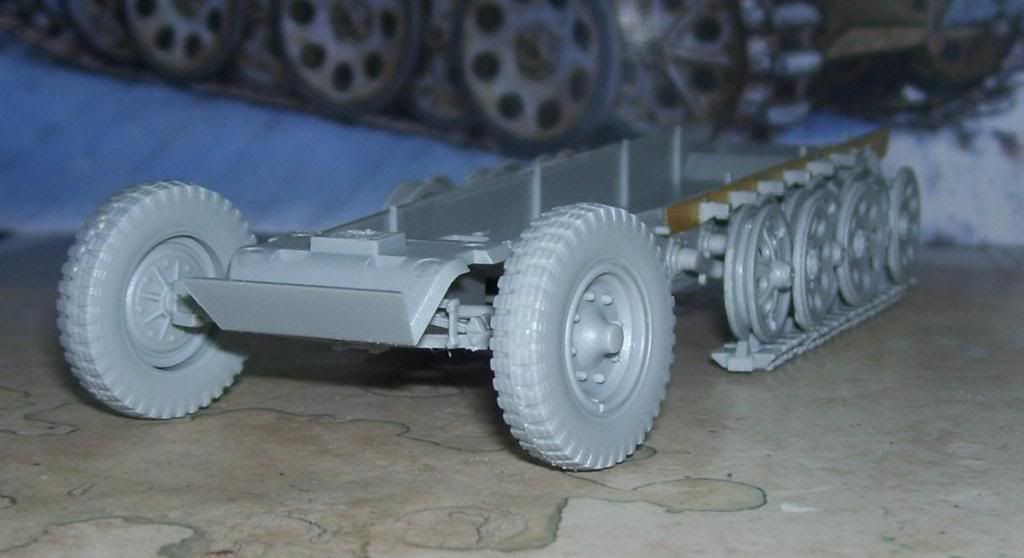
Now I had to make sure that all the wheels touched the tracks, as well as assuring that the "sit" of the hull was correct. I decided that the only proper way to assure this was to attach all the wheels--at least temporarily. This is not my preferred way of doing the suspension, but these are desperate times, and call for desperate measures!

I permanently glued the first 6 inner wheels on--they'll be easy to paint attached. Then, I added a tiny drop of glue to the attachmentt points of the other wheels, and glued them on. I will later twist them off, after I assemble the tracks around them completely. I willl then add them after the tracks and wheels are painted, same as I do tanlk tracks.

I used a drop of Tenax R-7 on each cut-through part of the mounting arms, which helped them move, as well as then cementing them again.

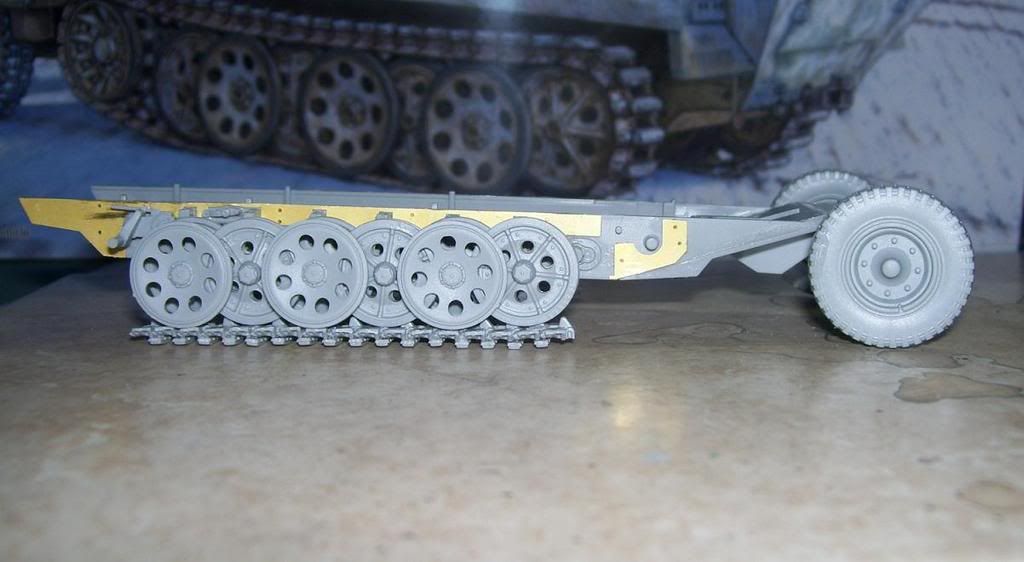
After some 4 hours of surgery and patient, diligent work, I have fixed my stupid oversight! 

The wheels are sitting on the ground, and the tracks' wheels are all in contact with the track. PHEW!!! Tongue [:P]

I'm still working on the track length; as Bill pointed out, with some care, you can make the tracks workable--a necessity to affix them in anyo ther way than just gluing them to the wheels as I have here. 

I will now assemble the length, form them around the wheels, and then glue tight the links--all except enough to remove the length from around the perimeter. The outer wheels will be twisted off with a quick snap, and the track slid off with the wheels to be painted. Reversing the order will put them on the model after all is painted properly.

OK--back to the workbench! I'm gonna beat this sucka yet! Big Smile [:D]


  • Member since
    April 2014
Posted by Carves on Sunday, January 25, 2009 11:38 PM
Nice recovery Karl. Yeah, this thing about DML nstruction can be real tricky and when not careful you can just see big surprises around da corner.
  • Member since
    March 2003
  • From: Rain USA, Vancouver WA
Posted by tigerman on Sunday, January 25, 2009 11:55 PM
Great save again Karl. I'm glad YOU find it easy to paint those wheels attached or are you painting the rubber tires? Wink [;)]

   http://i7.photobucket.com/albums/y269/wing_nut_5o/PANZERJAGERGB.jpg

 Eric 

  • Member since
    December 2005
  • From: Syracuse, NY
Posted by lexesbenz on Monday, January 26, 2009 1:08 AM
Nice Job Karl, its looking good, whens the next Update???? lol J/K, I know that your a busy man. Big Smile [:D]
The flying hamster of doom rains coconuts on your pitiful city!!!!
JOIN OUR COMMUNITY!

Our community is FREE to join. To participate you must either login or register for an account.

SEARCH FORUMS
FREE NEWSLETTER
By signing up you may also receive reader surveys and occasional special offers. We do not sell, rent or trade our email lists. View our Privacy Policy.