SEARCH FINESCALE.COM

Enter keywords or a search phrase below:

Post-Flu update and FINISHED PICS page 5--NeoGrade Bergepanzer III WIP

33370 views
154 replies
1 rating 2 rating 3 rating 4 rating 5 rating
  • Member since
    May 2005
  • From: Dublin Rep Of Ireland
Posted by terry35 on Saturday, April 25, 2009 11:06 AM

Looking good so far Karl. Really like the lenses. Pitty about the interior visiblity, but then again theres the bonus of getting practice at a bit of scratchbuilding.

Terry.

  • Member since
    April 2008
  • From: Philadelphia PA
Posted by smeagol the vile on Saturday, April 25, 2009 12:36 PM
Karl, this is the same as ChuckW's builds.  You wont see most of the stuff he did to that helldiver, but he knows its there, same goes for you, you know that detail is there, thats all that matters


  • Member since
    July 2004
  • From: Texas
Posted by wbill76 on Saturday, April 25, 2009 1:58 PM
Coming along nicely Karl, shame about the scarring on the fenders. DML's older Pz III kits have that tendency unfortunately. I'm looking into doing the Pz III M in the near future and just added one more item to my list of needed things based on what you've encountered. Wink [;)]
  • Member since
    December 2003
  • From: Colorado
Posted by psstoff995 on Saturday, April 25, 2009 2:27 PM

WOW! Came in late, but let me say, it's really a shame that your interior got covered up, it looks amazing!!! Nice fix on the wood, you sure can scribe! Now are you sure you didn't just paint strips of the wood white to make it look like you lengthened it with styrene? haha good work on practicing your corrective skills on the tow hitch Wink [;)] I can totally picture you messing things up on purpose just to see if you could fix them later on. The best has got to keep sharp some how..

-Chris

US Army Infantryman

  • Member since
    January 2007
Posted by the doog on Monday, May 4, 2009 10:19 PM

Hey Guys---well, it's been a long road to this point. Thanks for the comments, and I'm sorry for not acknowledging them sooner; I've really been just lax from being stressed out and under pressure with all that's been happening here.

Brian, I just used regular 5-minute epoxy from a hardware store; nothing fancy! Smile [:)]

Well, here's an update. I'm about ready for paint.

First, for those really considering this kit--there are a couple stupid mistakes that I made which you shouldn't--first, DO NOT install the spaced armor on the front hull--the box will not fit properly with it on.

2. DO NOT install the armored guards (?) over the engine screens--the crane will not fit with them installed.

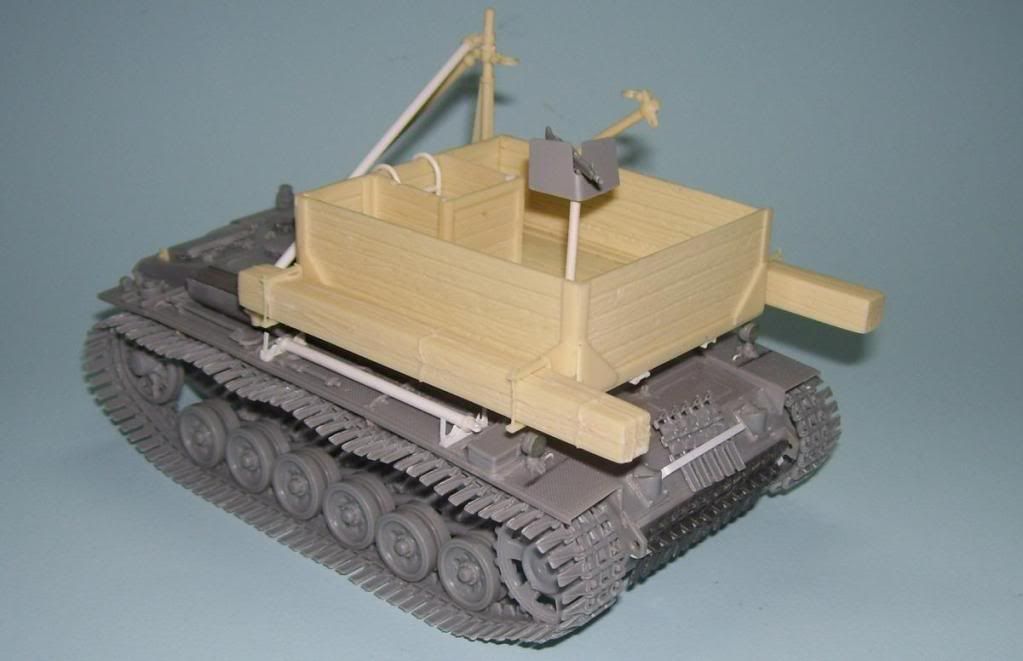
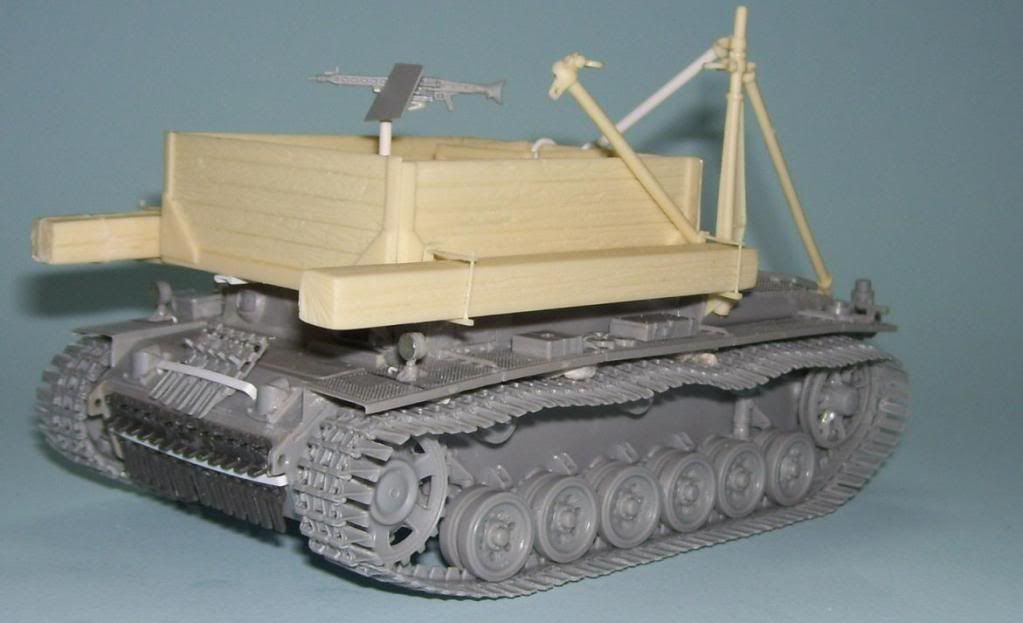
I had a hell of a time figuring out the parts placement--more how to space and align the crane parts--the darned side brackets are so tight that they really almost make the placement of the crane jib impossible--anyway, I finally got it figured out. Here's a progress report so far....

Most of these vehicles are seen either with regular tracks, or "Ostketten"--which are shorter than "Winteretten". However, since theonly kit of Ostketten tracks I could find were in the $40.00 range, and resin (you know how I hate resin tracks!) I decided to use the last set of winterketten tracks that I had. There is photographic evidence--TA DA!!! Tongue [:P] What's more, is that this photo also shows that some vehicle were modified beyond "normal"--there looks to be some sort of shield or special armor--even perhaps a top and a hatch?--fitted to this vehicle?
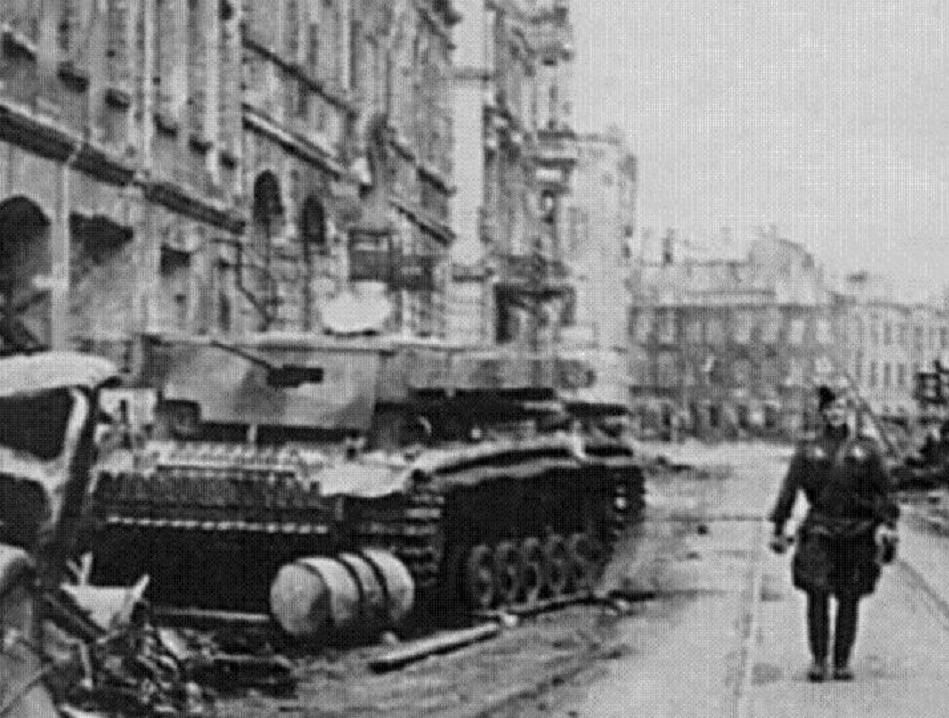
 

This "customization freedom" will play into my build-philosophy for this kit! Tongue [:P]

First of all--the winterketten tracks, I was disappointed to find that this set--I believe that I 'lifted" this set from the StuG IIIF kit--are completely unusable in their present state! I mean--look at the height of the dual knockout marks on this link! 
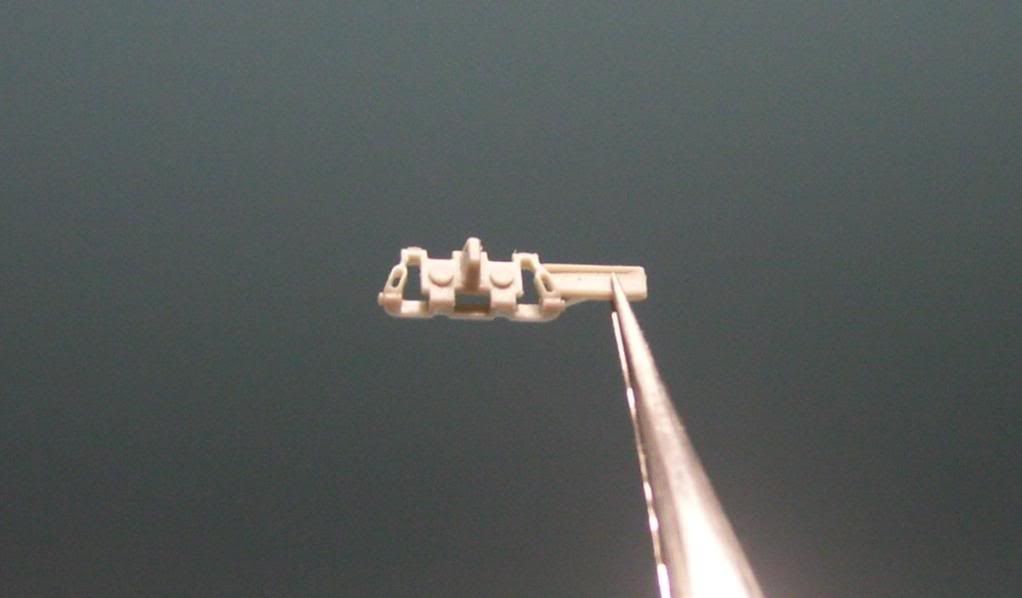
 

I do have to say that the separate, actual "kit" of later-released Winterketten tracks, which I used on my late Brummbar and which come in a darker gray plastic color--were not as egregiously scarred. 

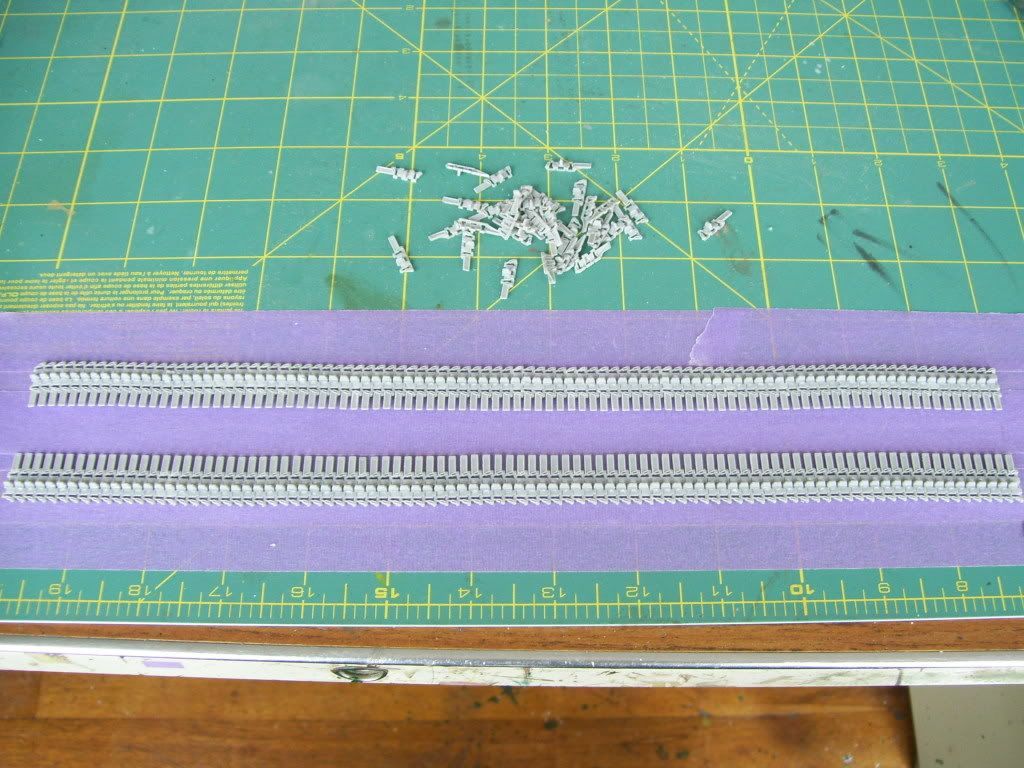
After painstakingly using a flat Exacto blade to shear off each little stub, and then filing smooth the remainder, (two night's work!) I started out by assembling the tracks, as per my "doog method"--leaving off the outer return rollers, and assembling the tracks on masking tape. The winterketten are "handed" so I did two rows. Here's the link to my tracks tutorial, for anyone curious: http://www.armorama.com/modules.php?op=modload&name=Sections&file=index&req=viewarticle&artid=1737
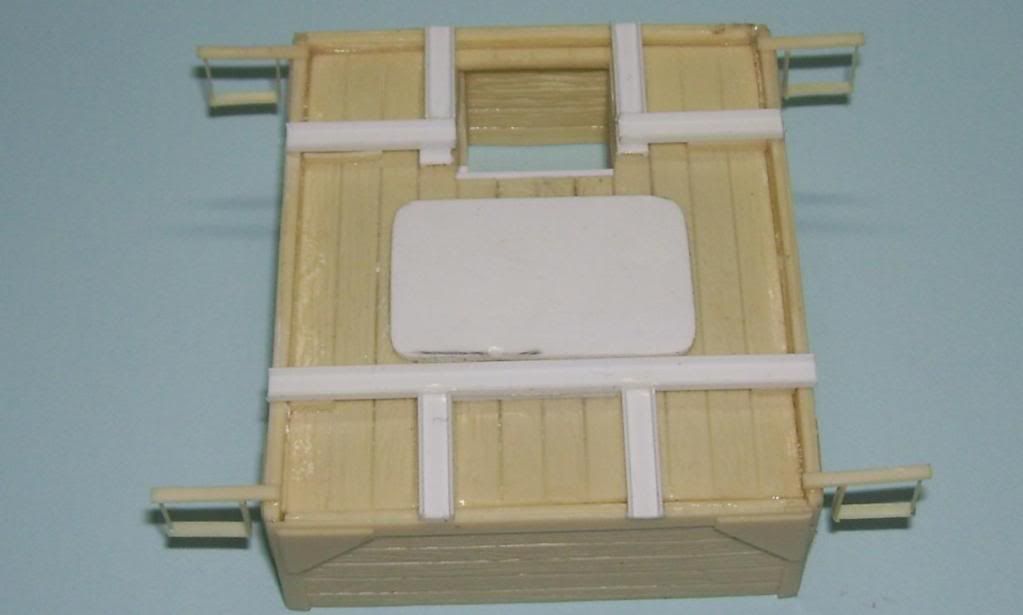
I also added some reinforcing strips to the bottom of the box--the box should not sit flush on the hull, and this is one omission of the NeoGrade kit.
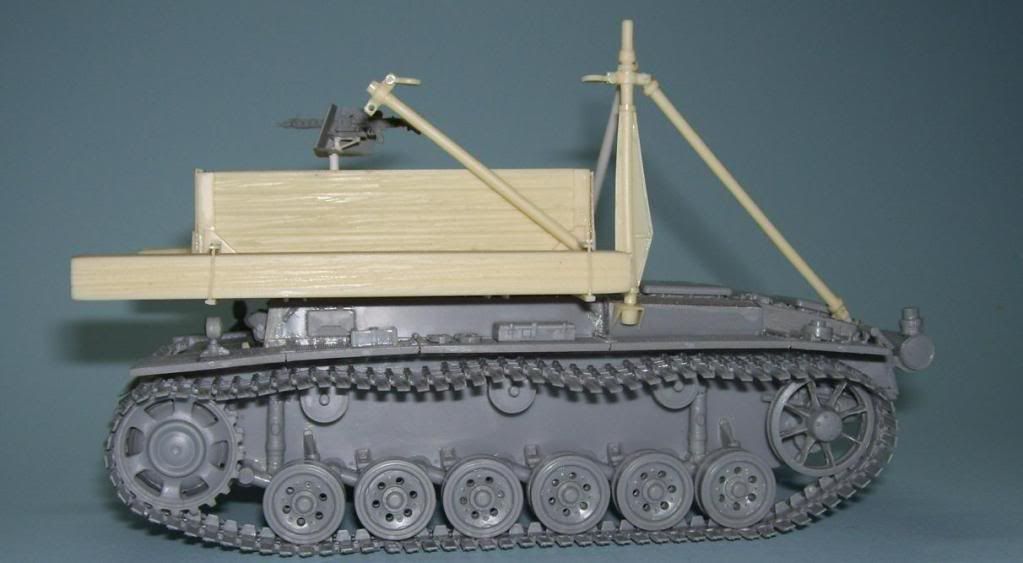
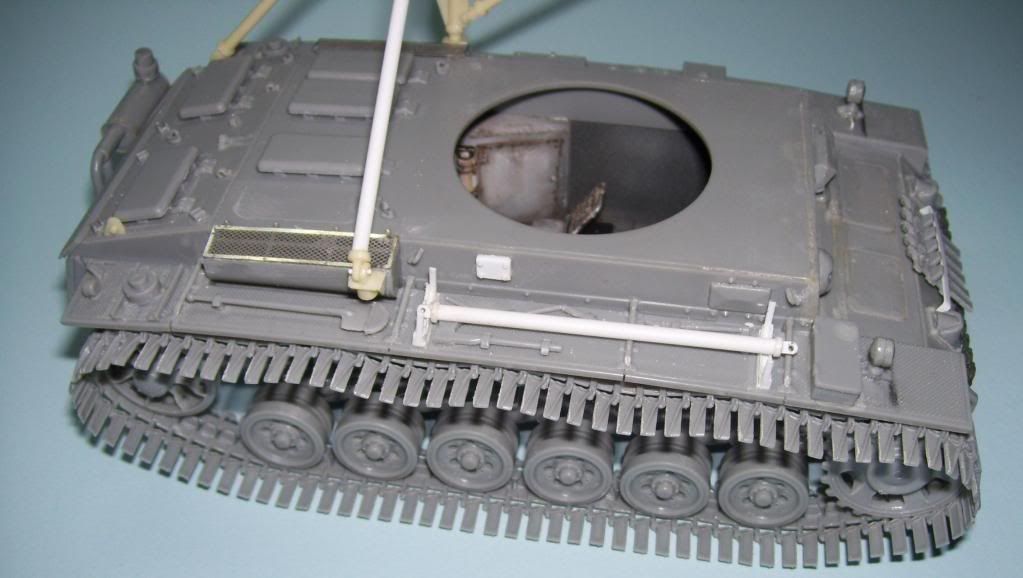
I also built a storage rack for the crane jigs, and built an extra crane jig. You also have to eliminate the radio antennae mount and channel--that little square of plastic is to replace where the mount would have been.
And as part of my "customization", I decided that a late-war Bergepanzer might need a bit of extra firepower (at least I would have wanted some in mine!?) so I built up this pedestal-mounted MG to put in the bed. The parts came from spare parts from the "Shwebelafette" halftrack that I finished recently.
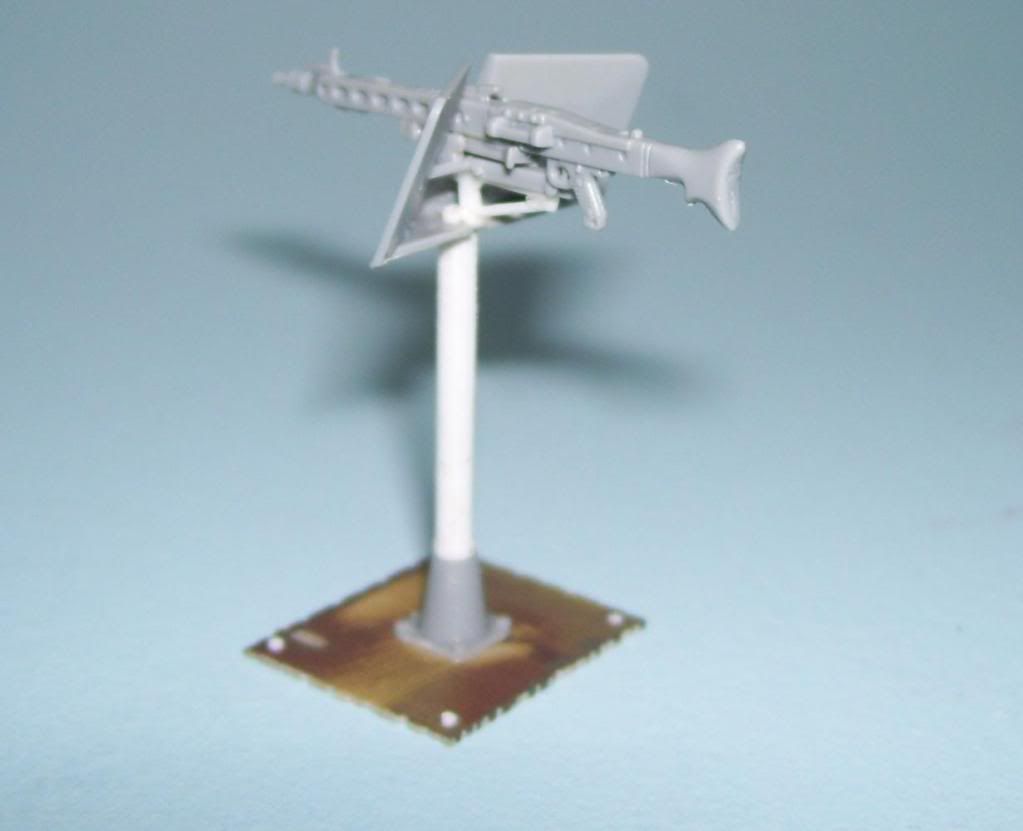
So here's what it looks like so far. The box, MG, and all the rest of the chains and tackles are not fitted yet. I'm going to paint them all separately, and put them together...
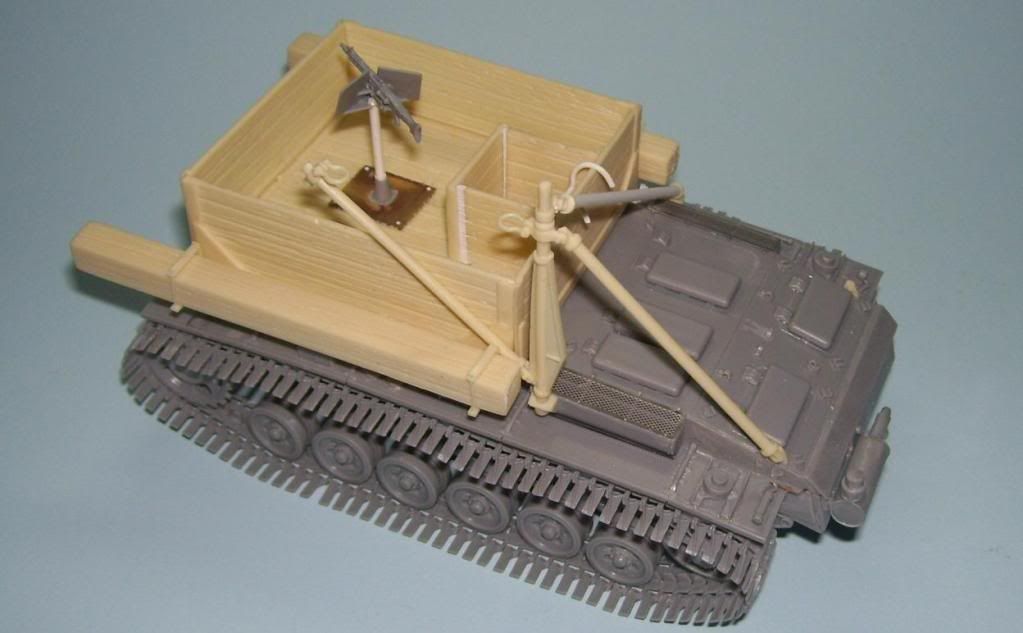
I also made a ladder for the entry hatch, and also had to lengthen the longer crane brace because it didn't reach the other mount. 
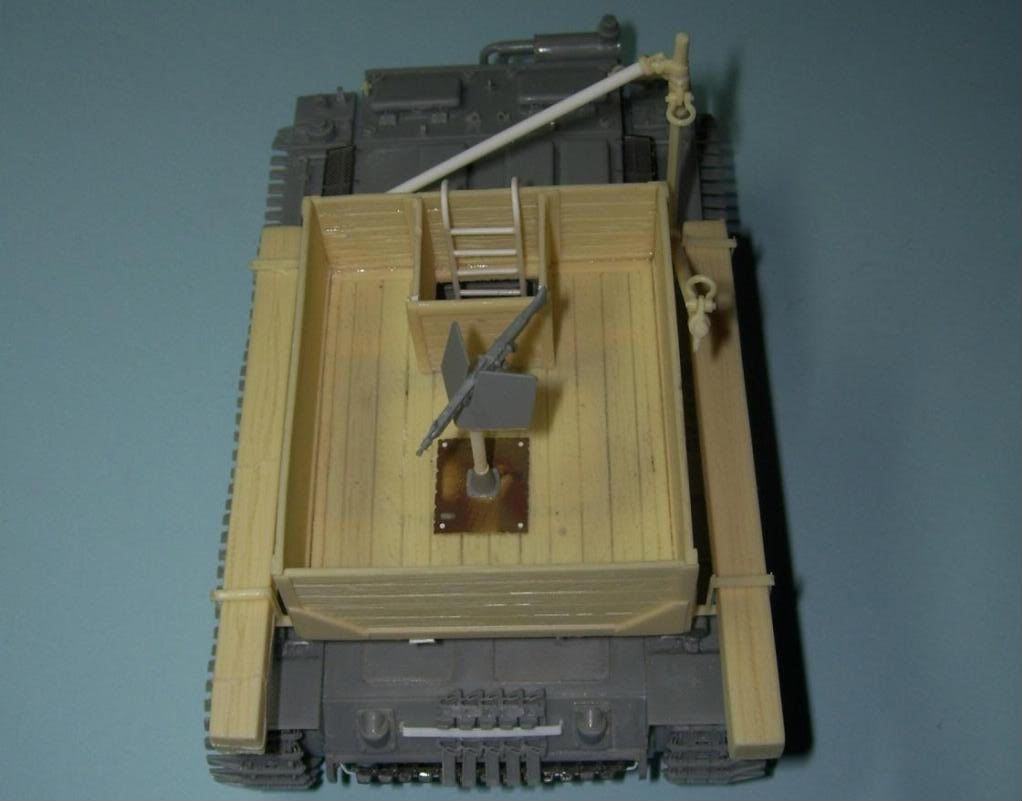
I went kinda easy on the sag--I figured that the engineers would keep it pretty tight?
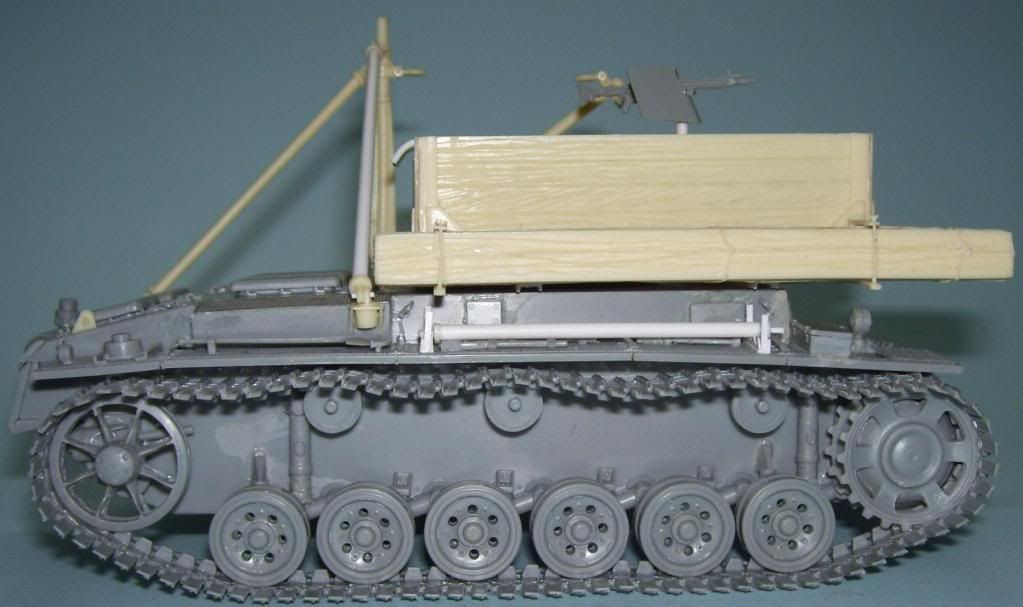
I added a pair of spare track racks and you can see the other dark-plastic winterketten links there.
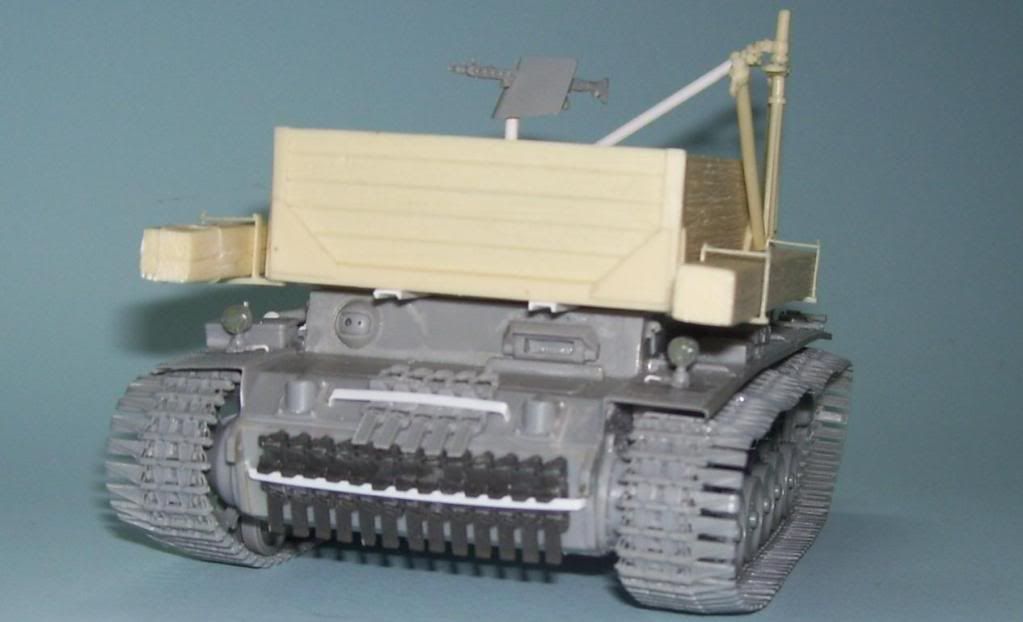
So that's where I am so far. I'm going to be trying a new painting approach on this one. I'm not sure how it will work out, but it will be interesting at least. That resin "wood" will also demand a bit of innovation. I just hope that, given the crazy schedule I'm under here with teh band, that I'l be able to get it going soon?

Comments, suggestions, critiques and anything else much appreciated and welcomed! Big Smile [:D]


  • Member since
    March 2003
  • From: Rain USA, Vancouver WA
Posted by tigerman on Monday, May 4, 2009 10:50 PM
Definitely something different Karl. Some really great stuff going on here.

   http://i7.photobucket.com/albums/y269/wing_nut_5o/PANZERJAGERGB.jpg

 Eric 

  • Member since
    December 2003
  • From: Colorado
Posted by psstoff995 on Monday, May 4, 2009 10:52 PM

WOW! You have been busy- two nights on track clean up?! Shock [:O] I don't know if I coulda done it...

I really like the custom work- that pedestal MG makes perfect sense to me. That thing needs SOME kinda firepower Thumbs Up [tup]

-Chris

US Army Infantryman

  • Member since
    April 2008
  • From: Kristiansund, Norway
Posted by Huxy on Monday, May 4, 2009 11:51 PM

Looking SWEET Karl!!

But that MG seems to be pretty much in the way in the box? I would have placed it closer to the walls...

And I love Ostkettens!! Big Smile [:D]

"Every War Starts And Ends With An Invasion".

  • Member since
    December 2005
  • From: Syracuse, NY
Posted by lexesbenz on Tuesday, May 5, 2009 12:08 AM
Good...good...my apprentice, it is coming along well!!
The flying hamster of doom rains coconuts on your pitiful city!!!!
  • Member since
    January 2012
Posted by I make stuff on Tuesday, May 5, 2009 1:53 AM

Looking nice, Karl.  I can't wait to see some paint on it.  I may propose to marry it if I am quick enough on the draw.

Bill  

  • Member since
    January 2007
Painting started----NeoGrade Bergepanzer III WIP
Posted by the doog on Tuesday, May 5, 2009 8:04 AM
 Huxy wrote:

Looking SWEET Karl!!

But that MG seems to be pretty much in the way in the box? I would have placed it closer to the walls...

And I love Ostkettens!! Big Smile [:D]

Thanlks, guys!

Lasse, the thinking was, the crewman would have to be able to get around the gun and pivit it 360' to counter any threat. Wouldn't be much goood if it were only able to shoot it to the front, or left side only for instance? I tried it closer to the edges and it reallly felt weird. It felt poorly planned to be unable to get around one side of it.

In a vehicle like this, the box ws only really a traveling and storage area. Most of the working would be done "outside the box" lol. And if you look at that photo, the "lid" on top of the box wasn't exactly practical either, but told me that the crew was thinking "protection" more so than "comfort".

Thanks, Chris, tigerman, Bill and Tony, too! Bill, you may have to fight Manny, lol!

  • Member since
    April 2008
  • From: Kristiansund, Norway
Posted by Huxy on Tuesday, May 5, 2009 8:35 AM

Lasse, the thinking was, the crewman would have to be able to get around the gun and pivit it 360' to counter any threat. Wouldn't be much goood if it were only able to shoot it to the front, or left side only for instance? I tried it closer to the edges and it reallly felt weird. It felt poorly planned to be unable to get around one side of it.

In a vehicle like this, the box ws only really a traveling and storage area. Most of the working would be done "outside the box" lol. And if you look at that photo, the "lid" on top of the box wasn't exactly practical either, but told me that the crew was thinking "protection" more so than "comfort".


MMM... I see..   tought more work would be done "inside the box"..  In my recent book about the Panther, it shows defensive armaments aswell, but that is all the way in the front, and the driver and hull MG guys.. But that tank is fairly different from the Panzer III, however! Tongue [:P]

Thanks for explaining!

"Every War Starts And Ends With An Invasion".

  • Member since
    July 2004
  • From: Texas
Posted by wbill76 on Tuesday, May 5, 2009 9:45 AM
Glad to see you getting in some bench time with all the other distractions going on this time of year Karl. Making good progress with this one for sure. Thumbs Up [tup]
mmc
  • Member since
    February 2007
  • From: Newcastle upon Tyne, England
Posted by mmc on Tuesday, May 5, 2009 9:54 AM

Very nice Karl.

Always good to see something a bit different, look forward to seeing how you finish it.

Mark

  • Member since
    October 2007
  • From: N.H.
Posted by panzerguy on Tuesday, May 5, 2009 10:05 AM

    This is turning out to be one cool little project KarlCool [8D].

 So I take it since it has the ostketten tracks we may be in for some type of winter cammo?

  At first I thought the same thing as Huxy about the MG but then I figured that the crew would have made this so the pole could have been lifted out of the base if more room was needed and stored.   

"Happiness is a belt fed weapon"

  • Member since
    January 2007
Posted by the doog on Tuesday, May 5, 2009 10:49 AM

Thanks, guys--I'm just about outta here for the day, but I wanted to chime in one time before I leave for the day...

Thanks, Bill, and Mark--it's certainly crazy around here lately, with trying to get a recording finished before we leave in June, and then rehearsing for the upcoming tour. Trying to keep the bike maintained, and then having time or Jenn. I'm running ragged lately....Sigh [sigh] HopefullyI'll be able to make a good dent on finishing this before I leave?

Steve--no winter camo on this; well, maybe a little bit o' remnants? Basically I think these vehicles were outfitted with  the wider tracks for better mobility, so it's plausible that they would be seen with them year round. I'm gong to try a mulit-layered approach to painting. If it works out the way I want it to, it should be pretty cool!

Great observation on the MG post coming out of the base! That's a perfect idea that, to be honest, I didn't even think of, but why not? It certainly would make sense?! Thanks for that idea! Big Smile [:D] I won't model it any differently, but it gives a great point to justify it! 


  • Member since
    July 2004
  • From: Texas
Posted by wbill76 on Tuesday, May 5, 2009 1:31 PM

Karl,

Be careful in not confusing "Winterketten" with "Ostketten". The "winterketten" were designed to provide better traction in ice/snow as well as better general flotation on frozen ground but were generally not fitted year round. The "Ostketten" on the other hand were designed primarily to act like the Tiger tracks and lessen the ground pressure of the vehicle in muddy/soft ground conditions and so were wider as a rule without the scoop-like extensions you see on the "winterketten". The "remnants" idea should give the best of both worlds in regards to a winter finish IMHO since you've got this one fitted with the "Winterketten". Wink [;)]

  • Member since
    January 2008
  • From: Bournemouth UK
Posted by Bodge on Tuesday, May 5, 2009 1:52 PM
Lookin great Karl , and admire the amount of work you have put in. Cant wait to see it in paint.
  • Member since
    November 2006
  • From: Coastal Maine
Posted by dupes on Tuesday, May 5, 2009 2:46 PM

First off, I think you need to be commended for doing allllll of that intricate scratch work on the interior...only to have a 1/2" x 1/2" hole in the floor show it off. Now that's dedication. Make a Toast [#toast]

The rest of the build is pretty darn neat too, but that interior is killing me. Nice stuff, Doog. Thumbs Up [tup]Thumbs Up [tup]

  • Member since
    January 2008
  • From: Hickory, NC
Posted by Bushi on Tuesday, May 5, 2009 4:38 PM

Karl I just saw this today it looks fantastic, cannot wait to see it finished. I don't see how you get everything done being so busy. Keep up the excellent work all around. I will be looking forward to the finished build.Make a Toast [#toast]

Bushi

  • Member since
    October 2007
  • From: Louisville, KY
Posted by pordoi on Tuesday, May 5, 2009 5:06 PM

    Wow, I can't find the time to keep current on the ongoing builds here in Armor!  And I'm not even a rock star rehearsing for an album and tour; I don't have a motocross to maintain, and I'm married and everyone knows that a wife is easier to maintain than a girlfriend Shock [:O].  (if she reads this, I'm Dead [xx(])

 Really nice work here Doog.  I like the scratched interior and the paint work is superb.  There will always be some challenges to surmount on anything that you choose to build but it is evident that you've overcome the difficulties. This will be really nice with some paint.  Thumbs Up [tup]

 Don

  • Member since
    January 2007
Posted by the doog on Tuesday, May 5, 2009 6:15 PM

Thanks, guys--I managed to get home a little earlier than I thought, so I've started the base coat and preshading.

Bill, thanks for that info. I kinda knew that already, but I figured if it was good for that vehicle in the photo, then it would be ok for the model to wear. In any case, it's great stuff fro anyone who's following this build. I will give a very old, slight "remnant" of a whitewash scheme. The hairspray technique will be used here, of course. I got something else planned too though, in terms of HOW I'm going to paint it...Tongue [:P]

Thanks too, Andy, and dupes -- yeah, I'm kinda sick about the interior being so hidden, but what can ya do? Sigh [sigh] File it under the category of "I know it's in there"!

Thanks too, Bushi, and Don! I appreciate all you guys taking the time to comment here! Big Smile [:D]


  • Member since
    December 2005
  • From: Syracuse, NY
Posted by lexesbenz on Wednesday, May 6, 2009 12:49 AM
Karl this is going to be a fantastic kit!!
The flying hamster of doom rains coconuts on your pitiful city!!!!
  • Member since
    July 2006
  • From: New Jersey
Posted by redleg12 on Wednesday, May 6, 2009 6:03 AM

Karl - OK.....I take a couple of days off and you burp out a new WIP and now you are moving in my direction....the strange and different.

Nice build so far. Building the "different" is always a learning experience.

Rounds Complete!!

"The Moral High Ground....A Great Place to Emplace Artillery."

  • Member since
    January 2007
Posted by the doog on Thursday, May 7, 2009 10:26 PM

Thanks, Mike and Tony! I appreciate your comments! I'm working away here....Smile [:)]

I've started the painting process--it's going to be a long process with all the steps I'm planning.

I'm about halfway finished right now with just the painting. 

First, I painted the box and wood parts in Tamiya Neutral Gray...

Then I sealed it with dullcoat, and hit it with hair spray. Letting it dry for an hour, I hit it next with a coat of a dark Dark Yellow mix, into which I added Black and Earth color. I then attacked it with a short-bristled brush, to get this;

What I'm going for is a look where the "box" was built from comandeered old wood--like from a Russian farmhouse or shed--and it's that old, weathered grey look to it. I'm going to finish it as if the crew had some old paint to throw at it, but nothing too complete--it will be somewhat painted outside, but not in the interior, which will be beat-up and weathered wood.

I then sealed and sprayed it again, and then hit it with a lighter shade of Buff, which was then rubbed off in a similar manner...

One more round went down,where I hit it with a little more DY. I'm still not done with it, but that's where I am now...

The hull was painted first with a dark brown, then the dark DY coat;

...and progressively lightened in the inner panels....

and a wash of acrylic DY was laid on it to give it some variety in tint from the box....

]

The wheels and box and wood rails...

I still will be adding a beat-up camo scheme, and remnants of a whitewash coat....stay tuned!

Any comments or ideas welcomed!

  • Member since
    February 2009
  • From: mass,USA
Posted by scratchmod on Friday, May 8, 2009 5:48 AM

This is looking great Doog, I  really like the wooden box, those planks looks very real. I'll have to try your method when I get back to my Sd.Ah 116. This has been a fun build to folow, and you bet I'll stick around to see this baby finished.

Rob

  • Member since
    May 2005
  • From: Dublin Rep Of Ireland
Posted by terry35 on Friday, May 8, 2009 7:08 AM

Hi, Karl, looking good so far. I think I have some photos of these berge's from panzer wrecks, must look it up for you. I personally don't quite know what to make of the vehicle myself as I don't know too much about the subject. I'm looking forward to seeing what your going to make of it.

I'm in work at the moment, will check back at the weekend.

Terry.

  • Member since
    January 2007
Posted by the doog on Friday, May 8, 2009 10:06 AM

Thanks, Rob, and terry!

I managed to get a camo coat on it, but don't have time to post it now--I'll have more photos later. I have to seal it now and then spray it, and add a whitewash coat later.

Man, I've never used so much damned sealant and hair spray! lol!

Thanks for looking in and commenting, guys! Big Smile [:D]

  • Member since
    July 2004
  • From: Texas
Posted by wbill76 on Friday, May 8, 2009 10:06 AM

Karl,

I like the wood effects you've achieved, very nice! Just remember though from a historical accuracy perspective that these vehicles weren't "ad hoc" arrangements, they were factory-done conversions including the addition of the wooden box so you wouldn't have had the "old Russian lumber" situation occur. Wink [;)] Normally the wood box was painted and integrated right into the camo pattern given the fact that these were recovery vehicles and so would be used frequently at the front edges of combat. The two pics below are from the Trojca Pz III book and are posted for discussion purposes only to illustrate my point.

That doesn't take away from the very nice aged wood effect that you've achieved though! Thumbs Up [tup]

The second pic is a double bonus...not only a Berge III but one also outfitted with Ostketten.

  • Member since
    July 2006
  • From: New Jersey
Posted by redleg12 on Friday, May 8, 2009 10:17 AM

Karl - Nice job on the wood, love the worn effect. Vehicle looking good woth fading.

Rounds Complete!!

"The Moral High Ground....A Great Place to Emplace Artillery."

JOIN OUR COMMUNITY!

Our community is FREE to join. To participate you must either login or register for an account.

SEARCH FORUMS
FREE NEWSLETTER
By signing up you may also receive reader surveys and occasional special offers. We do not sell, rent or trade our email lists. View our Privacy Policy.