SEARCH FINESCALE.COM

Enter keywords or a search phrase below:

M48A3 sans Engine - pics

9577 views
28 replies
1 rating 2 rating 3 rating 4 rating 5 rating
  • Member since
    September 2006
  • From: Dripping Springs, TX, USA
Posted by RBaer on Friday, March 12, 2010 5:46 PM

Do it, doog. I'd really like to see your take on an M48.

Apprentice rivet counter.

  • Member since
    January 2007
Posted by the doog on Friday, March 12, 2010 1:18 PM

Gino,

Thanks for a great post just chock full of info! WOW, man, that's EXACTLY what I needed! 

AWESOME! Big Smile

  • Member since
    December 2002
  • From: Valrico, FL
Posted by HeavyArty on Friday, March 12, 2010 12:40 PM

Thanks for the compliments Doog, glad you like it.  Yes, the suspension needs to be lowered if modeling it with an engine.  Here is a tweak list to improve upon it.  Not all the tweaks need to be done as most are cosmetic, but I would at least change out the tracks with the AFV Club set.

1. Turret height should be increased by approx 1.5mm, which can be done by adding a sheet styrene shim, which can then be sanded to the turret's shape.

2.  Fill the motorization slots and holes on the model.

3. Three oval holes should be added to the drive sprockets at the 12, 4 and 8 o'clock positions, these are not present on the model, but were there in real life. Check reference pics for shape and location.

4. It's worth considering replacing the fender stays with PE items or homemade efforts of very thin sheet styrene.

5. Rebuild the stowage basket from thin wire; it really improves the model.

6. Add casting numbers to the turret roof, rear hull, and engine access doors.

7. Glue mantlet in place and fill gap with milliput to represent the canvas cover.

8. Replace the cover, fixing clips with plastic strip and add bolt heads.

9. If shown opened, shave off loader's hatch internal handle and latch mechanism, and replace with brass or plastic strip, rod and tube.  The same should be done for the exterior handle as well.

10. Turret water jerry cans have incorrect style filling cap.

11. You could replace the molded on tie downs on the turret with brass items.

12. Use copper wire to add 3 lifting lugs to the commander's cupola, at the 12, 4, and 8 o'clock positions.

13. Shave off and replace the hull stowage bin handles with plastic/brass strip.

14. Fill up the main turret site periscope, as well as the driver's periscopes.

15. Add cast texture to the turret and hull.

16. Replace the awfully incorrect kit tracks with aftermarket ones. The AFV Club set is great, just make sure you get the correct one, they make two sets that they say can be used on the M48 and M60 tanks. One of them has octagonal shaped pads; the other has chevron shaped pads.  The latter (chevron block) are the correct ones for a Vietnam era tank.

17. Suspension height correction.  The Tamiya kit was based on a vehicle that did not have the engine installed, as such, it was lighter and rode high on its suspension.  The kit is about 3mm too high.  To fix it, cut the tabs off the road wheel arms and lower all the arms by 3mm.  Each suspension arm damper should also have about 2.5mm removed, they are too long and also make the model sit a little too high.  You may also have to remove a couple track blocks on each side to take the slack out of the track.
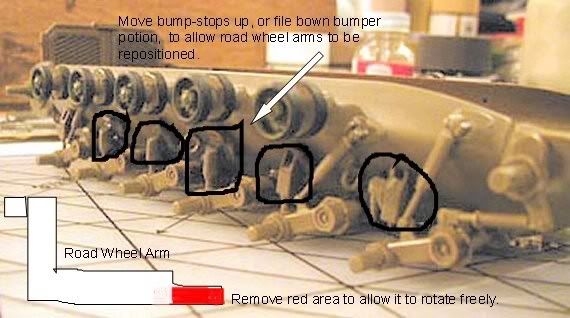
Good luck and I can't wait to see yours.

Gino P. Quintiliani - Field Artillery - The KING of BATTLE!!!

Check out my Gallery: https://app.photobucket.com/u/HeavyArty

"People sleep peaceably in their beds at night only because rough men stand ready to do violence on their behalf." -- George Orwell

  • Member since
    January 2007
Posted by the doog on Friday, March 12, 2010 11:27 AM

WOW, Gino---an absolutely GORGEOUS build! That open engine compartment is a cool aspect of the build that I haven't seen modeled before! SUPERB!!

You're the expert in these kits--can I ask you; do you have to lower the suspension "sit" on this model at all like you have to do in the M60's? I've been thinking about doing one of these myself after I get over my muscle car craze lately...

  • Member since
    December 2002
  • From: Valrico, FL
Posted by HeavyArty on Friday, March 12, 2010 7:25 AM

Thanks Kenny, glad you like it.

As to the transporter, if you mean the one my M48A3 is sitting on, an M123A1C w/M15A2 trailer, no.  Mine is a Vietnam-era transporter. 

The WWII tank transporter was the M25 "Dragon Wagon" made by Tamiya.  It would be appropriate for D-Day and the early part of the war in European.

Gino P. Quintiliani - Field Artillery - The KING of BATTLE!!!

Check out my Gallery: https://app.photobucket.com/u/HeavyArty

"People sleep peaceably in their beds at night only because rough men stand ready to do violence on their behalf." -- George Orwell

  • Member since
    November 2004
  • From: Essex England
Posted by spacepacker on Friday, March 12, 2010 6:25 AM

A wonderfull buildBow Down.  Would the tractor and trailer be in use around the time of 'D day' or the early part of the European war....Kenny

  • Member since
    December 2002
  • From: Valrico, FL
Posted by HeavyArty on Thursday, March 11, 2010 4:36 PM

Thanks G, glad you like it.

Gino P. Quintiliani - Field Artillery - The KING of BATTLE!!!

Check out my Gallery: https://app.photobucket.com/u/HeavyArty

"People sleep peaceably in their beds at night only because rough men stand ready to do violence on their behalf." -- George Orwell

  • Member since
    December 2002
  • From: Valrico, FL
Posted by HeavyArty on Thursday, March 11, 2010 5:50 AM

Hi Gary, glady you like it and thanks.  The search light is the kit one.  The M48 had a little better one than the M60 kit (actually, the whole M48 kit is better than the M60 kit). 

For a wash, I used acrylic craft paints thinned down with water.  I left the reddish mud color (sorry, don't remember the name) a little thick on the front slope.  I also drybrushed with the same color.  Then I did another wash with a light carmel color. 

I couldn't find any referance pics for  the engine compartment plumbing either.  I took an educated guess based on the number of connection points on the powerpack and from other tank engines I have seen (modern ones).  Guess I got pretty close.  I did a dirty-brown was and a black wash inside the engine compartment. 

Thanks again for the compliments.

Gino P. Quintiliani - Field Artillery - The KING of BATTLE!!!

Check out my Gallery: https://app.photobucket.com/u/HeavyArty

"People sleep peaceably in their beds at night only because rough men stand ready to do violence on their behalf." -- George Orwell

  • Member since
    December 2007
  • From: NE Massachusetts
Posted by 1SG Davis on Wednesday, March 10, 2010 9:38 PM

Heavy Arty, 

Great build, I've been following the thread for a day or so now.  Is the search light from the Tamiya kit?  It looks much better than the one from their old M-60A1 kit.  The weathering looks nice too, what type of wash did you use?   Nice additions to the engine compartment.  I've also got the Verlinden M60A1 engine kit, I plan on using it with the old Tamiya M60A1 kit I have in my stash.  where did you find the reference picture to add your plumbing? My M60 Patton in action has nothing. 

Gary

  • Member since
    December 2002
  • From: Valrico, FL
Posted by HeavyArty on Wednesday, March 10, 2010 9:08 PM

Thanks Gary.  I like the truck/trailer combo as well.  It is one of my favorite builds.

Gino P. Quintiliani - Field Artillery - The KING of BATTLE!!!

Check out my Gallery: https://app.photobucket.com/u/HeavyArty

"People sleep peaceably in their beds at night only because rough men stand ready to do violence on their behalf." -- George Orwell

  • Member since
    June 2007
Posted by squeakie on Wednesday, March 10, 2010 7:08 PM

actually I really liked the truck/trailer outfit. I only saw a couple while I was in the Army, and as far as I'n concerned it looks right by me.

gary

  • Member since
    June 2007
Posted by squeakie on Wednesday, March 10, 2010 7:04 PM

HeavyArty

Yeah, I know they are usually changed in the motor pool or on the spot in the field.  Maybe this one has some other issues that requires a ride to depot maintenance or somewhere else.  I just like the look of it up on the trailer.  I do like my trailers. Big Smile


lets just say the recoil system failed, and they stole the powerpac to get another tank up and running

gary

  • Member since
    December 2002
  • From: Valrico, FL
Posted by HeavyArty on Wednesday, March 10, 2010 5:36 PM

Thanks Terry.  Glad you like it.


Hans, that sounds totally feasible, esp. for NG troopers.

Gino P. Quintiliani - Field Artillery - The KING of BATTLE!!!

Check out my Gallery: https://app.photobucket.com/u/HeavyArty

"People sleep peaceably in their beds at night only because rough men stand ready to do violence on their behalf." -- George Orwell

  • Member since
    May 2005
  • From: Dublin Rep Of Ireland
Posted by terry35 on Wednesday, March 10, 2010 4:08 PM

Gino, that looks just brilliant. Excellent work there.

Terry.

  • Member since
    June 2008
  • From: Iowa
Posted by Hans von Hammer on Wednesday, March 10, 2010 2:42 PM

'Course, the crew has to be there because the Wrenches at the OMS won't remove any of the armor plate... That's a crew job..

  • Member since
    June 2008
  • From: Iowa
Posted by Hans von Hammer on Wednesday, March 10, 2010 2:22 PM

Maybe this one has some other issues that requires a ride to depot maintenance or somewhere else.

Yeah see, back in '79,  the 49th AD's Transportation Battalion needed a few training missions for some new drivers and also had to burn up the fuel they had in the tankers since it was the end of the Training Year, so they loaded up the tank and drove it from N. Fort Hood to S.Fort Hood down East Range Road  then back  to North Fort via West Range so the M-Day guys at the OMS at MATES could change out the pack up there...

  • Member since
    December 2002
  • From: Valrico, FL
Posted by HeavyArty on Wednesday, March 10, 2010 1:34 PM

Yeah, I know they are usually changed in the motor pool or on the spot in the field.  Maybe this one has some other issues that requires a ride to depot maintenance or somewhere else.  I just like the look of it up on the trailer.  I do like my trailers. Big Smile

Gino P. Quintiliani - Field Artillery - The KING of BATTLE!!!

Check out my Gallery: https://app.photobucket.com/u/HeavyArty

"People sleep peaceably in their beds at night only because rough men stand ready to do violence on their behalf." -- George Orwell

  • Member since
    June 2007
Posted by squeakie on Wednesday, March 10, 2010 10:29 AM

redleg12

Gino - Very nice....you love your trailers!!!. Nice details

I disagree with the other guys, I can see the run to depot maint. The look of headed to the impact area would have a lot more "rust" especially on the tracks....the cyclops would be broken or missing, and the barrel would be resting on the tail. It would have the put me out of my misery look rather than fix me look.

I think you captured the fix me.

Some how when I see the trailer...and I could be wrong....I picture hold down chains....that was the only thought on anthing missing???

Either way looks great

Rounds Complete!!

stateside they'd change the powerpac in the motorpool unless the motor was locked up (seen that a couple times). Then they'd change the powerpac right on the spot (takes about an hour). I've seen them changed with 10 ton wreckers, M88's, and by chopper over seas

gary

  • Member since
    December 2002
  • From: Valrico, FL
Posted by HeavyArty on Wednesday, March 10, 2010 9:23 AM

There's a dio idea Gino... That Draggin' Wagon parked next to a Mike-88 that's got the old pack in the air with the new one sittin' in the back of a Duece parked on th' other side... 

There! Just spent 200.00 bucks of your money, and ain't even mentioned figures yet, lol...

Hmmm...I have thought about the same thing.  I have another M60 engine set as well and may do it w/an M60.  I already have the M88 and plenty of figures too.  Another project to start. 

Gino P. Quintiliani - Field Artillery - The KING of BATTLE!!!

Check out my Gallery: https://app.photobucket.com/u/HeavyArty

"People sleep peaceably in their beds at night only because rough men stand ready to do violence on their behalf." -- George Orwell

  • Member since
    June 2008
  • From: Iowa
Posted by Hans von Hammer on Wednesday, March 10, 2010 8:19 AM

Never thought about a pack change... Guess I was used to seeing the open hulls in the motor park with the new pack sittin' in the crate right next to it...

There's a dio idea Gino... That Draggin' Wagon parked next to a Mike-88 that's got the old pack in the air with the new one sittin' in the back of a Duece parked on th' other side... 

There! Just spent 200.00 bucks of your money, and ain't even mentioned figures yet, lol...

  • Member since
    December 2002
  • From: Valrico, FL
Posted by HeavyArty on Wednesday, March 10, 2010 5:55 AM

Thanks WingNut and Redleg. It was a fun build.  I was thinking about the tie-down chains.  I even have the proper come-alongs and all from a previous HETTs build.  I wanted to leave the tank loose though so it could be removed if I change my mind on a load.

Gino P. Quintiliani - Field Artillery - The KING of BATTLE!!!

Check out my Gallery: https://app.photobucket.com/u/HeavyArty

"People sleep peaceably in their beds at night only because rough men stand ready to do violence on their behalf." -- George Orwell

  • Member since
    July 2006
  • From: New Jersey
Posted by redleg12 on Wednesday, March 10, 2010 5:36 AM

Gino - Very nice....you love your trailers!!!. Nice details

I disagree with the other guys, I can see the run to depot maint. The look of headed to the impact area would have a lot more "rust" especially on the tracks....the cyclops would be broken or missing, and the barrel would be resting on the tail. It would have the put me out of my misery look rather than fix me look.

I think you captured the fix me.

Some how when I see the trailer...and I could be wrong....I picture hold down chains....that was the only thought on anthing missing???

Either way looks great

Rounds Complete!!

"The Moral High Ground....A Great Place to Emplace Artillery."

  • Member since
    April 2005
  • From: Piscataway, NJ!
Posted by wing_nut on Tuesday, March 9, 2010 10:22 PM

I'm with Hans... looks kind of sad.  But that is also a testament to how well done it is.  It really looks like it is in need of of some Detroit muscle.Yes

Marc  

  • Member since
    December 2002
  • From: Valrico, FL
Posted by HeavyArty on Tuesday, March 9, 2010 5:24 PM

Thanks, glad you guys like it.

would this trailer be correct for an early sherman M4a3

Sort of.  I took the trailer from the Tamiya "Dragon Wagon" M25 Tank Transporter (w/M15 trailer) and heavily modified the trailer into the Vietnam era M15A2, along with a mostly scratch M123A1C tractor.  For a WWII M4A3 Sherman, the Tamiya M25 kit is a perfect match.

De-milled & de-stroyed are kinda synonymous when it comes to "My" era of AFVs... Hate seeing those vehicles with their "hearts" gone, though... It looks like the next stop for this once-proud Warrior's Chariot is the Impact Area... 

I hadn't thought of it that way.  I was just thinking a ride back to depot for an engine change and then its back into the fight.

Gino P. Quintiliani - Field Artillery - The KING of BATTLE!!!

Check out my Gallery: https://app.photobucket.com/u/HeavyArty

"People sleep peaceably in their beds at night only because rough men stand ready to do violence on their behalf." -- George Orwell

  • Member since
    June 2008
  • From: Iowa
Posted by Hans von Hammer on Tuesday, March 9, 2010 4:03 PM

Dunno if it's a neat idea or a sad one, but regardless, I like it Gino, at least the work...  De-milled & de-stroyed are kinda synonymous when it comes to "My" era of AFVs... Hate seeing those vehicles with their "hearts" gone, though... It looks like the next stop for this once-proud Warrior's Chariot is the Impact Area... 

  • Member since
    February 2010
Posted by frenchman on Tuesday, March 9, 2010 3:46 PM

would this trailer be correct for an early sherman M4a3. Really like the idea, simple story line, are you going to add it to a diorama

Denis

  • Member since
    December 2002
  • From: Valrico, FL
M48A3 sans Engine - pics
Posted by HeavyArty on Tuesday, March 9, 2010 1:10 PM

This is a project I have been working on and off on for a little while.  I wanted to build an M48A3 without its engine to put on my M123A1C w/M15A2 trailer.  I used the Tamiya M48A3 and a Verlinden M48A3 engine and compartment set.  The model and engine compartment went together without any real issues.  I applied a few of the M48A3 tweaks to the kit.  I drilled out the mud relief holes on the sprockets, added a 1mm shim to correct the turret height, and replaced the loader's hatch handle with thin wire.  I also added A&B putty on the mantlet cover and on the Commander's MG cover.  I added lift rings to the commander's cupola as well.  I also replaced the crappy kit tracks with AFV Club's excellent workable track set.  Lastly, I added a few hoses and wires to the engine compartment to add some details.

Here it is:


More pics here.

As always, all comments welcomed.

Thanks for looking.

Gino P. Quintiliani - Field Artillery - The KING of BATTLE!!!

Check out my Gallery: https://app.photobucket.com/u/HeavyArty

"People sleep peaceably in their beds at night only because rough men stand ready to do violence on their behalf." -- George Orwell

JOIN OUR COMMUNITY!

Our community is FREE to join. To participate you must either login or register for an account.

SEARCH FORUMS
FREE NEWSLETTER
By signing up you may also receive reader surveys and occasional special offers. We do not sell, rent or trade our email lists. View our Privacy Policy.