SEARCH FINESCALE.COM

Enter keywords or a search phrase below:

1:72 M48A3 Vietnam DONE!

32683 views
72 replies
1 rating 2 rating 3 rating 4 rating 5 rating
  • Member since
    May 2009
  • From: Poland
Posted by Pawel on Thursday, April 28, 2011 2:10 PM

And here I go with another update. First I got the hull almost ready for paint. I made the sand shields out of thin sheet styrene, and I also added the telephone box, taken from the Revell kit:

1:72 M48A3 Vietnam by Pawel Mroczkowski

I also added the lights and finished the fenders

1:72 M48A3 Vietnam by Pawel Mroczkowski

1:72 M48A3 Vietnam by Pawel Mroczkowski

On the turret I built the commander's cuppola (opened up) and the details around. I added the resin bustle rack loaded with stowage. I also made the lifting rings and the MG-limiter frame out of wire. Curiously enough, if you take a closer look at, you can see slight recesses in the turret's surface, allowing to accurately position details not included in the kit, like the lifting rings, or the towing rope hooks. The turret:

1:72 M48A3 Vietnam by Pawel Mroczkowski

1:72 M48A3 Vietnam by Pawel Mroczkowski

And since we were talking about the towing rope, look what I managed to solder:

1:72 M48A3 Vietnam by Pawel Mroczkowski

The whole tank is slowly starting to look like a Patton:

1:72 M48A3 Vietnam by Pawel Mroczkowski

Hope you like it, thanks for reading and have a nice day

Paweł

All comments and critique welcomed. Thanks for your honest opinions!

www.vietnam.net.pl

  • Member since
    January 2007
Posted by the doog on Thursday, April 28, 2011 6:23 PM

Pawel, you're really doing this build justice, It looks awesome; nice detailing!

Can't wait to see it come to life in color!

  • Member since
    July 2006
  • From: New Jersey
Posted by redleg12 on Thursday, April 28, 2011 6:59 PM

Pawel - Very nice work and then realize it is 1/72.....impressive

Rounds Complete!!

"The Moral High Ground....A Great Place to Emplace Artillery."

  • Member since
    July 2003
  • From: Perth, Western Australia
Posted by madmike on Friday, April 29, 2011 12:35 AM

Some fine looking work there.

Looking forward to seeing a layer of paint on it Smile

"I do not feel obliged to believe that the same God who has endowed us with sense, reason, and intellect has intended us to forgo their use." - Galileo Galilei
  • Member since
    May 2009
  • From: Poland
Posted by Pawel on Friday, April 29, 2011 2:52 PM

Gentelmen - thanks a lot for your very nice comments!

You want to see it painted? Me too! And I hope I can do it soon, I just have to make a tough decision or two on the turret. Then I'll be good to go.

The 1/72 scale is funny - there is some detail, I thought I won't be able to reproduce, and then I gave it a try and it worked. After soldering the eyes on the towing rope I had a hard time I pulled it off - four times in a rowCowboy

Thanks again for the comments and please stay tuned - and have a nice day

Paweł

All comments and critique welcomed. Thanks for your honest opinions!

www.vietnam.net.pl

  • Member since
    May 2009
  • From: Poland
Posted by Pawel on Tuesday, May 3, 2011 12:39 PM

And the beat goes on!

After thinking about it for a while I cut off the plastic handrails off the turret and replaced them with ones I soldered from a thin wire - much more realistic now! I also added a transport bracket for the xenon searchlight on the fan housing (the xenon searchlight is hung glass-down from this bracket when not in use). So after I was done, the turret looked like this:

1:72 M48A3 Vietnam by Pawel Mroczkowski

Then I did what we were all waiting for - started painting!

First I sprayed a lot of Humbrol 113 red-brown, then I picked up certain areas of the model with Humbrol 66 - the closest thing to Olive-Drab I could find in my neighbourhood. After I was done the model looked like this:

1:72 M48A3 Vietnam by Pawel Mroczkowski

And the undercarriage:

1:72 M48A3 Vietnam by Pawel Mroczkowski

From what I've seen on the photographs, uder certain conditions the surfaces of the running gear being rubbed constantly  maintain the colour of the material (in this case rubber or steel), the other surfaces remain dusty red-brown. That's what I want to get, so I took a fine brush and started applying Humbrol 32 (Dark Grey - my favourite for weathered black) and Humbrol 53 Gun-Metal. When I was done, this is what it looked like:

1:72 M48A3 Vietnam by Pawel Mroczkowski

I hope I proved you can assemble first and paint later. Not that I insist on this sequence, but in case of this model (and some others with styrene tracks, for that matter) it was of advantage. How do you like it? Thanks for reading, and have a nice day

Paweł

All comments and critique welcomed. Thanks for your honest opinions!

www.vietnam.net.pl

  • Member since
    June 2005
  • From: Massachusetts
Posted by minimortar on Wednesday, May 4, 2011 7:53 PM

Pawel, I just love this little gem of yours! The detailing that you're doing is outstanding and the painting is coming out real, real nice too... WOW!


Thanks,
Kevin Keefe

Mortars in Miniature
A Scale Model (Plus!) Collection of the Infantryman's Artillery

  • Member since
    May 2009
  • From: Poland
Posted by Pawel on Thursday, May 5, 2011 8:59 AM

Kevin, thanks a lot for your kind words! I hope, with a little more work, to make it even better.

Thanks again, have a nice day

Paweł

All comments and critique welcomed. Thanks for your honest opinions!

www.vietnam.net.pl

  • Member since
    May 2009
  • From: Poland
Posted by Pawel on Saturday, June 18, 2011 5:44 AM

Hello!

It's been a long time, but I wanted to let y'all know, I'm still working on it. Here's what it all looks like:

1:72 M48A3 Vietnam by Paweł Mroczkowski

So, from top left we have the major tank components still on their painting holders - pigmented some, futured and decaled. The crew is almost formed - I took 'em from the kits by Preiser company, number 72524 and 72530. Nominally they are year 2000 figs, but I say in this tiny scale they can be backdated to 1968 - the helmets were modified and the sleeves rolled up. I mean in 1:72 it's hard enough to tell the holstered Beretta 92 apart from a Colt 1911 Big Smile

I also started to prepare the stowage - the big things like Ma Deuce, the Xenon searchlight and spare road wheels (which I carved from Old Glue's leftovers). There's also the small stuff, like fuel cans, ammo cans, duffels and tarps. There are also the spare track links, doubling as add-on armour for the weak turret sides.

Now to paint it all... Hope you liked it - thanks for reading, have a nice day

Paweł

All comments and critique welcomed. Thanks for your honest opinions!

www.vietnam.net.pl

  • Member since
    May 2009
  • From: Poland
Posted by Pawel on Tuesday, August 23, 2011 6:42 AM

Even more time passed, but I managed to return to this project and paint the crew. And here's how I did it: First I assembled the figs, filled the seams and did some little conversions (older helmets, rolled up sleeves). Then I painted the flesh sand - Humbrol 63 if I recall right. I let this coat dry really well (hence those two months delay Big Smile. Then I used a brown oil wash, and before it dried I drybrushed the flesh with custom-mixed light pink. The photo below shows the result:

1:72 M48A3 Vietnam by Pawel Mroczkowski

Next thing to do was to paint the non-flesh areas with flat black:

1:72 M48A3 Vietnam by Pawel Mroczkowski

Then, before the black coat could dry throughly (after some 45 minutes) I gave the uniforms a not-so-dry brush coat of Humbrol 116. Then I added some yellow to the 116 and lightly drybrushed the highlights on the uniforms:

1:72 M48A3 Vietnam by Pawel Mroczkowski

Finally I painted the helmets, boots and pistol holsters wwith harnesses. The finished figures (minus the final red dust) look like that now:

1:72 M48A3 Vietnam by Pawel Mroczkowski

Hope you liked it, thanks for reading, and have a nice day

Pawel

All comments and critique welcomed. Thanks for your honest opinions!

www.vietnam.net.pl

  • Member since
    December 2008
  • From: Northern Va
Posted by psstoff995's lbro on Tuesday, August 23, 2011 11:22 AM

Getting closer and closer to the finish line! Glad to see you're still working on this guy, looking good.

-Will young modeler Test fit master
  • Member since
    May 2009
  • From: Poland
Posted by Pawel on Tuesday, August 23, 2011 3:12 PM

Will, thanks a lot for your comment, it means a lot to me. So I'm back now, let's see what I can do until the end of the week! Thanks again, have a nice day

Paweł

All comments and critique welcomed. Thanks for your honest opinions!

www.vietnam.net.pl

  • Member since
    May 2009
  • From: Poland
Posted by Pawel on Monday, August 29, 2011 7:44 AM

OK, I did a lot since the last time I wrote, so:

It became necessary for me to clear out my hobby room, so I decided to step on it and finish this project before the move, so as not have to move it in pieces. And I did it!

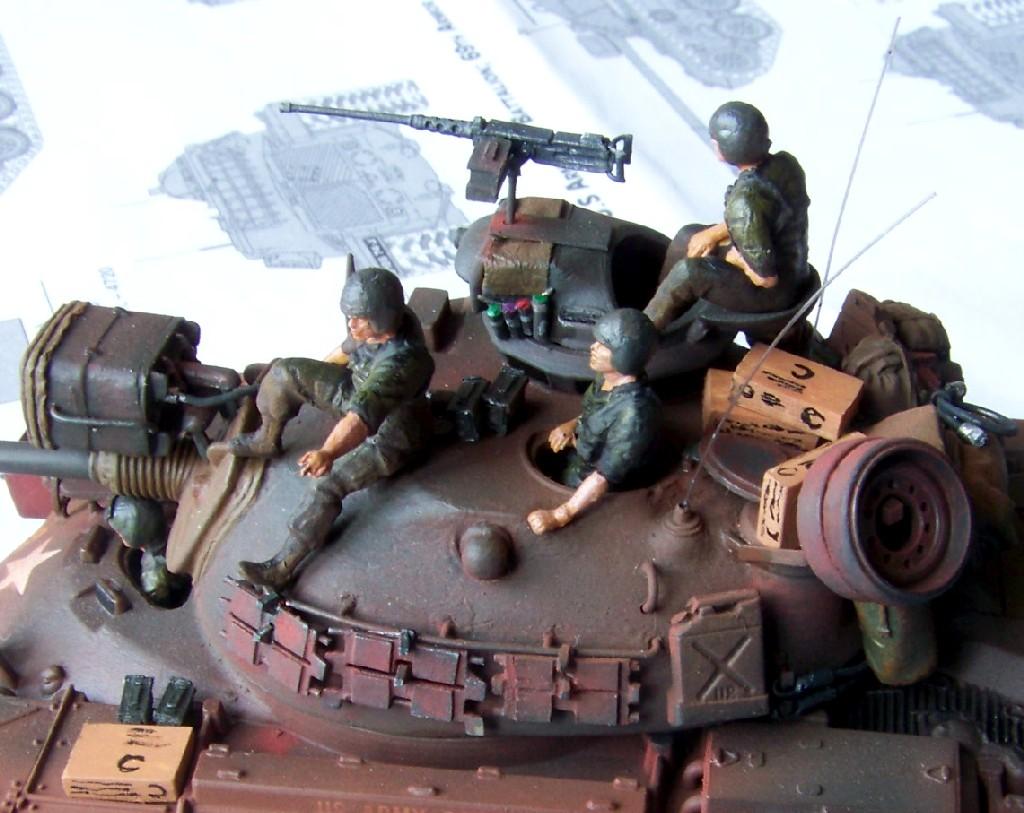
Since the main components of the model were already in place I had to concentrate on the stowage. I managed to lose one of the spare track segments, so after the carpet monster didn't wanna let go off it, I decided to build it again. While I was at it, I built two pieces, using the old ESCI model's track segments and plastic rod and sheet. I also decided I have to have C-ration crates on my tank, so I glued two pieces of styrene sheet together and cut according plactic cubes out of it. I also detailed the insides of the loader's hatch:

1:72 M48A3 Vietnam by Pawel Mroczkowski

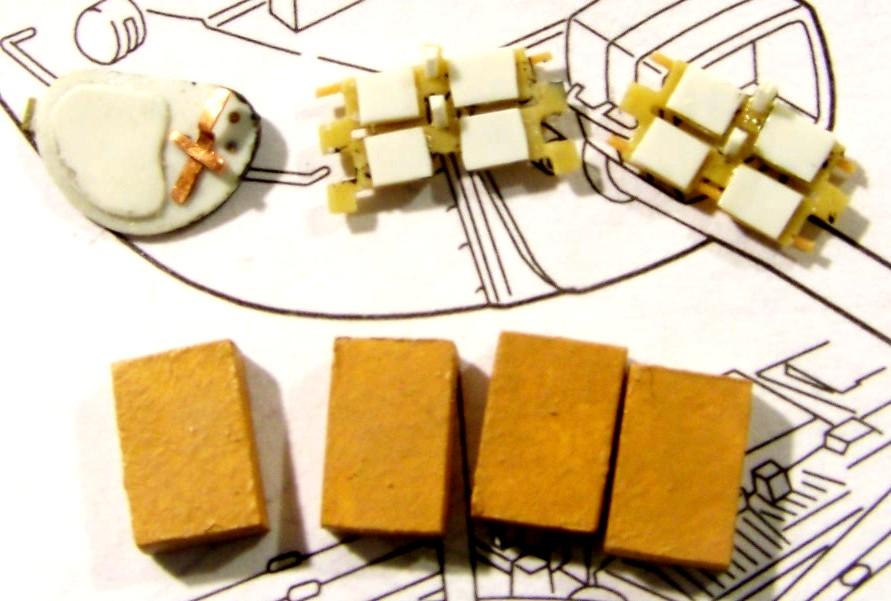
The C-rations crates should measure 2x4,5x7,5mm in 1:72. I painted them mixture of white and Humbrol 62 for that cardboard color. Later I took a black Pentel pen and marked the imprints on the crates. The track segments were painted Humbrol 53 (Gun-metal) and later "pigmented" Vietnam earth.

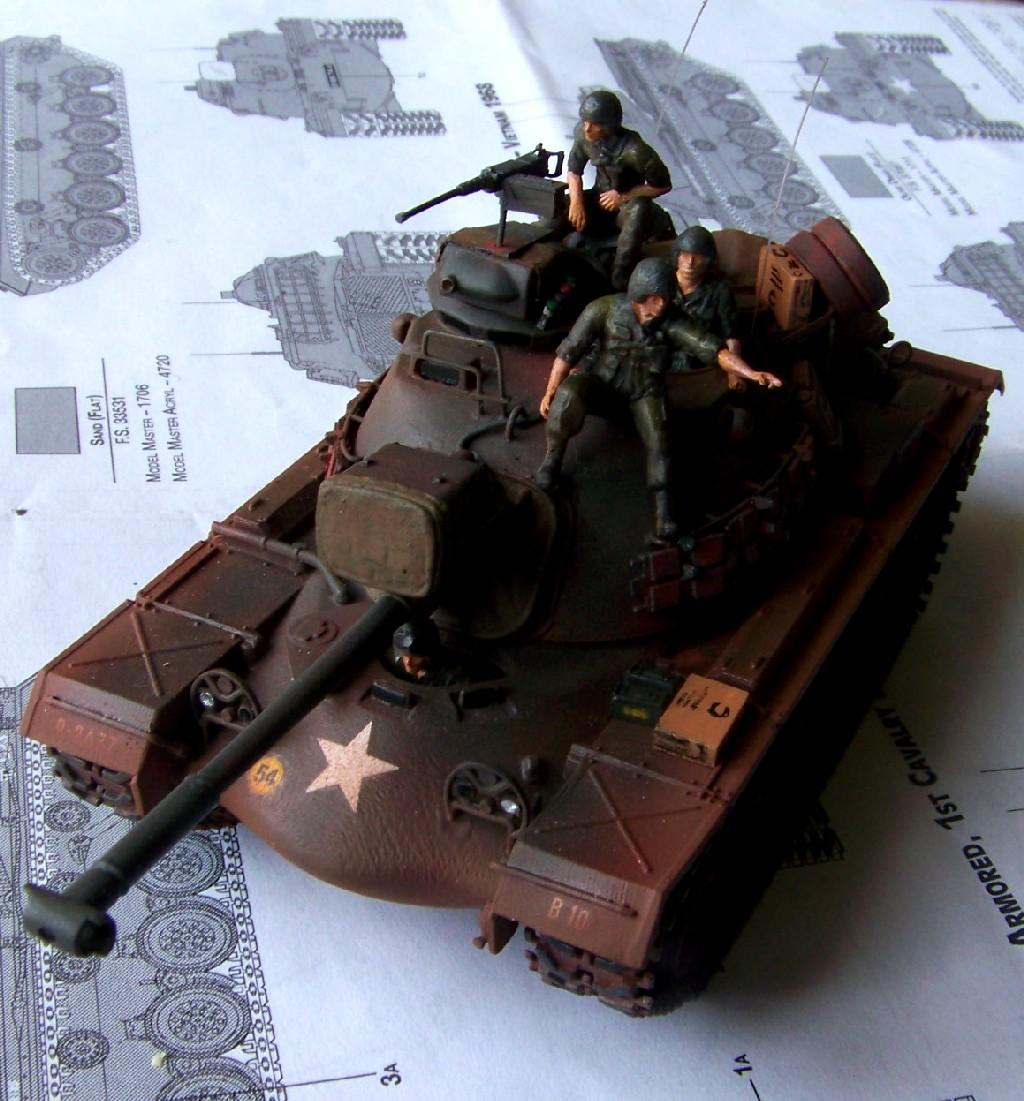
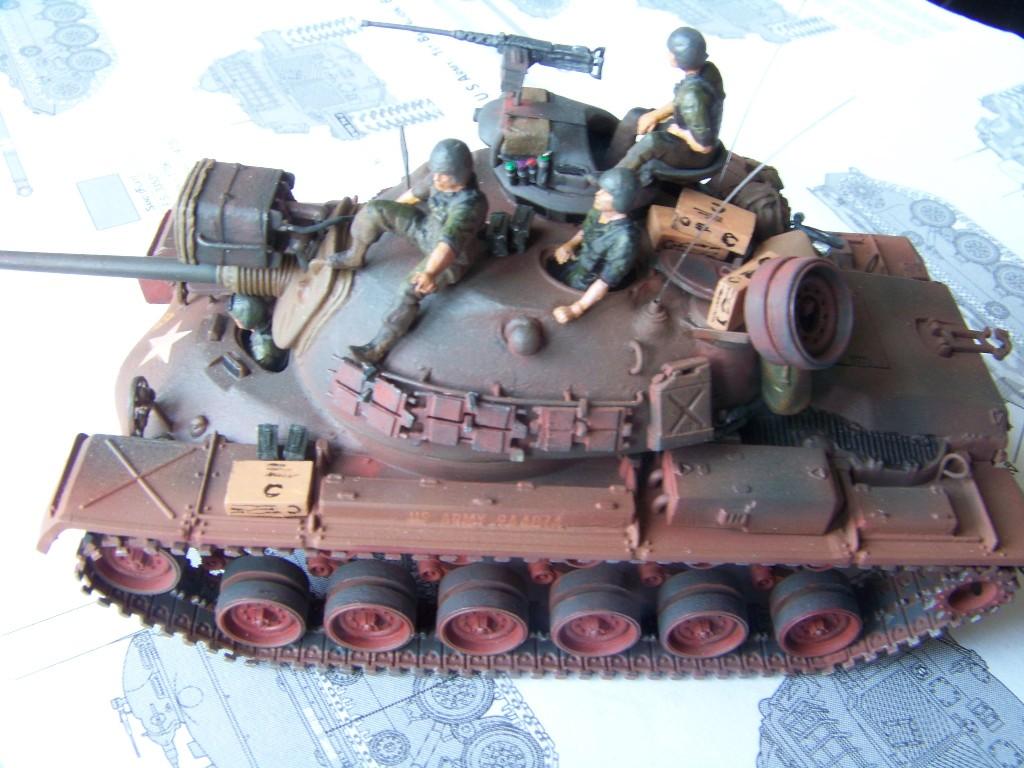
Then I started putting the tank together, creating new detail as I noticed the need for it. I added the ammo boxes, one more tarp and one more duffelbag (from the Legend set), then I created the Xenon-Searchlight cable out of 0,5mm soldering wire with masking tape plugs. I hung another (spare) cable from the bustle rack. I installed the tow cables. I also fabricated a wire with four smoke grenades hanging from it on the commander's cuppola. I "equilized" the weathering a little bit with an airbrush and here's what the model looks like now:

1:72 M48A3 Vietnam by Pawel Mroczkowski

1:72 M48A3 Vietnam by Pawel Mroczkowski

1:72 M48A3 Vietnam by Pawel Mroczkowski

1:72 M48A3 Vietnam by Pawel Mroczkowski

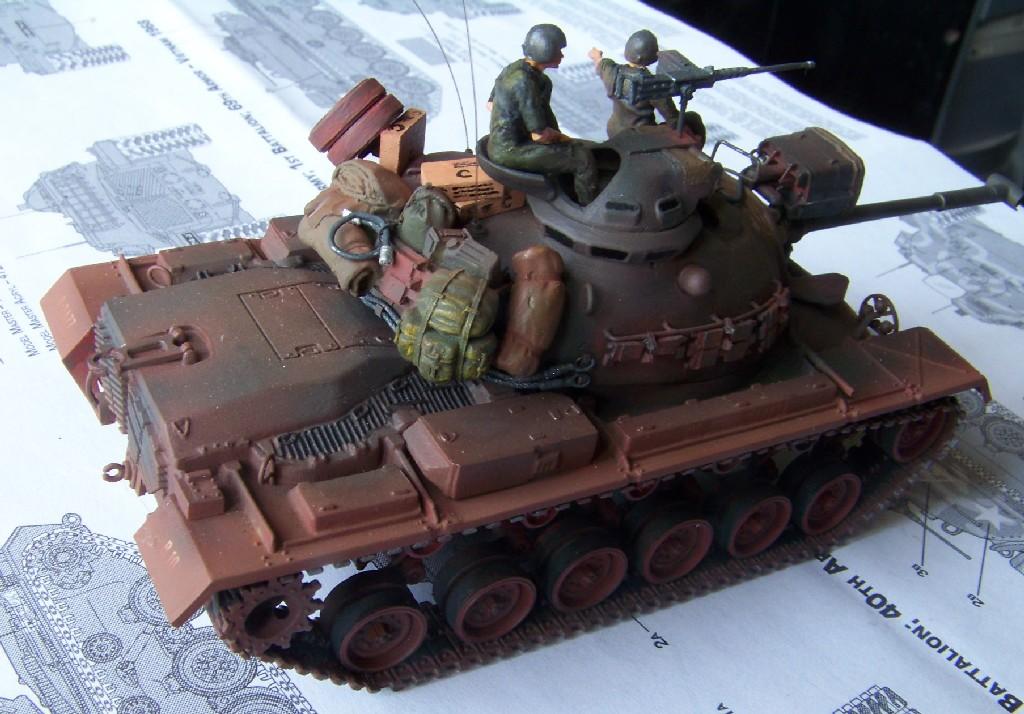
I didn't really have more time to work on it or shoot better photos, I'll do that later. Currently (27.08.2011) the model is on display in a hobby shop in Poznań. When I dig in in a new hobby room, I'll describe it in detail on my web page and I'll take better photos. Looking forward to your comments, thanks for reading and have a nice day

Paweł

All comments and critique welcomed. Thanks for your honest opinions!

www.vietnam.net.pl

  • Member since
    July 2003
  • From: Perth, Western Australia
Posted by madmike on Monday, August 29, 2011 9:55 AM

Now that is a fine build!

Needs a base though Smile

"I do not feel obliged to believe that the same God who has endowed us with sense, reason, and intellect has intended us to forgo their use." - Galileo Galilei
  • Member since
    December 2002
  • From: Fort Knox
Posted by Rob Gronovius on Monday, August 29, 2011 11:24 AM

I like it, excellent job. The doubled up spare road wheel looks out of place and cumbersome. I'd have mounted them separately.

  • Member since
    December 2008
  • From: Northern Va
Posted by psstoff995's lbro on Monday, August 29, 2011 12:34 PM

Nice looking final product! And congrats on finnishing it before you had to pack up.Toast

-Will young modeler Test fit master
  • Member since
    July 2003
  • From: On my kitchen counter top somewhere in North Carolina.
Posted by disastermaster on Monday, August 29, 2011 1:27 PM

http://tamiltorrents.net/Smilies/ok.gif  Excellent work!

.....Especially for 1/72 scale http://emoticoner.com/files/emoticons/smileys/out-of-place-smiley.gif?1292867648

                                     http://emoticoner.com/files/emoticons/smileys/im-ok-smiley.gif?1292867624

                     http://i20.photobucket.com/albums/b232/gluetank/Animated/th_1-Animated-Disastermaster.gif?t=1296616998

Sherman-Jumbo-1945

"I never know what to expect here anymore."


  • Member since
    July 2004
  • From: Texas
Posted by wbill76 on Monday, August 29, 2011 2:16 PM

Ditto to Steve's comments, nice work on this one Pawel! Beer

  • Member since
    January 2007
Posted by the doog on Monday, August 29, 2011 5:53 PM

Wow, this has been a genuine powerhouse of a build, Pawel.

You kicked butt on this one, no doubt. A REAL showstopper!

LOVE IT!!! Yes

  • Member since
    May 2009
  • From: Poland
Posted by Pawel on Tuesday, August 30, 2011 8:30 AM

Well, well - all of my favourite FS modellers in one thread! Thanks a lot for your comments!

Mike - we'll see about the base, when I finish my move and the model returns from the display.

Rob - Thanks a lot. I just put the wheels on like I've seen it in my reference. But 30 secondds googling also yields something similar, for example this photo:

Link

In my model both halves of the wheel are also shown as not bolted together, so you could only lift one of the wheel "halves" at time. By the way - how much does such part weight?

Will - oh yeah, that with the packing up was tight. As I put it on display, the paint was still wet on some parts...

Steve, Bill, Karl - thanks a lot for your kind words, they mean a lot to me.

Well, thanks again, and have a nice day

Paweł

All comments and critique welcomed. Thanks for your honest opinions!

www.vietnam.net.pl

  • Member since
    December 2002
  • From: Fort Knox
Posted by Rob Gronovius on Tuesday, August 30, 2011 8:40 AM

It weighs about three times as much as a car tire.

  • Member since
    July 2006
  • From: New Jersey
Posted by redleg12 on Tuesday, August 30, 2011 3:13 PM

Very nice!!

Rounds Complete!!

"The Moral High Ground....A Great Place to Emplace Artillery."

  • Member since
    May 2009
  • From: Poland
Posted by Pawel on Sunday, September 4, 2011 1:38 PM

Rob - thanks a lot, that's very interesting. I suppose you know now why I modelled the spare wheels that way. Where would you put extra road wheels, if you wanted to carry more of them?

Mike - thanks a lot for your kind words!

Thanks again, have a nice day

Paweł

All comments and critique welcomed. Thanks for your honest opinions!

www.vietnam.net.pl

  • Member since
    September 2010
  • From: California
Posted by mikeymize on Sunday, September 4, 2011 5:26 PM

   Don't build much armor but wow! Bringing this "back from the dead" was remarkable. Thanks for posting and giving us an inspiration for resurrecting our old builds!

"Time you enjoy wasting is not wasted time".


  • Member since
    May 2009
  • From: Poland
Posted by Pawel on Tuesday, September 6, 2011 10:19 AM

Thanks a lot! I just hate to see derelict models sitting around, and I put too much emotion into them once to throw 'em away - so I tend to rebuild models that have any good parts left in them. Glad you liked it, have a nice day

Pawel

All comments and critique welcomed. Thanks for your honest opinions!

www.vietnam.net.pl

  • Member since
    September 2005
  • From: Groton, CT
Posted by warshipguy on Wednesday, December 27, 2017 1:47 PM

Pawel,

"They" say that imitation is the highest form of flattery.  I had started this same conversion of an old ESCI M-48 A2 as the first of a projected 1/72 M-48 series, then just found your thread.  You have done precisely that which I have started, so I will follow along in detail!  After finding the necessary ESCI kits on EBay, I then bought 10 of the Revell M-60 A3 kits for their wheels and suspensions. Granted, this will give me some extra M-60 A3 kits, but I also procured a conversion set to convert the M-60 A3 to an early M-60.

Yours is an exceptional build that I hope to emulate!

Bill Morrison

  • Member since
    May 2009
  • From: Poland
Posted by Pawel on Wednesday, December 27, 2017 6:00 PM

Hello Bill!

I'm a little surprised to see a new comment here after six years or so, but I'm also glad that I can help you any. 10 M60 kits, that's a lot! I wished there was a better way - and for some time it looked like there was - a company called OKB Grigorov had a kit of M48/M60 wheels and tracks in 1:72, but sadly it's and actually always was very hard to get. So for now the modellers have to stick with the Revell M60. I actually wonder why there is no Shapeweys offering for that - Patton wheels and track.

Looking forward to see your WIP thread here on the forums and if I can be of any assistance, plase let me know. Good luck with you build and have a nice day

Paweł

All comments and critique welcomed. Thanks for your honest opinions!

www.vietnam.net.pl

  • Member since
    September 2005
  • From: Groton, CT
Posted by warshipguy on Wednesday, December 27, 2017 7:19 PM

Pawel,

I had tried to purchase the OKB Grigorov set but they never responded with a price quote.  That is why I purchased 10 M60 kits.  I also used the "U" shaped lifting brackets from the M60 kit to add a little more detail to the ESCI M48.  The first model is almost finished except for the tracks, so I will study what you accomplished very closely.  Anyway, in many ways, 1/35 scale is much easier!

Bill

  • Member since
    January 2015
  • From: Tumwater, WA.
Posted by M. Brindos on Thursday, December 28, 2017 9:52 AM

Italleri has the old esci molds?? Good to know! I've been wanting to remake the old M-60 series in 1/72 since I got back into scale modelling. I used to have about 4 or 5 types at one time when I was much younger... than I am now... 

I'd love to super detail at least one of those old kits.

- Mike Brindos "Lost Boy"

  • Member since
    May 2009
  • From: Poland
Posted by Pawel on Thursday, December 28, 2017 3:41 PM

Bill - that's the funny thing about OKB Grigorov - they got stuff so good, that they rather keep it for themselves! A kind of a pity sometimes, I'd be glad to buy from them but they don't wanna sell!

They say that the ESCI M48 is a scaled down Tamiya kit - sounds phony, but take a good look at the turret - you've got faint marks there just in place to mount parts that are not in the kit, like towing rope hooks, jerry can bracket and stuff like that. You can also achieve quite a lot by using right diameter wire instead of kit parts - like those handrails on the turret, some grabhandles, or those lifting rings.

Mike - You might want to check out the Revell 1:72 M-60 series. Those babies look really good with much better suspension. Kit bashing those with the old ESCI kits might give you some very interesting possibilities.

Lookin' forward to seein' some WIP photos - good luck and have a nice day

Paweł

All comments and critique welcomed. Thanks for your honest opinions!

www.vietnam.net.pl

JOIN OUR COMMUNITY!

Our community is FREE to join. To participate you must either login or register for an account.

SEARCH FORUMS
FREE NEWSLETTER
By signing up you may also receive reader surveys and occasional special offers. We do not sell, rent or trade our email lists. View our Privacy Policy.