SEARCH FINESCALE.COM

Enter keywords or a search phrase below:

1:72 M48A3 Vietnam DONE!

32569 views
72 replies
1 rating 2 rating 3 rating 4 rating 5 rating
  • Member since
    May 2009
  • From: Poland
1:72 M48A3 Vietnam DONE!
Posted by Pawel on Wednesday, February 2, 2011 4:26 AM

Hello everybody!

It's been a long time since I first thought about building this, but now the time has come and here we go. First, let's see the goodies-show:

1:72 M48A3 Vietnam by Pawel Mroczkowski

And now the dark secret - in the beginning of the nineties I once took like two hours to slap together an M48A2C from Esci. All this time I kept that model, let's call it "Ole Glue":

1:72 M48A3 Vietnam by Pawel Mroczkowski

1:72 M48A3 Vietnam by Pawel Mroczkowski

Well I decided to take parts from "Ole Glue" and incorporate them in this model, to give "Ole Glue" new life. Let's see how this will turn out.

So first I started by cleaning up the historic wreck and selecting parts that are usable. And then I went on to put suspension parts from the Revell model on the old Esci Hull. Now the Italeri model is an Esci rebox and its main weekness is the terrible suspension, or more specifically one-part road wheels that don't look good any... Now the Revell M60 has nice two-part road wheels that fit, and that's what I'm going to use here.

I also shaved the molded-on half-wheels and replaced them with correct lift rings made of wire. Now the lower hull looks like this:

1:72 M48A3 Vietnam by Pawel Mroczkowski

1:72 M48A3 Vietnam by Pawel Mroczkowski

I also installed the sockets for the additional return rollers, as most of the M48A3's had five rollers/side. This is a slight problem, as the Revell kit only has six, although very nice, return rollers. Now I have to get four return rollers from somewhere!

Thanks for reading, hope you like it, I look forward to your comments and have a nice day

Paweł

All comments and critique welcomed. Thanks for your honest opinions!

www.vietnam.net.pl

  • Member since
    March 2006
Posted by TD4438 on Wednesday, February 2, 2011 4:28 AM

That M48 builds up real nice.You will enjoy it.

  • Member since
    May 2009
  • From: Poland
Posted by Pawel on Wednesday, February 2, 2011 4:32 AM

Hello!

Yeah, I know I will! And the cool thing, I didn't even have to wait five minutes for my first comment, cool! Thanks a lot TD4438 and please stay tuned!

Paweł

All comments and critique welcomed. Thanks for your honest opinions!

www.vietnam.net.pl

  • Member since
    December 2002
  • From: Fort Knox
Posted by Rob Gronovius on Wednesday, February 2, 2011 6:54 AM

Are you going to take the old Esci kit, the Italeri reissue and the Revell kit to create one model? Sounds like quite a project. Good luck with it.

  • Member since
    July 2003
  • From: Perth, Western Australia
Posted by madmike on Wednesday, February 2, 2011 8:10 AM

Will be following this build!

"I do not feel obliged to believe that the same God who has endowed us with sense, reason, and intellect has intended us to forgo their use." - Galileo Galilei
  • Member since
    May 2009
  • From: Poland
Posted by Pawel on Thursday, February 3, 2011 7:10 AM

madmike - thanks for the comment, please stay tuned!

Rob - as you know the Esci and Italeri kits are actually the same thing, so mating "Old Glue"'s lower hull to the Italeri rest is no big  deal. Fitting the Revell suspension is a little more tricky, but it looks like I have at least half of the hard part done by now. I need to adjust the sprockets and find a source for the missing four return rollers yet. Please stay tuned, I need you to tell me what I'm building wrong, when it happens! Thanks for reading and have a nice day

Paweł

All comments and critique welcomed. Thanks for your honest opinions!

www.vietnam.net.pl

  • Member since
    December 2002
  • From: Fort Knox
Posted by Rob Gronovius on Thursday, February 3, 2011 9:28 AM

Yes, I know they are the same kit, just wondering why you were going to mate the new stuff to the old lower hull instead of starting out with the new Italeri hull. Actually, both the old Esci kit and newer Revell M60A1/A3 kits are both pretty good models. The Esci kit holds up especially well, but it is good to see one get decked out.

  • Member since
    May 2009
  • From: Poland
Posted by Pawel on Thursday, February 3, 2011 10:05 AM

I only use the lower hull for sentimental reasons, otherwise it doesn't make any sense... The Revell M60 model is very cool, with correct road wheels and very crisp detail. One thing I don't like about it is the tracks. Not only are they octagon style (no problem here if you want to show a later machine, although road wheels are steel), the biggest problem with them is that the track guide teeth are positioned in the middle of each link, instead of between links.

Infact the M60 is so nice, I started thinking about building a CEV in 1:72 - that would be something, wouldn't it? Have a nice day

Paweł

All comments and critique welcomed. Thanks for your honest opinions!

www.vietnam.net.pl

  • Member since
    December 2002
  • From: Fort Knox
Posted by Rob Gronovius on Thursday, February 3, 2011 10:15 AM

Steel road wheels on an M60 series tank are not uncommon nor a good indicator of when the tank was in use. All steel, all aluminum or a mixture can be seen throughout its lifespan. It would be nice if Revell gave us a Slick 60 M60A0 although to make an early tank, they would need to retool the upper hull to give us the option for early and late style air cleaners. That's one area the Esci M60A1/A2/A3 series was better; the choice between early and late style air cleaners.

  • Member since
    May 2009
  • From: Poland
Posted by Pawel on Thursday, February 3, 2011 10:20 AM

Thanks for the info Rob, it's always good to have an expert onboard for a WIP thread! 'Till next time

Paweł

All comments and critique welcomed. Thanks for your honest opinions!

www.vietnam.net.pl

  • Member since
    May 2009
  • From: Poland
Posted by Pawel on Saturday, February 5, 2011 5:33 PM

OK, movin' on with the build!

First there are the road wheels, like seen on the photo below. The sand-coloured ones were stripped off "Old Glue". The funny pink ones are Revell:

1:72 M48 Patton tank Vietnam Italeri by Pawel Mroczkowski

See why I broke out the Revell kit?

Then there are the return rollers:

1:72 M48 Patton tank Vietnam Italeri by Pawel Mroczkowski

And then I went on to do the sprockets. The double discs for the track's guide teeth are from the Revell kit, the sprockets are from the old Esci kit, narrowed (so as to allow for the double discs) and with mud-release holes cut in them:

1:72 M48 Patton tank Vietnam Italeri by Pawel Mroczkowski

Then there's track. The basic Esci/Italeri ones:

1:72 M48 Patton tank Vietnam Italeri by Pawel Mroczkowski

And the octagon-style Revell tracks. Note how the guide teeht are incorrectly shown in the middle of each link instead between the links, like the connecting links:

1:72 M48 Patton tank Vietnam Italeri by Pawel Mroczkowski

Now I'll have to figure out what to do with the track... As I don't really like neither of them.

OK, that would be it for now, thanks for reading and have a nice day

Paweł

All comments and critique welcomed. Thanks for your honest opinions!

www.vietnam.net.pl

  • Member since
    December 2002
  • From: Fort Knox
Posted by Rob Gronovius on Saturday, February 5, 2011 8:04 PM

I am not an expert by any means. I know too many men who know much more about these machines for me to ever consider myself to be an expert. Having said that, I learned to tank on an M48A5 when I was a kid. I am familiar with it and do know a good deal about the M48A5 and the M60A3TTS (another tank I cut my teeth on).

As far as fixing the Revell track, personally, I would not bother to make this correction. To me it would not be worth the time and effort for a detail that would go unnoticed to the common man. But, on the Esci track, I have used slices of channel strip styrene made by Plastistruct (sp?).

When you cut the channel strip, you end up with U shaped pieces that resemble the center guides of the track. I then glue them in the proper place on the track. You could do the same with the Revell track. You would have to remove the existing center guides and replace them with the channel lock Us.

Of course, the Revell track would not be correct for a Vietnam era tank. You could also detail the inside of the track with strips of styrene to represent the inner rubber track surface.

  • Member since
    October 2009
Posted by PANZERWAFFE on Sunday, February 6, 2011 2:49 PM

You have quite a project here.  I'll be watching to see how it goes.

Rob

  • Member since
    January 2007
Posted by the doog on Monday, February 7, 2011 1:31 AM

Pawel, it's quite the ambitious project you have going here, but I agree with Rob; don't get in over your head trying to correct the tracks. When they're on, you won't be able to notice it.

Good luck with where you're going with this!

  • Member since
    July 2006
  • From: New Jersey
Posted by redleg12 on Monday, February 7, 2011 6:11 AM

Such a nice project in a small size. I admire anyone working in this scale!!

Rounds Complete!!

"The Moral High Ground....A Great Place to Emplace Artillery."

  • Member since
    May 2009
  • From: Poland
Posted by Pawel on Friday, February 11, 2011 7:35 AM

Hello everybody!

Sorry for replying so late, but I was on a business trip...

Rob G - I need to do something about the track, the center guides are the absolute minimum here. Your idea with the U-channels sounds very interesting. I think I'll have something figured out by the weekend.

Rob (PANZERWAFFE) - Thanks for your comment, welcome aboard!

Karl, Mike - glad to have some of my favourite modellers onboard! Karl, I'm afraid I have to do SOMETHING about the tracks, to keep the model consistent. I've also seen another 1:72 Patton with the tracks fixed and I think it was worth it. Mike - 1:72 is a nice scale and this way I can have a tank and my choppers in the same display case :D

Thanks for reading and have a nice day

Paweł


All comments and critique welcomed. Thanks for your honest opinions!

www.vietnam.net.pl

  • Member since
    July 2003
  • From: On my kitchen counter top somewhere in North Carolina.
Posted by disastermaster on Saturday, February 12, 2011 11:08 AM

Off to a good start Pawel.

  if you sweat the tracks you might run the risk of burning yourself out, but that's up to you.

        I'll be waiting........

http://i20.photobucket.com/albums/b232/gluetank/Animated/th_1-Animated-Disastermaster.gif?t=1296616998

Sherman-Jumbo-1945

"I was so much older then, I'm younger than that now"


  • Member since
    May 2009
  • From: Poland
Posted by Pawel on Sunday, February 13, 2011 8:36 AM

DM - thanks for your comment and welcome to my thread! I agree with you, that the risk is there, but I say I can hack it and I got photos to prove it!

I mean I have an update for you gennulman!

For starters I glued the rear part of the hull on and filled the seam. I replaced the door handles with thin copper wire. When this was done I added the final drive housings. Before that I drilled out the original drive sprocket axles, because they were damaged (all these years!). I replaced them with a 3mm shaft made out of sprue. And finally I put the wheels on:

1:72 Vietnam M48A3 by Pawel Mroczkowski

1:72 Vietnam M48A3 by Pawel Mroczkowski

1:72 Vietnam M48A3 by Pawel Mroczkowski

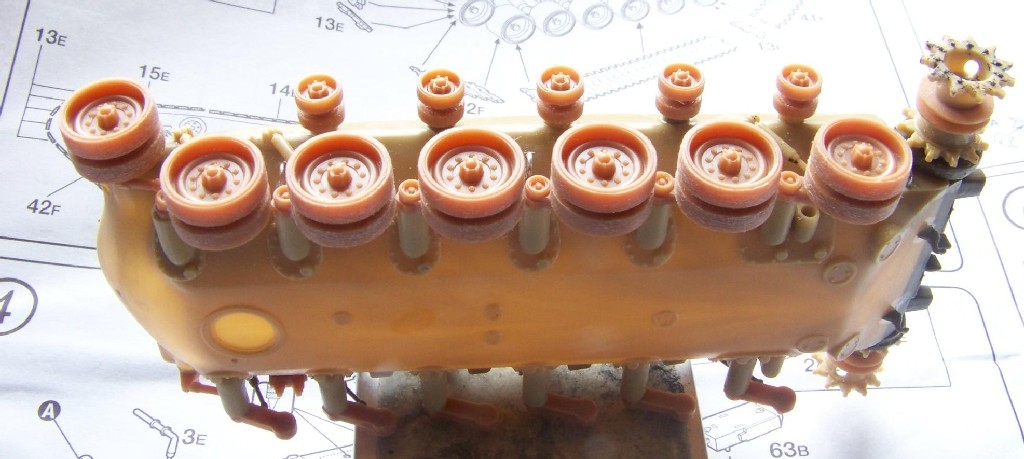
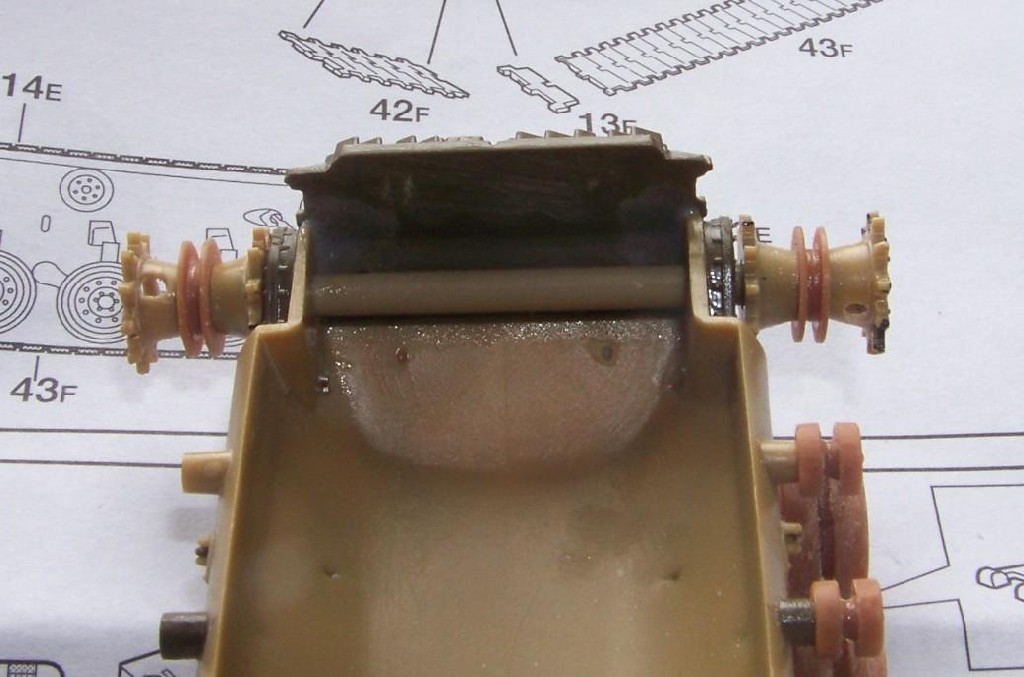
I narrowed the mounting points for the wheels slightly, so that the tracks fit inside the fenders completely. Without narrowing the tracks have a tendency to stick out slightly.

Currently I'm doing one side only, because I still didn't figure out what to do about the return rollers. As I wrote before I need ten of them and the Revell kit only has six. I wrote a polite letter to Revell Germany about ten days ago where I asked them for the parts, let's see what are they going to do.

Meanwhile I went on with the tough job - the tracks. I decided to sandwich the Esci/Italeri and the Revell tracks. That wouldn't look good if I didn't adjust their thickness, so I attached the track to a wooden brush handle with painter's tape and started sanding. My measurement showed that the Esci/Italeri track needs to be sanded on the flat side until it's about 0.7mm thick. I removed the track shoes of the Revell tracks and sanded until only the deepest marks were visible near the centerline of the tracks:

1:72 Vietnam M48A3 by Pawel Mroczkowski

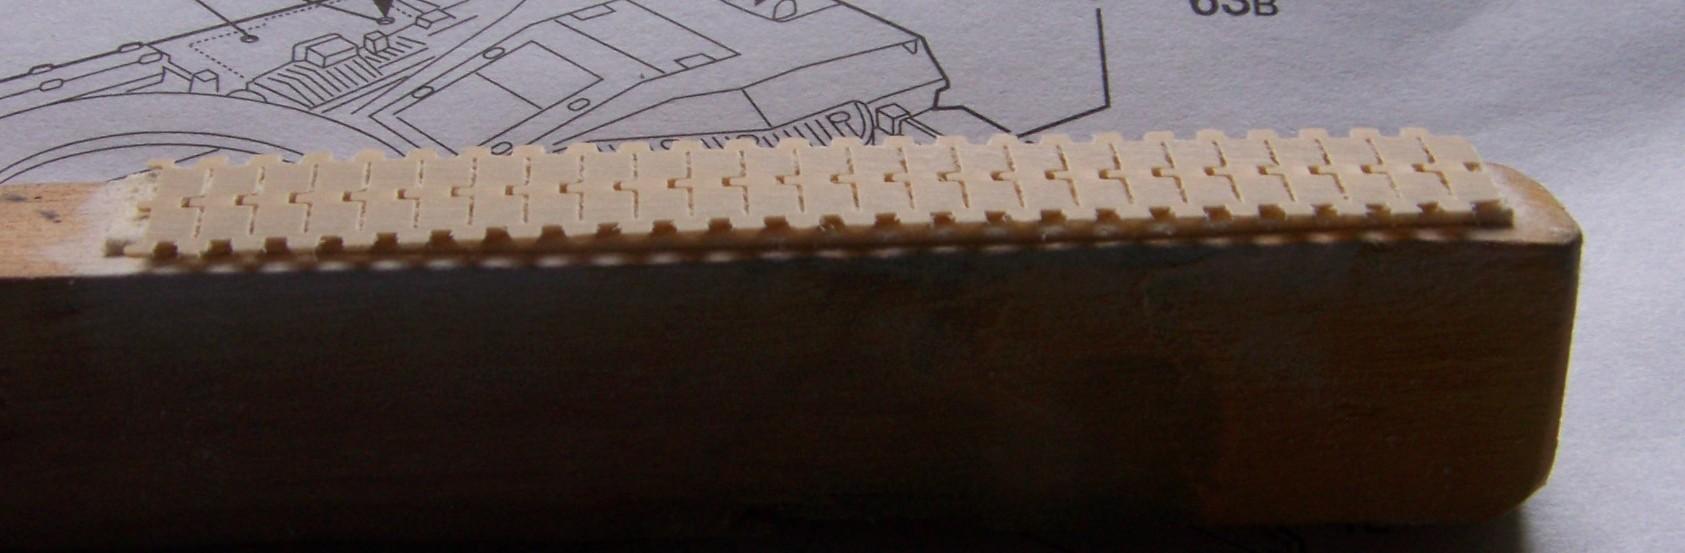
Then I glued the sanded tracks together. To do that I cut the Esci/Italeri tracks in three-link segments to compensate for the slight differnce in length between the Esci/Italeri and the Revell tracks. For glueing all the styrene together I used liquid glue/lacquer thinner, it works like charm. To impress you more I took a surgical blade and cut off the guide teeth off the track and moved them to their correct position between the track links. Here's the photo of the completed track section:

1:72 Vietnam M48A3 by Pawel Mroczkowski

For now I have four sections completed this way - the bottom section (26 links), two short diagonal sections (6 links) and the long top section that consists of two subassemblies (idler-roller and roller-sprocket - 33 links). To complete the track run I also need 12 individual links which I'm going to use almost straight out of the Italeri box. Together it makes for 83 links - I wonder if it's correct number?

And then I went on to assemble it all - I started with the individual links on the sprocket, then I went on toward the road wheelsand up to the idler. I scored the flat side of the individual links with the tip of the knive to give them some structure and to blen them with the straight runs. Finally I installed the long top run. By bending the short and the top sections I tried to give the tracks a little sag, nothing dramatic. After I was done it looks like that:


1:72 Vietnam M48A3 by Pawel Mroczkowski

1:72 Vietnam M48A3 by Pawel Mroczkowski

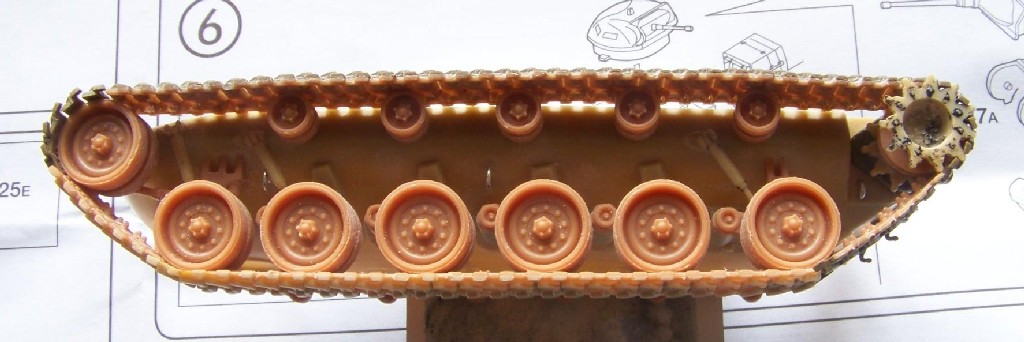
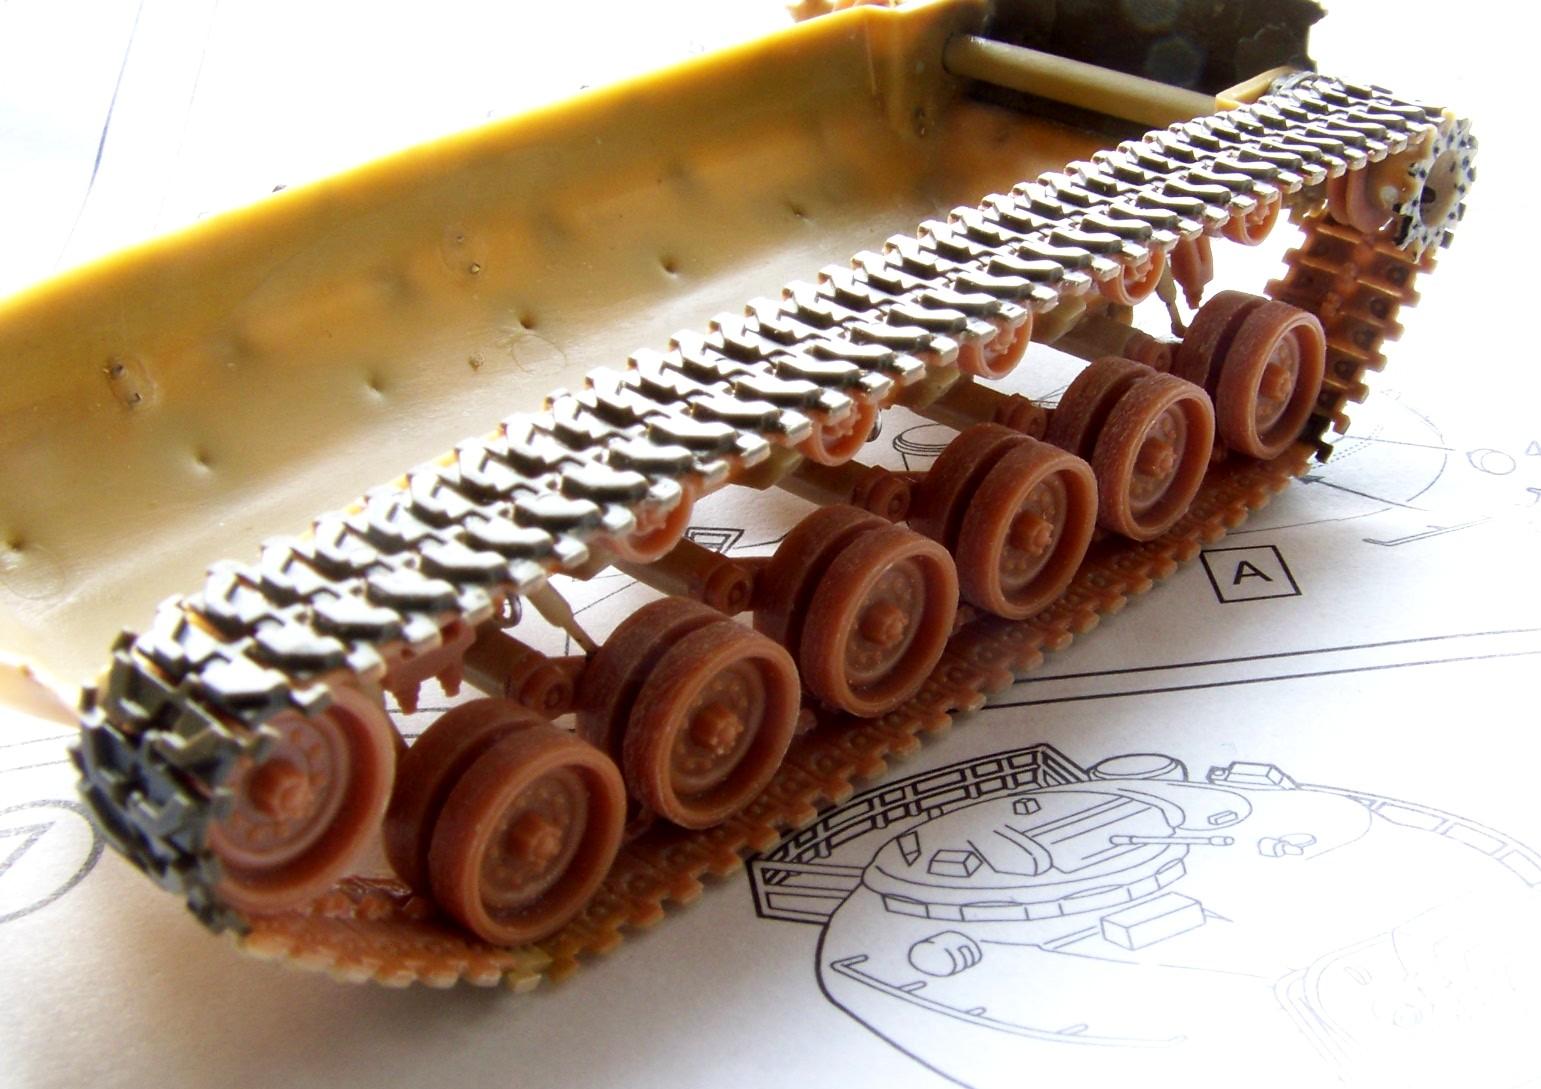
So I think as soon as I get the remaining rollers I can do the other side without burning out, it's not so bad. I'd say I put about 4 hours in the tracks so far, so it's doable. Hope you liked it, looking forward to your comments and thanks for reading

Paweł

All comments and critique welcomed. Thanks for your honest opinions!

www.vietnam.net.pl

  • Member since
    January 2007
Posted by the doog on Sunday, February 13, 2011 9:40 AM

Pawel, you're a detailing ANIMAL!  Wow; I didn't think you'd go the full mile on those tracks, but you sure showed us! That looks awesome, and it's great to see you tackling this one with vigor and dedication!

I know we say this a lot here, but I can't wait to see what you do with this when it's painted and weathered! Stick out tongue

  • Member since
    July 2003
  • From: On my kitchen counter top somewhere in North Carolina.
Posted by disastermaster on Sunday, February 13, 2011 2:48 PM

Dude.........

    You got talent.

        Remember folks, this is 1/72 scale.

http://i20.photobucket.com/albums/b232/gluetank/Animated/th_1-Animated-Disastermaster.gif?t=1296616998

Sherman-Jumbo-1945

"I was so much older then, I'm younger than that now"


  • Member since
    May 2009
  • From: Poland
Posted by Pawel on Monday, February 14, 2011 8:06 AM

Karl, DM - thanks a lot for your comments, it really means a lot to me!

And Karl - I'd also like to have it painted and stuff, but of course it's gonna take some time.

Well, thanks again and have a nice day

Paweł

All comments and critique welcomed. Thanks for your honest opinions!

www.vietnam.net.pl

  • Member since
    May 2009
  • From: Poland
Posted by Pawel on Sunday, February 20, 2011 9:06 AM

Hello!

I'm almost done with the tracks - at least no more cutting and glueing those little center guide teeth. I still don't have enough of the return rollers, so this is what I have so far:

1:72 Vietnam M48A3 by Pawel Mroczkowski

Now as soon as I get those rollers, I'll put this side together, in the meantime I'm movin on to the top hull and the turret. Thanks for reading and have a nice day

Paweł

All comments and critique welcomed. Thanks for your honest opinions!

www.vietnam.net.pl

  • Member since
    July 2003
  • From: Perth, Western Australia
Posted by madmike on Sunday, February 20, 2011 5:53 PM

Amazing stuff.

Tracks are always the big bugbear with 1:72.

"I do not feel obliged to believe that the same God who has endowed us with sense, reason, and intellect has intended us to forgo their use." - Galileo Galilei
  • Member since
    July 2006
  • From: New Jersey
Posted by redleg12 on Sunday, February 20, 2011 6:28 PM

And I complain about 1/35 track...Crying.....Outstanding.....I would be blind for sure!! Nice details insuch a small package.

Rounds Complete!!

"The Moral High Ground....A Great Place to Emplace Artillery."

  • Member since
    May 2009
  • From: Poland
Posted by Pawel on Monday, February 21, 2011 9:23 AM

Thanks for your comments guys!

Madmike - yeah, tracks! And machine guns. And aerials... But it all can be fixed with enough creativity. I'm not surprised 1:35 is more popular than 1:72, but I like 1:72 a lot, and I know you do, too!

Mike - thanks a lot, and I hope to give you some more details in my next posts, so please stay tuned.

Thanks for reading and have a nice day

Paweł

All comments and critique welcomed. Thanks for your honest opinions!

www.vietnam.net.pl

  • Member since
    May 2009
  • From: Poland
Posted by Pawel on Sunday, March 13, 2011 9:55 AM

The return rollers have arrived!

That was good news... Like six weeks ago I wrote a polite letter to Revell with requestt for parts. About two weeks ago I begun to lose hope, so I phoned 'em and the very nice lady I talked to told me the have always a real flood of requests like that after every christmas, but they are taking care of it - and here we go. I put them rollers on as soon as I got my hands on 'em:

1:72 M48A3 Vietnam by Pawel Mroczkowski

I'm also working on the upper hull right now. I decided to model the driver's hatch open and the fenders disturbed a little, so I took advantage of having two upper hulls and I cut three of the quarters out of the new hull, then I cut the quarters of the "old glue" and put them on at slight angle, so as to suggest bad things that happened. I also drilled out the driver's hatch and cut the hatch out of  "old glue", so now I'm ready to show it open. I also made the lifting rings out of wire - rear was no problem, because there was nothing there in the kit, but in the front I had to get rid of the "blobs". Here's what it looks like now:

1:72 M48A3 Vietnam by Pawel Mroczkowski

I also started working on the turret - I drilled out the loader's hatch (it will be open too), and I drilled out the visor in front of the TC's cuppola (by the way - somebody help me, what's the correct name for this visor? Rob? anybody?). And I'm using the turret that is many years old. Here's what it looks like:

1:72 M48A3 Vietnam by Pawel Mroczkowski

What do you think? Thanks for reading and have a nice day

Paweł

All comments and critique welcomed. Thanks for your honest opinions!

www.vietnam.net.pl

  • Member since
    December 2002
  • From: Fort Knox
Posted by Rob Gronovius on Sunday, March 13, 2011 11:28 AM

It's the gunner's primary sight housing, often referred to as the doghouse.

  • Member since
    May 2009
  • From: Poland
Posted by Pawel on Sunday, April 3, 2011 12:54 PM

Rob, thanks for your help!

I put the turret together and started filling the joint between the top and the bottom part. In order to do that, I had to take care of the main gun. I removed the old gun and shield and put the Italeri gun and shield in. I drilled out the muzzle brake so that it doesn't look ultra-heavy (scale!) and I also filled the big hole between the turret and the shield. OK, so now the gun isn't movable anymore, but hopefully it will look a lot better with a scale mantlet cover. Here's what I got so far:

1:72 M48 Vietnam by Pawel Mroczkowski

As always waiting for your comments, thanks for reading and have a nice day

Paweł

All comments and critique welcomed. Thanks for your honest opinions!

www.vietnam.net.pl

  • Member since
    April 2015
Posted by spadx111 on Sunday, April 3, 2011 1:54 PM

Yes nice build great pics .

Ron

  • Member since
    May 2009
  • From: Poland
Posted by Pawel on Monday, April 4, 2011 10:26 AM

Thanks a lot, Ron, and please stay tuned!

Paweł

All comments and critique welcomed. Thanks for your honest opinions!

www.vietnam.net.pl

JOIN OUR COMMUNITY!

Our community is FREE to join. To participate you must either login or register for an account.

SEARCH FORUMS
FREE NEWSLETTER
By signing up you may also receive reader surveys and occasional special offers. We do not sell, rent or trade our email lists. View our Privacy Policy.