Very interesting post! Let´s talk about paint and materials!
I tried something similar and ended up with it all being wasted because my cover color was sprayed too thick. If you pre-shadow you must NOT spray your regular color on too thick and not try to get in every nook and cranny, that's what the pre-shading is for.......a huge DUH on my part.
Obviously, it´s not mandatory to make a pre-shadow before the base coat. In fact, most of the TOP modelers in the world, do not make it. But whatever technique or material we use, we must have a complete control and knowledge of the materials and techniques we use and the results they offer. We must know which material is suited for a concrete task and the results we´ll achieve using it. It´s crucial to know how the diferent products works.
I have a heavy hand and I think for people like me it's best to do the shading afterward. You cannot argue with your results they are great. It just didn't work for me, maybe when my technique improves if ever it will work, I never give up and will try it again, there is merit to that technique no doubt.
I am very happy so far with just laying down a nice coat of primer and then the color I want then shadowing. BUT the trick I found was to use a lighter version of the color you want. All the added shadowing will darken the overall color especially with oils. Oils seem to get darker with time as they found with the Sistine Chapel... ..ha ha. But it kind of surprised me how much as I am new to oils.
I think from what I have found it 3 basic layers, your shadows, the color of the model and the highlights.
Actually, most of the modelers do the same as you and it really works. An airbrushed solid base color and, once dry, they start highligthing the base color to achive a more atractive looking and then, a general shadow to highlight volumes. But always try to paint the base coat in several very thinned coats. Maybe you will spend more time painting the base color (2-3 sessions), but that base will be smoother, cleaner and flawless.
And Yesssssss, oils obscure the colors, so, what you said is a BIG TRUE. Base color must be always lighter than the final color we´re looking for. But not only the oils darken the base color and the general appearance, also the washes, a general airbrushed varnish coat, pigments, filters... Depending of the desired levelof weathering, your base coat must be lighter or hipersupermegalighther! :)
I particulary love oils. Why? They have a slow process of drying (you can make corrections, impossible with acrilyc paints) and they allow to make smooth color transitions and transparencias. The catalog of colors is almost endless at your favourite art shop! And oils match perfectly with pigments.
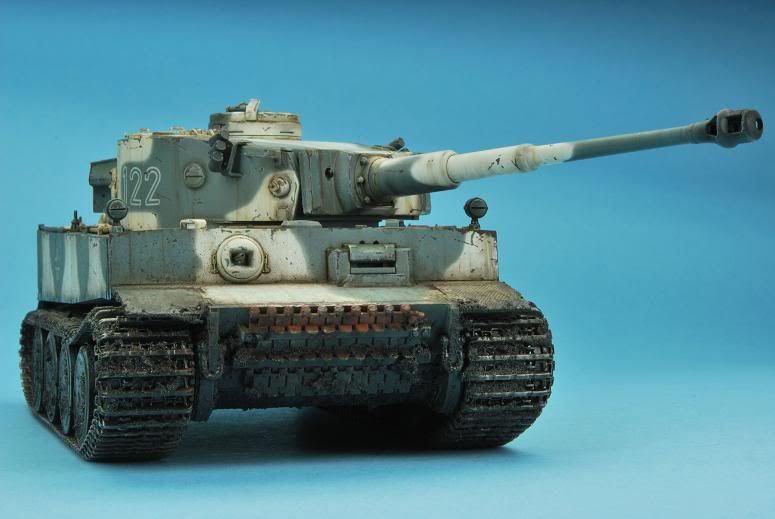
And for some specific weathering, you can use only oils to finish a tank. This Tiger was weathered just with oils over the base color. No filters, no base color highlighting ... just base color and oil.

It really doesn't matter how it's done or what type of paint as long as it looks good. Although I have found that the Polly scale acrylics look more natural then the Tamiya, smoother finish and a warmer more natural color. The Humbrol enamels look really good for anything that needs some natural depth like tarps and canvas or jeep seat covers, things like that. It seems like each type of paint has it uses and each manufacturer also can be used for certain things better then others.
I'm finding out which is best for what. The amazing thing is the difference in color from one company to the next. One company's Khaki is another company's green...LOL....that made me just scratch my head.
I always use Tamiya or Gunze Sangyo for airbrushing. Why? Are they better? Are they color catalog perfect and realistic? Not neccesary, but I perfectly know their results on a kit. I know how they´ll reack with oils, thinner .... Maybe I´m not using the best suited colors, but I really control this paints. So, first task is to work always with the materials you´re more confortable with. I always paint with this paints thinned with 60-80% of thinner. Less is more.
And there´re sooooo many products, Vallejo Aircolor, Life Color, Humbrol .... no time to know how to use all of them properly! :) I prefer to squeeze the properties of these paints altough they´re not the best.
It´s no neccesary to have all the products available, just the materials you´re confortable with and you know how they work.
But the model did come out amazing and very realistic looking which to me is the end game. I know what armor looks like, even Russian stuff as I was around a bit of that too during training.
When I really examine the photos in my opinion the recesses look more realistic then doing it after the model is sprayed. I will have to try this technique again, it's logical and looks really good. Maybe with some models this works better then others. I'm sure I am at the same point as many other model builders and have not achieved my goals in terms of getting the look I want. I'm getting there though, I am really working hard on getting the figures painted, the eye's are so important.
And the best reward is to feel proud of your work, no matter what your wife said about "those little tank toys over the kitchen table!
As more kits you make, as more fun you´ll get and more your results will improve
Regards