SEARCH FINESCALE.COM

Enter keywords or a search phrase below:

OT-76

2007 views
20 replies
1 rating 2 rating 3 rating 4 rating 5 rating
  • Member since
    November 2009
  • From: SW Virginia
Posted by Gamera on Thursday, May 19, 2011 9:14 AM

Great job Jose! And thanks for the advice, I'm still working past the old paint it, hit it with a wash, and dry-brush style that was in vogue twenty years ago...

"I dream in fire but work in clay." -Arthur Machen


  • Member since
    August 2010
Posted by Jose_Luis_Lopez on Thursday, May 19, 2011 8:44 AM

iraqiwildman

Very nice. I like this way of painting a base coat. and not messing around with filters later.

Correct! But you can also add some filters to enhance the base color constrast or to soften any sharp incorret transition.


  • Member since
    August 2010
Posted by Jose_Luis_Lopez on Thursday, May 19, 2011 8:37 AM

Very interesting post! Let´s talk about paint and materials!

I tried something similar and ended up with it all being wasted because my cover color was sprayed too thick. If you pre-shadow you must NOT spray your regular color on too thick and not try to get in every nook and cranny, that's what the pre-shading is for.......a huge DUH on my part.

Obviously, it´s not mandatory to make a pre-shadow before the base coat. In fact, most of the TOP modelers in the world, do not make it. But whatever technique or material we use, we must have a complete control and knowledge of the materials and techniques we use and the results they offer. We must know which material is suited for a concrete task and the results we´ll achieve using it. It´s crucial to know how the diferent products works.

I have a heavy hand and I think for people like me it's best to do the shading afterward. You cannot argue with your results they are great. It just didn't work for me, maybe when my technique improves if ever it will work, I never give up and will try it again, there is merit to that technique no doubt.

I am very happy so far with just laying down a nice coat of primer and then the color I want then shadowing. BUT the trick I found was to use a lighter version of the color you want. All the added shadowing will darken the overall color especially with oils. Oils seem to get darker with time as they found with the Sistine Chapel...Smile..ha ha. But it kind of surprised me how much as I am new to oils.

I think from what I have found it 3 basic layers, your shadows, the color of the model and the highlights.

Actually, most of the modelers do the same as you and it really works. An airbrushed solid base color and, once dry, they start highligthing the base color to achive a more atractive looking and then, a general shadow to highlight volumes. But always try to paint the base coat in several very thinned coats. Maybe you will spend more time painting the base color (2-3 sessions), but that base will be smoother, cleaner and flawless.

And Yesssssss, oils obscure the colors, so, what you said is a BIG TRUE. Base color must be always lighter than the final color we´re looking for. But not only the oils darken the base color and the general appearance, also the washes, a general airbrushed varnish coat, pigments, filters... Depending of the desired levelof weathering, your base coat must be lighter or hipersupermegalighther! :)

I particulary love oils. Why? They have a slow process of drying (you can make corrections, impossible with acrilyc paints) and they allow to make smooth color transitions and transparencias. The catalog of colors is almost endless at your favourite art shop! And oils match perfectly with pigments.

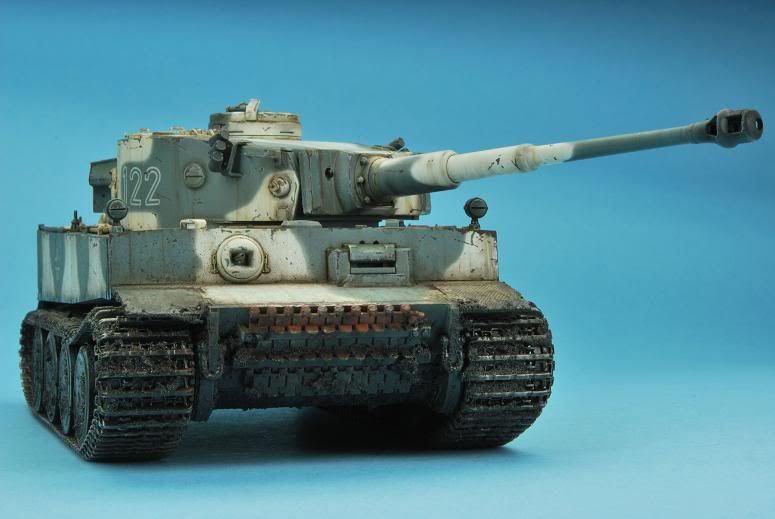
And for some specific weathering, you can use only oils to finish a tank. This Tiger was weathered just with oils over the base color. No filters, no base color highlighting ... just base color and oil.
It really doesn't matter how it's done or what type of paint as long as it looks good. Although I have found that the Polly scale acrylics look more natural then the Tamiya, smoother finish and a warmer more natural color. The Humbrol enamels look really good for anything that needs some natural depth like tarps and canvas or jeep seat covers, things like that. It seems like each type of paint has it uses and each manufacturer also can be used for certain things better then others.

I'm finding out which is best for what. The amazing thing is the difference in color from one company to the next. One company's Khaki is another company's green...LOL....that made me just scratch my head.

I always use Tamiya or Gunze Sangyo for airbrushing. Why? Are they better? Are they color catalog perfect and realistic? Not neccesary, but I perfectly know their results on a kit. I know how they´ll reack with oils, thinner ....  Maybe I´m not using the best suited colors, but I really control this paints. So, first task is to work always with the materials you´re more confortable with. I always paint with this paints thinned with 60-80% of thinner. Less is more.

And there´re sooooo many products, Vallejo Aircolor, Life Color, Humbrol .... no time to know how to use all of them properly! :) I prefer to squeeze the properties of these paints altough they´re not the best.

It´s no neccesary to have all the products available, just the materials you´re confortable with and you know how they work.

But the model did come out amazing and very realistic looking which to me is the end game. I know what armor looks like, even Russian stuff as I was around a bit of that too during training.

When I really examine the photos in my opinion the recesses look more realistic then doing it after the model is sprayed. I will have to try this technique again, it's logical and looks really good. Maybe with some models this works better then others. I'm sure I am at the same point as many other model builders and have not achieved my goals in terms of getting the look I want. I'm getting there though, I am really working hard on getting the figures painted, the eye's are so important.

And the best reward is to feel proud of your work, no matter what your wife said about "those little tank toys over the kitchen table!

As more kits you make, as more fun you´ll get and more your results will improve

Regards 


  • Member since
    October 2010
  • From: Staten Island
Posted by BigDaddyBluesman on Wednesday, May 18, 2011 5:18 PM

I tried something similar and ended up with it all being wasted because my cover color was sprayed too thick. If you pre-shadow you must NOT spray your regular color on too thick and not try to get in every nook and cranny, that's what the pre-shading is for.......a huge DUH on my part.

I have a heavy hand and I think for people like me it's best to do the shading afterward. You cannot argue with your results they are great. It just didn't work for me, maybe when my technique improves if ever it will work, I never give up and will try it again, there is merit to that technique no doubt.

I am very happy so far with just laying down a nice coat of primer and then the color I want then shadowing. BUT the trick I found was to use a lighter version of the color you want. All the added shadowing will darken the overall color especially with oils. Oils seem to get darker with time as they found with the Sistine Chapel...Smile..ha ha. But it kind of surprised me how much as I am new to oils.

I think from what I have found it 3 basic layers, your shadows, the color of the model and the highlights. it really doesn't matter how it's done or what type of paint as long as it looks good. Although I have found that the Polly scale acrylics look more natural then the Tamiya, smoother finish and a warmer more natural color. The Humbrol enamels look really good for anything that needs some natural depth like tarps and canvas or jeep seat covers, things like that. It seems like each type of paint has it uses and each manufacturer also can be used for certain things better then others.

I'm finding out which is best for what. The amazing thing is the difference in color from one company to the next. One company's Khaki is another company's green...LOL....that made me just scratch my head.

But the model did come out amazing and very realistic looking which to me is the end game. I know what armor looks like, even Russian stuff as I was around a bit of that too during training.

When I really examine the photos in my opinion the recesses look more realistic then doing it after the model is sprayed. I will have to try this technique again, it's logical and looks really good. Maybe with some models this works better then others. I'm sure I am at the same point as many other model builders and have not achieved my goals in terms of getting the look I want. I'm getting there though, I am really working hard on getting the figures painted, the eye's are so important.

Great job!!!!!!!!!Yes

  • Member since
    October 2008
  • From: New Jersey
Posted by oddmanrush on Wednesday, May 18, 2011 4:50 PM

Fantastic! I love the mini-tutorial you provide and excellent pictures! Interesting is your unique technique, getting away from filters and such.

Jon

My Blog: The Combat Workshop 

  • Member since
    November 2008
  • From: Jefferson City, MO
Posted by iraqiwildman on Wednesday, May 18, 2011 4:39 PM

Very nice. I like this way of painting a base coat. and not messing around with filters later.

Tim Wilding

  • Member since
    July 2004
  • From: Texas
Posted by wbill76 on Wednesday, May 18, 2011 2:54 PM

Very nice work as usual Jose-Luis and done quickly as well. Yes Yes

  • Member since
    August 2010
Posted by Jose_Luis_Lopez on Wednesday, May 18, 2011 1:18 PM

Many thanks for your opinion!

I´ll be glad to make a little resume:

1.- Preshadow. Over the primed tank.

Belive me, this step is very important. This helps to get a more atractive base color with natural shadows in the lower part of the hull

2.- Base color

For this step I used a mix of XF-73 and XF-74, with some XF-60 for the highlights. No need to make shadows, already present in the base color (preshadow). Use VERY THINED paint to paint the base. I like to use 80% thinner, 20% paint. To paint completely the base coat, I use to employ 3-4 coats. ALSO important. Paint the base color in thin coats like transparencies. Not try to paint a solid base color. Make it little by little, in a no homogeneous way. This REALLY HELPS to have a more rich base color. Why spend trying to change the base color with filters when you can make directly a nice base using your airbrush? Filters can help, but they´re not the best weapon at your disposal. Base color is the clue here.

3.- Tutti-Frutti

Yes, I know, a strange name. Using your acrylic paints (I used russian green, from Andrea, NAC-06), I painted some details as rivets, handles... this helps to highlight the most atractive parts of the vehicle.

In the above picture, no filters, no oils, just modulated base color!

4.- Washes

Using oils, make a traditional wash to enhance the details. I love natural umber and black, also a dark green.

The next weathering steps are the typical you can find on articles and magazines, pigments and oil paints. But the clue, my friends, is an interesting base color. Many modeller got nervous because they see the plates and surfaces so uniform and boring that they start applying filters and oil colors desesperately to achieve an atractive base color. So, spend you time in an atractive base color and the rest will be much easier.

Hope this helps


  • Member since
    April 2015
Posted by spadx111 on Wednesday, May 18, 2011 8:10 AM

nice job on the build enjoyed seeing the pics.

Ron

  • Member since
    October 2009
  • From: South Carolina
Posted by jetmodeler on Wednesday, May 18, 2011 6:10 AM

Very nice. I love your work.Toast

I agree with Beltfed. Could you do a tutorial on how you do it?


  • Member since
    June 2009
Posted by Guney on Tuesday, May 17, 2011 5:14 PM

Very fine work Jose.....Smile

  • Member since
    February 2011
  • From: San Antonio
Posted by MAJ Mike on Tuesday, May 17, 2011 4:41 PM

Supurb!!!  I try to attain that look, and fail every time!! YesBig Smile


 "I'd "I'd rather be historically accurate than politically correct."

"Sic gorgiamus allos subjectatos nunc!"

  • Member since
    July 2003
  • From: On my kitchen counter top somewhere in central North Carolina.
Posted by disastermaster on Tuesday, May 17, 2011 4:16 PM


Clapping Hands  Outstanding good work Jose.

That headlight's a killer and the base color unique and convincing.

Very good job all around.

http://i20.photobucket.com/albums/b232/gluetank/Animated/th_1-Animated-Disastermaster.gif?t=1296616998

 https://i.imgur.com/LjRRaV1.png


  • Member since
    May 2008
  • From: Budd Lake, New Jersey
Posted by BeltFed on Tuesday, May 17, 2011 3:46 PM

Stunning work as always Jose!  You should really consider doing a lengthy, step-by-step article on your processes.  If youve got the time that is!

  • Member since
    August 2010
Posted by Jose_Luis_Lopez on Tuesday, May 17, 2011 3:12 PM

Hello again my friends

I particulary love one color vehicles, as there´re plenty of color posibilities to make an atractive final look. It´s my first 4OB vehicle and I must say that I love this color, it´s very easy to bend and for weathering

The dust was made using Tamiya enamel paints (general dust), oils (to add constrast to the dust) and acrylic paints (for vertical striking).

And the finished kit

Thanks for looking!

Regards


  • Member since
    October 2010
  • From: Staten Island
Posted by BigDaddyBluesman on Friday, May 13, 2011 11:58 AM

Great work and just with acrylics. I can't get it that nice with oils....LOL. It's all about technique and yours looks impeccable.

Great build.

It's really worth it to use those aftermarket parts, they really make a difference.

  • Member since
    July 2003
  • From: On my kitchen counter top somewhere in central North Carolina.
Posted by disastermaster on Thursday, May 12, 2011 8:50 PM

http://th38.photobucket.com/albums/e105/CommentCrazyGirl/Smileys%20Action/Hobbies%20Games/th_20070813-090332-57.gif

 https://i.imgur.com/LjRRaV1.png


  • Member since
    July 2004
  • From: Texas
Posted by wbill76 on Thursday, May 12, 2011 2:43 PM

Looking good so far Jose Luis, always a pleasure to see what you're going to be working on next! Beer

  • Member since
    February 2003
  • From: Rothesay, NB Canada
Posted by VanceCrozier on Thursday, May 12, 2011 7:01 AM

Great texture & rusting/weathering. You really know how to present a single-colour tank & make it all stand out!

On the bench: Airfix 1/72 Wildcat; Airfix 1/72 Vampire T11; Airfix 1/72 Fouga Magister

  • Member since
    September 2007
  • From: Truro Nova Scotia, Canada
Posted by SuppressionFire on Thursday, May 12, 2011 6:17 AM

heh Jose!

Looking good so far!

A regional style is evident in your models. A artistic touch to mono tone finishes which adds interest & depth to a otherwise drab finish. Details and surfaces standout,  drawing the viewer in for a closer look.

Tanks for posting!

Toast

http://i6.photobucket.com/albums/y211/razordws/GB%20Badges/WMIIIGBsmall.jpg


  • Member since
    August 2010
OT-76
Posted by Jose_Luis_Lopez on Thursday, May 12, 2011 4:33 AM

Hello again:

This is the model actually on my workbench, a OT-76 from Dragon with some extra stuff from Mig Productions, Tiger Models, Friul ....

The assembled kit:

Base color with some highlights

Washes and some chipping

Thanks for looking


JOIN OUR COMMUNITY!

Our community is FREE to join. To participate you must either login or register for an account.

SEARCH FORUMS
FREE NEWSLETTER
By signing up you may also receive reader surveys and occasional special offers. We do not sell, rent or trade our email lists. View our Privacy Policy.