SEARCH FINESCALE.COM

Enter keywords or a search phrase below:

Newbie's build: Jagdpanzer 38(t) 'Hetzer', Tamiya, 1/48 scale

3120 views
9 replies
1 rating 2 rating 3 rating 4 rating 5 rating
  • Member since
    January 2007
Posted by the doog on Saturday, February 4, 2012 11:16 AM

All good suggestions here; no one seems to have pointed out the most glaring (to me) improvement you could do next time---your tools, tracks and "silver" accessories that you've painted bright silver. It's far more realistic to paint metal pieces in a dark gray or rubber-brown (if you use Testors enamel) and then lightly drybrush silver on top of them.

As far as painting, I paint my wheels and tracks OFF the model, every time. If you need to stick the wheels to the body for alignment purposes, a small dab of white Elmer's glue can secure them adequately enough to line up the tracks. Sometimes, a mere sliver of masking tape on the pegs can provide enough of an "interference fit" to keep them on.

Always paint the inside of the model where you can see down into it; also, paint the backs of shields, wheels, etc. (obviously, huh? Wink)

You did a nice job on painting your camo scheme; I think you'll have a great time and yield a great result on our next tank, from what you've shown here!

  • Member since
    November 2011
  • From: Los Angeles, CA, USA
Posted by HeyJoe on Saturday, February 4, 2012 12:42 AM

Oh yes. Please call me Joe.

Interesting. I'd been discouraged from after-market parts because I wasn't entirely confident in my ability to assemble the model correctly and didn't want to waste them, but I will have to look into them now.

  • Member since
    July 2004
  • From: Texas
Posted by wbill76 on Friday, February 3, 2012 12:43 PM

Joe (I assume that's your name from your call-sign), thanks for the comments on my work and site, I've been building armor now for 11 years and much of what I learned came via forums just like this one. I do my best to pass on how I do things so that if others are interested in replicating the results, they can do the same or modify/experiment in their own work as well.

Phil and Eric (tigerman) together have answered the question in terms of using replacement workable tracks. As a rule I use replacement after-market styrene (Model Kasten) or resin workable tracks in place of one-piece vinyl or static indy link tracks. I've found that it gives me much more flexibility in terms of managing the total build and weathering effects although it does add to the cost of the build in both $ and time investment, so there's a trade-off. On that particular build, I tested whether I could still attach the tracks and road wheels with the skirts fitted and found that I could...so there was no compelling reason not to leave them off when it came time to paint the hull. I also do all my large scale paint work with an airbrush instead of hand painting and that tends to go smoother when as much of the vehicle is built as possible.

HTH! Beer  

  • Member since
    March 2003
  • From: Rain USA, Vancouver WA
Posted by tigerman on Friday, February 3, 2012 11:44 AM

I believe Bill works exclusively with Model Kasten workable or static tracks. I recall him saying he's never used Fruils before.

   http://i7.photobucket.com/albums/y269/wing_nut_5o/PANZERJAGERGB.jpg

 Eric 

  • Member since
    October 2008
  • From: England
Posted by P mitch on Friday, February 3, 2012 3:23 AM

I've not looked at that builkd for a while but you will probably find that Bill used after market tracks which are made of metal (you will see tham called Fruils, and they can be expensive but look much better). They are much easier to thread through and look much more accurate as they are made up of several pieces for each link

Phil

"If anybody ever tells you anything about an aeroplane which is so bloody complicated you can't understand it, take it from me: it's all balls." R J Mitchell


  • Member since
    November 2011
  • From: Los Angeles, CA, USA
Posted by HeyJoe on Friday, February 3, 2012 1:07 AM

Thanks for the replies and the tips everyone.  As you noticed the hull-skirts being unpainted on the inside (along with the inside of the machine gun shield) is a definite flaw. I painted those separately, but only the outside thinking when it was glued on that the inside would not be visible. WhistlingOops  The inside of the MG was left alone because it was only painted after the MG was already attached and I didn't want to try angling a paint brush in there.

Bill, this is a very impressive (and informative) site you have here! I am really in awe at all of these models you've built. Especially your Hetzer here: http://www.bpmodels.net/Model/Album/phpBB2/viewtopic.php?t=51 Surprise I can't imagine trying to thread tracks through the wheels and idler after the hull skirts are attached... Was there any special reason for attaching the skirts first?

  • Member since
    October 2008
  • From: England
Posted by P mitch on Thursday, February 2, 2012 2:30 PM

Firstly let me say nice work for a second build.

My main suggestions would be, first take your time and examine the instructions, thinking how things will fit together. Second if your looking at ways to improve your builds have a look at Bill's website above. I think many of us would be more than happy to admit being mere mortals we can all get inspiration from his work. It may take you a while to get to his level ( I know I'm not even close)but you will get to see how things fit together which will help

Good luck and have fun

Phil


"If anybody ever tells you anything about an aeroplane which is so bloody complicated you can't understand it, take it from me: it's all balls." R J Mitchell


  • Member since
    July 2004
  • From: Texas
Posted by wbill76 on Thursday, February 2, 2012 1:28 PM

Welcome to the forums and to the wonderful world of armor model building! Beer

Thanks for sharing your work and you already mentioned that you enjoyed the build and know some of the flaws and things you did wrong to take to the next build. That's the most important thing as we all learn and grow from one project to the next. The forum here is a very helpful place and the members are ready to help so feel free to ask any questions you have along the way.

Some general suggestions I can provide are to pay attention to the details and take your time, look at how other models are done and techniques used, and experiment to find what works best for you. As you mentioned, you built the full model and then painted...next time around you might find it easier to paint some things before assembly. For example you can see some bare plastic areas on the inside of the hull skirts (the side flaps you mention), the inside of the roof machine gun shield, etc.

As to your specific questions, let me answer them here but bear in mind that each vehicle is different and different builders develop different preferences based on their experiencees and methods. Smile

1) I will generally assemble the full lower hull and upper hull but leave off the road wheels and tracks as well as any items that need to be detail painted like tools or equipment until after the hull is painted. In your particular subject of the Hetzer, the side skirts might have been painted separately and installed after the wheels and tracks were done for example. Glue generally has a harder time adhering to a painted surface depending on what type of glue and paint you use. I work with enamels and generally have found that regular glue (not liquid glue) can do what I need...if not, scraping paint or using CA gel solves the issue.

2) Alignment of wheels can be tricky without gluing as you discovered. Unless the vehicle has poly caps to hold the wheels in place, you can use small amounts of poster blue-tack putty to temporarily hold things in place if you need to do a test fit but ultimately you're going to have to glue things in place for them to stay permanently in most cases.

HTH and look forward to seeing more of your work here on the forum! Beer

  • Member since
    May 2009
  • From: Hobart, Tasmania
Posted by Konigwolf13 on Thursday, February 2, 2012 3:40 AM

Ok lets get the plesentries over...

G'day and welcome ot the foums.

Ok thats enough niceness


OK just kidding, for a second build ever thats not a bad looking tank. Tamiya's 1/48 range with metal bases are not the best place to start IMO so you did well (they do feel nice in the hand weight wise). I can only spot a few issues off hand. A couple of places the paint has run where you hand painted, and there is overspray in places where maybe some masking would of been good. A few other points, the exhaust would probably be betwen a little and very rusty (depending on the look you want) due to the heating/cooling/heating etc. There is also some silvering on your decals a gloss coat helps to settle them down better and prevent this.

But for a second build I would say stick with it your gonna love it and make some great builds in the future.

Andrew

  • Member since
    November 2011
  • From: Los Angeles, CA, USA
Newbie's build: Jagdpanzer 38(t) 'Hetzer', Tamiya, 1/48 scale
Posted by HeyJoe on Thursday, February 2, 2012 2:31 AM

Hello everyone. I am a complete newbie to this hobby, I only began building models about October of last year. However, I've always had a fascination of WWII, so being able to build these replicas has been really fun for me.

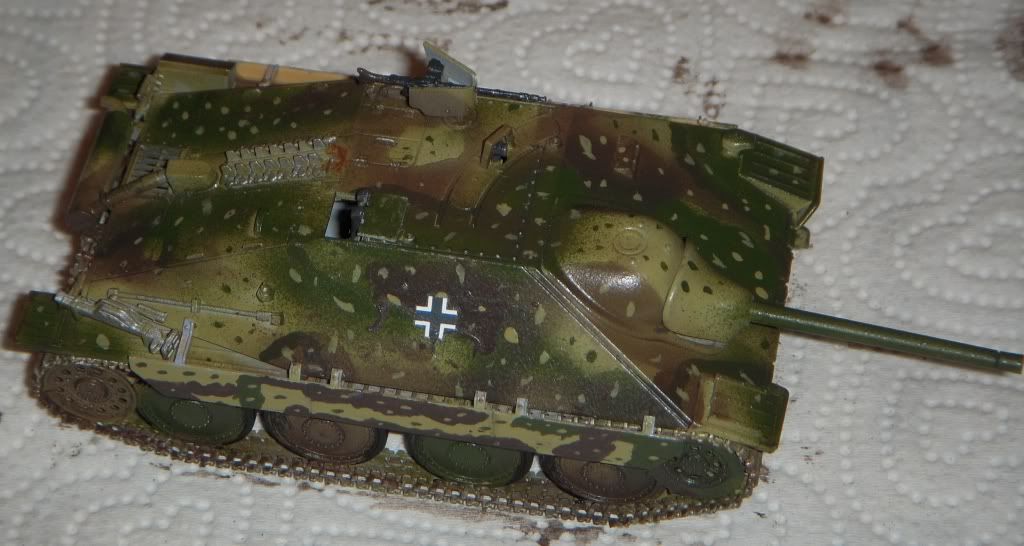
I wanted to share my first attempt at building an armor vehicle, and only my second model ever made. This is a late-war German tank-hunter vehicle: the Hetzer Jagdpanzer 38(t). The maker of the kit is Tamiya, and this is in 1/48 scale with the die-cast iron frame.  It was a pretty easy build. I had problems aligning the wheels and tracks, and had to reset the frame at one point, but that was my fault.  It was assembled completely before any painting was done, only the side-flaps and the small hatch on top were painted separately. The frame was airbrushed, but the side-flaps were hand-painted.  The 'dots' were hand-painted as well.  The decals are for a France 1944 vehicle. There is no internal part of this model and if you look too closely into the open hatch you will just see a blank hole and maybe the grey part of the iron frame.

It has many flaws to say the least. I could write a long list of what I did wrong! But I'm wondering if anyone has comments or suggestions on this? This took approximately three months to build.
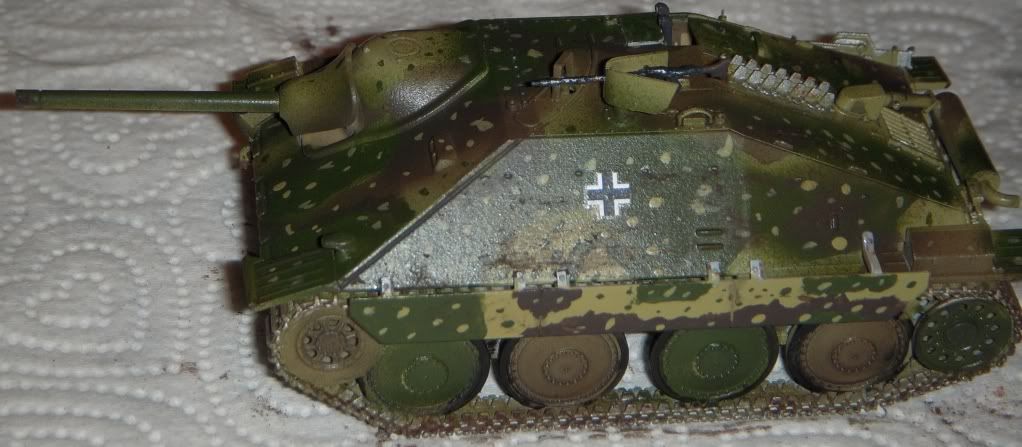
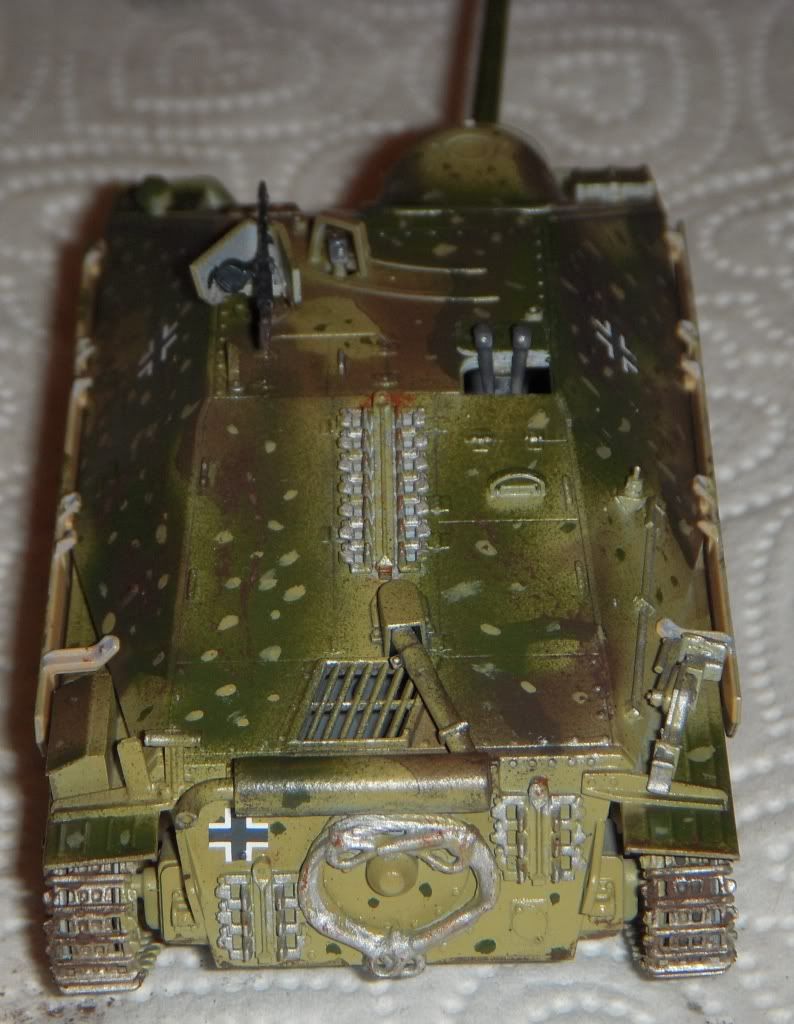
Apologies also for the very realistic Hmm backdrop of a smudged paper-towel. Appropriate diorama-placement is not something I've tried yet. (I was planning to hot glue it to a piece of cardboard and add some fake-tree/grass.)

Here also are my questions for more-experienced tank modelers:

1. Which parts do you paint before assembly? The tracks and wheels? Is there a way to solve the problem of having glue/cement not adhere to painted parts?

2. How do you know if you have aligned the wheels and track right before fitting? I know dry-fitting is everything, but I couldn't get the wheels to stay on the pegs without gluing them.

I hope to learn a lot from this community! Thanks everyone who takes a look at this.

Tags: 1/48 , wwii
JOIN OUR COMMUNITY!

Our community is FREE to join. To participate you must either login or register for an account.

SEARCH FORUMS
FREE NEWSLETTER
By signing up you may also receive reader surveys and occasional special offers. We do not sell, rent or trade our email lists. View our Privacy Policy.