SEARCH FINESCALE.COM

Enter keywords or a search phrase below:

Captured German Command vehicle - Finnished (PICS)

6491 views
27 replies
1 rating 2 rating 3 rating 4 rating 5 rating
  • Member since
    September 2005
  • From: Uppsala, Sweden
Captured German Command vehicle - Finnished (PICS)
Posted by bultenibo on Wednesday, March 14, 2012 8:38 PM

A couple of years ago I came across this color plate on the net.
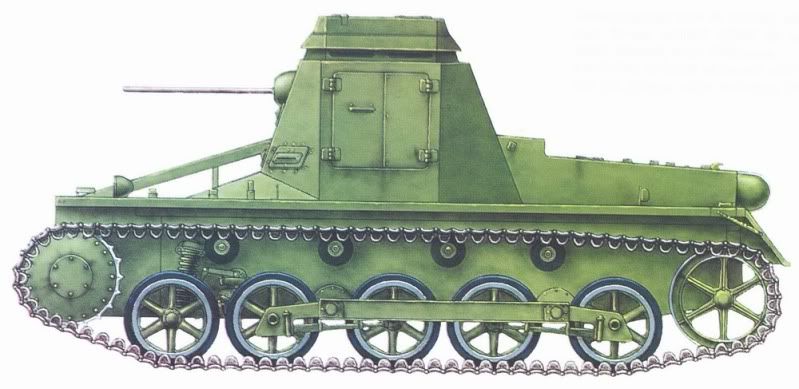
The information was sparse, and the only reference was to a Russian tank magazine from the late 90's which I unfortunately didn't managed to track down.

The information said that the color plate was depicting a German Sd.kfz 265 Panzerbefehlswagen, captured by the Soviets during the conter-offensive in december 1941, and used during the failed Soviet offensive in April 1942.

The whole thing captured my imagination, and not just because I am a great fan of this type of vehicle. I also thought that it was symptomatic for the difference between the Soviet and the German emphasis when it came to tank warfare. Hear my out on this one.

In general the German armor wasn't technichally superior to the Soviet armor at the beginning of the war. The advantage was mainly tactical, and one crucial aspect of the Blixtkrieg warfare was good communication capabilities. Hence the need for armored command vehicles. The Sd.kfz 265 was also designed solely for this purpose. It was poorly armored and only equipped with a single MG 34. Instead it housed additional radio equpiment that made it possible to function as a command vehicle in the panzer divisions: one vehicle on the company level and two on the battalion level. What I find interesting is the importance of these vehicles in the early part of the war. During the sucessful German campaings in Poland, the Western countries, Balkan and in the early stages of Barbarossa the bulk of the tactical decisions were taken inside these vehicle.To put it short - it was the Germans brains on wheels.

Now, the Soviet armored doctrine was the opposite: it relied heavily on strenght, in number and in fire power. The tactical skills and the cooperation between arms were not that impressive, especially not in the beginning of the war. The communication infrastructure, pretty much on every level, was rudimentary, to say the least. Coordination of the amored forces on a tactical level still relied to a certain degree on the use of signal flags!

Well back to the picture. I think that the captured vehicle in a interesting way represents the meeting of these two different approaches to tank warfare. What the Soviets apparently did when the had captured this German command vehicle was to follow their first impulse - Let's tear out the radio and mount some serious gun on it instead! They turned the vehicle into brawns on wheels.

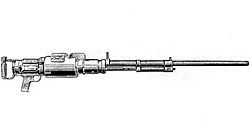
The gun they added was a Shvak  20mm autocannon, which from the beginning was thought to be used in aircrafts, but where later a tank vesion was developed, that was mainly used in the T-60 tank. Despite the relatively small caliber - but thanks to the high rate of fire - it was acatually a real  threat to the German tanks on the battlefield. There are examples of T-60's that penetrated the armor of Pz III's with this gun and even managed to do some serious damage to Pz IV's!
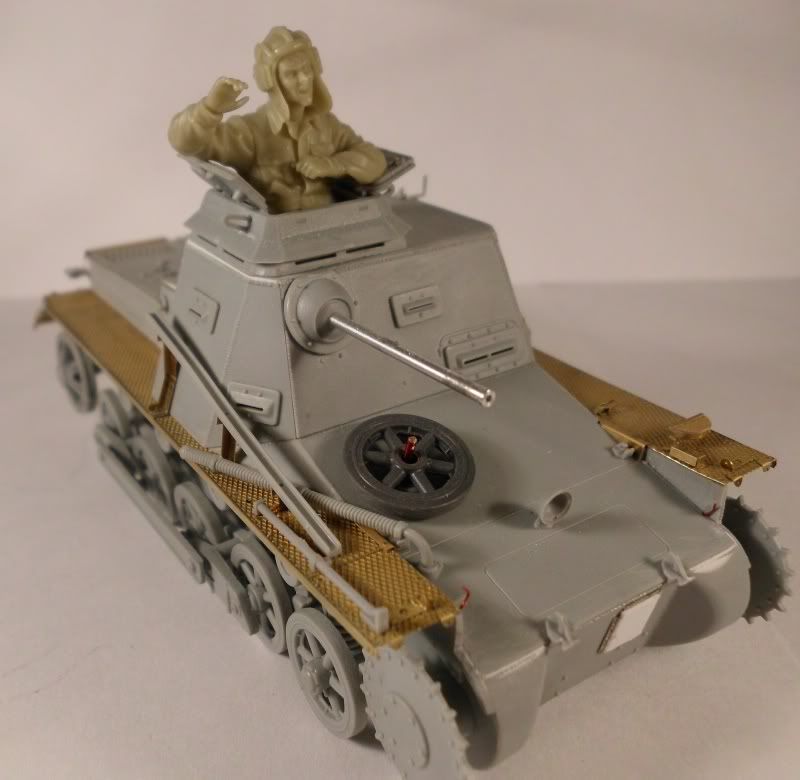
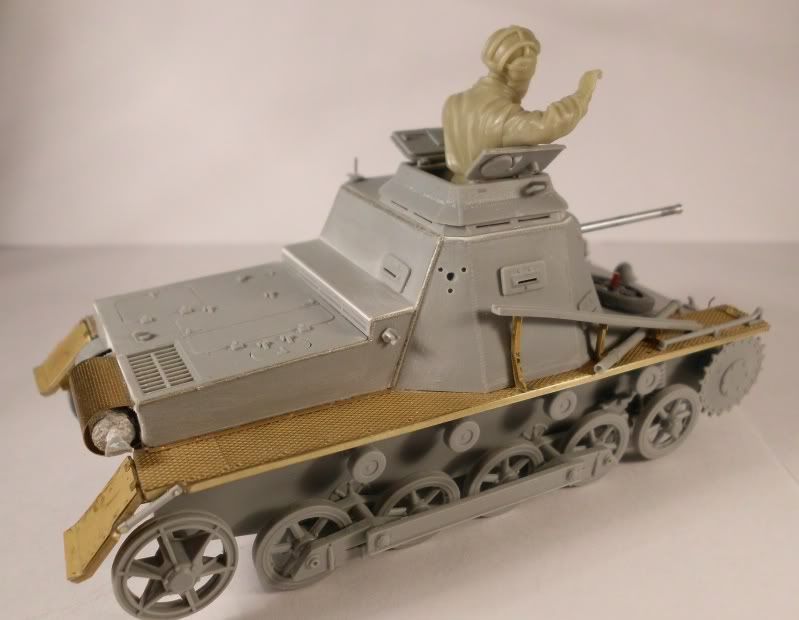
Well, this is the reason why I  have planned to build this little monster for a long time, and since I already have finnished the building part, I thought that I atleast could post a PIP-tread (Painting in progress).

A little about the build so far:

The kit is from DML -  "Kleine panzerbefehlswagen Sd.kfz 265 "(No 6218). It's a great little kit - pure joy to build.

To that I added some PE from a Voyager set and an aluminium barrel from Barrel depot.

The figure is from an  old Verlinden Soviet tanker set.

These are a couple of small modifications and addition that I've made:

1. Some of the moulded weld seems were replaced with PE ones.

2. Pretty much all of the equpiment and tools that comes with the original kit was left out, in an attempt to signal the improvisational aspect of the captured tank concept.

3. On the bow I added a welded armored plate to cover up the entry point where supposedly the tank was hit in the first place.

4. The antenna and even the antenna mount was removed, but I left the antenna cradle still in place.

5. An extra road wheel was added to the front, placed over a welded rod. The wheel will be painted in Panzer grey (together with the inside of the commanders hatch), again underlining the improvisation aspect.

6. The side headlights were removed, and only the electrical wiring is left sticking out of the front glacis.

7. The front of the mudgaurds were removed. From the pics I've seen these parts seems to have been pretty exposed, often damaged and finally removed.

Here's how it looks right now:
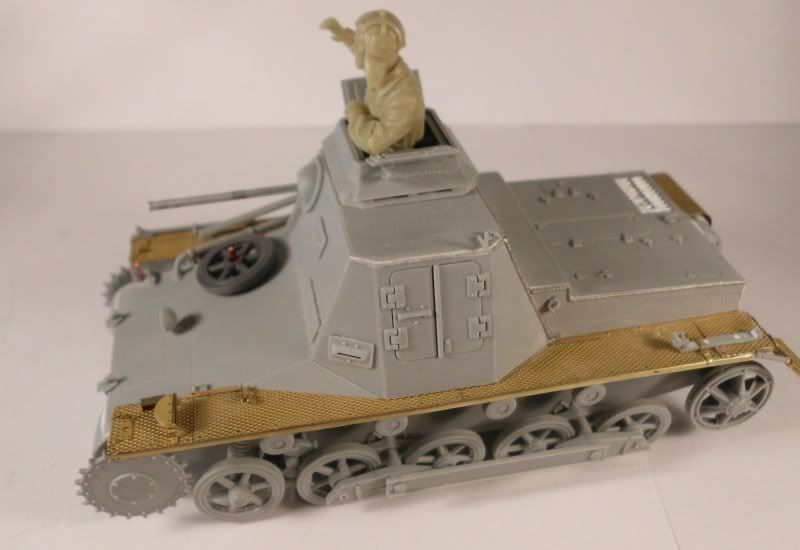
Tomorrow, I'll start the painting.

All kinds of comments and suggestians are naturally very wellcome!

/Bultenibo aka Tony


  • Member since
    July 2003
  • From: On my kitchen counter top somewhere in central North Carolina.
Posted by disastermaster on Wednesday, March 14, 2012 10:52 PM

Tony,

 http://photos-e.ak.fbcdn.net/hphotos-ak-ash1/19144_108071619206110_100000098187015_204586_2845383_s.jpg

You're just a machine man.


 https://i.imgur.com/LjRRaV1.png


  • Member since
    September 2005
  • From: Uppsala, Sweden
Posted by bultenibo on Thursday, March 15, 2012 7:13 PM

disastermaster

Tony,

 http://photos-e.ak.fbcdn.net/hphotos-ak-ash1/19144_108071619206110_100000098187015_204586_2845383_s.jpg

You're just a machine man.


LOL! Big Smile

Yeah, you're right, I actually feel like one right now! Gotta slow down...


/Tony

  • Member since
    November 2004
  • From: Cat Central, NC
Posted by Bronto on Thursday, March 15, 2012 7:39 PM

Is there any factual evidence of this modification?  or is it only the color plate and story?

  • Member since
    September 2005
  • From: Uppsala, Sweden
Posted by bultenibo on Thursday, March 15, 2012 7:57 PM

Bronto

Is there any factual evidence of this modification?  or is it only the color plate and story?

The color plate comes from the site armchairgeneral, with the information:

"A Kl PzBfwg command vehicle with soviet 20 mm ShVAK tank gun. Moscow, MZOK VIM factory, March 1942."

The litterature reference is to:

M. Kolomiets, I. Moshchanskiy, "Trofei v Krasnoy Armii", Frontovaya Illustratsiya/Frontline Illustration, 1/2000, Ed. 2, Moscow, 2001

This is the publication that I havn't managed to find. Otherwise I would have let a Russian friend translate it for more info.

According to a summary of the book it is built on archive reseach, so I would guess that the color plate isn't  just a fantasy creation.

"Summary: Captured Materials in the Red Army, Frontline Illustration, 1/2000

The book is dedicated to various captured materiel operated by the Red Army during World War Two. In fact, for the duration of hostilities, the Red Army's armoured and automobile units operated German and sometimes Italian, Japanese, Hungarian and Romanian-made armoured and utility vehicles. The monograph is illustrated with 120 pictures and factual texts obtained through archive research."

But no, if you by factual evidence mean a photo, then I don't have any. Sad

/Bultenibo aka Tony

  • Member since
    November 2004
  • From: Cat Central, NC
Posted by Bronto on Thursday, March 15, 2012 8:32 PM

Thanks, I'll ask around and see if I can track down a copy of that.  I am hesitant to trust anything on the armchair general site - it is full of mis-informations.

  • Member since
    September 2005
  • From: Uppsala, Sweden
Posted by bultenibo on Friday, March 16, 2012 10:20 AM

Bronto: It would be great if you found some more info. Big Smile I'll see if I can't find that publication, so I can check out the source.

I'm a bit surprised that you don't find armchairgeneral reliable. How come? My impression is the opposite: that it is a serious attempt to gather information on the armored vehicles of the Red army during WW2, and also - which is not that common - to give an account of the sources of the information presented. When it comes to the captured tanks site  the colorplates presented is often backed up by photographic evidence (which of cause is not the only valid form of evidence for the existence of a specific vehicle), but a good one.    

/Bultenibo aka Tony

  • Member since
    November 2004
  • From: Cat Central, NC
Posted by Bronto on Friday, March 16, 2012 8:39 PM

It has some good information there, but it also at times relies on old, out-dated sources for some things.

  • Member since
    July 2004
  • From: Texas
Posted by wbill76 on Saturday, March 17, 2012 11:49 AM

Such a field modification wouldn't surprise me...given some of the other experiments that the Russians carried out with captured German gear, this one doesn't seem that far out there. Regardless of whether it was a one-off or even just a fantasy, you've done a good job with recreating it Tony with the resources you've got. Look forward to seeing it with paint on. Beer

  • Member since
    September 2005
  • From: Uppsala, Sweden
Posted by bultenibo on Saturday, March 17, 2012 12:54 PM

At last, I found some more info on a Russian site 

http://vetrabotnik.narod.ru/Texts/TWW/USSR/Panzer/T008.htm

It confirmes the existance of the modified Sd.Kfz 265, and also elaborates on the circumstances. Big Smile

The place were the modification was made was at the MZOK VIM (trans. "The all-union institute for the mechanization of agriculture")  factory in Moscow. This is the translation of the original text, which is built on archive sources and also a memoires of two workers by the name of  S.A.Svirina and K.V.Murashknna:

(The translation is made with the help of Google Translate so it's not wholly correct.)

Normal 0 21 false false false MicrosoftInternetExplorer4 "In February 1942, three commander  tank on the chassis Kl.Pz.Bfwq Pz.Kpfw.l Ausf.B arrived at VIM (in documents referred to as 'the German radiotank without machine-gun turret '). Initially, the repair of the tanks was not interesting because the tanks did not have guns and the radio equipment was malfunctioning. At the same time the Red Army needed a well-armed machine, so the factory announced a competition to equip them with artillery armament. There were not much choice, because VIM had only 40 20-mm cannons and air TNSh motor ShVAK guns and five 45-mm tank cannon model 1938. The winner of the competition became I.Belikov (other sources Belyakov). He suggested removing all of the electronics, but instead of guns to install a 20-mm cannon SHVLK. The first tank was converted in early March 1942. In its frontal armor increased cut through the embrasure in which the eight bolts inserted molded mask gun. The mask was Bob "pear shaped" with a gun equipped with a trigger handle and shoulder rest. After the test gun armament installation added a screw stopper, and in this way two cars sent to the front. Their further fate is unknown."

Even more interesting is that the information corroborates the existence of this modified vehicle, which also can be found on armchirgeneral:

"But by October 1, 1942, due to the special needs of the front for the tanks, the plant is repaired 11 extra tanks, "Reno" and "Hotchkiss". According to the memoirs of S.A.Svirina K.V.Murashknna in some of these tanks were domestic automobile engines, DT machine guns and 20mm cannon TNSh."


Nice! Big Smile

/Bultenibo

  • Member since
    September 2005
  • From: Uppsala, Sweden
Posted by bultenibo on Saturday, March 17, 2012 2:09 PM

Here's a update on the paint job.

For the base paint I chose Tamiya Olive Drab spray paint, since I wanted a relatively light green color on the vehicle.

After that I drybrushed the panels with some Vallejos "Russian uniform green" and some Vallejos "Khaki".

The decal was added.

The other parts - the German gray inside of the hatchet and the spare wheel, the rubber rims on the road wheels - were painted seperately.

Lastly the whole thing was sprayed with Humbrol Matt Varnish. This is the last coat of varnish applied, since the wheathering will begin.

/Bultenibo aka Tony


  • Member since
    September 2005
  • From: Uppsala, Sweden
Posted by bultenibo on Sunday, March 18, 2012 7:05 PM

Here's a short update.

I thought I should try something I haven't tried before.

I took four photos from the same angle at four different phases of the weathering process so one actually can see the difference.

1. After the base paint, some drybrushing and a coat of varnish:


2. After a thin general wash with Van Dyck Brown oils and after the dot filteringen (using white, green, yellow and light ochra):


3. After the second general wash with Van Dyck Brown:


4. After a pin wash ( with Van Dyck Brown and black oils ) and some chipping, using the sponge method:


Now it's time for some metalizing and adding some strategic placed rust!

I've tried to hold back a bit on the weathering, since the vehicle is supposed to have been repainted recently, but I don't know if managed to do that.


/Tony


  • Member since
    March 2006
  • From: Right Side of a Left State
Posted by Shellback on Sunday, March 18, 2012 8:14 PM

Your weathering looks good to me , not overdone when concidering it has been recently repainted .Yes

  • Member since
    July 2006
  • From: San Francisco Bay Area
Posted by bufflehead on Sunday, March 18, 2012 9:50 PM

Tony, this is a wonderful WIP you've got going!  I like how you introduced the modified vehicle, its background, and why you chose to build this rare vehicle.  I agree that its very interesting to see the two military concepts between these two warring nations and how vehicles from one side are converted for a different use on the other!  Great work!

The build itself is looking fantastic!  I especially like how you depicted the stages of weathering with the same agle shots....very cool!   I was a little taken aback at first of  your choice of OD for the basecolor, but the washes and filters (oil dot) have totally changed it to a very "Russian" green!! 

Question:  Which BD barrel did you use for the main gun?

Ernest

Last Armor Build - 1/35 Dragon M-26A1, 1/35 Emhar Mk.IV Female


Last Aircraft Builds - Hobby Boss 1/72 F4F Wildcat & FW-190A8


  • Member since
    September 2005
  • From: Uppsala, Sweden
Posted by bultenibo on Monday, March 19, 2012 6:50 AM

Bufflehead: Thank for the comments !Smile

A also thought that OD would be the wrong Russian green, but then I remembered that it used to turn much darker when the Van Dyk Brown wash and the varnish coat is applied so thought I would give it a try, and it seem to work.

I've tried to find out what barrel I used, but I couldn't find it at Barrel Depot. I bought it 5 or 6 years ago, so I thought they stopped producing it. Then I found another barrel in my stash, and it's NOT from BD, it's from the czech company Elefant Model Accessories:  "20 mm gun for T-60 Zvezda" (No 35.337).

It seems hard to come by these days, but I found one on a Brittish Netshop:

http://www.armour-models.co.uk/model_kit_elephant.html


/Tony


  • Member since
    January 2007
Posted by the doog on Monday, March 19, 2012 9:08 AM

Tony,

This looks great--nice job on the weathering. And don't worry about "over-weathering" it--a brand new tank could go out the factory door, into the field and hit a huge mud puddle and it's "over-weathered". Wink

A nice little WIP you've got going here. Smile

  • Member since
    July 2003
  • From: On my kitchen counter top somewhere in central North Carolina.
Posted by disastermaster on Tuesday, March 20, 2012 12:07 AM

   doog has a good point......nice going Tony...... looking good to me.

  http://i717.photobucket.com/albums/ww173/prestonjjrtr/Smileys/SmileyAboutTime.gif

       I say a built model is just a moment in time.

 https://i.imgur.com/LjRRaV1.png


  • Member since
    September 2005
  • From: Uppsala, Sweden
Posted by bultenibo on Monday, March 26, 2012 7:02 AM

Doog and Disastermaster: Thanks for the input!

I'll go for the really dirty look - "long way to front + lots of puddles + lousy car wash service on the way"! Stick out tongue

I think I should keep the wear and tear on the upper hull to a minimum though.

Normally I use quite light-colored dirt pigments in the weathering process - often MIG's "Mud" and "European dust", but hist time I think I'll go for something more in line with the Russian dark  or dark-reddish soil. That will be a first.


/Bultenibo aka Tony


  • Member since
    September 2005
  • From: Uppsala, Sweden
Posted by bultenibo on Monday, April 2, 2012 11:51 AM

Hello again!

I've been a bit lazy when it comes to update this thread, but finally, here's the finnished build!

All comments are welcome!


/Tony aka Bultenibo


  • Member since
    April 2008
  • From: Kristiansund, Norway
Posted by Huxy on Monday, April 2, 2012 6:19 PM

That's pretty darn cool. Love the flag and the skin!

"Every War Starts And Ends With An Invasion".

  • Member since
    October 2009
Posted by PANZERWAFFE on Monday, April 2, 2012 7:03 PM

Thats a sweet looking build!!  Like the idea of changing gun and country, NICE!!  Great paint job and love that figure.

Rob

  • Member since
    November 2009
  • From: SW Virginia
Posted by Gamera on Monday, April 2, 2012 7:14 PM

Tony:

Great job there! Very nice work on a really interesting vehicle. I hadn't even heard of this modification till I read this thread. 

Kudos sir!

Cliff


"I dream in fire but work in clay." -Arthur Machen


  • Member since
    July 2004
  • From: Texas
Posted by wbill76 on Monday, April 2, 2012 7:22 PM

Love the finish you achieved on this one and the action pose/flag with the figure is a nice touch. Really shows how tiny these vehicles were! Yes

  • Member since
    April 2011
  • From: imperial beach, ca
Posted by malone duke on Monday, April 2, 2012 9:58 PM

wow man, very nice work.  im very much inspired to do something russian now.

  • Member since
    March 2006
  • From: Right Side of a Left State
Posted by Shellback on Monday, April 2, 2012 10:04 PM

Good looking weathering and the thing that catches my eye is the happy looking t.c. ..............Yes

  • Member since
    September 2005
  • From: Uppsala, Sweden
Posted by bultenibo on Friday, April 6, 2012 5:57 PM

Hi guys!

Thanks for the comments! Big Smile

I added the signal flag in the last minute, after the whole thing was finnished, since I first then thought that the crew should have some means of communication after they thrown out all the radio equipment.

The tank commander is from Verlinden. I found it by accident when I went through my stash and thought it would do pretty well. He got the face of TC that is quite happy with his new up-armored vehicle! It struck me that there are not so many Verlinden figures that keep up with the otherwise high standard of figures today. Especially their faces look unnatural and kind of strange. Some twenty years ago I thought otherwise -  the Verlinden figures were top-notch. Funny how things have changed (to the better).

/Tony aka Bultenibo

  • Member since
    May 2005
  • From: Dublin Rep Of Ireland
Posted by terry35 on Friday, April 6, 2012 6:05 PM

Really original, excellent work, well done.

Terry.

  • Member since
    March 2003
  • From: Western North Carolina
Posted by Tojo72 on Friday, April 6, 2012 7:09 PM

Nce build and techniques,something different,real nice.

JOIN OUR COMMUNITY!

Our community is FREE to join. To participate you must either login or register for an account.

SEARCH FORUMS
FREE NEWSLETTER
By signing up you may also receive reader surveys and occasional special offers. We do not sell, rent or trade our email lists. View our Privacy Policy.