SEARCH FINESCALE.COM

Enter keywords or a search phrase below:

DML Sdkfz 251/22 Ausf D COMPLETE! 10-14-12

34388 views
190 replies
1 rating 2 rating 3 rating 4 rating 5 rating
  • Member since
    July 2004
  • From: Texas
DML Sdkfz 251/22 Ausf D COMPLETE! 10-14-12
Posted by wbill76 on Sunday, August 5, 2012 5:18 PM


Unlike most DML kits, the instructions for this particular kit do not begin in the usual place with the road wheels. Step 1 deals with a bunch of internal detail consisting of the transmission, the fuel tank, and other mechanical elements but all of them get hidden away by the floor panel so I skipped it and consigned the parts to the spares bin. The step does include a small sub-assembly of the shock absorbers for the final suspension arm and calls for their install in Step 1 but it's easily moved to Step 2 without any issue.

Steps 2-4 deal with the lower hull suspension and the running gear elements and that's where the focus of this round of effort went. Based on past build experience of DML 251 kits, I know it's critical to get the suspension arms set at the correct height. To that end, I skipped around in the three steps and didn't follow the exact order as a result. First up was the removal of the road wheels and assembly of the mid wheel pairs while leaving the inner/outer pairs unassembled. The drive sprockets were assembled along with the front steering wheels. All the wheels received some light sanding to remove mold seams and the front steering wheels were sanded a bit heavier to simulate some road wear.

Next I installed the sprocket mounts, idler mounts, and all of the suspension arms and bump stops. The suspension arms have a little bit of wiggle to them so it's very important that they get lined up properly both vertically and horizontally so that the road wheels will sit level. Eye ball estimates are fine at this point so long as you have enough time to continue through the full step 3 installation of the front suspension as it will help ensure a level stance for the hull as well.

Speaking of which, the front wheel suspension assembly in Step 3 has an added bonus to it if you're careful with the glue and don't glue all the parts. The bonus is that the front wheels will remain steerable as well as flexible on the spring mounts laterally which helps in keeping the hull stance level as well. The trick is to not glue parts C30 and C35 (the wheel mount hubs) but instead trap them between parts C20 and C25. The second trick requires not gluing the rocker arm, C15, to C30/C35 either but use its natural snap fit to keep it in place and movable. The third and final trick is to not glue C10 to the C20/C25 assembly but instead use its join with C11 to trap the assembly and remain able to "rock" laterally.

Final trick (none of which the instructions indicate is possible by the way!) is to install the suspension into the lower hull and not apply any glue to the Y-yoke C8 at its base where it slips under the armored cover and only apply glue at the front where it attaches to the C20/C25 assembly. The end result is a fully workable and steerable front suspension.

Of course the main goal of this exercise is to end up with a suspension and running gear that sits level and does what is needed when the tracks are installed. I used poster blue tack putty to test fit the wheels and it's normal for the rear hull to have a slight angle to it as the tracks will "lift" it up and bring it level with the front when they are installed.

Next up will begin work on the compartment details. This one's off and rolling!

  • Member since
    January 2009
Posted by 4x4maniac on Sunday, August 5, 2012 7:17 PM

Nice ! I was debating doing either the Sdkfz 251/21 Drilling or the Nashorn mid -  Have great dio concepts for both but the 'Horn won ! I'll be following this build closely as I do all of your builds .

  • Member since
    January 2009
Posted by 4x4maniac on Sunday, August 5, 2012 7:24 PM

Love these '251 derivatives - 22 total .... a guy could almost specialise , huh ?

Bernard

  • Member since
    July 2006
  • From: New Jersey
Posted by redleg12 on Sunday, August 5, 2012 7:51 PM

Ahhhh.....nothing like breaking the fresh shrink wrap and setting up for a new build....It reminds me of putting on a nice fresh starched uniform....The sense of a great new beginning!

Rounds Complete!!

"The Moral High Ground....A Great Place to Emplace Artillery."

  • Member since
    July 2004
  • From: Texas
Posted by wbill76 on Sunday, August 5, 2012 8:11 PM

4x4,

yep and DML has provided kits of almost all the major variants...but many of them are harder to find now. HTs can take on a life of their own if you let them! Big Smile

Mike,

always the favorite part of the build...opening up the box! Always comes right after cleaning up the bench from the last project and is the sign of fresh adventures to come. Beer
  • Member since
    August 2005
  • From: Los Angeles, CA
Posted by corvettemike on Monday, August 6, 2012 5:51 AM

I'll be watching this topic DML 1/2 tracks are always fun to watch!

Rise my brothers we are blessed by steel in my sword I trust...

Arm yourselves the truth shall be revealed In my sword I trust...

Havoc Models

  • Member since
    December 2004
  • From: ohio
Posted by vonryan on Monday, August 6, 2012 5:55 AM

man Bill i've been wanting this kit for sometime now. WILL keep an eye on this build GREAT START.

Clay

  • Member since
    July 2004
  • From: Texas
Posted by wbill76 on Monday, August 6, 2012 12:52 PM

Thanks corvettemike!

Clay,

glad to have you along as well. Beer

  • Member since
    September 2005
  • From: beacon falls , Ct.
Posted by treadwell on Monday, August 6, 2012 1:31 PM

Off to another great start, Bill Big Smile   It's good to have the pose-able front wheels !Yeah

I'll just have a seat, you may proceed ! LOL

treadCool


  • Member since
    March 2011
  • From: Ottawa,Ontario,Canada
Posted by modeler#1 on Monday, August 6, 2012 1:58 PM

looks like a great kit so far.

On the Bench: Nothing atm

  • Member since
    November 2004
  • From: Essex England
Posted by spacepacker on Monday, August 6, 2012 2:01 PM

That's a big gun for a small vehicle. I might get this kit so I will be following your post...cheers....Kenny

  • Member since
    July 2004
  • From: Texas
Posted by wbill76 on Tuesday, August 7, 2012 12:42 PM

Thanks tread and modeler#1!

Kenny

can't argue with you there...like many hybrid designs the Germans employed this one overloaded the chassis but the need for SP AT capability was stronger! Glad to have you along for the ride. Beer
  • Member since
    November 2005
Posted by Anonymous on Tuesday, August 7, 2012 1:09 PM

Very cool...what scheme...???

  • Member since
    June 2009
Posted by Guney on Tuesday, August 7, 2012 4:50 PM

Good luck Bill.....:)

  • Member since
    March 2006
  • From: Right Side of a Left State
Posted by Shellback on Tuesday, August 7, 2012 6:45 PM

Another one already Bill ? Nice one .Yes

  • Member since
    April 2005
  • From: Piscataway, NJ!
Posted by wing_nut on Tuesday, August 7, 2012 7:37 PM

Your typical good start.  Regarding the way you put in the front suspension.  You mention that it will be "steerable" but will it also drop down for when you add the tracks?  When I did my 251 a ways back  I was told to get the road wheels on and set it on lengths of track.  If your trick works I will tuck this one away for the future.  You never know when you're just gonna have to build a 251Whistling

Marc  

  • Member since
    July 2004
  • From: Texas
Posted by wbill76 on Tuesday, August 7, 2012 7:51 PM

Manny

I'm leaning towards a hard-edged three tone scheme but haven't committed to it just yet...will decide when I get closer to the paint stages.

Thanks Guney!

Carl

I'm a one-build-at-a-time kind of guy so as soon as one project finishes the next one takes its place. Wink

Marc

The answer to your question is the reverse actually. Right now the lower end of the hull sits lower (at an angle) from the front wheels so when the tracks are added, the rear hull will lift and sit level with the front steering wheels so that they don't "float".  The approach of building some tracks and using that to level set the tracked road wheels does the same thing. there's added "height" from the track pads that will bring everything level when the time comes. The key is that the front wheel suspension becomes the pivot point around which the hull and everything else balances against, so as long as that remains true, the front road wheels won't get lifted off the ground and "float". I tested it with a pair of track links on both sides as an extra precaution to be sure the suspension arms sat in the correct position. HTH!

  • Member since
    December 2002
  • From: Bury St Edmunds, Suffolk, England
Posted by Bish on Thursday, August 9, 2012 2:23 PM

damn, you manged to sneak this one in without me seeing. And you know how much i love a 251.

I am a Norfolk man and i glory in being so


On the bench: Airfix 1/72nd Harrier GR.3/Fujimi 1/72nd Ju 87D-3

  • Member since
    December 2002
  • From: Bury St Edmunds, Suffolk, England
Posted by Bish on Thursday, August 9, 2012 2:25 PM

4x4maniac

Love these '251 derivatives - 22 total .... a guy could almost specialise , huh ?

Bernard


When you count the models as well as the variants, its something like 63. So a lot of options.

I am a Norfolk man and i glory in being so


On the bench: Airfix 1/72nd Harrier GR.3/Fujimi 1/72nd Ju 87D-3

  • Member since
    July 2004
  • From: Texas
Posted by wbill76 on Thursday, August 9, 2012 8:46 PM

Thanks bish, 251s are the workhorses so they need their share of attention! Wink

  • Member since
    March 2003
  • From: El Dorado Hills, CA
Posted by IBuild148 on Thursday, August 9, 2012 10:56 PM

I'm on board Bill for the ride! Always great to learn from your WIP's.

IBuildOne48

Teach modeling to youth!

Scalefinishes.com

http://i712.photobucket.com/albums/ww122/randysmodels/NMF%20Group%20build%20II/Group%20Badge/NMFIIGBbadgesmall.jpg


  • Member since
    July 2004
  • From: Texas
Posted by wbill76 on Friday, August 10, 2012 7:47 PM

Thanks IB, glad to have you along!

  • Member since
    May 2005
  • From: Dublin Rep Of Ireland
Posted by terry35 on Saturday, August 11, 2012 7:17 PM

Great subject Bill, I'm sure you know of the many different finishes that can be applied here, I'm not 100% on the exact configuration but I know that as you have stated in this thread yourself these vehicles were adapted to fill a lacking in A/t mobility, some were factory built but a kit was also issued where either a new gun or a gun in service could be used and mounted. I think that kit vehicles had the radio operators visor blocked over as this position was deemed redundant because of the difficulty of accessing the space. The mount is also so close to the one on the 234/4.

I think what I'm hinting at is that you have many choices for your finish with out having to perform any major surgery on the kit.

Best of luck to you on your new project and I hope to hop in more often to track your progress.

Regards.

Terry.

  • Member since
    July 2004
  • From: Texas
Posted by wbill76 on Saturday, August 11, 2012 7:42 PM

Hey Terry! Nice to see you drop by, hope things are well with you!

You're 100% correct. Some of the /22s were factory built and others were /9s that were converted using field kits and existing Pak 40s to convert them over. Kit vehicles and factory vehicles both had the radio operator's position eliminated because of the way the ammo was stored. I've been busy on this one today and will have an update posted tomorrow so if you pop back in about this same time tomorrow you can catch an update. Wink

  • Member since
    July 2004
  • From: Texas
Posted by wbill76 on Sunday, August 12, 2012 4:32 PM

Lots of progress to report as the build continues. Step 5 begins work on the interior of the fighting compartment and deals mostly with the floor and driver's area. The /22 did away with the radio operator's position because of space/access constraints due to the Pak 40 ammo bins so I removed the "hump" that is the seat mount on that side. It's molded hollow so some Lion Roar scale tread plate was used to patch the hole along with some thin sheet styrene for the side of the raised central part. The driver's seat is dry-fit only and I also installed the later type wooden crew seat for the left side. The instructions don't indicate it but two holes need to be opened up in the floor for the seat bottom to mount in the correct spot.

Step 6 assembles the driver's instrument panel. I added all the various parts called for but left off the steering wheel and gas mask container so they could be detailed separately. After painting, the dash will get the instrument face decals provided by the kit.

Step 7 is a simple step, it adds the driver's instrument panel to the floor and then adds the floor to the vehicle's lower hull completed earlier. I held off doing that just yet because the floor and side hull panels need to line up properly with each other and it's easier to achieve that by installing the three of them together vs. separately.

Speaking of the lower sides, those came next in Step 8. There are a lot of molded-on locater marks that aren't needed for this variant, so those were removed with a micro chisel and sanded smooth. Ejector marks were filled with Squadron White putty and sanded down. I also added the large ammo bin and the seat back as well as the gunner's wooden jump seat.

The instructions are wrong in the placement of the side ammo bin as they point to one of the molded on marks as the correct position when  the right locater marks are provided on the upper hull top...so some care is needed for the bin to end up in the right spot as both the height of the box and the position along the side matter when it comes time to add in the Pak 40 mount base in Step 15. The placement of the wooden jump seat is also critical on the other side for the same reason...so I used the blue-prints in Panzer Tracts 15-3 to help ensure I got it in the right spot and height as well.

Step 9 calls for the lower hull sides to be installed but I wanted to do that along with the rear hull plate and doors so I assembled them first as called for in Step 10. The doors were left in the closed position and putty used to fill the unused 2nd fire extinguisher slot.

Over in Step 12 the front portion of the Pak 40 mount makes an appearance but I went ahead and installed it, the floor, and the lower hull sides together in a single step to make sure everything was going to play nice and line up correctly.

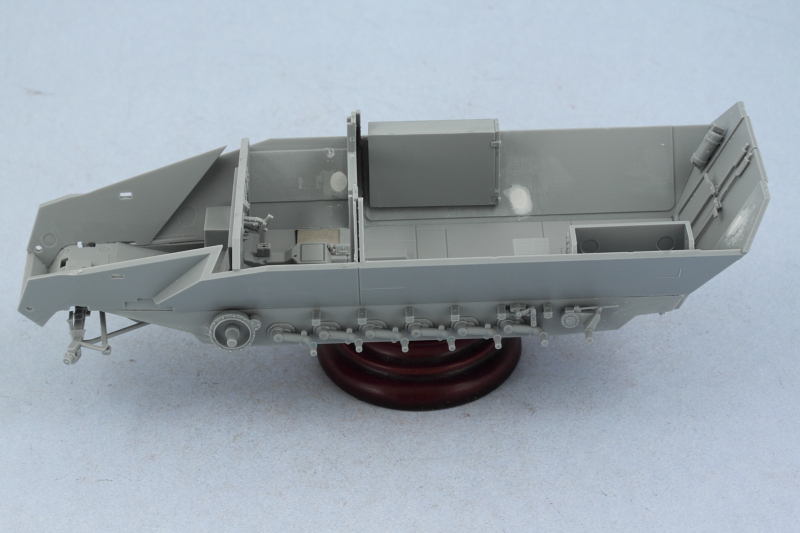
Speaking of playing nice, I also decided to check the fit and alignment of the platform mount for the Pak 40. This is assembled out of multiple parts in Step 15 so that was taken care of and the mount tested along with the front bulkhead to make sure everything would fit correctly. As you can see, the fit/alignment with the other lower hull elements is tight so everything needs to be in just the right spot. I also added the smaller 5-round ammo box once the mount was glued in place so it could go in the right spot. The instructions are somewhat vague on its placement but the PT photos include a nice shot of the interior of a /22 showing how it should go. That photo also showed that DML got the placement of the hinges backward on the bin's lid so I made sure to mount it with the hinges oriented correctly.

I returned to Step 10 to assemble the front plate for the driver's visors. The kit provides the external visors as the earlier style with the ridged outer surface but the final version of the 251s had simplified these to be flat plates. That meant some careful trimming and sanding to flatten the plates down and the radio operator's plate was just a simple blank plate, so it received some putty attention to fill the back side mount point for the vision block and on the front side to fill the vision slit.

Last but not least, Step 11 deals with the upper hull and I went with the late version options featuring the single piece engine access hatch and side opening radiator access hatch. The front plate was added in and the edges blended in using a combination of liquid glue and light sanding. The top plate over the driver's area was also added but I left off the nose plate until the upper and lower hulls are joined together. Finally, I filled and sanded smooth the small mount marks for the crew jump-rail that were fitted on standard 251s but not a feature on this variant.

Next up will be assembling the Pak 40, a kit in itself!

  • Member since
    December 2002
  • From: Bury St Edmunds, Suffolk, England
Posted by Bish on Sunday, August 12, 2012 5:34 PM

Looking great as always bill.Got to love PT, i have become rather addicted to them. Their 251 series is excellent.

Terry, i know i ask this every time i see you one here. But how is the UHU coming along.

I am a Norfolk man and i glory in being so


On the bench: Airfix 1/72nd Harrier GR.3/Fujimi 1/72nd Ju 87D-3

  • Member since
    September 2005
  • From: beacon falls , Ct.
Posted by treadwell on Sunday, August 12, 2012 7:07 PM

Smile Hi Bill

Nice big update as promised!... What could be better than reading a great technician's build log while watching a recap of the fantastic 2012 world Olympics ?  ... Looks like a lot of little, but important things to be aware of with this kit, but you are always thinking many steps ahead.

treadCool


  • Member since
    July 2006
  • From: New Jersey
Posted by redleg12 on Sunday, August 12, 2012 7:56 PM

Wow....big week...looks like great progress, looks like the putty monster was needed. The dashboard looks like it could use some detail help.

Rounds Complete!!

"The Moral High Ground....A Great Place to Emplace Artillery."

  • Member since
    August 2005
  • From: Los Angeles, CA
Posted by corvettemike on Sunday, August 12, 2012 9:31 PM

Coming along nicely Bill, looks like your moving flying along with the progress on this one!

Rise my brothers we are blessed by steel in my sword I trust...

Arm yourselves the truth shall be revealed In my sword I trust...

Havoc Models

  • Member since
    March 2006
  • From: Right Side of a Left State
Posted by Shellback on Sunday, August 12, 2012 11:04 PM

Top notch Bill !

JOIN OUR COMMUNITY!

Our community is FREE to join. To participate you must either login or register for an account.

SEARCH FORUMS
FREE NEWSLETTER
By signing up you may also receive reader surveys and occasional special offers. We do not sell, rent or trade our email lists. View our Privacy Policy.