SEARCH FINESCALE.COM

Enter keywords or a search phrase below:

Cyber-Hobby Flampanzer instructions help

700 views
3 replies
1 rating 2 rating 3 rating 4 rating 5 rating
  • Member since
    March 2006
  • From: Right Side of a Left State
Posted by Shellback on Sunday, October 7, 2012 11:36 PM

Good , glad i could help . Yes it was dry brushed with a lightened shade of the camo color . The picture i posted of the intake looks gray because of poor lighting . Here's the actual color . This is the DML kit .

mgh
  • Member since
    May 2011
  • From: Utah County, Utah
Posted by mgh on Sunday, October 7, 2012 8:44 AM

Thank you!  That shows me exactly what I need to do.

Looks like a beautiful build also.  Did you dry-brush the corners and edges to bring them out like that?

  • Member since
    March 2006
  • From: Right Side of a Left State
Posted by Shellback on Saturday, October 6, 2012 9:54 PM

MGH , those 3 parts build the air intake for the engine . b11 is the base , MA1 is the intake screen and K11 is the top cover which is spaced off of the screen and base .

Here's how it looks when finished .

Yes

mgh
  • Member since
    May 2011
  • From: Utah County, Utah
Cyber-Hobby Flampanzer instructions help
Posted by mgh on Saturday, October 6, 2012 9:28 PM

Hello All,

Maybe some of you more experienced folks can see what is supposed to happen here.

Part MA1 is a PE part, but I am not sure how it should fit, or what the point of it is.  Part b11 fits snug against the side of the hull, and perfectly flush with the top of the hull, but part MA1 is a little over-sized to fit on top of it; it is going to either hang out a little over the top of the hull, or hang out a little on both the long sides.  Part K11 fits on top of b11 just fine.

From all I can see, the PE part will be all but covered up by K11, except for the little bit that does not quite fit.  So, I am not sure what this PE screen is supposed to represent, or how it should fit, or if it will be visible at all, which would beg the question of why it is included.

Anyone have any ideas how this should go together?

Thanks!
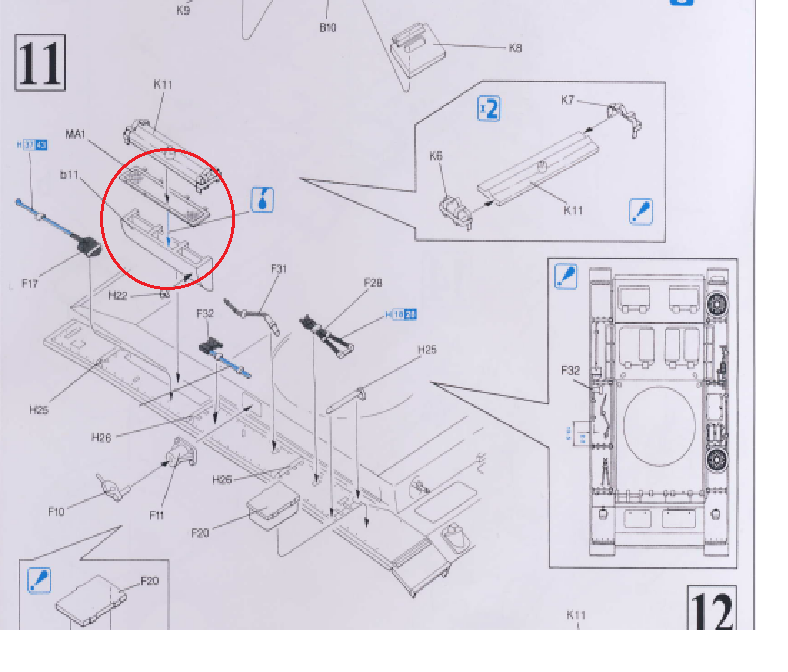
step_11.png

PS - This kit is going together fairly well.  The instructions can be a little difficult to follow, but so far has been a fun kit, with only some small fit issues.

JOIN OUR COMMUNITY!

Our community is FREE to join. To participate you must either login or register for an account.

SEARCH FORUMS
FREE NEWSLETTER
By signing up you may also receive reader surveys and occasional special offers. We do not sell, rent or trade our email lists. View our Privacy Policy.