SEARCH FINESCALE.COM

Enter keywords or a search phrase below:

Jagdpanzer IV A-O FINISHED! Page 8 Final pics!

23321 views
124 replies
1 rating 2 rating 3 rating 4 rating 5 rating
  • Member since
    January 2007
Jagdpanzer IV A-O FINISHED! Page 8 Final pics!
Posted by the doog on Sunday, January 27, 2013 11:09 AM

Well guys (and girl Wink)-- time to jump into another project here before the road takes me away again in March. Embarrassed

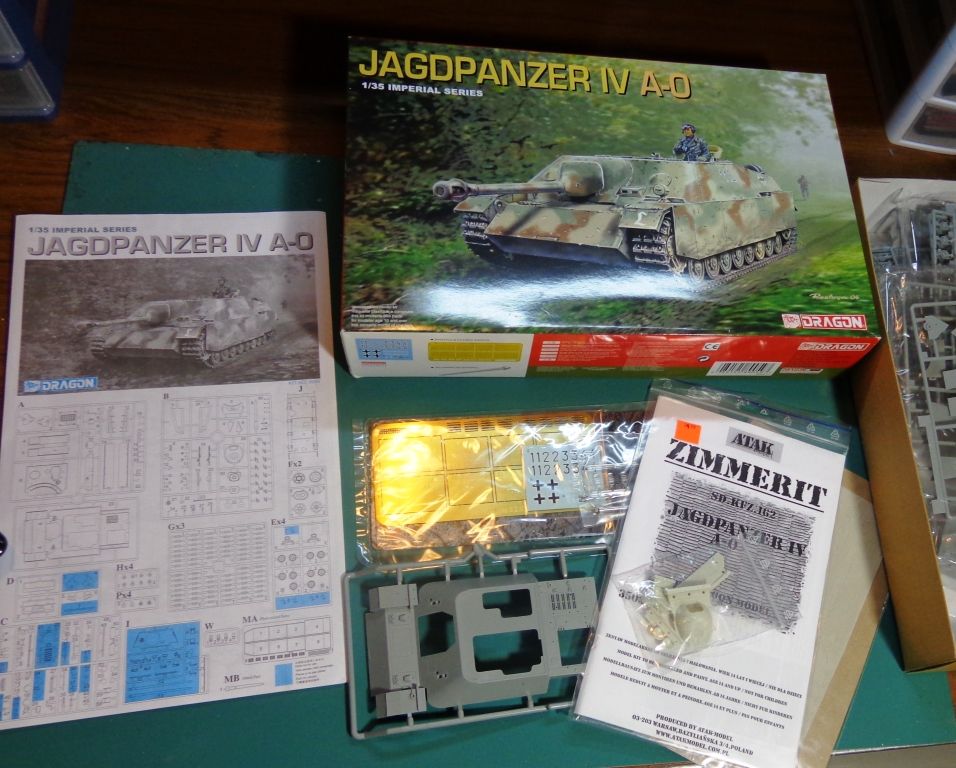
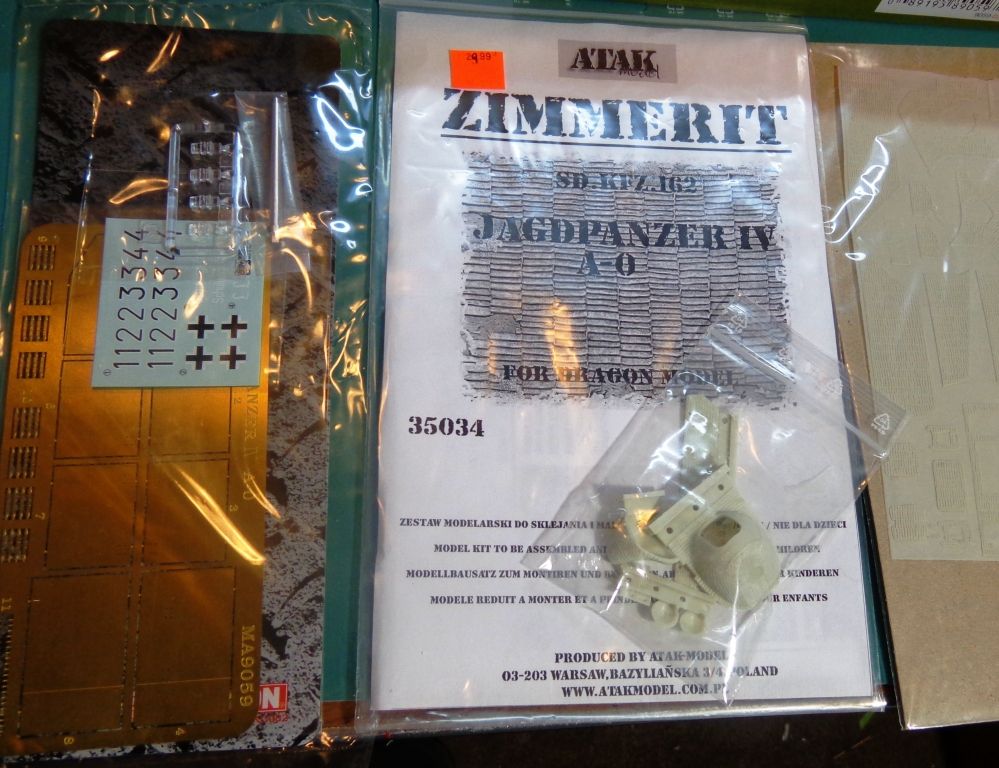
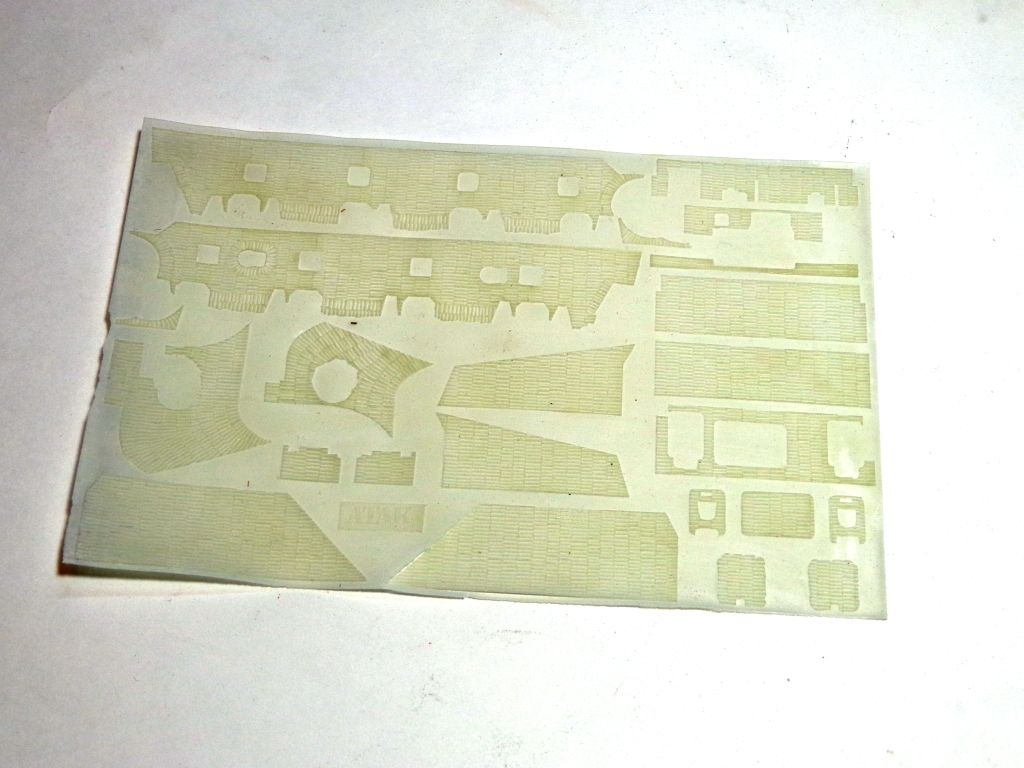
This is the Dragon Jagpanzer IV A-O. It's the "curved hull" one. It's a surprisingly nice kit, with PE skirts and a metal barrel if you want to use that. The only thing that it really needed was some zimmerit, and I've acquired some ATAK resin-sheet zimm for that.This kit also comes with a resin mantlet, gun housing, rear panel, and MG shields. Cool beans. Stick out tongue

In detail:

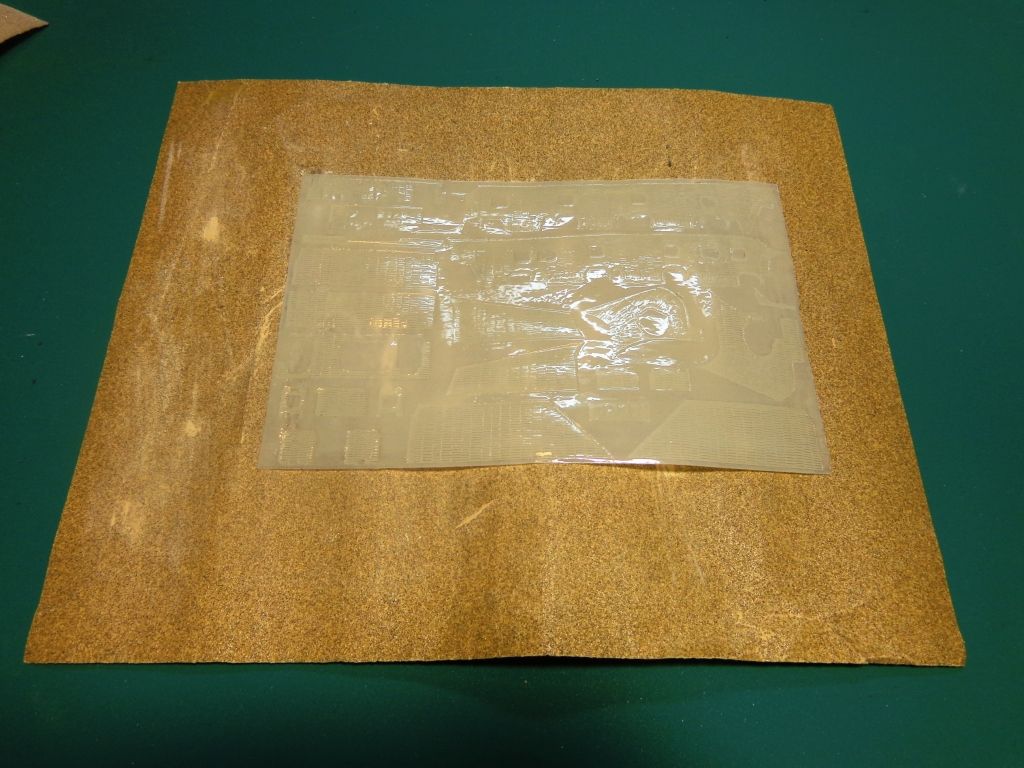
For those of you who have never used this kind of SM zimm before, the first thing to do after assembling some of the hull is to sand down the zimmerit and get it ready for application by roughing up the back of it; otherwise, you might have a hard time getting glue to "grab" it.  Here, I use a piece of coarse sandpaper to hold the resin sheet "zimm-side down"....
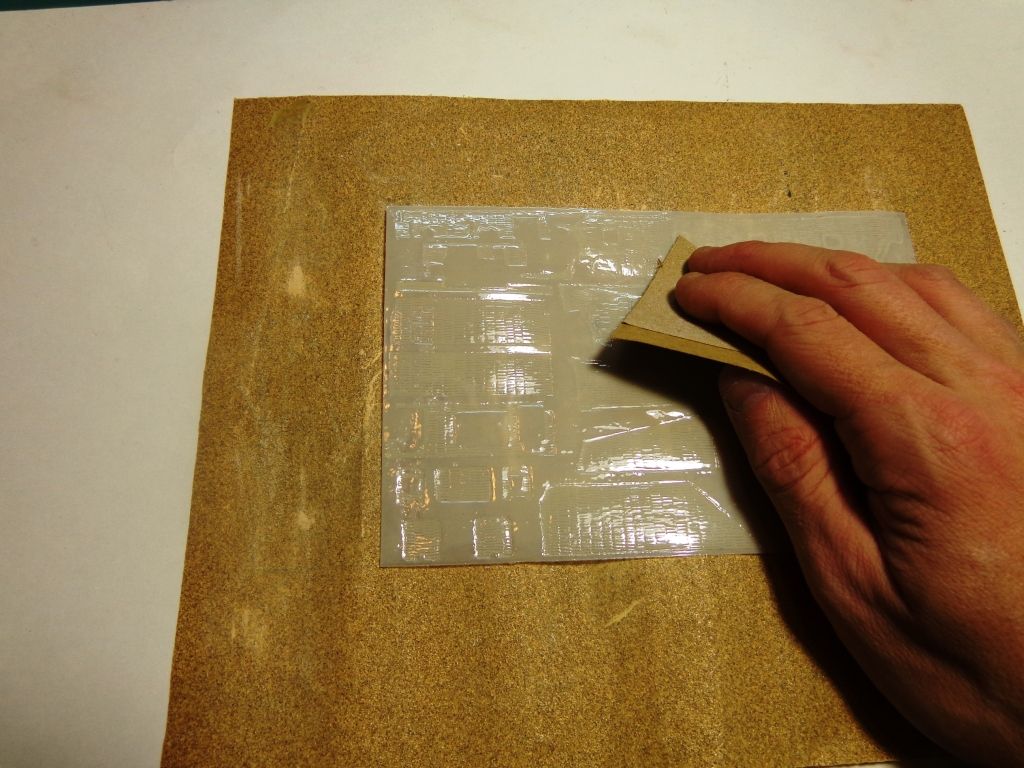
Then take another piece and sand the back of it. Don't go nuts with pressure, but try to remove the gloss sheen from it.
Here's the front of it---a lot of little pieces to put in place.
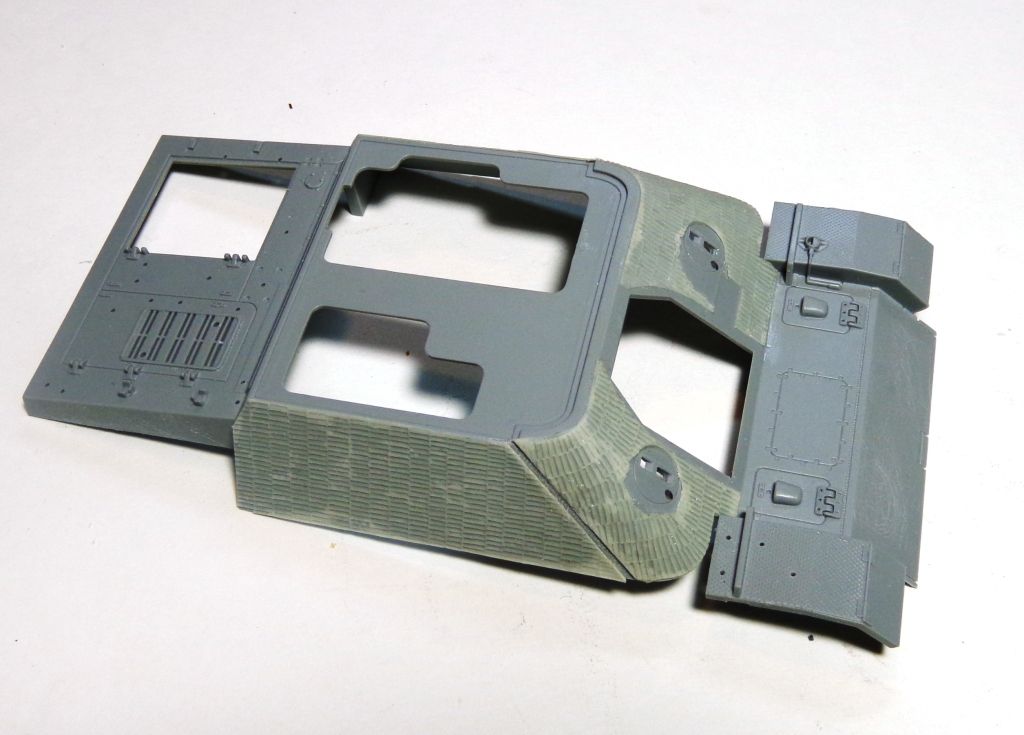
The zimm was applied with 5-minute epoxy putty, and later, the gaps filled with superglue using a precision tip. You can tell where there is no glue by the lighter color. You don't need to thoroughly darken EVERY minute spot, but be prudent about getting the edges, where it may accidentally chip off.  The curved hull required that I dip the resin zimmerit in some hot water) a coffee cup heated in the microwave for two minutes)to form the bend. Use tweezers, natch....

The problem of the curved sides holding a long piece of bent delicate resin zimmerit has been handled by giving you two smaller pieces of zimm to wrap around. The problem with this, however, is that it leaves a large gap. Hmmm... what to do?
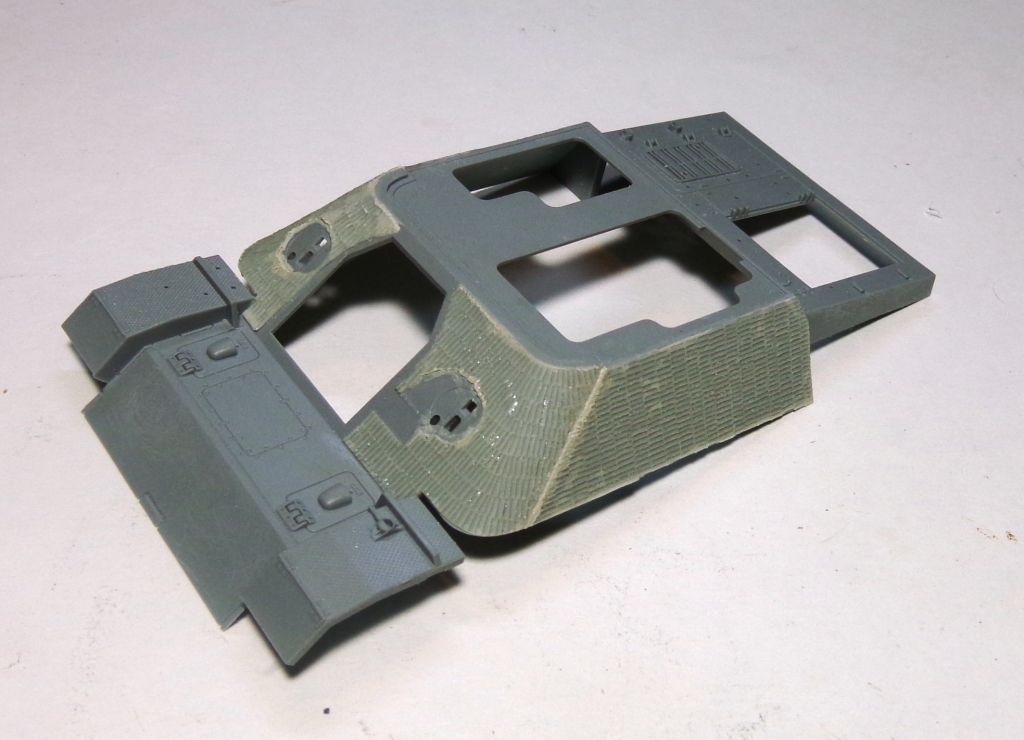
Conveniently, this seam occurs right over the weld seam. I took some .040 styrene rod, ran a #11 blade over half of it a few times to give me a half-round, and used it to plug the seam. By slopping some liquid glue on it, I was able to then etch weld marks in it and simulate the weld seam. Not the optimal rendition of it, as I would have preferred the zimm without the seam, but in fitting the piece, it was either to fix it here or be 2mm short of zimm on the rear hull--and still a pesky seam to deal with (albeit not as large perhaps?)--and that would have been much more annoying to fix. At least, in a way, this makes the zimmerit coat look appropriately-thin with the weld seam "showing through".
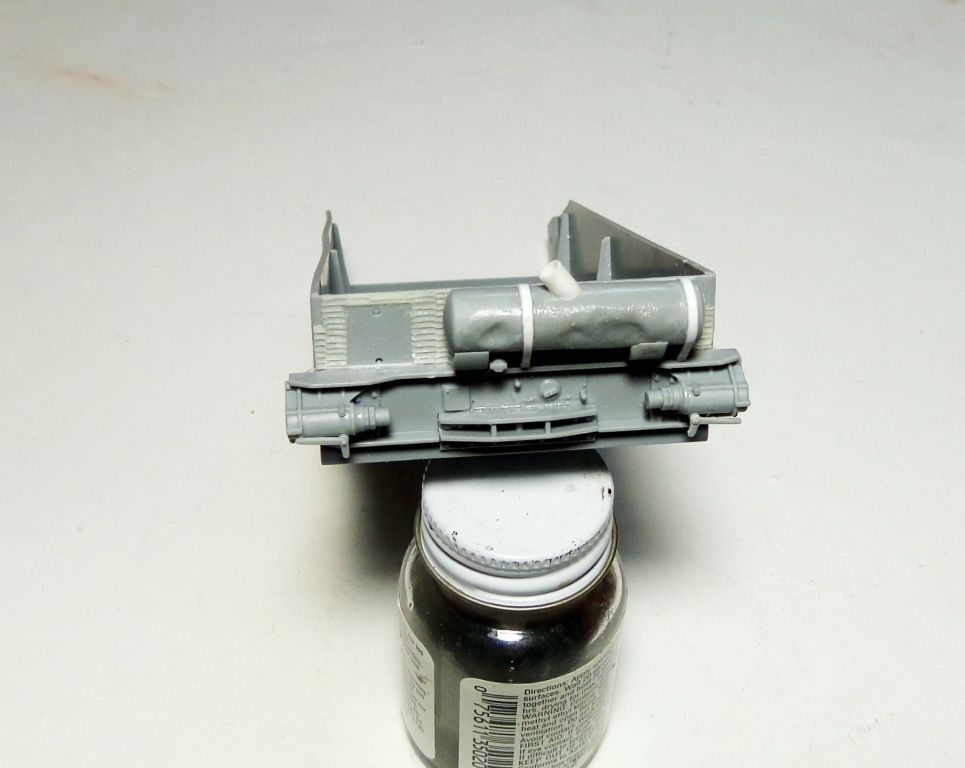
The muffler was dinged up a bit by holding it next to a flame. (SO old-school! Propeller). In doing so, the straps and outlet got a little deformed, so I replaced them with strip and rod.
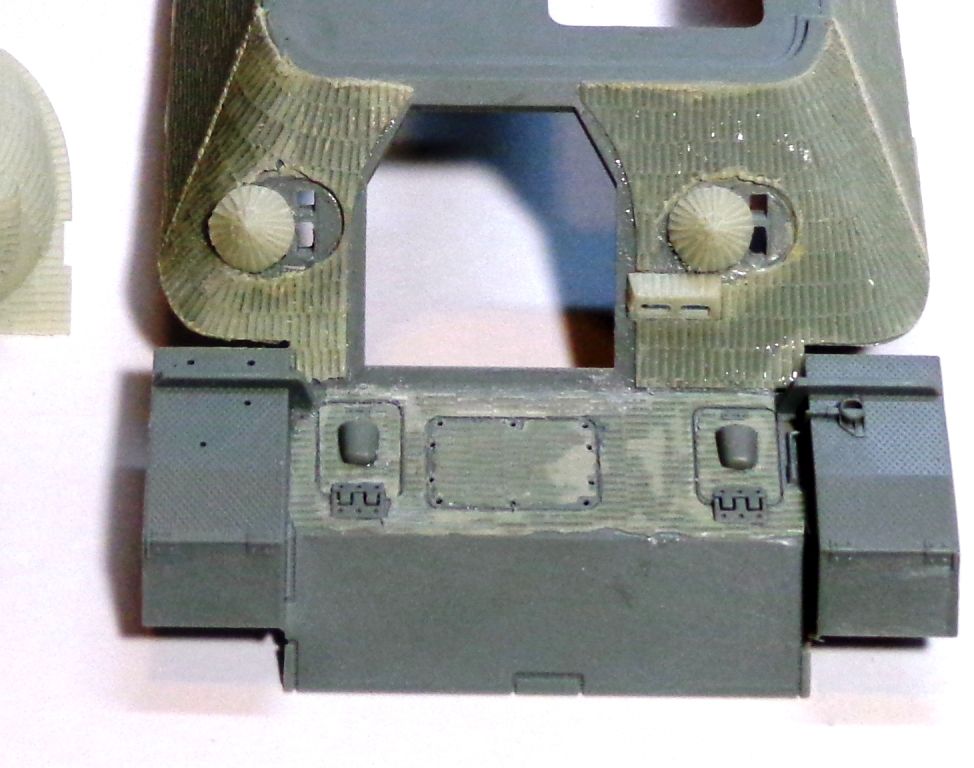
Next, the rear panel was super-glued on.
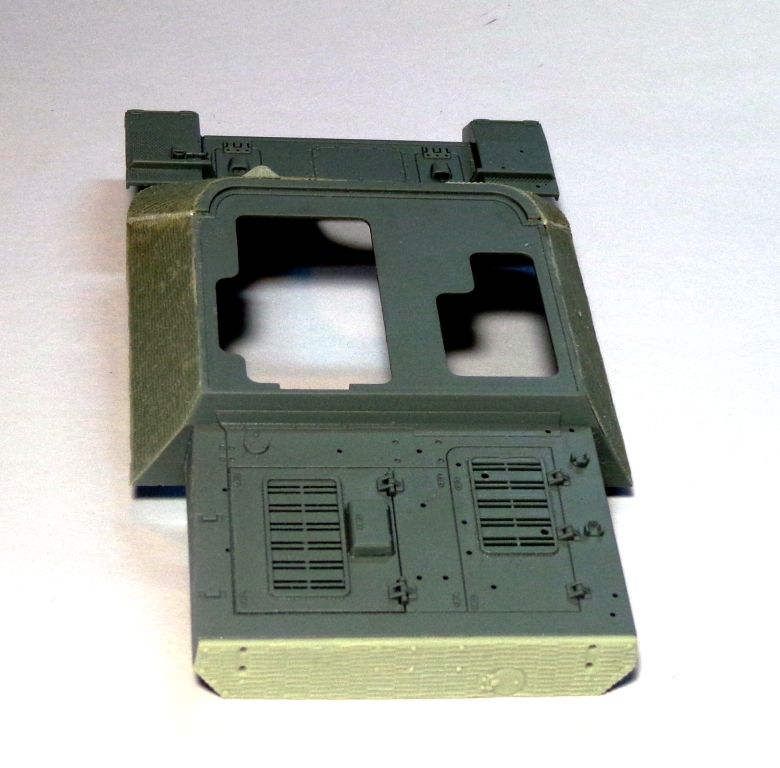
The front has a lot of little pieces that you have to carefully trim and apply, I spent a good hour test-fitting and trimming and chipping the zimm pieces to good effect, in order to let the hatch outlines show up. They wouldn't have zimmeritted over the hatch outlines-nor covered up the screw holes that provided access to the interior transmission housing. I drilled them out from the rear and then cleaned them up from front. I'll later put in a plate behind this to make a proper "screw hole".
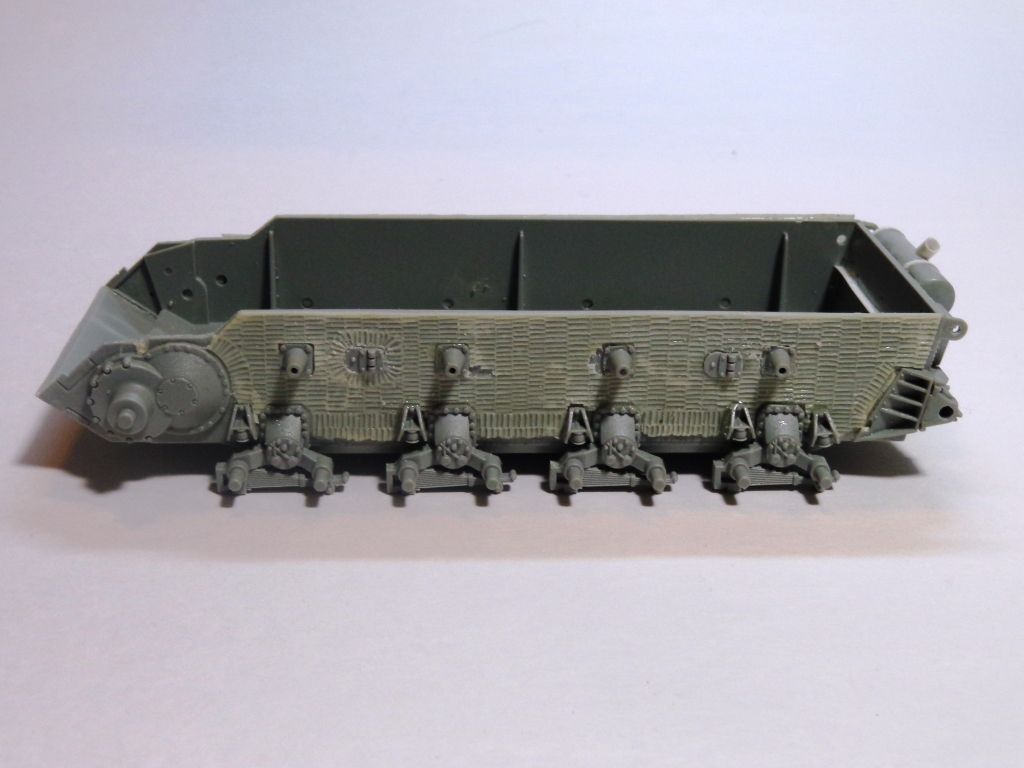
And lastly for now, the sides of the hull--again, a nice job on the zimmerit covering by ATAK here.
Well, that's it so far---I should make deent progress on this today, as most of the zzimm-work is done, and what is left is fairly simple. Should have an update by tomorrow or so. Big Smile

  • Member since
    December 2006
  • From: N. Georgia
Posted by Jester75 on Sunday, January 27, 2013 11:16 AM

Sweet, another doog WIP! I have a set of Cavalier zimm that I haven't used yet so I will be taking note of you application technique. Zimm looks like it went down very well!

Eric


  • Member since
    April 2006
  • From: ON, Canada
Posted by jgeratic on Sunday, January 27, 2013 11:57 AM

Looking good, doog.

The application of the resin zim got me thinking of how some other glue products would work. I've never tried them, but maybe a spray glue in a rattle can and once attached, a final bead of liquid super glue to the edges for a definite hold.  Another would be two coat rubber cement, though this would likely result with an added thickness.

regards,

Jack

  • Member since
    March 2003
  • From: Rain USA, Vancouver WA
Posted by tigerman on Sunday, January 27, 2013 12:40 PM

Great to seeing you back at the bench of late Karl. Always enjoy your WIP's. I have always had a soft-spot for the Jagdpanzers and this is no exception. If I'm somewhat correct, this was just a prototype, or did a few get into combat?

   http://i7.photobucket.com/albums/y269/wing_nut_5o/PANZERJAGERGB.jpg

 Eric 

  • Member since
    July 2003
  • From: On my kitchen counter top somewhere in central North Carolina.
Posted by disastermaster on Sunday, January 27, 2013 12:54 PM

Hey doog,

http://ts3.mm.bing.net/th?id=H.4845342464805214&pid=15.1 

     Looks like you're back with a vengeance.

 As you're probably aware you can simulate those muffler dents with various shaped mini-files that would enable more precise cuts and less "collateral" damage to repair.

 Here are the results that I got on my BT7 Here.

 I posted this here mainly for all the "newbies" that have signed on recently.

 https://i.imgur.com/LjRRaV1.png


  • Member since
    July 2004
  • From: Texas
Posted by wbill76 on Sunday, January 27, 2013 2:30 PM

Nice to see you back at full throttle at the bench Karl! Atak is my go-to source for zim these days, love their sets. Good progress with the zim application as well as all the other little detail treatments. Beer

  • Member since
    August 2012
  • From: Parker City, IN.
Posted by Rambo on Sunday, January 27, 2013 2:40 PM

Looking good doog I've never tried that Atak zim but I'm sure it's alot easier than making it with putty

Clint

  • Member since
    July 2006
  • From: San Francisco Bay Area
Posted by bufflehead on Sunday, January 27, 2013 3:57 PM

Sweet WIP build Karl!  I was really enjoying the 1/72 armor you've been doing lately, but this one looks like a real beauty!  I'm eager to see how you weather this Jagdpanzer, with all that zim.  Will the oil dot method still work on this?  I think Bill did it on one of his recent builds, going along the "grain" of the zim.  Anyway, I'm going to follow this WIP very intently!

Ernest

Last Armor Build - 1/35 Dragon M-26A1, 1/35 Emhar Mk.IV Female


Last Aircraft Builds - Hobby Boss 1/72 F4F Wildcat & FW-190A8


  • Member since
    March 2003
  • From: Western North Carolina
Posted by Tojo72 on Sunday, January 27, 2013 5:44 PM

Nice project Karl,should be a good one

  • Member since
    January 2007
Posted by the doog on Sunday, January 27, 2013 6:18 PM

Thanks, guys---Eric, just make sure you epoxy the FLAT side of the zimmerit panels--believe it or not I epoxied the wrong side of one while watching Supercross on TV today!  Luckily, some quick work in the sink with a toothbrush saved my piece! Surprise

Thanks, too, Jack--I tend to stick with epoxy and superglue. I don't  want to take any chance of it coming up post-paint and weathering. I think the rubber cement would definitely add too much depth to it.

Tigerman---I appreciate that! As far as I know, one of these was used by Panzer Lehr, I believe,and the other was a training vehicle. I've never seen actual combat photos of one where you couldn't say that it was just training photos. Hmm

Steve---hey thanks! Cool Smiley! And feel free to post the actual photo of that masterpiece you finished! I don't know if I saw that one before? WOW! It's magnificent, as is all of your fabulous disasters! Thanks for the tip on the file damage! Smile

Bill--thanks, man! I actually thought of you when I was posting this--I thought "Bill will like this" lol, because I know how much you use this ATAK stuff! Wink

Clint--hmm. You know, I'm not sure? Sometimes making zimm with some old razor saw blades can almost be easier depending on what you're working on? The nasty part of doing that is trying to do things like the rear panel of Pz IV's, or the bottom hull. This set was actually time-consuming to apply and cut out. On something like a Tiger or a Panther, the saw blade method is probably just as easy.

Ernest--thanks buddy. Good to know you're following along! I dunno if I'll do the dot thing on this? I may just try something new, or see how that "darklighting" thing I did on the 1/72 builds works out? I haven't really decided yet. But it's going to get "the Treatment" for sure! Super Angry

Back to the bench for me! Update tomorrow, guys! Thanks again, all! Beer

  • Member since
    September 2005
  • From: beacon falls , Ct.
Posted by treadwell on Sunday, January 27, 2013 9:01 PM

Hey Doog Smile

Nice man.... and I don't just mean the build Wink...Yes

tread Cool


  • Member since
    July 2003
  • From: On my kitchen counter top somewhere in central North Carolina.
Posted by disastermaster on Sunday, January 27, 2013 10:34 PM

doog,

I was thinking you saw it.....?

if not, click the pic below for the BT7 thread.

                             ☟

http://i20.photobucket.com/albums/b232/gluetank/BT7/BT-1.gif?t=1251826099 

 https://i.imgur.com/LjRRaV1.png


  • Member since
    January 2010
  • From: Nebraska, USA
Posted by CallSignOWL on Monday, January 28, 2013 10:04 AM

following ;)

------------------------

Now that I'm here, where am I??

  • Member since
    September 2006
  • From: Dripping Springs, TX, USA
Posted by RBaer on Monday, January 28, 2013 4:55 PM

Neat! I'll be watching.....

Apprentice rivet counter.

  • Member since
    March 2004
  • From: Kincheloe Michigan
Posted by Mikeym_us on Monday, January 28, 2013 10:26 PM

Karl the styrene rod weld bead does work well but have you thought about using Gunze Sangyo Mr. Dissolved Putty for the weld bead once applied you can stipple it with an exacto knife blade after about an hour. That way you don't need to carve styrene rod and accidentally slice your fingers.

On the workbench: Dragon 1/350 scale Ticonderoga class USS BunkerHill 1/720 scale Italeri USS Harry S. Truman 1/72 scale Encore Yak-6

The 71st Tactical Fighter Squadron the only Squadron to get an Air to Air kill and an Air to Ground kill in the same week with only a F-15   http://photobucket.com/albums/v332/Mikeym_us/

  • Member since
    January 2007
Posted by the doog on Tuesday, January 29, 2013 1:52 AM

Hey Tread! Thanks for stopping in, man! Good to see you here again! Big Smile

Steve--oh yes, now I remember that epic build! What a great model! Truly a "Master-piece"!  Bow Down

Mikey--I haven't tried that Gunze poduct, but thanks for the referral. I'll keep an eye out for in the next time I"m in an LHS! Geeked

RBaer and Owl----glad to have you along! Left HugRight Hug

I've got a quick update:

I've got maybe 80% done---I've got the gun on/in, and have started adding details. I also took the time to remind myself how much I hate using PE tool clamps and fittings! Bang Head Honestly---they drive me bonkers but I wanted to have some sweet detailing up front to catch your eye.

OOPS! Sorry! I accidentally deleted these pics from my Photobucket page! More pics in later posts!!!

I'm kicking around the idea of doing some more on the back deck, but it all depends on how long my patience lasts. I also built a spare track rack before noticing that one already came in the kit. Whistling Honestly, I have o stop watching Supercross while I"m building....lol

The kit does give you a metal barrel, but I'm not all that keen on metal barrels; I just used the plastic part. STill have some detailing to do on the rear deck and hull..

I also did some proper detailing on the commander's hatch here-it needed a corrected hinge, a circular plate around the periscope with bolts, and a wooden head pad. I've also just started detailing that other small binoculars hatch as well.

That's it for now. I should be able to get a lot more done tomorrow if the PE tool holders cooperate.

Thanks for looking in, guys and girl! Yes

  • Member since
    September 2006
  • From: Australia
Posted by Blitzwing on Tuesday, January 29, 2013 3:03 AM

It look's looking great already and would have caught my eye even without PE.

URL=http://picasion.com/]

  • Member since
    August 2012
  • From: Parker City, IN.
Posted by Rambo on Tuesday, January 29, 2013 3:30 PM

I really like the look of that zim especially over the MGs

Clint

  • Member since
    December 2006
  • From: N. Georgia
Posted by Jester75 on Tuesday, January 29, 2013 5:45 PM

Looking good doog! I feel ya on those tool clamps and such but the detail they add is so worth it!!

Eric


  • Member since
    January 2007
Posted by the doog on Tuesday, January 29, 2013 10:39 PM

Thanks, guys! I appreciate ya'll looking in!

Eric--yes, I must agree with you; they do add "something" to the build---I think it's the knowledge from other modelers that you actually would spend the time to craft these devilish little monsters, lol!

  • Member since
    August 2008
  • From: S.W. Missouri
Posted by Pvt Mutt on Tuesday, January 29, 2013 10:57 PM

Karl since you're a picker I would think you could do those clamps with one hand.Wink

Stop your belly aching and get on with it.Big Smile

Tony lee

Shoot Low Boys They're Ridin Ponys

  • Member since
    July 2004
  • From: Texas
Posted by wbill76 on Wednesday, January 30, 2013 8:55 PM

Some nice progress and detail work going on there Karl, dressing this one up nicely! Beer

  • Member since
    April 2008
  • From: N.H. USA
Posted by TZombie on Thursday, January 31, 2013 10:00 AM

Very nice work! Thanks for sharing. I have a quick question. Do you attach the pioneering tools to the hull before painting them and paint them in place?

  • Member since
    January 2007
Posted by the doog on Thursday, January 31, 2013 7:10 PM

Tony, you're right, man! I must quit my bellyachin' and model like a MAN! Super Angry (sorry, CallSignOwl! Embarrassed I'm working away on them right now!

Bill, thanks, bud! Good to see you stopping in to give me a Yes

TZombie.--thank you sir!--and regarding the painting of the tools; well, in this case, yes, I will--if only because the photo-etch parts are so delicate. It wouldn't be prudent to leave them off. Better too, to glue them directly onto the plastic than to a coat of paint, in my estimation. And those tool clamps need to be painted and weathered to match the hull base coat too, so, yes, I'll paint the in place. Smile

  • Member since
    July 2006
  • From: San Francisco Bay Area
Posted by bufflehead on Thursday, January 31, 2013 11:40 PM

Wow, you're just blazing through this one Karl!  Its looking might fine!  BTW, what did you use for the periscopes in the hull top?

Ernest

Last Armor Build - 1/35 Dragon M-26A1, 1/35 Emhar Mk.IV Female


Last Aircraft Builds - Hobby Boss 1/72 F4F Wildcat & FW-190A8


  • Member since
    January 2007
Posted by the doog on Friday, February 1, 2013 9:59 AM

Thanks, Ernest! The periscopes are kit parts---clear plastic. They look really nice, eh? This kit is actually quite nice---an optional metal barrel, some PE schurzen, clear periscopes. Almost ahead of its time for when it came out!

  • Member since
    January 2007
Posted by the doog on Saturday, February 2, 2013 9:07 PM

OOOOkay. Been working on this sucka all week, and finally I think I'm ready for paint. Here's where I've been, and what I got! Stick out tongue

Well, I committed myself to doing some PE tool holders on the rear, so I had to plug all the holes, natch--so I planted a stretched-sprue forest in the holes. A little candle and some old sprue, and you can have beautiful sprue shoots blooming in your model too! Clown You can also see some of the new details that I've added to the small hatch there--the star-shaped knob to open it, the three bolts, and then the handle to the gunner's hatch.

And after cutting out harvesting the sprue shoots, the garden is nicely bare. Notice that I haven't glued the roof on yet--I want to be able to paint the periscopes inside.and the interior dark at least.

Handling those @#&%#! tool clamps! Angry I've found that if I superglue the base of the clamp onto a piece of tile, I can use my two hand to maneuver the two other pieces onto the little pins that hold both the lever and the top of the clamp in place: I've got 5x reading glasses on here plus my Optivisor!

And here's the clamp! SUCCESS!!! I had to make 5 of these buggers!

I'm sure that most of you know my track method, so I won't bore you with it here:

I wanted to keep a relatively tight track, as the vehicle was only used sparingly. I set only a little bit of sag. The wood block is keeping a lazy idler wheel in place....

Here's some other details I should address. The #1 shows the cutouts for the schurzen hangers; I can't put them on yet because I wouldn't be able to get the tracks on or off for painting. #2 shows where I removed the supports that lie on the rear fenders--the real vehicle didn't have these, apparently?

More details were added: #1 shows the cleaning rods that I added, and racks that I made from spare PE. The right rack has a cloth strap and buckle made from lead foil and a buckle shaved off from a kit piece--I forget which. #2 These projections are on the rear of the original vehicle; not sure what they housed, but it's gone now, even as they remain. #3 shows the tail reflector that I made from spare PE and some 1/24 "side dot reflectors" PE from a Dodge Charger detail set. #4 the detail added to the wood block, which was taken from the excellent Tamiya On-Vehicle tools set. #5 shows the new supports which I had to fabricate in order to support the rear schurzen. These are more in line with the original vehicle's configuration. #6 I never realized this before, but the muffler bolts onto the rear rail which runs along the rear of the hull. So I corrected my own repair job there, adding some resin Verlinden bolts.

A little closer on the rear deck:

And here's where I am so far. I have a figure that I'll be putting in as well. I believe I"m ready for paint tomorrow!

If you see anything weird or left undone, call it out, guys! Comments and suggestions always welcomed! Smile

  • Member since
    December 2006
  • From: N. Georgia
Posted by Jester75 on Saturday, February 2, 2013 9:23 PM

Was looking forward to an update on this one doog. Sweet idea with the 'sprue forest'! The extra pe work on the clamps looks great and well worth the effort. I will be giving your magic track method a try on my 38t, always seems to look good on your builds. With all that magnification you had going on there, you should have been able to bend that pe on the molecular level Stick out tongue

Eric


  • Member since
    September 2005
  • From: Uppsala, Sweden
Posted by bultenibo on Sunday, February 3, 2013 5:34 AM

Hi doog!

My first reaction when looking at this thread:

"OMG, what IS that maniac doing? Is he adding tool clamps on a tank in 1/72-scale! That guy is not human!"

Then I saw that the Jagdpanzer was in 1/35, and my heart started beating again...

Seriously, impressive work, as usual. Glad you made it back to the forum (and to the 1/35-scale)!

/Bultenibo aka Tony

  • Member since
    January 2010
  • From: Nebraska, USA
Posted by CallSignOWL on Sunday, February 3, 2013 7:42 AM

nice!

------------------------

Now that I'm here, where am I??

JOIN OUR COMMUNITY!

Our community is FREE to join. To participate you must either login or register for an account.

SEARCH FORUMS
FREE NEWSLETTER
By signing up you may also receive reader surveys and occasional special offers. We do not sell, rent or trade our email lists. View our Privacy Policy.