SEARCH FINESCALE.COM

Enter keywords or a search phrase below:

1/6th scale M4A4 sherman tank Project

24782 views
44 replies
1 rating 2 rating 3 rating 4 rating 5 rating
  • Member since
    January 2012
  • From: Hatfield
Posted by Misty on Sunday, October 12, 2014 6:05 PM

absobloodylutely gorgeous Cool

  • Member since
    April 2005
Posted by armourguy on Thursday, October 9, 2014 1:12 PM

Thanks guys, this build was a very fun one and one that I enjoyed very much building... and driving :D

I was able to take the tank out for a quick out door dio the other day. I also took out my M3 Lee, as these two tanks are from the same period.

It's been a few years since my M3 left the shop, It was nice to see it in the sun again

A project wrap up video was also made,
http://youtu.be/x9sIEzHzQJs

and more higher res pics were posted on the facebook page. http://www.facebook.com/EastCoastArmory

All that remains for me to do is to make a gallery webpage for the model, Once complete this project will be 100% complete.


  • Member since
    January 2012
  • From: Hatfield
Posted by Misty on Wednesday, September 24, 2014 2:50 PM

thanks for the wip on this, it was a real eye opener, ill be sure to check in at your site too. brilliant job!!!!!!Cool

  • Member since
    February 2014
  • From: N. MS
Posted by CN Spots on Wednesday, September 24, 2014 1:34 PM

Anybody see a jaw lying on the floor around here?  I dropped mine and can't find it.

Seriously though, the is one of the nicest & most interesting builds I've ever seen.

VERY well done!

  • Member since
    March 2012
  • From: Corpus Christi, Tx
Posted by mustang1989 on Saturday, September 20, 2014 7:57 AM

This is slick! REALLY SLICK!!


 Forum | Modelers Social Club Forum (proboards.com) 

  • Member since
    April 2005
Posted by armourguy on Friday, September 19, 2014 10:07 PM

Thanks guys, 

The very last remaining bits have been added and the tank is now complete!!

Since the last update the tank's pioneer tools have been assembled / painted/ and fitted.

Some of the tools that you see are white metal from Armorpax. These tools sets came with the Armortek kit. The tools are very nice and I didn't see a reason to not use them. The only mod that I made to the tools was I replaced the kit supplied metal handles with real wood ones.

The set didn't come with all the tools needed for the Sherman, so the not included tools were supplemented with the ECA ones, This would include the Wrench, and the Sledge hammer.

To mount the tools to the tank, for this model I fabricated the small mounting straps. On US AFV the tools are secured inplace via straps made from Leather, or webbing. On this build I fabricated the straps out of leather, with scratch built metal buckles.

The wrench is not secured via the belts, instead via a chain retained pin.

The small rear idler nut securing bracket was another small part that was added finishing off the model. The purpose of the clip is to prevent the idler nut from getting loose while the tank is in operation. The clip on the model is for looks only.

Another small bit that was added was the headlight plug, and retention chain.

The final (and crucial), bit that was added was the AA M2 50.cal. Unlike all the other US vehicles I have made, this model's M2 is different and is special.

Because of the early nature of this build I went with the early period Short Bull barreled, M2HB. This gun features a shorter length barrel, along with a slotted barrel shroud. For the model I used the Receiver from the Dragon M2HB kit, and switched out the barrel and shroud with the ECA short barrel conversion set.

Unlike the later period tanks in which the gun is mounted to a M23 Cradle, this gun is fitted to an earlier mount which has some interesting features.

Because the top mounted M2 was really meant for AA use, the gun cradle is designed to change it's angle by the flick of a lever. The purpose of this is so that the commander can get a higher angle with the gun so you can shoot down planes easier. This feature was built into the model

The early style cradle itself was tooled up and has been added to the catalog as a kit.
http://eastcoastarmory.com/m4.htm

On the real cradle to make the unit pivot there was a special spring mounted towards the side of the mount. On the kit the part is casted in flex resin to allow flexibility and to allow the part to function.

The special low profile 50rnd ammo can was also crafted. The can comes with the set but I felt that with the the can being all solid added too much weight once fitted. I will cast another one and hollow it out on the mill to see if that resolves the issue, If it does I will make a new hollow mold and include them in the sets. The solid can is also being offered separately.

More info on that to come

more pics were posted on the ECA facebok page
https://www.facebook.com/EastCoastArmory

With the gun now added the tank is officially complete. Over the weekend I'll take the tank out for a dio, and make my usual gallery webpage. Now fully wrapped I can focus on the other commission builds I got going. More to come!

  • Member since
    August 2014
Posted by lando452 on Wednesday, September 17, 2014 9:17 PM

That is so cool, great job

  • Member since
    January 2012
  • From: Hatfield
Posted by Misty on Monday, September 15, 2014 4:44 AM

thanks for the vid link, it looks and sounds awesome on the  move .

  • Member since
    April 2005
Posted by armourguy on Sunday, September 14, 2014 2:57 PM

I have a few vids of the tank being test driven, I just Posted a video update of the model where I give it a test drive all painted

youtu.be/_M8CschoqIU

  • Member since
    January 2012
  • From: Hatfield
Posted by Misty on Saturday, September 13, 2014 8:17 PM

thats really special! Bow Down

any vids of it on the move yet?

  • Member since
    April 2005
Posted by armourguy on Friday, September 12, 2014 10:12 PM

Since the last post the tank has progressed some more and is now about 95% complete

After the base was completed I added the markings, Like on all my builds the markings are painted on via home made disposable stencils. This includes all the stars, stripe, and TO&E markings

For the tank's markings I went with a style that has not been done in 1/6, and that is of a stateside training vehicle. Vehicles like this would be in this configuration with the white stripe in Fort Knox, and in the Desert Training center in California.

Many M4A1s, M3 Lees, and Stuarts went into North Africa with similar paint schemes, but the A4 was relegated to training in the US before being sent off as lend leases... or upgraded and sent to Burma and China.

There were also other options for the stripe, Yellow and Blue were also done in this format... possibly an idea for future builds ;) . When I had the idea for the A4 project I wanted to build it for this scheme / era as once done these tanks look very sharp and distinctive in this format.

Another early war feature that is found on the markings is the Blue ID "W" prefix lettering.

The lettering at the early part of the war was in blue, and had the "W" in the code which stood for "War Department". This was changed and dropped by around 1943 where the numbers where in white, and had only a USA prefix

After the markings were added the tank got it's weathering.

After the weathering was complete the tank's tracks were painted and fitted

The tracks themselves were painted and were left unweathered. Because the tank is RC and the tracks are made out of metal, they would weather themselves after drived a (very) short distance. Which was subsequently done after the tracks were mounted... for testing and weathering purposes of coarse ;) .

After the tracks were taken care of, I then moved to the remainder if the fittings, this includes the red painted zerk fittings, red fire extinguisher handles, MP48 Insulator, Copula interior

The two M1919 gun barrels were painted/ weathered and installed at this time

The tank's head / tail light lenses were also fitted.

The last bit that was added was the tank's fuel filler caps. Like with all my sherman builds the main filer caps are fabricated out of Aluminum. The radiator filler was also mounted, this is resin and comes with the radiator cover set. The caps were all weathered and like on all my US AFV builds the cap pins are chain retained.

More pics were posted on the facebook page:
http://www.facebook.com/EastCoastArmory

With these parts now out of the way, all the remains now to be added are the pioneer tools and the M2HB AA machine gun. As a final surprise for this build, I have something I have something special planned for the AA gun ;) ... More to come!

  • Member since
    April 2005
Posted by armourguy on Sunday, September 7, 2014 1:10 PM

Thanks, I always have a blast building these things!!

For the build I added the last of the model's details and the model is now ready for painting!!

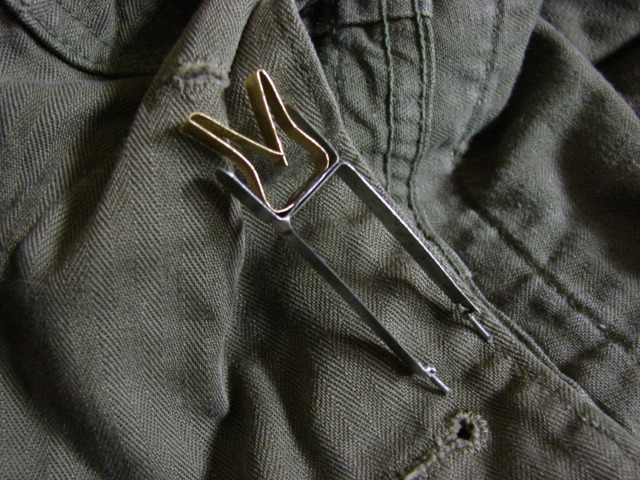
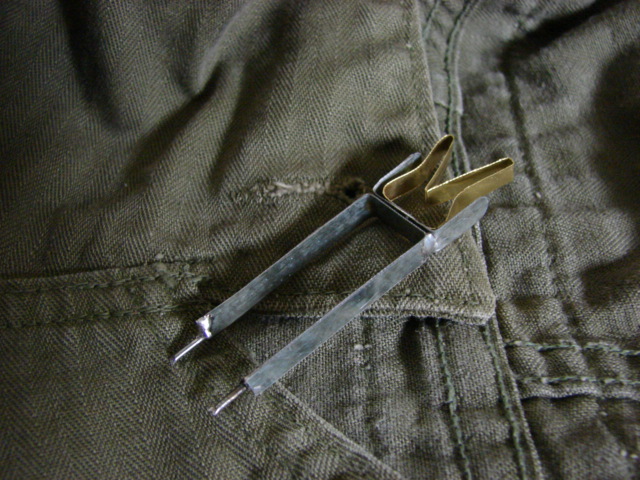
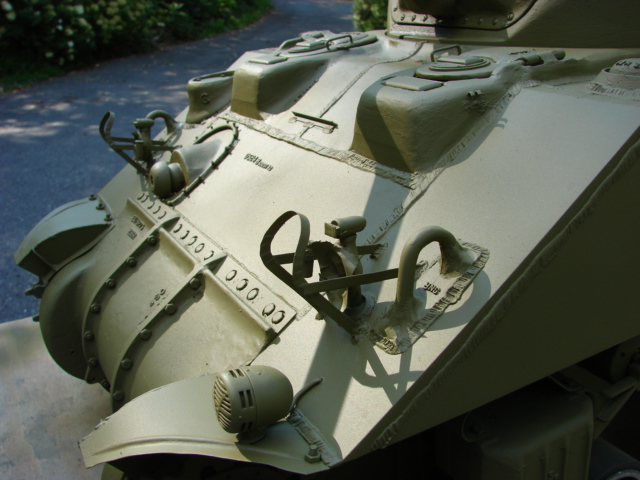
After the rear hatch work was completed turned my attention to the tool posts. The tool posts are fabricated with my usual method. As for the tool layout the A4 used the same tool layout of the other sherman family. the posts and footman loops are all metal fabrication and have sculpted welds.

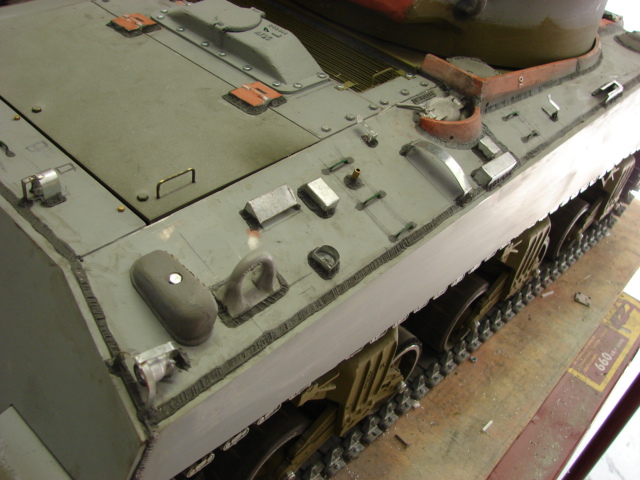
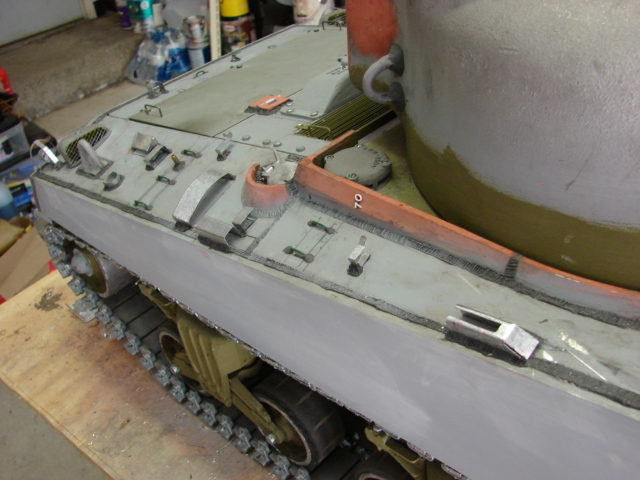
The tow cable mounts were also added, unlike the later shermans the early war period ones only had one cable lock, as the cable would connect to the U hook on the front transmission cover, this was changed later on in the war to feature another cable lock on the front cover.

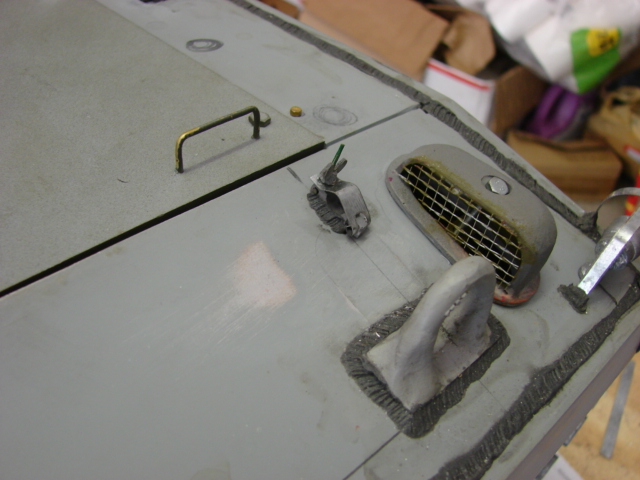
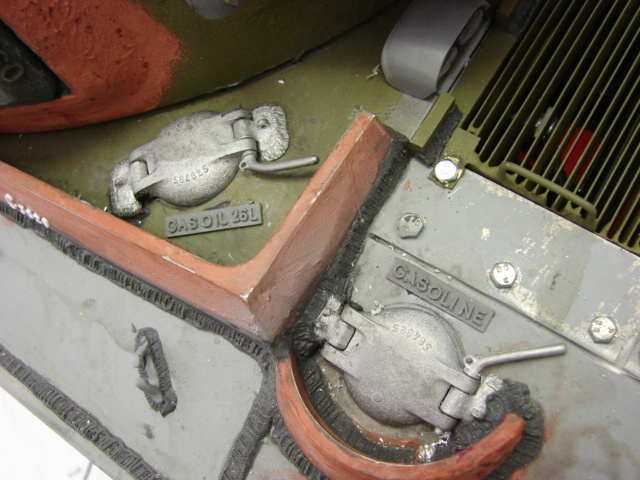
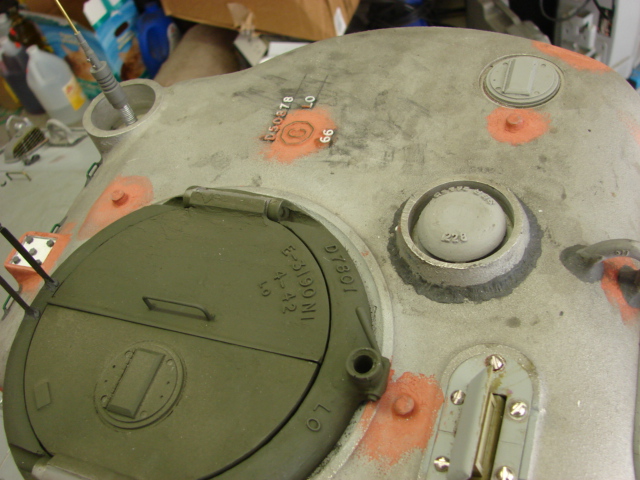
The Fluid ID tags were also added,

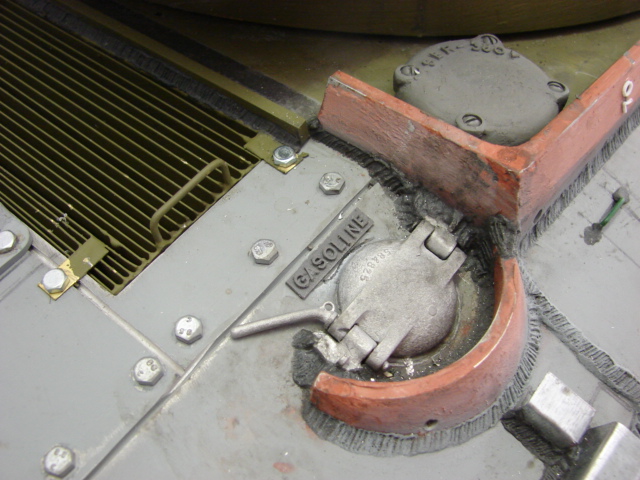
While adding these parts I tooled up the ID plate for the Little joe generator. Because the generator was a two stroke engine the unit needed Premix fuel. The ID plate stated the info as "GASOIL". The new plate was added to the current ID tag set and is now available on the product line.

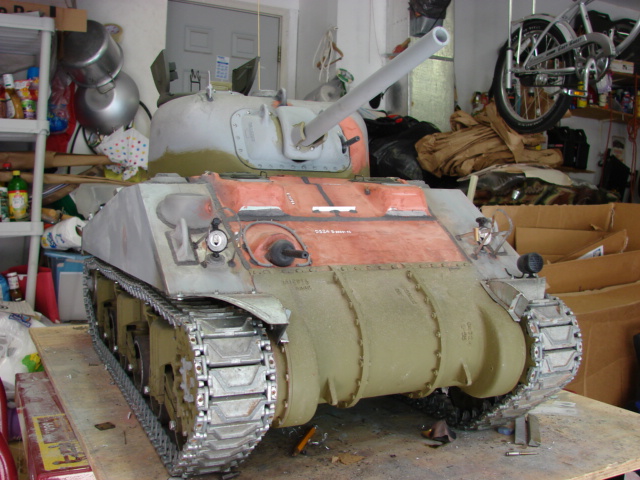
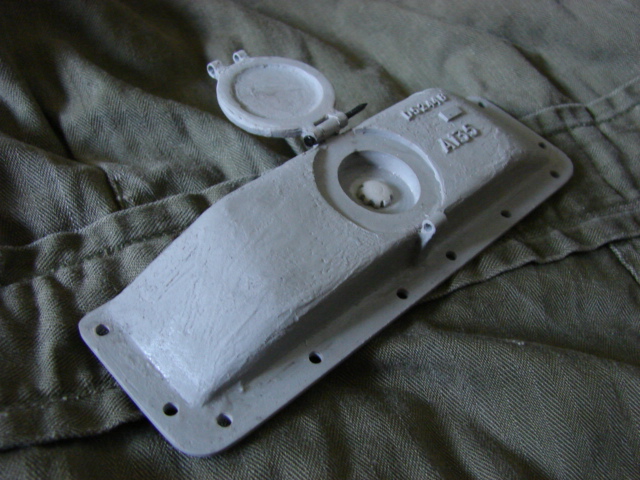
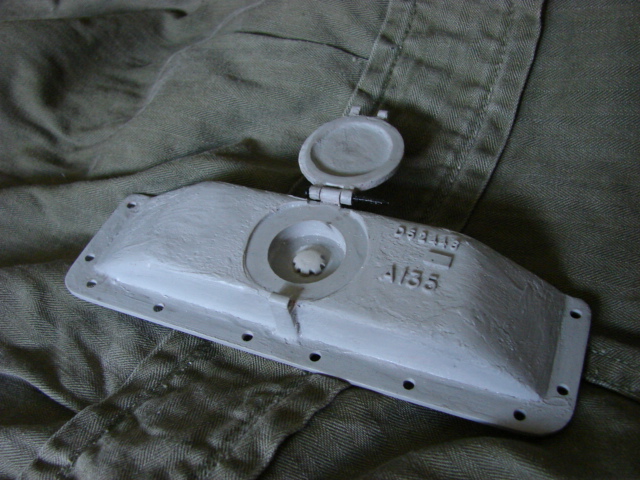
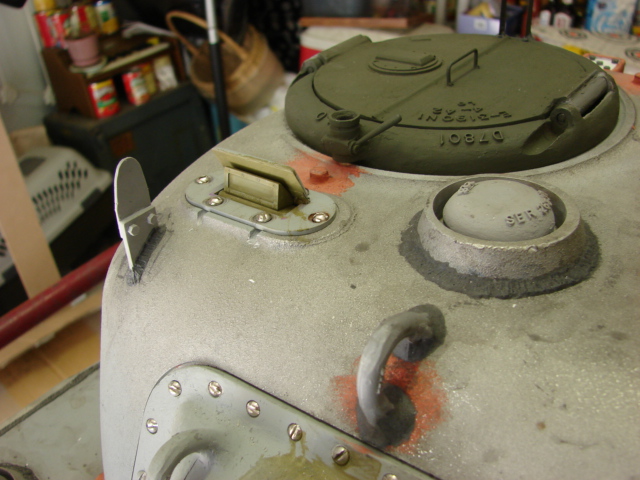
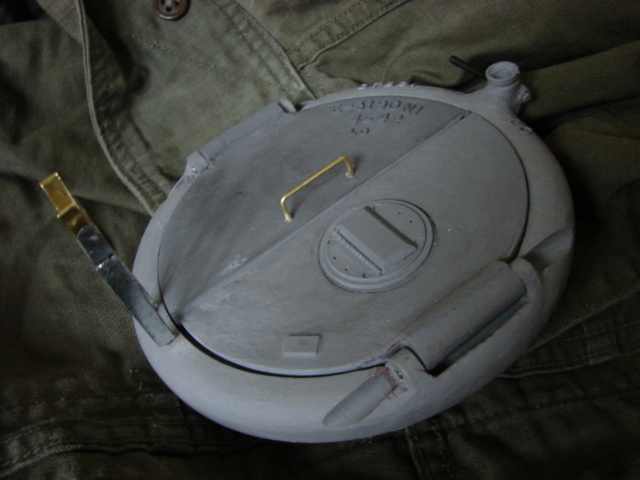
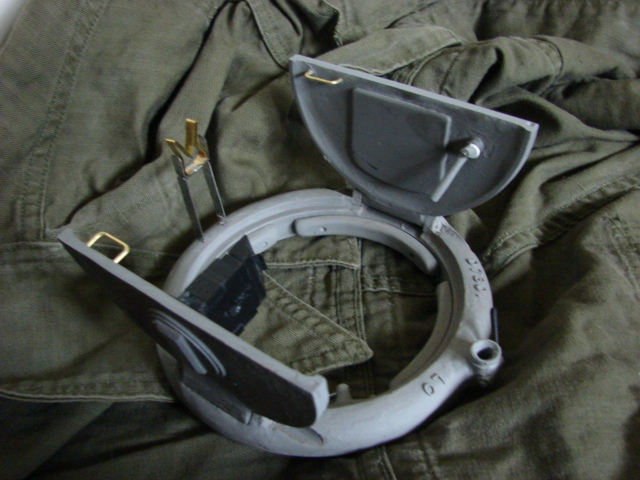
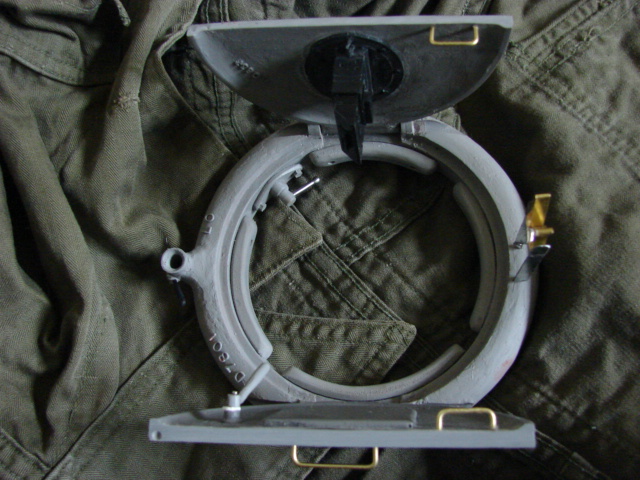
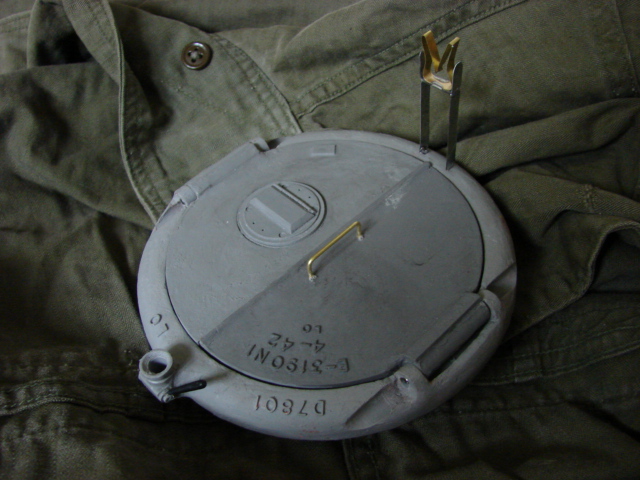
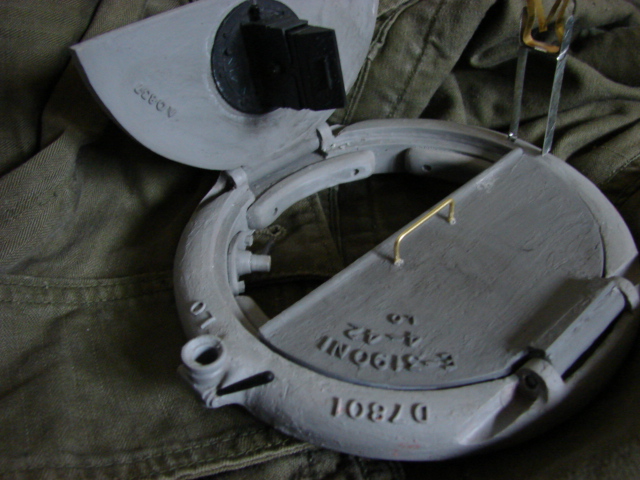
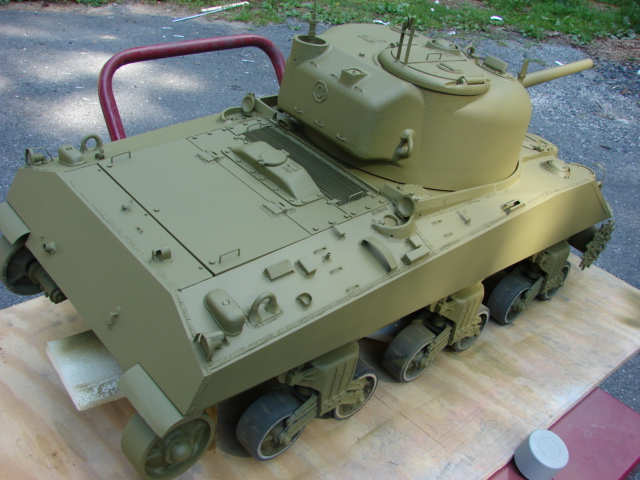
The last component to be fabricated / installed to the rear deck was the radiator armored cover blister.

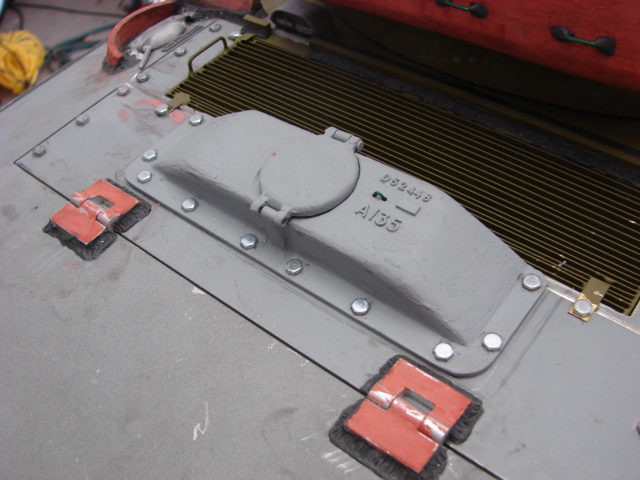
The Blister is one of the key distinguishing features of the A4 over other shermans, The purpose of the blister was because of the large radiator on the multibank engine. The engine was so large that even with the hull extended the engine still didn't fit. In addition to the large blister was added to the lower hull a top blister was also needed.

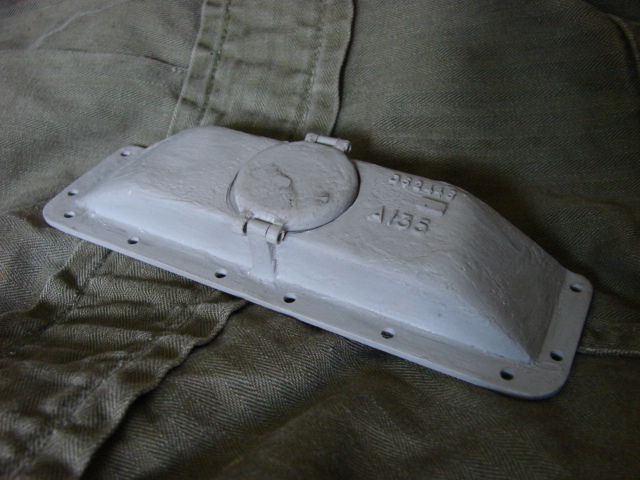
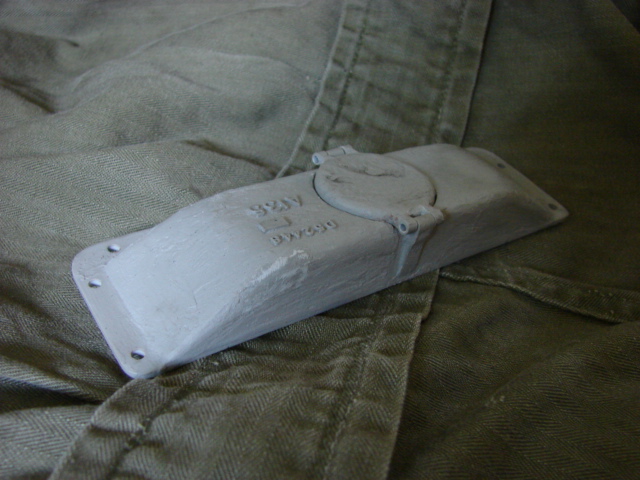
the top blister also has a large round hatch for access to the radiator filler cap.

The blister was tooled up and is added to the catalog.

Once the hull was complete I turned my attention to the turret.

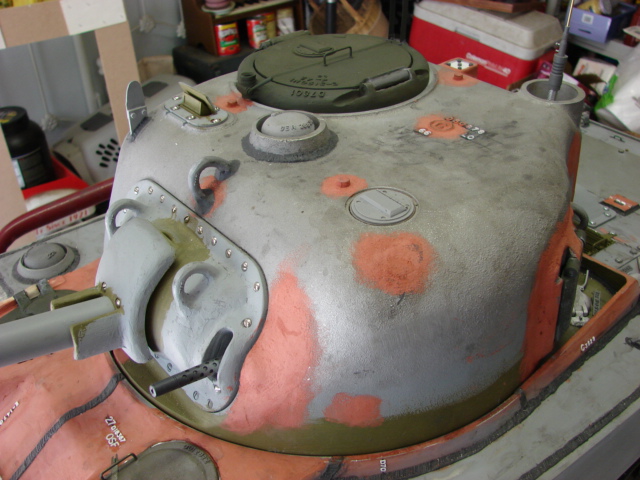
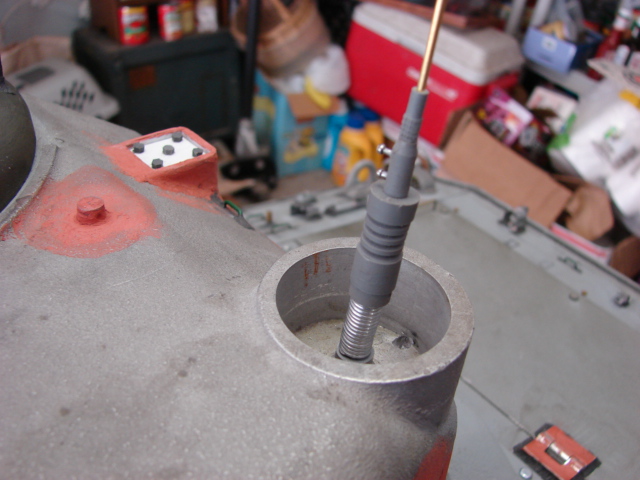
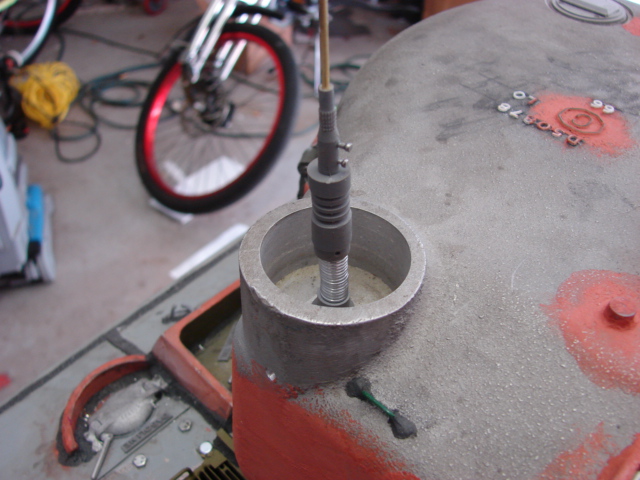
The details that were added were the turret lift hooks, shark fin vane sight, and MP48 spring antenna base... All parts were stock ECA. For the antenna all that was needed to prep the location was to drill a small drainage hole in the lower center of the antenna well.

Unlike my other builds where I run the radio antenna into the MP48 antenna base on this build that was not needed. This was because of the 2ghz radio used, the antenna extension of the antenna was not needed so a static one was used instead. One good factor is that it leaves one less umbilical cord to deal with when removing the turret.

Also what was added was the nubs for the the lift eyelets to the turret's top deck. The sherman was originally intended to have the turret removed via threaded eyelets, this design was a carry over from the M3 Lee. The design was dropped and the larger cast in lift rings were developed in stead. Even though the design was dropped the eyelet locations were still present in the turret casting. These three nubs were added to the model.

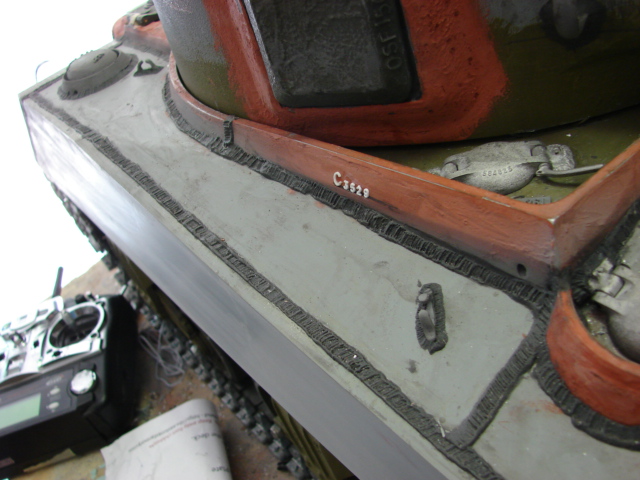
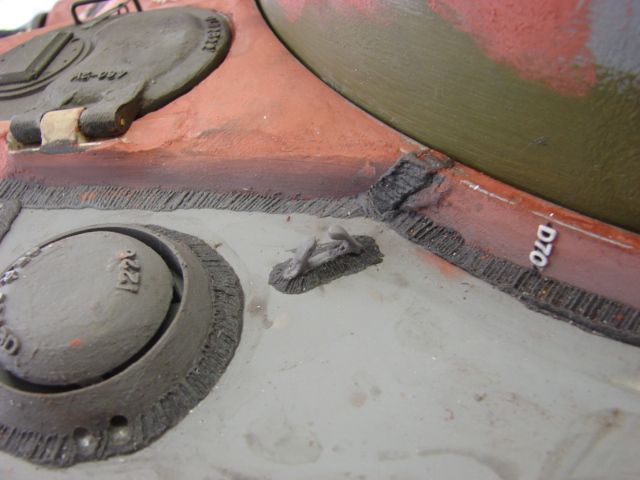
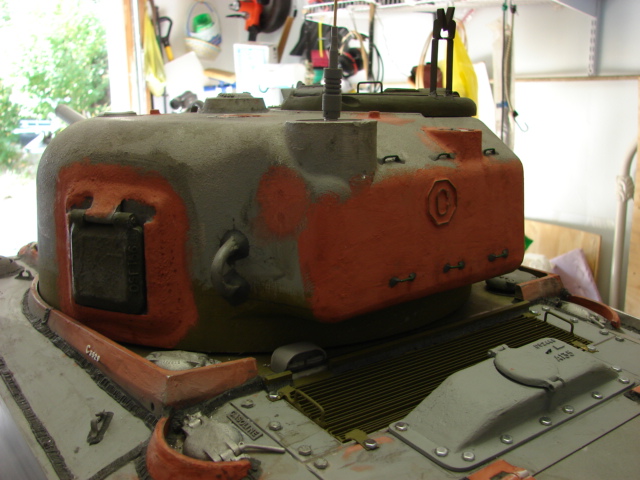
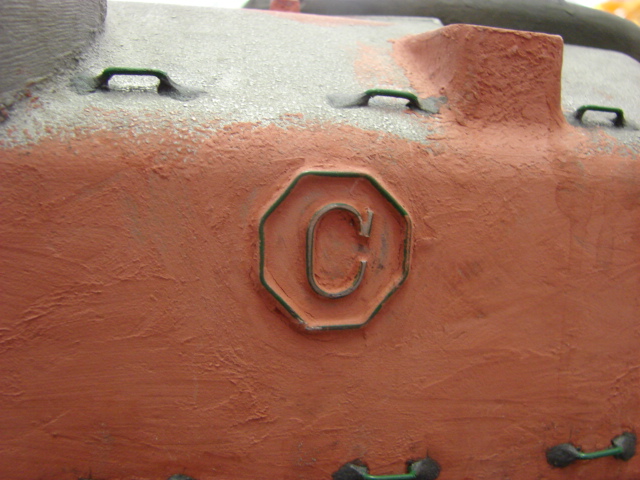
On the rear bustle and top deck of the turret I added the casting and foundry marks. Also added were the 6 footman loop tie downs found on the rear bustle. These tie downs were very common on the low bustle turret shermans of the era.

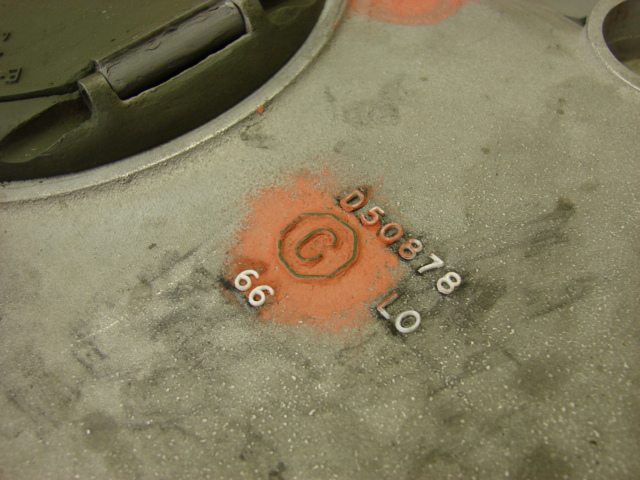
From what I have noticed on most M4A4s the low bustle turrets were mostly casted in east Chicago by the American Steel Foundries Cast Armor Plant. These castings have a prominent "C" inside a Octagon. This logo was scratch built amd blended in the turret's bodywork.

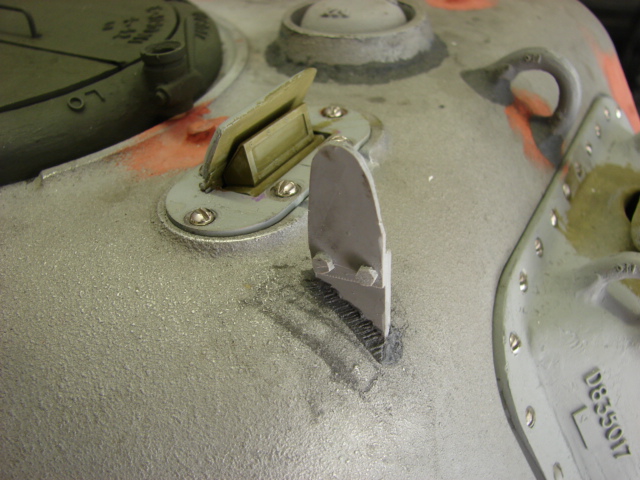
Work was also done to the auxiliary antenna base mount. The armortek turret has the blister casted in and has a simple cover plate that get bolted to the location. The parts are correct and look good once mounted, but I wanted to mod the part to have the recess plate well that was common on early period tanks. The mod was simple and was done with strips of plastic and body work. the unit was then blended together into the turret with the body work

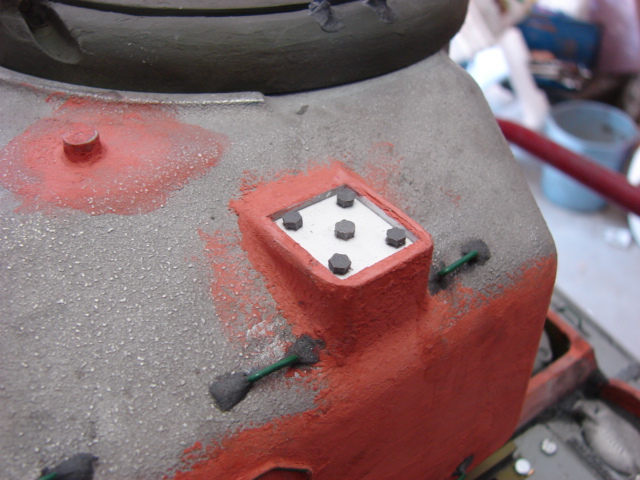
A new plate was fabricated out of styrene and detail bolt heads were mounted.

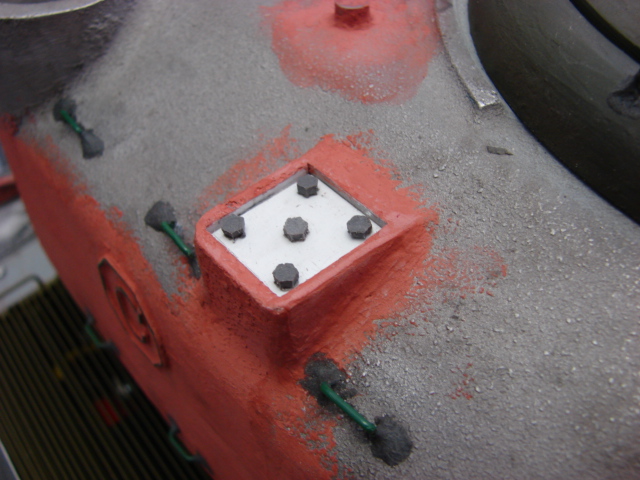
Like I always mention in these build logs, this part is for the spare antenna base ONLY! Many people miss ID this for the location of the MG pintle mount (because of the four bolts), and if added here is WRONG and KILLS the look of the tank... Don't do it!!!!


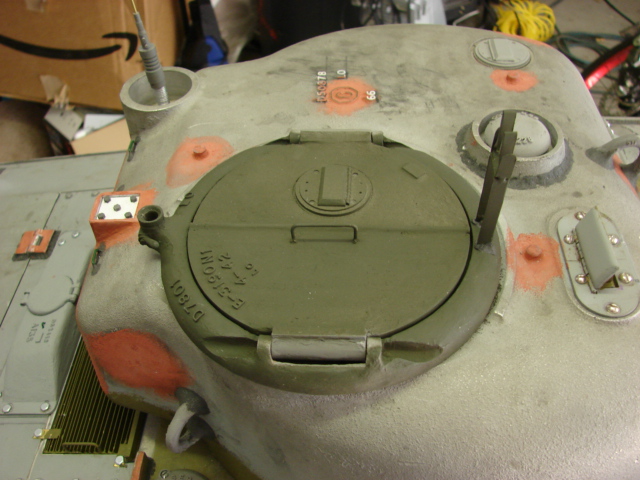
The last part of the build that was needed prior to paint was the commander's copula. The kit supplies you with a basic commander's split ring copula. The kit copula is a good starting point, however I always wanted to tool up this part as I already have the late single hatch version, and wanted this style as well.

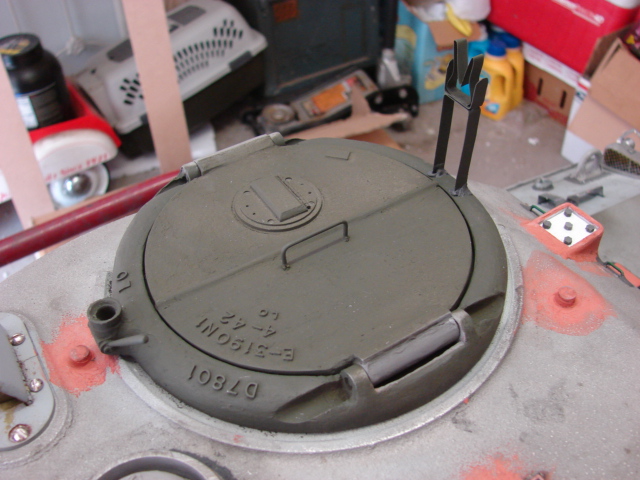
This is the first sherman I have built in 10 years to have the split ring so for me building a tank with this part is very overdue, The new copula is fully functional and has been added to the catalog.

The copula features full interior detailing on both the ring and hatches, minus the internal periscope... in which case I recommend the rein one from Panzerwerk (which is what I used) or the white metal one from Armorpax.

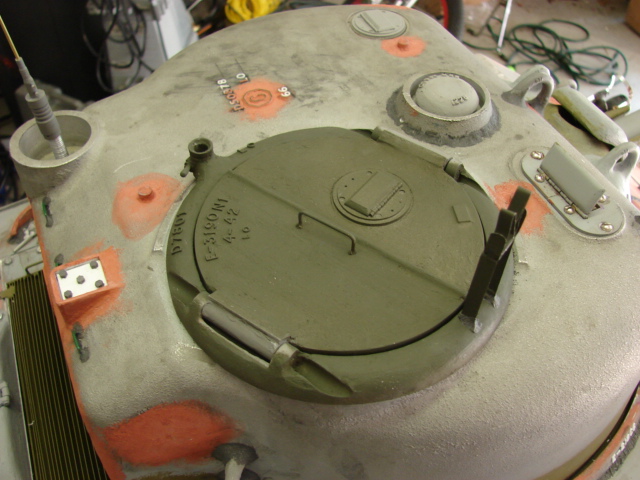
This version of the copula represents the first style witch doesn't have the spring assist which was found on later units. The hatch comes in two styles, One with the early style fixed M2 travel lock, and the other with the later retracting style travel lock.

This style was more commonly found on early low bustle turret tanks, this kit will work for the Viper, New DML firefly / composite hull M4, Armortek early production M4A3 and armortek M4A4. This version may not be 100% accurate for the DML mid / late production M4A3, but I have that version in the works.

Even though, this replacement copula is already superior the the stock DML one in that it has the integral pintle mount, interior detailing, and is the correct scale unlike the DML one which is severely under scaled, more on the new copula to come ;)

Also added to the catalog is the early style copula M2 fixed travel lock. This travel lock was common on early period tanks, and is all fabricated out of metal

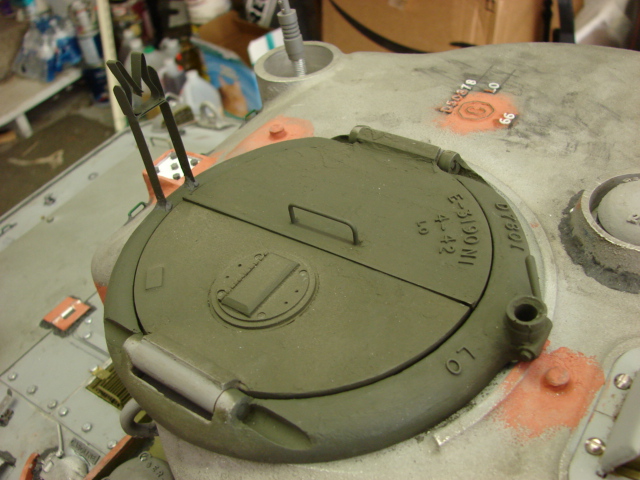
Before installation the copula was painted in it's OD base, the details like the pads and heads rests will be painted after the rest of the tank is painted.

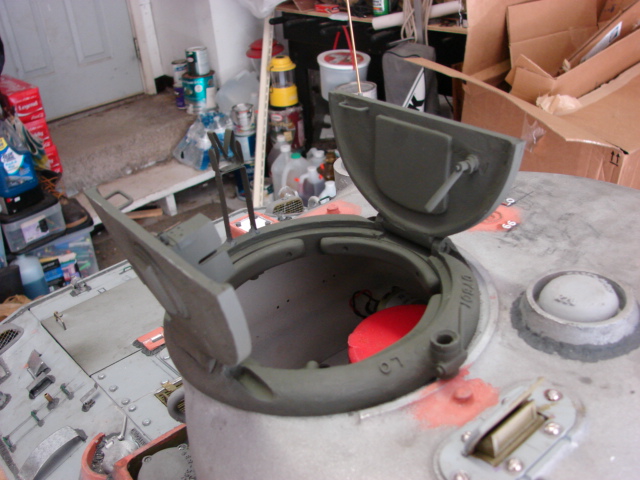
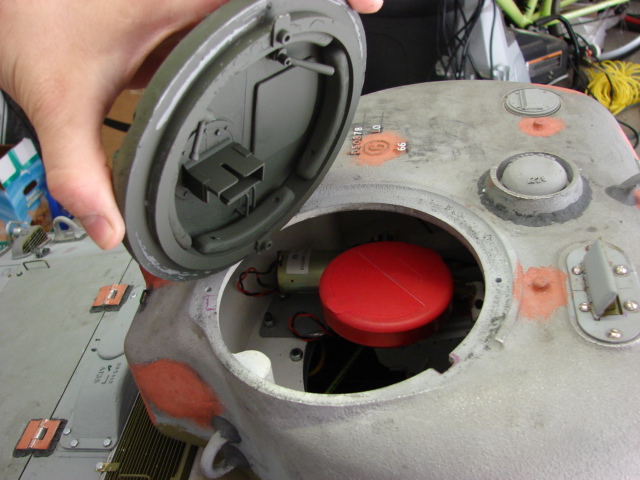
The final feature that I added was the ability to have the copula rotate. Unlike the single hatch version the split ring was able to rotate 360 degrees. This feature was built into my model, giving the tank a unique feature.

This was done by adding to locks to the bottom of the copula and notches to the turret, like a 1/35th scale tank model. Another reason for making the copula removable was so I can still get easy access to the airsoft gun without risk of damage to any copula details.

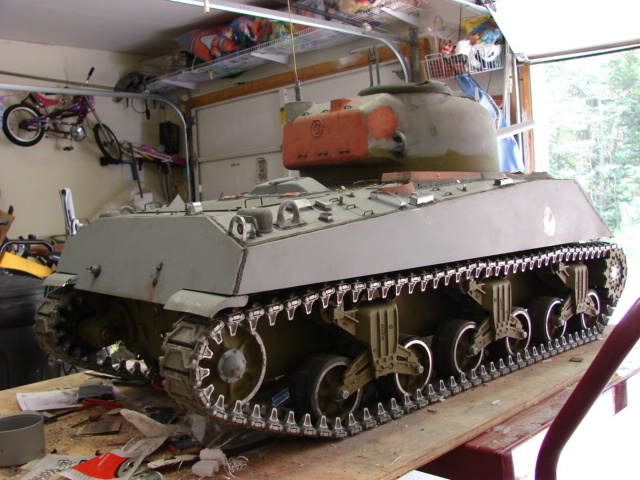
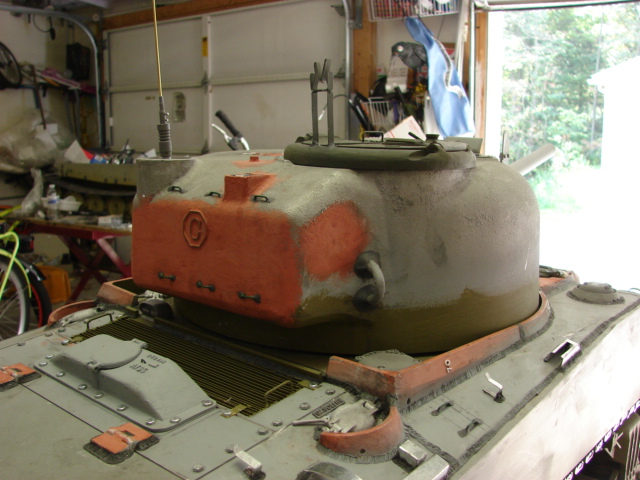
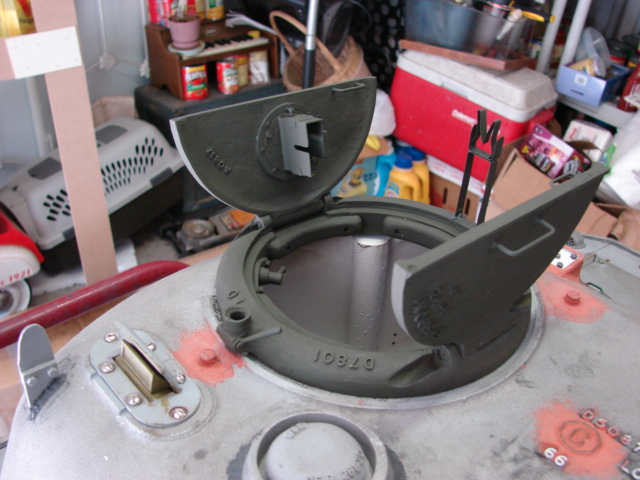
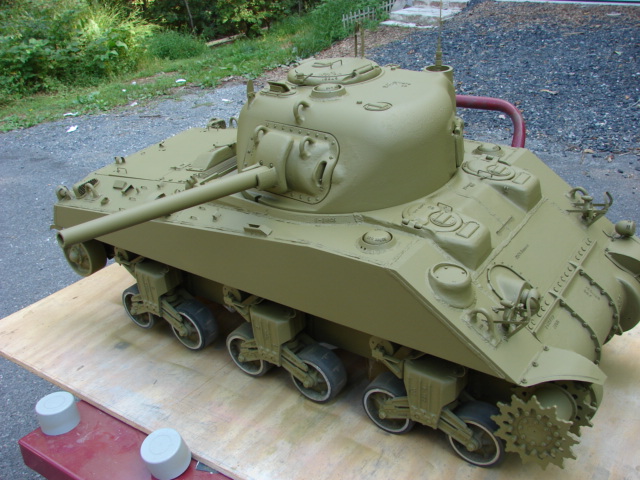
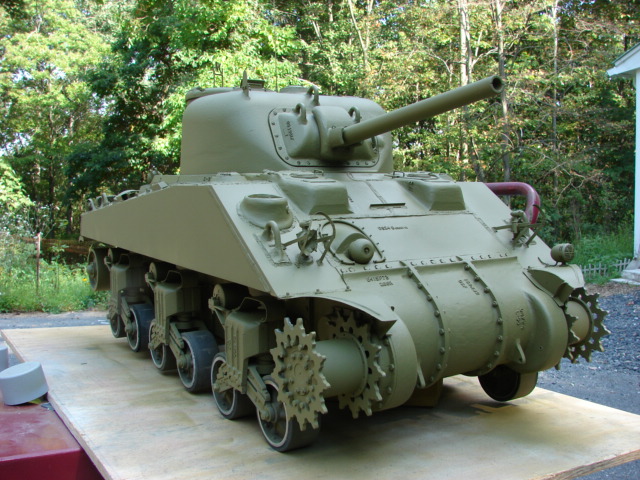
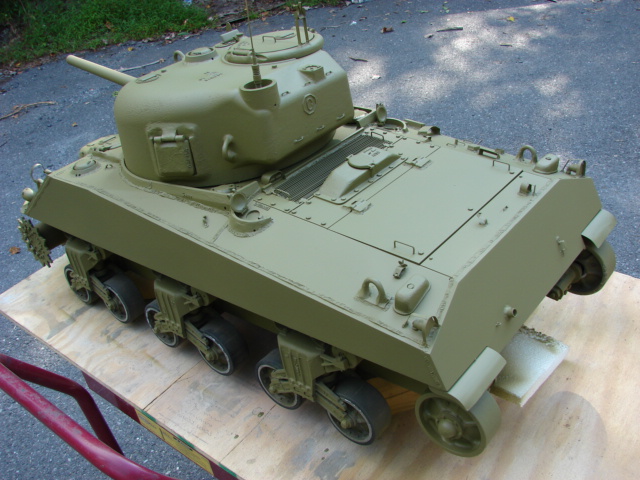
Once the details were done it was time to get the tank into paint, the tracks were removed, lights / pre painted lower hull areas were masked, and the model got a good dusting / vacuuming. Once ready the tank got it's final prime

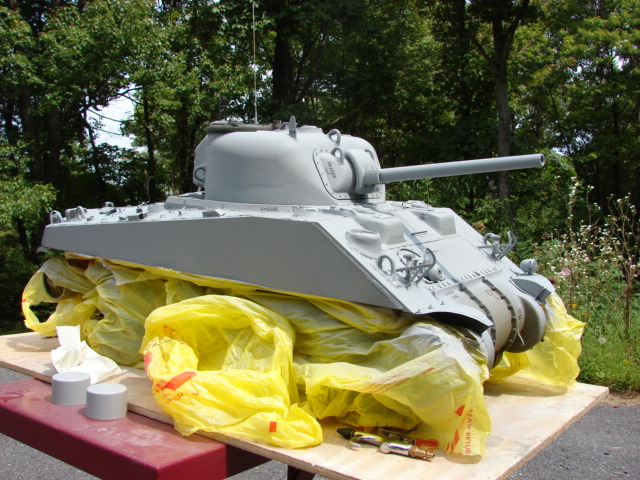
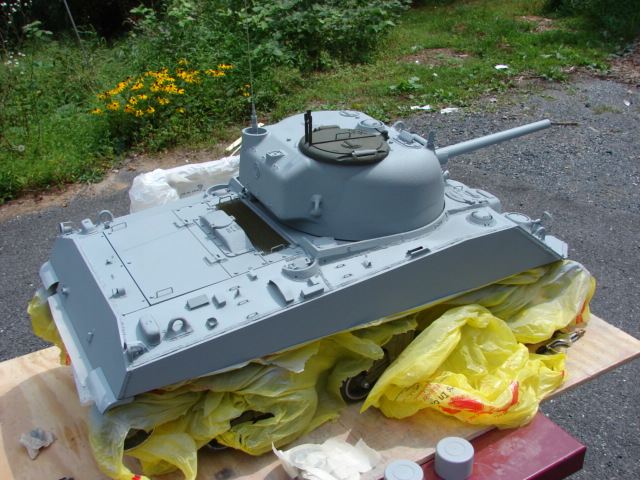
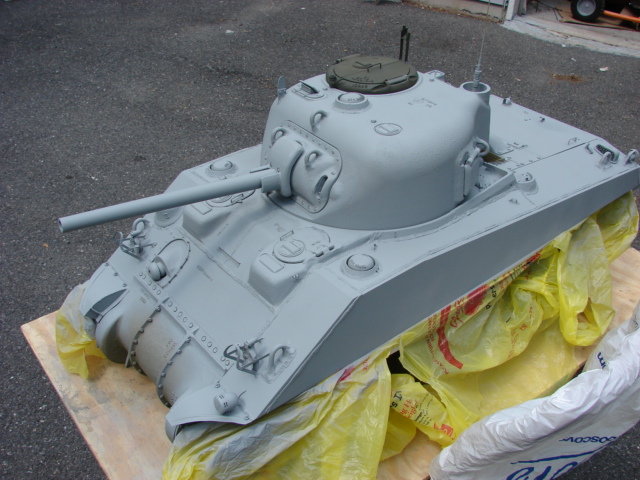
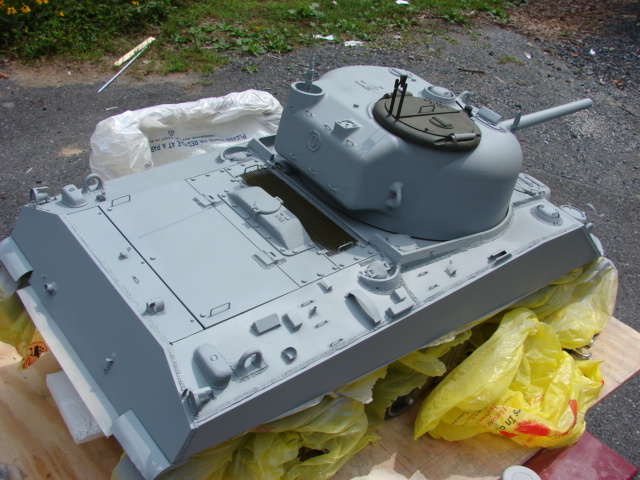
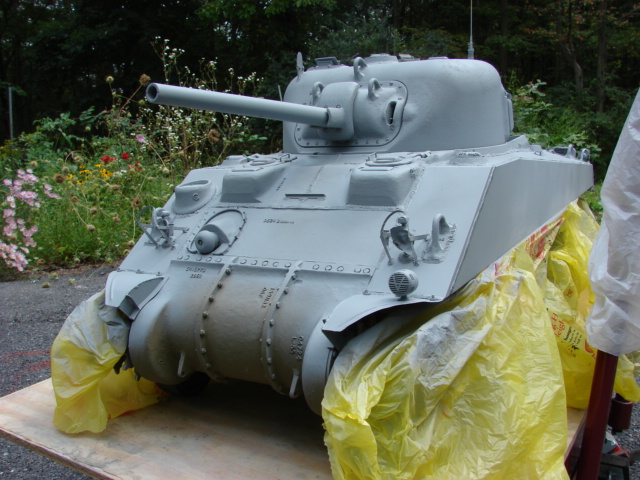
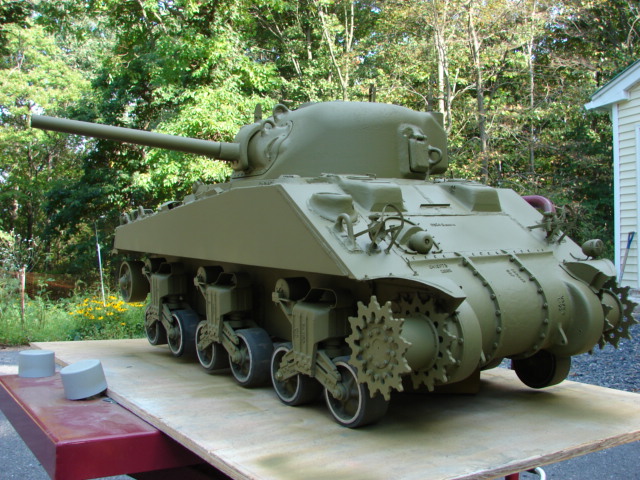
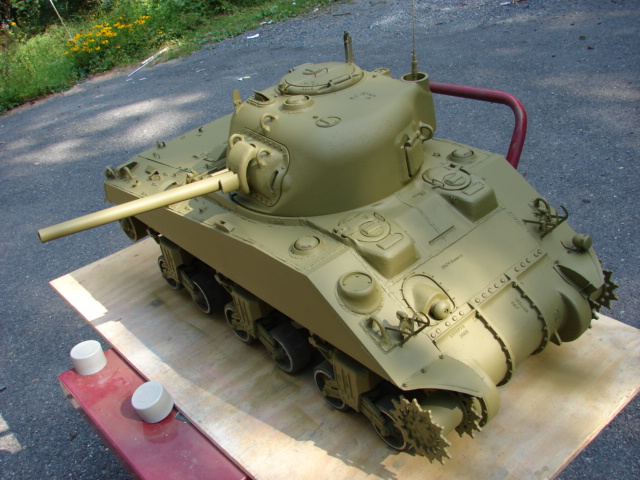
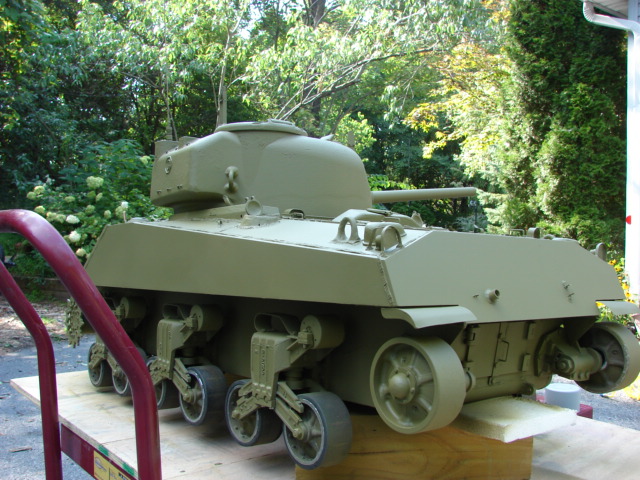
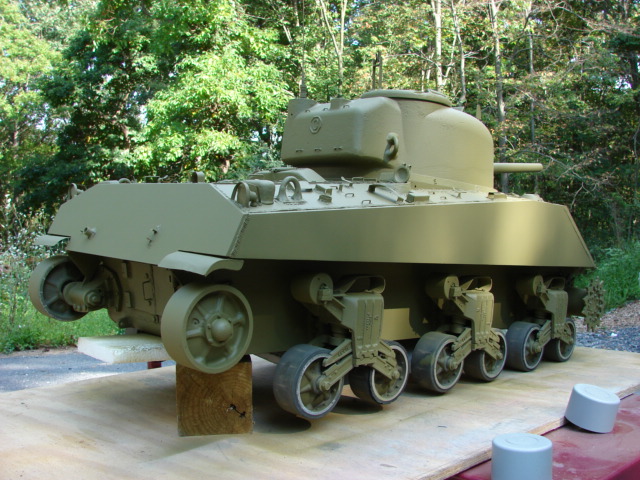
After the prime the base coat of OD was added, Like I mentioned earlier for the color I'm going with the early shade of OD (like the one I used on my M3 Lee). With the base on the tank is all one shade and all the work begins to pay off

More pics were posted on the facebook page, http://www.facebook.com/EastCoastArmory

and a video update was added to youtube
http://youtu.be/AKkJxkz3ssE

Now with the tank is in it's base coat I've started to add the markings... More to come!!!

  • Member since
    August 2014
Posted by YariCav on Tuesday, August 26, 2014 12:16 PM

Seeing your work makes me feel like a wuss for complaining about fumbling with small photo-etched parts.

Truly inspirational work.  Bravo!

  • Member since
    April 2005
Posted by armourguy on Tuesday, August 26, 2014 9:09 AM

More progress on the model was made and the tank is another step closer to the finish line.


All the functions have been completed, this includes the turret and the hull functions.


With the functions now out of the way, the project's back has been broken and it is all down hill external detailing from here.


Like on my last RC sherman build I added the function of the pivoting loader's periscope. The kit has a nice milled recess for the periscope. To make the unit pivot I modded one of my resin periscopes to rotate on a sleeve plug.


The sleeve was then epoxied to the interior of the turret.


The scope is hooked up with the turret rotation function and pivots when the turret is activated. This function gives a little more animation to the model.


The last function that I added to the turret was the functional gunner's scope.


The gunner's scope on the sherman like with most tanks is connected to the tank's main gun... and elevates and depresses with the gun in unison. I wanted to add this feature to my build as it helps with the accuracy of the tank, and is something that I haven't seen done before.


The top plate was retained as it was the correct size and shape, only mods made were the addition of more fasteners and the split line detailing. The turret already has a nice divot in the casting and a securing plate for the scope.


The scope notch was drilled out, and pivot mounts were also added. For the scope itself I modded a spare panzerwerk periscope and fitted it to a rotor drum, finally for the top hatch door I used one of my resin periscope covers. To pivot with the scope the molded in hinge was removed and in it's place micro hinges were used.


As for the hookup I simply used a connecting rod to hook the system to the gun. this way like the real tank it moves in sequence and because it's passive no extra electronics are needed and saves interior space.


The last function that was added to the hull was the addition of the taillights. For the taillights I used one of my own sets, along with a set of my tail light brush guards


Like on my other builds I modded the LED to fit snugly into the tight recess of the taillight.


The lights were patched into the headlight circuit and works along with the other lights


After the last of the functions were added I started to comb through and add the remaining exterior detailing.  So far the front portion of the vehicle.


Starting with the sprocket, since the test drives showed that the sprocket needed no adjustments I fabricated a cover cap for the center fastener.


the cover cap was fabricated out of a thin sheet of brass. By being so thin it covers up the fastener and keeps the recess that is found on the center of the Sherman sprocket.


On the front plate the cast numbers, foot rest, welds, foul weather driving hood clips and the bow hatches were all added.


I used my early sherman hatches for the model, like with my other builds I used the panzerwerk periscopes. The interior portion of the hatches were painted and weathered


One mod that I made to the hatches though was the removal of the counter weight assist spring and mounts. Because this tank is being built as such an early vehicle these springs were not developed at this time. It is also because of this reason why I didn't add the brush guards to the periscopes on this tank... as they would be anachronistic.


On the tank's rear deck I added the fuel cover caps. The caps on this tank were supplied with the kit and they are from armorpax. They are very nice, easy to build and are fully functional. They were assembled out of the box.


I also fabricated the tank's grill work. The M4A4 had a unique rear deck setup compared to the other variants of the sherman. The A4 had a small intake grill just aft of the turret which was placed right in front of the engine's radiator.


The grill itself was the typical US design, where it used welded slats. The kit comes with a laser cut sheet metal grill. The kit grill is a decent piece, but rather than using the kit supplied one I went and scratch built a new one.


The new grill is all fabricated out of soldered brass strip, and sits in a box frame like the real one. Also like the real grill the mounting straps, and lift handles were also fitted.


The only plastic part is the bullet splash guard, which was made out of styrene. As I mentioned before the rear bullet splash rim was making contact with the turret and was deleted... What's interesting is that this same issue happened in real life with the real M4A4, and the designers redesigned the grill to have the bullet guard connected to it.


After the grill was completed the grill was primmed/ painted in it's base coat, and a weld was sculpted on for the bullet shield. The grill will be fastened to the tank after the radiator cover is fabricated/ mounted... more on that to follow!!


The fire extinguisher box was also fitted at this time, As of note you can also see that the guard has a notch cut out for clearance. The extinguisher itself is one of my resin units.


The top deck engine hatch was also fitted. The kit supplied hatch was a nice made component, but after I made some mods to the upper deck it was no longer going to be compatible. I obtained an aluminium plate of the same thickness and fabricated the new hatch for the dimensions of my rear deck.   


The A4's hatch was very simple, was noting more than a steel plate with some handles and lock fasteners fitted. These simple details were added.


For the hinges the kit hinges were used OOB, only mods made was the weld detail, and some cast texture that also covers up the mounting fasteners


The underside of the hatch was painted. With the hatch done I also mounted the control panel to the tank permanently, as no more RC functions will be added at this point.


Some turret details were also added. This would include the notch for the turret ring slot screws, and the cheek blister.


The shell ejection hatch was also fitted. The kit supplies you with a basic functional hatch along with the collar blister. The kit one could have been modded, but instead I swapped it out for one of my own resin ones. The collar blister was bolted to the turret, and body work was done to blend in all add on's to the turret cast surface.


more images were posted on the ECA facebook page

http://www.facebook.com/EastCoastArmory


and a video update was posted on youtube,

https://www.facebook.com/EastCoastArmory


I'm now finishing up the molding for the A57 multibank radiator cover. Once added I can finish off the tool post effectively completing the tank's hull! Once complete I can finish off the turret and get this bad boy into paint!! More to come!  

  • Member since
    November 2009
  • From: SW Virginia
Posted by Gamera on Saturday, July 26, 2014 8:08 AM

Wow, in some of your photos I'd swear I was looking at the real thing on the production line!

I love the ability to shoot BBs!

"I dream in fire but work in clay." -Arthur Machen


  • Member since
    July 2008
  • From: Vancouver, the "wet coast"
Posted by castelnuovo on Friday, July 25, 2014 6:58 PM

This is sooooo darn cool Cool

  • Member since
    April 2005
Posted by armourguy on Tuesday, July 22, 2014 12:56 AM

More progress was made on the model

The 75mm conversion / gun work has been made and completed, It is at this point where my model is different from the other 24 other firefly kits produced, which are all 17 pounder equipped tanks.

When I received the kit it had a mixture of gun parts from the older 75mm kit and the current 17lber firefly

There were not enough parts to build the complete elevation unit for either design, but with the parts supplied I was able to cobble together a Frankenstein design that utilizes parts from both kits

Like I mentioned earlier when purchasing the kit I specially requested to have the turret and equipment swapped with the 75mm version. This also included the kit's M34D mantlet and rotor drum. The kit original parts are very nice assemble easy and were one of my favorite parts from the first kit.

Unfortunately because of the time period that I'm building the tank for, the M34D mantlet was not developed yet, so I will not be using it on the model <:^( . In it's place I fabricated the early war period M34 mantlet and rotor drum.

The earlier design of the M34 has the gun protected by a smaller thinner mantlet.


The gunner's scope is missing as that was developed later, and the coax M1919 barrel emerges from the rotor drum and is very exposed.

There were several different variations of this style of mantlet, of which these versions are currently in development. This set however has been added to the catalog. http://eastcoastarmory.com/m4.htm

The set is designed to be compatible with the Armortek components / kits, but the parts can also be adapted for use on any other 1/6th scale sherman model... like for backdating a viper, vantex M4, or for backdating.. the new DML firefly to a composite hulled M4 ;)

While on the 75mm barrel I smoothed out the barrel's small cnc marks with some Emory cloth. to speed up the process I placed the barrel into the lathe

another part of the barrel that I tweaked was the barrel's front. Like with the German tanks the kit's barrel has muzzle break threads located on the barrel's front tip. but unlike the later 76mm gun the 75 never received a muzzle break so the threads are not needed.

To improve the look I developed a resin plug tip that slips in the barrel and gives a more scaled thickness, and the detail of the emergency cross hair groves,

Once added and blended in the barrel was primed and mounted to the trunion along with the other elevation parts

For the elevation motor system the kit was supplied with the newer style.

Because of the longer trunion on the older kit the motor needed to be mounted lower on the motor mount. To to this I simply drilled a new hole lower on the mount and fitted the motor upside down.

On this build I also wanted to do something different than my usual RC tank. For this build I wanted to have the model be able to have a functional main gun. For this feature I wanted to install into the tank an airsoft gun. For the firing unit I went and acquired the bb firing unit from the Heng Long 1/16th scale tanks,

The unit was left stock with no added mods. A standard airsoft barrel was acquired from ebay and fitted. Once fitted I modded the unit to mount to the armortek bracket, and to have a hopper devise for the bbs. For the hopper I used an empty tin of mints

some advantages of the tin is that it has a nice low squat shape that saves space in the cramp confines of the turret, and it has a convenient open able lid that keeps the bbs from getting loose and running amok on the interior.

to help with the alignment and mounting I machined a few spacers for the barrel so the firing unit is centered in the tank's gun barrel and fires straight out the front. The elevation limit switches were also fitted at this time

To fire the gun an simple remote firing system was fabricated using a servo and an impact switch. a manual kill switch was also added for safety. the unit is also powered by a separate battery source. that is carried on board

Just prior to mounting to the tank, I added the coax M1919 MG. For the barrel itself I used the Panzerwerk resin one as I mentioned before are highly recommended

To add more to the realism I was able to make the M1919 elevate with the main gun simultaneously. This was done by attaching the gun to the one pivot screw. The screw pivots with the mantlet, and since it's the pivot point the M1919 when attached will move true and seamlessly. It's a very simplistic feature that is low profile and passive. No extra servos or equipment is needed.

http://eastcoastarmory.com/forumpic/m4a4/gun/DSC01469.JPG[/img]

For installation of the unit, I replaced the kit recommended hex bolts for domed slot screws. Because it's not easy to find metric slot screws this size I swapped out the metric for standard. The screws themselves I find in Radio Shack.

After the installation of the gun I decided it was time for a another road test. With the turret and hull weights now basically established I can set the track tension and chew up some lawn... which these VVSS have a knack on doing ;)

Then after a nice Sunday drive I hosed off the lower portion and got the tank back in the shop and on the lift to continue construction.

More pics were put on the facebook page, http://www.facebook.com/EastCoastArmory

and update videos were added to youtube.

http://youtu.be/ZJNoKPROUiA

http://youtu.be/B4Xn4p5taac


http://youtu.be/G_ynSwahJ9w

Currently I'm adding some more functions to the turret. More to come!

  • Member since
    April 2005
Posted by armourguy on Saturday, June 28, 2014 12:09 PM

Thanks bob, 

More progress has been made and the tank is another step closer to completion. 


Since the last post the rear deck was mounted,


Before I was able to mount the deck to the tank I first had to add the etch lines for the rear plates. On the armortek shermans the rear deck is one pressed metal pan. Because of this the panel lines that are found the real tank are not present. To add them I etch them into the plate with a Dremel. Before I add the lines I mark where the lines go, and use tape as a guide


with a steady hand the lines are etched, Once the lines were etched the interior of the plate was primed and painted in flat white, then was added to the tank


Once the rear deck was fitted I was now ready to add on the rear deck components. This would include the fuel cap guards, rear lift hook, and rear vents. For the guards the kit supplies you with two CNCed aluminum ones that work very well. 


All the bullet splash guards received cast textureing, welds, and their drainage holes. All that will be added to complete the look will be the cast numbers, which will be added as the build continues


The rear hull blower was also mounted, for the part I swapped out the kit original for one of my own. 


Just like with the rear blower I swapped out the basic kit supplied vent, lift hook, and front blowers with my own sets. 


On the tank's bow hull I completed the tin work. This would include the front fenders and the brush guards. 


The kit supplied fenders were swapped out for one of my own sets. The fenders are all soldered together and are mounted to the tank's fender mounts via fasteners like the real unit. 


The kit supplied brush guards were not compatible with my head lights so I fabricated a new set that works better for them. Like on all my tanks the guards are all soldered together and have the plunger canister mounted to them. Chains and plunger detail to be added later.


The tank's siren was also mounted. For this tank I went with a different style siren then I normally use. Rather than using my funnel horn I went with the Panzerwerk resin unit instead. 


Because of the early period style tank I want to represent the larger panzerwerk siren was a more accurate choice. Also Unlike all my other shermans the siren is not mounted to the hull, or has a brushguard. Instead it is mounted to the front fender


Mounting the siren here is another early war / production trait, Because of the high vulnerability of the siren getting damaged in this location it was moved from this spot to the front hull where it would be protected by the caged brush guard. Like the real one the part itself is attached to the fender via a fastener.


The M1919 Tarpaulin rail was also affixed to the tank, welds will be sculpted soon.


Work was also stared on the turret. this is the biggest difference from my model than the other armortek firefly kits. When I purchased the kit I requested that the kit firefly turret and gun be swapped out from the turret and gun from thier 05 release early M4A3. 


The turret itself is all one piece aluminum casting, has real cast texture to it and has a very realistic feel to it. The turret has a cooking pot resemblance.


The turret's floor is made out of laser cut steel and is comprised of the floor, turret neck and the turret rotation gear ring. the parts are very nice and assemble easily. Before prime and paint I simply hit the surface with an Emory cloth to buff away any surface rust that was present.


Once complete the parts were painted and installed. The only addition was adding lock washers to the fasteners


After a few small tweaks to the bullet splash rim the turret plops into place and rotates on control.


a youtube video was made describing the updates in more detail, 


http://youtu.be/9whWNO5Ic0E


More pics were also added to the facebook page, 

http://www.facebook.com/EastCoastArmory


Currently I'm working on the gun and turret. I got lots of plans for this part of the build, and will also have some new early period sherman parts to add to the catalog, As for what they are, here is a sneek peek ;)


More to come!


  • Member since
    April 2014
Posted by r13b20 on Thursday, June 5, 2014 1:17 PM

Thanks armourguy, don't know why I asked that. By the way love that "hey, Kelly, it's getting hotter than h**, in here..." avatar. :) Bob

  • Member since
    April 2005
Posted by armourguy on Thursday, June 5, 2014 12:17 AM

The electronics look to be the same, but because of the sherman turret's smaller size, lower weight  / mass they tend to spin faster on these kits then on the German counter parts. This also applies to the gun elevation, the shorter 75mm gun moves a lot more effortlessly then the larger german guns with that heavy gun muzzle on the end. 

  • Member since
    April 2014
Posted by r13b20 on Wednesday, June 4, 2014 11:19 PM

Do the Sherman turrets turn faster than the tiger's for accuracy? Bob

  • Member since
    April 2005
Posted by armourguy on Tuesday, June 3, 2014 11:28 PM

Thanks guys, For an armortek the weight is much lighter than the german tanks. The finished model weighs in at around 150 or so lbs.  The King tiger I have from them is closer to 450lbs. 

It's been awhile since I posted any updates, but I made a lot of progress on the model completing most of the front portion of the vehicle.

Once all the work was completed in the last update it was time to start buttoning up the tank. For this I started with the front half of the tank due to the work needed for the bow hatches.

For the bow hatches the kit supplies you with two CNCed aluminum billets that have roughly the right shape and size of the wide welled early hatch blister. The kit also supplied you with a basic set of hatches

The blisters are a similar design from their first sherman release, only the units on the first model were made out of a hollow cast white metal alloy. Since these are solid billet they are much easier to rework and alter.

For the bow hatches I will be using one of my own early sherman hatch sets. to make my hatches fit better on the stock wells I enlarged the hatch well recess via the mill, also milled into the billet was the recess for the backup periscope. The Stock machined hinges were deleted as they will not be needed as I will be using the resin ones instead.

The squared off shape of the wells were rounded off with a few passes of the belt sander.

once the wells were revised it was time to mount them to the upper deck. The pieces themselves mounted perfectly with the stock fasteners and no fitting required.After the wells were added I also added on the bullet splash rim. these parts were also OOB. The only mod that I made was adding the water drain hole to the rear bullet splash rim corner (Pics to follow)

On this version of the sherman Armortek revised the upper deck design from their first release. On the first release M4A3 the deck was one plate of Sheet steel, this deck had two small triangular sections which needed to be affixed the the deck (either with straps and fasteners or welding). On this version of the kit the deck is aluminum and comes in two complete sections which makes it a lot easier to install. For extra support I fabricated two brass straps that will connect the two halves via countersunk fasteners.

these straps were added before the splash guards were added. The strap fasteners were blended in with the bodywork and are no longer visible. they will be connected with corresponding mounting holes on the rear plate. This will be done after the rear deck is mounted.

After the straps were fabricated I turned my attention to the turret rotation system. The kit supplied system was built OOB and assembles very easily.

After the rotation motor was mounted I turned my attention to the brass turret bushing. The bushing is a common feature found on the armortek kits and is very effective at ensuring smooth operation of the turret.

On all my builds I like to mount the ring to the upper deck via counter sunk fasteners. By doing this that ensures the bearing to stay in it's place allowing the turret to glide over it during operation.

One these armortek shermans I encountered that the ring will make contact with the turret turning gear, which will not allow the ring to seat fully.

A simple fix was to remove a small section of the ring allowing clearance with the gear. All burrs and corners were removed and buffed smooth.

Once removed the ring slipped on like clockwork

Once the top deck was installed I then completed the front hatch area with the bodywork.

On these early sloped shermans the front plate was constructed out of 5 parts, two rolled steel sides and three cast units. The bodywork completes the illusion of the hatch wells blending everything together making it resemble the real unit. Once everything was blended smooth cast texture was added to all the appropriate cast plate units.

The resin hatch hinge was thoroughly blended into the cast surface.

In addition to the hatch wells I also built up and completed the Bow M1919 section. Like the hatch wells on these early style shermans the entire plate containing the M1919 ball equipment was casted on a long rectangular plate.

Because this kit was a firefly the kit was not designed to have the M1919. On the firefly they removed the assistant driver location for use of more ammo for the 17 pounder gun. In it's place a large steel rectangular plug was placed on the hole. As I mentioned earlier in the build the well was all fabricated out of resin, PVC and epoxy bodywork.

For the M1919 ball unit I used the resin set from panzerwerks, I've used these sets in the past and they are highly recommended. The MG ball was hooked up the a servo and pivots on demand.

As a side note, because I ordered the kit as an M4A4 Armortek did throw in an Armorpax white metal M1919 ball set (special thanks to Armortek). The armorpax version is also very nice and would have been used, but by the time I noticed that they supplied the parts I already had the Panzerwerk version fitted. The armorpax set will be put in storage and will be used on my next sherman build...which shouldn't be too far off lol.

After the front hull rework I then added most of the front hull details. These details are off the shelf ECA and include the head lights, lift hooks.

One new addition to the ECA catalog is the addition of the early sherman hull front antenna base mount.

http://eastcoastarmory.com/m4.htm

As for the headlights themselves they have been rigged to light via an LED. To better make the LED fit in the resin headlight housing I turned down the front portion of the led on the lathe.

Before I fitted the LEDs to the resin housing I first painted the entire searchlight silver, then Black on the exterior. The purpose of this is to insulate the resin casting and to remove the chance of the resin part "glowing" after the bright light is activated. Once all paint is dry the LED was fitted and mounted to the vehicle.

The lights on this model I configured to operate remotely. a remote activation switch was fabricated, along with a cut off so I can use the same channel for more than one operation... more on that to follow ;)

More pics were posted on the ECA facebook page http://www.facebook.com/EastCoastArmory

and a video update was posted on youtube
http://youtu.be/RPQE-TN40N8

Now with this out of the way I have started finishing up the rear deck once fitted I will then be able to focus on the turret... more to come ;)


  • Member since
    November 2008
  • From: Central Florida
Posted by plasticjunkie on Sunday, April 13, 2014 2:13 PM

This is simply jaw :jaw:!!! Bow Down Mind blowing to say the least.

 GIFMaker.org_jy_Ayj_O


Too many models to build, not enough time in a lifetime!!

  • Member since
    November 2009
  • From: SW Virginia
Posted by Gamera on Friday, April 11, 2014 11:13 AM

Yeah, that' s just plain out awesome, looking forward to seeing her in action.

"I dream in fire but work in clay." -Arthur Machen


  • Member since
    March 2003
  • From: Western North Carolina
Posted by Tojo72 on Friday, April 11, 2014 7:40 AM

Man,that is just some awesome work,would love to see that thing in action.How much will the finished model weigh ?

  • Member since
    January 2012
  • From: Hatfield
Posted by Misty on Friday, April 11, 2014 5:47 AM

Damn thats got more tech in it than the real thing! awesome.

  • Member since
    April 2014
Posted by r13b20 on Thursday, April 10, 2014 8:01 PM

Now I know why I never bought from Armortek. O.K., it WAS the money! Great job so far. If that primer is the same stuff we used on 1:1 helo's I used to build, that's tuff stuff. Very cool! Good use of spent brass also.

  • Member since
    March 2014
Posted by BarrettDuke on Wednesday, April 9, 2014 10:18 PM

That's hilarious TD. As I was looking at the pics, I said "That's insanely cool." And then I came across your comment. Great minds, or something like that, I suppose. But it is really amazing.

  • Member since
    April 2005
Posted by armourguy on Wednesday, April 9, 2014 10:45 AM

More progress has been made on the model.

The models smoke system has been assembled and mounted.

For the smoke system I went with the armortek smoke unit. The armortek unit is a nicely constructed accessory that is all plug and play with their RC system.

The system comes unassembled, but it is all pre wired, and assembled easily and quickly and is made out of high quality components

When assembling the unit I like to seal all crevasses and seams with silicone. The silicone seals off any gaps that can lead smoke to seep out, and to only force the smoke / blower air to exit through the plumbing.

For generating the heat the system uses a heating filament from a industrial soldering iron. One design feature I like is that the filament is connected to a shut off switch so you can run the tank without the smoke. This also saves wear and tear on the system.

The kit includes all the plumbing for arranging the smoke system. The kit doesn't not come with the actual detail exhaust manifolds. For the manifolds themselves I fabricated them out of my resin M4 sherman exhaust manifolds.

The resin exhaust tips were hollowed out on the mill, and a press bent aluminium tube.

For connecting the thinner tube to the larger PVC adapter tube I recycled a spent 8mm mauser shell casing. The shell casing was a perfect fit for connecting the two tubes together.

To modify the casing I simply cut off the bottom portion of the shell and assembled the rest of the unit together.

the manifolds were painted / weathered and were mounted to the tank. After they were mounted I also mounted the rear screen work. All plumbing and screen work was mounted to the model via silicone. The reason why I went with this medium was because in case I need to get access to the system for maintenance I can remove and disassemble everything without causing damage.

Another addition I made to the tank was the addition of the smoke system throttle control box. This unit is a drop in addition from Adrian ( sales@armortekaddict.co.uk ),

With this simple add on the smoke system is synced with the sound system and emits the appropriate amount of smoke with the sound (less smoke for engine idle, and more smoke for revving)

Idle

revving


It was at this point I mounted the rear engine hatch doors.

For the door pins I fabricated a set of pins from Hex bolts. The hex heads were rounded off giving them a pin appearance.

Like all of my RC tanks I built i a refueling system into the model. The system uses a RC fuel pump, and the pump was patched into the armortek power supply. The pump is only used to refill the system and uses a long tube. The purpose of the system and the long hose is because of the smoke fluid I want to minimize the chance of the fluid making contact with the model's surface, and possibly ruing the finish.

In addition to the pump I was also able to make the rear control panel. Because of the rear engine deck engine hatch, I have ample access to this location. This location is where I mounted the smoke system controls, (refueling, filament power cut off) and the tank's recharge jack system.

For the recharge jack I utilized a switch set up where I plug in the jacks to the tank, and hit the switch to charge. When charging is complete I hit the switch and pull out the jacks and I'm ready to go.

Battery not charging


Battery charging

A youtube video was made with the progress, http://youtu.be/3LPSDdrlV5E

More pics were also posted on the facebook page,
http://www.facebook.com/EastCoastArmory

With this system now complete I'm going to be working on the Bow MG, and sealing up the tank to move on to the turret...More to come!

JOIN OUR COMMUNITY!

Our community is FREE to join. To participate you must either login or register for an account.

SEARCH FORUMS
FREE NEWSLETTER
By signing up you may also receive reader surveys and occasional special offers. We do not sell, rent or trade our email lists. View our Privacy Policy.