SEARCH FINESCALE.COM

Enter keywords or a search phrase below:

Dragon 1/35 M1A1 AIM Build log

14347 views
35 replies
1 rating 2 rating 3 rating 4 rating 5 rating
  • Member since
    August 2013
Posted by Ktkrow on Friday, November 22, 2013 10:16 PM

Thanks doog! How true. Learning a lot.  But that is great advice to keep in mind.

Thanks buffel! I appreciate you looking in and the compliment.  

I haven't done much, so there hasn't been an update.  Little bits plus working on my car build.

I did manage to base coat the tracks and get more of the lower hull guts installed.  The turret is daunting and will take a major chunk of time, but I'll get back to it soon.

Stay tuned and thanks again.

Ken

On the bench: Dragon's 1/35 M1A1 AIM   &    Revell '69 Ford Mustang Mach I Cobra Jet

  • Member since
    July 2006
  • From: San Francisco Bay Area
Posted by bufflehead on Friday, November 22, 2013 9:13 PM

Cool work Ken!  I don't know a darn thing about Abrams interiors, but I know great model detailing work when I see it!  

Ernest

Last Armor Build - 1/35 Dragon M-26A1, 1/35 Emhar Mk.IV Female


Last Aircraft Builds - Hobby Boss 1/72 F4F Wildcat & FW-190A8


  • Member since
    January 2007
Posted by the doog on Friday, November 22, 2013 8:21 AM

Cool shots, Rob! Thanks for posting those---great, first-hand reference!

Ken---you'll find that, generally, when detailing to this degree, you're going to run into fit problems like this SOMEWHERE along the way. It just always seems to happen at some point. You'll learn to hide modifications and outright desecrations of parts behind kit parts and bulkhead. I've taken a Dremel tool to parts that wouldn't fit, after test-fitting the hull and making sure that the chopped-corner of a transmission part wouldn't show! You model, you learn...

  • Member since
    August 2013
Posted by Ktkrow on Wednesday, November 20, 2013 12:17 AM

Thanks for looking in IB.  I figured your last post was meant for another thread.  Those look like Dragon instructions.  My M1A1 Dragon instructions are riddled with part # errors like that.  Good luck working it out. :)

Ken

On the bench: Dragon's 1/35 M1A1 AIM   &    Revell '69 Ford Mustang Mach I Cobra Jet

  • Member since
    March 2003
  • From: El Dorado Hills, CA
Posted by IBuild148 on Tuesday, November 19, 2013 6:02 PM

I like the detail. Yes

IBuildOne48

Teach modeling to youth!

Scalefinishes.com

http://i712.photobucket.com/albums/ww122/randysmodels/NMF%20Group%20build%20II/Group%20Badge/NMFIIGBbadgesmall.jpg


  • Member since
    August 2013
Posted by Ktkrow on Monday, November 11, 2013 6:30 PM

Thanks for looking in Brian!!!

Your screen name prompted me to read your profile.  I am right down the road in Nashua.

Ken

On the bench: Dragon's 1/35 M1A1 AIM   &    Revell '69 Ford Mustang Mach I Cobra Jet

  • Member since
    December 2008
  • From: Goffstown, NH
Posted by New Hampshire on Monday, November 11, 2013 5:25 PM

Those little details are making this one fun build to watch!  Great job!

Brian

  • Member since
    August 2013
Posted by Ktkrow on Monday, November 11, 2013 11:53 AM

Progress is slow, but it is at least progress.

I am still working the bottom hull interior.

I have done a little on the engine, getting it to fit better and added the air tube for the intake using a couple of peices of bendy straw.  Need some more paint as some of it came off moving it around.  To make it a little more solid, I used the 90 degree resin piece that went pointing down to the floor.  I really didn't care for it, but it reshaped easily and I think the desired affect once painted will look nice.  I also added the torsion bar housings in the bottom of the hull that are beneath the turret floor.

I was one piece short, so I went to the LHS and got some more tubing today.

I also was able to get some of the driver compartment detail done.  It's ok, but I got some fluorescent paints to make the controls pop a bit (at least some of them) which I will be painting on soon.  This is a shot before the fluorescent paint goes on.

I also started the turret basket.

I am working on a way to keep the top of the hull and turret on, yet make them removable.  It's a total experiment, but I think I have it worked out.

Stay tuned!

Ken

On the bench: Dragon's 1/35 M1A1 AIM   &    Revell '69 Ford Mustang Mach I Cobra Jet

  • Member since
    August 2013
Posted by Ktkrow on Wednesday, November 6, 2013 9:48 AM

LOL!  My daughter is 2 now, so I think at this point it was more a matter of "ANYTHING but lions, monkeys and elephants!"  A bit burned out on the other choices.

Thanks for the congrats!!!

Ken

On the bench: Dragon's 1/35 M1A1 AIM   &    Revell '69 Ford Mustang Mach I Cobra Jet

  • Member since
    March 2013
  • From: Puebla, Mexico
Posted by garzonh on Wednesday, November 6, 2013 8:39 AM

Very, nice!, is becoming a detailed project, and congratulations on your new baby.

My wife would have not ever allowed me to put a military theme in his room....

  • Member since
    August 2013
Posted by Ktkrow on Wednesday, November 6, 2013 7:32 AM

Thanks for looking Phil.

I agree that it could be for cost reasons, but my first assumption was that even though the new kits are sharper with better detail through improvements in manufacturing processes, that it was just residual detail leftover from the older mold as both are Dragon kits.

I like your theory better, as it usually IS the "bottom line" that drives these types of things.

I have no complaint that it wasn't included, as this kit is simply beautifully done!

Thanks again!

Ken

On the bench: Dragon's 1/35 M1A1 AIM   &    Revell '69 Ford Mustang Mach I Cobra Jet

  • Member since
    August 2005
  • From: Sydney, Australia
Posted by Phil_H on Wednesday, November 6, 2013 1:41 AM

Coming along nicely.

It's interesting to note that the newer kit seems to have mounting points for some interior detail, like the driver's station and some of the stuff in the turret (which is included in some of the older kits).

If I recall correctly, at one point in the kit's development, it had been intended to contain interior detail, but this was deleted for cost reasons.  

  • Member since
    August 2013
Posted by Ktkrow on Wednesday, November 6, 2013 1:18 AM

Made a little progress since my interior kit arrived (not much LOL, but a little).

Had to build up the turret foundation for the interior parts to sit on.

The turret base that came with the older kit isn't that great, so I'm building up the proper kit part.

Also started painting the parts for the drivers compartment, AND had to break apart the engine parts to reposition them.  After seating them all in, the were a millimeter too high preventing the back deck from closing.  ALL FIXED!

Also started the turret floor, so next time, I should have much more completed inside.

It's late, gotta sleep.  Thanks for looking in.

Ken

On the bench: Dragon's 1/35 M1A1 AIM   &    Revell '69 Ford Mustang Mach I Cobra Jet

  • Member since
    July 2006
  • From: San Francisco Bay Area
Posted by bufflehead on Tuesday, October 29, 2013 11:09 PM

Yeah Rob, those are some really cool pics of the Abrams engine!  Great reference material for anyone building a scale engine for models!  Thanks for sharing!!

Ernest

Last Armor Build - 1/35 Dragon M-26A1, 1/35 Emhar Mk.IV Female


Last Aircraft Builds - Hobby Boss 1/72 F4F Wildcat & FW-190A8


  • Member since
    August 2013
Posted by Ktkrow on Tuesday, October 29, 2013 10:22 PM

Great pics!!!  Thanks Rob!

I lost an entire box of pictures a few years back during a move.

I did find a few other good ones online.  

Do you have any clear shots inside the hull with the powerpack removed.  That's one I've had difficulty finding.

Ken

Ken

On the bench: Dragon's 1/35 M1A1 AIM   &    Revell '69 Ford Mustang Mach I Cobra Jet

  • Member since
    December 2002
  • From: Fort Knox
Posted by Rob Gronovius on Monday, October 28, 2013 1:14 PM

the doog

That's looking pretty nice so far.

One question--are you sure about that steel color on the engine? I'd have a hard time believing that the engine was left in bare metal and not painted in some kind of protective paint?

Here are photos of an Abrams engine I took when I commanded a maintenance school. Very little paint on the engine; it is almost entirely unpainted metal with a few white painted components. The green items are part of a maintenance stand the engine is sitting on and not part of the actual engine/transmission assembly. The engine and transmission combination is called a "powerpack". The combination is usually referred to as the FUP (sounds like pup) for Full Up Powerpack.

  • Member since
    August 2013
Posted by Ktkrow on Monday, October 28, 2013 12:49 PM

@Garzonh,

Removable deck plates, as they come off for engine removal.

I also plan to leave the turret attached but removable.

Thanks for looking in and for your kind words.

This is my first attempt at real detail, so the engineer in me is enjoying it, however, I'm not going to do every model this way.

This one is special for 2 reasons.

1. I crewed on an M1 my first 2 years in the army.

2. It is going to be the center piece of my new sons room as we decided to do a camouflage/Army theme.  He will be born any day now.

Thanks again

Ken

Ken

On the bench: Dragon's 1/35 M1A1 AIM   &    Revell '69 Ford Mustang Mach I Cobra Jet

  • Member since
    March 2013
  • From: Puebla, Mexico
Posted by garzonh on Monday, October 28, 2013 12:01 PM

Hey,

Very nice!

Im not a detail guy, specially if everything is going to be closed not to be appreciated.

Will you leave the hatches of the engine opened?

  • Member since
    August 2013
Posted by Ktkrow on Monday, October 28, 2013 11:29 AM

Hey guys,

Made some progress last night, as I had trouble sleeping.

I want to get the engine done so I can get the interior started when I get my kit in a day or 2. Yes...I found the old DML M1A1 kit that includes the interior stations on eBay.  it was only $15 bucks!!!!

Anyway, onto the build log!!!

I have mixed feelings about the engine kit - Legend part# LF1028

There are many shortcomings, but on the other hand, I have found it easy to modify, change, destroy Stick out tongue 

I had some fit issues on the right hand side with the turbine drive conversion and cooling system.  
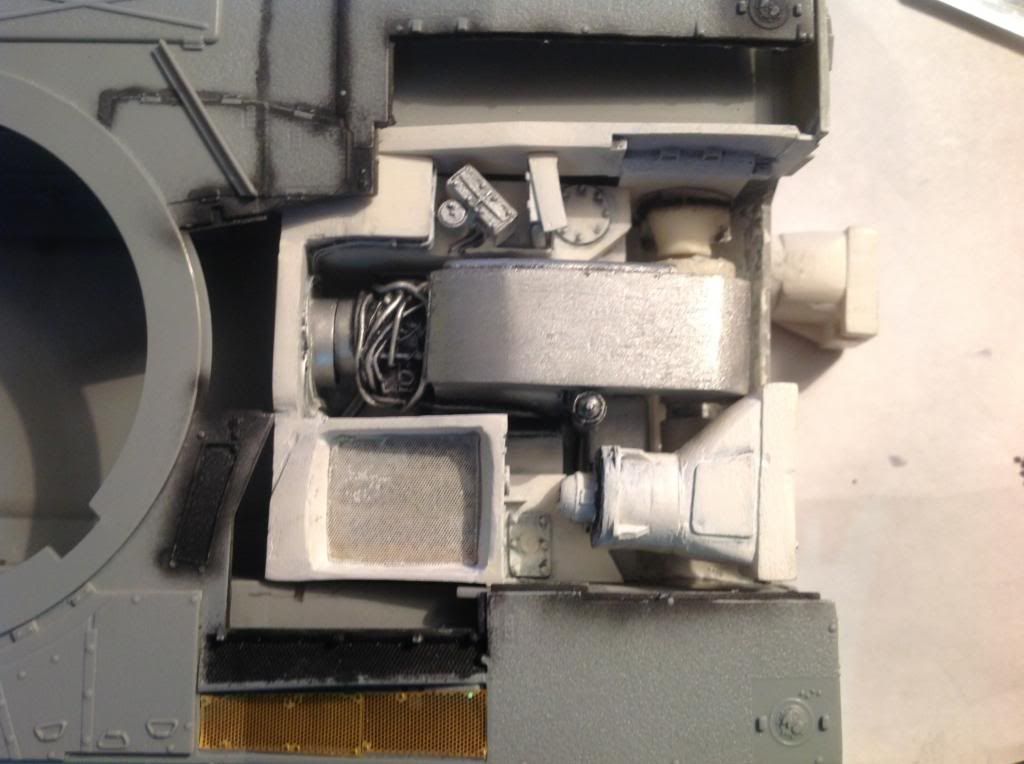

Note the obscured airholes beneath the screen (just some scrap PE screen my local hobby shop had as a discontinued train item).
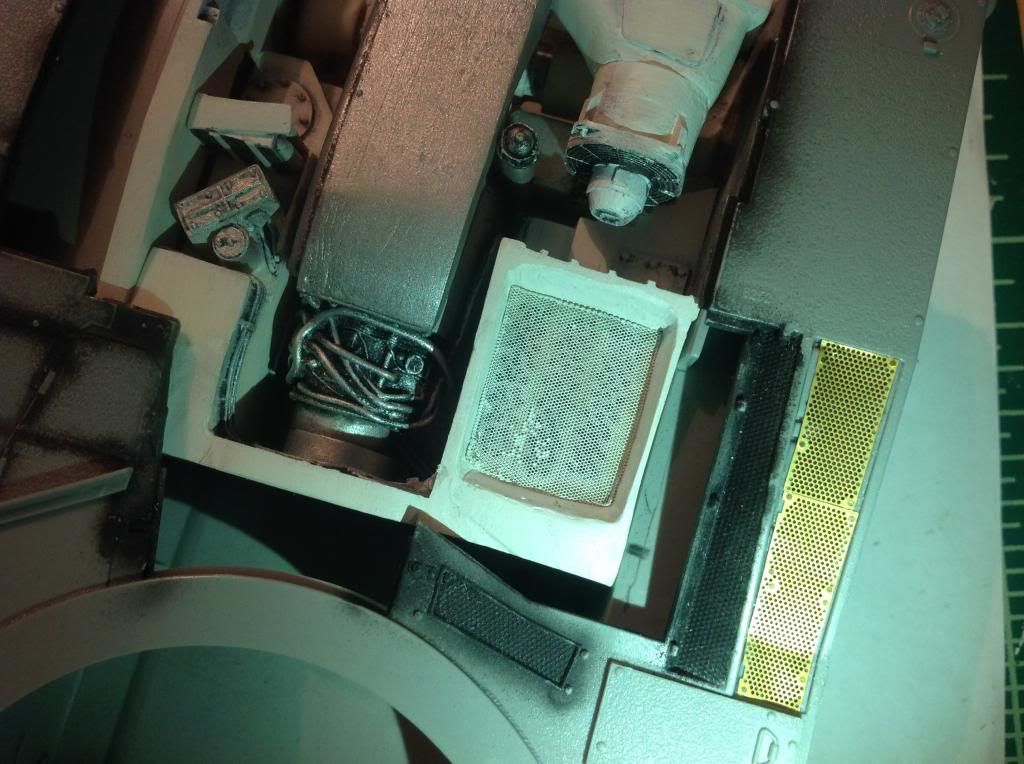

You can also see my handy work on the air intake/filter system that was non-existent.  I ended up pulling out what I had completed and repositioned some things to get a much better fit.
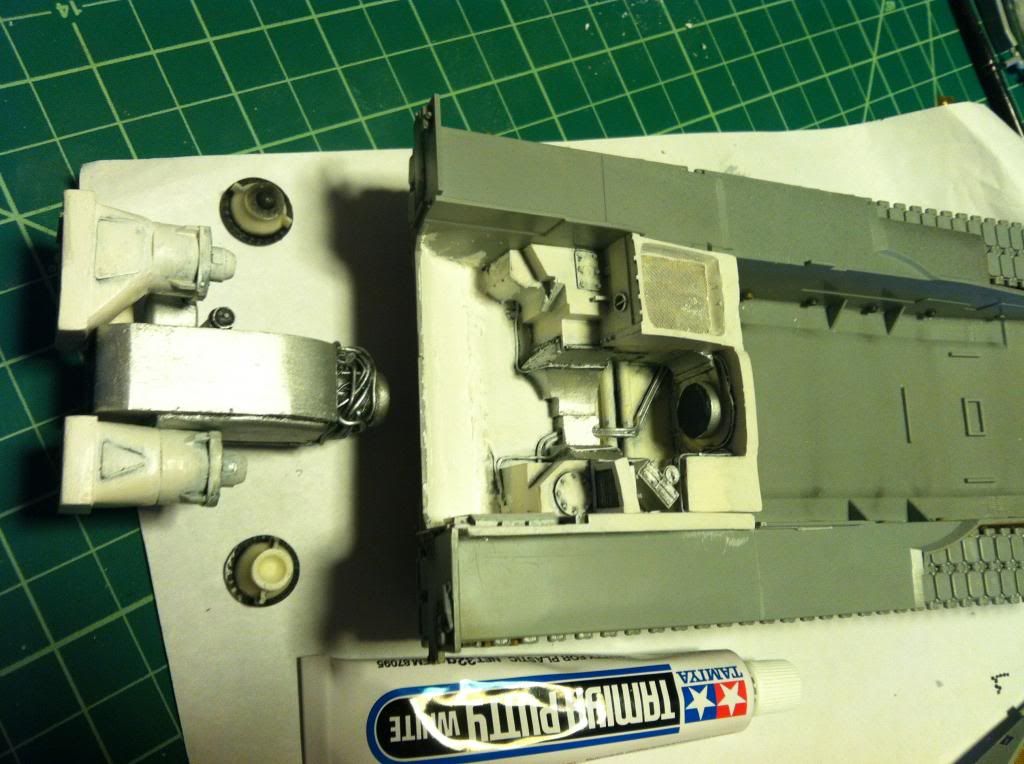
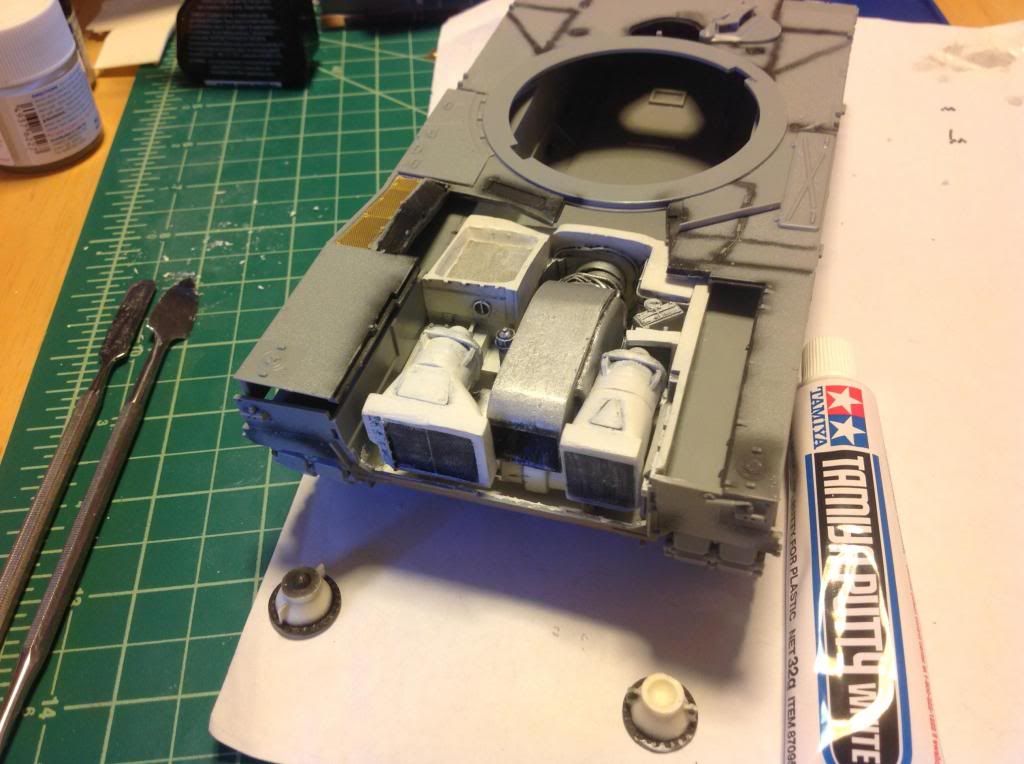
NOTE the WARPING of the top hull plating.  Must be the change in weather.  I had to move up from the basement until I get a space heater down below in man town!

Any tips for dealing with warping polystyrene?  I figure the glue will hold it down when I attach.

There are many more choices to be made in regard to the engine, however, it all comes down to how MUCH time do I want to OR CAN give to just the engine.  At a minimum, I intend to add some line colors and connectors that more accurately reflect the real thing.  Not sure I want to spend the time building out the back exhaust port.  It is SO FAR BACK it is making me mental.  Plus I have to redo the aluminum finish.

Finally, I am going to start painting the tracks (AS SOON as I get my heater downstairs so I CAN paint).  Then I expect to have the interior pieces to get the drivers station in to complete the hull.

Not only am I excited to be making some progress, I am going to be in an Auto GB starting next month that I want to be able to focus on without taking away from this major undertaking.

As usual, thanks to all for following and supporting.

Ken

Ken

On the bench: Dragon's 1/35 M1A1 AIM   &    Revell '69 Ford Mustang Mach I Cobra Jet

  • Member since
    August 2013
Posted by Ktkrow on Sunday, October 27, 2013 4:56 PM

@the doog - good eye...

The exhaust ducting (which is basically the entire top) and the heat shielding that surrounds the turbine is aluminum sheeting.

The problem is that it is very muted and flat and milky looking.  I used flat aluminum.  By contrast, this is way to shiney.

I agree that it needs to be changed or washed over with a dusty milky looking aluminum color of some sort.  Haven't decided my plan of attack yet, while I work on other parts.

Thanks for looking in.

Ken

On the bench: Dragon's 1/35 M1A1 AIM   &    Revell '69 Ford Mustang Mach I Cobra Jet

  • Member since
    January 2007
Posted by the doog on Sunday, October 27, 2013 9:04 AM

That's looking pretty nice so far.

One question--are you sure about that steel color on the engine? I'd have a hard time believing that the engine was left in bare metal and not painted in some kind of protective paint?

  • Member since
    August 2013
Posted by Ktkrow on Sunday, October 27, 2013 7:49 AM

Squeezing in time for the more monotonous work.

The tracks are glued and setting.  I'm thinking they will be set enough tonight to start painting.

I am definitely anxious to get the engine bed done and the top of the lower hull on and get to detailing it.

I am trying to locate the interior detail set from Verlinden (kit 1967) but it appears to be out of stock EVERYWHERE!!!!

Does anyone out there have a line on a source for this kit?  I should probably post this question in another thread.

Ken

On the bench: Dragon's 1/35 M1A1 AIM   &    Revell '69 Ford Mustang Mach I Cobra Jet

  • Member since
    August 2013
Posted by Ktkrow on Monday, October 21, 2013 4:09 PM

Minor update:

The engine compartment is driving me nuts, so like I said, I have some big plans (hope they turn out)!

I hollowed out the flat top where the air induction filter system is.  The idea is that when you lift the deck off to see the engine, you will see better details than the resin kit offers.  I have a few other small mods in mind, but this is the first of them.

Tool work was difficult to get smooth, so I laid in some Mr. Putty White to make the base of the hole smooth.  When it is sanded and ready, I'll add some shallow holes with black paint laid in, then put a mesh screen of some sort over the top.  This should make it look pretty close to the actual thing (in my mind!) lol

That may be all for the day, but it took a while

Ken

On the bench: Dragon's 1/35 M1A1 AIM   &    Revell '69 Ford Mustang Mach I Cobra Jet

  • Member since
    December 2008
  • From: Currently Moscow, Russia
Posted by Coldsteel6d on Monday, October 21, 2013 12:20 PM

Yea, would only look right if you had the thing set in a field or maybe active combat setting since such a fix was of course temporary but it's always an option.

  • Member since
    August 2013
Posted by Ktkrow on Monday, October 21, 2013 7:14 AM

Great tips everyone.

Not sure a dab would do as the hole is rather large, but I was considering using a clear sprue as filler, and maybe a dab on top of that would do.  It's funny.  I almost didn't want to put this part on, because they looked like little gemstones off the model.  I thought, I don't want to give this tank a "bedazzled" look! HA!  After putting a few on, I am satisfied with the look.  I think painting black inside the well before attaching them mutes it enough, since you'd be seeing dark oil when looking in the real thing.

I like the idea of the tape too coldsteel.  It's the little things.  That never happened on any of my tanks, but 100M an hour tape was used on almost everything else...LOL.

Thanks guys.

Ken

On the bench: Dragon's 1/35 M1A1 AIM   &    Revell '69 Ford Mustang Mach I Cobra Jet

  • Member since
    December 2008
  • From: Currently Moscow, Russia
Posted by Coldsteel6d on Monday, October 21, 2013 5:45 AM

If you want to add a hint of realist you can always simulate some duct tape on that bub if you cannot find the old one or don't want to make another with clear cement.

There was a time or two when a tank I was on had shattered or sheared off a hub and we just used some of the hundred mile an hour tape or any other duct tape equivalent to cover the hub till we could get a new one on it. Simple part just screws on but every once in a while we would lose one and would not have a spare on hand.

Not to common mind you but it has happened a few times.

  • Member since
    January 2010
Posted by Klik on Sunday, October 20, 2013 10:48 PM

Quick tip--you can use a dab of clear parts cement to replace clear parts.  Testors brand works real well.

Keep up the great work!

Klik

oneyearwar1

The hardest part of flying isn't flying...it's landing.

  • Member since
    August 2013
Posted by Ktkrow on Sunday, October 20, 2013 8:11 PM

WELL!!!  I can't believe it has been 22 days since I posted anything...moreover, I can't believe I hardly had any time to work on this in 3 weeks.

I was able to get some of the engine work started, in that 3 weeks, but that was about it.

Work was crazy, but is calming down finally, and I made some progress today and yesterday.  I was in what I like to refer to as "stupid busy" mode.

Here is what I was able to do in the past 3 weeks:

Some engine work

A little road wheel painting

So yesterday and today, I was able to get a lot more done on the lower hull assembly:

Son Of a B&^@#$% - I was cutting the clear hub oil level site indicators and one of them went flying.  Hope I can find it!!!!! (you can see it missing on the last wheel LOL)

So I go the wheels on and the first track fit, but not glued yet.

I have a bit of touch up to do on the wheels where some black ran over the edge of the rim.

AND a little more on the engine.  I have big plans for this part, but we'll see Cool

Anyway, it's GREAT to be back and thank you all for your patience!!!

Ken

On the bench: Dragon's 1/35 M1A1 AIM   &    Revell '69 Ford Mustang Mach I Cobra Jet

  • Member since
    August 2013
Posted by Ktkrow on Monday, September 30, 2013 7:46 PM

Thanks for the compliment and the suggestions. I'm a huge fan of tips like this. I find myself frequenting Micheal's lately, so next trip, I'll check out the craft acrylics. Thanks. I was surprised to find replacement parts for my Badger 200!  I was cleaning my gun 2 weeks ago and it fell off my bench. It landed on cardboard, however, it landed directly on the tip creating this perfect little 1mm 90 degree bend. I was able to straighten out the pin, but it notched the tip bushing ever so slightly.  Enough to make it unusable.

So here is my tip, no pun intended!!!  Michael's has badger parts. I got a general purpose needle kit and a super fine needle and tip.  They both retailed for $25 each, but you can always find a michael's coupon for 40 or 50%. I got them for $12.50 each!!!!  

Ken

On the bench: Dragon's 1/35 M1A1 AIM   &    Revell '69 Ford Mustang Mach I Cobra Jet

JOIN OUR COMMUNITY!

Our community is FREE to join. To participate you must either login or register for an account.

SEARCH FORUMS
FREE NEWSLETTER
By signing up you may also receive reader surveys and occasional special offers. We do not sell, rent or trade our email lists. View our Privacy Policy.