SEARCH FINESCALE.COM

Enter keywords or a search phrase below:

Merit 1/18th 88mm Flak 36 WiP (Completed pics Page 6)

26547 views
121 replies
1 rating 2 rating 3 rating 4 rating 5 rating
  • Member since
    November 2010
  • From: Florida-West Central
Posted by Eagle90 on Thursday, January 2, 2014 5:48 AM

1/18!!!!!!!!!  Is that a typo Mr. 1/72!  Wink

Great build Bish!  That thing is huge and I'll be watching this one for sure!

Eagle90


  • Member since
    March 2003
  • From: Western North Carolina
Posted by Tojo72 on Thursday, January 2, 2014 7:44 AM

Hey,thats great you started up,I remember when you got it,looking forward to this one

  • Member since
    December 2002
  • From: Bury St Edmunds, Suffolk, England
Posted by Bish on Thursday, January 2, 2014 9:13 AM

Eagle, I know. Think of all the 72nd kits I could do with this plastic. But hopefully it will be worth the sacrifice.

Tojo, I have been itching to get at this one. Its not often I start a kit so soon after getting it, but as soon as I saw it, I knew I couldn't resit. It might not be upto the detail standard of a Dragon kit, but I think the size alone means it will be a site to see when done.

I hope.

I am a Norfolk man and i glory in being so


On the bench: Airfix 1/72nd Harrier GR.3/Fujimi 1/72nd Ju 87D-3

  • Member since
    April 2005
  • From: Gothenburg
Posted by JohanT on Thursday, January 2, 2014 9:17 AM

Wow,

you have my attention for sure.
Some details please - how is the quality? 

BTW, there is a 1:1 in the IWM in London for reference :)

Very Best Regards

Johan

  • Member since
    December 2002
  • From: Bury St Edmunds, Suffolk, England
Posted by Bish on Thursday, January 2, 2014 9:51 AM

Glad to have you on board Johan. So far, not to bad. The bits which come up the side of the cradle and support the recuperate were ot a perfect fit, but nothing major. Certain things need attention, like filling holes and of course adding nuts and bolts. As I go along, I will get some close up of the areas that needed attention. I just wanted to get a quick post out there to kick it off.

All in all, its not a Dragon kit in regards to the detail. But the again, it is also cheaper than the much smaller 35th Dragon 88. I would say it is worth it.

Is there, I haven't been for a couple of years, I don't recall seeing it then, either I missed it or its a new addition. It would be nice to get down there and get some first hand pics, I just don't have the time right now. But thanks for the heads up.

I am a Norfolk man and i glory in being so


On the bench: Airfix 1/72nd Harrier GR.3/Fujimi 1/72nd Ju 87D-3

  • Member since
    April 2005
  • From: Gothenburg
Posted by JohanT on Thursday, January 2, 2014 9:55 AM

Thanks Bish Big Smile

I will see if I can dig out my reference pics from the NAS.

Happy new 2014 Toast

VBR

JT

  • Member since
    December 2002
  • From: Bury St Edmunds, Suffolk, England
Posted by Bish on Thursday, January 2, 2014 11:13 AM

I'd appreciate anything you have. I have a few books, but there are not that many close up shots.

I am a Norfolk man and i glory in being so


On the bench: Airfix 1/72nd Harrier GR.3/Fujimi 1/72nd Ju 87D-3

  • Member since
    January 2013
Posted by jibber on Thursday, January 2, 2014 1:15 PM

Bish, I'll can't wait to see more, this AAG has been on my list for a while.

  • Member since
    November 2005
Posted by T26E4 on Thursday, January 2, 2014 1:40 PM

Bish: have a look at these

svsm.org/.../88mm-Flak-18_aberdeen (Flak 18)

svsm.org/.../88mm-Flak-36 (actually a Flak 37)

www.primeportal.net/.../88mm_flak_gun (Flak 36)

www.primeportal.net/.../flak_36 (actually a Flak 37)

If you need help identifying the differences  btwn a Flak 18, 36 or 37 go here:

www.track-link.com/.../1203

It has a long errata list for well known 8.8cm Flak books, too

Roy Chow 

Join AMPS!

http://www.amps-armor.org


  • Member since
    April 2005
  • From: Gothenburg
Posted by JohanT on Thursday, January 2, 2014 2:09 PM

Hi Bish,
Only had 5 pictures from the IWM London and they where taken with a mobile back in 2007...
I was trying to get the different materials to show like the stainless steel firing angle meter, the wooden handles of the elevation wheels, the brass lining of the loading slid, the bare metal of the breach.  

Here you go Cool:


VBR
Johan


  • Member since
    December 2002
  • From: Bury St Edmunds, Suffolk, England
Posted by Bish on Thursday, January 2, 2014 2:12 PM

jibber, in that case, I will make extra effort to point out any problem areas.

Roy, beauty, those links are brilliant, thanks. Even if they are not the 36, the guns were that similar they are still useful. And I have a good idea of which bits do and don't apply to the 36. Now I have seen it, I think the IWM one was there when I was, I just didn't take any pics Bang Head But those one are excellent. A nice pic of the hand wheels I need to sort out, and its at about the elevation I plan on doing mine, so I can see where the relevant handles and indicator should be.

Thanks, your a star.

I am a Norfolk man and i glory in being so


On the bench: Airfix 1/72nd Harrier GR.3/Fujimi 1/72nd Ju 87D-3

  • Member since
    December 2002
  • From: Bury St Edmunds, Suffolk, England
Posted by Bish on Thursday, January 2, 2014 2:15 PM

Johan, brilliant, with those and the ones Roy just poste a link to, great detail on those handles, I didn't know they were wood. can't see that in B&W. I might leave the loading tray off, apparently some crews removed them.

If I don't get this right now, you guys can kick my butt all the way across the Pond.

Cheers guys.

I am a Norfolk man and i glory in being so


On the bench: Airfix 1/72nd Harrier GR.3/Fujimi 1/72nd Ju 87D-3

  • Member since
    April 2005
  • From: Gothenburg
Posted by JohanT on Thursday, January 2, 2014 2:17 PM

@ Roy - thanks - saved for future builds :)

VBR

Johan

  • Member since
    December 2002
  • From: Bury St Edmunds, Suffolk, England
Posted by Bish on Thursday, January 2, 2014 2:19 PM

Johan, when you were there, do you recall is there was a German 20mm Flak gun near that 88, perhaps to the left of it.

I am a Norfolk man and i glory in being so


On the bench: Airfix 1/72nd Harrier GR.3/Fujimi 1/72nd Ju 87D-3

  • Member since
    April 2005
  • From: Gothenburg
Posted by JohanT on Thursday, January 2, 2014 3:34 PM

Not sure if that was/is a 20MM or not but this was next to the left of the 88.
Thought I had a couple but only one came up in the search.
The picture was taken for the same reason as above - interesting to see what the original "Gun-Metal" could look like.

//JT

  • Member since
    December 2002
  • From: Bury St Edmunds, Suffolk, England
Posted by Bish on Thursday, January 2, 2014 3:36 PM

Ye, that's the one. I got a pic of that, wasn't sure if that was where the 88 is in your pics and maybe they had swapped them over.

I am a Norfolk man and i glory in being so


On the bench: Airfix 1/72nd Harrier GR.3/Fujimi 1/72nd Ju 87D-3

  • Member since
    July 2004
  • From: Texas
Posted by wbill76 on Friday, January 3, 2014 4:01 PM

Looking forward to more on this monster Bish, off to a good start.

  • Member since
    December 2002
  • From: Bury St Edmunds, Suffolk, England
Posted by Bish on Friday, January 3, 2014 4:50 PM

Thanks Bill, glad to have you along.

I am a Norfolk man and i glory in being so


On the bench: Airfix 1/72nd Harrier GR.3/Fujimi 1/72nd Ju 87D-3

  • Member since
    July 2006
  • From: San Francisco Bay Area
Posted by bufflehead on Saturday, January 4, 2014 4:15 PM

I've seen armor kits in 1/15 and 1/16 scale, but this is the first kit in 1/18 scale that I've ever seen!   Looking forward to seeing your work on this big gun Bish!

Ernest

Last Armor Build - 1/35 Dragon M-26A1, 1/35 Emhar Mk.IV Female


Last Aircraft Builds - Hobby Boss 1/72 F4F Wildcat & FW-190A8


  • Member since
    December 2002
  • From: Bury St Edmunds, Suffolk, England
Posted by Bish on Saturday, January 4, 2014 4:23 PM

Ye, same here. From what I could find, Merit have a range of ready made models in this scale. This kit was originally by a company called 21st Century toy's (never heard of them) and the kit has a date of 2007. But doesn't seem like it was a big seller, I certainly don't recall hearing of it.

Been doing a bit more work tonight on the cradle and some other bits. There's quite a few seam lines to sand away. I think I may have solved the issues of the missing bolts. I have been told about some resin hex bolts as well as hex plastic rod, so going to order some of both.

I should have a pic update tomorrow.

I am a Norfolk man and i glory in being so


On the bench: Airfix 1/72nd Harrier GR.3/Fujimi 1/72nd Ju 87D-3

  • Member since
    December 2002
  • From: Bury St Edmunds, Suffolk, England
Posted by Bish on Sunday, January 12, 2014 4:13 PM

Been doing quite a few alterations this week, lot more needed changing than I had expected.

A big thank you to Roy and Johan for those pics and links, they have been more helpful than you can imagine. Theres lots of stuff I would have missed without them, and while it would still be a good kit, those changes do make a difference. I am able to get pics of almost every inch of those 88's so am able to check everything.

Its very much appreciated. I will add some comparison pics of the real things so you folks can see what needs changing.

Firstly, the left side of the cradle. I am leaving the loading tray off as this was often removed in the field, and the kit one is missing some detail.

This is the kit piece before altering.

 And this is the finish I am aiming at.

 I removed the strip under the rivets, being careful not to remove the rivets. I will add some stripe later on, I have to get some more as what I have isn't wide enough. Also used sheet styrene for the netal plate and cut back the piece that comes out of the front. The circled handle had to be thinned as the pad at the bottom stuck out both sides and the whole thing was to thick.

And here the rest of the cradle, most of this side is complete.

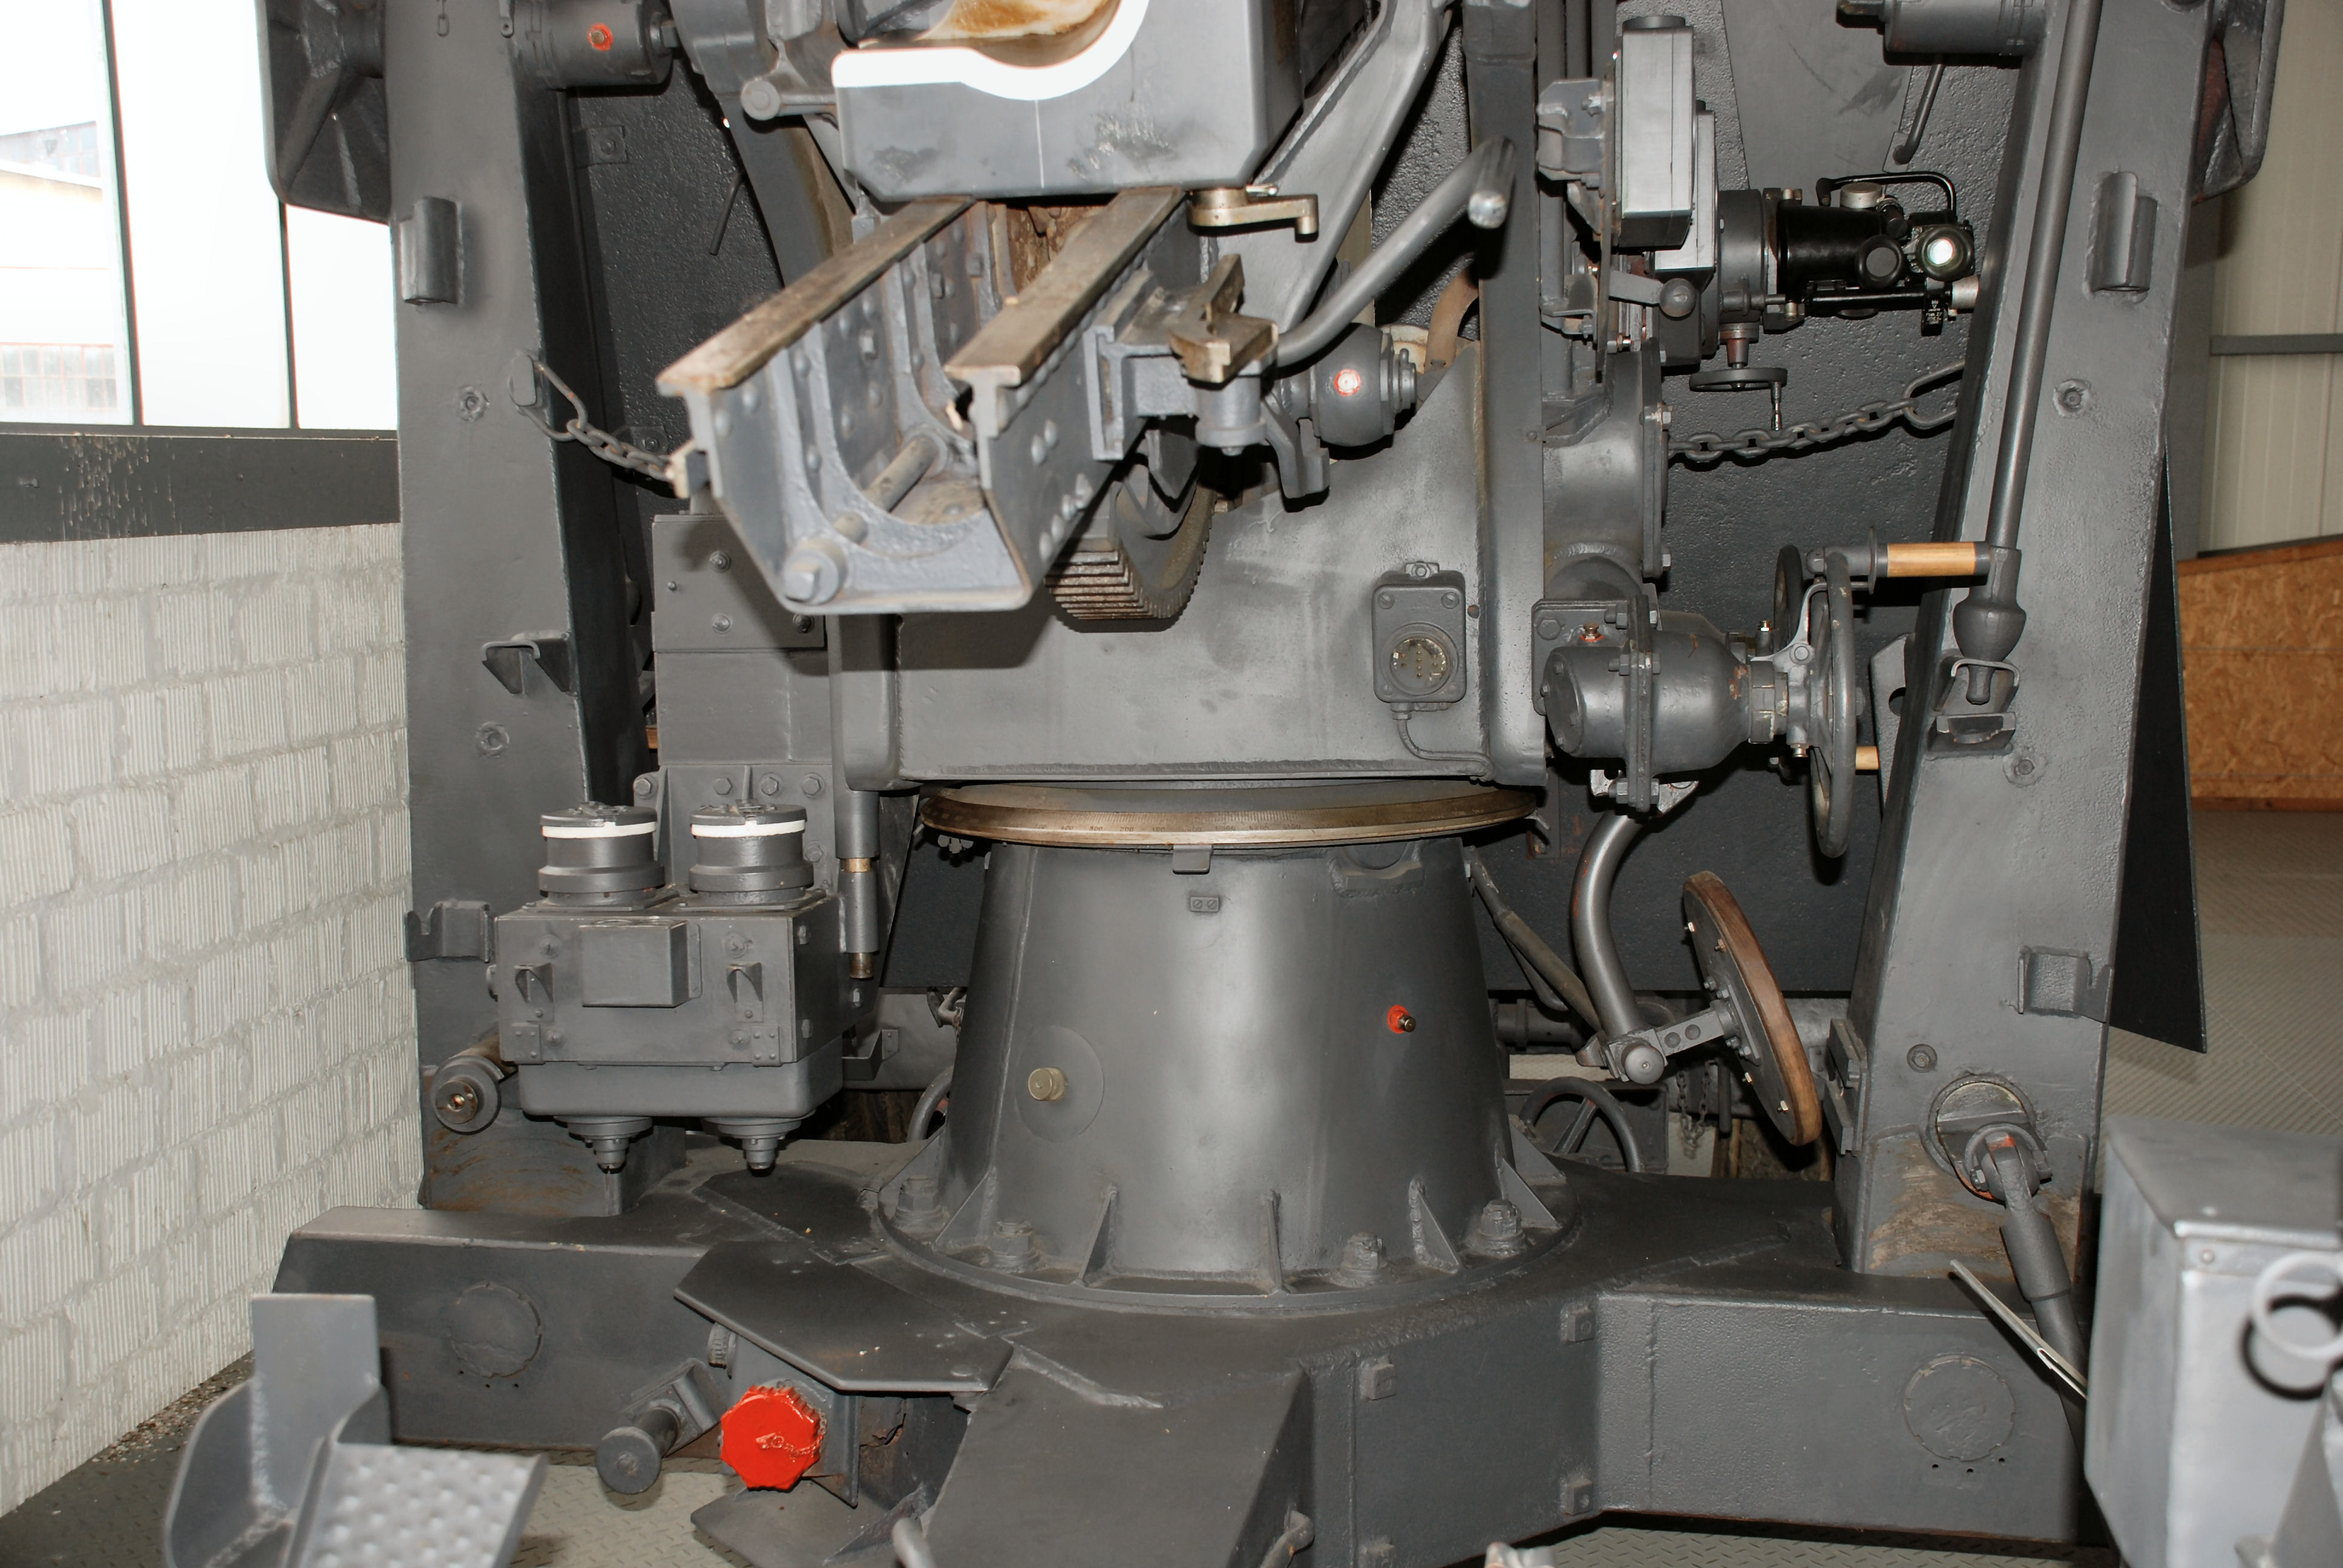
On the other side of the cradle are two hand wheels. The handles are the main issue here. They should look like this. Its the item on the right with the wooden handle.

And the kit pieces look like this.

So the handles were removed and replaced with plastic rod. For the nut on the back, I used hex rod, its a fraction to small, but was the closet I could get. Got one done, working on the other.


 Now the gun barrel. You can see where I have filled in the back of the breech. The area circled will need filling if the breech is open. The breech block has two small tabs which allow you to open and close it without it falling out. But this mean it have to be fitted before the breech goes together. So I removed the tabs so I can add the block later. I am having it closed so don't nee to fill these in.

On the piece the barrel sits on there are 3 holes on each side which need filling. They go right through, so I added some bits of sheet styrene underneath and then filled. The styrene needs to be thin, I used .010. If its to thick, it won't slide onto the cradle. The circled area should have 3 hex bilts, same for other side. Will add these later.

Now for the major work, the platform. The main issue is the pivoting legs. The inside of the pieces that hold the legs is hollow, so will need filling is the legs are folded. 

I am having mine down, and its ok in that position.

But the fixed pieces don't close enough. I took all of the pins and other bits from the inside and sanded away some of the edges, but not to much as it will throw everything out. But there was still a gap that needed sorting and the rear of the legs slope down to much.

The pins that stick out of the pivoting legs can either be fitted in the locked or unlocked position, so you need to decide how you want the legs. If down like mine, the recesses in the fixed piece needed filling out or it pushes the pins forward.  The arm that locks the pin in place, on the right of the fixed piece, also needs some work. The bracket at the back is to square and needs rounding off a bit and round end at the pin needs thinning.

And here's the platform as it stands, you can see other parts I have changed, these are mostly just plastic blobs as they come.

And that's it for now. My main focus is to finish the platform and cradle and then star on the trailers.

This is my first time doing a WiP in this much detail. If I have confused anyone, please feel free to ask for clarity and for pics of anything you want close up's of. 


I am a Norfolk man and i glory in being so


On the bench: Airfix 1/72nd Harrier GR.3/Fujimi 1/72nd Ju 87D-3

  • Member since
    March 2013
  • From: Puebla, Mexico
Posted by garzonh on Sunday, January 12, 2014 4:15 PM

Good progress, very nice adaptation and modifications to original model.

Keep updating..

  • Member since
    August 2012
Posted by JimNTENN on Sunday, January 12, 2014 4:31 PM

I have the Tamiya 1/35 '88' in my stash....have had it for forever. This may tempt me to dig it out.

Current project(s): Hobby Boss: 1/72 F9F-2 Panther

                                  Midwest Products: Skiff(wood model)


  • Member since
    December 2002
  • From: Bury St Edmunds, Suffolk, England
Posted by Bish on Sunday, January 12, 2014 4:34 PM

Jim, that's a nice kit, I built it many years ago with a nice dio, unfortunately it didn't survive first contact with the now ex wife. Eagle is doing one in the Duck Hunter GB if you want to check it out.

garzonh, thanks, hopefully I can get another update next weekend. I am not expecting as much work to be needed on the trailers. (famous last words)

I am a Norfolk man and i glory in being so


On the bench: Airfix 1/72nd Harrier GR.3/Fujimi 1/72nd Ju 87D-3

  • Member since
    August 2012
Posted by JimNTENN on Sunday, January 12, 2014 4:39 PM

Thanks, Bish, I'll check Eagle's build out.

Current project(s): Hobby Boss: 1/72 F9F-2 Panther

                                  Midwest Products: Skiff(wood model)


  • Member since
    July 2004
  • From: Texas
Posted by wbill76 on Wednesday, January 15, 2014 5:20 PM

Making good progress here Bish, I can see one of the downsides of a larger-scale model, when the details are off it really shows. You're making nice improvements to this one for sure. Beer

  • Member since
    March 2003
  • From: Western North Carolina
Posted by Tojo72 on Wednesday, January 15, 2014 9:16 PM

Hi Bish,your really detailing it up,looking good,should be worth the effort

  • Member since
    December 2002
  • From: Bury St Edmunds, Suffolk, England
Posted by Bish on Thursday, January 16, 2014 12:46 PM

Bill, your not wrong, it would be hard to get away with anything. On the plus side, its not so fiddly to sort out. I just have to keep reminding myself that things have to be thicker or bigger than I am used to.

Thanks Tojo

In regards to the origins of this kit, it defiantly is not new. On the bottom of the centre of the platform, it has the logo of 21st Century toys and the date 2007. This was while I was still out of the hobby and could be why I missed it.

I am a Norfolk man and i glory in being so


On the bench: Airfix 1/72nd Harrier GR.3/Fujimi 1/72nd Ju 87D-3

  • Member since
    January 2007
Posted by the doog on Friday, January 17, 2014 12:20 AM

Hey, Bish--can you put that cradle next to a tank model so we can get a sense of the scale of this big gun?

  • Member since
    January 2013
Posted by jibber on Friday, January 17, 2014 8:08 AM

Johan nice pics, I didn't realize there were different materials near the breach or the wooden handles. Thanks

  • Member since
    January 2013
Posted by jibber on Friday, January 17, 2014 8:17 AM

Bish it looks great, with so much plastic any problems with warping? I liked the "gun metal" pic, thats really going to come in handy, must have been some nice lighting to pick up those shades.    

  • Member since
    December 2002
  • From: Bury St Edmunds, Suffolk, England
Posted by Bish on Friday, January 17, 2014 10:42 AM

doog, no problem. I was going to do that when it was more assembled, but I will get one with the various sub assemblies and my 35th Tiger at my next update.4

jibber, no, every thing seems fine. I have checked the barrel a few times as the front piece looks like it off to one side, but when I run a straight edge along the seam, its perfect.

I was surprised at the wooden handles as well.

I am a Norfolk man and i glory in being so


On the bench: Airfix 1/72nd Harrier GR.3/Fujimi 1/72nd Ju 87D-3

  • Member since
    December 2002
  • From: Bury St Edmunds, Suffolk, England
Posted by Bish on Monday, January 20, 2014 2:08 PM

Its that time again.

The base and cradle are now complete, until at least I see something else that needs doing.

 The bar with the kink in it was straight on the kit part and the piece at the end just a blob

I dedcided to leave the fuse setter on. These seem to have been removed from some guns in field units. But I am not depicting any specific gun, and there must have been some need for AA defence in Africa.


 The little bit on top is where the site goes. That's not very well detailed so has been removed and will be replaced by a cover.

 I will add the recoil indicator after painting.

 I have also made a start on the trailers. This one still needs a few bits adding.

The box needed a bit of work, I still have 3 to do so will do a before and after pic for the next up date.


And now for those comparison pics with a 1/35th Tiger I.

  The legs of the base are approx. 11 and a half inches across in both directions.

And jibber, or anyone else who is thinking of getting one, there is a lot to this kit, 15 sprues in all. And from seeing the pics above, you might think there is not a lot left.

Thanks for looking, all comments and questions very welcome. 

I am a Norfolk man and i glory in being so


On the bench: Airfix 1/72nd Harrier GR.3/Fujimi 1/72nd Ju 87D-3

  • Member since
    August 2012
Posted by JimNTENN on Monday, January 20, 2014 2:52 PM

That's gonna look good, Bish. Heck, it already looks good.

Current project(s): Hobby Boss: 1/72 F9F-2 Panther

                                  Midwest Products: Skiff(wood model)


  • Member since
    April 2005
  • From: Gothenburg
Posted by JohanT on Tuesday, January 21, 2014 7:20 AM

Nice going Bish Big Smile

You are doing the kit justice, looking forward to your next update Stick out tongue

What a monster, you will need a showroomCool

Very Best Regards
Johan 

  • Member since
    December 2002
  • From: Bury St Edmunds, Suffolk, England
Posted by Bish on Tuesday, January 21, 2014 1:02 PM

Thanks guys.

And Johan, thanks again for those pics. You have no idea how much help they have been.

I would put it in the garden, but we get a few Apaches and civvy gliders over head, they might panic if they saw it.

I am a Norfolk man and i glory in being so


On the bench: Airfix 1/72nd Harrier GR.3/Fujimi 1/72nd Ju 87D-3

  • Member since
    January 2007
Posted by the doog on Tuesday, January 21, 2014 2:33 PM

Wow, that is one big gun!

I suddenly feel inadequate.....Indifferent

  • Member since
    December 2002
  • From: Bury St Edmunds, Suffolk, England
Posted by Bish on Tuesday, January 21, 2014 3:08 PM

How'd you think I feel Big Smile

I am a Norfolk man and i glory in being so


On the bench: Airfix 1/72nd Harrier GR.3/Fujimi 1/72nd Ju 87D-3

  • Member since
    July 2004
  • From: Texas
Posted by wbill76 on Tuesday, January 21, 2014 6:01 PM

You should feel good about the progress on this one Bish! Wink Nice work bringing this monster together.

  • Member since
    December 2002
  • From: Bury St Edmunds, Suffolk, England
Posted by Bish on Wednesday, January 22, 2014 3:13 PM

Thanks bill. There certainly is a lot more to do than I originally thought. What with the He 111 and now this, scratchbuilding is getting a bit addictive, and it certainly is satisfying to know you made those bits yourself, even if they are not 100% accurate. I thought the trailers might be straight forward, but I am now doing some tolls clasps and a few other bits.

I am a Norfolk man and i glory in being so


On the bench: Airfix 1/72nd Harrier GR.3/Fujimi 1/72nd Ju 87D-3

  • Member since
    January 2013
Posted by jibber on Wednesday, January 22, 2014 5:36 PM

That 1/18th is one big gun, next to the Tiger it looks enormous. Nice build Bish, can't wait to see it done.  

  • Member since
    December 2002
  • From: Bury St Edmunds, Suffolk, England
Posted by Bish on Saturday, January 25, 2014 8:57 AM

Thanks jibber, its getting there.

Ok, time to call on the experts. I am looking for some help with some of the tool brackets. There's several that hold a few tools in place. I have checked PE brackets but I can't find any that look like this. What I am trying to find is what goes over the tool to hold it in place.

 The bracket in question is to the left of the pic, two vertical pieces with slightly bent ends and a hole on top of each, sitting on top of the flat triangular metal plate. I have made this as far as it looks here, but I can't figure out what goes across the top. It does not look like it would have a piece of metal over it as there is no hinge. Could these have been secured with some sort of webbing strap, none of the pics I have show the tools in place, and the in action pics don't show the trailers in much detail.

Thanks in advance.


I am a Norfolk man and i glory in being so


On the bench: Airfix 1/72nd Harrier GR.3/Fujimi 1/72nd Ju 87D-3

  • Member since
    March 2004
  • From: Spartanburg, SC
Posted by subfixer on Saturday, January 25, 2014 2:53 PM

Beautifully intricate and complicated. Really nice job on this, Bish.

I'm from the government and I'm here to help.

  • Member since
    December 2013
Posted by jetmaker on Saturday, January 25, 2014 5:00 PM

Outstanding job with the mods and fills. I can't wait to see that done!

  • Member since
    December 2002
  • From: Bury St Edmunds, Suffolk, England
Posted by Bish on Saturday, January 25, 2014 6:41 PM

Thanks guys.

I am a Norfolk man and i glory in being so


On the bench: Airfix 1/72nd Harrier GR.3/Fujimi 1/72nd Ju 87D-3

  • Member since
    April 2013
Posted by SchattenSpartan on Saturday, January 25, 2014 7:08 PM

You're doing one hell of a job on this one, Bish!

I took a few pics of the 88 at the Munster tank museum and there isn't anything on top of this tool clamp. I suppose it should looks someething like the clamp in this pic though:

  • Member since
    April 2013
Posted by SchattenSpartan on Saturday, January 25, 2014 7:12 PM

I actually do have a pic of that clamp with the upper part in place:

Is the area outlined in red the clamp you are referring to?

I hope this is of any help... 

  • Member since
    December 2002
  • From: Bury St Edmunds, Suffolk, England
Posted by Bish on Sunday, January 26, 2014 3:05 AM

Perfect, I wasn't expecting them to be those type. The one in the first pic, bottom left, is for the shovel and I didn't realise that needed one as well, and both of those show a few things I had seen on the other pics.

Those are excellent, thanks buddy.

I am a Norfolk man and i glory in being so


On the bench: Airfix 1/72nd Harrier GR.3/Fujimi 1/72nd Ju 87D-3

  • Member since
    April 2013
Posted by SchattenSpartan on Sunday, January 26, 2014 6:57 AM

I'm always glad if I'm able to help! If you need more pics of certain areas, just tell me and I'll have a look at my photo archive.

  • Member since
    December 2002
  • From: Bury St Edmunds, Suffolk, England
Posted by Bish on Thursday, January 30, 2014 1:35 PM

Well, I finally got the first trailer finished, and again, a big thanks to Clemen's for those pics.

As always, the members of this forum pull out the stop's.

Firstly the box on the trailers. This is what they should look like.

And this is how they come. You can see the over sized rivets, thick lid, the hinge on the back which allows the lid to just be clicked in place and the poor catch.

To fix this, the rivets, hinge and front of the catch were removed and the lid thinned. For the r9ivets, I drilled 9 small holes and put in a thin piece of plastic rod. Once dry, I cut it close to the base then rounded off with a small file. I built a catch and put plastic strip round the edge so it over hangs the box more.

As for the rest of the trailer, this is the one I have still to finish with the pieces to be removed rined.

And here you can see which parts have been replaced. Other items changed were done so because they were to thick or solid plastic when they should not be.


 Now to get the next one done.


Roy, I got my March issue today and saw your item in there. I had seen that link at the bottom of your sig, but didn't realise what I was. I looked at the article and thought I know that name.

Congrats on getting in the mag. Is the AMPS open to members from outside the States?

I am a Norfolk man and i glory in being so


On the bench: Airfix 1/72nd Harrier GR.3/Fujimi 1/72nd Ju 87D-3

  • Member since
    November 2005
Posted by T26E4 on Thursday, January 30, 2014 1:49 PM

Yes, AMPS has international members -- a good no. in the UK.  Go to the website and you'll see membership info.

Roy Chow 

Join AMPS!

http://www.amps-armor.org


  • Member since
    December 2002
  • From: Bury St Edmunds, Suffolk, England
Posted by Bish on Thursday, January 30, 2014 1:53 PM

Will do, thanks Roy.

I am a Norfolk man and i glory in being so


On the bench: Airfix 1/72nd Harrier GR.3/Fujimi 1/72nd Ju 87D-3

  • Member since
    December 2002
  • From: Bury St Edmunds, Suffolk, England
Posted by Bish on Sunday, February 9, 2014 11:03 AM

Sorry for the delay, I have been punching on to get construction finished. And I am finally done.

This is the other trailer, only difference is that this one has no seat but does have the tow bar.

 And the barrel was finished with a few alterations.

 I also re made the 4 ground spikes as the kit ones were to thick. They are not full length as they will be put into the base, the excess rod is just for holding when painting. 

 I will get to the tools once I have started painting the main parts. But I replaced one of the handles to help when doing the tool clamps. The kit ones are square and would not be very comfortable to use.

 And this is most of the sub assemblies all ready for painting. There is also the wheels and a few small pins and other bits to add to this.

 Hopefully I can get the first coat on tonight or tomorrow. 

I am a Norfolk man and i glory in being so


On the bench: Airfix 1/72nd Harrier GR.3/Fujimi 1/72nd Ju 87D-3

  • Member since
    April 2013
Posted by SchattenSpartan on Sunday, February 9, 2014 11:15 AM

Truly amazing work!

  • Member since
    July 2004
  • From: Texas
Posted by wbill76 on Wednesday, February 12, 2014 8:38 PM

Dressing this one up nicely Bish! Yes

  • Member since
    November 2005
Posted by T26E4 on Wednesday, February 12, 2014 10:50 PM

Bish: Can I direct you to one omission?  There was a locking mechanism on the cruciform arm hooks, which would keep the SdAnh "loops" in place.

(you can see the bent brass rod which engages both locks)

i45.photobucket.com/.../PA300041.jpg

data3.primeportal.net/.../flak_36_43_of_55.jpg

data3.primeportal.net/.../flak_36_13_of_55.jpg

Roy Chow 

Join AMPS!

http://www.amps-armor.org


  • Member since
    December 2002
  • From: Bury St Edmunds, Suffolk, England
Posted by Bish on Thursday, February 13, 2014 12:19 AM

Thanks guys.

Roy, well spotted, thanks, yep, I defiantly missed that. I can sort that out tonight, thanks again.

I am a Norfolk man and i glory in being so


On the bench: Airfix 1/72nd Harrier GR.3/Fujimi 1/72nd Ju 87D-3

  • Member since
    March 2013
  • From: Puebla, Mexico
Posted by garzonh on Thursday, February 13, 2014 7:04 AM

Great modifications and fixing things around.

I cant wait to see it painted!

  • Member since
    December 2002
  • From: Bury St Edmunds, Suffolk, England
Posted by Bish on Monday, February 17, 2014 3:56 PM

Well garzonh, wait no longer. Just a small update now that the painting is done (after addressing the bits I missed that fortunately Rob noticed) and most of the decals are on. I am using Xtracolour's RAL 8020. I have done several coats going slightly lighter with each one, this should be enough to compensate for the effects of the filter. I have only added a few markings. For the DAK badge, I used the smallest 72nd Swastika I could find and then painted the palm tree by hand. I am going to add a couple more kill rings to the barrel, but doing it one at a time.

 Next up, dry brushing with oils and then filters and washes

I am a Norfolk man and i glory in being so


On the bench: Airfix 1/72nd Harrier GR.3/Fujimi 1/72nd Ju 87D-3

  • Member since
    January 2013
Posted by jibber on Monday, February 17, 2014 4:29 PM

Bish I've been following along and it really looking fantastic. I can't believe how you've addressed every detail and were able to make all those modifications. Any thoughts of what you'll do with it?  

  • Member since
    August 2007
  • From: back country of SO-CAL, at the birth place of Naval Aviation
Posted by DUSTER on Monday, February 17, 2014 9:46 PM

Bish you ol' air defence dog you . You have certainly made a magical transformation of the plain kit.  The added/ improved details are great. 

 Oh I noticed that Roy seems to have missed telling you, the 47th bolt on the right....just over there.... is not torqued to the exact required specs. But I'm sure you have it on your to do list .

Steve

Building the perfect model---just not quite yet  Confused

  • Member since
    December 2002
  • From: Bury St Edmunds, Suffolk, England
Posted by Bish on Thursday, February 20, 2014 3:49 PM

DUSTER

Bish you ol' air defence dog you . You have certainly made a magical transformation of the plain kit.  The added/ improved details are great. 

 Oh I noticed that Roy seems to have missed telling you, the 47th bolt on the right....just over there.... is not torqued to the exact required specs. But I'm sure you have it on your to do list .

Slack nuts, slack crew as we used to say. I guess the crew of this gun need a bit of a talking to Wink

Thanks Duster. I have spent the last couple of nights dry brushing with oils. So tomorrow night I will give it all a couple of coats of future mixed with Tamiya flat base and then doing the weathering over the weekend, I plan on using AK's range of DAK products.

jibber, thanks. I am in the process of making a base. The gun will be sat on a patch of desert sand, it come with an ammunition box and 4 shell's, so I will add them. I am also making some badges out of MDF for it.

After that, I need to work out where I am putting it, the base is pretty big.


I am a Norfolk man and i glory in being so


On the bench: Airfix 1/72nd Harrier GR.3/Fujimi 1/72nd Ju 87D-3

  • Member since
    November 2005
Posted by T26E4 on Friday, February 21, 2014 6:58 AM

@ Duster/Steve: I'm not sure if you're trying to throw some underhanded jab at me.  Perhaps calling out the "rivet counter" pejorative on me.  Something I've posted seems to have put you off.  I dunno.

I'm sure it's pretty obvious that Bish wanted to go to an extreme level of accuracy, correction and detailing.  Thus, I provided him info that furthered his journey.  I wouldn't toss out small nitpicks if that wasn't the flavor of his build.  Perhaps Bish, on another day or another project, wouldn't like this level of "advice".  To me, it seems he welcomed it.  Indeed, he's gone after things that I wouldn't have had the patience to do so.

Thanks for making sure I'm not a know-it-all dropping unsolicited advice to random modelers -- but I've gotten nothing from Bish but "please more".

Roy Chow 

Join AMPS!

http://www.amps-armor.org


  • Member since
    July 2004
  • From: Texas
Posted by wbill76 on Friday, February 21, 2014 2:11 PM

Looks good under paint Bish! Nice solution to the DAK badge. Got to love all the little details you're adding especially in this scale. Beer

  • Member since
    March 2003
  • From: Western North Carolina
Posted by Tojo72 on Friday, February 21, 2014 2:40 PM

Painting up real nice Bish

  • Member since
    August 2007
  • From: back country of SO-CAL, at the birth place of Naval Aviation
Posted by DUSTER on Saturday, February 22, 2014 3:09 AM

T26E4

@ Duster/Steve: I'm not sure if you're trying to throw some underhanded jab at me.  Perhaps calling out the "rivet counter" pejorative on me.  Something I've posted seems to have put you off.  I dunno.

I'm sure it's pretty obvious that Bish wanted to go to an extreme level of accuracy, correction and detailing.  Thus, I provided him info that furthered his journey.  I wouldn't toss out small nitpicks if that wasn't the flavor of his build.  Perhaps Bish, on another day or another project, wouldn't like this level of "advice".  To me, it seems he welcomed it.  Indeed, he's gone after things that I wouldn't have had the patience to do so.

Thanks for making sure I'm not a know-it-all dropping unsolicited advice to random modelers -- but I've gotten nothing from Bish but "please more".

Roy
No, I was not throwing anything at or to or for you. Your skills are well known and visible at every showing.  This also applies to the amount of knowledge you have about the armor category and your dedication to this hobby.  So please don't take anything, I have sent, to be construed as being directed to you or your willingness to help a fellow modeler, raise the bar of his abilities.  My including your name was my mistake, so of course it would cause you to wonder and be irritated by my post.
 My message to Bish was meant as a well-deserved complement for his work on this build.  Added was a left handed complement, as it were, for him in light of the care and skill he has shown in his build. 

Steve

Building the perfect model---just not quite yet  Confused

  • Member since
    November 2005
Posted by T26E4 on Sunday, February 23, 2014 12:16 PM

thnx steve.  I was a bit defensive about that.  Thanx for taking time to reply.  Greatly appreciated.

Roy Chow 

Join AMPS!

http://www.amps-armor.org


  • Member since
    December 2002
  • From: Bury St Edmunds, Suffolk, England
Posted by Bish on Sunday, February 23, 2014 2:27 PM

Steve, I know your comment was sent all in good faith. But I understand Roy getting a bit defensive as this is rather a touchy subject and I know both Roy, myself and others have been ridiculed for simply trying to help others and offer advice.

But no harm done and nice to see there's no hard feelings. This is all meant to be fun after all. And Roy, I just want to add again that your help is not only welcome but essential. I could have built this as it came, hopefully had a nice enough build and been finished a month ago and moved onto the next one. But that's just not me and I wouldn't have been satisfied with it. I did notice something else the other day that I had missed and that's the cables for the sights. So I have added this. Unfortunatly, I used up all of the paint mix I had, so its a bit darker than the rest at the moment.

Now, onto the make or break part, weathering. Just wanted to get this in before the weekend was over.  I spent this week dry bruising with oils. After that I added the filters. I am using AK interactive DAK filter and wash. Its the first time I have used a filter and I am not sure what I was expecting. It has certainly changed the colour slightly, but I seem to recall it being said that filters add depth, but I just can't see it. And I was under the impression it would leave a semi gloss finish, but it is more flat than it was before. But the washes seem to be going down ok. I haven't added all the washes yet and have still to remove most of the excess.


Lots more wash to add, there is a lot of nooks and crannies on this to get into. 

I am a Norfolk man and i glory in being so


On the bench: Airfix 1/72nd Harrier GR.3/Fujimi 1/72nd Ju 87D-3

  • Member since
    August 2007
  • From: back country of SO-CAL, at the birth place of Naval Aviation
Posted by DUSTER on Sunday, February 23, 2014 10:27 PM

As we end this unfortunate saga; I'll just go over here in the corner and quietly  watch    the fascinating  evolution of little parts into major assemblys ;   I won't say a thing...........well, maybe a small comment or two or three or ...?  as the progress continues...  

 After all why would I want to mess with a guy that has an 88mm flack gun to point in my direction?!? Even in scale that  thing would hurt!

                     see ya!                  


Steve

Building the perfect model---just not quite yet  Confused

  • Member since
    April 2005
  • From: Gothenburg
Posted by JohanT on Monday, February 24, 2014 8:30 AM

@ Bish, you are on the mark m8, keep the progress pictures coming :)

The issue with the filters, could it be the scale effect?

@ Roy, keep supporting!

@ Duster, I smiled at your first note - you gotta love this hobby for all its worth - right?

Very Best Regards

Johan

  • Member since
    December 2002
  • From: Bury St Edmunds, Suffolk, England
Posted by Bish on Monday, February 24, 2014 12:29 PM

Thanks Johan. I am not sure if its so much an issue but maybe me not being sure what to expect. The more I look at it, especially under light, the more I can see depth there, I think I am getting it.

I am a Norfolk man and i glory in being so


On the bench: Airfix 1/72nd Harrier GR.3/Fujimi 1/72nd Ju 87D-3

  • Member since
    July 2004
  • From: Texas
Posted by wbill76 on Sunday, March 2, 2014 4:27 PM

Haven't been able to get by in a little while to the forums but have managed to catch the update on this one at just the right stage Bish. Nice work with the washes, definitely brings out the detail. As for the filter, the effects of a filter are typically subtle and it sounds like once the filter has dried, you're seeing more of its effects on the finish. Wink

  • Member since
    December 2002
  • From: Bury St Edmunds, Suffolk, England
Posted by Bish on Sunday, March 2, 2014 4:42 PM

Thanks a lot bill. I have spent most of this last week finishing the washes, which themselves took a few days, and the base. But tonight I am getting to the bear metal areas and will get some pics up in a day or so.

But I am glad you checked in as I wanted to ask you something. I was reading up on your Tiger build about applying the pastels and wanted your opinion, and anyone else's who might have a view.

I know on the Tiger you were doing dry mud which is of course different to the dry sand that I will be doing. But do you think the same technique would work. And also, given the much larger scale, do you think the pastel's would still work.

I am using AK pastel rather than MiG's but am not sure if the pastel's will look right on such a large scale.

I am a Norfolk man and i glory in being so


On the bench: Airfix 1/72nd Harrier GR.3/Fujimi 1/72nd Ju 87D-3

  • Member since
    December 2002
  • From: Bury St Edmunds, Suffolk, England
Posted by Bish on Wednesday, March 5, 2014 4:00 PM

Finally time for another up date on my 88. All of the washes and chipping are now done and the bare metal bits have been painted.

 And a close up of the recoil indicator. I had removed the moulded on one and have replaced it with styrene strip.  

Next up will be finishing and fitting the tools before adding the dust effects. So almost there. 

I am a Norfolk man and i glory in being so


On the bench: Airfix 1/72nd Harrier GR.3/Fujimi 1/72nd Ju 87D-3

  • Member since
    January 2013
Posted by jibber on Wednesday, March 5, 2014 5:31 PM

Bish the wash looks awesome. Its amazing how it changes the look and adds so much depth.  

  • Member since
    December 2002
  • From: Bury St Edmunds, Suffolk, England
Posted by Bish on Thursday, March 6, 2014 12:58 PM

Thnaks, ye I agree it makes a lot of difference.

I am a Norfolk man and i glory in being so


On the bench: Airfix 1/72nd Harrier GR.3/Fujimi 1/72nd Ju 87D-3

  • Member since
    July 2006
  • From: San Francisco Bay Area
Posted by bufflehead on Thursday, March 6, 2014 8:58 PM

Hey Bish, I've been absent from the forums for a couple of months and am just getting caught up on things.  Last I remember you were just getting this big gun started and I finished reading your blog back from the beginning!  I've got to say what a great job you've done!  The detail work you put in this is fantastic and the paint job is looking awesome!  I REALLY love how the sand color is coming along...the filters and washes add perfect depth to the paint job!  Work or not, I'm going to make it a point to check back on this one...I have to see the finished product!!  

Ernest

Last Armor Build - 1/35 Dragon M-26A1, 1/35 Emhar Mk.IV Female


Last Aircraft Builds - Hobby Boss 1/72 F4F Wildcat & FW-190A8


  • Member since
    December 2002
  • From: Bury St Edmunds, Suffolk, England
Posted by Bish on Friday, March 7, 2014 8:11 AM

Thanks Ernest, I will try to avoid keeping you away from work for to much longer.

I am a Norfolk man and i glory in being so


On the bench: Airfix 1/72nd Harrier GR.3/Fujimi 1/72nd Ju 87D-3

  • Member since
    April 2005
  • From: Gothenburg
Posted by JohanT on Monday, March 10, 2014 2:47 PM

Hi Bish;

You are getting very good results with your weathering technique, I am totally amazed on the level of detail you bring out.

For the shiny metal parts, recoil cylinders, sliding rail, breach block...

Blackened grease as a semi gloss transparent layer?

Thank you for sharing, checking in on a daily basis :)

Very Best Regards

Johan

  • Member since
    December 2002
  • From: Bury St Edmunds, Suffolk, England
Posted by Bish on Monday, March 10, 2014 2:53 PM

Thanks Johan. For those bare metal parts, I mixed steel with a touch of raw umber oil paint, using the photo's you guys provided, I think my mix is pretty close.

Its just about done. All the assemblies are together and its on the base, just got to add the pigments. Its in the airing cupboard to dry out the celluclay,that and I have no where else to store it at the moment. Should have the final pics in a day or two.

I am a Norfolk man and i glory in being so


On the bench: Airfix 1/72nd Harrier GR.3/Fujimi 1/72nd Ju 87D-3

  • Member since
    March 2003
  • From: Western North Carolina
Posted by Tojo72 on Monday, March 10, 2014 5:39 PM

Wow,the wash and wear are looking real good

  • Member since
    November 2010
  • From: Florida-West Central
Posted by Eagle90 on Tuesday, March 11, 2014 5:39 AM

There are no words my friend!  Amazing.......amazing!  The wash is awesome!

Eagle90


  • Member since
    July 2004
  • From: Texas
Posted by wbill76 on Tuesday, March 11, 2014 5:06 PM

Very nice progress! In regards to the question on the pigments, I think you'll be fine with it in this scale, you just may have to build it up a little bit more depending on how 'heavy' you want it to look when all said and done. HTH!

  • Member since
    December 2002
  • From: Bury St Edmunds, Suffolk, England
Posted by Bish on Tuesday, March 11, 2014 5:09 PM

Thanks guys. Bill, ye, that's what I have been doing.Its hard to see it on the desert scheme, but on the parts, tires, tools etc its looking really nice.

Its just about done now. I am just finishing off my Stormtrooper for the Hollywood GB and my mug to arrive for the Hero's and villains GB and then I can get all the finished pics done in one go

I am a Norfolk man and i glory in being so


On the bench: Airfix 1/72nd Harrier GR.3/Fujimi 1/72nd Ju 87D-3

  • Member since
    December 2002
  • From: Bury St Edmunds, Suffolk, England
Posted by Bish on Thursday, March 13, 2014 6:07 PM

Ok guys, wait is over, I am calling this done.

Bill, I really like the effect that's been left with those pigments. You can really pile up the dust in areas were it would build up, so thanks for that tip.

After everything was put together, I sprayed on AK's dust effects. Once that was dry, I used their pigments mixed with water to add some heavy dusting. I rather like the end result. Though in some of the pics, some areas show up as a bright yellow the real thing isn't quite as bright as that. I also added some chain to the sides of the gun and the box's on the trailers.

I was originally going to make the badges from printing my own decals. But after chatting to plasticjunkie, I decided to try making them out of 6mm MDF. I kept it simple, the 88, I don't think it needs and more of an intro than that, and the DAK insignia.

So, here's the pics.

Thanks to all those who followed along, I hope the wait was worth it. And a huge thank you to all those who offered advice, links and there own pics, especially Johan, Clemans and of course Roy. I really couldn't have pulled this off to this level without your help.

All comments welcome as always. And thanks again. 

I am a Norfolk man and i glory in being so


On the bench: Airfix 1/72nd Harrier GR.3/Fujimi 1/72nd Ju 87D-3

  • Member since
    January 2013
Posted by jibber on Friday, March 14, 2014 9:08 AM

WOW Bish, what a beautiful build. This build and dio is something you should be very proud of. Your close-ups are great, thanks for sharing all the steps and again just WOW.

  • Member since
    December 2002
  • From: Bury St Edmunds, Suffolk, England
Posted by Bish on Friday, March 14, 2014 9:24 AM

Thanks buddy. Now I just have to find some where to put it. Its rather large.

I am a Norfolk man and i glory in being so


On the bench: Airfix 1/72nd Harrier GR.3/Fujimi 1/72nd Ju 87D-3

  • Member since
    January 2013
Posted by jibber on Friday, March 14, 2014 1:26 PM

Send it to me….LOL

  • Member since
    December 2002
  • From: Bury St Edmunds, Suffolk, England
Posted by Bish on Friday, March 14, 2014 1:54 PM

Here you go buddy, all yours.  Gift

Big Smile


I am a Norfolk man and i glory in being so


On the bench: Airfix 1/72nd Harrier GR.3/Fujimi 1/72nd Ju 87D-3

  • Member since
    January 2013
Posted by jibber on Friday, March 14, 2014 4:29 PM

Bish thinking about it, what about a big gun, large bore GB? AFV, Canon etc sometime in the future. I know we're piled up right now but maybe around years end?

  • Member since
    December 2002
  • From: Bury St Edmunds, Suffolk, England
Posted by Bish on Friday, March 14, 2014 4:48 PM

We have had GB's along those lines, though I think its been a couple of years. There are a few guys who specialise more in artillery.

I already have a couple of GB's planned for next year, so I couldn't host one myself,  but I still have space in the diary for another GB. So if you fancy hosting one or can talk one of the big gun guys to go for it, I think I would be in.

I am a Norfolk man and i glory in being so


On the bench: Airfix 1/72nd Harrier GR.3/Fujimi 1/72nd Ju 87D-3

  • Member since
    April 2006
  • From: Denver, Colorado
Posted by waynec on Friday, March 14, 2014 5:03 PM

hey bish

that turned out really nice.

Никто не Забыт    (No one is Forgotten)
Ничто не Забыто  (Nothing is Forgotten)


  • Member since
    October 2007
  • From: Louisville, KY
Posted by pordoi on Friday, March 14, 2014 5:45 PM

Bish,

I've been following this build silently up until now, but really have to congratulate you on your excellent work!  Great job, and I really like the base.  How about a short description of how you made that? 

Would be really nice with a figure or two; are there DAK 1:16 figs available?  And would the scale difference be noticeable? 

Don

  • Member since
    August 2007
  • From: back country of SO-CAL, at the birth place of Naval Aviation
Posted by DUSTER on Friday, March 14, 2014 5:53 PM

Bish

Unlike Don, I haven't been so silent in following your build.

Regardless, this is a thing of beauty, both model and base offset one another as a unified whole.

Well Done! 

Steve

Building the perfect model---just not quite yet  Confused

  • Member since
    July 2006
  • From: San Francisco Bay Area
Posted by bufflehead on Friday, March 14, 2014 11:01 PM

OH MAN!  I take a couple of afternoon naps and I almost miss the completed 88!!  I even mentioned in another thread that I was trying to keep tabs on this build!  DOH!!! Stick out tongue

Great work Bish!!  I love the whole dusty DAK look and the base.  You put in a lot of effort in detailing and painting this big gun and it definitely paid off!!  Nice work on the "88" and DAK symbol....they really add to the presentation!  Yes

Ernest

Last Armor Build - 1/35 Dragon M-26A1, 1/35 Emhar Mk.IV Female


Last Aircraft Builds - Hobby Boss 1/72 F4F Wildcat & FW-190A8


  • Member since
    December 2002
  • From: Bury St Edmunds, Suffolk, England
Posted by Bish on Saturday, March 15, 2014 2:29 AM

Thanks very much guys.

Don, I hadn't considered a figure, there is a Tamiya DAK Tank crewman that would fit the scene, might have a look into that. The kit did have 4 88mm shells that I was going to use, but I wasn't to keen on those.

The base was pretty simple. Its just a piece of furniture board I got from the local DIY store cut to the right size. I routed the edge, I bought a router just for this and the Darth Vadar figure I have just finished, and its a nice toy, I will defiantly be making more use of that. Once stained and varnished, I masked off and sprayed the desert yellow patch for the DAK badge.

The badge and the 88 were cut out of 6mm MDF with a copping saw, that was a bit fiddly, especially the palm tree. Then finally the desert terrain, this was celluclay mixed with sand to give texture and acrylic paint until I had the right colour and than just laid on, and the stones are pumice and some Talus. And that was it.

Thanks for following along Don.

Steve, thank you, and thanks for all your impute. And your similes, which always make me, mmmm, well, smile.

Ernest, thanks, glad you managed to catch it.

It was a real pleasure to build, as well as a challenge. Its not often I buy a kit and build it so soon. But as soon as I saw this was being released last year, I knew I wanted one. And I am really pleased with it, but I think that's it for scratch building for a little bit, at least until next time.

I am a Norfolk man and i glory in being so


On the bench: Airfix 1/72nd Harrier GR.3/Fujimi 1/72nd Ju 87D-3

  • Member since
    December 2002
  • From: Bury St Edmunds, Suffolk, England
Posted by Bish on Saturday, March 15, 2014 7:20 AM

Ernest, seing as you dropped in, a quick question. You may recall a while back you mentioned you use photographic backing paper for your backgrounds. As you can see from my pics, I am using two sheets of paper but even these are not really big enough for stuff this size.

What size photo backing paper were you able to get. The only stuff I can find comes in lengths 11m long, which is a bit much. I was wondering if you were able to get anything smaller.

I am a Norfolk man and i glory in being so


On the bench: Airfix 1/72nd Harrier GR.3/Fujimi 1/72nd Ju 87D-3

  • Member since
    March 2004
  • From: Spartanburg, SC
Posted by subfixer on Saturday, March 15, 2014 9:38 AM

Simply soo-perb!  YesYes

Well done!

Lee

I'm from the government and I'm here to help.

  • Member since
    April 2013
Posted by SchattenSpartan on Saturday, March 15, 2014 2:20 PM

Amazing work, buddy! Your 88 sure is one gorgeous piece of art!

  • Member since
    December 2002
  • From: Bury St Edmunds, Suffolk, England
Posted by Bish on Saturday, March 15, 2014 2:44 PM

Thanks guys, much appreciated.

I am a Norfolk man and i glory in being so


On the bench: Airfix 1/72nd Harrier GR.3/Fujimi 1/72nd Ju 87D-3

  • Member since
    July 2006
  • From: San Francisco Bay Area
Posted by bufflehead on Saturday, March 15, 2014 3:52 PM

Bish, I'm using a 26" wide roll of background paper I ordered online from either Adorama or B&H Photo (can't remember which).  They do sell different width rolls....seems the standard sizes are 26", 53" and 107".  26" is perfect for most average size models,  but I'm not sure if it would suit a dio....??

Here's the link to Adorama:  http://www.adorama.com/l/Lighting-and-Studio/Backgrounds-and-Supports/Paper-Backgrounds

and to B&H Photo: http://www.bhphotovideo.com/c/buy/seamless-paper/ci/23680/N/3976090297

I'm pretty sure both of these are based in the U.S., but I would bet that there's something similar in the UK!

I also going to start using a nicer, graduated background for final photos.  Its made by Flotone and is a bit more expensive, but looks quite nice as a background for models, especially those that are a bit larger.

http://www.bhphotovideo.com/c/product/17747-REG/Flotone_GFT409_Graduated_Background_31x43.html

I hope this helps!  Looking forward to your next build!

Ernest

Last Armor Build - 1/35 Dragon M-26A1, 1/35 Emhar Mk.IV Female


Last Aircraft Builds - Hobby Boss 1/72 F4F Wildcat & FW-190A8


  • Member since
    December 2002
  • From: Bury St Edmunds, Suffolk, England
Posted by Bish on Saturday, March 15, 2014 4:09 PM

Thanks Ernest, the ones here are about the same size, I just wasn't sure if there were any that were not quite as long, but I guess the extra will come in handy. I think I will try and get some this week and get some better pics.

Next build is a Panther for the D-day GB, so back to something a bit more familiar.

I am a Norfolk man and i glory in being so


On the bench: Airfix 1/72nd Harrier GR.3/Fujimi 1/72nd Ju 87D-3

  • Member since
    November 2004
  • From: Essex England
Posted by spacepacker on Wednesday, March 19, 2014 3:57 PM

Haven't been looking in so often lately, so missed most of your build; but the finished article is looking real good. Congrats...cheers....Kenny

  • Member since
    April 2005
  • From: Gothenburg
Posted by JohanT on Wednesday, March 19, 2014 4:07 PM

Outstanding m8!

Truly inspiring and challenging Blog...

Thank you, its just XLNT!

Very Best Regards

Johan

  • Member since
    December 2002
  • From: Bury St Edmunds, Suffolk, England
Posted by Bish on Wednesday, March 19, 2014 4:32 PM

Thanks guys. And thanks again for those pics Johan.

I am a Norfolk man and i glory in being so


On the bench: Airfix 1/72nd Harrier GR.3/Fujimi 1/72nd Ju 87D-3

  • Member since
    August 2008
  • From: S.W. Missouri
Posted by Pvt Mutt on Wednesday, March 19, 2014 9:33 PM

You can take some pride in that project buddy.Yes

Shoot Low Boys They're Ridin Ponys

  • Member since
    March 2013
  • From: Puebla, Mexico
Posted by garzonh on Thursday, March 20, 2014 8:10 AM

WOW, looks so nice and detailed, painting and weathering loos awesome.

I would had liked to have the complete base covered in sand and one figure would make it perfect!. But no offense it is a museum quality model.

Cheers!

  • Member since
    December 2002
  • From: Bury St Edmunds, Suffolk, England
Posted by Bish on Thursday, March 20, 2014 1:25 PM

Thanks a lot guys, I am indeed extremely pleased with this one.

garzonh, for these sort of displays, I prefer only partial cover of the board with a nice stain surrounding the terrain. I don't view this as a dio, simply a means of displaying the model. For dio's I do indeed cover the full board. I might look at getting a 1/16th figure, the nearest scale there seems to be, but I am still not sure yet. I just wanted the focus to be on the gun itself.

And no offense taken, its all down to personal taste I guess.

I am a Norfolk man and i glory in being so


On the bench: Airfix 1/72nd Harrier GR.3/Fujimi 1/72nd Ju 87D-3

  • Member since
    March 2014
Posted by BarrettDuke on Friday, March 21, 2014 6:26 PM

Bish,

A truly remarkable job. Thanks for taking the time to explain so much of what you were doing. I learned a lot for my own future work. The 88 was an amazing weapon. You have captured it well. Congratulations. It must look awesome in person.

  • Member since
    December 2002
  • From: Bury St Edmunds, Suffolk, England
Posted by Bish on Sunday, March 23, 2014 11:15 AM

Thanks very much. I am really getting the taste for scratchbuilding, it is time consuming, as much so or if not more than adding PE. But it is very satisfying.

And I must admit, it does look rather nice. Unfortunately I still haven't decided where to put it. Its currently on the floor next to the model bench, but I really should move it before it gets damaged.

And thanks again, and glad you find it useful.

I am a Norfolk man and i glory in being so


On the bench: Airfix 1/72nd Harrier GR.3/Fujimi 1/72nd Ju 87D-3

  • Member since
    July 2004
  • From: Texas
Posted by wbill76 on Sunday, March 23, 2014 7:52 PM

Haven't been able to get back here for a while Bish but glad to see this one get done! Very nice work not only in the scale but also in all of the details. A real winner for sure! Yes

  • Member since
    December 2002
  • From: Bury St Edmunds, Suffolk, England
Posted by Bish on Saturday, April 19, 2014 3:02 AM

Sorry, bill, hadn't seen your post. Thank you very much. Much appreciated.

It was real satisfying to add all those details without any AM, I think I will be doing quite a bit more of that.

I am a Norfolk man and i glory in being so


On the bench: Airfix 1/72nd Harrier GR.3/Fujimi 1/72nd Ju 87D-3

  • Member since
    April 2006
  • From: ON, Canada
Posted by jgeratic on Saturday, April 19, 2014 5:13 AM

Bish, very impressive work on the 'dreaded 88'.  Yes

As far as figures go, Tamiya did have a 1/16  Afrika tank crewman.

It could easily be converted to an artilleryman by shaving off the skulls on his lapels, and using red instead of pink waffenfarbe, (or would it be under army control - then white piping would be in order).  Oh, and also the panzer badge on the chest pocket would have to go.

regards,

Jack

  • Member since
    December 2002
  • From: Bury St Edmunds, Suffolk, England
Posted by Bish on Saturday, April 19, 2014 5:24 AM

Thanks jack, ye, I was looking at that one. Would not take to much to correct it, not sure about the Waffenfarbe, but wasn't white waffenfabe for Inf, I think it would be red whether it was an Air Force weapon or army, will have to look into that.

If I add it, I will post some more pics.

I am a Norfolk man and i glory in being so


On the bench: Airfix 1/72nd Harrier GR.3/Fujimi 1/72nd Ju 87D-3

  • Member since
    April 2006
  • From: ON, Canada
Posted by jgeratic on Saturday, April 19, 2014 3:12 PM

Did some searching through my reference library, and combined with these charts, it looks like the Luftwaffe would crew the 88's, their battalions being attached to the army.

http://niehorster.orbat.com/011_germany/41-oob/corps_dak.html

http://niehorster.orbat.com/011_germany/42-oob/42-10-23/d-i-pz-aok.html

According to Osprey,  the earlier crews were given army tropical clothing but replaced all insignia with their own (I'm assuming continental), including collar patches.

By late '41, they began issuing their own tropical clothing.  The field jacket differed slightly, more golden coloured, (but I've a photo book that has examples showing it was also made in blue-grey!) with straight edge flaps on the pockets and no pleats on the bottom pockets.  It was also designed to be fastened at the collar.  No collar patches worn, and Luftwaffe chest eagle in grey thread on tan backing for all ranks.  Trousers would also be more loose fitting, with a large pocket on the left thigh.

regards,

Jack

  • Member since
    December 2002
  • From: Bury St Edmunds, Suffolk, England
Posted by Bish on Saturday, April 19, 2014 3:47 PM

Thanks for that info Jack. One thing I have never ben able to clarify is the Flak elements within a Division. I seem to recall reading that these were originally Luftwaffe units but that the army took over in 1943, but I have not been able to confirm it. In facvt, from what I have been able to find, there were no Flak Battalions within the Divisions until 1943, which is counter to what I had always believed.

I do have some good books on German airforce uniforms, so I recon I can have a go at re working that figure if I need to.

I have found one on e-bay so I think I might put it together and then see how it looks.

And I just have to mark this. This is my 10,000th post. Finally, my free life time subscription to the mag. Toast

I am a Norfolk man and i glory in being so


On the bench: Airfix 1/72nd Harrier GR.3/Fujimi 1/72nd Ju 87D-3

  • Member since
    August 2007
  • From: back country of SO-CAL, at the birth place of Naval Aviation
Posted by DUSTER on Sunday, April 20, 2014 1:11 AM

Bish

And I just have to mark this. This is my 10,000th post. Finally, my free life time subscription to the mag. Toast

You Da Man Bish!   It couldn't happen to a finer fellow    

Steve

Building the perfect model---just not quite yet  Confused

  • Member since
    April 2006
  • From: ON, Canada
Posted by jgeratic on Sunday, April 20, 2014 2:09 PM

Bish, grats on the 10k mark.  I wasn't aware there was a prize for the achievement, right on!

As far as the flak query goes, I can't find anything either that states these units were taken over by the army. Interesting find was a couple of American documents dated 1943, with their assessment of flak units.  Seems to state these was both integrated into army units, thus wearing white waffenfarbe, and those that were attached from the Luftwaffe, in which case red piping was the order.

http://usacac.army.mil/cac2/cgsc/carl/wwIIspec/number10.pdf

http://www.lonesentry.com/articles/ttt/german-antiaircraft-defense-flak.html

regards,

Jack

  • Member since
    December 2002
  • From: Bury St Edmunds, Suffolk, England
Posted by Bish on Sunday, April 20, 2014 2:28 PM

Thanks, I wish there was a prize lol.

When I say about units being taken over, I was not on about the Flak Divisions but rather the Flak battalions within a Division. But it seems that these did not even exist until 1943 and before then the Army would rely on the Air Force Flak units. And then once the threat from the air grew greater, the Army created its own Flak units. I guess I had misunderstood.

I was checking through one of my German uniforms books after the last post and I had not realised that Army Flak units did indeed wear white. Strange that they did this rather than the usual Artillery red.

Thnaks for those links, i'll have a read through them.

I am a Norfolk man and i glory in being so


On the bench: Airfix 1/72nd Harrier GR.3/Fujimi 1/72nd Ju 87D-3

  • Member since
    August 2006
  • From: Oromocto, Canada
Posted by Gun Tech on Sunday, April 20, 2014 2:58 PM

Hey Bish!

I just went through the whole tread, OUTSTANDING work on this big guy!  Yes

I wish I could have kicked myself in the butt earlier and become active here again at Christmas time, I would not have missed your Flak 36 then and would have followed it "live"!

I'm going to pass on this kit though.  As someone mentioned in this tread (I think it was Bill), the lack of details at this scale is more apparent!   Great scratch work throughout!

Cool

Jean-Michel

Jean-Michel    "Arte et Marte"

  • Member since
    December 2002
  • From: Bury St Edmunds, Suffolk, England
Posted by Bish on Sunday, April 20, 2014 3:17 PM

Thanks Jean. And yes indeed, the errors with this are very magnified. But, if someone wants a large 88 at a good price and is not to worried about accuracy, its a lovely kit. But while I really wanted this in a big scale, I felt it just deserved the extra work. But compared to the detail you get with a Dragon kit (I've got their 35th Flak 37 in the stash) its chalk and cheese.

But all this scratchbuilding is not something I would want to do very often.

I am a Norfolk man and i glory in being so


On the bench: Airfix 1/72nd Harrier GR.3/Fujimi 1/72nd Ju 87D-3

JOIN OUR COMMUNITY!

Our community is FREE to join. To participate you must either login or register for an account.

SEARCH FORUMS
FREE NEWSLETTER
By signing up you may also receive reader surveys and occasional special offers. We do not sell, rent or trade our email lists. View our Privacy Policy.