SEARCH FINESCALE.COM

Enter keywords or a search phrase below:

Tamiya's PzKpfw II Ausf. F/G Completed

1007 views
4 replies
1 rating 2 rating 3 rating 4 rating 5 rating
  • Member since
    May 2012
  • From: Pennsylvania
Tamiya's PzKpfw II Ausf. F/G Completed
Posted by pilotjohn on Wednesday, February 5, 2014 3:59 PM

I saw this lonely kit at Hobby Lobby about two months ago.  I passed on it a couple of times and then saw it was only $14.99.  I figured why not?  Now everyone knows it is an old one, but I wanted to experiment a bit.  The build was super easy and the only real concern I had was that the rubber tracks were pretty badly twisted up.

So I did the following with her:

  • Used Vallejo's black primer and then a base coat of Model Master 66 panzer schwarzgrau.
  • I kept the wheel rims the primer black.
  • Added a gloss coat and placed some decals.  I kind of made up what I put where based on a couple of photos I saw.
  • I had never done a filter and wanted to try, so I made a blue one from turpenoid and a dark blue oil.  And applied one coat.
  • I then used some Vallejo steel and a silver pencil to do some wear marks.
  • I then thinned some Vallejo black and applied some grime.
  • The tracks were Vallejo steel over black primer and then a thin Model Master rust wash.  Same went for the track section on the front of the hull.  I also rusted the muffler.
  • Then I made a mix of Liquitex matte gel, some Model Master sand, Some Vallejo earth, and lastly added some Sepia green pastel to the mix.  Brushed it on.
  • Lastly I thinned some Model Master sand and sprayed it on from the front.

My goal was to get a well used 1940 Panzer II from the France campaign.  I assumed the wear would be more of a dust than a mud since it was summer time.  Below are some screen shots.  Suggestions and comments are welcome as I am trying to get the weathering better.

SDC10456.jpg.html

SDC10451.jpg.html

SDC10448.jpg.html

John

  • Member since
    January 2007
Posted by the doog on Wednesday, February 5, 2014 5:19 PM

Ok, John----the good: the muffler looks good. The detail painting seems ok--tools, etc.

Now to get to the things you could improve: first, whatever is the strange white powder on the model, get rid of that if you can. It's very distracting, and not convincing at all if you were trying to show dust. It's too sporadically-applied for that.

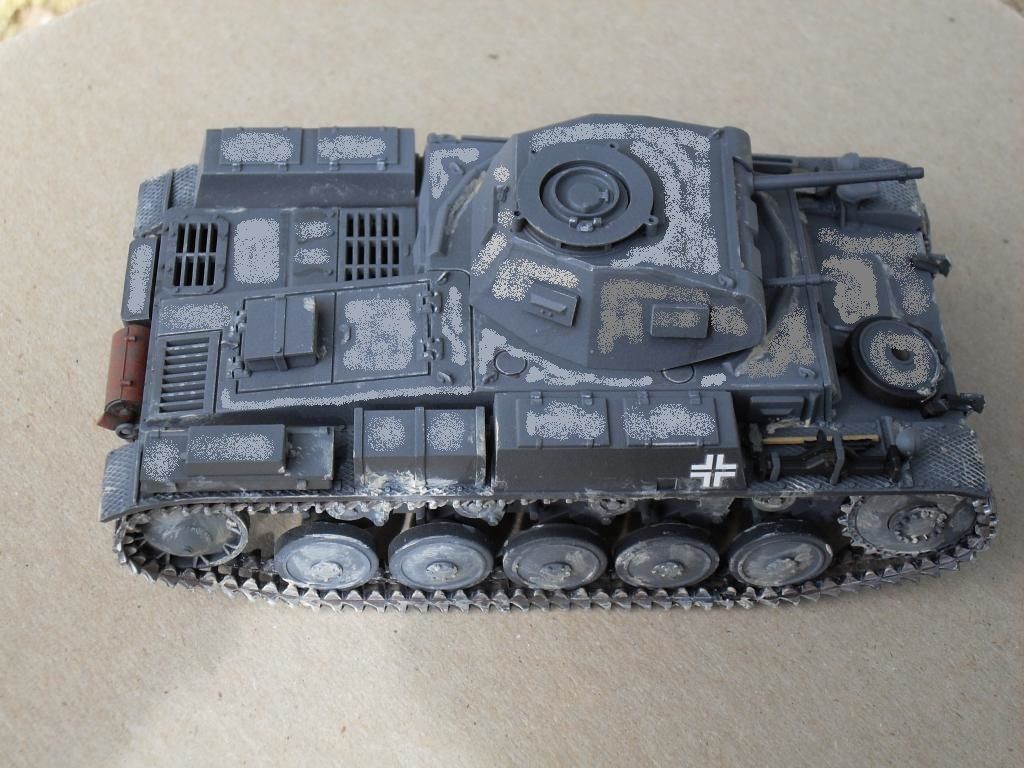
Gray vehicles are tough because that gray paint shade just sucks up light. You need to simulate the effects of light and shadow on a model to make it look realistic. First, if you want a simple thing to do, dry-brush this model with a light tan color. That will simulate a dusty finish, while highlighting and defining the edges and the shape of the turret and all the various projections on the tank.

Next, add pin washes with black. Use oil paint, and a small, fine brush. Make a puddle of diluted black oil paint, and use the fine brush to coax the mix into all the panel lines, around all the projections on the tank. Around the hatches, the engine grilles, the bullet splash rail, etc. Now you've got highlights AND shadows. This finish will come alive.

It's best to simulate scratches and wear with a metallic brown or grey, NOT silver. Use silver VERY sparingly--only a small percentage, maybe only on the edges of the front fenders where they might get bumped? But VERY lightly.

If you want to do some advanced technique, use your airbrush to add a lightened coat of paint inside the panel lines of the tank., Spray lighter gray on the inner panel--something like this. You can then mitigate the difference in tone with washes and filters. Then do all the above steps as well.
  • Member since
    May 2012
  • From: Pennsylvania
Posted by pilotjohn on Wednesday, February 5, 2014 5:55 PM

Hi Doog;

That is not my photo.. I mean it is, but that is not what the thing looks like.  Weird.  I am going to try this link on Flickr instead:

http://www.flickr.com/photos/84704985@N08/12331702625/

Does this look any better?  Scratching my head on that one.

John

  • Member since
    January 2007
Posted by the doog on Wednesday, February 5, 2014 6:06 PM

John,

I'm so sorry--I must not have made it clear. That IS YOUR photo! I downloaded it, modified it in "Paint" to show you what I meant by the painting technique! I added the lighter parts!

When you want to paste photos, you have to click on the little icon in the utilities bar in your post---look for the one that looks like a photo icon--it's about 5 or 6 from the right. CLick on it, and erase the "http" fill-in, and add your own image code from Photobucket or Imageshack or whatever. Then your photo will show up. You will not get many replies if you only post links, not photos. A lot of guys just won't bother looking.

  • Member since
    May 2012
  • From: Pennsylvania
Posted by pilotjohn on Wednesday, February 5, 2014 6:22 PM

Doog;

Oh, that makes sense.  Sorry, I was stumped on that one.  Thanks for the tips!

John

JOIN OUR COMMUNITY!

Our community is FREE to join. To participate you must either login or register for an account.

SEARCH FORUMS
FREE NEWSLETTER
By signing up you may also receive reader surveys and occasional special offers. We do not sell, rent or trade our email lists. View our Privacy Policy.