SEARCH FINESCALE.COM

Enter keywords or a search phrase below:

Tamiya Merk1 WIP, Finished 9/9

9829 views
86 replies
1 rating 2 rating 3 rating 4 rating 5 rating
  • Member since
    January 2007
Posted by the doog on Tuesday, July 8, 2014 7:45 PM

Wow, going to town on this one, Baer!

  • Member since
    January 2014
  • From: Toronto
Posted by Rob S. on Tuesday, July 8, 2014 7:58 PM

Lookin' good Yes

______________________________________________________________________________


On the Bench: Nothing on the go ATM

  • Member since
    September 2006
  • From: Dripping Springs, TX, USA
Posted by RBaer on Wednesday, July 9, 2014 9:02 AM

Thanks, guys!

I have some more pics from last night's work, but working off-site for the next couple of days, might be able to get them up tonight. It's slowing down a little bit, getting into some of the finer details on the turret that Tamiya totally skated on.

Apprentice rivet counter.

  • Member since
    September 2006
  • From: Dripping Springs, TX, USA
Posted by RBaer on Wednesday, July 9, 2014 1:41 PM

Well, the off-site job kind of fizzled, so all of a sudden I have some time....

Last night I started the loader's hatch, did the driver's hatch stop, mounted the Academy stretcher, and stared at pics for a long time.....

The hatch is pinned to be operable, not sure how many figs I'll use yet. All I've added to it so far is the interior pad, still need to find a pic of the inside latch and handle.I also trimmed the Academy stretcher to fit, looks a lot better than Tamiya's part.

Tamiya had the driver's hatch lock base there, all I had to do was add the actual lever, done from scrap plastic. I hope I don't knock it off, it's pretty small.....

Apprentice rivet counter.

  • Member since
    September 2006
  • From: Dripping Springs, TX, USA
Posted by RBaer on Monday, July 14, 2014 4:05 PM

The kit tow cables (both Tamiya and Academy) were pretty lousy, and I couldn't get either of them to drape correctly, so I decided to whip up some "liberated" Soviet cables, from one of the many T-55s or T-62s captured by the Israelis in '73.  That's my story anyway. Looking in the Tamiya T-55 in the stash and a Trump KV-1 right next to it made me realize the tow cable ends were pretty much the same, and the Trump parts were already set up to accept a cable, no filling or drilling required. I've also started robbing parts from a Legends Merk3C conversion that has too many damaged and poorly cast parts to be used intact, replacing Tamiya bits if and when the Legends parts are actually better. At this point, I've probably only got a few more bits here and there before it's ready for primer.

Pics so far:

Apprentice rivet counter.

  • Member since
    December 2002
  • From: Bury St Edmunds, Suffolk, England
Posted by Bish on Wednesday, July 16, 2014 10:11 AM

That's coming along really nicely.

I am far from an expert on modern armour, so don't take my word for it, but I can't see anything missing. Well, except for the side skirts which I am guessing will be added after the tracks.

I am a Norfolk man and i glory in being so


On the bench: Airfix 1/72nd Harrier GR.3/Fujimi 1/72nd Ju 87D-3

  • Member since
    September 2006
  • From: Dripping Springs, TX, USA
Posted by RBaer on Wednesday, July 16, 2014 10:48 AM

Thanks, Bish.

No skirts planned for the old gal, I want to show off the suspension, although I've see quite a few pics of tanks with just the rear one or two pieces on when the front fenders are off...    must be a result of urban conditions.

Apprentice rivet counter.

MrT
  • Member since
    December 2010
Posted by MrT on Wednesday, July 16, 2014 10:51 AM

Very nice!

  • Member since
    September 2006
  • From: Dripping Springs, TX, USA
Posted by RBaer on Wednesday, July 16, 2014 5:53 PM

Thanks!

Apprentice rivet counter.

  • Member since
    September 2006
  • From: Dripping Springs, TX, USA
Posted by RBaer on Wednesday, July 23, 2014 1:09 PM

A few more bits and pieces, mainly details that are left out of the kit or super-simplified, but as long as I can do them without having to buy AM parts or pieces, I'm trying to do what enhancements I can, mainly on stuff that has obvious deficiencies.

Commander's MG and mount, with an obvious pin mark that I missed last night:

Gun tube lock:

And I popped the stretcher off again after it was pointed out to me that the real thing has four handles, which makes a whole lot of sense, and did all four from brass tube and masking tape.

Gotta be getting close to "Prime-Time"....

Apprentice rivet counter.

  • Member since
    September 2006
  • From: Dripping Springs, TX, USA
Posted by RBaer on Thursday, July 31, 2014 1:39 PM

Well, gee whiz, lots done lately. I picked up Tasca's M2 set, confirmed that there was at least one Merk with a mantlet-mounted MG in Op. Peace for Galilee, so that was simple enough....

Then, in a real effort to avoid a remission of my AMS, I went ahead and shot some primer, using my personal favorite, Krylon automotive gray, from the can.

After priming, the suspension springs and all the intake/exhaust screens and vents got a heavy wash with black acrylic, and since I woke up way too early this morning, a first coat of color, Tamiya TS-46 Light Sand from the can. I need to make a trip to the local Hobby Town for more paint and a few other goodies, but it's in color....

I'm happy so far with the different textures on the hull front and turret, but will probably bring them up a little more with washes.

Thanks for looking, as always!

Apprentice rivet counter.

  • Member since
    May 2009
  • From: Poland
Posted by Pawel on Thursday, July 31, 2014 2:20 PM

Hello!

It's a pleasure to look at - your model looks great under that coat of paint! Keep up the beautiful work, good luck with your project and have a nice day

Paweł

All comments and critique welcomed. Thanks for your honest opinions!

www.vietnam.net.pl

  • Member since
    September 2006
  • From: Dripping Springs, TX, USA
Posted by RBaer on Thursday, July 31, 2014 4:04 PM

Thank you, Pawel.

Apprentice rivet counter.

  • Member since
    September 2006
  • From: Dripping Springs, TX, USA
Posted by RBaer on Friday, August 8, 2014 10:40 AM

Well, long time no post.

Been busy with other stuff, but got into the model room last night, I feel better now, thank you.

Knowing that my base coat was well-cured ;)  I laid down a wash on the hull and running gear parts using gray and black acrylic, thinned with alcohol, black on the suspension units, road wheels, hull grates and engine exhausts,  and gray on the hull top and sides. I want LOTS of contrast here, since this is a one-color scheme that will get plenty of dust later that is almost the same color as the base coat. I've also get all the road wheel and return roller tires painted in as Floquil grimy black enamel as are the rear mud flaps. First pic is the washed hull and the unwashed turret together, to show the difference:

I felt the Tamiya TS-46 was too "sandy", and wanted to better represent what I think is IDF sand gray, circa 1982, so I chose a gray filter/wash. I like it so far.

^ Lots of contrast here, stark now, but I'm still happy....

^ Heavy black wash down on the suspension units, partly to emphasize the coil springs, partly to create shadow.

^ Again, shadow, and emphasis of the cast hull front.

^ Contrast, contrast, contrast.

Thanks for looking, as always!

Apprentice rivet counter.

  • Member since
    September 2006
  • From: Dripping Springs, TX, USA
Posted by RBaer on Monday, August 11, 2014 10:00 AM

Turret washed, gun tube striped and detail painting begun:

Apprentice rivet counter.

  • Member since
    May 2009
  • From: Poland
Posted by Pawel on Monday, August 11, 2014 1:09 PM

Howdy, RBaer!

I just got back from a trip, and I wonder why your thread gets so little comments? It looks fine with the weathering. Cooler still is the absence of the traces of the disaster - i mean the missing font quarter! Keep up the excellent work and have a nice day

Paweł

All comments and critique welcomed. Thanks for your honest opinions!

www.vietnam.net.pl

  • Member since
    December 2002
  • From: Bury St Edmunds, Suffolk, England
Posted by Bish on Monday, August 11, 2014 1:29 PM

That's looking very nice, and you defiantly would not know how this looked at the start.

I am a Norfolk man and i glory in being so


On the bench: Airfix 1/72nd Harrier GR.3/Fujimi 1/72nd Ju 87D-3

  • Member since
    September 2006
  • From: Dripping Springs, TX, USA
Posted by RBaer on Monday, August 11, 2014 1:40 PM

Thanks, guys.

Regarding the piece patched in, I was lucky in that I was able to do all the joins in either hidden areas or pre-existing seams like welds or panel breaks. No biggie though, it's all modeling.

Apprentice rivet counter.

  • Member since
    July 2003
  • From: On my kitchen counter top somewhere in North Carolina.
Posted by disastermaster on Wednesday, August 13, 2014 9:19 PM

        Hey!

http://www.picgifs.com/graphics/w/waving/graphics-waving-462508.gif      

    I'm really loving this progression of excellence.  

Sherman-Jumbo-1945

"I was so much older then, I'm younger than that now"


  • Member since
    September 2006
  • From: Dripping Springs, TX, USA
Posted by RBaer on Thursday, August 14, 2014 10:57 AM

Why, thank you, sir!

I've done a little more early-morning detail painting, but will wait until I have some significant progress to post pics.

Apprentice rivet counter.

  • Member since
    September 2006
  • From: Dripping Springs, TX, USA
Posted by RBaer on Friday, August 15, 2014 10:22 AM

Apprentice rivet counter.

  • Member since
    January 2007
Posted by the doog on Sunday, August 17, 2014 9:35 AM

An absolute home run on this beauty, man! Seriously, this is like Modeling 101, sign up now. This turned out fantastically!

  • Member since
    September 2006
  • From: Dripping Springs, TX, USA
Posted by RBaer on Monday, August 18, 2014 10:42 AM

Why, thank you doog!

Speaking of things to be learned while modeling, here's a good one: when you're tired and start thinking about taking a break, DO IT!

I was getting ready to place two small decals on the rear equipment doors Friday night late, and got everything set up to slide the decals on to the model, grabbed the MicroSol and put two wee drops where the decals needed to be, grabbed a decal, turned to the model and saw I had two big blobs of dissolved paint where I had put the .......    

Plastruct liquid glue!

Bang Head

So.....     I put everything away and let it all dry for a day, sanded the spots and had to re-spray. Tense but OK, except now I'll need to source some more decals, which is interesting anyway, since it turns out I don't have or can't find the decal sheet that had the markings I need for this particular tank. Rats, cuz it's time for dust and I need to get the relatively few markings this tank carries on before I dust it up, and it needs to be ready by the 15th of next month. Hmmm.....    I may end up hand-painting. Anyway, here;s a pic of the affected area after the cleanup and re-spray:

And after the wash to blend it all back in:

And the only pic I took of all the work I did Friday night:

I have the turret stowage painted up, ready for the air recog. panel, forgot to take pics....

Thanks for looking, hope this is as much fun for you all as it is for me!

Apprentice rivet counter.

  • Member since
    September 2006
  • From: Dripping Springs, TX, USA
Posted by RBaer on Tuesday, August 19, 2014 10:02 AM

Apprentice rivet counter.

  • Member since
    January 2006
  • From: California
Posted by SprueOne on Monday, August 25, 2014 4:08 PM

Looking great. All those details.

Anyone with a good car don't need to be justified - Hazel Motes


Iron Rails 2015 by Wayne Cassell Weekend Madness sprueone

  • Member since
    September 2006
  • From: Dripping Springs, TX, USA
Posted by RBaer on Tuesday, August 26, 2014 1:26 PM

Thanks!  It's almost funny, now that I've got paint on it, there are a few things I missed......  but gotta save something for the next one, right?

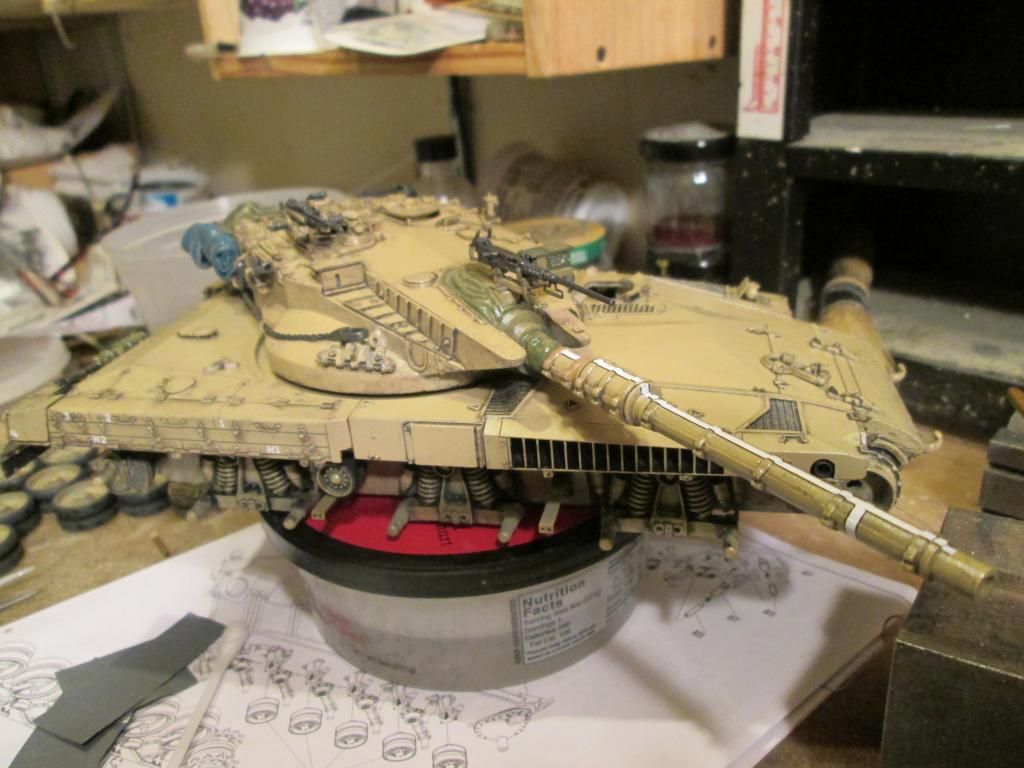
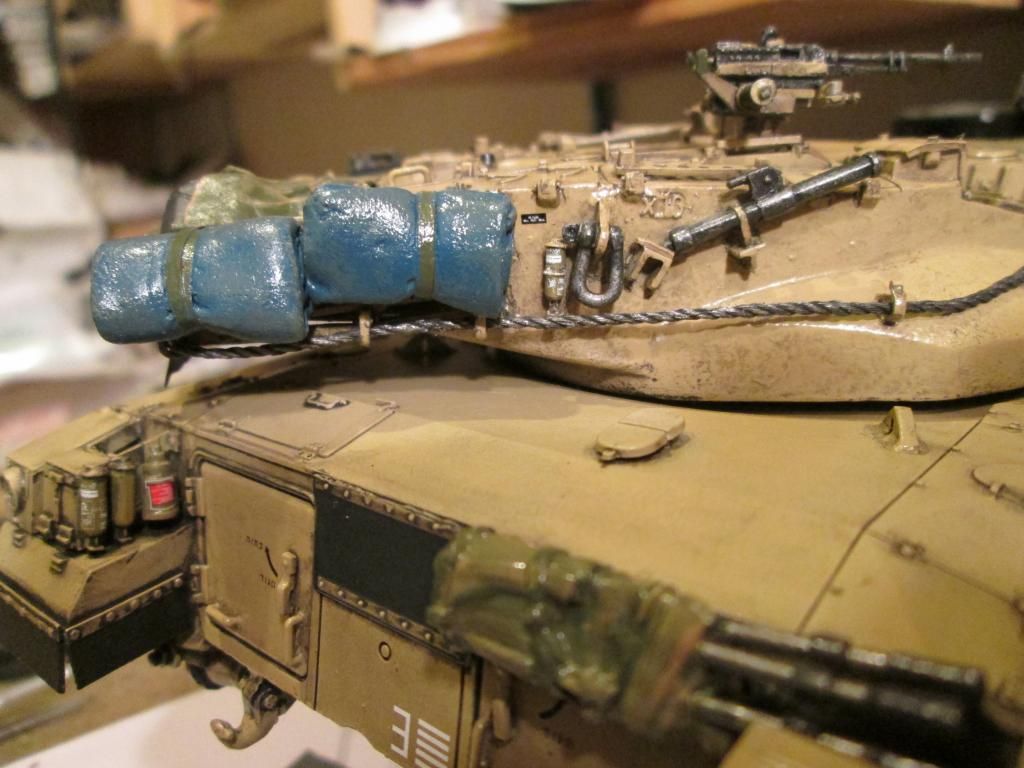
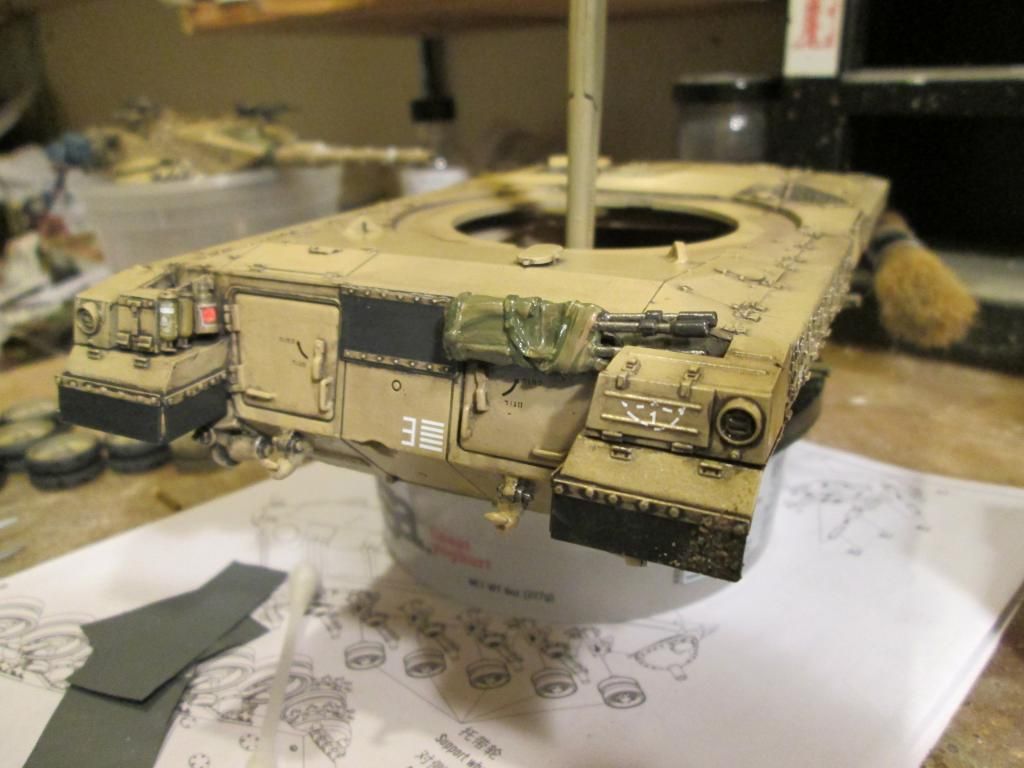
So my decals showed up yesterday, yay!  After taking a look at the placement guide Echelon sends along, I decided the whole model would need a gloss coat, good thing the ModelMaster gloss dries fast.....   then it was decal time. I quickly found out that Echelon's decals are on the thin-side, but lay down really well. They also included a Yanush stripe, which I was able to get on without too much damage. Even it laid down with only one application of MicroSol.  Everything then got another light coat of clear gloss this morning, and now I can start the final dusting. Yippee!

Pics with decals, glossed up and shiny:

Model on, Garth!

Apprentice rivet counter.

JOIN OUR COMMUNITY!

Our community is FREE to join. To participate you must either login or register for an account.

SEARCH FORUMS
FREE NEWSLETTER
By signing up you may also receive reader surveys and occasional special offers. We do not sell, rent or trade our email lists. View our Privacy Policy.