SEARCH FINESCALE.COM

Enter keywords or a search phrase below:

Dragon's 1/35 Panzer iv ausf H Mid Production w/ zimmerit

3752 views
9 replies
1 rating 2 rating 3 rating 4 rating 5 rating
  • Member since
    September 2014
Dragon's 1/35 Panzer iv ausf H Mid Production w/ zimmerit
Posted by Dakattack on Thursday, September 18, 2014 10:55 PM

Dear Fellow Modelers,

This is my first post on the FSM website so I apologize for anything that I may have done wrong. Moving on, I

I had just returned from Normandy this summer and wandering around the small towns and endless hedgerows

made me decide to model an AFV that fought in Normandy. After reading reviews about Dragon's 1/35 

Panzer iv ausf H w/zimmerit, I decided to give it a try. As with all my previous experiences with Dragon kits, 

detail was excellent, the instructions were somewhat crazy , and the fit was great. The only complaint I have

is the errors in part numbering which led to sometimes over half an hour looking for a part. However, it was worth it in the end. 

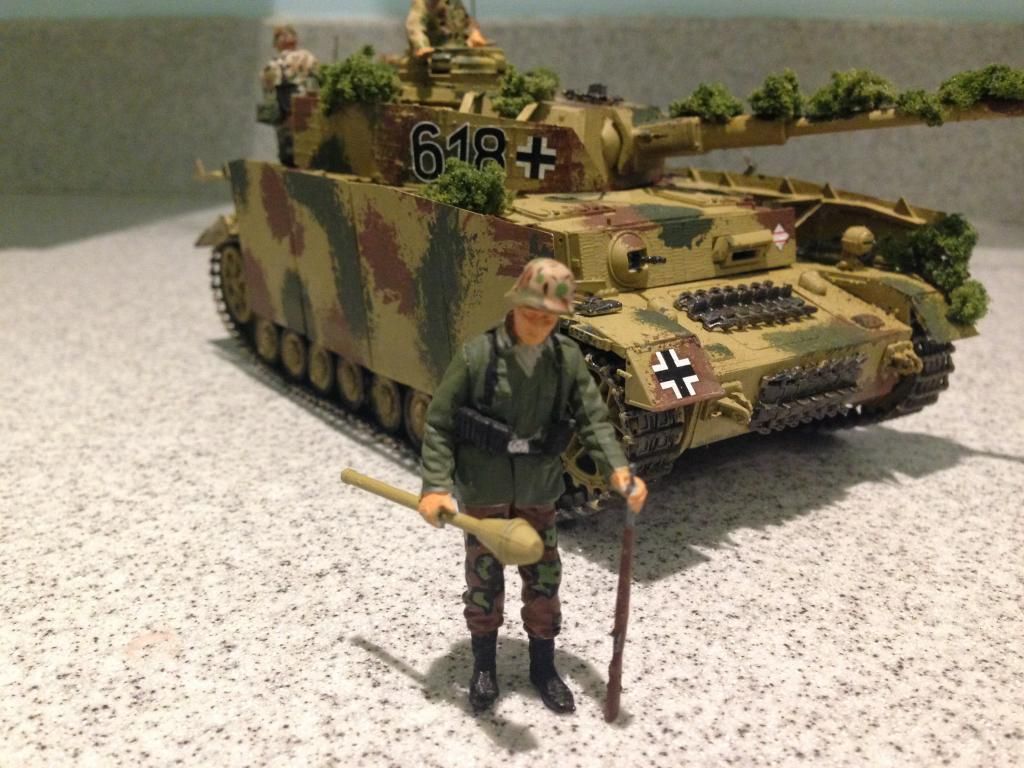
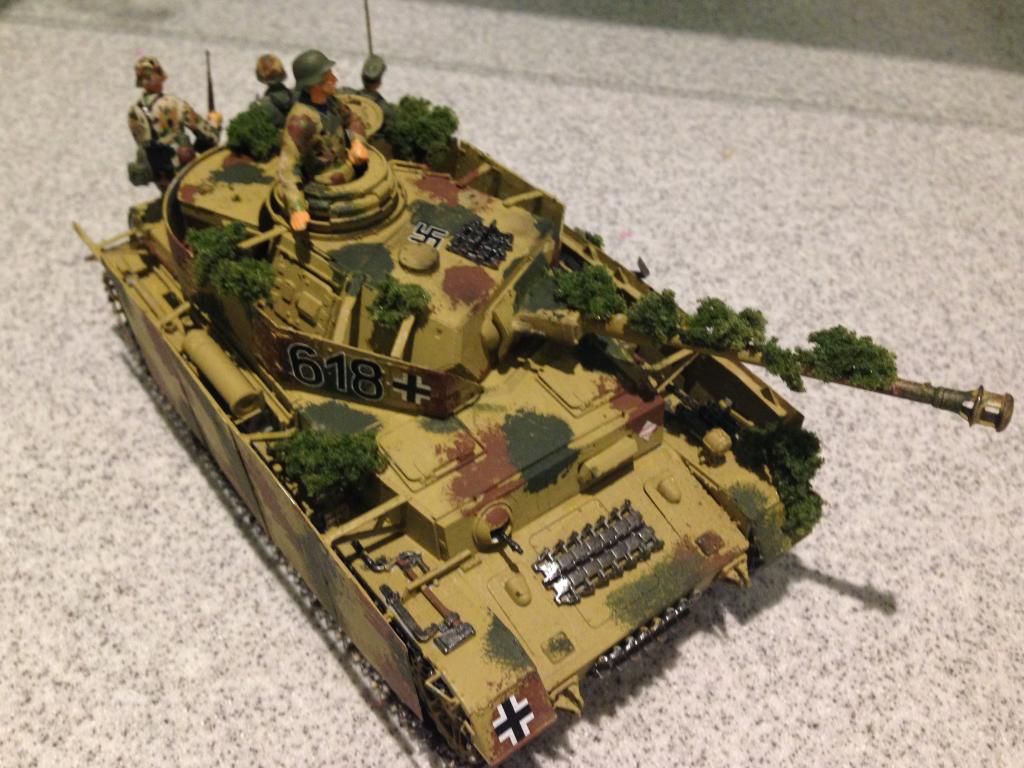
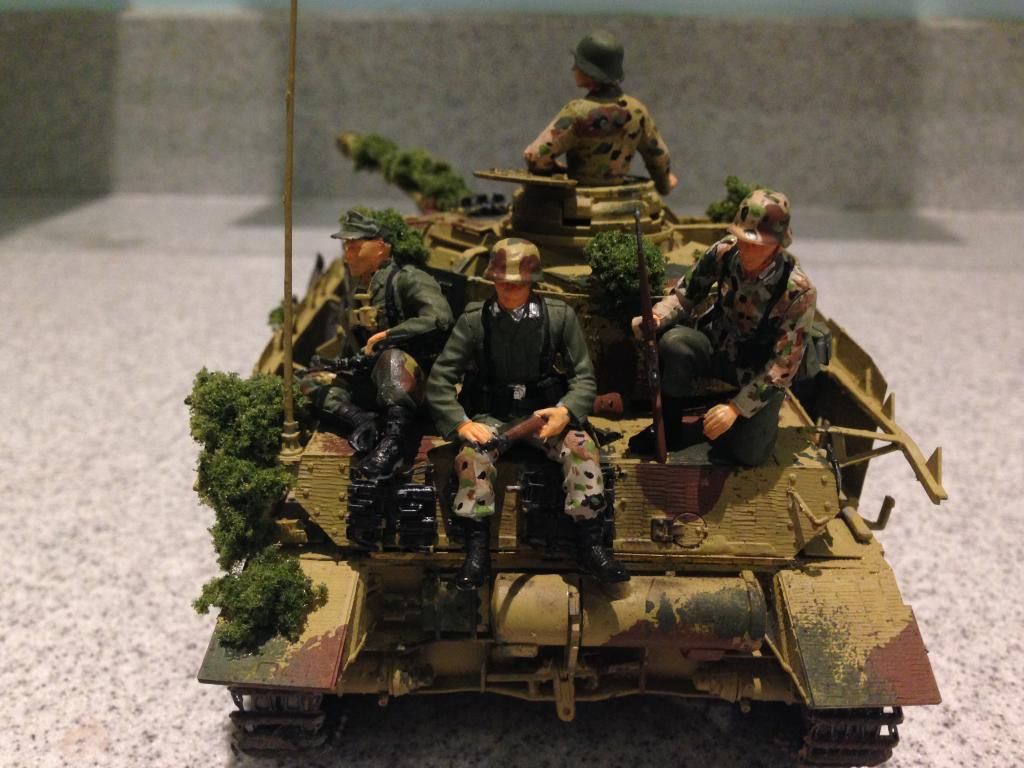
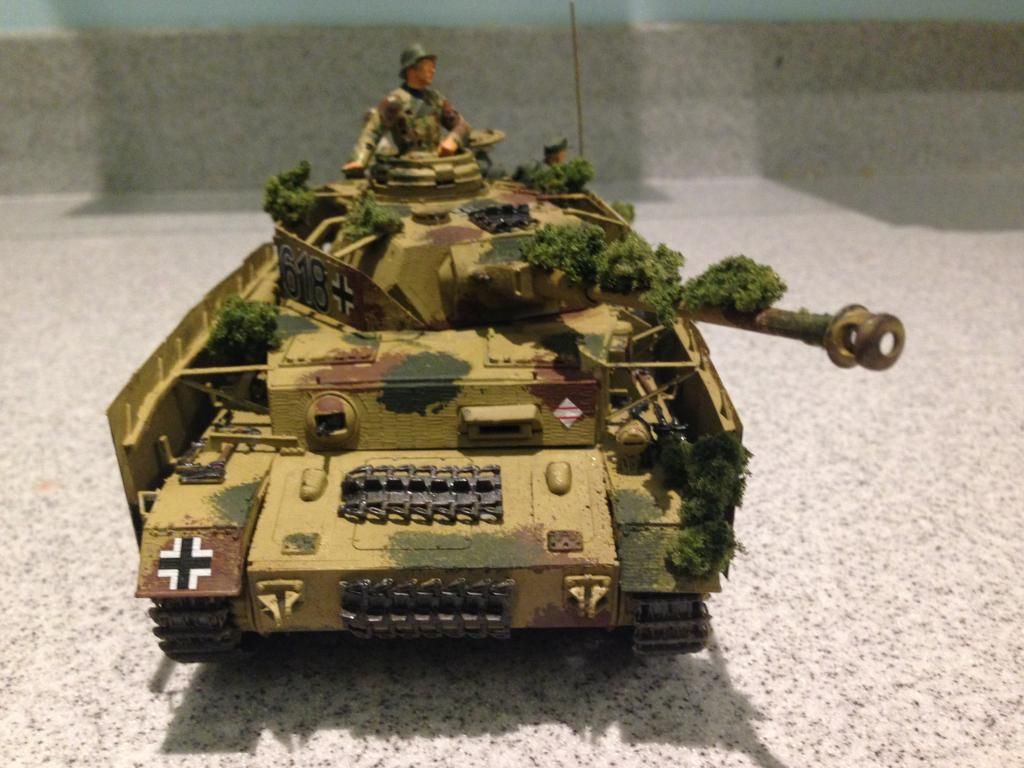
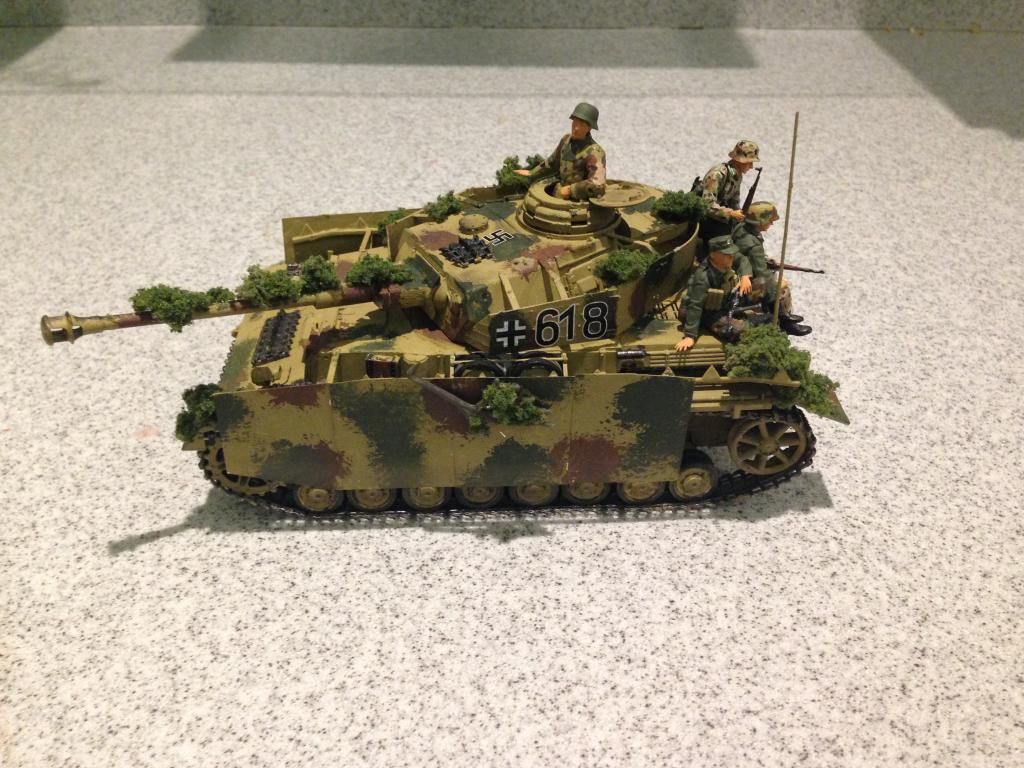
The kit was made completely out of the box with the minor exception of woodland scenic foliage. The figures on the tank were

from the Dragon 1/35 Panzer Riders Lorraine 1944 and the commander came from some Tamiya kit I built in the past. I attempted

to paint them in a Waffen SS camo scheme but it was my first time panting more than 1 1/35 figure so they are somewhat undetailed

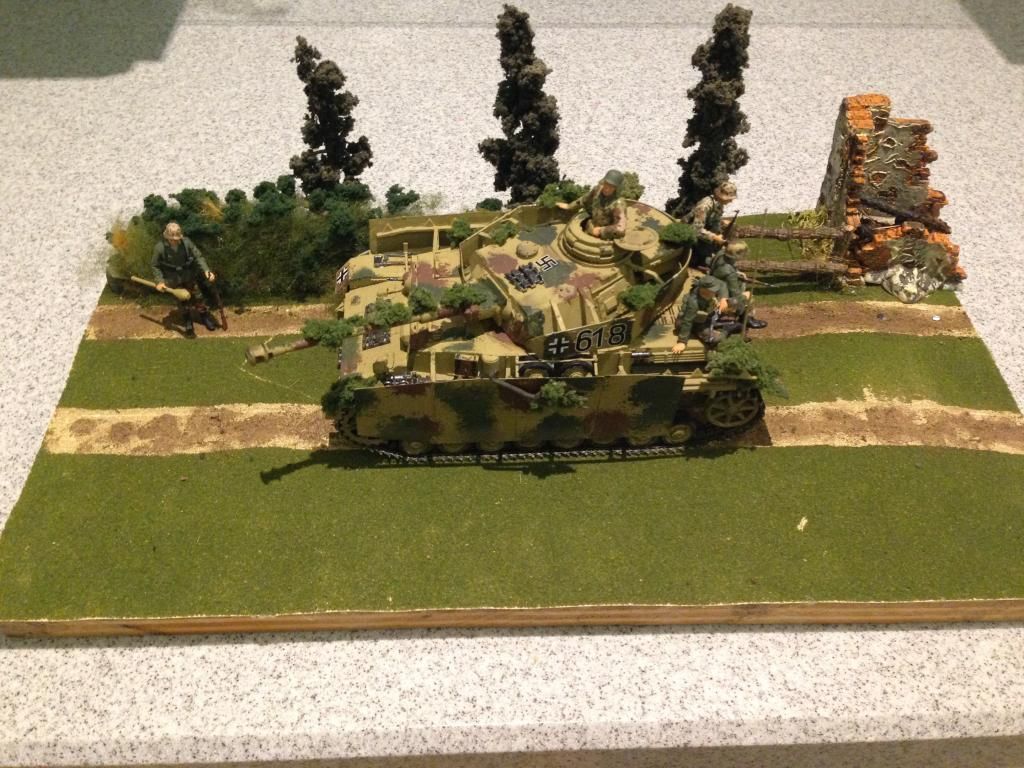
but add to the tank's dioramas capabilities which I showed in one of the pictures. 

For the paint scheme I simply used Tamiya dark yellow for the base, and then used cotton balls to apply the camo which is Tamiya red brown 

and Tamiya JA Green. For weathering I used the Tamiya a&b weathering kits. The tracks were painted gun metal and then covered in rust powder for a realistic 

look. Feel free to make any future suggestions but please keep in mind that I am only 14 and I am on a budget. Thanks for the input!

Sincerely - Dakota Gorder
  • Member since
    January 2007
Posted by the doog on Friday, September 19, 2014 8:52 AM

Can't see any photos, Dakota. Your link goes to a generic page. Check into getting yourself a Photobucket account---it's the easiest way to post photos here.

  • Member since
    September 2014
Posted by Dakattack on Saturday, September 20, 2014 10:25 PM

Thank you. I appreciate the help, the pictures should be up soon.

                                                                                                            -Sincerely, Dakota G.

  • Member since
    January 2006
  • From: California
Posted by SprueOne on Saturday, September 20, 2014 10:45 PM

At 14 and you're already resourceful with the cotton ball camo scheme. Nice Yes 

Anyone with a good car don't need to be justified - Hazel Motes


Iron Rails 2015 by Wayne Cassell Weekend Madness sprueone

  • Member since
    December 2002
  • From: Bury St Edmunds, Suffolk, England
Posted by Bish on Sunday, September 21, 2014 3:50 AM

Nice to see your visit to Normandy has given you some inspiration. I have been wanting to get over there for years, and even though I am not that far away, I have not yet had the chance. I imagine it must have been busy over there what with it being the 70th anniversary.

You asked for some future suggestions for future builds. I will leave out the weathering as I believe those things can come in time, although I would not go for rust on the working tracks as despite what many believe, it is not realistic. My main suggestions would be for what to leave out. When adding foliage, give some thought as to how it was attached and secured. In particular I am thinking of the stuff on the barrel. This would only work if there was a net wrapped round it and the foliage put into that. Try and create some braches that can be placed behind equipment.

Here is a couple of examples from the D-day GB early this year. One of the guys build this Cromwell and as you can see has used netting to add the foliage.

And I build this panther (also a really nice pre Zimmed Dragon kit) and I used sea moss with scatter grass applied.  Or you could use Woodland scenic fine leave foliage which comes attached to branches, but that stuff is pricey.

 Another thing to leave out is the swastika on the roof. German armour did not have them painted on. If your trying to produce an air recognition symbol, this would have been a flag but certainly not in Normandy in 1944. You only do this when your air force has control of the air. You don't want to advertise your self to your enemy.

Good attempt at the SS camo, I have been trying to get that right for years.

Overall, a nice looking build. I am sure we all understand the difficulties of modelling at 14 when funds are limited. Hopefully you will stick around and can pick up ideas and methods as you go. No matter how long we have been building or how old and crusty we are, there is always room to improve and new things to learn.

I am a Norfolk man and i glory in being so


On the bench: Airfix 1/72nd Harrier GR.3/Fujimi 1/72nd Ju 87D-3

  • Member since
    January 2007
Posted by the doog on Sunday, September 21, 2014 8:37 AM

Dakota,

Very nice, honestly. A good start, and you've shown that you've got the basics down really well!

Bish gave you some good advice; I would offer some more. It's true that you would never see a swastika on a German vehicle; the only ones that would ever bear this marking would be a Finnish vehicle; they had a modified sort of swastika as part of their WWII markings. They also used some German vehicles too, such as the StuG.

Your models would benefit greatly from some simple techniques like a wash and drybrushing. A wash is an overall coat of greatly-thinned oil paint. You basically get yourself a little container like a jar lid, and add a good amount of mineral spirits (enamel paint thinner) to it, and then take like a bit of Raw Umber oil paint and swish that around until the thinner gets "dirty" with it. What you will have is a very thin liquid that can be brush over ALL the model. It will accumulate in the creases and recesses of the model, making it look like there's shadows in them, This simulates the effect of light on the tank, and is very effective in bringing out details. Then you can drybrush on top of that when it dries to bring out details.

Drybrushing is a technique which helps you to bring out "high" details by rapidly brushing a soft brush with a little bit of almost-dry paint on it over the model. Use an acrylic--do not use Tamiya paints for this, as they are best for airbrushing--put some paint on your brush and then brush most of it off by "painting" a piece of cardboard or paper. When there's just a little bit of paint left, start brushing the model lightly to transfer paint to the high parts of the model. I would suggest looking up videos on Youtube to learn this.

As a last piece of advice, I would add that  when you make a diorama like you did, don;t put your model parallel to the base sides, Always try to construct your scene at an "angle" to the front of the wooden base. It makes it more visually interesting.

All in all, for a fourteen year old modeler, I"d say you have a great future in the hobby!

  • Member since
    September 2014
Posted by Dakattack on Sunday, September 21, 2014 10:44 AM

Thanks for all the feedback guys, I really appreciate how friendly and informative the modeling community is. After reading your advice I have re-weathered the tracks and instead of using rust powder I used a metallic and mud finish. I also have removed the swastika after I confused the German and Finnish markings earlier. I'm new to drybrushing but after reading an excellent article on this website I will probably mix some flat white with the dark yellow, hopefully this will get me a worn but not over weathered tank. Thank you for all the feedback, I really need it because I am the only modeler in my family. Thanks.                                        -Sincerly, Dakota G.

  • Member since
    December 2002
  • From: Bury St Edmunds, Suffolk, England
Posted by Bish on Sunday, September 21, 2014 10:52 AM

We are always happy to help those who want it Dak. One thing to be careful of is dry brushing with Acrylics, at least Tamiya anyway. because it dry's so quick, it clumps up on the brush. The only way I found I could do it was to add quite a bit of thinner to the mix and dry brush with that.

I mostly use enamels and I dry brush either with oil paints or oils mixed with enamel. Oil paints might be something to consider when you are able. They may seem a bit pricey, but they last for ages.

Look forward to seeing some more of your work, and hopefully you will consider a WiP thread and that way people can help during your build. Or you could try joining a Group Build (just don't tell the doog I said that Wink)

I am a Norfolk man and i glory in being so


On the bench: Airfix 1/72nd Harrier GR.3/Fujimi 1/72nd Ju 87D-3

  • Member since
    September 2014
Posted by Dakattack on Sunday, September 21, 2014 9:59 PM

As it turns out I have a tamiya 1/35 Cromwell that was never weathered and I think it would look great with a wash an dry brushing. It is painted entirely tamiya xf-61 dark green, before I add an enamel wash is there anything I must do to prep the model? Some videos said to apply a gloss coat but others don't mention it. It this required? Also, if I do use a gloss varnish can I apply it directly to the acrylic paint? Or will this damage the paint? Thanks for the help guys.                Sincerely- Dakota G.

  • Member since
    September 2014
Posted by Dakattack on Sunday, September 21, 2014 11:53 PM

Here are some pictures after I dry brushed with some Tamiya acrylics, it isn't much but I think it helps add wear, dull the colors, and make the Zimmerit pop. Thanks for the advice guys. 

                                                                                                                                                                                                     -Sincerely Dakota Gorder

JOIN OUR COMMUNITY!

Our community is FREE to join. To participate you must either login or register for an account.

SEARCH FORUMS
FREE NEWSLETTER
By signing up you may also receive reader surveys and occasional special offers. We do not sell, rent or trade our email lists. View our Privacy Policy.