SEARCH FINESCALE.COM

Enter keywords or a search phrase below:

1/35 Dragon M-103A2

14695 views
136 replies
1 rating 2 rating 3 rating 4 rating 5 rating
  • Member since
    January 2015
  • From: Tumwater, WA.
Posted by M. Brindos on Wednesday, June 10, 2015 11:17 AM

Thanks Karl. This effect occurs even without the camera. But yes it's a bit too green in some areas, but I'll be toning that down with the next layers of washes and if that doesn't do it I can add a touch more pale to it later.

I thought it was great that I captured the effect in pictures lol. Usually if you can see it with the cam, you can't see it with your eyes, and vice-versa.

I'm going to keep my clears thinner after talking to you about it. I feel you have the right of it in this case.

- Mike Brindos "Lost Boy"

  • Member since
    November 2009
  • From: SW Virginia
Posted by Gamera on Wednesday, June 10, 2015 11:22 AM

Wow, I'd read here about Cold War olive drab being darker than the Second World War but didn't know about 'gasoline washes' and being this green. Thanks guys!

"I dream in fire but work in clay." -Arthur Machen


  • Member since
    January 2015
  • From: Tumwater, WA.
Posted by M. Brindos on Wednesday, June 10, 2015 12:16 PM

I believe that the Cold War era O.D. was definitely darker and leaned more towards the brown side of the color than the previous O.D that leaned more towards the green side of it.

I'll be adding more dirt tones to the paint pretty soon. The dirt from boots did grind into the paint and tone it differently where the crews walked on the tank most often. I'll be taking this into account while I work more on this paint scheme as I did on the little M-48.

Marine Corps Green was more like a medium green when freshly applied. This effect I just got should be pretty close to how it should look, but since I've had it only described to me and have never seen it for myself I'm not going to say with 100% certainty that this is an authentic paint job. I can't back this one up, but it sure does look cool. lol

- Mike Brindos "Lost Boy"

  • Member since
    March 2013
  • From: Puebla, Mexico
Posted by garzonh on Wednesday, June 10, 2015 1:24 PM

I come here every now and then just to find this amazing build.

I like the color and the shadows you achieved, also the "dusty" layer looks very convincing.

  • Member since
    January 2015
  • From: Tumwater, WA.
Posted by M. Brindos on Wednesday, June 10, 2015 1:27 PM

Thanks Garzonh. I'm having fun with it. First I don't like it, then I finish the layer and think, "Okay, that's neat" lol.

- Mike Brindos "Lost Boy"

  • Member since
    January 2015
  • From: Tumwater, WA.
Posted by M. Brindos on Wednesday, June 10, 2015 2:04 PM

[QUOTE=rbrindos]Michael, I probably should have clarified what I said about washing tanks with diesel. It was never done, unless there was a reason. The only time I remember ever doing it was at Ft. Lewis when we officially activated the 2/77th Armor Battalion. We had a ceremony with the tanks driving by the review stand. We washed and dieseled up the side that was seen by the stands. It was considered a safety hazard and, on a personal note, made the front slope very slippery.[/QUOTE]

I just got this over on Genessis. I will tone this paint effect way down now as it is incorrect. Bummer, that was looking cool.

- Mike Brindos "Lost Boy"

  • Member since
    July 2004
  • From: Sonora Desert
Posted by stikpusher on Thursday, June 11, 2015 7:25 PM

Ah yes, making stuff look good for the dog & pony shows. I always wondered how they got the vehicles on the parade field looking so. Usually the ones we had out there looked like they just came out of the paint shop at the Support Battalion. Although I do remember in one of my units how our supply clerk  was putting brake fluid on the sidewalls of his M35A2 Deuce and Half tires  after the wash rack to give a nice "armor all" look to them. Shiny black tires on a beat to snot MERDC Temperate Spring truck...


F is for FIRE, That burns down the whole town!

U is for URANIUM... BOMBS!

N is for NO SURVIVORS...

       - Plankton

LSM


  • Member since
    January 2015
  • From: Tumwater, WA.
Posted by M. Brindos on Wednesday, June 24, 2015 5:22 PM
I finally pushed through a serious slump recently and got back to work on the Beast. I toned down the bright green quite easily by sponging on the base color over everything. That really randomizes the tones while giving the original color more life.

After going through my reference books I realized my canvas color was too much on the brown side of the spectrum and I corrected that to better match the photos I have, adding 50% RLM 70 to my MM Olive Drab.


The decals were on the thin side, but with some liquid cement went on as if painted on. I brushed a bit of lightened yellow in the numbers to add to the effect.

I lost the serial number on the left side after one swipe of the LC brush took it completely off and it dissolved on the brush. That is exactly why I can't ever recommend that anyone use that trick and why I hesitate to fully describe its usage. It can really screw things up.

I added the TC's sight vane and did some washes on the .50 cal.


I think another wash may be in order to deepen some of the recesses, but otherwise I need to start weathering the wheels and tracks.

I'm getting close to the finish line.

- Mike Brindos "Lost Boy"

  • Member since
    January 2006
  • From: California
Posted by SprueOne on Wednesday, June 24, 2015 9:05 PM

oh yeah. "… original color more life" I agree

Anyone with a good car don't need to be justified - Hazel Motes


Iron Rails 2015 by Wayne Cassell Weekend Madness sprueone

  • Member since
    January 2015
  • From: Tumwater, WA.
Posted by M. Brindos on Thursday, June 25, 2015 2:08 PM

Thanks Sprue.  :) its not quite so bright now.

Tracks have their first wash of Tamiya Weathering Master "Oil Stain" on them. I like how versatile this stuff is. Wet or dry.

- Mike Brindos "Lost Boy"

  • Member since
    December 2002
  • From: Bury St Edmunds, Suffolk, England
Posted by Bish on Thursday, June 25, 2015 2:53 PM

That's looking very nice. I have no idea on the correct OD, but that looks good to me and the weathering seems just right. I do like those markings.

I am a Norfolk man and i glory in being so


On the bench: Airfix 1/72nd Harrier GR.3/Fujimi 1/72nd Ju 87D-3

  • Member since
    January 2015
  • From: Tumwater, WA.
Posted by M. Brindos on Thursday, June 25, 2015 3:23 PM

- Mike Brindos "Lost Boy"

  • Member since
    January 2015
  • From: Tumwater, WA.
Posted by M. Brindos on Thursday, June 25, 2015 3:40 PM

Thanks Bish!  :)

I'm glad I checked my references. Dragon would have me put the serial numbers on the rear toolboxes. They never put them there. Not one single reference shows them placed there. They were either on the air filters as I have done, or on the forward storage bins.

The only other thing that is wrong with them is that there should be one more star in the second row for a total of 7.

Other than the markings I've pretty much nailed this one as far as how it should have actually looked. Well, aside from the early A1 gun tube dust cover. I wasn't left with many options for that anyways.

I'm getting really close to having it match the reference photos and I'm happy about that. :)

- Mike Brindos "Lost Boy"

  • Member since
    December 2002
  • From: Bury St Edmunds, Suffolk, England
Posted by Bish on Thursday, June 25, 2015 3:56 PM

Ye, you can never 100% trust kit markings. I always try and check when I can.

I am a Norfolk man and i glory in being so


On the bench: Airfix 1/72nd Harrier GR.3/Fujimi 1/72nd Ju 87D-3

  • Member since
    January 2015
  • From: Tumwater, WA.
Posted by M. Brindos on Thursday, June 25, 2015 4:35 PM

I'm learning that now lol. This is the first Historicaly accurate build I've done.

- Mike Brindos "Lost Boy"

  • Member since
    July 2004
  • From: Sonora Desert
Posted by stikpusher on Thursday, June 25, 2015 10:31 PM

Looks great so far. I suggest that the IR headlight lenses should be black.  Those were still in use when I was on active duty, and the IR light projector lenses are black.


F is for FIRE, That burns down the whole town!

U is for URANIUM... BOMBS!

N is for NO SURVIVORS...

       - Plankton

LSM


  • Member since
    January 2015
  • From: Tumwater, WA.
Posted by M. Brindos on Thursday, June 25, 2015 10:35 PM

You're right. I should darken those more.  :)

- Mike Brindos "Lost Boy"

  • Member since
    January 2015
  • From: Tumwater, WA.
Posted by M. Brindos on Thursday, June 25, 2015 11:09 PM

Okay that looks better.  :)

- Mike Brindos "Lost Boy"

  • Member since
    July 2004
  • From: Sonora Desert
Posted by stikpusher on Thursday, June 25, 2015 11:26 PM
Much better. It's only a little thing but they all add up.


F is for FIRE, That burns down the whole town!

U is for URANIUM... BOMBS!

N is for NO SURVIVORS...

       - Plankton

LSM


  • Member since
    January 2015
  • From: Tumwater, WA.
Posted by M. Brindos on Thursday, June 25, 2015 11:48 PM

Thanks Stick. I've got a lot of detailing left on the tracks to do still and the vision blocks need to be blacked out as well. Yeah, its all the little things. That's right lol.

- Mike Brindos "Lost Boy"

  • Member since
    January 2007
Posted by the doog on Friday, June 26, 2015 8:45 AM

Hey Mike,

I've been busy as of late, but wanted to say that your model here looks pretty good. The finish is appropriately "busy" and I like what you did spattering the wheels. :)

  • Member since
    September 2006
  • From: Dripping Springs, TX, USA
Posted by RBaer on Friday, June 26, 2015 11:06 AM

Very nice paint work, Mike. You're starting to get some real depth.

Apprentice rivet counter.

  • Member since
    November 2009
  • From: SW Virginia
Posted by Gamera on Friday, June 26, 2015 11:35 AM

I dunno know how accurate the colour is but I really like the variation and 'depth' to it.

"I dream in fire but work in clay." -Arthur Machen


  • Member since
    November 2012
  • From: Capon Bridge West by God Virginia
Posted by feldgrau23 on Saturday, June 27, 2015 10:06 AM

Mike your build is looking fantastic. The person your building it for is going to have a model to be proud of!!!

  • Member since
    March 2015
  • From: Streetsboro, Ohio
Posted by Toshi on Saturday, June 27, 2015 11:24 AM

I'm just learning to navigate this wonderful and insightful forum, when I came across this; Oh My!  WOW!  I can't believe what I'm seeing.  Speechless.

Toshi

On The Bench: Revell 1/48 B-25 Mitchell


Married to the most caring, loving, understanding, and beautiful wife in the world.  Mrs. Toshi


  • Member since
    January 2015
  • From: Tumwater, WA.
Posted by M. Brindos on Saturday, July 11, 2015 1:32 PM

Update incoming.

- Mike Brindos "Lost Boy"

  • Member since
    January 2015
  • From: Tumwater, WA.
Posted by M. Brindos on Saturday, July 11, 2015 2:19 PM

Finally!

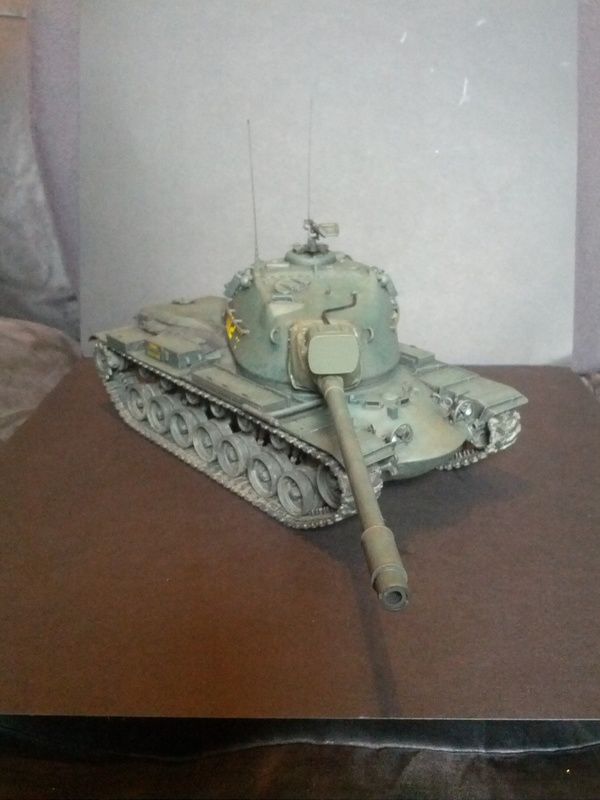
It was hard to get this beast to fit in my little shooting area mostly because of the enormous AA cannon they wedged into it.

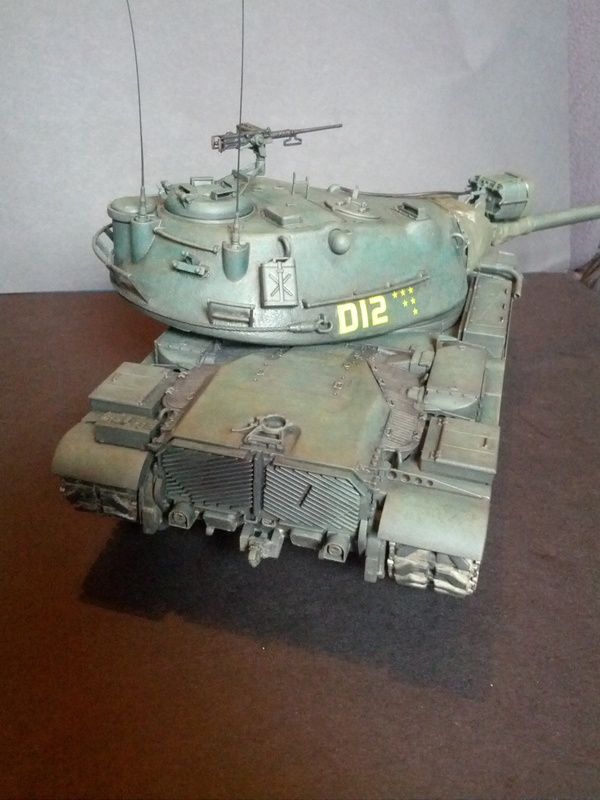
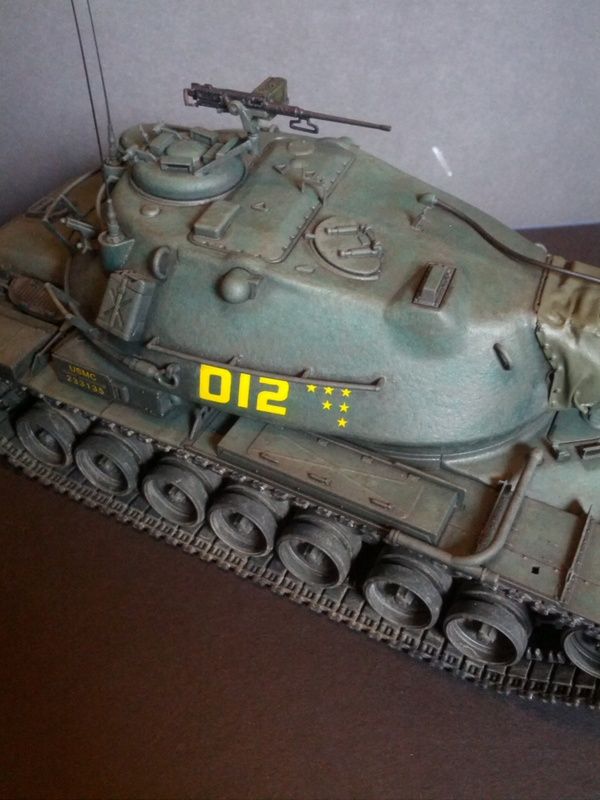
One last minute change was to correct the "O"12 into the correct "D"12.

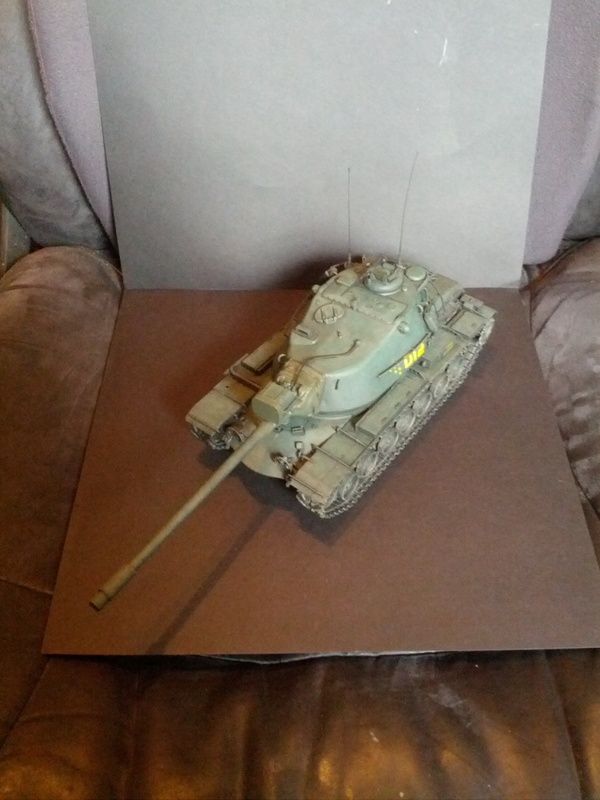
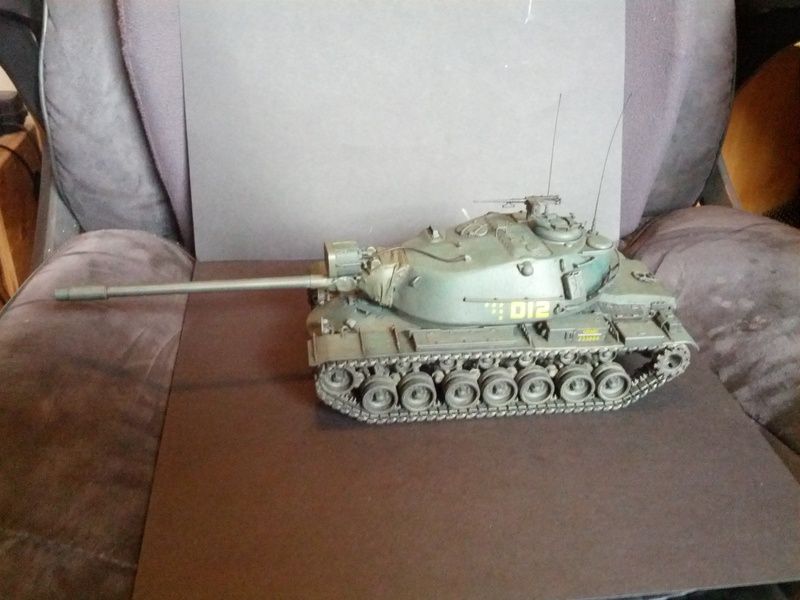
I need a bigger area to take photos in lol.

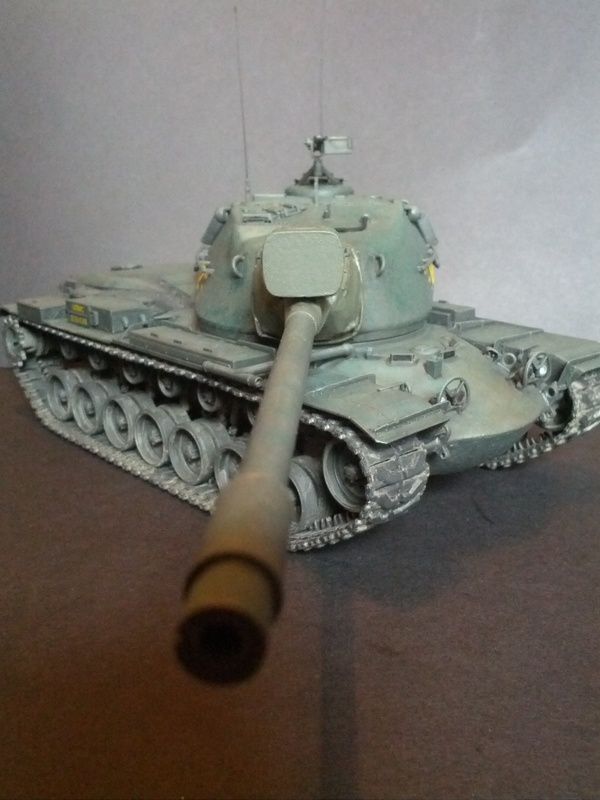
So here it is. One "clean" M-103A2 as it would have looked in Cuba during the Cuban Missile Crisis era while on base, circa 1962.

In hindsight there are few things I would do differently, but I'm happy enough with the final results.

Thanks for the support and advice during this project. You guys are the best and I'm glad to be counted among you as a respected peer.

Thank You all!

- Mike Brindos "Lost Boy"

  • Member since
    January 2015
  • From: Tumwater, WA.
Posted by M. Brindos on Saturday, July 11, 2015 2:20 PM

Sorry. Using the droid still. I'll fix this when I have a chance. :(

- Mike Brindos "Lost Boy"

  • Member since
    July 2004
  • From: Sonora Desert
Posted by stikpusher on Saturday, July 11, 2015 2:37 PM

Mike, I use a similar set up for taking photos. Just a suggestion but if you drape a plain solid color bedsheet over the base and chair arms and back, you get a nice non distracting background. A neutral color or plain white sheet works great.

By the way, very nicely done!


F is for FIRE, That burns down the whole town!

U is for URANIUM... BOMBS!

N is for NO SURVIVORS...

       - Plankton

LSM


  • Member since
    January 2006
  • From: California
Posted by SprueOne on Sunday, July 12, 2015 10:28 AM

Mike, nice finish to this plastic beast  Yes

stik, this model tank would probably need a chair like this:

http://www.hahabird.com/wp-content/uploads/2012/07/IMG_4240.jpg

Anyone with a good car don't need to be justified - Hazel Motes


Iron Rails 2015 by Wayne Cassell Weekend Madness sprueone

JOIN OUR COMMUNITY!

Our community is FREE to join. To participate you must either login or register for an account.

SEARCH FORUMS
FREE NEWSLETTER
By signing up you may also receive reader surveys and occasional special offers. We do not sell, rent or trade our email lists. View our Privacy Policy.