SEARCH FINESCALE.COM

Enter keywords or a search phrase below:

Dragon Vorpanzer---FINISHED PICS!

23599 views
154 replies
1 rating 2 rating 3 rating 4 rating 5 rating
  • Member since
    November 2009
  • From: SW Virginia
Posted by Gamera on Tuesday, March 24, 2015 11:48 AM

Great to see you back underway on this Karl. Sorry to hear about your illness but glad you're feeling better now. I guess at least all the PE would take your mind off feeling queasy by giving you a headache!

Still the PE looks fantastic as it should considering the work invested in it, and I love the battle damage.  

"I dream in fire but work in clay." -Arthur Machen


  • Member since
    September 2012
Posted by GMorrison on Tuesday, March 24, 2015 10:17 AM

RBaer

They've also gone to DS tracks with separate guide horns, not too bad, and ala your MBT70 adventure, joined in an obvious way. However, they need shortening, anyway, so I generally cut out the nasty part and re-attach them by cutting exactly in the middle of the two blocks to be joined. Works great.

That's a great tip.

Karl, this is looking really good, even without paint. Following with great interest.

 Modeling is an excuse to buy books.


  • Member since
    January 2007
Posted by the doog on Tuesday, March 24, 2015 10:11 AM

FFFFFFFFFFFFinally got some work to show on this model!

In the last three weeks, I've been through a bout with food poisoning, had the flu, and--worse than that--had to endure the agony of making all these PE tool clamps. All in all, given the comparison, if I had to do it all again, I"d take either the flu or the food poisoning over re-doing the PE. Whistling

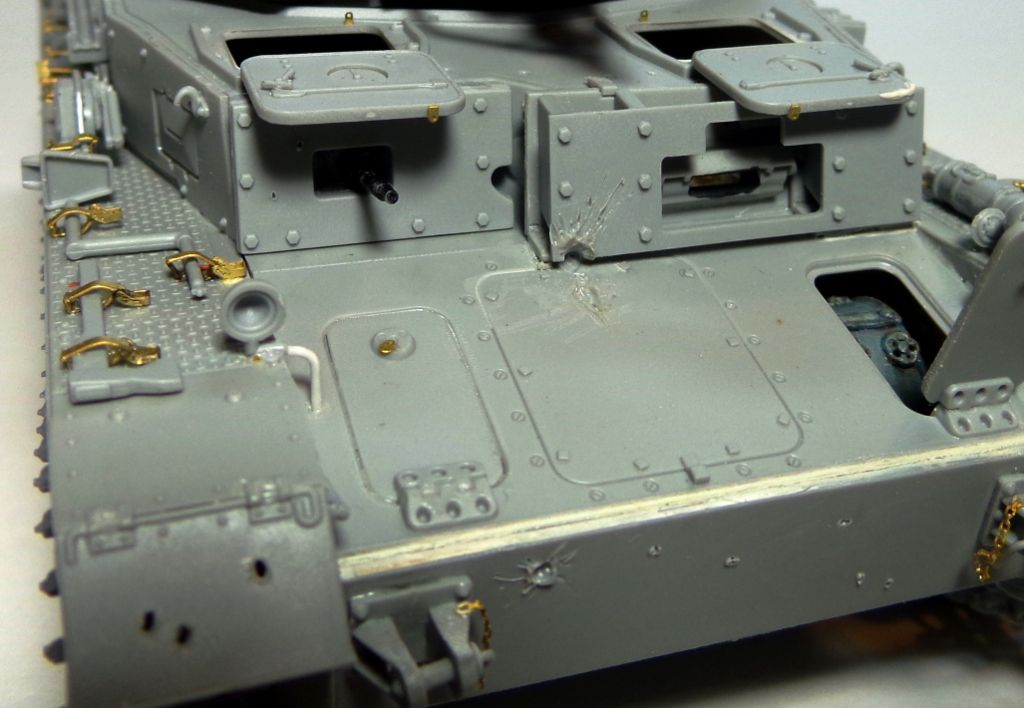
Here's an example of some of the problems I faced with this kit. See that nice, pre-formed shovel mounting there? Yeah, nice, huh? Yet totally unusable, Angry This shovel is supposed to fit UNDER the antenna trough there, in the two mounting holes. As you can see, it's literally impossible to use.

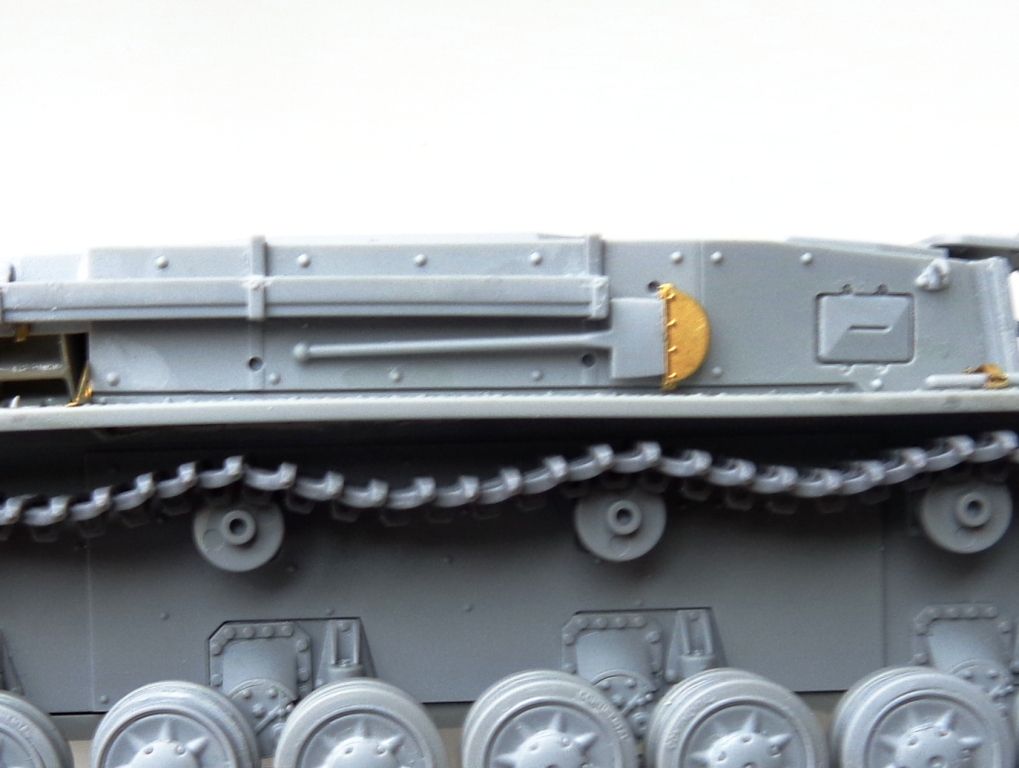
There's absolutely NO way to fit this under the trough. I checked every reference and the instructions three times, and yup, it's SUPPOSED TO fit under there. But there's just no way at all to fit it. How frustrating! I wound up making a replacement head from plastic, and just added the rear clamp--which, uh, STILL looks way out-of-scale to me. (you can see the inside rollers of the return rollers there; part of my tracks method)

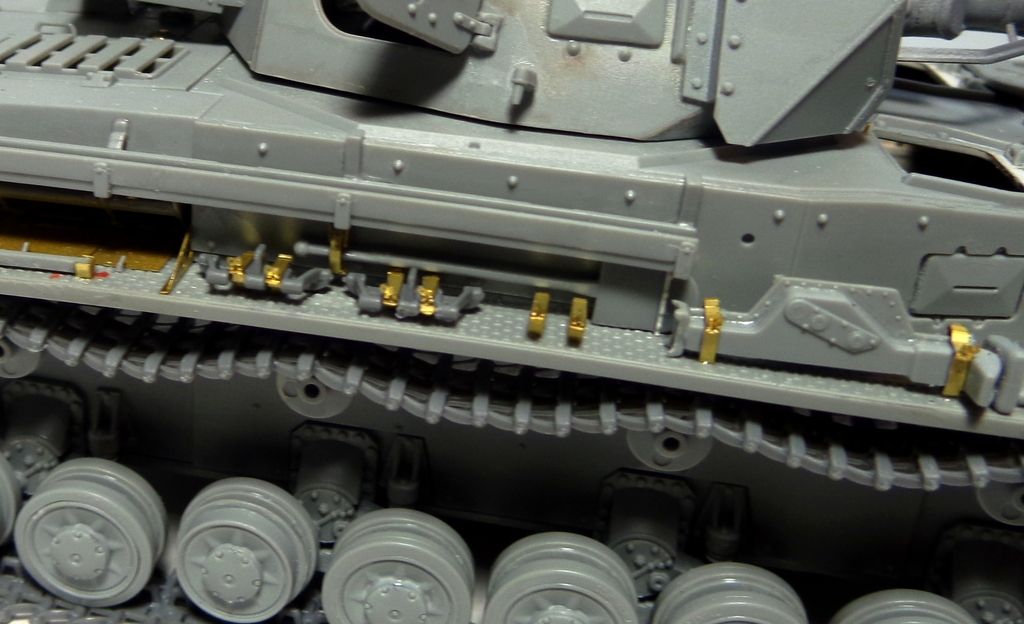
I found Dragon's clamps to be extremely troublesome to build---an average of 30 minutes to do each one--some took me well over an hour to complete. The ends just don't fit into each other; the tabs are too large, and I wound up basically shaving off tabs and actually having to needle-file correct widths of other parts to try to get them assembled. The size of the clamps were also an issue--several times, I had a problem fitting the tools in them snugly. They were alternately either too large, or too small. Ugh. This honestly was NO FUN at all, and that's NOT what modeling is supposed to be about. Sad

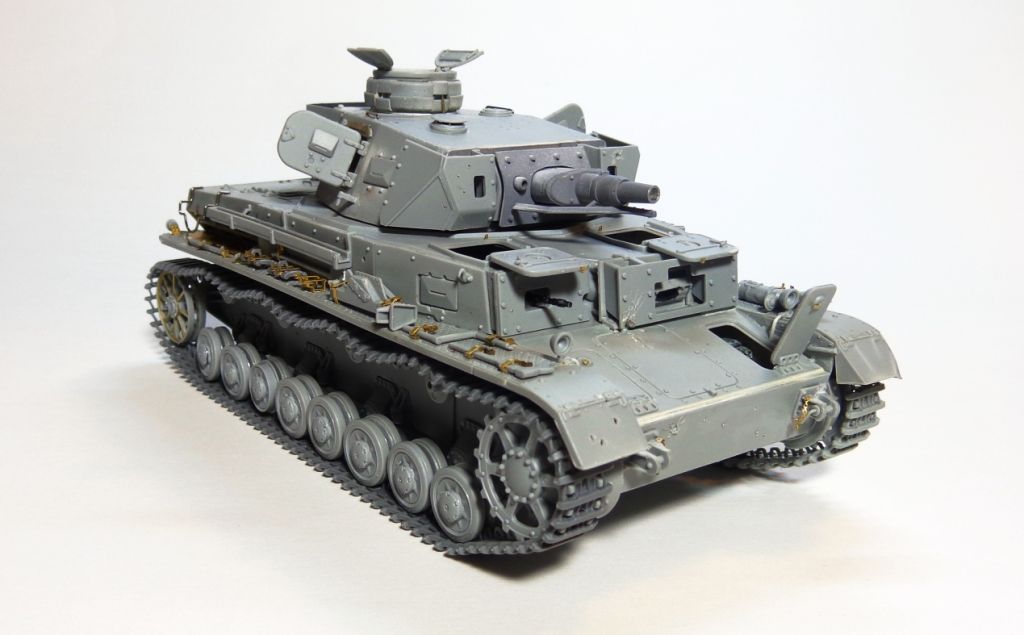
Anyway, I got them all finished for the most part. I didn't use the fire extinguisher parts--they just looked like crap after I finished them; the plastic part looked so much better. FINALLY, it's ready for primer!

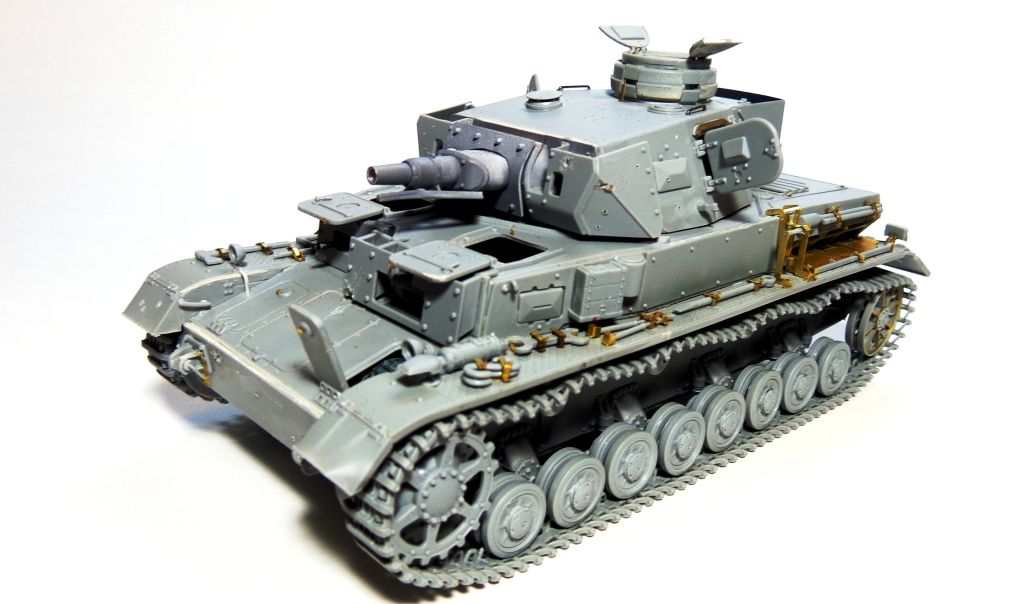
I did some battle damage with a low-heat pyrogravure that I got at AC Moore's--this is actually a "Stencil Cutter" that heats up to the perfect temp for scribing plastic. I used it to make these cool shell hits. I think they came out pretty good.

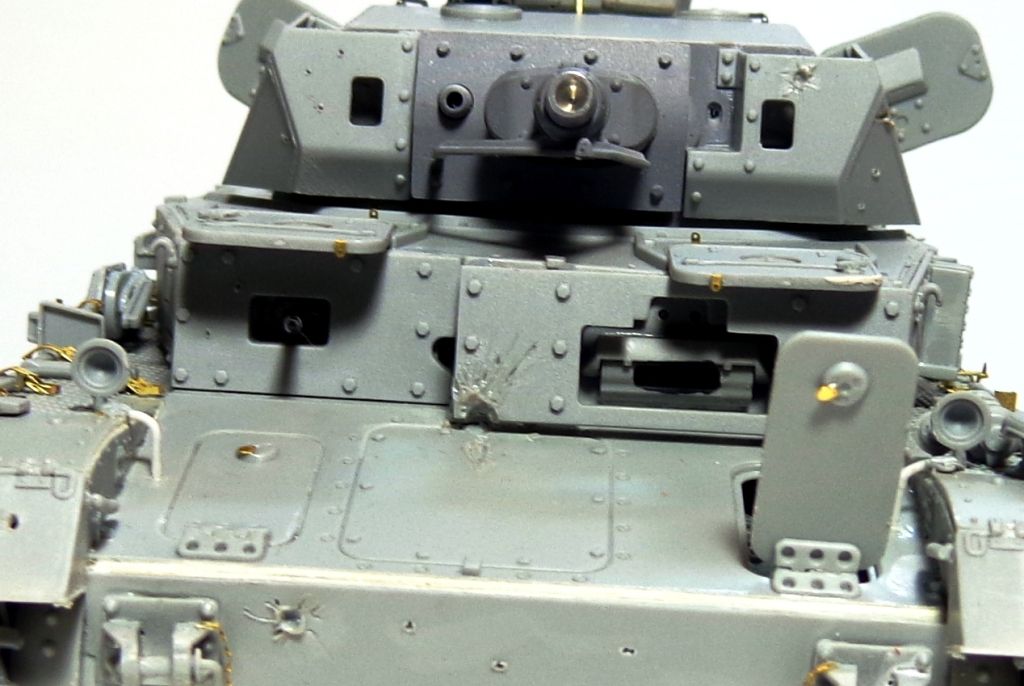
This step took me over two hours to engineer and make. All hail my perseverance and tenacity! Propeller

Well, I've got some masking to do to protect the interior paint, and then I'll shoot a coat of primer...man, I haven't done a gray tank in quite a while....should be fun! Smile

  • Member since
    July 2003
  • From: On my kitchen counter top somewhere in North Carolina.
Posted by disastermaster on Thursday, February 26, 2015 2:54 PM

Following along Karl.......

    http://stkr.es/p/g6 Looking sweet!

Sherman-Jumbo-1945

"I never know what to expect here anymore."


  • Member since
    July 2014
  • From: Rifle, CO. USA
Posted by M1GarandFan on Thursday, February 26, 2015 2:00 PM

Danke Schon, Mein Herr!

  • Member since
    December 2007
  • From: Eagle River, WI
Posted by PANZERJAGER on Thursday, February 26, 2015 1:33 PM

M1GarandFan

Please excuse my ignorance, but what are DS tracks?

they are a type of 1 piece glue able vinyl track.

 PANZERJAGER


  • Member since
    July 2014
  • From: Rifle, CO. USA
Posted by M1GarandFan on Thursday, February 26, 2015 1:29 PM

Please excuse my ignorance, but what are DS tracks?

  • Member since
    September 2006
  • From: Dripping Springs, TX, USA
Posted by RBaer on Thursday, February 26, 2015 11:59 AM

Splendid work, Karl.

Re the Dragon Sherman bogies: newer issues have bogies that are made up of 18 parts each, IIRC,  and tedious beyond belief to assemble. The end result is "probably" worth it.  They've also gone to DS tracks with separate guide horns, not too bad, and ala your MBT70 adventure, joined in an obvious way. However, they need shortening, anyway, so I generally cut out the nasty part and re-attach them by cutting exactly in the middle of the two blocks to be joined. Works great.

Apprentice rivet counter.

  • Member since
    December 2002
  • From: Bury St Edmunds, Suffolk, England
Posted by Bish on Thursday, February 26, 2015 12:26 AM

Looking really good there Karl, some nice extra detailing.

I am a Norfolk man and i glory in being so


On the bench: Airfix 1/72nd Harrier GR.3/Fujimi 1/72nd Ju 87D-3

  • Member since
    January 2006
  • From: California
Posted by SprueOne on Wednesday, February 25, 2015 10:08 PM

a lot of interior covered up. It's what can be seen through the hatches is what counts though 

Anyone with a good car don't need to be justified - Hazel Motes


Iron Rails 2015 by Wayne Cassell Weekend Madness sprueone

  • Member since
    November 2009
  • From: SW Virginia
Posted by Gamera on Monday, February 23, 2015 11:16 AM

She's coming along great there!

"I dream in fire but work in clay." -Arthur Machen


  • Member since
    October 2007
  • From: Louisville, KY
Posted by pordoi on Monday, February 23, 2015 7:47 AM

the doog

Have you considered opening up one or both of the vision ports?

the doog

... I think I may skip ahead a bit and save those PE tool holders for when the turret is drying...

Wimp...  Wink

Don

  • Member since
    January 2015
  • From: Tumwater, WA.
Posted by M. Brindos on Saturday, February 21, 2015 7:33 PM

You have me drooling here Karl. That looks so cool already. The stuff you added to the interior is just gorgeous!

- Mike Brindos "Lost Boy"

  • Member since
    January 2007
Posted by the doog on Saturday, February 21, 2015 1:12 PM

So, a little bit of progress here--I spent some time detailing and painting the interior of the upper hull. I had to build a framework around the driver's hatch, as quite strangely they don't provide any deail of this area at all.?!!? It's not 100% spot on correct but it looks the part. I could have added a lot more--flanges on the joints, and a strip/rail below the driver's viewing port, but it would have blocked the view of the pedals and floor area even more.

I decided to leave one maintenance hatch open just to show off a little. The assembly of the armored plates on the front was a litle complicated, but the hull is joined now.. FINALLY!

I still have quite a bit of detailing on the upper hull to do before I even tackle the interior of the turret. I think I may skip ahead a bit and save those PE tool holders for when the turret is drying..Soldiering on here... Smile

  • Member since
    January 2007
Posted by the doog on Thursday, February 19, 2015 6:33 AM

Cool, thanks again, Ixion!!

  • Member since
    December 2012
Posted by Ixion on Wednesday, February 18, 2015 10:03 PM

Here is another shot of it;

It looks a bit more bluish here. RAL 7009 Grey-Green is / was a common color paint used on various industrial equipment in Germany. Railroad electrical towers, junction boxes, motors, pumps, etc., are still painted in this color, although it tends to look more greenish.

IMHO, this looks more like RAL 7031 Blaugrau (blue-grey), but theoretically it should be RAL 7009.

  • Member since
    November 2009
  • From: SW Virginia
Posted by Gamera on Wednesday, February 18, 2015 7:23 PM

Great find there Ixion, nice to have more conformation on the grey primer or paint or whatever it is.

"I dream in fire but work in clay." -Arthur Machen


  • Member since
    January 2007
Posted by the doog on Wednesday, February 18, 2015 7:05 PM

Ixion

While it looks pretty clean, here is a Panzer III transmission in grey-green (RAL 7009) at Panzermuseum Munster:

With the requisite grease and grim, I'd say you nailed it Karl.

Ixion,

Thanks for that great pic--I hadn't seen that before. I appreciate it all the more because it gives me peace-of-mind to see the similarity in color...thank you!!! Yes

  • Member since
    January 2007
Posted by the doog on Wednesday, February 18, 2015 7:03 PM

Thanks, Tojo! I appreciate it!

  • Member since
    December 2012
Posted by Ixion on Wednesday, February 18, 2015 11:26 AM

While it looks pretty clean, here is a Panzer III transmission in grey-green (RAL 7009) at Panzermuseum Munster:

With the requisite grease and grime, I'd say you nailed it Karl.

  • Member since
    March 2003
  • From: Western North Carolina
Posted by Tojo72 on Tuesday, February 17, 2015 1:15 PM

Very nice,that really came alive nicely.

  • Member since
    December 2002
  • From: Bury St Edmunds, Suffolk, England
Posted by Bish on Tuesday, February 17, 2015 12:46 PM

Thanks for those links guys, I have never come across this before. Doyle and Jentz do seem to uncovere quite a bit before unknown information about German armour, the issue with the Sd.Kfz 251/3 springs to mind. But as much as I respect there work, I do have to wonder how after 60 years they suddenly come across this info that all others have missed before. he even goes so far as to say they have only found one vehicle to have had RAL 1001 inside.

I am also a bit unnerved by there Xtracolor roundup. I like realism but I think they are being a bit to picky here.

I am a Norfolk man and i glory in being so


On the bench: Airfix 1/72nd Harrier GR.3/Fujimi 1/72nd Ju 87D-3

  • Member since
    November 2009
  • From: SW Virginia
Posted by Gamera on Tuesday, February 17, 2015 9:51 AM

Hey Karl, yeah that's right, Cliff, Gamera, doesn't matter to me.

I went though about five-six sites and the photos showed the grey so that's what I went with. At least it's not as bad as early war Zero fighters- I've read about a dozen sources and no one can agree on whether they were painted light grey, light brown, light green, etc, etc, etc...  

"I dream in fire but work in clay." -Arthur Machen


  • Member since
    January 2007
Posted by the doog on Tuesday, February 17, 2015 8:38 AM

Gamera

Dunno if it's accurate or not but everything looks really good to me!

Funny, I was looking up some stuff about the engine compartment of a Panther recently and most people said primer red but Toadman's site had a pile of photos with the interior parts the same blue-greyish colour.

Thanks, Cliff! (? correct me if I got your name wrong...Sad)

Sheesh! I know---it can be so frustrating and confusing! There seems to be no consistent patterning with the few unrestored examples that we have left! I've spent literally days scouring everything I could to get an idea, and went with a tennuous decision that this was acceptable for what era and make I've got. I think it's a tad "blue" in the photos, but it's more "green" in real life. It should look good with the Panzer Grey exterior though.

  • Member since
    November 2009
  • From: SW Virginia
Posted by Gamera on Tuesday, February 17, 2015 8:14 AM

Dunno if it's accurate or not but everything looks really good to me!

Funny, I was looking up some stuff about the engine compartment of a Panther recently and most people said primer red but Toadman's site had a pile of photos with the interior parts the same blue-greyish colour.

"I dream in fire but work in clay." -Arthur Machen


  • Member since
    January 2007
Posted by the doog on Tuesday, February 17, 2015 8:03 AM

jgeratic

I'll third that, looks scrumptious!

---------------------------

Likely research from Hilary Doyle and Tom Jentz about the interior colours.  There is some description of their findings here:

http://byrden.com/panzers/Colours/index.html

regards,

Jack

Oh, sorry, Jack--that's the same page I posted. Tongue Tied Thanks for posting it too though! Yes

  • Member since
    January 2007
Posted by the doog on Tuesday, February 17, 2015 7:56 AM

Thanks, guys! I appreciate the thumbs-ups!

Bish, the document, cited in several forums and places, is HERE. It states:

   "In the lower interior of the tank, the grey-green covered just about everything. Transmission boxes and other modules, which were perhaps manufactured separately, were ordered to be delivered in grey-green. Torsion bars, levers, transmission shafts, floor panels (yes, top AND bottom surfaces) storage boxes, etc. were painted uniformly grey-green."

So that has rather confused me because it seems to say that the whole lower part of the tank was painted in that color? The part about "floor panels'...unless I'm reading it wrong...?

I've found some color photos where the transmission seemed a more bluish color, so I went with that in my tank. Smile

  • Member since
    July 2003
  • From: On my kitchen counter top somewhere in North Carolina.
Posted by disastermaster on Tuesday, February 17, 2015 4:09 AM

jgeratic

I'll third that, looks scrumptious!

---------------------------

I'll have to fourth that!

           http://www.sherv.net/cm/emoticons/shocked/shocked-smiley-emoticon.gif

That's the stuff I like to see.

Sherman-Jumbo-1945

"I never know what to expect here anymore."


  • Member since
    April 2006
  • From: ON, Canada
Posted by jgeratic on Monday, February 16, 2015 11:48 PM

I'll third that, looks scrumptious!

---------------------------

Likely research from Hilary Doyle and Tom Jentz about the interior colours.  There is some description of their findings here:

http://byrden.com/panzers/Colours/index.html

regards,

Jack

  • Member since
    December 2002
  • From: Bury St Edmunds, Suffolk, England
Posted by Bish on Monday, February 16, 2015 11:23 PM

That looks really god in there Karl.

I don't recall reading of the interiors being a grey green. Which is this internet document of which you speak.

I am a Norfolk man and i glory in being so


On the bench: Airfix 1/72nd Harrier GR.3/Fujimi 1/72nd Ju 87D-3

JOIN OUR COMMUNITY!

Our community is FREE to join. To participate you must either login or register for an account.

SEARCH FORUMS
FREE NEWSLETTER
By signing up you may also receive reader surveys and occasional special offers. We do not sell, rent or trade our email lists. View our Privacy Policy.