SEARCH FINESCALE.COM

Enter keywords or a search phrase below:

My first tiger! WIP. 99% COMPLETE 1/18/17

3753 views
32 replies
1 rating 2 rating 3 rating 4 rating 5 rating
  • Member since
    April 2015
  • From: Detroit, MURDER CITY
My first tiger! WIP. 99% COMPLETE 1/18/17
Posted by RudyOnWheels on Saturday, September 17, 2016 5:03 PM

Hello all! I picked this one up yesterday, primed everything today and will dig in tonight! I had no idea that it was a 20 year old kit by looking at the box! Maybe the price difference should have told me. Question: did they make ANY of these mid-production Tiger 1's without zimmerit? I also saw tamiya makes an add-on kit. Is the kit worth it? Does it look believeable, or is it hokey looking? Should I even attempt to make my own zim with putty having never done it before? This is only my second tank. Regardlless I'm going to enjoy the process and have fun. 


UPDATE 10/18/16: Most of the main assembly is done. I purchased Tamiya's aftermarket Zimmerit kit. I got it all on there, but it was a major PITA because NONE of the pieces were die-cut on the sheet. You had to cut around every and all pieces and holes with an exacto. That sucks. BIG TIME. Next time I will SURELY spend the extra $25-30 for a kit with the zimmerit ALREADY molded on! Now I am to the point where I cannot do any further assembly until I at least paint the lower half of the tank, and the road wheels. Looking forward to trying out my new badger patriot 105 airtbrush, as my prior two were junk ,(even though they were $100+ airbrushes) and made me DESPISE painting. Here is where I am now:


thanks everyone!! -Rudy 

  • Member since
    April 2015
  • From: Detroit, MURDER CITY
Posted by RudyOnWheels on Saturday, September 17, 2016 5:07 PM
Forgot a question. Are the individual tracks in the box any good (do they build up convincingly) or should I plan on buying some friulmodel or AFV (or other brand) tracks? Thanks! Rudy
  • Member since
    December 2002
  • From: Bury St Edmunds, Suffolk, England
Posted by Bish on Saturday, September 17, 2016 5:10 PM

Thats a nice kit, it was my first build when i got back into the hobby after 5 years away. Even though its been done for 8 years, i still haven't gottn to finish the diorama for it.

As to the Zimm, if you want it to be realistic, then i am afraid it has to have it. I do my own Zimm so i can't help with any of the AM ones, but if you are going to start ading your own, this kit is as good as any. Or you could just build it, enjoy it and not worry about the Zimm but just knowing it not 100% accurate.

I got Fruils for mine, i have not use tamiya Indy tracks. But they look nice enough, i'll be useing the ones i got with this on my tamiya Sturmtiger.

I am a Norfolk man and i glory in being so


On the bench: Airfix 1/72nd Harrier GR.3/Fujimi 1/72nd Ju 87D-3

  • Member since
    November 2009
  • From: SW Virginia
Posted by Gamera on Saturday, September 17, 2016 6:23 PM

I want to make a Hello Kitty! joke so badly....Embarrassed

Anyway to add to what Bish said making your own zimmerit isn't that hard. It doesn't have to be perfect since the real thing wasn't. I've used Squadron putty (not sure it makes a difference, I use white) and a razor saw (you can get a cheap one from Atlas at the railroad section of the hobby shop). Just spread the putty on, douse it with a good amount of rubbing alcohol and then rake though it with the saw. Make a strip about a cm long and then jog the saw about a mm, then make another strip. Keep going a cm along, jog the saw, make another cm long strip, rinse, repeat till you're done. Keep everything wet with alcohol to keep the putty from sticking too much to the saw. 

Or just use the pre-make zimmerit. I've never used the Tamiya brand and am not crazy about the Eduard PE stuff. I've only used the Cavalier brand once but really liked it. It's a thin resin that seems to fit better.

"I dream in fire but work in clay." -Arthur Machen


  • Member since
    January 2008
  • From: Austria
Posted by Byrden on Sunday, September 18, 2016 3:37 AM

The first few Mid Tigers had no Zimmerit, but they were different to what's in your kit.


David 

cml
  • Member since
    March 2007
  • From: Brisbane, Australia
Posted by cml on Sunday, September 18, 2016 6:07 PM

Gamera

...

Or just use the pre-make zimmerit. I've never used the Tamiya brand and am not crazy about the Eduard PE stuff. I've only used the Cavalier brand once but really liked it. It's a thin resin that seems to fit better.


Cavalier Zimm is fantastic unfortunately, i think that company is no longer operating, so may be hard to find any.

I've never tried it myself, but have seen some good tutorials on a Facebook site where the builder used Tamiya 2 part putty and a Lion Roar Zimm tool - seemed to work well.

At the end of the day though, if you just want a fun build, then just build up as is and enjoy the process Big Smile

Chris

  • Member since
    July 2016
Posted by Tanker45 on Monday, September 19, 2016 7:11 AM

It's a good kit and I built mine without Zimmerit as well.  The tracks went together fine, just took a bit of time. 

  • Member since
    June 2004
  • From: East Stroudsburg, PA
Posted by TigerII on Monday, September 19, 2016 7:37 PM

I'm with Gamera on this regarding AM Zimmerit. I used Cavalier on my King Tiger and it worked out great. It's more pliable than PE Zimm and it went on easily. As for the individual tracks, I like Model Master. But to each his own. Good luck.

Achtung Panzer! Colonel General Heinz Guderian
  • Member since
    March 2003
  • From: Western North Carolina
Posted by Tojo72 on Tuesday, October 18, 2016 3:33 PM

The zimm came out pretty good.

  • Member since
    March 2003
  • From: Rain USA, Vancouver WA
Posted by tigerman on Wednesday, October 19, 2016 1:59 AM

Atak is another resin am zimmerit. It's quite nice, but rather spendy. I've used Cavalier 3 times and think it's really good.

   http://i7.photobucket.com/albums/y269/wing_nut_5o/PANZERJAGERGB.jpg

 Eric 

  • Member since
    June 2004
  • From: East Stroudsburg, PA
Posted by TigerII on Wednesday, October 19, 2016 10:32 AM

I think you did a fantastic job on that zimm. 

Achtung Panzer! Colonel General Heinz Guderian
  • Member since
    January 2008
  • From: Austria
Posted by Byrden on Thursday, October 20, 2016 5:33 AM

Lifting point on Tiger

About the lifting points on a Tiger.

This photo won't make you very happy, but I'm posting it anyway.


David


  • Member since
    November 2009
  • From: SW Virginia
Posted by Gamera on Thursday, October 20, 2016 8:04 AM

Despite your issues the zimmerit looks pretty darn perfect in the photos, nice work! 

And thanks Chris, I had no idea Cavalier was out of business... 

"I dream in fire but work in clay." -Arthur Machen


  • Member since
    October 2015
Posted by Modelrob on Thursday, October 20, 2016 1:14 PM
The cat is coming out very nice. The zim looks good. Rob
  • Member since
    April 2015
  • From: Detroit, MURDER CITY
Posted by RudyOnWheels on Friday, October 21, 2016 1:10 PM

Byrden

Lifting point on Tiger

About the lifting points on a Tiger.

This photo won't make you very happy, but I'm posting it anyway.


David


Thanks guys! David, is that lifting "post" on the side of the turret, where they had me cover it with Zimm? If so, easy enough to fix with some quick scratch-building.


  Thanks!

   Rudy

  • Member since
    January 2008
  • From: Austria
Posted by Byrden on Friday, October 21, 2016 5:14 PM

It's on both sides. The kit provides the parts but it looks like you pushed them in too far.

David


  • Member since
    April 2015
  • From: Detroit, MURDER CITY
Posted by RudyOnWheels on Friday, October 21, 2016 10:00 PM
Ah yes I see that now. They're glued in good now so I'll just chop them off flush and make new ones I spose.... Thanks for the heads up. Rudy
  • Member since
    April 2015
  • From: Detroit, MURDER CITY
Posted by RudyOnWheels on Wednesday, January 18, 2017 11:57 AM

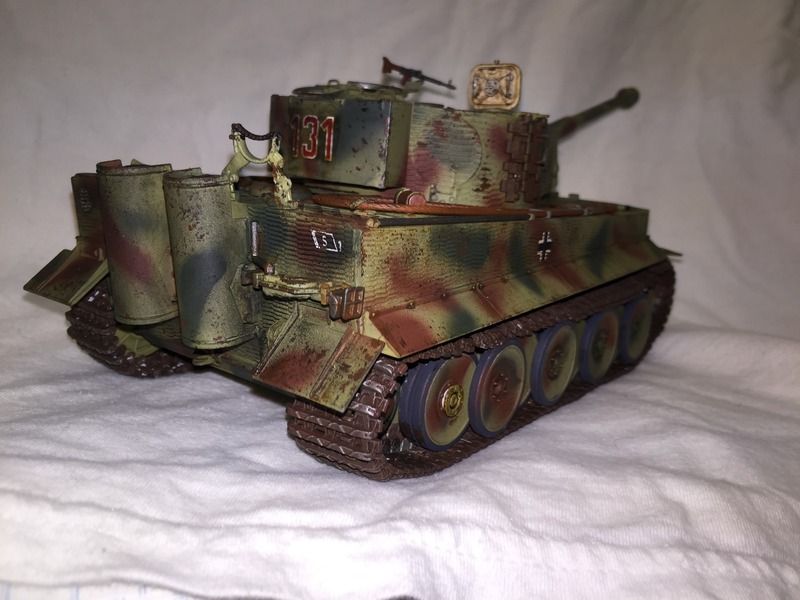
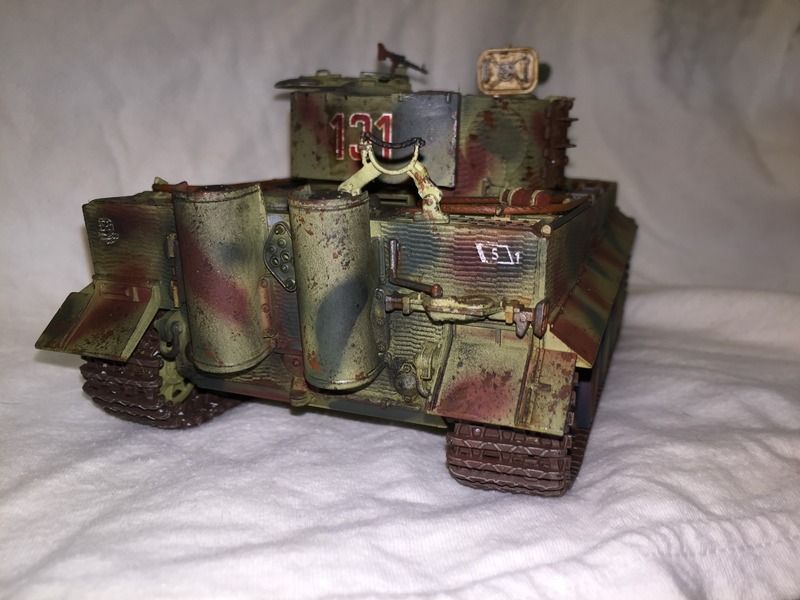
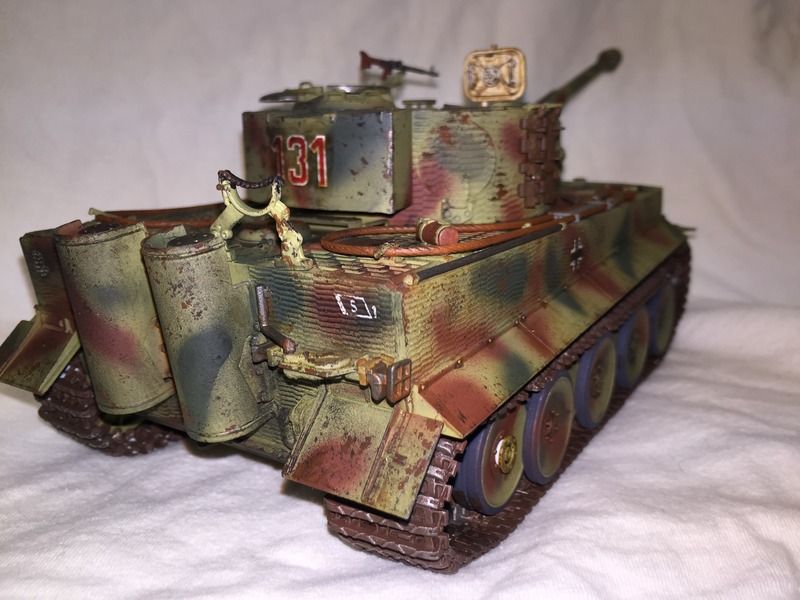
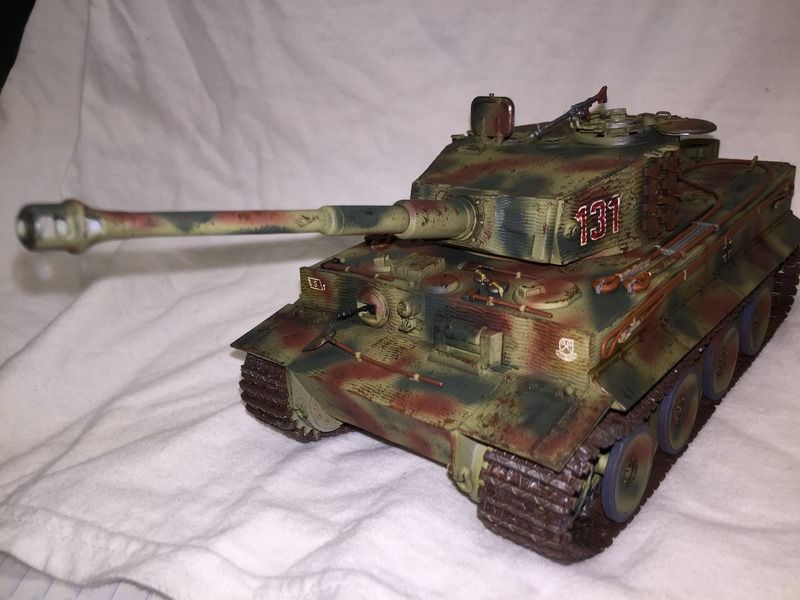
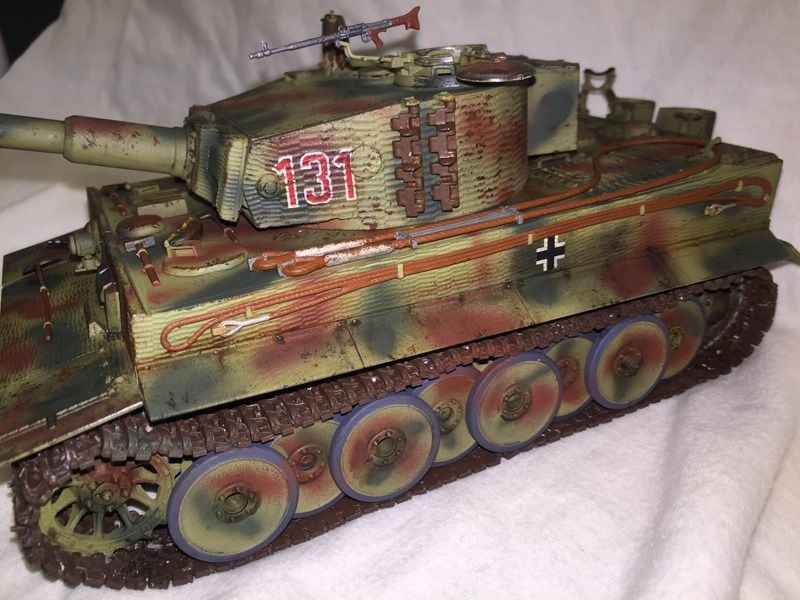
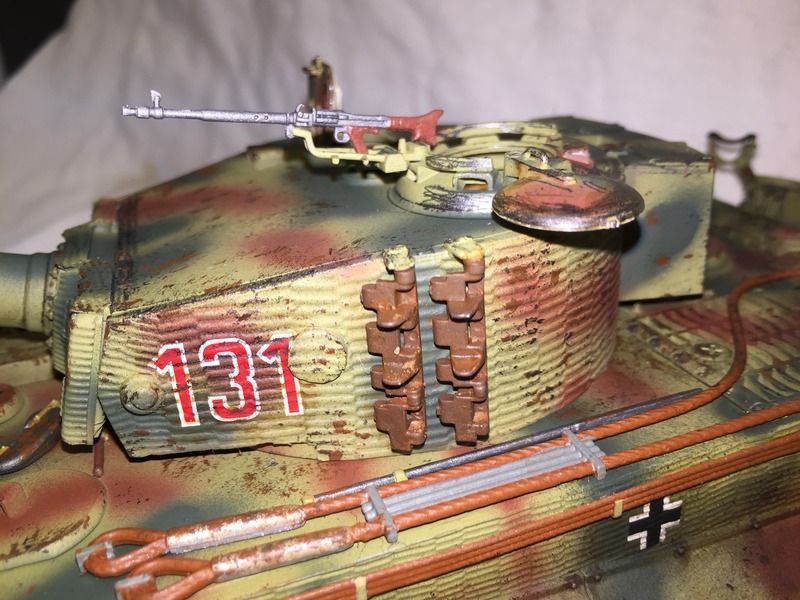
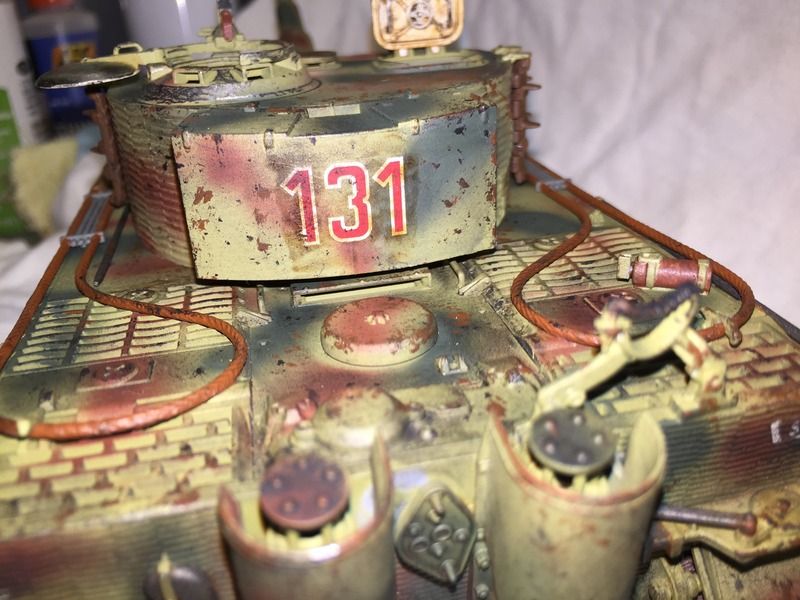
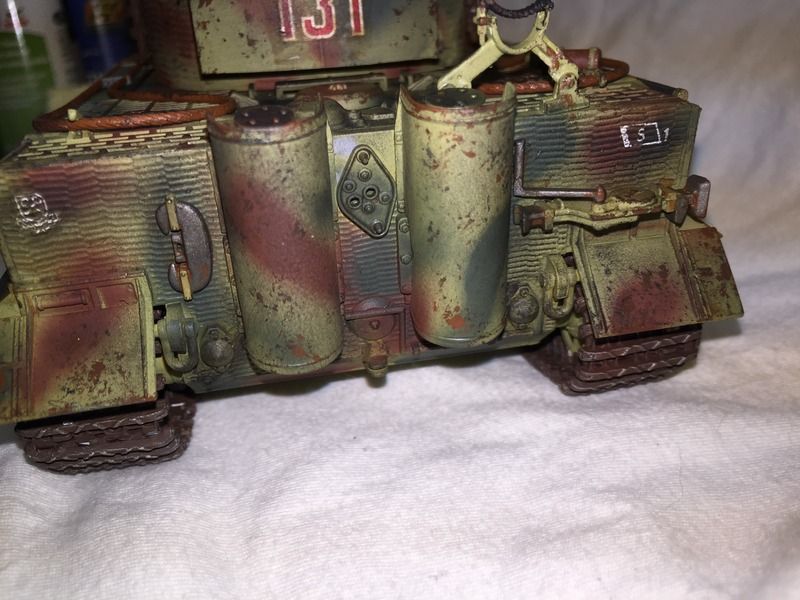
Hi Guys! Well, I am 99% done with this one. I still need to add the antenna, and plan to add some wet mud, but she is pretty much complete otherwise. The individual track links were a real PITA. I set up a jig, complete with an extra sprocket, to build them "off" the tank, but as soon as I tried to move one it fell apart like a jenga game gone wrong. So I proceeded to build them ON the tank, but attachiong them togeht requires so much force I had to more or less break them where the ends attached and just glue the bejesus out of them. Therefore, the tops of the trachs are not "weathered" properly, or painted to appear as bare metal. I'd like to see what is worn and what is not bare metal on the inside of the tracks form the sprockets and road wheels to improve that on future projects. I plan to throw some wet and dry mud on the tracks to cover these things up. I did some chipping weahtering with a sponge and enamels, some wear with a pencil, and some pastels. I also did an oil paint wash, but there seem to be few lines for the washes to get into, and the zimmerit makes things difficult. I might still try to do my first dot filter, but again i think the zimerit complicates things. I used the tamiya aftermarket zimmerit, but I wouldnt do it again. I'll spend the extra $30-40 for a dragon kit that already has it. My complaint about the zimmerit is that it was not "die-cut" and ready to apply, you have to cut around every piece. But all in all, it was a fun project. I made some mistakes, like painting where the barrel comes out of the tank for the coaxial machine gun black, and the lifting points are missing on the turret, I think I over-did the chipping, and I think the extra tracks need more fresh rust, needs more soot by the exhausts, etc. but I had fun!


All comments and criticisms welcome, I aim to improve my skills a little and try new techniques with every build. I just love to build!


 Rudy

Before any weathering, tools mounted:


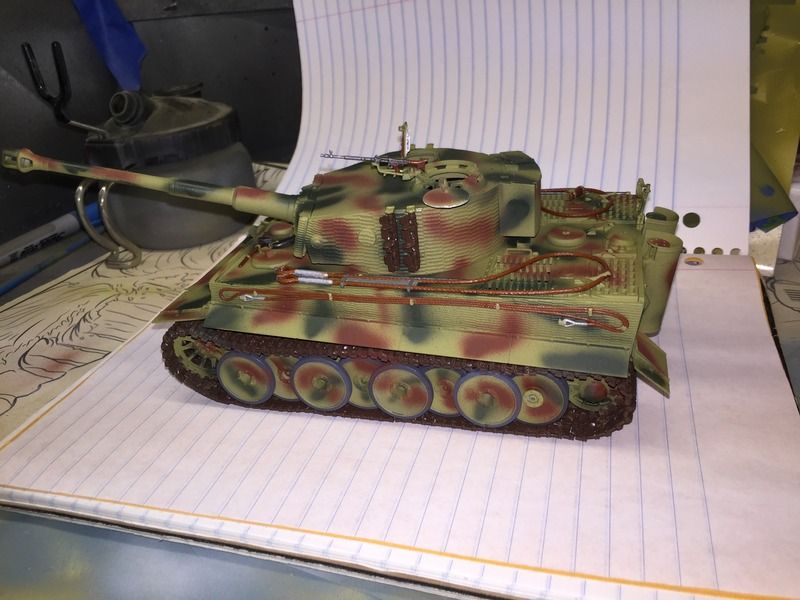
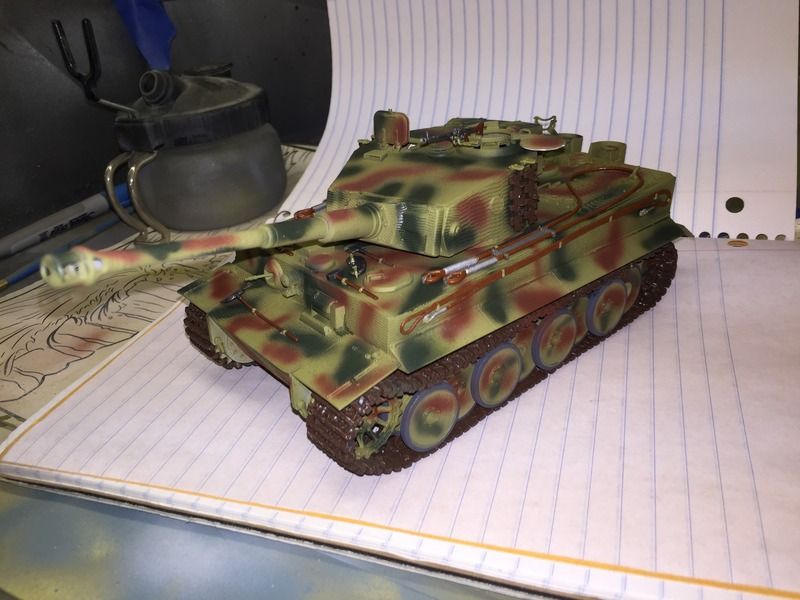
After Mild Weathering, still learning!


  • Member since
    December 2002
  • From: Bury St Edmunds, Suffolk, England
Posted by Bish on Wednesday, January 18, 2017 12:27 PM

Looking really nice. Chipping is a bit over done for my taste, but thats more a personal preferance.

I am a Norfolk man and i glory in being so


On the bench: Airfix 1/72nd Harrier GR.3/Fujimi 1/72nd Ju 87D-3

  • Member since
    March 2003
  • From: Western North Carolina
Posted by Tojo72 on Wednesday, January 18, 2017 1:41 PM
You did a really nice job,my only suggestion is the tow cables,they wouldn't rust so badly.Next time just make them steel,but overall great job.

  • Member since
    April 2015
  • From: Detroit, MURDER CITY
Posted by RudyOnWheels on Wednesday, January 18, 2017 1:53 PM
Thanks bish, yes I agree I went a little nuts with the chipping. Thank you Tojo, now that you mention it, the cables would NOT be completely rusted like that, good catch. Rudy
  • Member since
    November 2009
  • From: SW Virginia
Posted by Gamera on Thursday, January 19, 2017 8:37 AM

Yeah, there's some little issues here and there but she looks like a Tiger! Nice work!!! Yes


BTW: You might be able to drybrush the cables with a little mix of steel and grey paint. Maybe leave the rust in the cracks where water would accumulate and corrode them? 

"I dream in fire but work in clay." -Arthur Machen


  • Member since
    May 2013
  • From: From the Mit, but live in Mason, O high ho
Posted by hogfanfs on Thursday, January 19, 2017 11:47 AM

Rudy.

Great job on your Tiger! I really like it!

 Bruce


 On the bench:  1/48 Eduard MiG-21MF

                        1/35 Takom Merkava Mk.I


  • Member since
    December 2015
Posted by lcb248 on Thursday, January 19, 2017 12:33 PM

This is more of a question for everyone than a nit to pick...the machine gun looks too "silver". Thing is I don't have a suggestion to make it any better.

How do the rest of you finish guns? I've tried various steel paints. I've tried painting black with silver and/or steel dry brushed over it. Next I'm thinking of painting steel again and doing a heavy wash of gray/black. In any case, I'm looking for a "formula" for making guns in 1/35th scale look like...guns. 

  • Member since
    July 2014
Posted by modelcrazy on Thursday, January 19, 2017 12:39 PM

I use "Gunmetal" followed by a wash of oil black. I will sometimes go over that with a application of grey pastels for that dusty look.

Steve

Building a kit from your stash is like cutting a head off a Hydra, two more take it's place.


http://www.spamodeler.com/forum/

  • Member since
    December 2002
  • From: Bury St Edmunds, Suffolk, England
Posted by Bish on Thursday, January 19, 2017 1:23 PM

lcb248

This is more of a question for everyone than a nit to pick...the machine gun looks too "silver". Thing is I don't have a suggestion to make it any better.

How do the rest of you finish guns? I've tried various steel paints. I've tried painting black with silver and/or steel dry brushed over it. Next I'm thinking of painting steel again and doing a heavy wash of gray/black. In any case, I'm looking for a "formula" for making guns in 1/35th scale look like...guns. 


I paint mine semi gloss black then dry brush gun metal followed by metalic grey, all Tamiya.

I am a Norfolk man and i glory in being so


On the bench: Airfix 1/72nd Harrier GR.3/Fujimi 1/72nd Ju 87D-3

MrT
  • Member since
    December 2010
Posted by MrT on Thursday, January 19, 2017 1:36 PM

Looks good for the first attempt.

  • Member since
    November 2009
  • From: SW Virginia
Posted by Gamera on Thursday, January 19, 2017 1:38 PM

A guy in our IPMS taught me this:

1). Paint gun black or dark grey.

2). Rub a pencil on a piece of paper to get a good patch of 'lead'. 

3). Rub either your finger or a cotton swab in the 'lead' and burnish it on the gun. 

It gives a really nice metallic sheen to the part. Do this last though, any varnish coat over it will make it vanish. But you can redo it easy enough. 

"I dream in fire but work in clay." -Arthur Machen


  • Member since
    December 2002
  • From: NYC, USA
Posted by waikong on Thursday, January 19, 2017 2:01 PM

I do what Gamera said with the pencil, very convincing to my eyes.

My website: http://waihobbies.wkhc.net


JOIN OUR COMMUNITY!

Our community is FREE to join. To participate you must either login or register for an account.

SEARCH FORUMS
FREE NEWSLETTER
By signing up you may also receive reader surveys and occasional special offers. We do not sell, rent or trade our email lists. View our Privacy Policy.