SEARCH FINESCALE.COM

Enter keywords or a search phrase below:

1/35 Dragon M2A1

6684 views
48 replies
1 rating 2 rating 3 rating 4 rating 5 rating
  • Member since
    February 2010
  • From: Maine
1/35 Dragon M2A1
Posted by Stage_Left on Tuesday, November 14, 2017 6:56 PM

Hi folks,

Well it's been quite a while. Due to 'life stuff,' I've not spent really any time at all at the bench, and tried to satiate my modeling habit by lurking here and there. Thankfully, much of the 'life stuff' has settled and I've been able to actually put some glue to plastic on the Dragon M2A1. This is one of their 2-in-1 kits, and I built the M2 seven years ago. I'm having another crack at it, this time doing an M2A1 in a winter scheme, XX Corps, Belgium 1945.


Initial session produced the engine, front axle, and rear axle/drivetrain assemblies.


The position of the front axle wheel hub/bearing assemblies (parts A3 and A4) need to be reversed from what is shown on the instruction sheet (yes, true believers.....). If they are attached per the instructions, because of the shape of the locator tabs the brake drums will cause the wheels/tires to be put on upside down. The tires have a flat spot, and for obvious reasons this would look most appropriate on the ground. Another problem is that the holes for the tie rod ends would end up facing forward, as would the tie rod, and thus it would be on the wrong side of the axle.


Be sure to still attach A9 to A4 and A8 to A3. The tiny tabs on these will only allow the parts to fit properly on their respective hubs anyway.

I do have to give Dragon credit for some updating of their instructions; the parts shaded in blue clearly illustrate proper location. This did not appear on the original release of this kit.


So here's what I've got so far: much of the chassis, the engine, drivetrain, running gear, and front bumper is assembled. Feels good to be back at the bench.


Dave

  • Member since
    January 2006
  • From: California
Posted by SprueOne on Tuesday, November 14, 2017 8:34 PM

I'm not seein' nuttin'. Maybe my browser?

Anyone with a good car don't need to be justified - Hazel Motes


Iron Rails 2015 by Wayne Cassell Weekend Madness sprueone

  • Member since
    November 2009
  • From: SW Virginia
Posted by Gamera on Tuesday, November 14, 2017 8:35 PM

Hate to say it but I'm not getting any photos you're posting on Pale Moon or Firefox either.

"I dream in fire but work in clay." -Arthur Machen


  • Member since
    July 2012
  • From: Douglas AZ
Posted by littletimmy on Tuesday, November 14, 2017 8:47 PM

 All I get is a page to sign in to my microsoft account, and i already am.

So I sign in again and it seends me to an "Error" page.

 Dont worry about the thumbprint, paint it Rust , and call it "Battle Damage"

  • Member since
    November 2005
Posted by T26E4 on Wednesday, November 15, 2017 5:47 AM

If you decide to do the roller instead of the winch, know that those two plates with six bolts each on the bumper are incorrect and should be filed off. DML incorrectly mimicked a restoration and not an actual vehicle

Roy Chow 

Join AMPS!

http://www.amps-armor.org


  • Member since
    February 2010
  • From: Maine
Posted by Stage_Left on Wednesday, November 15, 2017 6:27 PM

Sprue, Gamera, timmy.....thanks for the look, and sorry the pics aren't loading for you guys. I just clicked on my post, and the pics loaded for me, but I'm a tech noob so any help as to the problem would be appreciated so I can get this fixed. I'm hosting the pics on Microsoft OneDrive, which I get as part of my Outlook mail program. I tried to make the folder public, but maybe it just looks that way to me and not others?

Roy- thanks for the info. I'm doing the winch on this one, but I appreciate the help!

Again, thanks for looking guys and sorry the images didn't load for you!

Dave

  • Member since
    February 2010
  • From: Maine
Posted by Stage_Left on Wednesday, November 15, 2017 6:52 PM

Ok...I made an adjustment, hopefully the pics load for everyone now.

Dave

  • Member since
    November 2008
  • From: Far Northern CA
Posted by mrmike on Wednesday, November 15, 2017 7:03 PM

Great to see you back at the bench! Your photos are showing up fine for me on Firefox. I'll be following your build - lots of details please!

Mike

  • Member since
    September 2016
  • From: Albany, New York
Posted by ManCityFan on Wednesday, November 15, 2017 8:07 PM

My Chromebook shows the pics just fine.  Glad to see you were able to get the pics up, and that you are able to get back to the bench.  Looks good so far.

Dwayne or Dman or just D.  All comments are welcome on my builds. 

  • Member since
    January 2006
  • From: California
Posted by SprueOne on Wednesday, November 15, 2017 8:26 PM

Stage_Left

Ok...I made an adjustment, hopefully the pics load for everyone now.

Dave


Yes, I can see the pictures now.

Anyone with a good car don't need to be justified - Hazel Motes


Iron Rails 2015 by Wayne Cassell Weekend Madness sprueone

  • Member since
    July 2012
  • From: Douglas AZ
Posted by littletimmy on Wednesday, November 15, 2017 8:28 PM

 I CAN SEEEEEEE   !!!!    

 I like it.   Cant wait to see more.

 Dont worry about the thumbprint, paint it Rust , and call it "Battle Damage"

  • Member since
    November 2009
  • From: SW Virginia
Posted by Gamera on Wednesday, November 15, 2017 9:51 PM

Yeah, I can see all your photos fine now. Nice work!

"I dream in fire but work in clay." -Arthur Machen


  • Member since
    March 2003
  • From: Rain USA, Vancouver WA
Posted by tigerman on Saturday, November 18, 2017 1:22 AM

Still nothing here.

   http://i7.photobucket.com/albums/y269/wing_nut_5o/PANZERJAGERGB.jpg

 Eric 

  • Member since
    February 2010
  • From: Maine
Posted by Stage_Left on Tuesday, December 5, 2017 6:26 PM

Ok guys,

Many apologies to you all for the failed pic presentation. I'm trying a new image hosting site (Postimage.org) because the old one- rhymes with Microcrap Dumbdrive- is simply too sophisticated for a noob like me to take advantage of it's functionality. Anyway....here's a rundown of what's been happening:

The kit:


The paint scheme (upper right; XX Corps, Belgium, 1945):


Early progress:


Swap the position of parts A3(A8) and A4(A9). Dragon instructions and all, you know. A more detailed explanation is above.


Dragon did revise it's instructions somewhat for this kit, however. This includes blue highlighted parts that may otherwise be difficult to tell their exact placement; this feature did not come in the original release:


And now, the latest. The chassis/running gear is mostly all together. I chose to leave the bogie wheels unglued to facilitate painting; the bogie arms can be pinched together gently and the wheels and their frames will click in.


I thinned down the frame for the .50 mount over the front seat, and added two small copper sheet right-angle braces, as on the real thing. Also the gas cans and the winch:


Finally I used an Xacto #10 blade, a grinding bit in my Dremel, a sanding stick, and various needle files to thin down the front fenders, to the point where light can be seen through the plastic so I could bend and otherwise rough up the material. There are two very small holes on top of the left front fender. Also, if you notice, the sanding belt is partially off the edge of the sanding stick. I found this technique useful to sand the inner edges of the compound curves.


And hopefully this works. Sorry again about the snafu, guys, and thanks for looking in!


Dave

  • Member since
    November 2009
  • From: SW Virginia
Posted by Gamera on Wednesday, December 6, 2017 7:39 AM

I can see everything perfectly now. 

Nice work, she's coming right along. 


Crossing my fingers you have no issues, the 75mm GMC version of this kit gave me fits. I think it was entirely my mistakes plus horrid luck and not the actual kit though. 

"I dream in fire but work in clay." -Arthur Machen


  • Member since
    January 2016
  • From: A Galaxy Far, Far Away
Posted by Hunter on Wednesday, December 6, 2017 9:18 AM

Hey Dave,

I really like this kit, and you're off to a great start. Glad to see you back!

Hunter 


  • Member since
    February 2010
  • From: Maine
Posted by Stage_Left on Thursday, December 7, 2017 8:41 PM

Gamera- thanks for the support! Sorry the 75mm gave you trouble. I built this kit in 2010 as the earlier M2, so yeah I remember the particulars about it. I will say Dragon actually re-tooled the gearshift; the original release was basically a straight stick, but now has a more representative bend in it. A small thing maybe, but I'll give them credit for the effort.

Hunter- I appreciate the kind words! Yeah I dig this kit also; second build of it, different version.

More to come, and I appreciate you guys giving a look!

Dave

  • Member since
    January 2006
  • From: California
Posted by SprueOne on Thursday, December 7, 2017 9:31 PM

I'm still following along as well.


Anyone with a good car don't need to be justified - Hazel Motes


Iron Rails 2015 by Wayne Cassell Weekend Madness sprueone

  • Member since
    January 2015
  • From: Tumwater, WA.
Posted by M. Brindos on Friday, December 8, 2017 9:45 PM

So am I. You're doing some brilliant work here and it's gorgeous so far!

- Mike Brindos "Lost Boy"

  • Member since
    August 2012
  • From: Parker City, IN.
Posted by Rambo on Sunday, December 10, 2017 6:42 AM

Not sure how I missed this till now. Your off to a great start, I love a half track.

Clint

  • Member since
    February 2010
  • From: Maine
Posted by Stage_Left on Thursday, January 4, 2018 8:03 PM

Hi all,

I hope everyone's enjoyed their holidays; mine was busy but good. Santa didn't bring me anything personally this year, but was very good to the kids and grandkids and that's what it's really about.

Sprue, Mike, and Clint- thanks much for the comments and following! On to the latest:

Not a ton of progress, but I got some bits attached to the cab and troop compartment interiors:


 I decided to upgrade the solid, molded-on tie-downs on the front fenders with fine wire. Left fender is before, right is after:


That's it for now, thanks as always guys!

Dave

  • Member since
    August 2009
  • From: MOAB, UTAH
Posted by JOE RIX on Thursday, January 4, 2018 9:08 PM

Hey Dave. Boy, am I ever excited to find you building this particular kit. I have been wanting this kit for awhile and I just ordered one on ebay last night with some X-mas cash I receieved. I am definitely going to be following along and taking notes.

The work you have done so far is quite impressive. I'm taken by your ability to catch inaccuraacies in the instructions. Well done. Overall, well done.

Cheers, Joe

"Not only do I not know what's going on, I wouldn't know what to do about it if I did". George Carlin

  • Member since
    March 2003
  • From: Rain USA, Vancouver WA
Posted by tigerman on Thursday, January 4, 2018 10:58 PM

I recently tried Postimage and think it's easier then Flickr. 

Nice progress and will be following along

   http://i7.photobucket.com/albums/y269/wing_nut_5o/PANZERJAGERGB.jpg

 Eric 

  • Member since
    November 2009
  • From: SW Virginia
Posted by Gamera on Friday, January 5, 2018 9:13 AM

Looks great so far. Yes

"I dream in fire but work in clay." -Arthur Machen


  • Member since
    January 2016
  • From: A Galaxy Far, Far Away
Posted by Hunter on Friday, January 5, 2018 9:56 AM

She's coming along nicely Dave...I can't wait until you slap on the paint.

Hunter 


  • Member since
    February 2010
  • From: Maine
Posted by Stage_Left on Friday, January 5, 2018 6:33 PM

Joe- thanks so much! I'm glad you're going to be diving into this kit and I don't think you'll be disappointed. This is my second go-around with it; I built it as the early M2 in 2010, just after it came out. The only real snafu's with the instructions are, as I pointed out above, with the front axle hub/bearing assemblies. Take your time with this assembly and do lots of dry-fitting. If you can sandwich A3 (or A4), the brake drum assembly (D11 & D20) and the front wheel to the axle you'll see what I mean. As illustrated the flat spot on the front tire ends up on top, not on the ground and the tie rod in front of the axle, not behind it.

The only other minor issue I didn't mention above is with the mating of D34 to D32, the bogey springs to the outer half of the bogey body. One illustration has the springs backward, but they simply won't mate with D32 that way. Rotate them 180 degrees and you're good to go.

Eric- thank you and I'm finding Postimage to be quite user-friendly myself.

Gamera- thanks again!

Hunter- looking forward to the paint stage as well!

Dave

  • Member since
    August 2009
  • From: MOAB, UTAH
Posted by JOE RIX on Tuesday, January 9, 2018 9:20 PM

Dave, Just wanted to tell you that my M2A1 kit arrived yesterday. I am really impressed. I immediately pulled out the instructions and made the appropriate notes of corrections per your recommendations. It will likely be some time before I get around to building it but, at least I have recorded the necessary adjustments. Thank You.

I am really excited to see your next updates. Hopefully they come along soon.

Cheers, Joe

"Not only do I not know what's going on, I wouldn't know what to do about it if I did". George Carlin

  • Member since
    February 2010
  • From: Maine
Posted by Stage_Left on Thursday, January 18, 2018 7:03 PM

Hi Joe,

You're most welcome. I'm glad this thread can be of help to you (and anyone else), and I'm glad you got your copy of the kit and that it has impressed you.

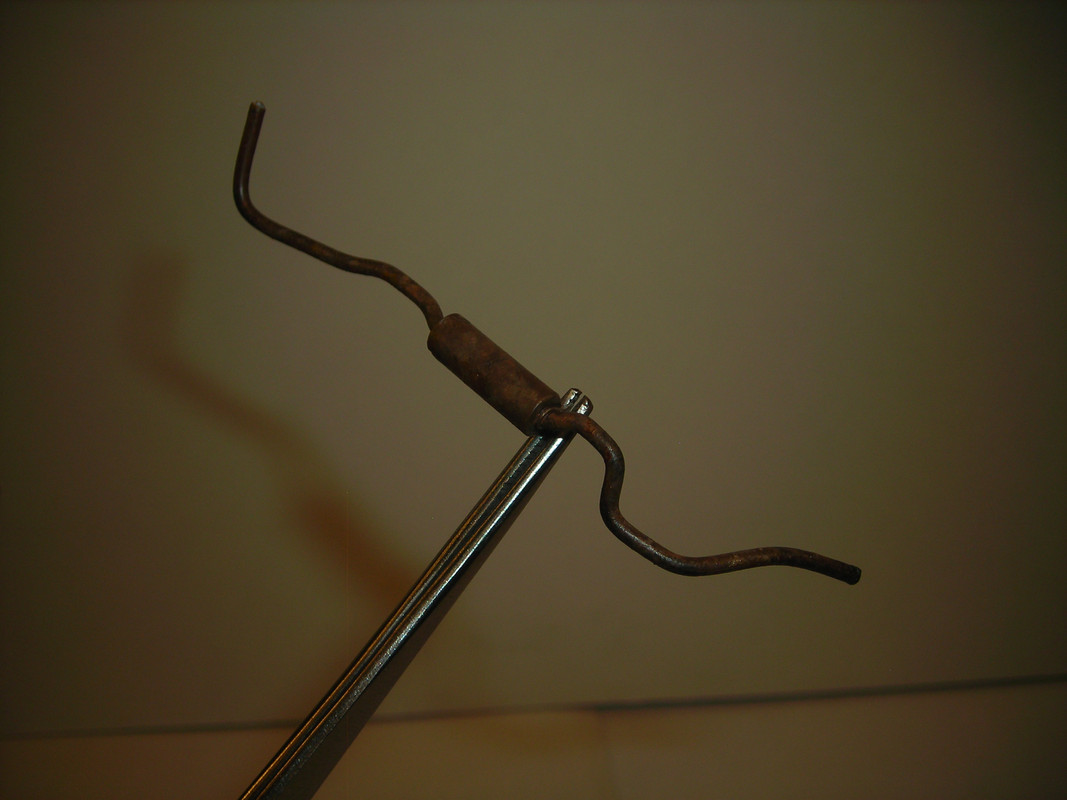
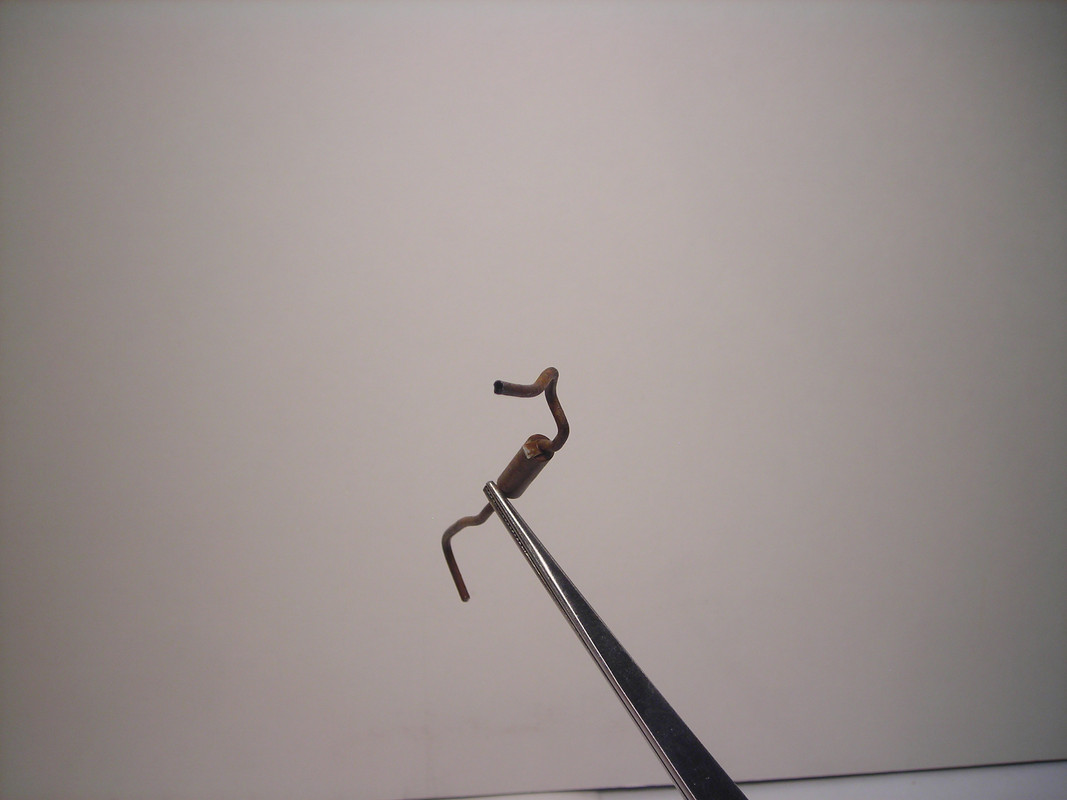
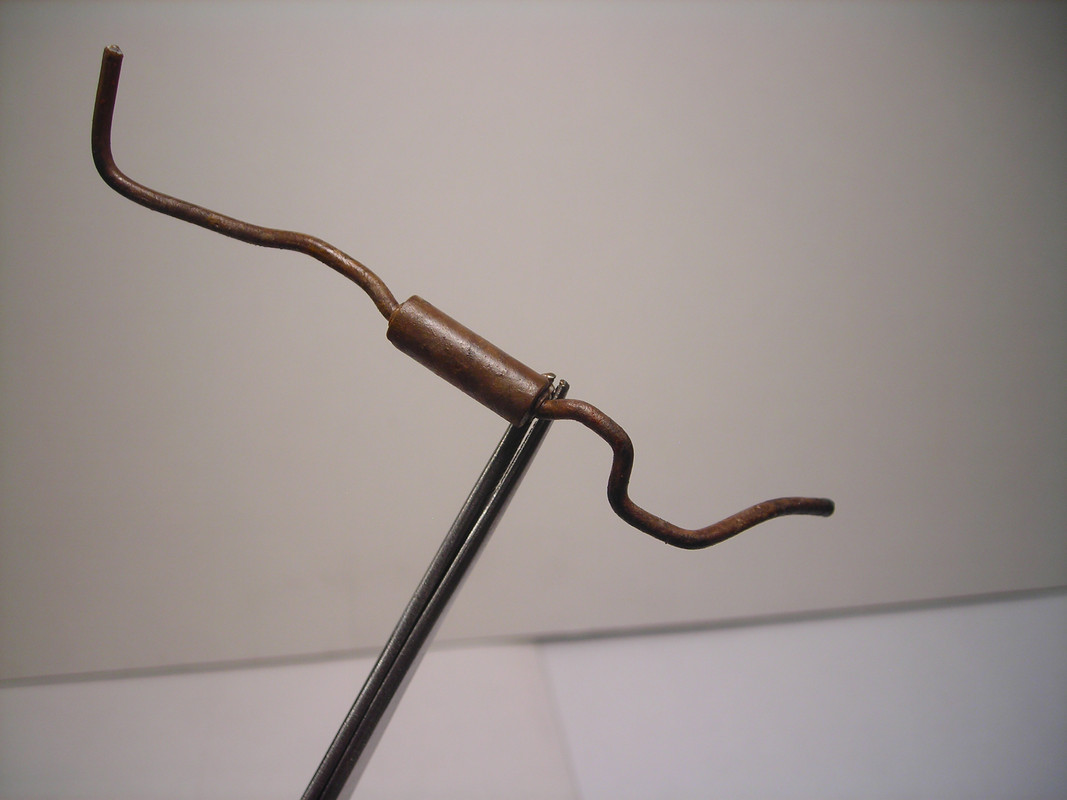
So without further ado, here's the latest: first, I 'rusted' the exhaust system. Sorry for the lack of in-progress pics here, but my process was to first give it a coat of MM Italian Dark Brown. Next I dabbed a wash of Cotman's (Windsor & Newton) watercolor black over the whole thing. I had attempted to produce spots, but I got the watercolor too thin and it ran, leaving tide marks. This didn't look particularly encouraging at first, but in the end simply became part of the corrosion spectrum.

Next I cracked open some recently purchased Wilder oils: rust brown, faded yellow, and winter white. This stuff is thin right out of the tube, so for this application I used it as-is. I mixed each of the yellow and white with the brown, and randomly dabbed the brown and each of the two mixtures in places along the entire length of the exhaust. The colors didn't seem as vibrant as I wanted in this case, but certainly- subtly- varied the tones of what was underneath.

Between each of these steps I allowed a day of two of drying, and three in the case of the oils. So now I wanted some vibrance to the colors, so back to the Cotman's: burnt sienna and raw sienna. I thinned these a bit with water and just a speck of dish soap, then with a pointed brush proceeded with my dabbing technique. Now I was getting spots or any other shape I wanted and the variety of tones was really coming along. I let this dry for a couple more days, then dry-brushed Testors flat black in the pronounced bends and the tailpipe, and being careful not to make each bend look identical.

I'm still fooling with adjustments on my Nikon Coolpix L3 (yeah I know, not the most sophisticated camera), so here's a couple different pics to hopefully give you an idea of what this thing looks like:


Next up were the .30 gun cradles, J25 and J26. These two parts represent two halves of the cradle, and there are no positive location devices on either. I simply figured out how to carefully hold the two halves together at one end while super-gluing the other end, then super-gluing the first end when the other was dry. Here's what they look like, and the end I initially held (yes, a bit of tedious work here):


I also finished up the crew compartment save for a couple parts, like the antenna mount which I didn't want to accidentally snap off:


At the lower rear where the side panels and the rear panel meet, there is a small gap. I could have avoided this by sanding a little where the rear panel meets the back end of the compartment tub, but alas it's easily delt with:


So that's it for now. Thanks for looking in and for your comments!


Dave

  • Member since
    November 2009
  • From: SW Virginia
Posted by Gamera on Friday, January 19, 2018 11:58 AM

Great looking job there! 

I got the same gaps in the bed on my kit, nice to see it might have been the kit instead of my misassembly for once. 

The rust on the muffler and pipe turned out great, shame you'll have to turn the model over to see it. 

"I dream in fire but work in clay." -Arthur Machen


  • Member since
    August 2009
  • From: MOAB, UTAH
Posted by JOE RIX on Sunday, January 21, 2018 10:50 PM

Wow! Your technique on the muffler turned out terrific. You managed to turn out some very realistic effects. I'm not familiar with Cotman's or Wilder. Stuff sure seems to work.

I'll make further notes on the fit issue on the bed.

You've made some wonderful progress. Looking forward to your next update.

"Not only do I not know what's going on, I wouldn't know what to do about it if I did". George Carlin

JOIN OUR COMMUNITY!

Our community is FREE to join. To participate you must either login or register for an account.

SEARCH FORUMS
FREE NEWSLETTER
By signing up you may also receive reader surveys and occasional special offers. We do not sell, rent or trade our email lists. View our Privacy Policy.