SEARCH FINESCALE.COM

Enter keywords or a search phrase below:

1:72 RT-2PM Topol ICBM by Zvezda - Finished! Page 2

9434 views
63 replies
1 rating 2 rating 3 rating 4 rating 5 rating
  • Member since
    May 2009
  • From: Poland
1:72 RT-2PM Topol ICBM by Zvezda - Finished! Page 2
Posted by Pawel on Thursday, June 28, 2018 4:12 PM

Hello!

While this is not my main area of interest, I decided to build this baby because it is kinda fascinating. 12 by 14 truck with top weight of 105 tonnes - you don't see something like this every day. The kit looks great in the box - lots of parts and quite detailed, too. The fit of it is very good, too. The kit gives you two options - to build it in transport or launch position. There's a slight problem with the launch position, lifted on hydraulic jacks and with the misille container up. Well, normally, if you want to launch, you drop the nose cone of the container before erecting the container/launcher. As I didn't want to detail the insides of the container, I decided to show my model lifted on jacks, but the container/launcher still down.

I started with building the chassis together with the wheel suspension:

1:72 Zvezda RT-2PM Topol by Pawel

1:72 Zvezda RT-2PM Topol by Pawel

I painted the insides of the frame with black Gunze paint before assembly, to save trouble later. This way I didn't have to worry about scraping paint off when glueing parts together, because the glue I use - lacquer thinner - just melts the paint away in the necessary spots. Very handy. I have cut out the holes in the frame that are just marked on the kit parts, but they don't go all the way through. Then I have additionally detailed the steering system with copper wire. Interestingly, although the kit is pretty detailed, it lacks the engine, leaving a big empty space in the place indicated by the arrow:

1:72 Zvezda RT-2PM Topol by Pawel

I decided to fill this space with something later. Next I'm working on all th boxes that will be put on the frame. Thanks for looking and have a nice day

Paweł

All comments and critique welcomed. Thanks for your honest opinions!

www.vietnam.net.pl

  • Member since
    August 2012
  • From: Parker City, IN.
Posted by Rambo on Thursday, June 28, 2018 4:32 PM
Should be a interesting buildd Pawel

Clint

  • Member since
    November 2009
  • From: SW Virginia
Posted by Gamera on Friday, June 29, 2018 7:41 AM

Oh wow! I had a look this one up Pawel, what a big brute!!! I'm guessing she's over 30cmm / a foot long when finished? And fourteen wheels, that's some supension system! Looking forward to more photos of this monster! 

"I dream in fire but work in clay." -Arthur Machen


  • Member since
    May 2009
  • From: Poland
Posted by Pawel on Saturday, June 30, 2018 12:50 PM

Rambo, Gamera - thanks a lot for your comments!

Rambo - like I wrote, I find this truck fascinating, too!

Gamera - The body of the misille container is exactly 26cm long, and it will get the nose cone and the base, so yes, roughly 30 cm it is. Good thing it's in 1:72 - that's what I love this scale for - even big subjects are still manageable. As for the suspension system - 8 of those 14 wheels are steerable and 12 of those are driven in real life! In the kit you get the whole suspension system x2 - one set is ccompressed as if under weight, the other set is uncompressed, as for the vehicle lifted on hydraulic jacks. That's the one I have used.

Thanks for lookin' and have a nice day

Paweł

All comments and critique welcomed. Thanks for your honest opinions!

www.vietnam.net.pl

  • Member since
    April 2003
  • From: USA
Posted by keavdog on Saturday, June 30, 2018 8:47 PM

That's a big truck!  Imagine rotating the tires on that lol.  Following along. Looks like the launcher in "spies like us"

Thanks,

John

  • Member since
    June 2018
Posted by TankerEasy on Wednesday, August 1, 2018 4:47 AM

We need to see an update! Smile Burger

Millennial modeler

Air Force vet (2006-2012)

Recently completed: 1/48 Tamiya V1

On the bench: Hasegawa 1/8 Clerget 9B rotary engine, 1/35 scale Trumpeter SA-2 Guideline missle


  • Member since
    May 2009
  • From: Poland
Posted by Pawel on Thursday, August 2, 2018 4:29 PM

Hello Easy!

I'd be glad to make an update here!

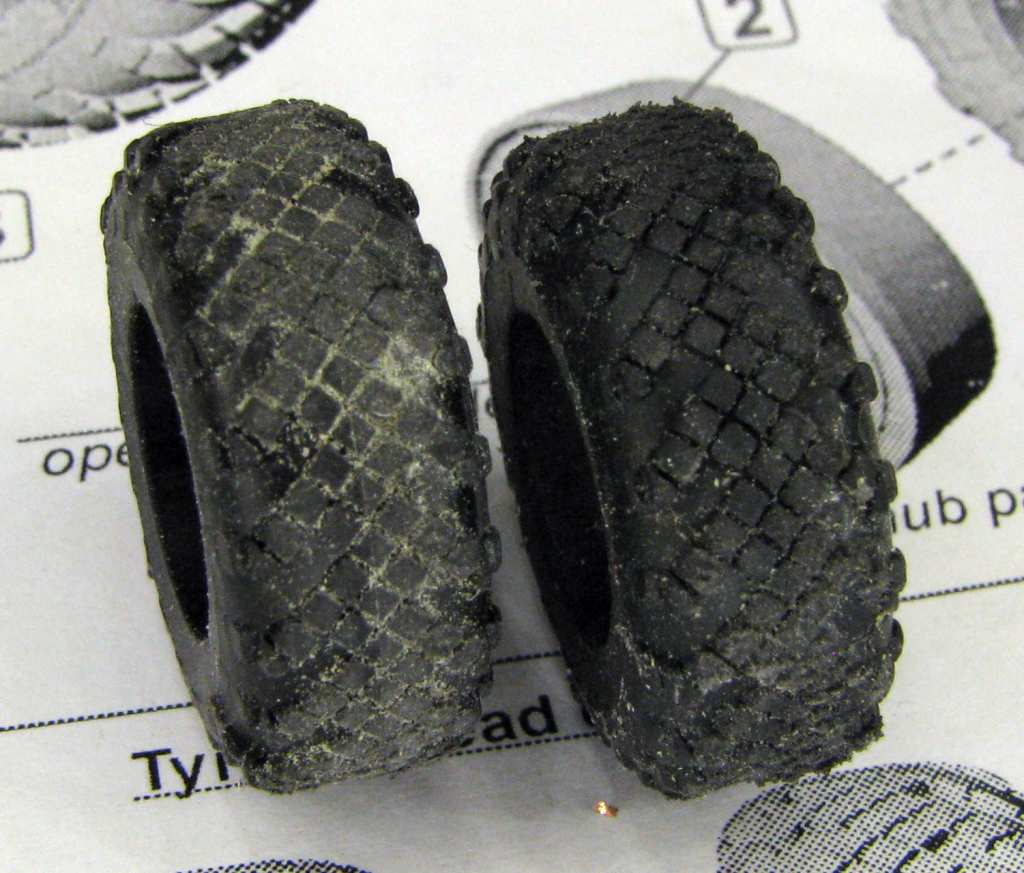
I started working on the wheels. I planned to use the kit's wheels, but they have a prominent seam on them and as it turned out, thes sand quite poorly:

1:72 Zvezda RT-2PM Topol by Pawel

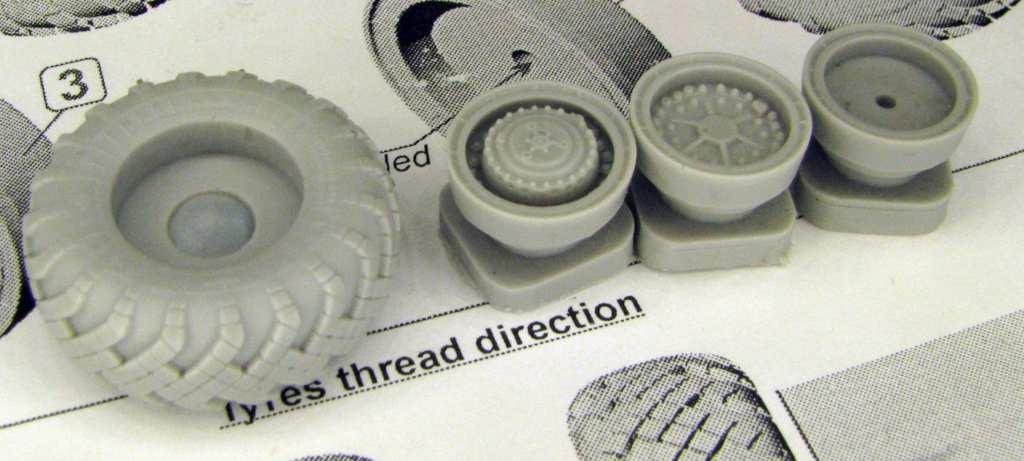
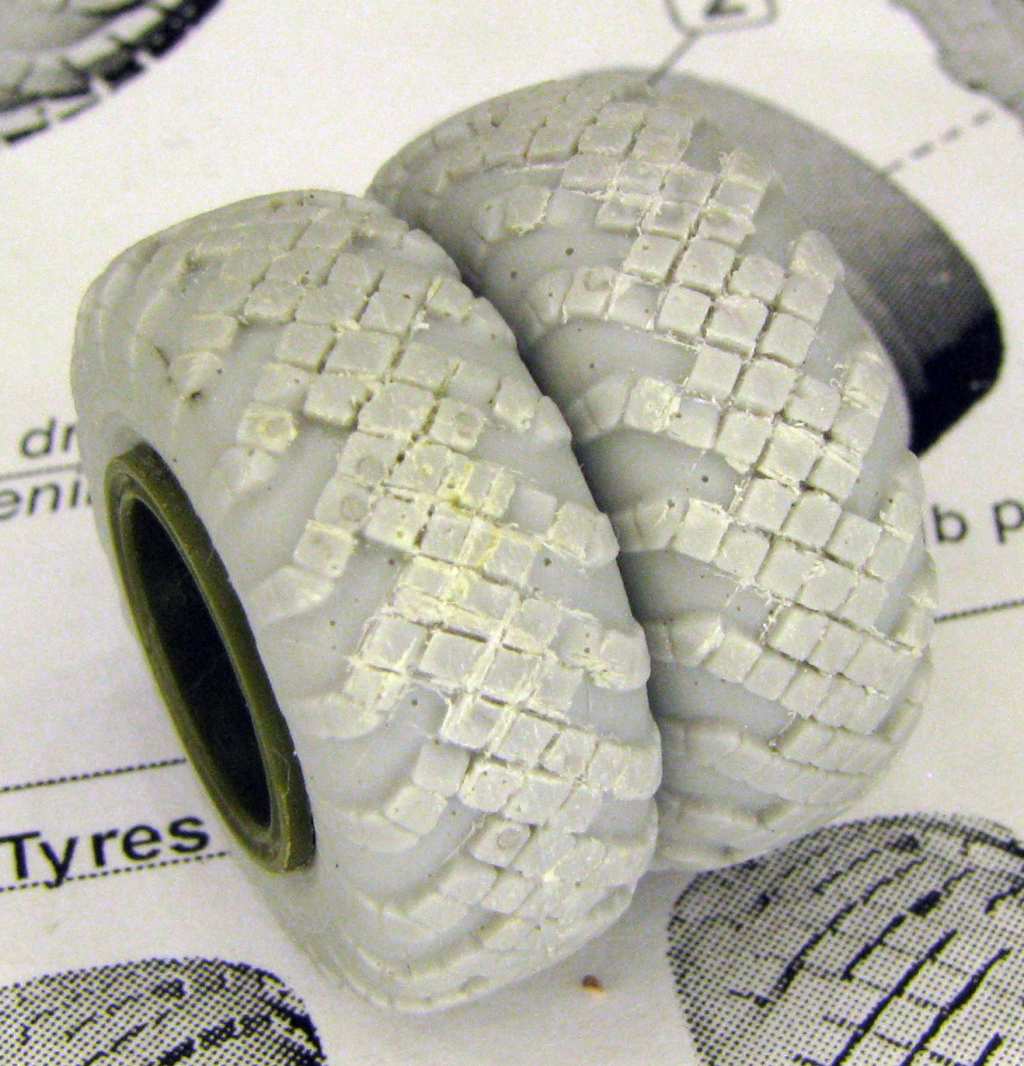
That's when I decided to buy resin wheels. I got a set from a company called "Armory". The thread on theit tires looks good and sands better than the kits parts:

1:72 Zvezda RT-2PM Topol by Pawel

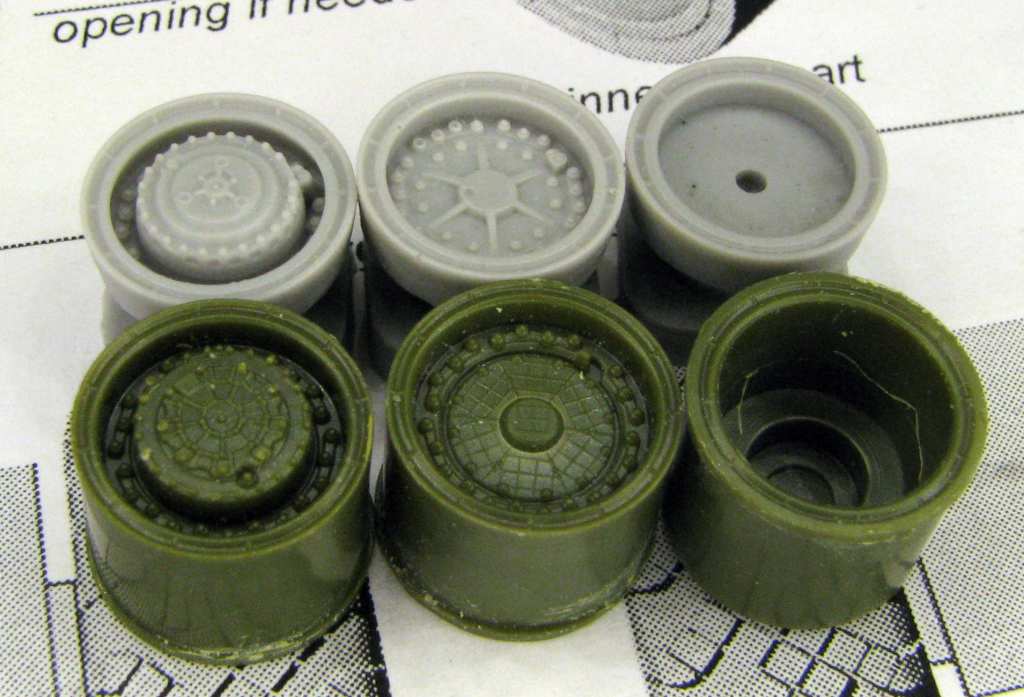
Unfortunately fitting the resin hubs to the rest of the chassis looks very complicated here - it would take precise drilling or milling of large diameter holes in the resin parts, or a major surgery of the styrene axle stubs:

1:72 Zvezda RT-2PM Topol by Pawel

The resin tires als have a spot each, where the resin was being poured, with rough surface and trapped air bubbles. I have drilled out the pinholes and have glued a small piece of stretched sprue in each one:

1:72 Zvezda RT-2PM Topol by Pawel

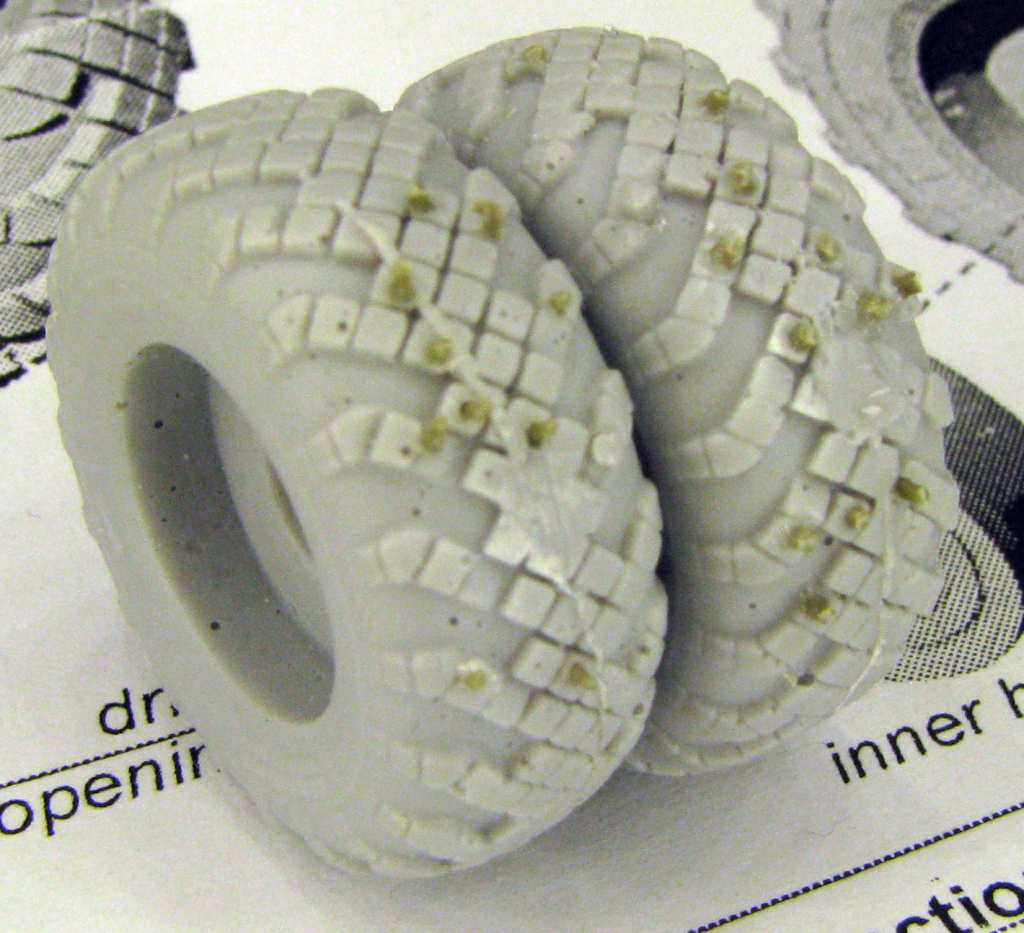
After a little sanding I have cleaned up the thread with razor saw:

1:72 Zvezda RT-2PM Topol by Pawel

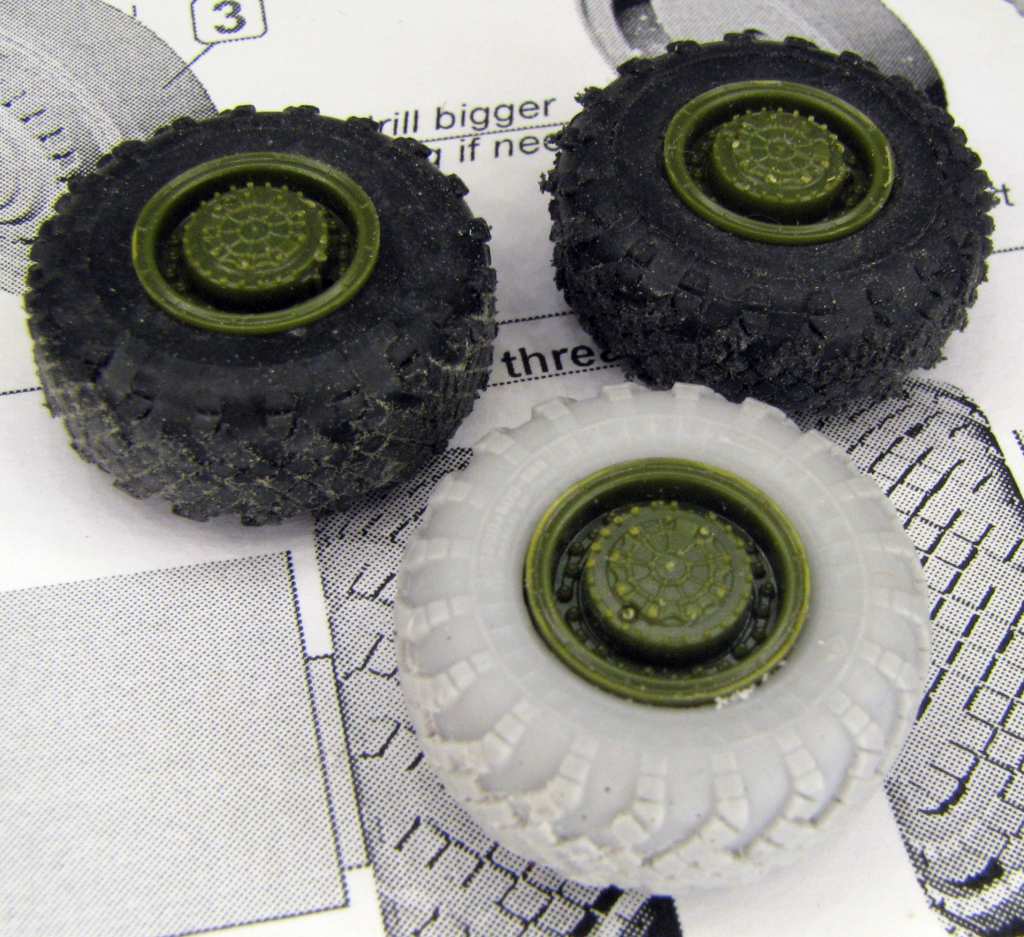
Because of how much work it would take to install the resin hubs, and because of how nice those kit's wheels are, I decided to install the kit's wheels with resin tires on my model. To do this I only needed to remove some resin from the tires - this was done quickly and nicely with a 11mm wood drill bit.

It's worth noting, that when you assemble all the wheels exactly as per the instructions, the tires on one side will be installed "in the wrong direction". To adress this, you would need to deliberately work against the instructions - and end up getting a small hole/seam along the wheel on all wheels on one side of the model. On the photo below you can see one kit tire assembled per kit instructions, one tire assembled against the kit instructions and resin tire with a styrene hub:

1:72 Zvezda RT-2PM Topol by Pawel

This is what I have so far - thanks for lookin' and have a nice day

Paweł

All comments and critique welcomed. Thanks for your honest opinions!

www.vietnam.net.pl

  • Member since
    November 2009
  • From: SW Virginia
Posted by Gamera on Thursday, August 2, 2018 6:04 PM

Nice work on repairing the tires, looking very good!!!

"I dream in fire but work in clay." -Arthur Machen


  • Member since
    May 2009
  • From: Poland
Posted by Pawel on Friday, August 3, 2018 5:05 PM

Gamera - thanks a lot!

All comments and critique welcomed. Thanks for your honest opinions!

www.vietnam.net.pl

  • Member since
    November 2009
  • From: SW Virginia
Posted by Gamera on Sunday, August 5, 2018 4:37 PM

BTW Pawel is the M42A1 Duster in the contest gallery of September FSM yours? If so nice work and congrads on making it in the magazine! 

"I dream in fire but work in clay." -Arthur Machen


  • Member since
    May 2009
  • From: Poland
Posted by Pawel on Monday, August 6, 2018 1:36 AM

Hello!

They tell me it is, but I have yet to see the printed copy. When I do, I'll post about it, but in a different topic.

Thanks for thinking aboput me and have a nice day!

Paweł

All comments and critique welcomed. Thanks for your honest opinions!

www.vietnam.net.pl

  • Member since
    May 2009
  • From: Poland
Posted by Pawel on Saturday, October 20, 2018 11:06 AM

Hello!

It's been a long time... I have used that ime to do some research and to get an engine for my baby...

And the engine for this truck (MAZ-7917 / 15U128) should be a V-58-7 which is a rusian designation of an engine, that is directly related to the V-2 - and by this I mean the engine that was powering the T-34 tank! What the Russians did was to modify the engine slightly by adding two superchargers thus giving the truck 720 HP. I have contacted the Modelcollect company and they were friendly enough to send me the C sprue from their MAZ-543 kit that contains parts for the D12A/V-38 engine - very similar to the one I need. My job was to scratchbuild the twin superchargers. The C sprue also contains many goodies like the radiarot fans, transmission boxes and drive shafts, that will come very handy for this build. For now I did the mock up of how the components should fit on the frame:

1:72 Zvezda RT-2PM Topol by Pawel

1:72 Zvezda RT-2PM Topol by Pawel

Now I have to paint the frame to be able to start mounting other components to it. Thanks for looking and have a nice day

Paweł

All comments and critique welcomed. Thanks for your honest opinions!

www.vietnam.net.pl

  • Member since
    November 2009
  • From: SW Virginia
Posted by Gamera on Sunday, October 21, 2018 2:30 PM

Pawel: Cool, the engine looks really good, looking forward to seeing it all painted up.

"I dream in fire but work in clay." -Arthur Machen


  • Member since
    May 2009
  • From: Poland
Posted by Pawel on Tuesday, October 23, 2018 4:46 PM

Gamera - thanks a lot for your kind words! I expect to be able to show you the photos of the painted chassis about the next weekend. for now I'm chugging along - slowly but steadily. Have a nice day!

Paweł

All comments and critique welcomed. Thanks for your honest opinions!

www.vietnam.net.pl

  • Member since
    May 2009
  • From: Poland
Posted by Pawel on Saturday, October 27, 2018 1:35 PM

Hello everybody!

I managed to put some paint on the chassis and install the engine. As for paint the chassis is supposed to be black, but to show some real  life condition of it I have painted it with Humbrol 32 (Dark Grey) with some Sand colour mixed in. The engine is painted using T-55 engines as a reference:

1:72 Zvezda RT-2PM Topol by Pawel

1:72 Zvezda RT-2PM Topol by Pawel

1:72 Zvezda RT-2PM Topol by Pawel

The space between the engine and the radiator is populated using creative gizmology - I wasn't able to find any info on the equipment there. The space behind the engine will get an air cleaner. The Engine will be covered by the deck, so unfortunately some of what is shown here won't be seen - except from the underside and from under the fenders. I'm glad I dont have a big gaping hole in place where the engine should be, like it is OOB!

Thanks for looking and have a nice day

Paweł

All comments and critique welcomed. Thanks for your honest opinions!

www.vietnam.net.pl

  • Member since
    November 2009
  • From: SW Virginia
Posted by Gamera on Sunday, October 28, 2018 5:40 PM

Looks great Pawel!

And yeap, sometimes you just have to fill the empty space with something even if it's not exactly the right stuff!

"I dream in fire but work in clay." -Arthur Machen


  • Member since
    May 2009
  • From: Poland
Posted by Pawel on Saturday, November 3, 2018 12:02 PM

Hello!

Gamera - thanks a lot!

I have fitted the "deck" over the engine. It was missing a few covers and the air cleaner, so I have added them. Here are the photos of the dry fit, before painting. I'm considering leaving the deck removable - that would allow to take a look at the engine from time to time!

1:72 Zvezda RT-2PM Topol by Pawel

1:72 Zvezda RT-2PM Topol by Pawel

Thanks for looking and have a nice day

Paweł

All comments and critique welcomed. Thanks for your honest opinions!

www.vietnam.net.pl

  • Member since
    November 2009
  • From: SW Virginia
Posted by Gamera on Monday, November 5, 2018 11:38 AM

Oh cool! I'd leave the deck removable too after all the work you put into detailing under it.  

"I dream in fire but work in clay." -Arthur Machen


  • Member since
    February 2011
Posted by knox on Monday, November 5, 2018 12:47 PM

I’m really enjoying following this build.  Thanks for sharing your talent.  

                                            knox

  • Member since
    May 2009
  • From: Poland
Posted by Pawel on Monday, November 5, 2018 5:18 PM

Gamera, knox - thanks a lot for your kind words, they mean a lot to me! I hope to be able to post another update soon. Thanks for reading and have a nice day

Paweł

All comments and critique welcomed. Thanks for your honest opinions!

www.vietnam.net.pl

  • Member since
    May 2009
  • From: Poland
Posted by Pawel on Thursday, November 8, 2018 5:21 PM

Hello!

Here's another update. I have painted the deck over the engine and yes, it can remain removable!

1:72 Zvezda RT-2PM Topol by Pawel

1:72 Zvezda RT-2PM Topol by Pawel

Then I started tackling the "cabinets". Other than the instructions have you do it I have built the cabinets as subassemblies, filled and sanded the seams, and just then I have started fitting them to the frame. The largest, rear cabinets fit a little iffy on their rear. First I have thought to fasten them to the rear beam of the jacks - that's why I have glued some 0,5mm styrene sheet to the beam - it's white on the photo below. But then some dry fitting revealed that it is best to glue the sides of the cabinets to the surface marked with the yellow cross on the photo below:

1:72 Zvezda RT-2PM Topol by Pawel

After that was clear I have put the large cabinets on. The smaller, front ones are dry fitted for now, as is the frame that supports the missile pod - and this part took an unusually big amount of filling and sanding:

1:72 Zvezda RT-2PM Topol by Pawel

I have also added some missing beams to the antenna girders - used square 1mm styrene strip for that. The added parts are white in the photo below:

1:72 Zvezda RT-2PM Topol by Pawel

Now it's about time I started tackling the cabins... Thanks for looking and have a nice day

Paweł

All comments and critique welcomed. Thanks for your honest opinions!

www.vietnam.net.pl

  • Member since
    November 2009
  • From: SW Virginia
Posted by Gamera on Friday, November 9, 2018 9:43 AM

Nice to see you still rolling along on this Pawel. The added detailing looks good! 

"I dream in fire but work in clay." -Arthur Machen


  • Member since
    May 2009
  • From: Poland
Posted by Pawel on Thursday, November 15, 2018 5:25 PM

Hello!

Gamera - sorry I took so long to reply, thanks a lot for your kind words! This is getting hard, because recently I have some seriuos restrictions as to the use of my airbrush, and I wanted a somewhat complicated colour scheme for this baby.

As promised I wanted to write a few words about the cabins. OOB the cabins are pretty disappointing - they lack many details like the windows facing the missile container and the roof vents, not to mention that they don't have any interior at all, which might bother people, as the windows of the cabs are pretty big. That's why I decided to buy this set:

The above set, although somwhat pricey, is very comprehensive, containing not only parts for complete cabins with interior, but also some decals and several additional colour schemes for the Topol launchers. The drama struck after I have opened the box. It turned out one of the two PE sheets included in the set, the one containing the window gaskets was faulty, distorted. I have contacted the manufacturer and he has shocked me by admitting he checked out his stock and 100% of those PE sheets are shot which he noticed just now and he's not going to make any more. To his credit he refunded me a significant portion of the set price. Shortly thereafter crosshairmodels.com went off the net, which is a pity, because apart from this shot PE sheet the rest of the set is actually pretty nice.

That still left me without the windows, which I decided to fix by making my own windows out of Vivak sheet. In comparison with the original design that ment no window gaskets, something I have to address later. I also had a hard time figuring out the interior colour that finally turned out to be that strange green also found in some aircraft or helicopters. at the moment the cabins look like on the photos below:

1:72 Zvezda RT-2PM Topol by Pawel

1:72 Zvezda RT-2PM Topol by Pawel

1:72 Zvezda RT-2PM Topol by Pawel

1:72 Zvezda RT-2PM Topol by Pawel

1:72 Zvezda RT-2PM Topol by Pawel

1:72 Zvezda RT-2PM Topol by Pawel

1:72 Zvezda RT-2PM Topol by Pawel

Now I would like to temporarily put the doors in (I think I'll finally show them open) and paint the camo on the cabs and on the more flimsy cabinets, that would IMO not survive multiple masking sessions if they were glued to the frame.

Thanks for looking and have a nice day

Paweł

All comments and critique welcomed. Thanks for your honest opinions!

www.vietnam.net.pl

  • Member since
    March 2007
  • From: Northeast WA State
Posted by armornut on Thursday, November 15, 2018 7:06 PM

    Bummer about the PE set, AWESOME that the seller refunded some of your money. Looks really cool, IF they ever poo one in 35th I may take a second mortgage to have it.

we're modelers it's what we do

  • Member since
    November 2009
  • From: SW Virginia
Posted by Gamera on Friday, November 16, 2018 6:04 PM

Yeah that's a shame about the PE fret. Still more nice work! Yes

"I dream in fire but work in clay." -Arthur Machen


  • Member since
    May 2009
  • From: Poland
Posted by Pawel on Saturday, November 17, 2018 6:00 PM

Hello!

Thanks a lot for your comments!

armornut - some russian modeller has scratchbuilt this baby in 1:35 - that must have been some work! Unfortunately it seems to be taken down from the 'net recently.

gamera - thanks a lot for your kind words!

It's a real pity about the whole company. The cabs set is an example of a modern trend to 3D print some masters and then to duplicate them in resin. The whole set was very carefully designed, with drawings/instructions, colour profiles, decals and so on. You could say high quality work if not for that one goof. But I predict we will see more similar sets from different companies.

Thanks for reading and have a nice day

Paweł

All comments and critique welcomed. Thanks for your honest opinions!

www.vietnam.net.pl

  • Member since
    March 2007
  • From: Northeast WA State
Posted by armornut on Tuesday, November 20, 2018 7:05 PM

   Hi Pawel, so I found a few pictures of a 35th scratchbuilt Topol, WOW, while I want one in 35th I have no idea where I would put it. It was a beautiful build though.

we're modelers it's what we do

  • Member since
    May 2009
  • From: Poland
Posted by Pawel on Saturday, November 24, 2018 4:14 PM

Hello!

Good thing you've found 'em - I've seen those photos some time ago, but couldn't find them again for you. Whole lot of work - and a big model, too!

I have a good idea just how big it would be, because I have tackled the misille container - the biggest subassembly of the kit. Building it involves such joys as having to fill and sand a straight seam almost a foot long... After doing that I have hit the container with spray Surfacer 500, then after I was sure the seam is taken care of with Tamiya spray primer and then Tamiya TS-61 NATO green spray. But the NATO green was too green for this application, so I have airbrushed a thin layer of Humbrol 155 on top of that. That has allowed me to do some shading and I've got a nice, faded look for my misile container now:

1:72 Zvezda RT-2PM Topol by Pawel

1:72 Zvezda RT-2PM Topol by Pawel

1:72 Zvezda RT-2PM Topol by Pawel

So now I'm trying to figure ot the best way to do a pixelated camouflage on this baby... Thanks for looking and have a nice day

Paweł

All comments and critique welcomed. Thanks for your honest opinions!

www.vietnam.net.pl

  • Member since
    March 2007
  • From: Northeast WA State
Posted by armornut on Saturday, November 24, 2018 5:08 PM

   Not sure how to do a pixelsted camo job in 72nd, but I do have a plan for my 35th, Scud TEL from Trumpeter.

     I drew a grid on small card stock paper, darkened in my pattern, now I'm going to take the mesh screen from an old Tamiya kit, overlay it on the card stock, with a sharp knife trim my design. Then I will seal with tape and trim the pattern again essentially creating a template.

    I have several designs that can be turned in many different directions to add a complex overall apperance.

    When I get the internet back for posting pictures I may try to do a WIP on it.

we're modelers it's what we do

  • Member since
    November 2009
  • From: SW Virginia
Posted by Gamera on Monday, November 26, 2018 11:14 AM

Pawel: Looks good, I really like the shading there! 

Good luck with the pixelated camo. I've gotten some work done on a modern Chinese ZTZ-99 MBT that I intend to use graph paper for the digital camo. But she's 1/35th so the squares are about 4mm or so in size. In 1/72nd they'll be so small I'm not sure it would work.   

"I dream in fire but work in clay." -Arthur Machen


JOIN OUR COMMUNITY!

Our community is FREE to join. To participate you must either login or register for an account.

SEARCH FORUMS
FREE NEWSLETTER
By signing up you may also receive reader surveys and occasional special offers. We do not sell, rent or trade our email lists. View our Privacy Policy.