SEARCH FINESCALE.COM

Enter keywords or a search phrase below:

My First Tamiya Tank - Again!

9118 views
105 replies
1 rating 2 rating 3 rating 4 rating 5 rating
  • Member since
    September 2006
  • From: Dripping Springs, TX, USA
Posted by RBaer on Thursday, February 25, 2021 8:17 AM

With the advances in "rubber band" tracks, I'm completely solld on them for most "live" track designs, and am quite satisfied with Dragon and Tasca, even the new Tamiya M4 tracks. I'm old, don't want to take the time to do multi-part Sherman tracks any more, but that's just me. Kudos to you on the Miniart tracks, they sound onerous.

Apprentice rivet counter.

  • Member since
    May 2011
  • From: Honolulu, Hawaii
Posted by Real G on Wednesday, February 24, 2021 12:07 PM

Gamera,

If I were to do another IJA tank, I'd spring fot the Sector 35 preassembled metal tracks.  They might not be as crisp, and their factory workers get CA glue all over the place, but the labor savings is worth it.

As for the M3, as well as M4 and other similar tanks, I would rather suck it in and do plastic tracks, since some have rubber shoes and all are of the "live track" variety with little to no sag.  But I am thinking the glue assembly ones are preferrable over infernal workable types like Miniart's.  I have glue together track sets for my Tamiya M10 and AFV Club M5, which I now consider them to have been the right choice.

“Ya ya ya, unicorn papoi!”

  • Member since
    November 2009
  • From: SW Virginia
Posted by Gamera on Wednesday, February 24, 2021 11:24 AM

Those tracks look good Real G! 

And I know the feeling, the snap together type tracks are pretty idiot-proof (even I can assemble them) those with multiple parts are a royal pain. 

I have a couple of sets of replacement tracks for Type 97s and related tanks like the Type 1 from Vision Models- funny these look like the same thing. Wonder if it's just the same design or the same parts repackaged by Model Kasten? 

"I dream in fire but work in clay." -Arthur Machen


  • Member since
    May 2011
  • From: Honolulu, Hawaii
Posted by Real G on Tuesday, February 23, 2021 11:55 AM

GreySnake,

Yeah, I had to resort to metal files as well.  Not fun at all.  Sad

In contrast, the Modelkasten Type 3 tracks fairly zipped together in about four build sessions.

My only observation is that the center guide teeth sprue connections are best cleaned up after the teeth are attached to the track shoe.  And of course the tiny pins make the assembled track terribly fragile.  Perhaps it is best to glue the links after the proper run and sag are set.

Okay no more excuses, back on to the M3's tracks...

“Ya ya ya, unicorn papoi!”

  • Member since
    February 2011
Posted by GreySnake on Saturday, February 20, 2021 2:46 PM
My set of Miniart tracks had flash on the connectors as well. I just ended up giving each a few light passes with a flat metal file that seemed to have done the trick.
 
 
Those Modelkasten tracks and Type 3 look nice.
  • Member since
    May 2011
  • From: Honolulu, Hawaii
Posted by Real G on Friday, February 19, 2021 11:53 AM

The Miniart track set is turning out to be a pain to assemble.  The sprue stubs all need a lot of clean up, the flash on the end connectors is too heavy to chase away with the edge of a sharp knife, and it's like herding cats to get everything together.  After several hours of work, I only have this to show:

It's not enjoyable at all and is really killing my motivation.  And so like a squirrel with ADHD, I decided to try a Modelkasten set for a Type 3 tank I have in the Shelf of Doom:

By stark contrast, the M-K set went together very easily.  I had started a few links many years ago and got stymied.  But I figured out a system (by following the instructions!) and in just a couple of hours I had almost one run completed.  The scant flash is the wafer kind, so it easily scrapes off, and the sprue attachment points are fewer and smaller than the Miniart parts.  Modelkasten's instructions say you should snap off the track links like when you were a little kid.  It kind of works, but you still need a liitle bit of trimming.  I think I'll finish the Type 3's tracks for a sanity break before going back to the M3.

Here is where the S.O.D. Type 3 is currently at:


“Ya ya ya, unicorn papoi!”

  • Member since
    February 2011
Posted by GreySnake on Saturday, December 5, 2020 7:21 AM

Looking good RG! 

  • Member since
    May 2011
  • From: Honolulu, Hawaii
Posted by Real G on Sunday, November 22, 2020 12:56 PM

I’m pretty sure Tamiya used the Bovington Jagdtiger’s paint job as a reference for their box art.  Well, it was the 1970s, so both can be forgiven.  I guess it might be too much to haul the JT out to the paint shop for a refresh.

While at the Tank Museum we did get to watch an EBR-75 getting driven out of the display area, probably destined for the restoration shop.

As for the M3, I finally assembled the last two Tasca bogies and fixed them in place.  I added some extensions to the drive and idler axles to get them to align with the new wider road wheels.  Funnily, the Tamiya kit tracks actually fit the wider Tasca wheels.

Now the dreaded task of assembling those infernal tracks.  They do look nice though.

Photos to follow once I make headway on the tracks.  Or if I get bored and start painting the tank.  Actually I can do that right now.  A long weekend is approaching so...

“Ya ya ya, unicorn papoi!”

  • Member since
    June 2011
  • From: Detroit
Posted by garylee on Sunday, November 22, 2020 7:48 AM

Real G

I never got the old Tamiya Jagdtiger, but when I visited the Tank Museum in Bovington, I noticed the box art camouflage was based on the museum’s specimen!  Yes, even in 2015 it was STILL painted in a spurrious grey with dark yellow spots!  Too funny.


You have to watch the stuff in museums, they're human, too, and just as prone to mistakes, like the way they had their Porsche turret King Tiger painted with a three color camo scheme until it was pointed out that their tank is a pre-production model with the soft steel Porsche turret and should have been plain dunkelgelb. They have it corrected now, but it was wrong so long and I liked it so much I'm thinking of doing a KT in the original, incorrect paint and marking it as such. Besides, that's the only way I know to get a three color paint job on a Porsche turret KT with no zim. Wink


Are you sure that Jagdtiger was based on the box art? It could have been the other way around, with the box art based on the Bovington JT. It wouldn't be the first time a model company used an incorrect paint scheme based on what they saw in a museum. I guess it depends on which was painted first! 

Detroit, where the weak are killed and eaten. Bwahahaha

  • Member since
    February 2011
Posted by GreySnake on Saturday, November 21, 2020 8:16 AM
Looking good and the KV is rather big.        
  • Member since
    May 2011
  • From: Honolulu, Hawaii
Posted by Real G on Tuesday, November 17, 2020 2:14 AM

Gamera - Modeling has been very slow over here, but I did assemble two more bogies.  Those VVS suspension units are most fiddly - give me torsion bar suspension any day!

The KV is hibernating until I feel like getting the weathering paints out.  But I am like a dog with a squirrel fixation, and am easily distracted.

Greysnake - No more tracks have been made, but since I have been able to get them to work with the Asuka running gear, I should be resuming production.


“Ya ya ya, unicorn papoi!”

  • Member since
    November 2009
  • From: SW Virginia
Posted by Gamera on Monday, November 16, 2020 3:34 PM

Nice!!! The replacement running gear looks good!!

BTW is the KV still in the box? Looking forward to seeing more of her too.

"I dream in fire but work in clay." -Arthur Machen


  • Member since
    February 2011
Posted by GreySnake on Monday, November 16, 2020 11:00 AM

How are the tracks coming along? 

  • Member since
    May 2011
  • From: Honolulu, Hawaii
Posted by Real G on Tuesday, November 10, 2020 10:07 AM

I never got the old Tamiya Jagdtiger, but when I visited the Tank Museum in Bovington, I noticed the box art camouflage was based on the museum’s specimen!  Yes, even in 2015 it was STILL painted in a spurrious grey with dark yellow spots!  Too funny.

“Ya ya ya, unicorn papoi!”

  • Member since
    April 2015
Posted by Mopar Madness on Tuesday, November 10, 2020 9:50 AM

I remember getting this for Christmas in '84.  I also got the "Hunting Tiger". Many carpet battles ensued!

Chad

God, Family, Models...

At the plate: 1/48 Airfix Bf109 & 1/35 Tamiya Famo

On deck: Who knows!

  • Member since
    May 2011
  • From: Honolulu, Hawaii
Posted by Real G on Monday, November 9, 2020 4:26 PM

Wow, where does the time go?  Work continues on the M3 Lee.

I got in a set of running gear from Asuka (formerly Tasca), because Miniart's set was not available from any of my usual sources.

The bogies have sponge rubber inserts above the volute spring assembly, which allows the suspension to function.  But I replaced the sponge with some sheet plastic stacked to make 0.050" thickness, which just about locks the upward travel.  I left the suspension arms free to teeter-totter, as this will help level everything when all the bogies are attached.

The sprocket, of which three types are provided, mesh perfectly with the Miniart tracks.  But the sprocket halves need to be spaced around 0.015" or so to match the track width.

“Ya ya ya, unicorn papoi!”

  • Member since
    February 2011
Posted by GreySnake on Thursday, September 17, 2020 5:30 PM
I always end up having something on YouTube playing in the background while working on something. I’ll find something on an interesting topic such as American tank development and listen to that while sanding out tracks. I’ve tried having video running on tablet while working on something and find it too districting especially when painting so now the screen is always off. 
  • Member since
    May 2011
  • From: Honolulu, Hawaii
Posted by Real G on Thursday, September 17, 2020 1:31 PM

Gamera,

I tried the modeling-while-watching-TV thing, but apparently my brain cannot multi-task.  I am an analog dinosaur in the Digital Premium Coffee Twitter Fail Age.  Yeah, I also HATE cleaning up endless teeny-tiny flash on endless teeny-tiny parts!

One of my co-workers nicknamed me the Japaneesu Dinosaur.  Stick out tongue  So the Japaneesu Dinosaur has been dormant like Gojira for a bit, modeling-wise.  I'll try to wake up and wade back to the 1/35 shore of armor kits to continue my reign of terror.

Gotta make one of those track jigs Greysnake suggested.

“Ya ya ya, unicorn papoi!”

  • Member since
    November 2009
  • From: SW Virginia
Posted by Gamera on Thursday, September 17, 2020 11:59 AM

Guess I'm wierd that I don't mind assembling those tracks. It's the cleaning up of all those tiny-teeny pieces that makes me cuss. I do it now while watching TV or YouTube videos. 

"I dream in fire but work in clay." -Arthur Machen


  • Member since
    May 2011
  • From: Honolulu, Hawaii
Posted by Real G on Tuesday, September 15, 2020 6:53 PM

Great ideas Greysnake!  I will try them.

“Ya ya ya, unicorn papoi!”

  • Member since
    February 2011
Posted by GreySnake on Tuesday, September 15, 2020 6:19 PM
RG, an easy way to make those tracks go faster is to make a jig for them out of some styrene.
 
I made mine just a little wider than the width of the track. Then what I did was just put a row of pads down then teeth and then glued the pads on top.
As for cleaning up the tracks what I was cut forty or so parts off at a time clean them up take a break come back later and do another forty more. I wouldn’t have been able to clean an entire run in one sitting.
  • Member since
    May 2011
  • From: Honolulu, Hawaii
Posted by Real G on Tuesday, September 15, 2020 6:06 PM

Greysnake,

Yeah, but it is a two-edged sword.  The Miniart tracks have little bits of flash all over the place and the assembled track is a little too wide to fit between the kit sprockets.  You are a better man than me, because when I did a test run of 10 segments, it became obvious that I needed four hands to keep the end connectors in place.

So on to some pics:

I figured that by using some tape, the end connectors could be held in position long enough to glue the track pads together.

They are quite loose and twisty, so I will glue them in place once the entire runs are completed.  At least the track pitch appears to match the sprocket teeth.

“Ya ya ya, unicorn papoi!”

  • Member since
    February 2011
Posted by GreySnake on Tuesday, September 15, 2020 4:20 PM
Looking good RG! Those Miniart tracks go together pretty quickly once you get a rhythm down.
  • Member since
    November 2009
  • From: SW Virginia
Posted by Gamera on Friday, September 11, 2020 9:59 AM

Real G: I don't blame you for replacing the tracks. Good call. 

They don't need to deal with a broken track link while being chased by the Giant Murder Hornet... 

"I dream in fire but work in clay." -Arthur Machen


  • Member since
    May 2011
  • From: Honolulu, Hawaii
Posted by Real G on Thursday, September 10, 2020 6:29 PM

Okay I lied.  There, I said it.

I was worried the kit's tight fitting "rubber band" tracks would stretch out later on, so I buckled and ordered a track set:

So here I go again with end pin connector indie link tracks.  I hate them so much I bought a set for my Tamiya M3 Stuart as well!  And I have some for the Tamiya M10 coming from another source.  The Stuart and M10 tracks are correct, but pretty stiff, and a friend said his recently completed M10 suffered disintegrating tacks after he weathered them.  This made me a bit averse to using those allegedly gluable tracks that are common these days.

Yeah, and you know how it is when you order something online - you throw stuff on the barbie just to make shipping worth it.  Embarrassed  That little Messerschmitt fighter was a case of monkey-see-monkey-do.  See what the forum does?  It makes me buy more stuff!  Terrible.  The Be-200 is sweet though.  But I have to wonder about the shallow draft.  On the water, it almost looks like a ditched airliner.  I suppose it is meant to operate on calm water, not open ocean.  Oh, and the FM-2 is not mine.  Honest. Cool

Anyway, tonight I wash the M3 Lee's components and get ready for a final primer check and paint!

“Ya ya ya, unicorn papoi!”

  • Member since
    May 2011
  • From: Honolulu, Hawaii
Posted by Real G on Tuesday, September 1, 2020 1:10 PM

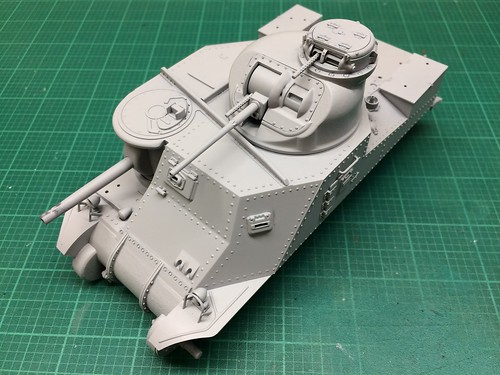
Okay gang, I was able to work a little on the M3.  I got impatient to see how all that putty work looked, so I took the model out this morning and hit it with some Tamiya spray primer.

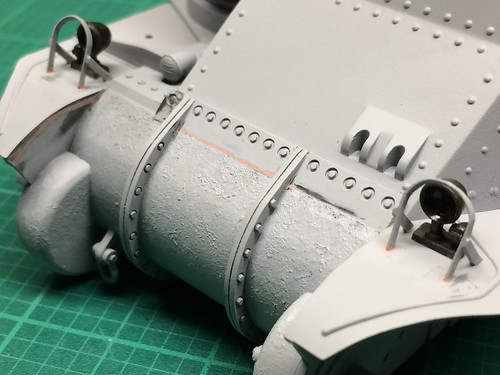
Oops, the transmission casing has a bevel at the bolt strip, where I tried to level it before giving up.  I'll have to erase it and re-texture the area.

The turret side port was faired in.  I'll need to touch it up a bit before moving on.

The M3 Lee's armor was pretty thin, so the overlapping kit panels had to be faired in.  It was messy, but it is done.  Oops, there is a gap at the top of that hook!  Grrrr...

I model at a glacial pace, but the kit is sliding slowly but surely down the hill to completion.

It seems old kit builds are gaining traction on the forum as of late, which is nice.  I am actually enjoying applying modern techniques (plus old ones) to a kit that has been put to pasture.  I think the Tamiya M3 actually looks pretty good.  The fact that it was produced in 1974 is a testament to their tool makers.  The newer 30 Cal replacements blend right in and enhance, not embarass, the model.

“Ya ya ya, unicorn papoi!”

  • Member since
    February 2011
Posted by GreySnake on Friday, August 28, 2020 9:01 PM

Coming along nicely RG! Can't wait to see some OD on it. 

  • Member since
    November 2005
  • From: Formerly Bryan, now Arlington, Texas
Posted by CapnMac82 on Thursday, August 27, 2020 6:57 PM

Well, the Bogart version is superior to the remake, so there is that.

Also, the remake has the Sherman-style TC hatch, which would need you to hack at your finished kit.

Now, off the top of my head, I cannot remember if the Bogart Lulubelle had blanked-off bow machine guns like the remake did.

Keeping the bow guns would explain how they had all the MG used in defense of the well.

From only memory, the Brits welded a plate over on the outside, US welded a plate on the inside.  But, I could have that backwards.  And, as the movie's tank was a loaner from Training Command, it might not have had the port bow slots welded over.

I can't remember if the Bogart Lulubelle was OD or sand, an given it's a B&W mmovie you can claim either.

Your kit, your pick.

  • Member since
    August 2020
  • From: Lakes Entrance, Victoria, Australia.
Posted by Dodgy on Thursday, August 27, 2020 12:28 AM

Looking great G. I built the Tamiya Tiger 1 when it first came out and I thought I was in modelling heaven, having previously only had access to Airfix HO/OO. Ive enjoyed reading this thread a great deal and watching your progress. Sometimes its great to ignore the demands of 'serious' modelling and just have fun. A great build, I look forward to seeing the finished product.

I long to live in a world where chickens can cross the road without having their motives questioned

JOIN OUR COMMUNITY!

Our community is FREE to join. To participate you must either login or register for an account.

SEARCH FORUMS
FREE NEWSLETTER
By signing up you may also receive reader surveys and occasional special offers. We do not sell, rent or trade our email lists. View our Privacy Policy.