SEARCH FINESCALE.COM

Enter keywords or a search phrase below:

Centurion IDF Shot build

8535 views
42 replies
1 rating 2 rating 3 rating 4 rating 5 rating
  • Member since
    November 2009
  • From: SW Virginia
Posted by Gamera on Monday, May 24, 2021 7:51 PM

I love the base Rob, and thanks for walking us though it! 

"I dream in fire but work in clay." -Arthur Machen


  • Member since
    November 2020
Posted by Also known as Rob on Sunday, May 23, 2021 12:53 PM

Thanks Mike.

I first put a layer of fine sand over the area I wanted the dune to be sited. The sand was purchased from a local craft store. I fixed it with watered down PVA glue. In the final view, this appears as the debris at the foot of the front face of the dune.

The pot holes were filled with the craft sand, fixed with watered down PVA.

The sand dune was sculpted from DAS air drying clay. I covered the area it would cover with a layer of thinned PVA glue and then lay a couple of blocks of clay in the general shape, and then sculpted it into shape. It took me a couple of attempts. The key thing I found was to keep my sculpting tools wet. I needed to do that to get a nicely flat top surface. Then I used a small round ended tool to sculpt the linear erosion lines down the front face.

Once I'd got the shape as I wanted it, I left it a couple of days to dry. Then I covered it with Vallejo Desert Sand Acrylic Texture. I laid it smoothly over the back of the dune (again, using a wet scuplting tool was essential), but used a brush in linear strocks down the front face to enhance the erosion lines.

I then knocked that colour back a little with Flory Models SAND weathering wash. I found that by rubbing the back of the dune in a linear direction (perpendicular to the erosion surface) with a dry rag, the wash was removed in a way that left some nice variation in colours and gave what I think is a realistic streaked appearance.

I also applied some Flory Models Light weathering wash, but stuggled to get the effect I wanted so most of that got wiped off or over painted.

I added some more sand after the dune was in place which needed some more glue to fix it. This left a residue. To remove this and return the tarmac to nearer it first colour, I spayed a light coating of black paint over the road surface (after masking the road marking lines). This covered some of the sand at the foot of the dune. So once that was done I hand painted the sand with a variety of sand browns mixed with a little yellow. I then applied some more of the Flory sand weathering wash.

Once everything was dry and I was happy with how it looked, I gave the whole lot a good coating of matt varnish.

  • Member since
    November 2008
  • From: Far Northern CA
Posted by mrmike on Sunday, May 23, 2021 11:04 AM

That looks fantastic! The weathering and the base reflect the attention you've paid to them. What did you use for the "terrain"?

  • Member since
    November 2020
Posted by Also known as Rob on Sunday, May 23, 2021 9:17 AM

After a lot of distractions and a few retries, I think I'm finally happy with my desert road diorama base.

I think it will suit the Centurion well. This isn't quite where I want to put it, but it shows how the tank looks on the base.

 So just the figures to make and paint.

  • Member since
    November 2009
  • From: SW Virginia
Posted by Gamera on Sunday, April 25, 2021 6:29 PM

Rob: The Centurion is coming along very nicely! I never knew that the tank was that much bigger than a Churchill though I suppose I shouldn't be surprised. And love the base, looks great to me! Yes

"I dream in fire but work in clay." -Arthur Machen


  • Member since
    November 2020
Posted by Also known as Rob on Sunday, April 25, 2021 4:03 PM

A little more work done this weekend.

I sealed the tank with a matt varnish. I usually use satin varnish for the top coat, but I'm hoping the matt will give a dry look.

So time to start work on the base. I cut a piece off an old shelf that I had free.

Cutting the base from wood offcut

I then took a sheet of cork and ripped a couple of holes and a tear in it. Then marked the placement of the holes on the wooden base. I then chiselled out holes in the base to line up with the cork sheet. Then the cork sheet was glued to the wood base with wood glue.

Cork sheet glued to base

Once the glue had dried, I applied a coat of AK Terrains Asphalt to the cork. The first coat gave good coverage but I struggled to get a flat surfice. The asphalt kept sticking to whatever I tried to smooth it with. In the end the best I could get was using a damp cloth and then tapping it down with my fingers, but I wasn't happy with the result.

So yesterday I applied another coat. I'd watched a couple of videos on using the asphalt, and realised I needed to use water with the sculpting tools I was using. With the tools dipped in water each time they were used, I was able to get the flat surface I was after.

This morning I masked off some line marking and painted those in.

Masking road markings

That's it for this weekend. The next job will be to add some sand!

For now I'll have to amuse myself deciding on the exact placement of the tank on the base


  • Member since
    November 2020
Posted by Also known as Rob on Saturday, April 17, 2021 3:31 AM

Hutch6390

Lovely job, mate - I really like that weatheringSmile

Thank you

  • Member since
    May 2020
  • From: North East of England
Posted by Hutch6390 on Friday, April 16, 2021 2:29 PM

Lovely job, mate - I really like that weatheringSmile

Vell, Zaphod's just zis guy, you know?


TakkaTakkaTakkaTakkaTakkaTakka


  • Member since
    November 2020
Posted by Also known as Rob on Friday, April 16, 2021 11:37 AM

Thank you Gamera Smile

The side skirts and turret are done now. I needed to give the whole thing one last look over, then a couple of coats of varnish. After that I need to start building the diorama!

Here's a quick snap of the Centrurion with a couple of my earlier lockdown models.

  • Member since
    November 2009
  • From: SW Virginia
Posted by Gamera on Thursday, April 15, 2021 11:43 AM

I love that! Looks fantastic!!! Heart

"I dream in fire but work in clay." -Arthur Machen


  • Member since
    November 2020
Posted by Also known as Rob on Sunday, April 11, 2021 2:08 PM

I've now had a few days free to apply some weathering. I decided to weather the hull first so that the wheels could be weathered before the skirts went on. In hindsight, I probably should have kept it to just the wheels and running gear, but I got carried away and did the whole hull.

I used Flory Models washes for the first time and I like them a lot. I like treatments where you apply a covering and then removed it until you have the desired result. It makes it a lot easier to avoid over doing it.
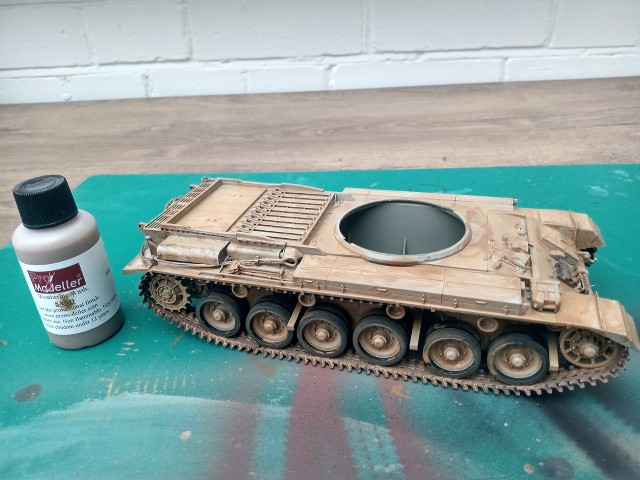
Tank and Flory Models wash

As you can see from the above picture, the initial application looks like too much.

The next step is to remove the wash with a damp cloth or cotton bud. With the result that the weathering is toned down a lot.
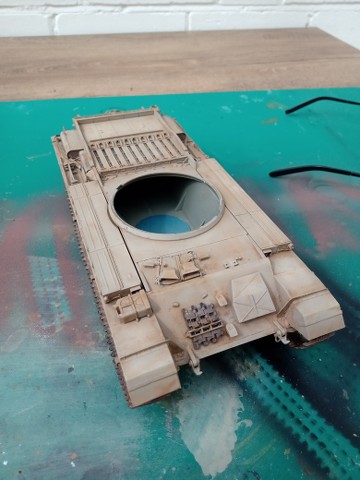
I really like the grubby effect that resulted.

I think I made a mistake applying white wash on it's own.
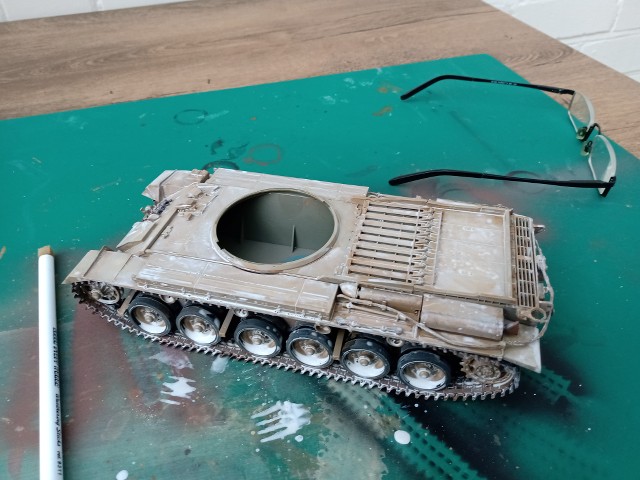
Although rubbing it back made it a more suble effect to me it looked a little unnatural. So I removed almost all of it. After the one application I used it in combination with the sand wash to get lighter brown washes, and that worked well. 

Once I was happy with the wash effect, I applied Vallejo Desert Sand Earth Texture to the wheels and running gear. To blend in the colour a little, I then reapplied some wash over the sand.
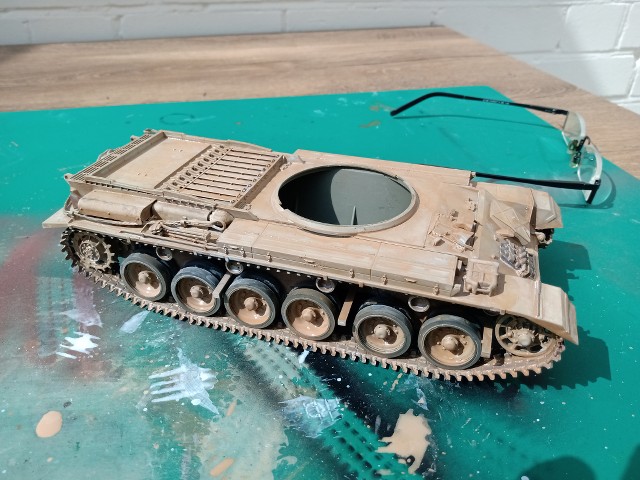
The image below shows how the weathered hull compared to the still unweathered turret
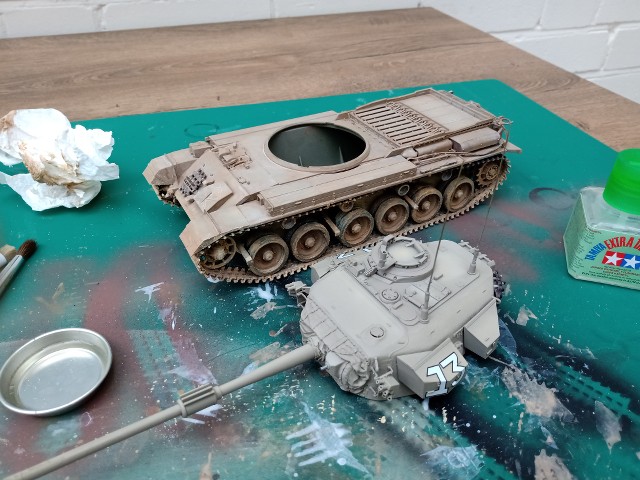
The next step was to glue the side skirts to the hull.
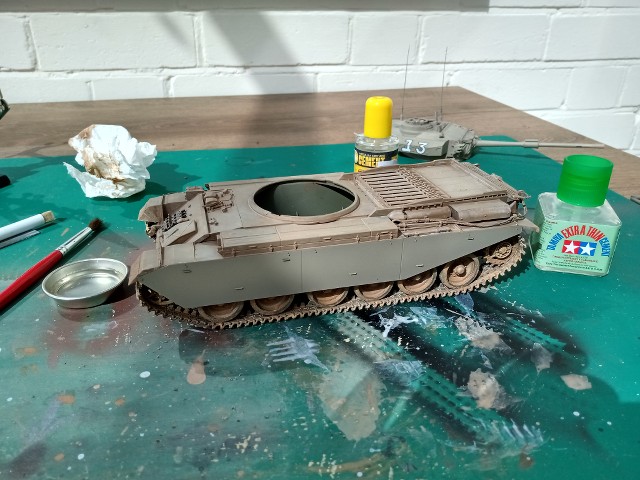
There was a little touching up to do (around the edges of the skirt mainly) and the end of the gun need to be black.
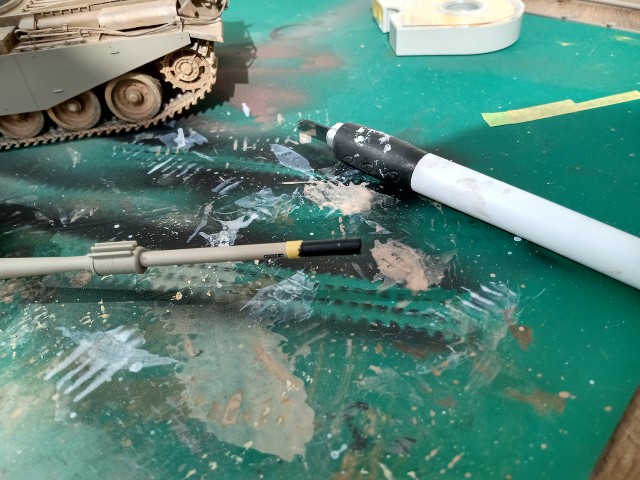
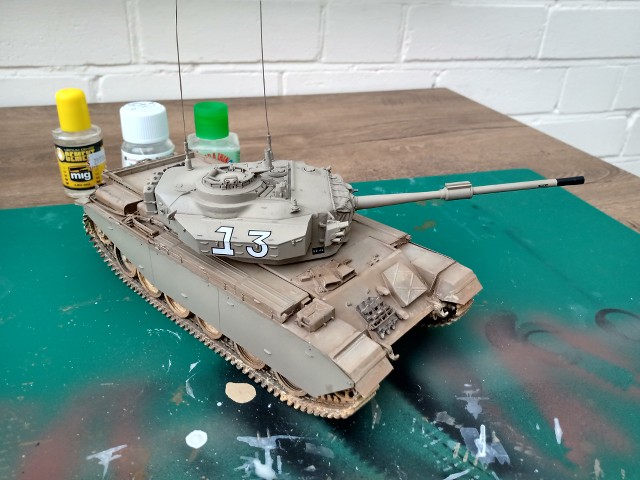
With that done, it leaves the weathering of turret and side skirts to do.
  • Member since
    November 2020
Posted by Also known as Rob on Thursday, April 1, 2021 2:30 PM

Gamera

Somehow I missed your last couple of posts. Nice work, I really like the look of the faded paint of the upper surfaces. 

Thank you. Having a decent airbrush now, is make doing things like that a lot easier.

  • Member since
    November 2009
  • From: SW Virginia
Posted by Gamera on Thursday, April 1, 2021 8:49 AM

Somehow I missed your last couple of posts. Nice work, I really like the look of the faded paint of the upper surfaces. 

"I dream in fire but work in clay." -Arthur Machen


  • Member since
    November 2020
Posted by Also known as Rob on Wednesday, March 31, 2021 4:12 AM

Thanks Tanker-Builder for the great feedback.

Tanker-Builder

I know this is going to be way late. When I stretch sprue for Antennaes I do still drill a little teensy hole in the base to put it. It seems to work better as far as unbreakability is concerned.

 
That's good advice, but the antennaes on this kit are on the top of a spike base with a very small diameter top - barely wider than the sprue antenna. To fit a wire antenna, I was going to cut the spike back to a section where it thickens to about twice the diameter. The main reason I didn't do that was to avoid having to do that cut back.
 
At the moment, the antennaes seem to be surviving well. However, I'll see how they survive over the next couple of weeks, and may have to fall back to the trim back, drill and insert option.
  • Member since
    November 2020
Posted by Also known as Rob on Wednesday, March 31, 2021 4:05 AM

Tanker-Builder
Welcome to the Hand Burners club!

Thank you. I will wear my membership badge/pin with pride.

  • Member since
    October 2019
  • From: New Braunfels, Texas
Posted by Tanker-Builder on Tuesday, March 30, 2021 4:21 PM

Hi Rob;

        I know this is going to be way late. When I stretch sprue for Antennaes I do still drill a little teensy hole in the base to put it. It seems to work better as far as unbreakability is concerned.

  • Member since
    October 2019
  • From: New Braunfels, Texas
Posted by Tanker-Builder on Tuesday, March 30, 2021 4:17 PM

A.K.A.R.;

          Aha a new set of letters to remember; Hey Rob, Just kidding. Now that you burned yerself ! Welcome to the Hand Burners club! I believe we number in the hundreds of thousands, although our parents and grandparent thought they taught us better!

   You are doing and outstanding job. I can't wait for the weathering!

  • Member since
    October 2019
  • From: New Braunfels, Texas
Posted by Tanker-Builder on Tuesday, March 30, 2021 4:12 PM

Oh Gosh;

     Don't tell me please? You Didn't glue that beautiful gun to your fingers did you? Nice work so far.

  • Member since
    November 2020
Posted by Also known as Rob on Tuesday, March 30, 2021 2:21 PM

Small update. I added the main colours to the Centurion at the weekend. So I think I'm ready to start weathering. Hopefully that will keep me occupied over the Easter weekend.

Centurion in sand grey

Centurion in sand grey just completed

  • Member since
    November 2020
Posted by Also known as Rob on Sunday, March 21, 2021 5:48 PM

Tanker-Builder

Rob;

     The last thing you want to wish for is Heat, Cut, or Glue resistant fingers. Because of injuries sustained in my accident three and a half years ago, we've discovered I have no feeling in my Finger pads or Palms at all. Not thinking I grabbed a piece of chicken off the stove that hadn't had time to cool. three burn't fingers later we figured it out.

     I can feel a little heat on some of the sides, not many mind you. My right index finger seems to attract Knife blades. I broke an X-Acto blade this Morning. I wondered what caught on my shirt. The part of the blade that broke off was buried in the finger. I had to dig it out and C.A. it to stop the bleeding. All is well now.

    I Think? Now, how did I glue that engine to my left hand? And it's C.A. glued, too!


I'm not the only one who manages to glue things to themself then Big Smile

I've also discovered how good CA glue is for closing cuts. Modelling gives you the blades to make the cuts, and the glue to fix them.

Burning my fingers on this build was a new one for me.

Great to hear your still able to make models after your accident. It's such an enjoyable hobby - inspite of the hazards.

  • Member since
    October 2019
  • From: New Braunfels, Texas
Posted by Tanker-Builder on Sunday, March 21, 2021 5:43 PM

Rob;

     The last thing you want to wish for is Heat, Cut, or Glue resistant fingers. Because of injuries sustained in my accident three and a half years ago, we've discovered I have no feeling in my Finger pads or Palms at all. Not thinking I grabbed a piece of chicken off the stove that hadn't had time to cool. three burn't fingers later we figured it out.

     I can feel a little heat on some of the sides, not many mind you. My right index finger seems to attract Knife blades. I broke an X-Acto blade this Morning. I wondered what caught on my shirt. The part of the blade that broke off was buried in the finger. I had to dig it out and C.A. it to stop the bleeding. All is well now.

    I Think? Now, how did I glue that engine to my left hand? And it's C.A. glued, too!

  • Member since
    November 2020
Posted by Also known as Rob on Sunday, March 21, 2021 4:10 PM

Hutch6390

That's really looking the business, Rob.  I, too, need to rediscover the art of sprue-stretching for AFV antennae, and that's a good tip with the picture wire - it looks better than the rigging line I used on my Matilda (decent cabley texture, but too thin). 

Very nice job, I'm looking forward to the paint.


Thanks Hutch.

  • Member since
    November 2020
Posted by Also known as Rob on Sunday, March 21, 2021 4:08 PM

This afternoon, I started work on the painting scheme. I had a couple of options with painting so though I'd try some test painting. As I've just bought a new airbrush, doing some test painting would also give me more practice with the new airbush.

I have four primers to try: IDF Sand Grey Primer, White, Grey and Black.

Four primers

I then had a couple of Vallejo IDF sand greys and a pair from Lifecolor for the main colours.

So blocks of primer with the four main colours as horizontal stripes with the Vallejo paints at the top.

The most obvious conclusion was that black primer wasn't going to work. As I like the idea of minimising the paint applied, I decided to go for the IDF sand grey primer. I think I also do a little highlighting with white primer.

Of the main colours I thought the Lifecolor paints worked best together so will go for those two.

So I had time for some priming and got a good covering of the sand grey primer on. It nicely evened up the mixed colours present on the model from the build process (bare plastic, brass and Mr Surfacer). That was most obvious for the turret.

Turret pre-painting

Turret primed

Once both the hull and turret were primed in Sand Grey, I then used a highly thinned white primer to add some highlighting. I'll be interested to see if that helps in giving a little variation to the main coats.

That's it for another weekend.

  • Member since
    May 2020
  • From: North East of England
Posted by Hutch6390 on Sunday, March 21, 2021 3:58 PM

That's really looking the business, Rob.  I, too, need to rediscover the art of sprue-stretching for AFV antennae, and that's a good tip with the picture wire - it looks better than the rigging line I used on my Matilda (decent cabley texture, but too thin). 

Very nice job, I'm looking forward to the paint.

Vell, Zaphod's just zis guy, you know?


TakkaTakkaTakkaTakkaTakkaTakka


  • Member since
    November 2020
Posted by Also known as Rob on Sunday, March 21, 2021 3:37 PM

This weekend I finally completed the main build.

It's been a long time since I melted sprues to make aerials.

Melting sprues

So, I was pleases with how they came out. I'll have to see how long they last as they are butt jointed onto the mounts, and I've found them very fragile in the past.

The final parts to fix on where two cables around the back - and the bracket that holds them in place. The kit supplies string for the purpose but I failed dismally to get the ends to fit into the holes in the end loops. They kept fraying just enough to stop them going in. So hunting around my bits box I found some multi-thread brass picture hanging wire that was just the right size.

Picture hanging wire

This when twisted stayed in place and went relatively easily into the holes, and could be fixed with CA.

Twisting wire

Great I thought. I then went to fit them, and realised they were too short. And being CA fixed they didn't come apart too well. Fortunately there were a spare set of ends. So third time luck. The wire doesn't sag the way the string would, but could be bent to shape. I'm reasonably pleased with the results.

Wire cables in place

And with that the build is complete!

  • Member since
    February 2011
Posted by GreySnake on Saturday, March 13, 2021 5:11 PM

Looking great! 

  • Member since
    November 2020
Posted by Also known as Rob on Thursday, March 11, 2021 9:38 AM

mrmile - it's a very nice model that I'm sure you'll enjoy building. I could just do with smaller fingers ... and if they could be heat resistent and PE replenant too I'd be laughing.

gamera - thank you. I hope they look as good when they're painted.

  • Member since
    November 2009
  • From: SW Virginia
Posted by Gamera on Thursday, March 11, 2021 9:03 AM

That looks friggin' good!!! The smoke dischargers look pretty darn great. Glad to see how well they came out. 

"I dream in fire but work in clay." -Arthur Machen


  • Member since
    November 2008
  • From: Far Northern CA
Posted by mrmike on Wednesday, March 10, 2021 1:18 PM

Following along with interest. I have the Shot Kal version in the stash, and will enjoy having your WIP for reference - keep up the good work! 

JOIN OUR COMMUNITY!

Our community is FREE to join. To participate you must either login or register for an account.

SEARCH FORUMS
FREE NEWSLETTER
By signing up you may also receive reader surveys and occasional special offers. We do not sell, rent or trade our email lists. View our Privacy Policy.