SEARCH FINESCALE.COM

Enter keywords or a search phrase below:

Meng M2A3 Bradley w Busk III and Full Interior: State-to-Finish Build

28372 views
115 replies
1 rating 2 rating 3 rating 4 rating 5 rating
  • Member since
    March 2012
  • From: Louisville, KY
Posted by Builder 2010 on Thursday, June 17, 2021 10:54 AM

Thank you! I need to post this on the Kit thread also.

  • Member since
    December 2002
  • From: Valrico, FL
Posted by HeavyArty on Thursday, June 17, 2021 7:28 AM
Looks even better. Great job.

Gino P. Quintiliani - Field Artillery - The KING of BATTLE!!!

Check out my Gallery: https://app.photobucket.com/u/HeavyArty

"People sleep peaceably in their beds at night only because rough men stand ready to do violence on their behalf." -- George Orwell

  • Member since
    March 2012
  • From: Louisville, KY
Posted by Builder 2010 on Wednesday, June 16, 2021 5:35 PM

Took Gino's advice (always do) and got rid of the "sloutcher" and the "Thumbs Up" guy. I posed the rest in reasonable positions, especially since they may have engine trouble and the guy on the sponson is talking to HQ about it. I'm declaring this baby DONE! 

Another view:

And still another:

And the back:

I'm pleased with how it turned out.

Meanwhile, the work on the bourbon rick house continues apace. I'm getting technical support from Buzick Construction. They are the prime contractors in building all the whiskey aging warehouses in Kentucky (and probably elsewhere). They were impressed how I back-engineered the construction from some photographs. I'm getting ready to add the partial second level.

As a memory jogger, here's what I'm building. It's a rick house under construction showing all the timber that used in building one of these things.

And here's where I am now. Lots of pieces. I'm making good use of my mini-power-miter-saw from MicroMark.

It's going to sit across the street from my Victorian-era distillery. The model was sized to fit this site and it's tight.

The next plastic scale model is going to be the Kitty Hawk Sikorsky SH-60b. I've got another thread started on this forum already so stay tuned.

Thanks to all the readers who contributed to this build. Gino has so much first-hand information and it was terrific input when doing the build.


  • Member since
    November 2005
  • From: Formerly Bryan, now Arlington, Texas
Posted by CapnMac82 on Wednesday, June 16, 2021 3:38 PM

HeavyArty
You could also lose the guy sitting on the era blocks as he looks out of place to me.

Ditto.  That looks a convoluted place to sit, so a person would have to have a good reason to perch there.

Do they still have that "thing" where if you dismounted you were to K-Pot? (Clearly an idea by somebody who is committed to the notion that all rocks ought be whitewashed.)

Now, if they are parked at the Motor Pool, wouldn't they be in soft covers?  Shouldn't there be some 91M in overalls in this setting?  Or a 63H?

Just thinking out loud here, with no critism of the build.

  • Member since
    December 2002
  • From: Valrico, FL
Posted by HeavyArty on Wednesday, June 16, 2021 9:42 AM
The figures came out looking pretty good and they add life and scale to the model. Nice job. It would be no big deal to remove the squatting, thumbs up guy. You could also lose the guy sitting on the era blocks as he looks out of place to me. The standard crew for a Bradley is only 3. The rest of the guys are the Infantry in the back w/regular helmets and gear as opposed to the CVC helmets, uniforms and gear worn by the Bradley crewmen.

Gino P. Quintiliani - Field Artillery - The KING of BATTLE!!!

Check out my Gallery: https://app.photobucket.com/u/HeavyArty

"People sleep peaceably in their beds at night only because rough men stand ready to do violence on their behalf." -- George Orwell

  • Member since
    March 2012
  • From: Louisville, KY
Posted by Builder 2010 on Wednesday, June 16, 2021 9:14 AM

Just blew a half hour. I accidentally hit the closing "X" on the browser tab and blew away today's work. So I'll do it again.

I got the crew painted over a number of sessions. I made a test of the camo painting scheme. The colors are darker than I would have wanted.

I made the splotches smaller and painted the remainder. It's a grey green/dark green/beige scheme done in the digital pattern, which I didn't replicate very well.

I did a lot of painting and back painting to get the trim lines as tight as I could especially in the goggles and their straps, the khaki faces covers, etc. My Archer Fine Transfer Human Iris decals came yesterday and I tried them out on the two figures that had exposed eyes. They are almost microscopic being not much larger than a period at the end of a sentence.

They're decals, but have no carrier film. You wet the iris and when slides, place it in the eye socket on a freshly applied coating of clear. The clear glues the iris in place. I used the smallest brush tip I had to pick and place it. It was not easy.

This was the best rendition of the two characters that got their eyes. The spots ARE smaller than I could do with a brush or toothpick so they work in that regard. They'd be easier to use in a larger scale since they'll work with 1:32 and 1:24.

To tone down the camo I put of a wash of light gray after sealing the paint with Testor's Dullcoat lacquer. I used a light touch with the Dullcoat since it too can dissolve the Tamiya paint and smear the camo design. I also replaced the kit's plastic mic stems with 0.010" brass wire with a little rounded end made with Bondic UV resin. The brass is a more scale appearance. I was careful in drilling the 0.010" holes and didn't break the carbide bit (for a change).

I placed te crew around the vehicle and took some shots. I may lose one of them... the guy who's knees are bent and he has his hand in the "thumb's up" position. He doesn't look right. Otherwise, the crew's done and I'll permanently place them and the tank. 

The guy I'm questioning is the fellow at the left of the fella looking at the engine.

Once everything is glued down, I'm declaring this baby FINISHED!

  • Member since
    March 2012
  • From: Louisville, KY
Posted by Builder 2010 on Thursday, June 10, 2021 10:15 AM

I will do that! Nothing much to show today. Just painted the first flesh coat on the small areas of exposed skin. Used a mixture of Vallejo Dark Flesh and White. I'm waiting for my Archer Fine Transfer "Eye Decals" to arrive.

  • Member since
    December 2002
  • From: Valrico, FL
Posted by HeavyArty on Wednesday, June 9, 2021 8:30 PM

The goggles are not really that reflective.  They don't really have a chrome shine base.  The color is a dark green that looks almost black.  I replicate them like I do older (non-anti laser coated red) optics.  First I put down a coat of black, then a couple coats of clear green, then a couple coats of clear gloss.  They look like dark, glossy green when done.

Gino P. Quintiliani - Field Artillery - The KING of BATTLE!!!

Check out my Gallery: https://app.photobucket.com/u/HeavyArty

"People sleep peaceably in their beds at night only because rough men stand ready to do violence on their behalf." -- George Orwell

  • Member since
    March 2012
  • From: Louisville, KY
Posted by Builder 2010 on Wednesday, June 9, 2021 4:59 PM

A little more details today: radio gear, commander's holster and weapon, headsets and touchup.

What should I do about the goggles? I'd like to lay down some Bare Metal Foil first and then Tamiya Clear Orange or Green. But there's the rub. How do I put the foil on such a small space? I've tried using Molotow Chrome Pen, but the Tamiya color dissolves it and destroys the reflectivity. I've tried sealing the chrome, but the clear coat damages it also. What do you guys do?

I've got the colors to do the digital camo on the Nomex. I'm thinking about what brush to use to apply it.

  • Member since
    March 2012
  • From: Louisville, KY
Posted by Builder 2010 on Monday, June 7, 2021 5:49 PM

Each day I do a little bit more on the crew. I'm multi-tasking, building the bourbon rick house at the same time. I'm letting each added paint area fully dry before touching the crew to add more. As I've noted before, I tend to rush things like paint drying and glue curing which leads to any of my routine screwups. After I get the first layer of colors in place I'll coat it with Dullcoat to seal the paint so I can go back and add more layers. Unlike some of the other acrylic colors which, when cured, don't re-dissolve in water, Tamiya, IPA-based, paints, will re-dissolve with additional coats, and needs to be sealed.

I got the khaki face coverings and commander's jacket done today. Three out of the five crew have the cloth face coverings for desert service. There's only a bit of flesh and eyes showing. Archer Fine Transfers has eye irises for this scale that look like a great way to render eyes. In 1:35, the eyes are defined enough to be seen and small enough to really screw them up. I just ordered them since I have no luck painting realistic eyes.

  • Member since
    March 2012
  • From: Louisville, KY
Posted by Builder 2010 on Wednesday, June 2, 2021 5:26 PM

Started painting the crew. The majority of their clothing appears to be digital camo Nomex and flak jackets. Only what appears to be the commander has a khaki jacket on top. I'm going to overcoat with Dullcoat to seal the first color so I can pick out the next two colors for the camo pattern.

  • Member since
    March 2012
  • From: Louisville, KY
Posted by Builder 2010 on Saturday, May 29, 2021 11:19 AM

Hey guys, I'm back. We took our first road trip since the Plague began back East to visit freinds and family at the old homestead. It's a pleasure being fully vaccinated and not having to worry about human contact.

I finished assembling the crew yesterday and they're ready for paint. I'll take Gino's advice and not try and fit them in the hatches.

The fellow with his arms up is in the perfect position to be leaning into the open engine compartment. Painting will commence on Monday.

I'm writing this post on a brand new MacBook Pro (MBP) 16" with 1TB SSD and 4 GB of video RAM. The reason for the switch from my 2014 model is this. 

My old MBP was swelling and could potentially explode and/or catch fire, and I don't think that's a good thing. Apparently, old Macs don't go softly into the night, but behave more like a star going through its death throes. When the computer is swelling you are advised to STOP USING IT AND DISCONNECT IT FROM POWER. In order to ensure that I could capture all my data, an expedited new computer buy was in order.

I ordered the new Mac online and got it in two days. Transferring over 800,000 files, fairly automated Mac to Mac, was complicated by the new computer not having the latest OS Big Sur operating system like my old one. After two failures trying to upgrade the new one to Big Sur from Catalina, I first needed to update its older version of Catalina to the latest AND THEN upgrade to Big Sur. This took several hours. The two laptops could then find each other on WiFi and begin transferring files using the Migration Assistant app.

After getting the files transferred, neither SketchUp nor my VM Fusion Windows emulator (and CorelDraw) were working. SketchUp crashed on start up and Fusion couldn't find the Windows' files. Also, none of my screen configurations, file lists were showing. This was 12:10 a.m. and I was tapped out.

I woke the next day not happy, thinking I was going to have to spending hours on the phone with various software companies. When I started the new one, I was greeted with a dialog box requesting that I update my iCloud registration. I thought I had done that the night before, but did it again. And then... POOF... everything was now exactly like my old one, AND all the special programs ran perfectly and faster than the old one. SUCCESS and without any tech support. I'm the MAN!

The first symptom of computer swelling was the degrading of track pad performance. I was finding clicking getting harder and it was being restricted to the bottom left corner. The other thing was general slowing down of programs. I suspect that the swollen battery was pushing on things and probably causing overheating. We actually positively i.d.'d the problem when the lid could no longer lay flat.

This is the curvature of the keyboard showing how much pressure was being applied below. It can be worse than this. Apple had a battery recall for models made between 2015 and 17. Mine was too old. You know it's a problem when you got through Apple's checklist to value a trade in and get to the question, "Is the computer swelling". After answering "yes" you're told that they will help recycle it. They know... they know!

I've used the analogy of a brain tumor, but my wife says I should find a less awful example. My battery life was waning and was about an hour near the end. MBP owners: If you want to keep the machine for a long time, get the battery replaced by Apple after about four years. 

  • Member since
    December 2002
  • From: Valrico, FL
Posted by HeavyArty on Thursday, May 13, 2021 9:13 AM

That figure set is perfect for it.  The figures are not really designed with one figure as the commander or driver, etc.  Their gear and uniforms are pretty generic and similar, as modern AFV crewmen are, so they are good.  Personally, I would not put them in the hatches though since they will obscure viewing the interior details.  It may be better to have them milling around outside the vehicle.

Gino P. Quintiliani - Field Artillery - The KING of BATTLE!!!

Check out my Gallery: https://app.photobucket.com/u/HeavyArty

"People sleep peaceably in their beds at night only because rough men stand ready to do violence on their behalf." -- George Orwell

  • Member since
    March 2012
  • From: Louisville, KY
Posted by Builder 2010 on Wednesday, May 12, 2021 6:45 PM

Thanks Gino, 

Started assembling the crew today. I'm working this project concurrently with the rick house. As one is drying/printing/etc., I'm building the other.

Got three assembled today. It's kind of hard to figure out who's the commander, etc., so I'm winging it based on how they positioned going together. When they're all assembled I'll paint them.

  • Member since
    December 2002
  • From: Valrico, FL
Posted by HeavyArty on Tuesday, May 11, 2021 7:17 AM

The base came out nicely.  Looks great.  The figures will add some life to it.

Gino P. Quintiliani - Field Artillery - The KING of BATTLE!!!

Check out my Gallery: https://app.photobucket.com/u/HeavyArty

"People sleep peaceably in their beds at night only because rough men stand ready to do violence on their behalf." -- George Orwell

  • Member since
    March 2012
  • From: Louisville, KY
Posted by Builder 2010 on Monday, May 10, 2021 6:24 PM

I finished up the base, although it probably needs more weathering. I took more pictures with my iPhone 12 Pro. It tends to add a lot more orange than my eye sees and I've had to doctor them up a lot. The LED lighting I'm using is very warm. Even setting the camera to "Vivid Cool" doesn't bleach the orange enough. I picked up some MiniArt modern US Tank crew figures which I will also add to this little vignette. Meng asked me for a pic of the finished model and they thought it looked good. They also suggested I put it on their Facebook page where they hold monthly contests. I'm doing that tonight.

So here's a series of the latest pictures. I bought a couple of those AK Interactive Weathering Pencils. I used them a little and made the tank tread marks with the "Rubber-colored" pencil. I used Tamiya Black Accent for the expansion joints cleaned with a Q-tip dampened with low-order mineral spirits.

When I get the crew done, I'll post some more images.

  • Member since
    March 2012
  • From: Louisville, KY
Posted by Builder 2010 on Friday, May 7, 2021 5:51 PM

I painted the raw earth a dark yellow, the placed some strategic rock, followed by beige colored groud cover. I saturated the ground cover with IPA and then then dripped Woodland Scenics Scenery Cement to hold everything in place. It's in the process of drying when I took this picture.

On Monday, when it's fully dry, I'll start weathering the concrete pad.

  • Member since
    March 2012
  • From: Louisville, KY
Posted by Builder 2010 on Wednesday, May 5, 2021 5:37 PM

I sealed the pine based and then coated both it and the underside of the appliqué with MicroMark Pressure Sensitive Adhesive and, when it flashed off, stuck the two together and rolled it out with a small roller. I masked the painted wood edge. I then mixed a batch of "concrete" using various Tamiya colors including, Buff, Gray and white, and airbrushed the surface.

It's hard to see in this lighting the expansion joints, but they did come out pretty well... subtle, but really there.

I reversed the mask at the pad's end, mixed up some Scupley Fiber-filled Plaster and built up some limited terrain at that end. In this shot you can see the joints better.

When it's cured either tomorrow or Friday, I will apply some spackle to smooth the contours, paint it and then add some ground cover. This is be a deserty looking small plot of ground. I had sealed the airbrushed paint with some Grumbacher Final Fixativ and will do some weathering, oil staining, and tread marks. I will also get the expansions joints to stand out a bit more.

  • Member since
    March 2012
  • From: Louisville, KY
Posted by Builder 2010 on Tuesday, May 4, 2021 5:56 PM

Little got done today, but started on the actual base surface. I realized that instead of "cutting" the expansion grooves in the "concrete" surface, being that I'm using a paper product, I chose to emboss them in using a dental tool upside down so it didn't cut. Cutting would raise the edges that wouldn't work. Embossng didn't do that and wil look very real when properly colored. The Bristol Board's texture works for me in this situation as well. Styrene would have been too smooth.

I then coated both sides with sanding sealer. The front side so it would hold paint without absorption and the backside so the pressure sensitive adhesive wouldn't absorb there. Also, the sealer is water-based and was causing the piece to curl. Doing both sides balanced that out.

Tomorrow I will be gluing it down to the base and starting to color it.

  • Member since
    November 2020
  • From: Brunswick, Ohio
Posted by Buckeye2 on Tuesday, May 4, 2021 9:15 AM

Fantastic work there!

Mike


  • Member since
    March 2012
  • From: Louisville, KY
Posted by Builder 2010 on Monday, May 3, 2021 5:32 PM

Work on the base has begun in earnest. I painted the edges with an off-white craft paint. The display surface gets glued on the flat part of the base so I didn't need to paint any of that.

I'm going to attempt to use Bristol Board as the base material. If it doesn't work, I will use something else. I'm going to make it as a concrete pad with expansion strips every 10 scale ft (3.42" at 1:35). I used the paint template that came with the Meng model to paint the tread pads to trace tread marks on the base... this is not the final version, but was done for layout purposes. I thought to have the tracks curving into the parking slot, with the outer track scribing a curve and the inner track skid steering in place. But the results are not going to work. The tank wouldn't make that turn. 

Instead, I'm making the track marks going straight in.

Here's another view.

I will have rough dirt/sand on the other side of the straight line in front of the vehicle. I may put a short piece of chain link fencing at that spot to frame it in. 

No one noticed, including me, that the right door of the gunner's optical system had fallen off. I took all the Friday pictures with that door missing. I noticed it today and the had to find it. I thought I knocked it off today since I was "sure" that it was there before. Then I checked all the previous images it was missing! I ended up sweeping the floor around my work station and DID find it and reinstalled with a small quantity of Gel CA and accelerator. Dodged a bullet since I was afraid that I might have tossed it out with the rest of the mess in my Friday clean up.

  • Member since
    March 2012
  • From: Louisville, KY
Posted by Builder 2010 on Sunday, May 2, 2021 11:16 AM

This is what a rick house without its skin will look like.

 Here's the link to the SH-60b post. Keep checking it in about a month. I will announce when work starts on it. I picked up the Eduard Masks for it last Thursday.

http://cs.finescale.com/fsm/modeling_subjects/f/16/p/187540/2148571.aspx#2148571

  • Member since
    March 2012
  • From: Louisville, KY
Posted by Builder 2010 on Sunday, May 2, 2021 11:14 AM
You're welcome! Next up after my next railroad project will be the 1:35 Kitty Hawk SH-60b Seahawk helicopter. I've already started a thread on that here on FSM Forums. Before I do it I'm building a rick house (bourbon warehouse) under-construction for the railroad. It will be a gigantic puzzle of scale-sized timber, but will have no painting, just a lot of gluing. Should have it done in a month or so.
  • Member since
    October 2007
  • From: Louisville, KY
Posted by pordoi on Sunday, May 2, 2021 7:35 AM

Thanks for the detailed write up and all of the photos.  Very nice build and worth all of the frustrations and snags that you worked through.  Look forward to seeing it on the base.  Also very much appreciated Gino's input along the way.

  • Member since
    March 2012
  • From: Louisville, KY
Posted by Builder 2010 on Friday, April 30, 2021 10:13 PM

I knew you'd have the answer! That's why I asked.

Whenever I write one of these threads, there's always a person who's an expert or has vast experience. When I did the 1:32 TBM Avenger on this forum, one of the commentors was the owner of a real one and it was in the middle of restoration. He posted pictures unavailable from any other source. Really helped on the build and understanding... just like you.

Have a great Derby Weekend.

  • Member since
    December 2002
  • From: Valrico, FL
Posted by HeavyArty on Friday, April 30, 2021 9:35 PM

It looks like it came out nicely.  Good job.


Builder 2010
the vertical thingamabob left of the driver's hatch (Gino, what is that?)


It is an anti-foul bar for the wires coming from the TOW missile when fired.  TOW is wire-guided and trails them behind it.  The wires would occasionally get tangled on the drivers' hatch and break, causing the missile to fail and go into the ground.  The anti-foul bars (both sides of the hatch) keep the wires from tangling and breaking.  An easy solution.

Gino P. Quintiliani - Field Artillery - The KING of BATTLE!!!

Check out my Gallery: https://app.photobucket.com/u/HeavyArty

"People sleep peaceably in their beds at night only because rough men stand ready to do violence on their behalf." -- George Orwell

  • Member since
    March 2012
  • From: Louisville, KY
Posted by Builder 2010 on Friday, April 30, 2021 6:21 PM

Today was the end game for the Bradley itself. I still have to create the display base. A lot of odds and ends and a couple of heart stoppers, and some not-so-acute concerns.

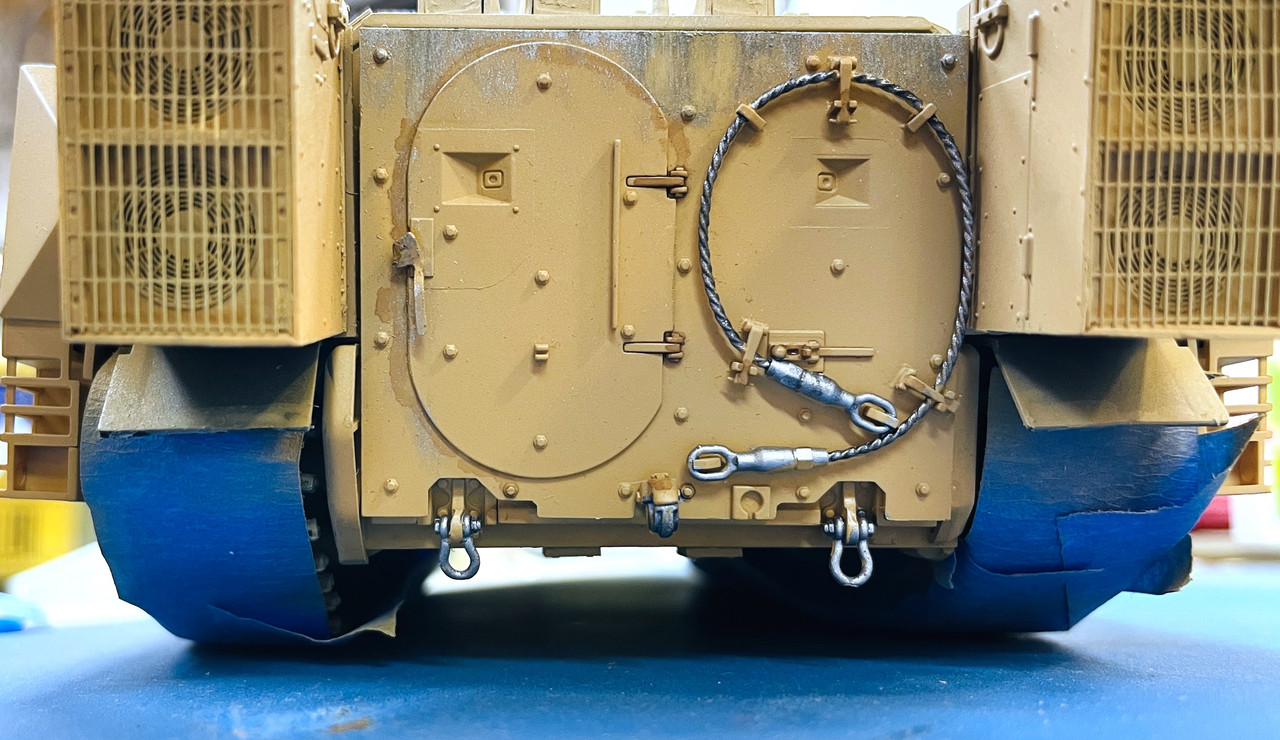
First up; detail painting the back of the lift gate. Unfortunately, all this beauty will be hard to view since I'm posing it with the gate dropped, but we all know it's there. Notice, I repositioned the door handle so it's in the correct downward position. I also made some bare metal where it would be rubbing on the ground. Painted the cable and liked how it worked out. Painted the towing clevises with my "galvanized steel" color which is a flat aluminum and gun metal mix.

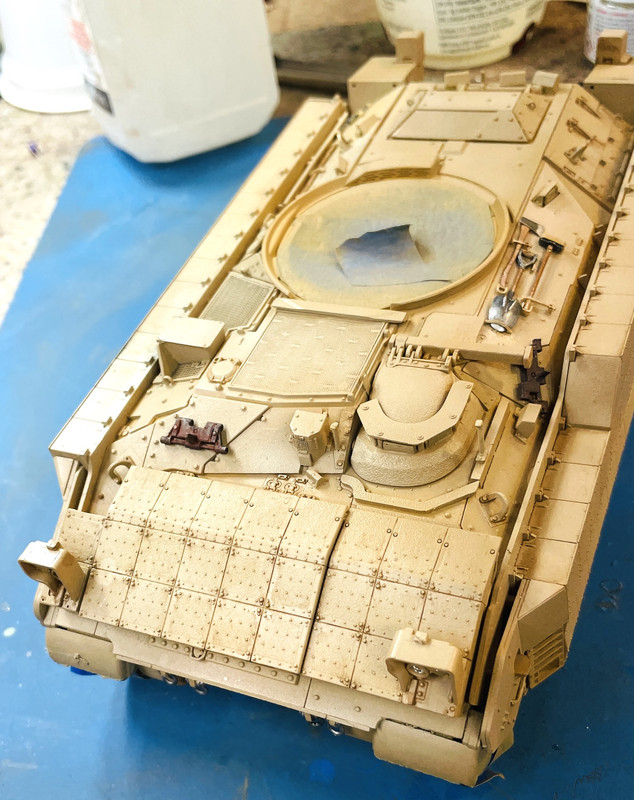
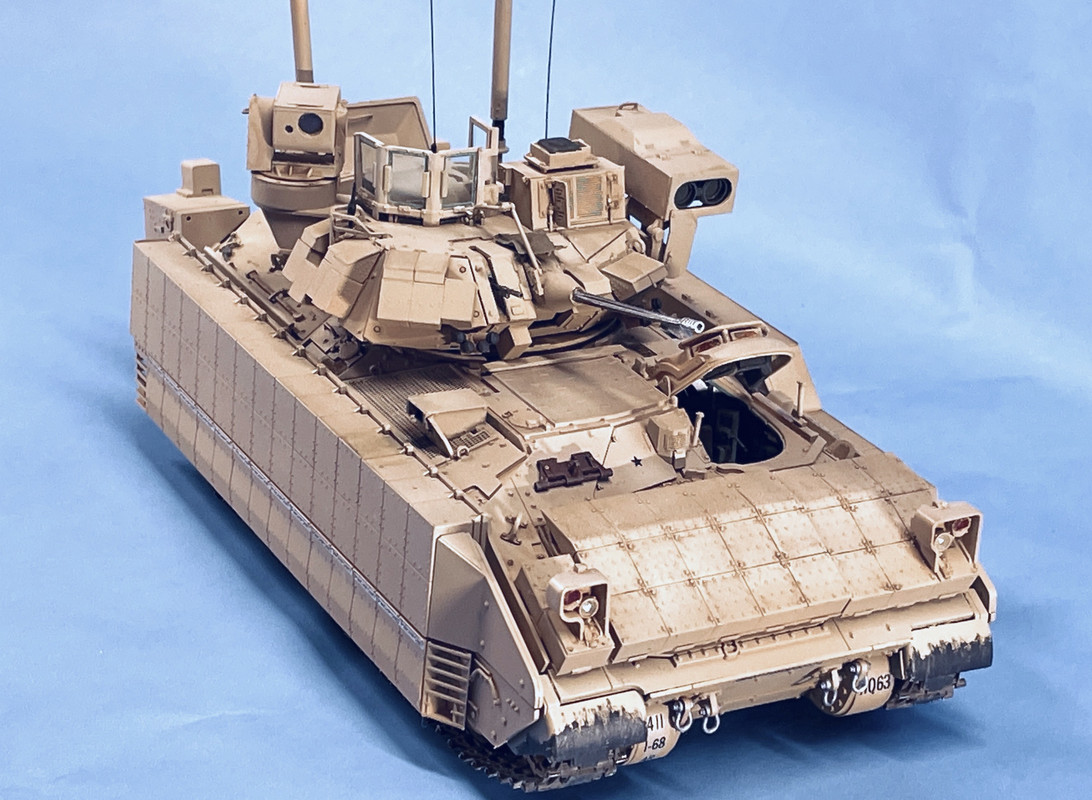
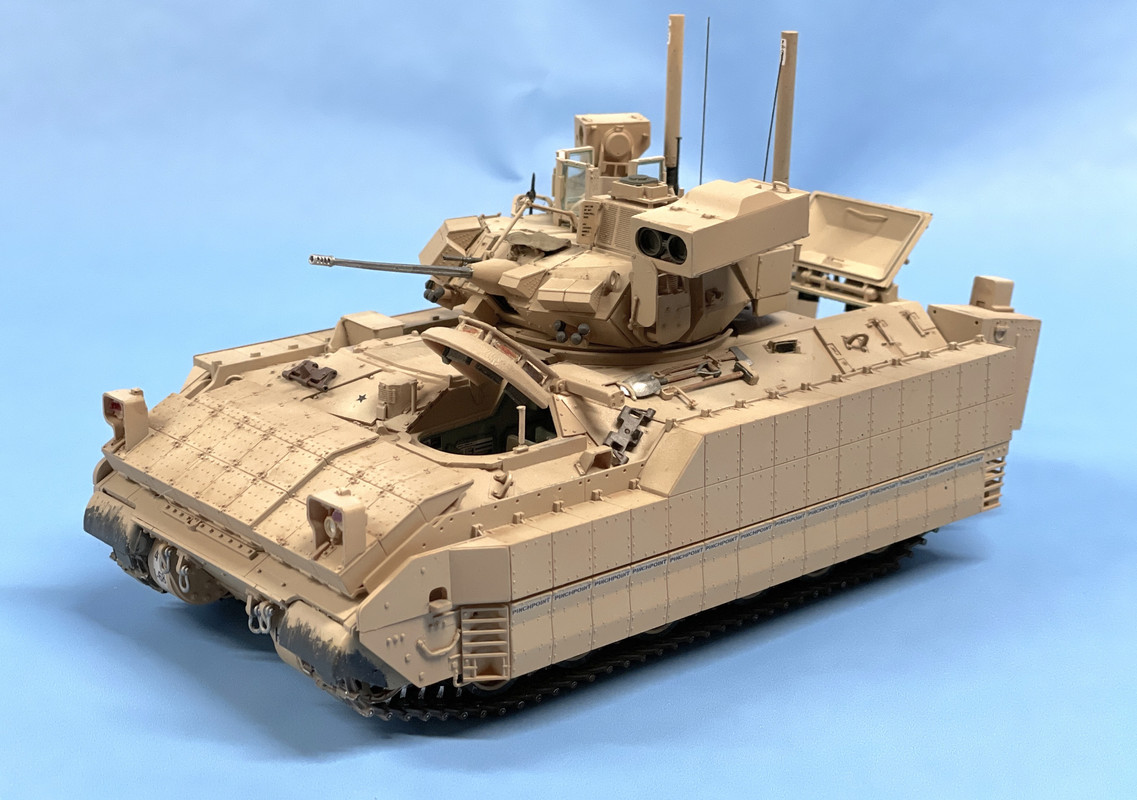
I went over the entire vehicle with Tamiya Brown Panel Accent. I put in in the upper ERA seams, and the granular surface (anti-slip?) on the upper and front blocks, various seams, bolts and hinges, and any other thing that I thought needed accenting. After it dried a bit I removed the excess with Q-tips dampened with low-odor mineral spirits. The effect is subtle, not bold.

I added the "PINCHPOINT" decals the reside at the upper and lower side ERA joint. There are 15 on each side. Meng inlcuded 2 extra. You will need them. 

The decals silvered a bit even with the Tamiya clear gloss coating. 

I opened the drop gate to prepare the exposed upper surface. I glued the hinges into the open position, but they were not holding and were, in fact, breaking. After doing the surface treatment off the vehicle, I drilled and pinned the hinges with 0.022" phos-bronze. Much more secure. I took the pictue before pushing them all the way home. I used med CA on the pins as I inserted them. The drop gate is no longer positionable, but considering how frail the kit hinges were, it really never was.

The lift gate was treated with various pastel powders, brown panel accent and very light coat of AK Interactive Real Metal.

Through all the handling, the vertical thingamabob left of the driver's hatch (Gino, what is that?) kept bending over and was in the process of breaking. I removed it and attempted to drill it with the small 0.011" drill for the guitar string, but the hole was not centering and broke out of the side. I substituted some styrene rod and it worked. I then cut off the tiny flat piece from the original and glued it to the new one.

And then the outer shell of one of the drive sprockets fell off. This was potentially more troublesome since access was severaly limited with the ERA skirts and mud flaps now blocking most of the area. And the sprocket face has a key slot that needs to align with the other half. I use Testor's tube cement, and worked it under all the obstacles and amazingly got it to settle in correctly.

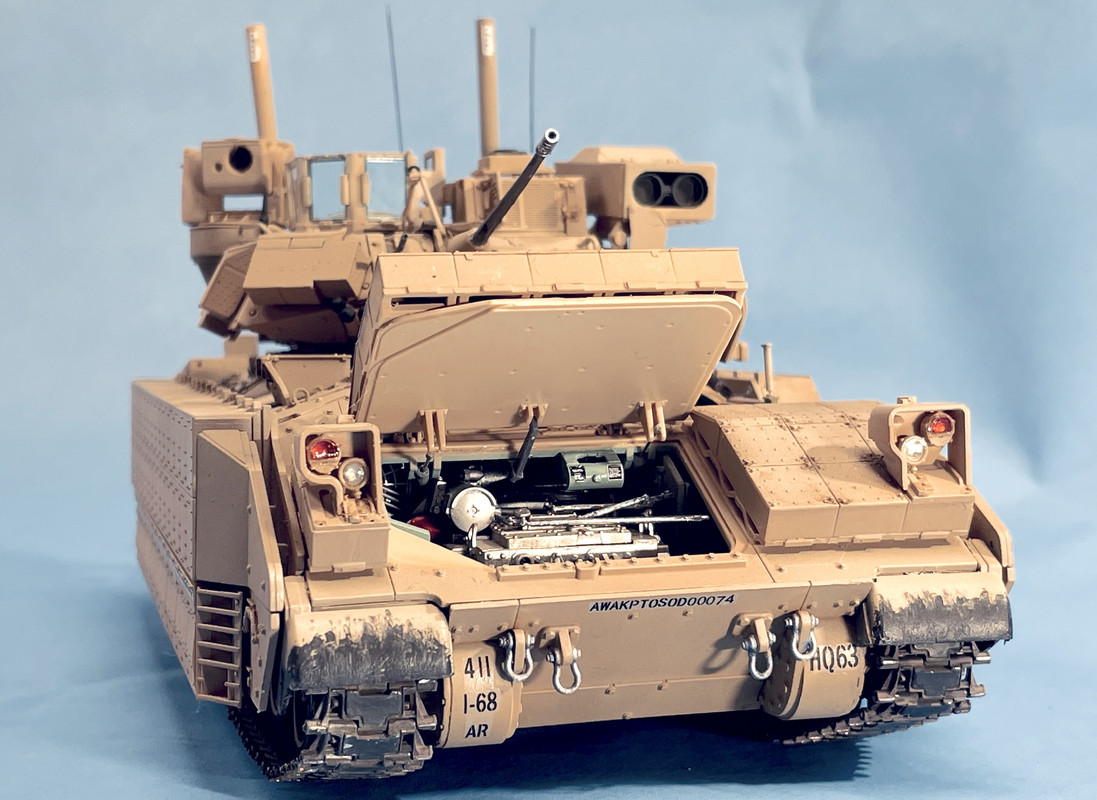
I had trouble installing the light glazing. Instead of breaking anything I chose to use Bondic on the headlights. I was able to put in the turnsignal/breaklights, but they didn't snuggle into the housing as they should. I used Testor's Canopy Cement.

The model was ready for the final coat of Tamiya Clear Flat which I applied.

I had a lot of trouble removing the Molotow Liquid Mask. The stuff just wouldn't pull off in a sheet. It came off in little bits and required lots of fussing, not much better than the Microscale. Next time I do periscopes I'm using masking tape or bare metal foil. I put a coat of Pledge with Future on all the periscopes to give a bit more luster after all the scraping.

I saw that the top hatch also had a rubber seal raised area and thought it should be black. I attempted... poorly... to color it with a black Sharpie and made a big mess. It required a repaint. Actually, I had never painted the underside thinking the kit's yellow might work for an underexposed area. I masked the opening and used the Badger Fine Line airbrush.  No harm no foul!

With that last task... oh... and I put some gloss Tamiya Clear Smoke around the fuel filler caps. Not a lot of spillage, just a little bit... It was time to make the turret to the hull. Got it together without breaking anything. Miracle!

I painted the aft end of the Bushmaster barrel with Gun Metal, used some Testor's Tube Cement and install the gun. I then finish painting it on the tank. I highlight the muzzle wit the metal paste since pictures show that firings polish that area a bit.

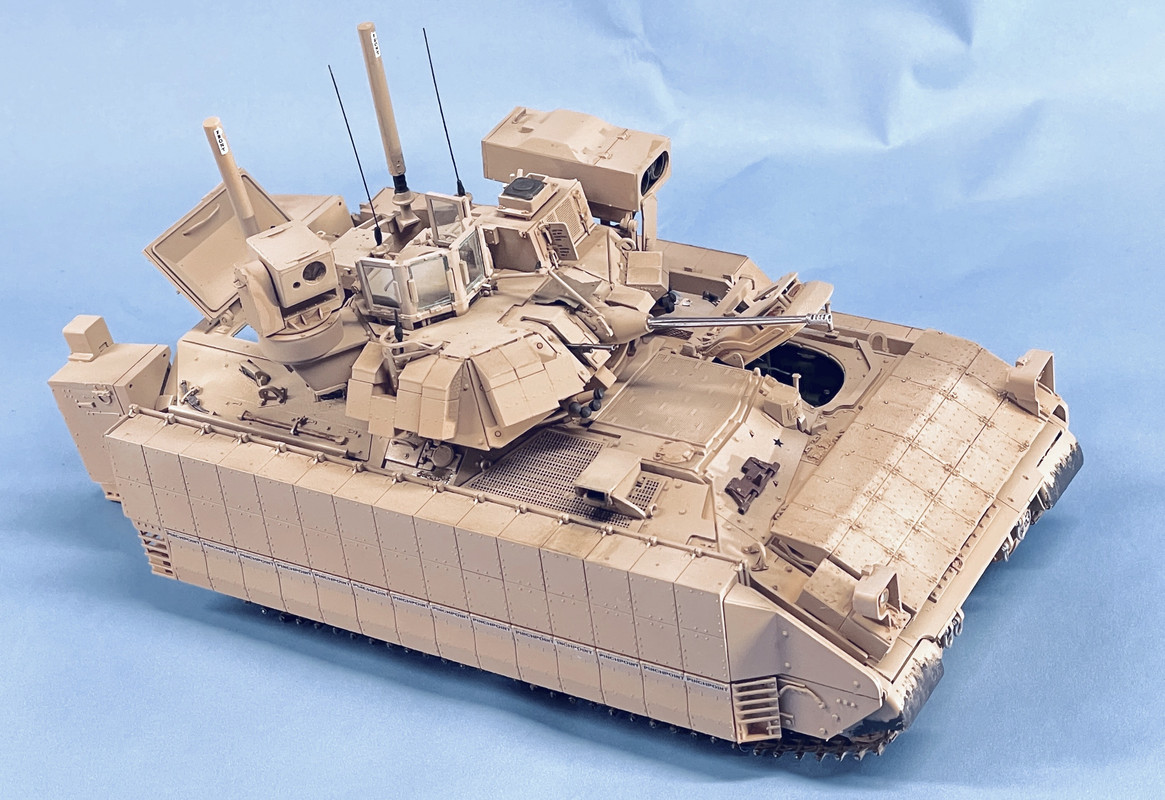
And the model IS DONE! Here are some beauty shots. I found that right out of the phone's camera, the finish was too yellow... much more than appeared to my eyes. I messed with the post-processing controls: Exposure, Temperature, Contrast, Highlights and Shadows and got it a little better. But when I reduced the Saturation, it finally looked like it did in the flesh.

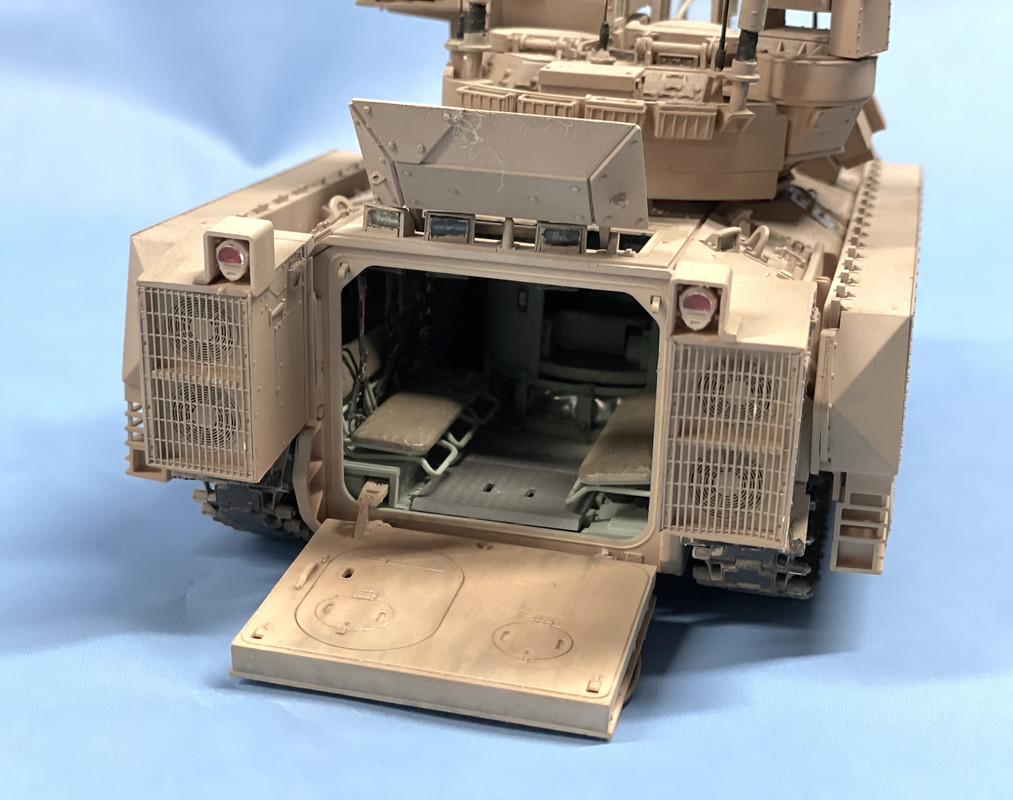
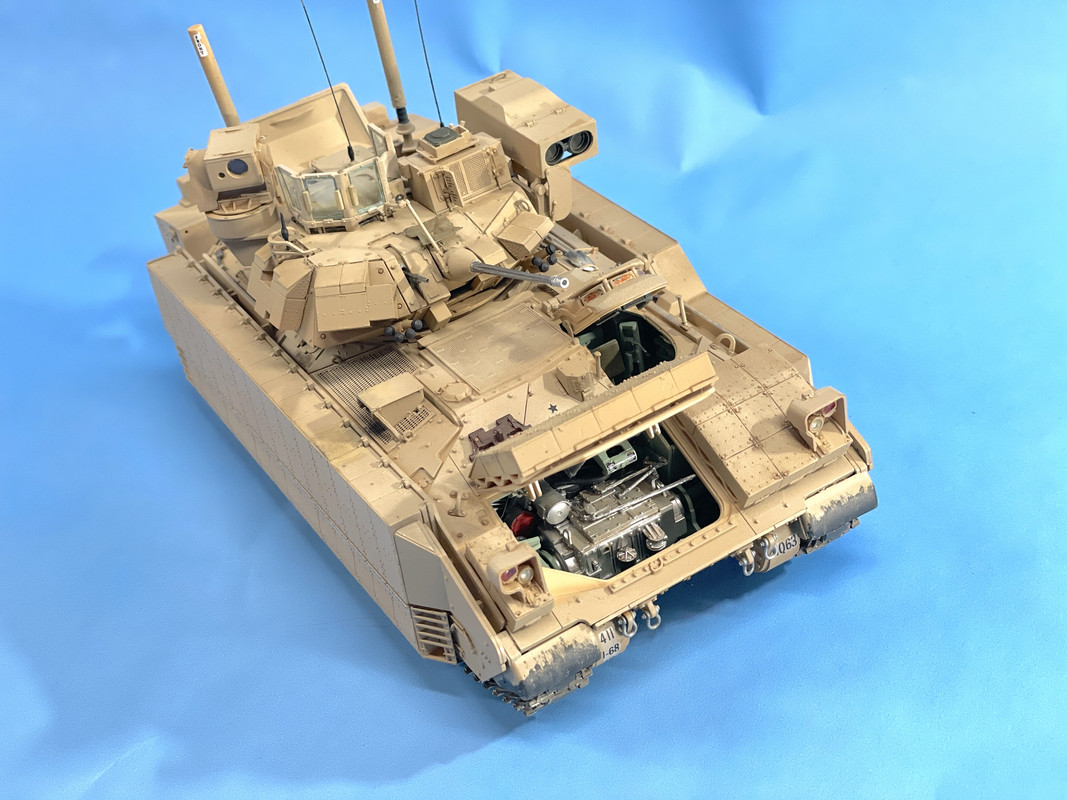
I still have to build the base and will do that next week. Since the machine is going to be sitting with all its opening open, I'm going to situate in an area that looks like motor pool. That means a concrete pad, and not a desert road. I'll be posting that too. I got the hood open, put the metal lift piston rods in place and reinstalled the hold-open latch and then took these pictures.

This was a complex and rewarding model. Not quite as complex as the Ryefield Model Sherman, but darn close. The Friulmodel tracks really helped. The kit tracks would have been very frustrating to me unless I glued them together. It would have been less frustrating if the "Q" parts were included, but I was able to work around that without losing much time and all's well that ends well. It was my first Meng kit and it was well engineered. The working hinges on the hood and drop gate, while scale-sized are way undersized if they're actually supposed to work. On both parts one hinge (female side) fractured in just trying to assemble them in the first place, not when I was trying to operate them. While I was disappointed in not having the full gun breach detail, you would not see any of it at all. I'm looking for some crew members for this beast. I have marty at Scale Reproductions, Inc., finding me some.

I learned a lot about Bradleys in researching this build. They're an impressive machine that keeps getting upgraded. This model is not for the faint of heart, but it's a rewarding build.

  • Member since
    March 2012
  • From: Louisville, KY
Posted by Builder 2010 on Wednesday, April 28, 2021 5:22 PM

Doing punch list items: Track tools, rear lights, spare track link, repaint sides, clear coat, etc.

I don't know about you, but airbrushing a multi-coat, multi-shade finish is almost impossible to touch up easily. I painted the track tools while on the sprue, the glued them to the hull. The paint got a bit munged up on one of the panels so I attempted to brush paint it to bring it back. Trouble was I couldn't get the shading right. First it was too dark, then too yellow and finally, probably a bit too light. It's due to the eveness that an airbrush feathers one shade to another. It's almost impossible to duplicate this with a brush... for me. So you might see some shading differences. I gave up on the brush painting and resorted to the air brush at least get the feathering right.

The tools on the other side came out a little better.

After putting these in place I airbrushed the whole deal with Tamiya Clear Gloss. I pre-mix my colors in the Badger compatible bottles and had some Tamiya Clear Gloss already containing some, although it needed more. After adding the clear, IPA and a few drops of extender to aid in flow, I noticed that it was cloudy. Okay! The bottle didn't have clear gloss. It was clear flat, so I dumped it and made some more. The clear gloss is to facilitate using Tamiya panel accent which, when put on a flat finish, flows all over the place and not just in the targeted grooves. It was still tacky by the end of the session and it was booming like crazy outside with a really classic thunderstorm, so I stopped work early. 

I had installed the rear light and painted the turn signal and fog light lenses with Tamiya clear red, which also need to dry fully overnight.

I also screwed up the paint next to the exhaust stack. I wanted to add some soot powder. The powder stuck to the not-quite-dried clear and made it very black. I attempted to remove it and using a brush with a little IPA, ended up removing the top coat back to the really yellow stuff. I attempted to get that back to the right shade, but it will still need more work I'm afraid. I'll use the airbrush tomorrow. (is "air brush" one word or two... I seem to use both)

All of this trouble goes back to my long-standing understanding of my skills. I am not patient... I am persistent. When I screw up, it's always becasue I didn't give paint or glue enough time to dry properly.

Next session I'll continue to do some final finishing and add the remaining decals. Then I'll dull coat the whole deal and it will be finished. And on to the base.

  • Member since
    March 2012
  • From: Louisville, KY
Posted by Builder 2010 on Tuesday, April 27, 2021 5:35 PM

Gino, I joined the Kit forum after reading your thread on the Rocket Launcher. Another forum on which to contribute. You might think I have a lot of free time...

After installing the last piece of ERA I masked the tread area and painted the four coats on the hull: Straight Desert Yellow, lightened Desert Yellow, some Tamiya Buff and finally a really lightened Desert Yellow. The hull wasn't matching the turret which I painted weeks ago which is why I further lightened it. I did the light coats in the center of panels and upper facing surfaces, but after looking at it, I need to further lighten the ERA side armor. It's still too yellow. Before painting I did apply the Molotow liquid mask on the mud flaps.

And the other side:

I also built and painted the Commander's glass shield. When dry I applied the glazing using Testor's Canopy Cement and then went back and paint the little bit of frame that was attached to the glazing. Other than the main gun, the turret is now complete. I scratched the center glazing when removing the spure nubs. I will diminish it with some Pledge floor finish.

Next session I'll go back and lighten the sides a bit. Then I'll gloss clear coat it in prep for panel accenting and decaling. I also painted the track tools with the light desert sand and will paint the implements before installing them.

The only parts left on any sprue is the main gun and a couple of individual track links that will get some kind of metallic treatment, and then the light lenses. 

JOIN OUR COMMUNITY!

Our community is FREE to join. To participate you must either login or register for an account.

SEARCH FORUMS
FREE NEWSLETTER
By signing up you may also receive reader surveys and occasional special offers. We do not sell, rent or trade our email lists. View our Privacy Policy.