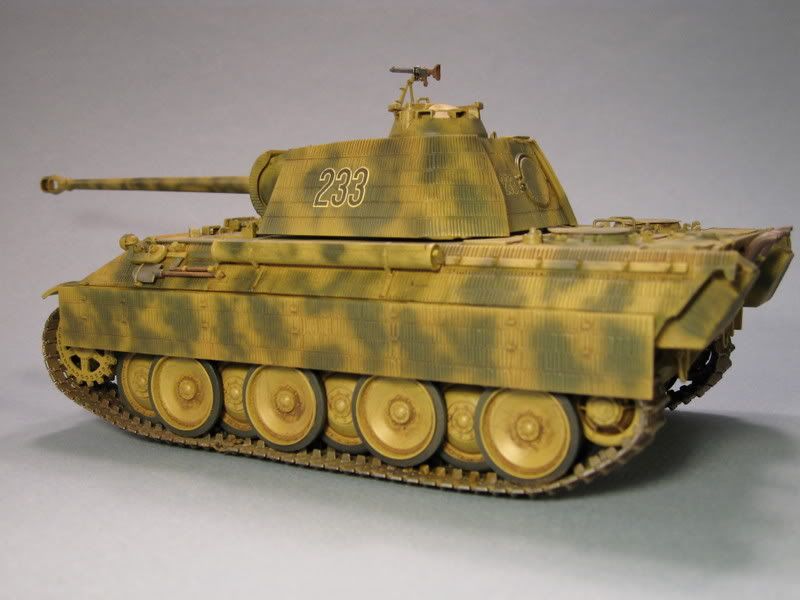
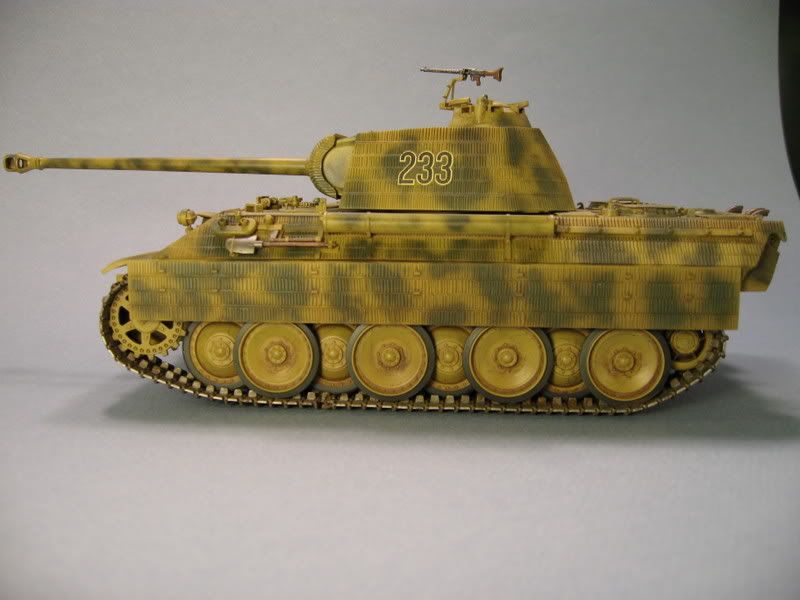
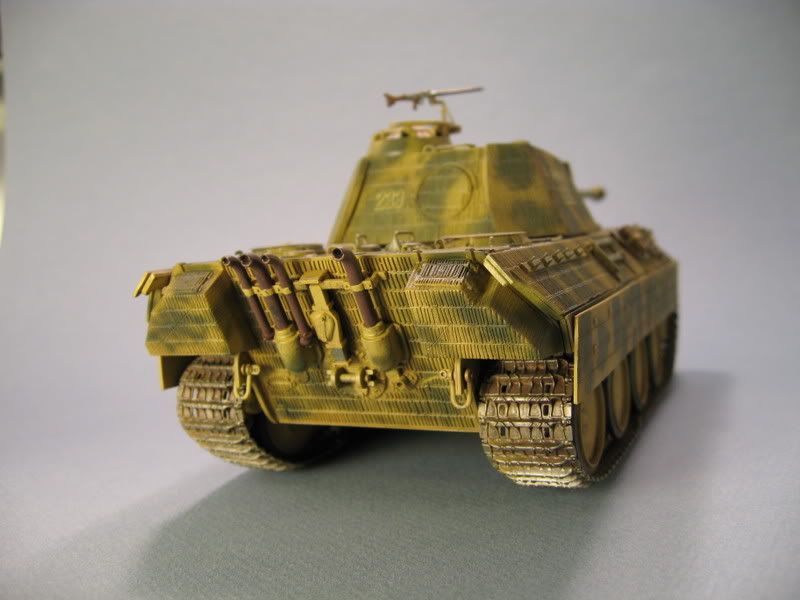
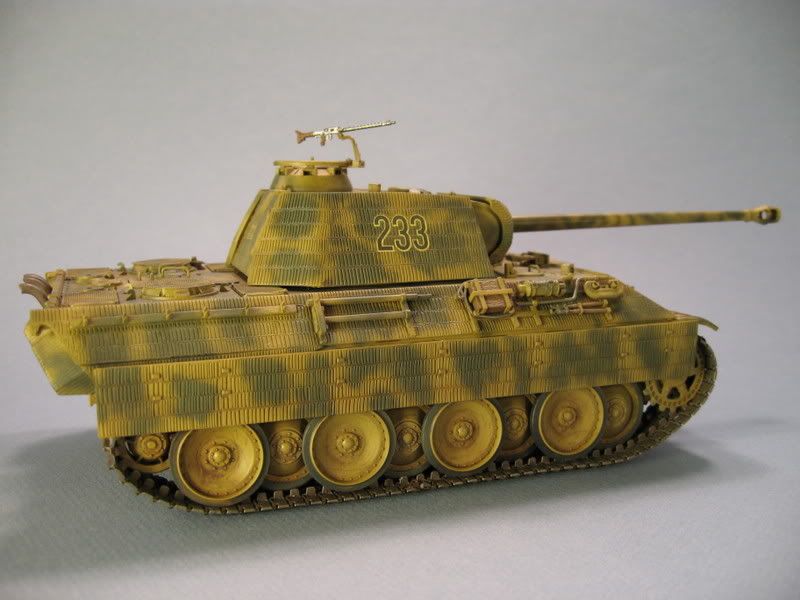
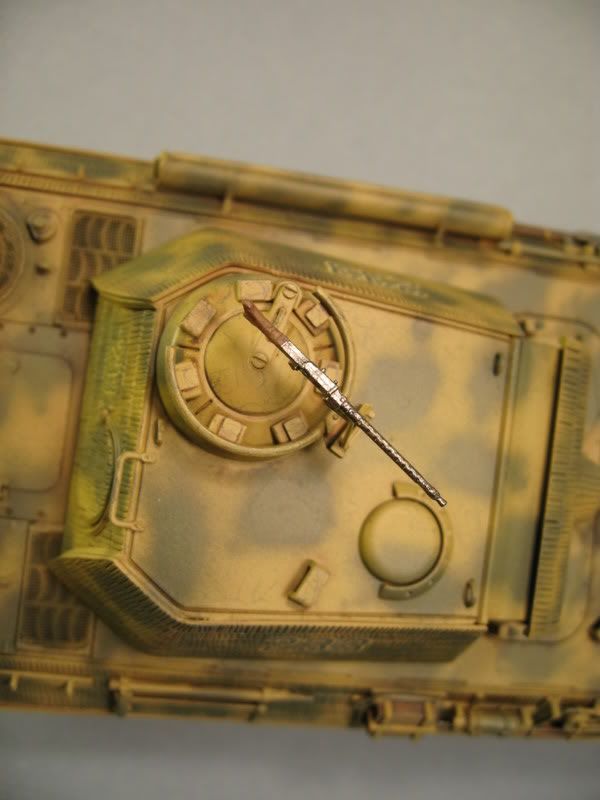
Italeri 1/35 Panther Ausf. A finished!
This was my submission to the Italeri GB hosted by Tigerman. I really enjoyed his GB. ![Smile [:)]](/emoticons/icon_smile.gif)
About the kit: Italeri 1/35 Panther Ausf. A
Relatively speaking this kit is fairly old, especially when compared to all the modern releases from Dragon (I have both Dragon's Panther Ausf. A and Ausf. G... absolutely stunning kits, can't wait to have some time to get them on the bench!)
Overall it was a really fun kit to build. I've only been back into the hobby for several years, so I've been using my older kits to get my skills up. I really wanted to try some new things and see if I couldn't improve my armor modeling skills to get me ready for my Dragon kits. This build has several firsts for me:
- First Panther
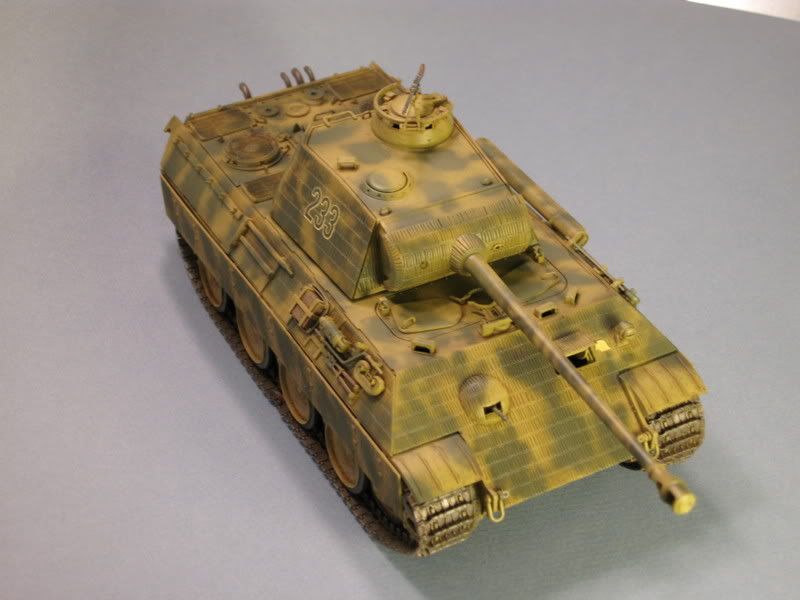
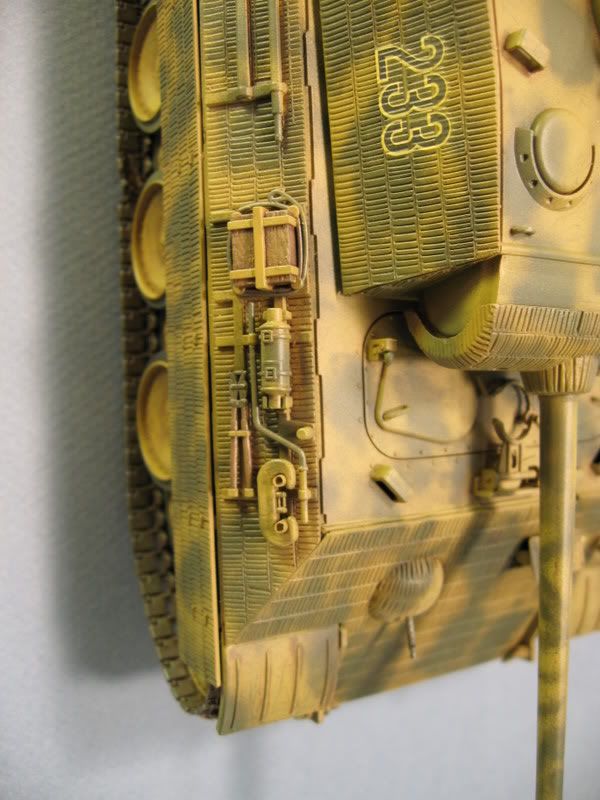
- First Zimmerit
- First camo job other than single color
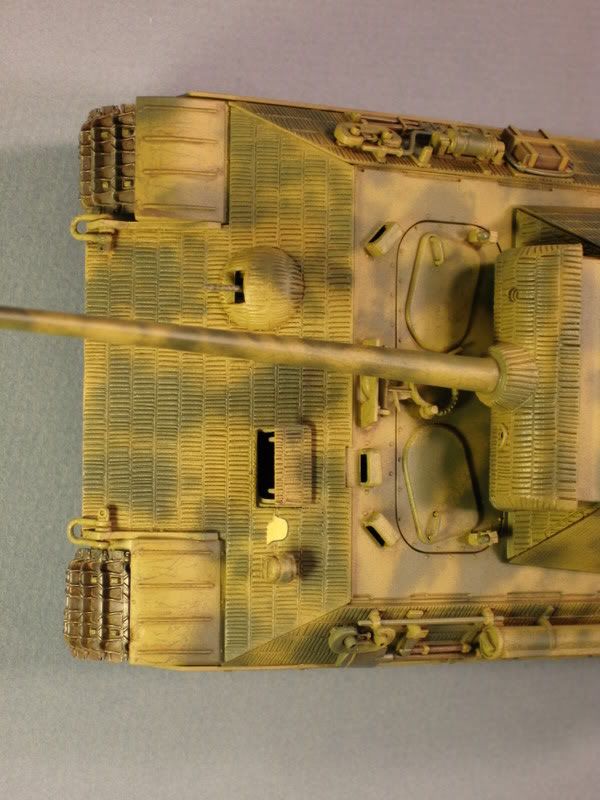
- First photo etch.... ever (grill screens really add a nice touch)
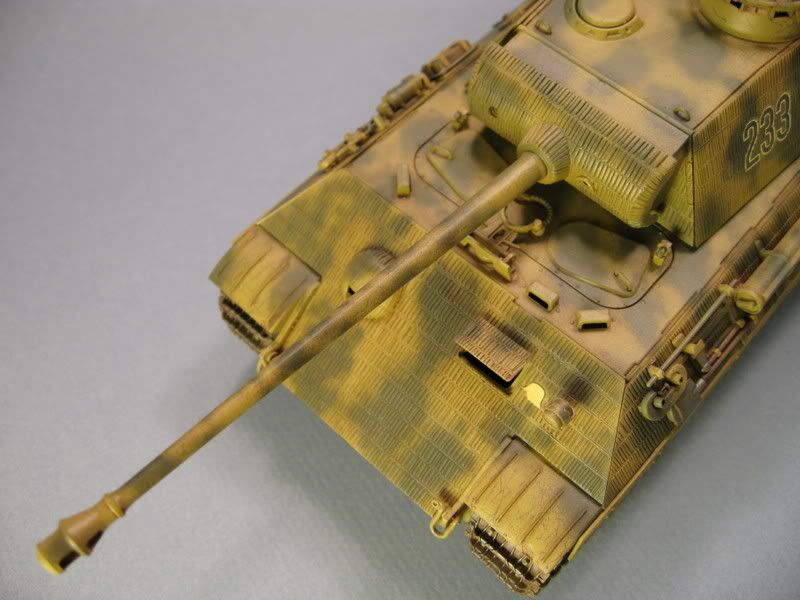
- First use of the kit plastic barrel (usually use aluminum aftermarket barrels)
- First tank I've completed in about 2 years
- First Italeri build
The moldings were decent, although at times the plastic seemed a bit on the soft side. The vinyl tracks were abysmal, the pins for joining the track segments together were just too short to get strong connections. I finally had to resort to two staples to keep one of the sections together. If I didn't have several of Dragon's Panthers lined up already, I would have invested in a set of Aftermarket tracks for this baby, although in the final analysis the tracks turned out ok after all. The plastic zimm was a nice, if not unusual touch.
If I had to do it all over again I wouldn't have used the zimm pieces provided and would have made my own zimmerit instead. Most of the zimmerit was either provided by an optional replacement part in the kit, or with applique sections that you glued over the existing panels. This makes some of the parts rather thick and creates alignment problems when trying to butt the sections together. I think I did a decent job with it anyway, although in retrospect I could have tried to thin some of the applique panels with some very careful sanding..... live and learn.
The decals were ok, a little "stark", especially the GrossDeutschland insignia (white German helmet) in between the headlight and driver vision port. It should have been just plain white, but Italeri had a black "shadow" effect also printed on the decal, which is obviously not correct and only makes the decal appear that much starker. The dust and flat coats really toned them down however.
About the Panther Ausf. A
The Panther Ausf. A came after the original Panther Ausf. D which was rushed into service for use in Operation Zitadelle. The Ausf. D had major teething problems because of this rushed development which cause most of them to break down before they really had a chance to have any impact on the battle at all. In spite of this poor showing, the Panther had a lot of potential so many of the trouble areas were corrected or improved upon with the release of the Ausf. A model. (It can be very confusing to those just learning about the Panther... the D came first, then the A and finally the G). The Ausf. A was produced from mid 1943 into early 1944.
The Panther tank is believed by many to be the best medium tank of the war (heavy tank by allied standards) with the only true rival being the Russian T-34/85. In fact, many of the innovative design features of the T-34 inspired the design of the Panther. The Panther was complicated, like most German tanks and required a lot of raw materials and man hours to build. Because it was rushed into service they continued to have mechanical and reliability problems all throughout the war. The final drive gears were to plague the Panther for all of it's life, including on the Ausf. G. The ride of the Panther was exceptionally smooth, due mostly to it's innovative torsion bar suspension. The interleaved road wheels did a fantastic job of distributing the Panthers immense weight over the wide tracks, which allowed it to perform much better in the often soft and muddy terrain found on the Eastern Front.
The Panther was both feared and respected by its enemies. Its 75mm Kwk 42 was extremely accurate over long ranges and had tremendous penetrating power. The allies really had nothing comparable. Its thick armor especially in the front made knocking out a Panther a very daunting prospect. The Sherman was completely outclassed by the Panther. The T-34/85 and the later Russian Heavy Tanks were the only major armored threats to the Panther. If memory serves correctly, more Panthers were destroyed by Allied aircraft, mechanical breakdowns and by their own crews than were ever knocked out by Allied tanks.
Some of the improvements made to the Panther Ausf. A over the Panther Ausf. D were:
- Cast Cupola with 7 periscopes
- Rail installed and mount for an Anti Aircraft MG34 to the cupola
- Armored ball mount for the bow MG 34
- Gunners sight changed from binocular to monocular
- Schurzen (side skirts) were standardized
- Zimmerit was applied to almost all of the Ausf. A's built
- Zimmerit generally more neatly applied and textured in several unique patterns
- Jack was mounted vertically on the rear
- Several different exhaust variations, one of which provided additional exhaust manifold cooling via 2 pipes attached to the metal shroud surrounding the exhaust manifold to duct the hot air out. This was necessary when the left engine fan was modified to flow in the opposite direction to blow air that was heated up by the engine into the crew compartment to provide a heating during the cold Russian winters. The triple exhaust was only mounted on the left side (erroneously mounted on the right side occasionally by Allied captors who didn't know any better... you'll even see that fubar on a museum Panther or two)
- The turret was modified during production eliminating the side vision port plugs and left side loading port
About GrossDeutschland
I built my Panther as one that served with GrossDeutschland in the summer of 1944 and tried to replicate my interpretation of a typical Dark Yellow with Green mottling scheme as it would have appeared having been done by your average Panzer trooper that got stuck with the duty, but tried his best anyway, as any good German soldier would ![Wink [;)]](/emoticons/icon_smile_wink.gif) .
.
GrossDeutschland was an elite German division in the Heer (regular German army as opposed to a Waffen SS unit). It was one of the best equipped units in the Heer (along with the Panzer Lehr). It originated as an Infantry regiment that saw action in France and Russia in the early phases of Operation Barbarossa and was all but annihilated outside of Moscow in 1941. It was upgraded to an Infantry Division in time for the opening phase of Fall Blau, the assault on Stalingrad and it served with distinction all throughout the Stalingrad ordeal around Rzhev and in the attempts to break through to relieve the 6th Army.
After having a company of Tigers attached to it along with armored personnel carriers it was upgraded to a Panzer-Grenadier Division and served exclusively on the Eastern Front from that point forward. It served with distinction during the third battle of Kharkov alongside other famous German divisions like the 1st SS "Leibstandarte Adolph Hitler", the 2nd SS "Das Reich" (my personal favorite), and the 3rd SS "Totenkopf". GrossDeutschland was also at the Battle of Kursk where it first employed the Panther Ausf. D, which suffered from numerous mechanical breakdowns as it was rushed prematurely into service by Hitler.
After Kursk, GrossDeutschland was heavily involved in the defensive fighting against the Russian armored onslaught, with many if it's units being used as a mobile reserve, being rushed from crisis point to crisis point.
GrossDeutschland suffered horrendous losses during the battles in East Prussia and the Baltic States where it was almost annihilated during the battles in the Memel bridgehead. By March of 1945 it had been reduced to only 4000 men at which time they evacuated the Memel bridghead only to be immediately thrust back into combat at Pillau where by April 25, 1945 it ceased to exist after being completely destroyed. Only a few hundred men managed to escape the destruction and make it to the British lines to surrender. The rest were captured by the Russians where many died in forced labor camps over the next decade.
The Finished Model:
Here are the final photos. I will eventually add a radio antena. I tried doing the stretched sprue thing and I couldn't get it long enough or thin enough without it breaking. I think I'll drill a small hole where the antena goes and insert an appropriate segment of fine steel guitar string. I think that would do the trick nicely.
Anyway, let me know what you think.