SEARCH FINESCALE.COM

Enter keywords or a search phrase below:

WIP update: Hetzer engine compartment / interior, May 25

7886 views
13 replies
1 rating 2 rating 3 rating 4 rating 5 rating
  • Member since
    September 2005
  • From: beacon falls , Ct.
Posted by treadwell on Sunday, May 27, 2007 12:42 PM
great job doooooog!Big Smile [:D]-- this beauty is really comming along --don'tya just love all the cutting and fitting of parts?-- I thnk its a great feeling when it  all comes together-- and yours is comming together very very nicely!-- I look forward to your next installment!!-- great jobThumbs Up [tup]Thumbs Up [tup]-- treadCool [8D]


  • Member since
    December 2006
  • From: t.r.f. mn.
Posted by detailfreak on Saturday, May 26, 2007 7:46 PM
i can smell the exhaust and chordite from here.looks great.i also think the verlinden resin is a bit lacking.i used there interior for the tiger 1 in my dml initial.copied most of it in styrene as super glue and i dont get along.but just the same,you could do a field maintenance dio. with the engine covers and fighting compartment roof removed.looking forward to the finished product.

[View:http://s172.photobucket.com/albums/w1/g-earl828/]  http://i158.photobucket.com/albums/t104/cycledupes/1000Roadwheels4BuildBadge.jpg

  • Member since
    December 2006
  • From: t.r.f. mn.
Posted by detailfreak on Saturday, May 26, 2007 7:31 PM
i can smell the exhaust and chordite from here.looks great.i also think the verlinden resin is a bit lacking.i used there interior for the tiger 1 in my dml initial.copied most of it in styrene as super glue and i dont get along.but just the same,you could do a field maintenance dio. with the engine covers and fighting compartment roof removed.looking forward to the finished product.

[View:http://s172.photobucket.com/albums/w1/g-earl828/]  http://i158.photobucket.com/albums/t104/cycledupes/1000Roadwheels4BuildBadge.jpg

  • Member since
    January 2007
Posted by the doog on Saturday, May 26, 2007 1:42 PM

 MadMel wrote:
wow- the engine compartment looks absolutely beautiful. I thought I was looking at the real thing when the first picture was starting to load. Did you exclusively use washes or did you use chalks/pigments as well ? The dust/grime looks very impressive my friend.

Thanks again, all who responded!...I first laid down the base of Polly-S gun metal, and then picked out certain parts like the engine base, the horizontal strip around the cylinder head(?!) with various different grays-no plan here, just for variety, ya know?--I painted some caps in flat aluminum and picked out some small details in black--all to provide a variety of hues, that's the key to defeating the monochromatic monster! 

An oil wash of white tinted by a pinprick of both yellow and burnt umber over it all-but then it looks TOO indistinct...hmmm...ok, try some pin washes in dark umber and burnt sienna...yup, that's doin' it!

Stab at the cylinder bank in black to bring it out a bit...followed by silver chipping,,,highlight/lowlight the edges/high parts in metallic steel/dk brown....hmmm...add rust streaks...add various  tiny washes of dirty white where needed,,,dust with powders..retouch with lowlights/black/silver to bring out details a bit more...hmmmm...ok that looks about right!

Hope you can follow that! I had to try to remember my thought processes; when I go into a weathering mode, I don't have any set plan, it's just try this, try that--all along a more-or-less familiar path, but never the same steps or order. I DO repeat alot of steps in order to give depth and layers to anything that I really want to "beat up" Sometimes I get lucky!Laugh [(-D]

BTW, I used MMP (www.modelmakerproducts.com) powders #020 "worn dark yellow" for the dusty look, as well as MIG PO39 "Industrial City Dust" 

  • Member since
    July 2004
  • From: Texas
Posted by wbill76 on Saturday, May 26, 2007 12:33 PM
Nice to see the surgery paid off doog, and have to agree with the "removable hull" approach, no way you could get away with hiding all of that under the shell. Thumbs Up [tup]
  • Member since
    November 2005
Posted by Anonymous on Saturday, May 26, 2007 10:34 AM
wow- the engine compartment looks absolutely beautiful. I thought I was looking at the real thing when the first picture was starting to load. Did you exclusively use washes or did you use chalks/pigments as well ? The dust/grime looks very impressive my friend.
  • Member since
    January 2007
Posted by the doog on Saturday, May 26, 2007 10:12 AM

Thanks again guys for taking the time to respond!

Roo, the headphones are just those DML ones that come with their figure kits, with some thread added for wiring. I don't have any actual photos of  me sawing off he roof or the like--I just cut veeerrrry carefully along theroof seam with a micro saw blade; I got a little off line around the left side, but patched it uo with putty. Then I had to put a lip on the hull, and add .010 strip around the roof itself to replace what had been sawn away. I also replaced what rivets disappeared in the process. 

I should mention that I just got in the mail a Memorial Day sale flyer from RJ Products, and they have listed both an "early" and a "mid" production Hetzer interior listed from "BRACH MODELS"--a line of resin from Italy. They're listed as part BM015 for the early, part BM018 for the mid...for around $40.00--their number is 360-796-3828 and it says "mention Memorial Day Super Sale 2007" Might be an option for you crockett! I certainly wouldn't reccomend the Verlinden offering!

Thanks again all! 

  • Member since
    August 2006
  • From: Oromocto, Canada
Posted by Gun Tech on Saturday, May 26, 2007 8:48 AM
It looks sooooo   good!     I might save some pics for later references Wink [;)]

Jean-Michel    "Arte et Marte"

  • Member since
    April 2004
  • From: The cornfields of Ohio
Posted by crockett on Saturday, May 26, 2007 8:43 AM

Nice work Doogster. I've got the Eduard early Hetzer. I just echo the comments that all that beautiful interior work will be only partially visible is a shame. I pirated the drivers compt from the Eduard kit into the Tamiya Marder IIIM, so the kit justs sits there. Maybe some day I'll build it.

Anyhoo, great and accurate work there, can't wait to see the outside.

regards,

Steve

  • Member since
    July 2003
  • From: Pensacola, FL
Posted by Foster7155 on Saturday, May 26, 2007 8:18 AM
Very nice interior work! It's a shame so much of it will be covered up when the build's complete. Getting the engine set to fit is a very good save! Well done... 

Robert Foster

Pensacola Modeleers

  • Member since
    February 2007
  • From: NOLA
Posted by roosterpelo on Saturday, May 26, 2007 1:30 AM

 the doog wrote:
So, now that I'm qualified as a Civil War battlefield surgeon,

Laugh [(-D] can't see the pics yet as i'm at work, but i'm following the text until i get off. what did you use to build the headphones? or were they verlinden also? also, do you have any pics of where you had to cut off the top? not sure if i want to glue my top on, and cut it where you can remove it, or just not glue the top halve on, kinda like the academy tiger w/ interior is set up. haven't really dry fitted it yet.

chris d.
  • Member since
    December 2006
  • From: N. Georgia
Posted by Jester75 on Friday, May 25, 2007 11:45 PM
I like the dusty look of the engine compartment. Looks like it spent alot of time in the field!

Eric


  • Member since
    October 2005
  • From: Yuma, Arizona
Posted by Brumbles on Friday, May 25, 2007 10:26 PM
Beautiful work, Doog!
  • Member since
    January 2007
WIP update: Hetzer engine compartment / interior, May 25
Posted by the doog on Friday, May 25, 2007 10:06 PM

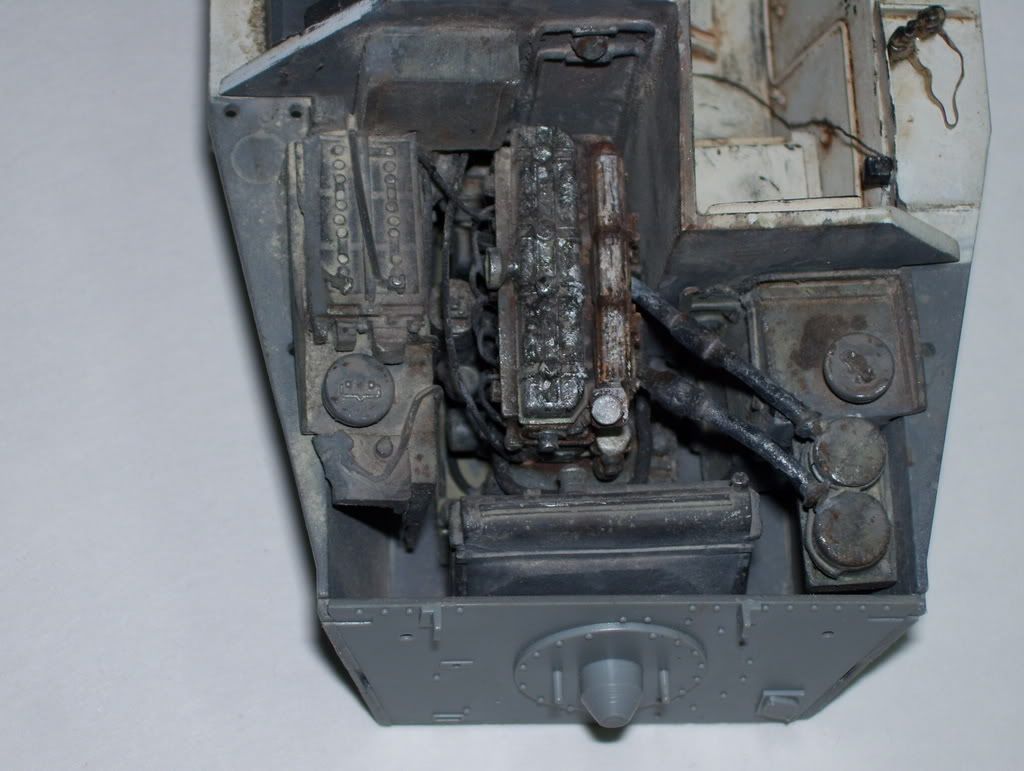
Well, I shoulda known--even with all the radical surgery done to squeeze the engine into its bay, it STILL wouldn't clear the top hull and engine roof!Sigh [sigh] A lot of filing on the edges was in order, and I had to separate the double air cleaners (on the right rear side) from the fuel tank (?) in front of it and drop it by about 5mm in order to allow the hull to clear it.( Man!Angry [:(!]--could the Italeri Hetzer REALLY have been that dimensionally different?!)

1.So, now that I'm qualified as a Civil War battlefield surgeon, I finally got it to sit where it needs to be--it looks a bit hairy with the hull off here, but it cleans right up with the hull mated...The engine was base-coated in Polly-S gun metal, then weathered with a witches brew of additional dirty-white oil washes, touched up with various dark rusts, gun metal, and rust washes. Silver was used to chip the top, and white/ oil rust washes on the other heat-faded part (I'm no mechanic!)  Some extra wires/hoses were added around the sides and base to match references...
 

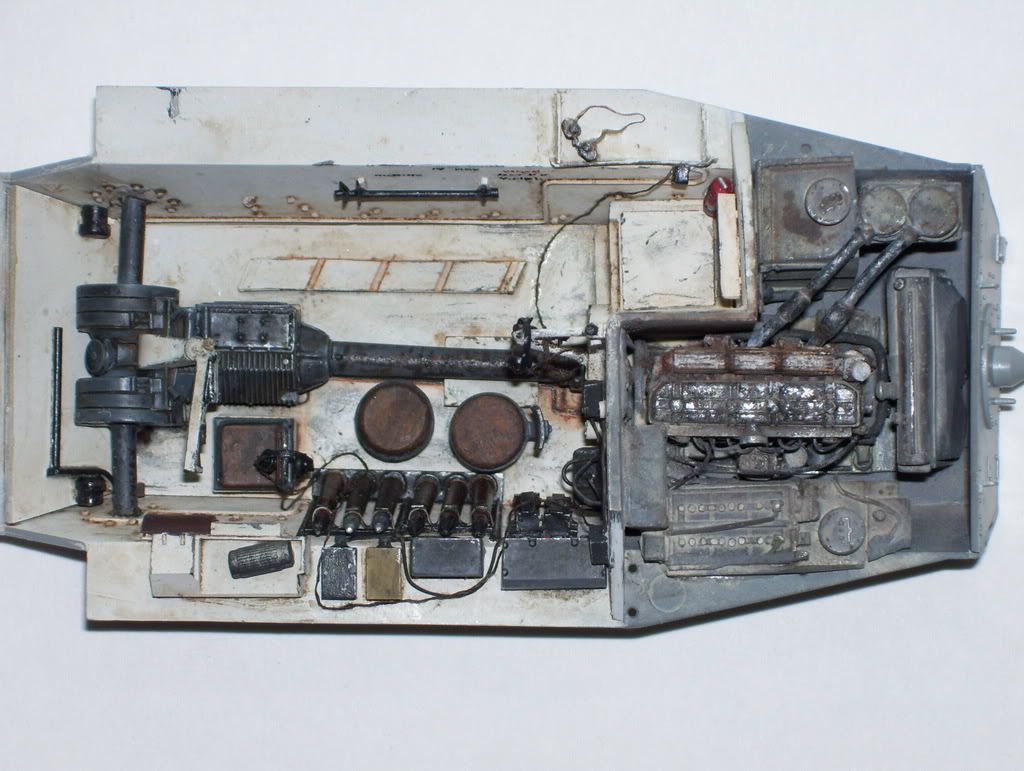
2. An overall from the top...
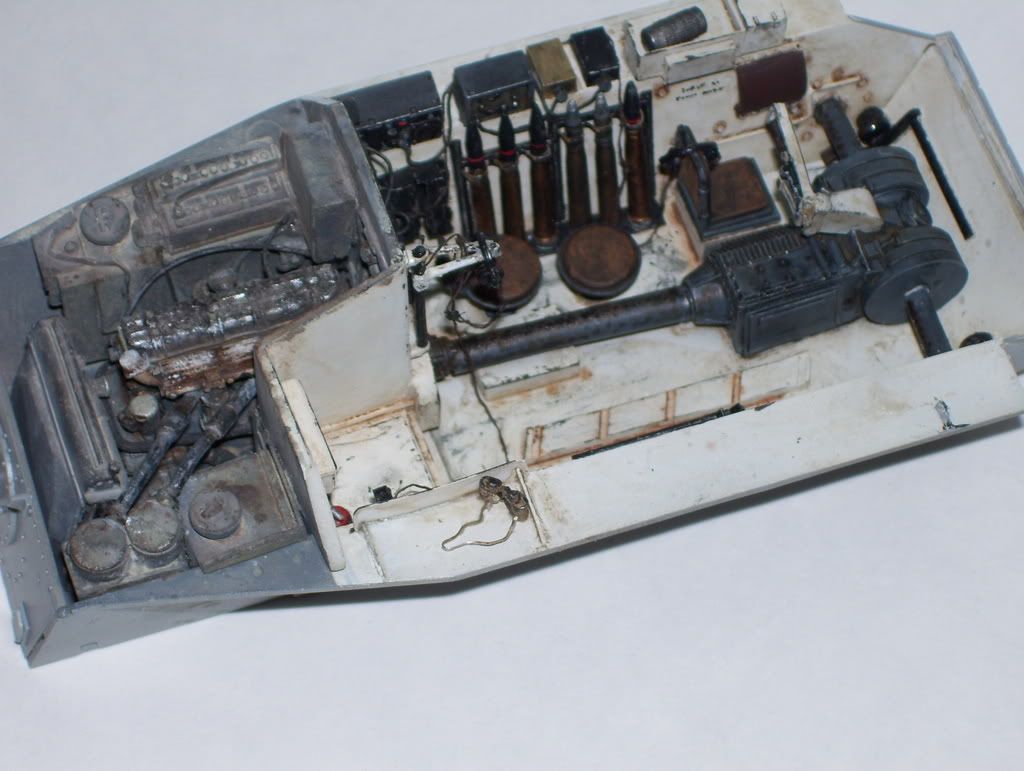
3....and the left....you might notice some additional headsets and wires in the interior front...there are two in the lower hull--one draped over the scissors mount on the rear wall; the other over the driver's seat...the third is attached to the upper hull, hung on the gun sight...
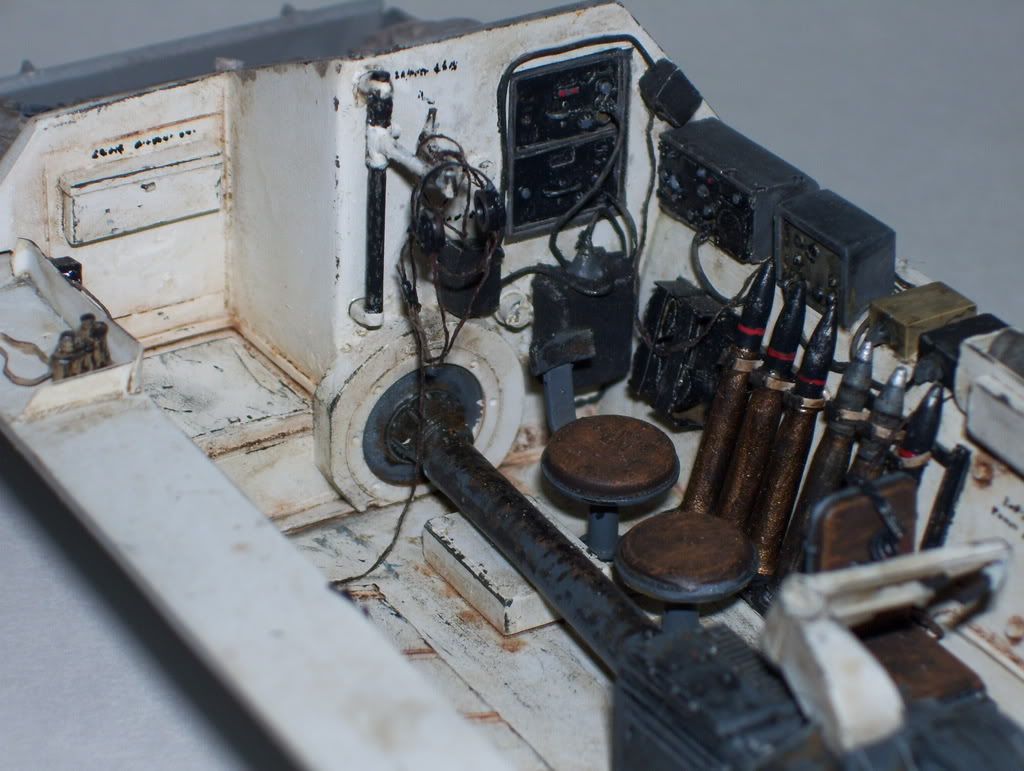
4. A detail of the headsets; I added some personal gear in a binoculars, and will add a hat and some other stuff soon...
 

5. A shot of the hull on...I weathered the engine with some pastel powders as well, to dusty it up...
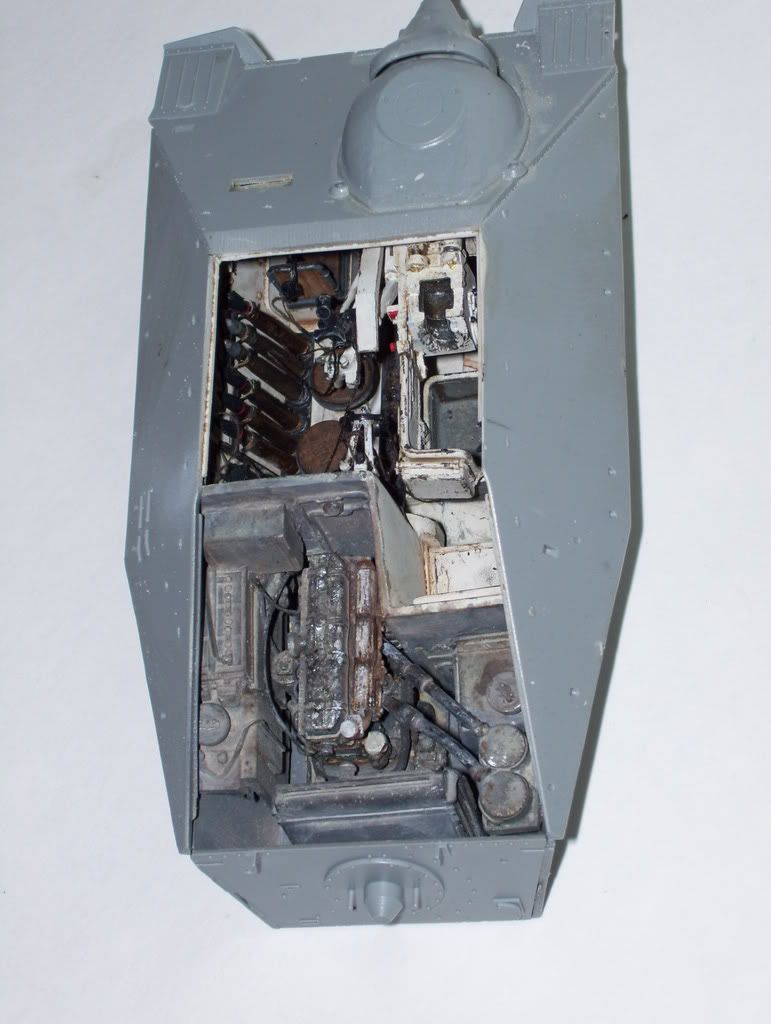
 

6...and the other side...
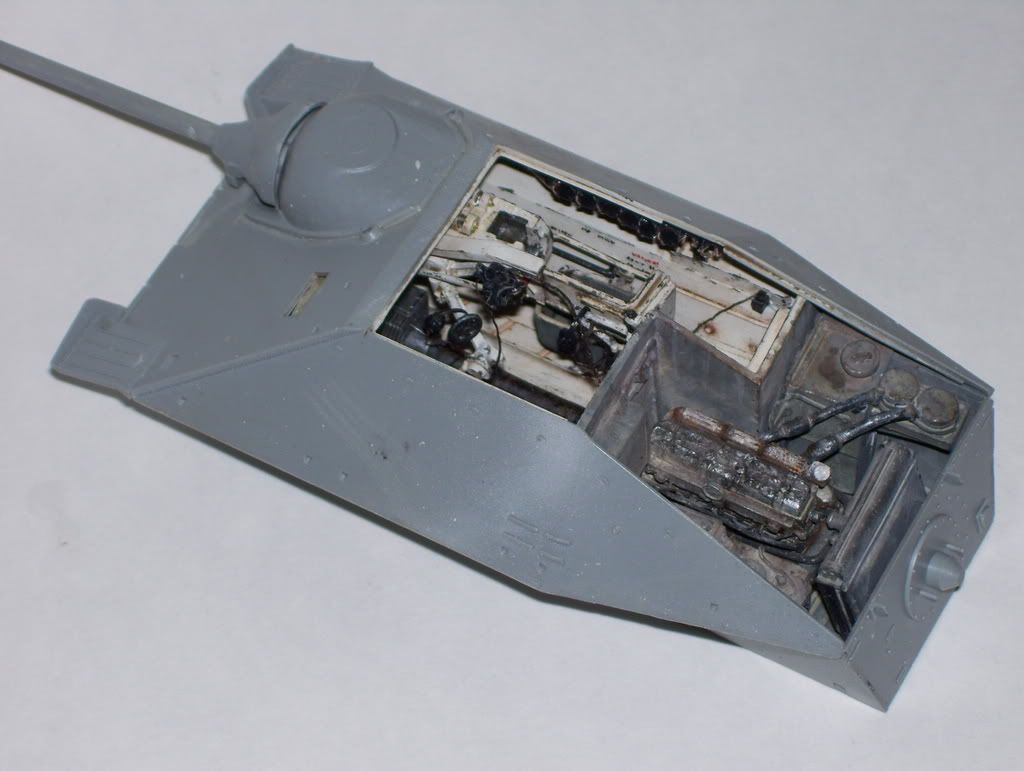
7. And lastly, all together now...PHEW!!!Approve [^]...it all fits! You can see why I think it's really necessary to cut the roof off; all that work just to hide it all? NO WAY! 
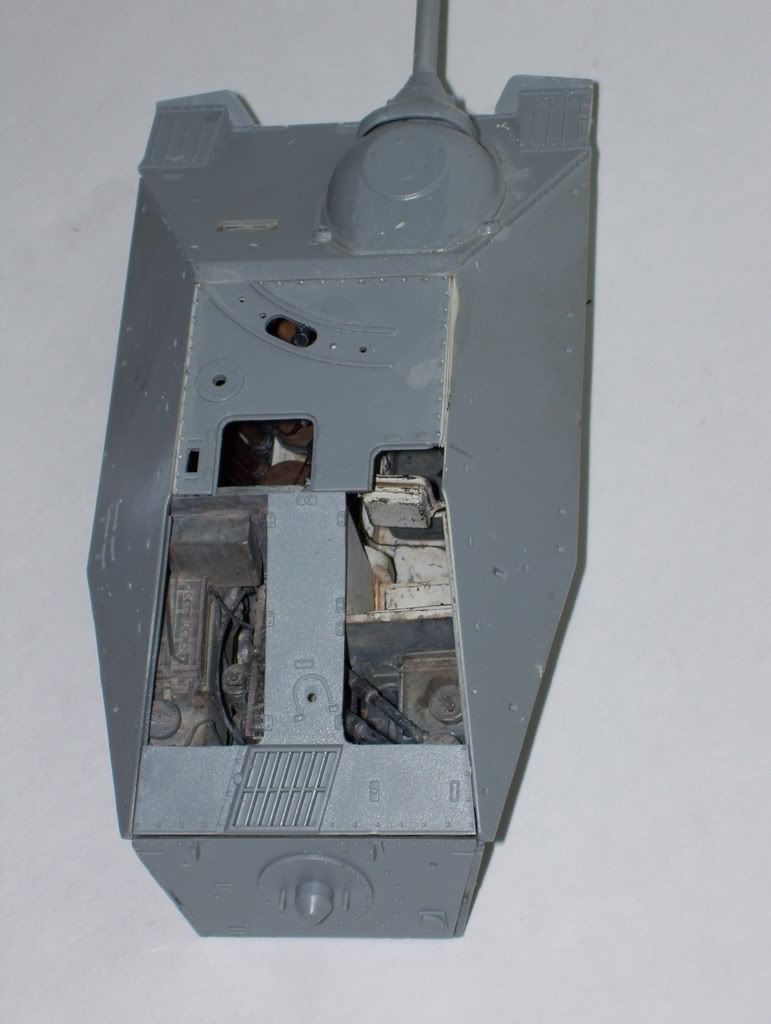
 

It's a relief to finally be ready to close her up! I have to say that I was really rather disappointed with the Verlinden interior--then again, I guess we DO have to keep in mind that it wasn't really designed for the DML kit. I hope I showed that, with a bit of work and creativity, it can be made to work...

Comments and suggestions/criticisms always welcomed and much appreciated! 


JOIN OUR COMMUNITY!

Our community is FREE to join. To participate you must either login or register for an account.

SEARCH FORUMS
FREE NEWSLETTER
By signing up you may also receive reader surveys and occasional special offers. We do not sell, rent or trade our email lists. View our Privacy Policy.