SEARCH FINESCALE.COM

Enter keywords or a search phrase below:

"Iraqi Freedom" M2A2 Bradley W.I.P.

14989 views
63 replies
1 rating 2 rating 3 rating 4 rating 5 rating
  • Member since
    April 2004
  • From: UK
Posted by Jon_a_its on Friday, July 6, 2012 3:24 PM
Only 4 years?
That's just.... 'resting' lol!

I started adding extra interior details from the verlinden/zaloga books on the original tamiya release while still at school....
I since added 3 or 4 Eduard p/e, resin & another late A2 ODS Kit to the stash

P.S. I've been out of school 30+ years now & still haven't finished it!

Good work so far, btw
;-)

East Mids Model Club 32nd Annual Show 2nd April 2023

 http://www.eastmidsmodelclub.co.uk/

Don't feed the CM!


  • Member since
    December 2004
  • From: ohio
Posted by vonryan on Tuesday, July 3, 2012 12:39 PM

AWESOME BUILD corvettemike. very crisp looking work and very thorough all the way threw build again AWESOME.

Clay

  • Member since
    August 2005
  • From: Los Angeles, CA
Posted by corvettemike on Tuesday, July 3, 2012 10:55 AM

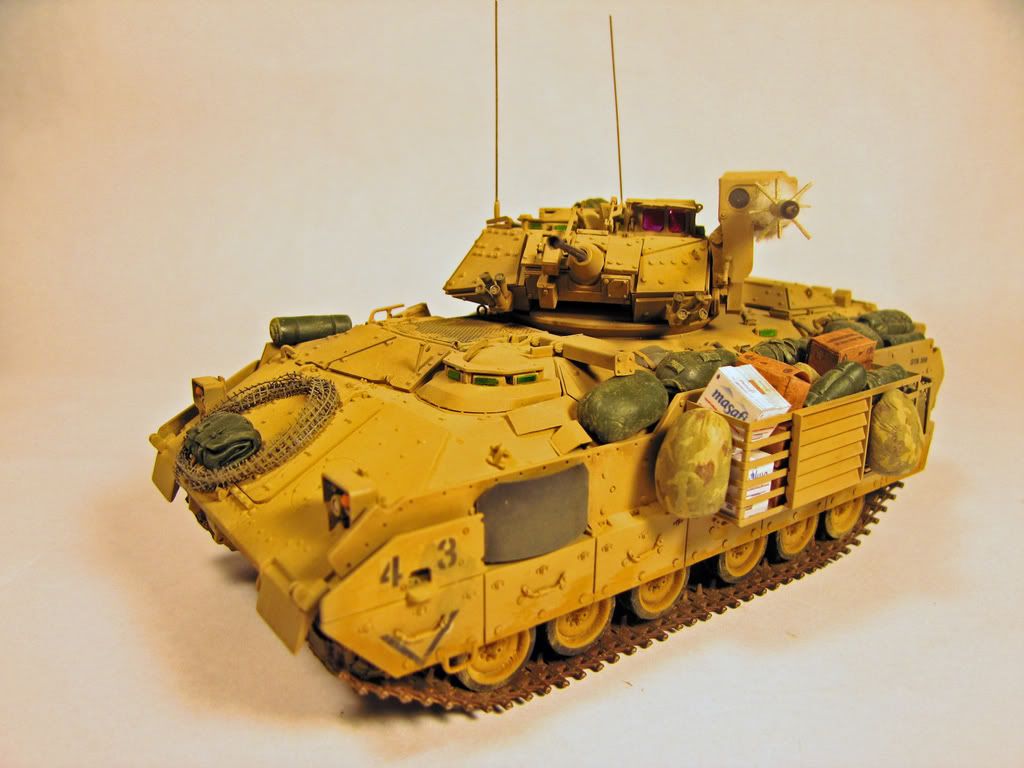
Hard to believe it's been nearly 4 years since I updated this thread. This thing has been shuffling around from box to box in all that time getting tiny amounts done here and there. I still need to do the pioneer tools and paint the vision blocks. I'm not really satisfied with it so I won't be decaling or adding any stowage/figures. By the end Istarted using it as a test bed for weathering effects since I'm really bad at making things look dingy being a auto modeler. My normal project is supposed to look shiny and clean :) Anyway here's where I'm at after 4 years of off and on labor.

Rise my brothers we are blessed by steel in my sword I trust...

Arm yourselves the truth shall be revealed In my sword I trust...

Havoc Models

  • Member since
    August 2005
  • From: Los Angeles, CA
Posted by corvettemike on Thursday, August 14, 2008 3:41 PM
Ya, all the time! I even got the DH logo tattoo. STGOH was pretty good, sorta going back to their roots. The origional DH cd will always be the best, but in all honesty I really didn't care for the Triptych except for Not I, Undying, 1000 Apologies, and The Tide Began To Rise.

Rise my brothers we are blessed by steel in my sword I trust...

Arm yourselves the truth shall be revealed In my sword I trust...

Havoc Models

  • Member since
    October 2004
  • From: Northern Virginia
Posted by ygmodeler4 on Sunday, July 6, 2008 1:50 AM

Looking pretty good, keep it up

 I like your avatar, do you listen to Demon Hunter? I havent heard their new cd, but I liked The Triptych


-Josiah

  • Member since
    October 2007
Posted by White_R34 on Thursday, July 3, 2008 10:09 PM
Hay CorvetteMike Townsy is right you should hold on and finish it in his GB. I'l be there as well.
Building the Impossible Is my main goal!!
  • Member since
    August 2007
  • From: Peterborough, Ontario
Posted by Townsy11 on Wednesday, July 2, 2008 9:35 PM
So..any progress? If your build still doesn't have any paint on it CorvetteMike, your welcome to join "The Gulf Wars GB" I'm currently hostingBig Smile [:D]. (assuming your planning on making it a vehicle from OIF?)
"The object of war is not to die for your country, but to make the other bastard die for his."-- General George S. Patton
  • Member since
    August 2005
  • From: Los Angeles, CA
Posted by corvettemike on Saturday, May 17, 2008 6:00 PM
I'm Still goin on this one (in case you thought I was dead or something), I'm just bored of it. I haven't done any models lately, but I swear I'll get it done by the end of the summer!

Rise my brothers we are blessed by steel in my sword I trust...

Arm yourselves the truth shall be revealed In my sword I trust...

Havoc Models

  • Member since
    September 2006
  • From: Dripping Springs, TX, USA
Posted by RBaer on Monday, May 5, 2008 12:38 PM
Corvettemike, lookin' good.

Apprentice rivet counter.

  • Member since
    August 2005
  • From: Sydney, Australia
Posted by Phil_H on Monday, May 5, 2008 9:19 AM

It depends on the individual vehicle you are modelling. My understanding is that existing vehicles which were upgraded to "ODS" spec retain the mounting points for the flotation barrier, whereas new-build M2A2 "ODS" vehicles were built without the mountings.

It would be possible to omit the barrier parts on the front of the vehicle, but all current Bradley kits have the (stowed) flotation barrier molded into the perimeter of the upper hull, making complete removal of the barrier difficult.


  • Member since
    August 2005
  • From: Los Angeles, CA
Posted by corvettemike on Monday, May 5, 2008 8:47 AM
Looking at Pavel's article in the supplement section, did the Iraqi Freedom Bradleys have the smoother front armor plate with the brackets for the swim barrier removed???

Rise my brothers we are blessed by steel in my sword I trust...

Arm yourselves the truth shall be revealed In my sword I trust...

Havoc Models

  • Member since
    March 2004
  • From: Kincheloe Michigan
Posted by Mikeym_us on Sunday, May 4, 2008 2:23 PM
 corvettemike wrote:

I got a tiny bit more work done on this one...

Here are the spare ammo cases and the unit I.D. plate installed. Tamiya provides a small piece of thin styrene for you to cut this out of.

And I got the gunners hatch installed. Nothing special here, just an extra hand grab or whatever it is I saw in a couple of photos, so I added it from copper wire.

Tongue [:P]

And I added a few more of the myriad of small parts that covers the turret.....


Gino's right about the grab handle but I would try using a slightly thicker diameter brass wire versus the copper wire you were using. Sure copper wire bends easier but it is also a softer material which is less forgiving than brass when it comes to mistakes. And also get Griffon Models workable hinge and grab handle forming set so you can make grab handles or hinges more accurately.

On the workbench: Dragon 1/350 scale Ticonderoga class USS BunkerHill 1/720 scale Italeri USS Harry S. Truman 1/72 scale Encore Yak-6

The 71st Tactical Fighter Squadron the only Squadron to get an Air to Air kill and an Air to Ground kill in the same week with only a F-15   http://photobucket.com/albums/v332/Mikeym_us/

  • Member since
    February 2007
  • From: NOLA
Posted by roosterpelo on Sunday, May 4, 2008 12:19 PM
yes mike the color does shift depending on the angle you look at it. not drastic like going from pink to green, but they do stay along the same color spectrum. never tried the color shifting paint. if you go that route, make sure you post some close up shots of the blocks, and let me know how it went. arty would be the guy to go to with the color questions, i have worked with them a little, and i always thought that the vision blocks looked a greenish blue color to me, while the range finder and sights went a pinkish redish color. anyway, let me know what you going to do, i'll follow the build with anticipation.
chris d.
  • Member since
    August 2005
  • From: Los Angeles, CA
Posted by corvettemike on Sunday, May 4, 2008 9:34 AM
Oh yeah, now I remember that!!! I think there was an FSM article a few years back on that. Thanx. I had an idea, don't know if it would work or not. I heard the laser protection shifts colors depending on the angle you look at it from. I have some green/blue/purple shifting paint I had thought about doing the vision blocks with.

Rise my brothers we are blessed by steel in my sword I trust...

Arm yourselves the truth shall be revealed In my sword I trust...

Havoc Models

  • Member since
    February 2007
  • From: NOLA
Posted by roosterpelo on Sunday, May 4, 2008 8:40 AM

hey mike, not sure if you know this already, but a little trick i find to work on the vision blocks, (when you get to that point), is i use a small bag of party confetti. you can buy a bag od different colors in different shapes: blue, green, red, pink in stars, circles, diamonds, etc etc. i take some colors a\that are close to the actual color, and cut them to shape, and just glue them on. here's how mine went:
like i said, if you knew it already, kudos, if not, hopefully i can help a little. you can find the confetti at any wal-mart, michaels, or dollar store. it wont work so well on WWII armor since they didn't have the laser protection in it.

looking forward to seeing some more of the build, its coming along nicely

chris d.
  • Member since
    October 2007
Posted by White_R34 on Sunday, May 4, 2008 2:45 AM
I'm glad you still working on this one, an can't wate to see the end.
Building the Impossible Is my main goal!!
  • Member since
    December 2007
  • From: Southern NJ
Posted by Jeordicat on Thursday, May 1, 2008 7:57 AM

CM!

I'm watching your progress closely, as I this kit is in my very small stash, and I look forward to getting to it.  Keep up the good work, dude!!!  You're inspiring me to get to it sooner, rather than later.  Although, I'm currently working on Academy's 1/35 Scale M2 Bradley, and Tamiya's 1/35 Scale M1A1 Abrams.  I may move Tamiya's M2A2 ODS Bradley up in order of construction.  Maybe!

  • Member since
    August 2005
  • From: Los Angeles, CA
Posted by corvettemike on Thursday, May 1, 2008 7:31 AM
Actually, the wheels are only temporarily installed. Since they attatch with poly caps, they will be removed for painting. First the Desert Storm sand color will be applied all over, then a frisket film mask cut out with a compass will be applied for painting the tires. The side skirts are tacked on with silly putty and will also be painted seperately. Hpe this un-stumps you....Big Smile [:D]

Rise my brothers we are blessed by steel in my sword I trust...

Arm yourselves the truth shall be revealed In my sword I trust...

Havoc Models

  • Member since
    January 2008
  • From: Adelaide, South Australia
Posted by somenewguy on Thursday, May 1, 2008 5:58 AM
 corvettemike wrote:

O.K. here are the update pics!!!

I assembled and temporarily installed the running gear on both sides. The wheels will be removed for painting. I also added a few other pieces to the upper hull....

Such as the headlights....

I also assembled and installed the little hatch near the rear...

And I got started on the turret. At this point it's about 70% finished....

I also took the time to drill out the end of the barrel.....

And finally, I tacked on the side skirts and mocked up the whole thing....

Gotta ask this question.

How do you (modellers in general) paint in areas that are seemingly impossible to reach accurately after you put the parts together. In this case I'm talking about the inside of all the wheels. and the sides of the hull. Yes, I know you're going to use an airbrush, but you're gonna need to get a sharp line in between the wheel and polyurethane tire thing. And then you're gonna weather it all.

Has just left me stumped.Confused [%-)]

At the end of the day one's work may be completed but one's education never!
  • Member since
    August 2005
  • From: Los Angeles, CA
Posted by corvettemike on Thursday, May 1, 2008 4:46 AM
That's a great article!! My only problem is I'm too far along to make most of the corrections LOL!!! I'm not a fan of disassembly for accuracy. I will however, use that info on the next one.

Rise my brothers we are blessed by steel in my sword I trust...

Arm yourselves the truth shall be revealed In my sword I trust...

Havoc Models

  • Member since
    December 2002
  • From: Valrico, FL
Posted by HeavyArty on Wednesday, April 30, 2008 7:54 AM

An OIF Bradley could have either type hatch.  Both styles were/are still in use, it just depends on how up to date the vehicle is and when/what unit/what vehicle you are depicting.

Check out Pavel's great article to see corrections and upgrades you can make to the Tamiya Bradley kits. The Supplement at the end covers ODS upgrades, added post-Operation Desert Storm (ODS, '90-'91), that are seen on OIF Brads.  

Gino P. Quintiliani - Field Artillery - The KING of BATTLE!!!

Check out my Gallery: https://app.photobucket.com/u/HeavyArty

"People sleep peaceably in their beds at night only because rough men stand ready to do violence on their behalf." -- George Orwell

  • Member since
    August 2005
  • From: Los Angeles, CA
Posted by corvettemike on Wednesday, April 30, 2008 7:47 AM
I saw it once with both handles in one photo and on someone elses model. On an Iraqi freedom Bradley, would it have the updated style hatch or what the kit comes with? I wanna make it accurate, so I have no problem popping off the handle I made and re-doing it right.

Rise my brothers we are blessed by steel in my sword I trust...

Arm yourselves the truth shall be revealed In my sword I trust...

Havoc Models

  • Member since
    December 2002
  • From: Valrico, FL
Posted by HeavyArty on Wednesday, April 30, 2008 7:08 AM
Looking pretty good.  The wire handle you added to the gunner's hatch is in the wrong location though.  The raised line at the top of the hatch is Tamiya's representation of the actual handle.  If you scrape it off and relocate your wire there, it will be correct for that type of hatch.  The side handle is on an updated style hatch with flattened outer surface and it is more rounded.  Keep up the good work.

Gino P. Quintiliani - Field Artillery - The KING of BATTLE!!!

Check out my Gallery: https://app.photobucket.com/u/HeavyArty

"People sleep peaceably in their beds at night only because rough men stand ready to do violence on their behalf." -- George Orwell

  • Member since
    August 2005
  • From: Los Angeles, CA
Posted by corvettemike on Wednesday, April 30, 2008 12:51 AM

I got a tiny bit more work done on this one...

Here are the spare ammo cases and the unit I.D. plate installed. Tamiya provides a small piece of thin styrene for you to cut this out of.

And I got the gunners hatch installed. Nothing special here, just an extra hand grab or whatever it is I saw in a couple of photos, so I added it from copper wire.

Tongue [:P]

And I added a few more of the myriad of small parts that covers the turret.....


Rise my brothers we are blessed by steel in my sword I trust...

Arm yourselves the truth shall be revealed In my sword I trust...

Havoc Models

  • Member since
    August 2005
  • From: Los Angeles, CA
Posted by corvettemike on Thursday, April 17, 2008 12:31 AM
Oh yeah, that's the Tamiya kit, not Academy....

Rise my brothers we are blessed by steel in my sword I trust...

Arm yourselves the truth shall be revealed In my sword I trust...

Havoc Models

  • Member since
    August 2005
  • From: Los Angeles, CA
Posted by corvettemike on Wednesday, April 16, 2008 11:40 PM
 the doog wrote:

Mike, that's looking really awesome!

Hey, also--I took a loook at your website---man, that Titanic wreckage you did was AWESOME! (That IS your model, right?)

INCREDIBLE! 

That wreck took 3 years from start to finish. I started when I was 17, so I guess the best years of my teenage life were taken up with it LOL! One year was research, and each section took a year of work respectively. I'm not sure if I ever wanna try something like that again! I'm starting a little work on the ammo boxes and such tonight, I may be able to get the hatches on and the turret ready for paint too maybe within the next couple of days. As for tomorrow though, I'm off to the Long Beach Grand Prix all weekend!!! GO CORVETTE RACING!!!!!!!

Rise my brothers we are blessed by steel in my sword I trust...

Arm yourselves the truth shall be revealed In my sword I trust...

Havoc Models

  • Member since
    October 2007
Posted by White_R34 on Wednesday, April 16, 2008 9:23 PM
Man your build makes me want to just drop all my othere work an do that one. You must admit the thing has a lot of detail for an academy kit. I love you background and the way you set up your lighting. It makes the images look so much more Professional. Keep it up, your on a roll now!!Thumbs Up [tup]
Building the Impossible Is my main goal!!
  • Member since
    January 2007
Posted by the doog on Wednesday, April 16, 2008 7:26 PM

Mike, that's looking really awesome!

Hey, also--I took a loook at your website---man, that Titanic wreckage you did was AWESOME! (That IS your model, right?)

INCREDIBLE! 

  • Member since
    December 2002
  • From: Valrico, FL
Posted by HeavyArty on Wednesday, April 16, 2008 4:44 PM
Looking like a nice clean build.  Keep us posted.

Gino P. Quintiliani - Field Artillery - The KING of BATTLE!!!

Check out my Gallery: https://app.photobucket.com/u/HeavyArty

"People sleep peaceably in their beds at night only because rough men stand ready to do violence on their behalf." -- George Orwell

JOIN OUR COMMUNITY!

Our community is FREE to join. To participate you must either login or register for an account.

SEARCH FORUMS
FREE NEWSLETTER
By signing up you may also receive reader surveys and occasional special offers. We do not sell, rent or trade our email lists. View our Privacy Policy.