SEARCH FINESCALE.COM

Enter keywords or a search phrase below:

$13.99 Pyrogravure at A.C. Moore's!!!

6010 views
26 replies
1 rating 2 rating 3 rating 4 rating 5 rating
  • Member since
    January 2007
$13.99 Pyrogravure at A.C. Moore's!!!
Posted by the doog on Saturday, March 29, 2008 8:06 PM

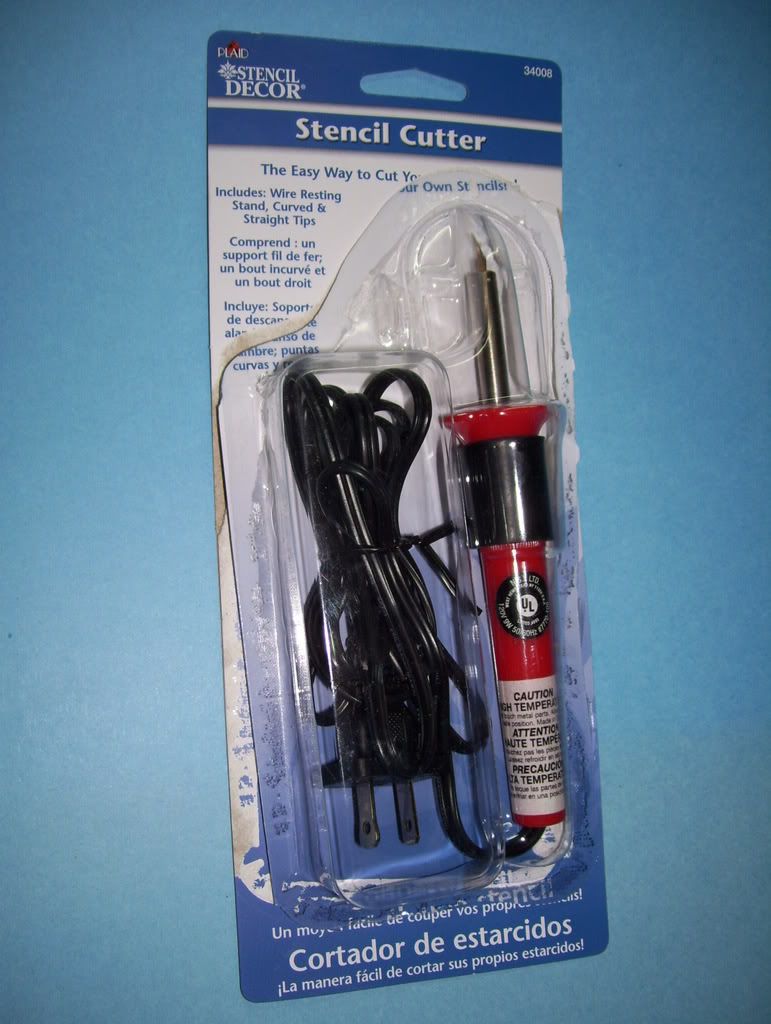
Hey guys--because I'm one of those silly modelers who admits that he doesn't know the BEST way to do zimmerit, and therefore am always open to trying new things, (Smile,Wink, & Grin [swg]) I was at A.C. Moore's hobby chain store today, and saw this in the paint and stencils aisle--a "Plaid/Stencil Decor Stencil Cutter--and I thought "Hmmm..? Looks like a perfect pyrogravure to me!" Tongue [:P]

For those of you who don't know, a pyrogravure is basically a heat tool, used to groove or indent wood or plastic. For years they've been exceptionally difficult to find, the only option really being to order one from overseas (if you could find one) or make one with a jigged-up soldering iron.

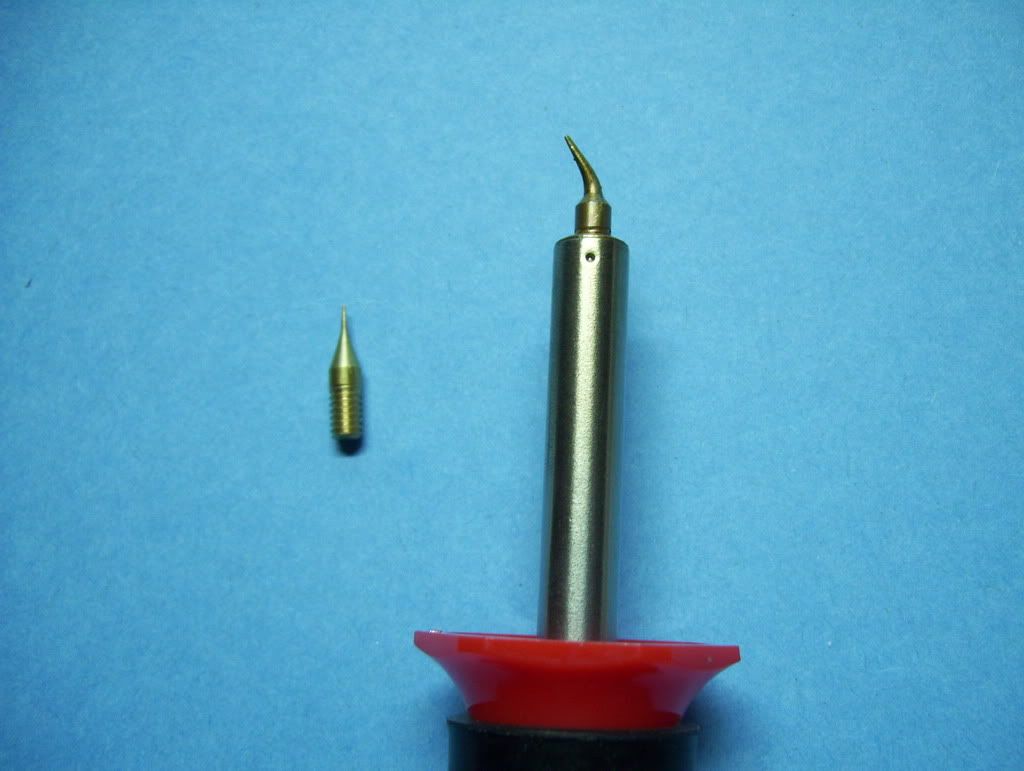
But not now!! Here's the nice, fine tips you get....
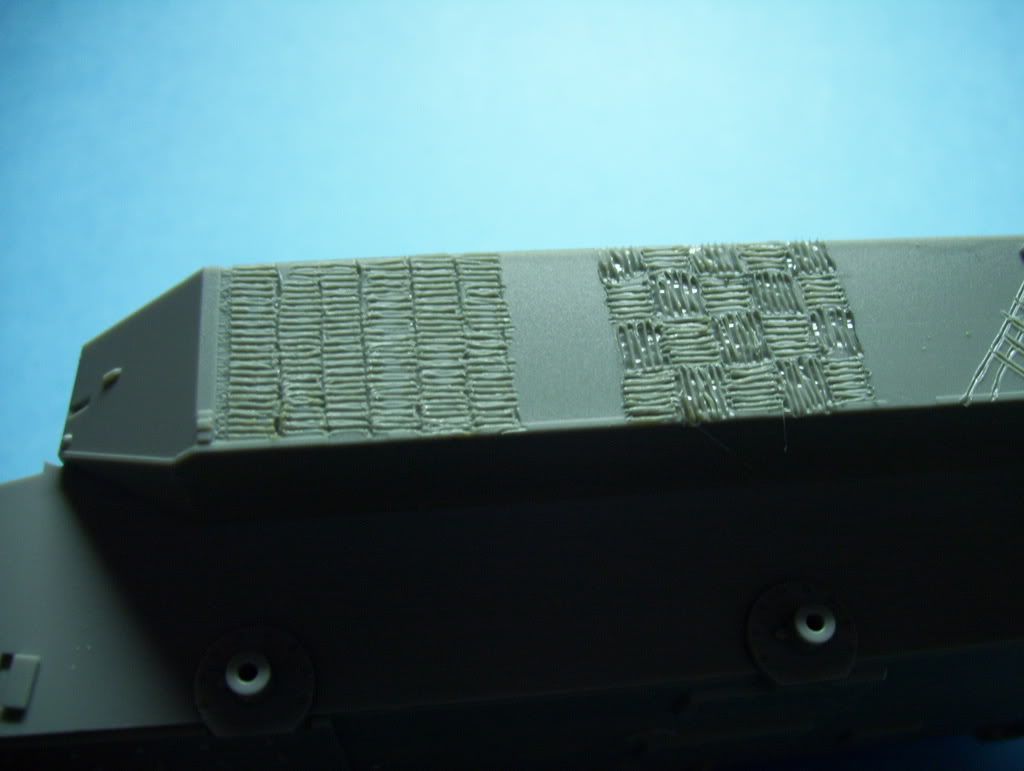
...and here's not even five minutes work, totally un-practiced by me, on a spare DML hull (the Tiger VK4501P command tank)--just "let'e see what this thing can do"....BRAAAP! Big Smile [:D]...It's AMAZINGLY easy! Mind you--this wasn't even "trying"! Just pure improvisation! Imagine this with a bit of planning, care, and cleaning up?! Shock [:O]Tongue [:P]

Purdy cool, huh? 

For those of you with an open mind and a spirit of adventure, there's finally an easy product to get for this methid! I'm gonna try it out on possibly the next build! (After the beater Nomad I'm working on right now) Cheers! Big Smile [:D]


  • Member since
    December 2007
  • From: Bridgeview, Illinois
Posted by mg.mikael on Saturday, March 29, 2008 8:16 PM

Neat idea!!Big Smile [:D] Just one question, does that weaken the plastic to the point of where it breaks easily?

"A good plan executed now is better than a perfect plan next week." - George S. Patton

  Photobucket 

  • Member since
    January 2007
Posted by the doog on Saturday, March 29, 2008 8:28 PM

Not at all!

You're really just scratching the surface a bit! I think you'd have to really smack the plastic to break it! 

  • Member since
    December 2007
  • From: Bridgeview, Illinois
Posted by mg.mikael on Saturday, March 29, 2008 10:22 PM
Wow! I have to think about getting one then.

"A good plan executed now is better than a perfect plan next week." - George S. Patton

  Photobucket 

  • Member since
    December 2007
  • From: Newnan, Ga
Posted by bostonbruins34 on Sunday, March 30, 2008 2:14 AM

That looks good. Are you "pressing" the tip or making a groove by scratching in in? I got a tip from an old wood burning kit...Do you think this would do the trick?? I've been scared to try it. Just wanted to get your opinion...It's about 1 centimeter.

Photobucket" border="0" />

The existence of flamethrowers is proof that someone, somewhere, said to himself, "I want to set those people over there on fire, but I don't feel like walking over there to do it." Group Build
  • Member since
    February 2007
  • From: Bournemouth UK
Posted by Luftwoller on Sunday, March 30, 2008 5:23 AM

Wow, looks like a corker Doog. I think the key to a good pyro is to have a short distance from the handle to the tip to give good control. Im going to have to go to my LHS to see if i can find one for that sort of cash. Thx for posting Bud.

...Guy

..'Your an embarrassment to the human genus, makes me ashamed to call myself Homo'.
  • Member since
    August 2006
  • From: The Green "Mountains", Vermont
Posted by IanIsBored2000 on Sunday, March 30, 2008 8:13 AM
Cool!  I don't know much about zim, but I wonder if you could make your own tip to "heat stamp" a waffle pattern?
"Scanlon: work your knobby hands on the table in front of you, constructing a make-beleive bomb to blow up a make-beleive world."
  • Member since
    January 2007
Posted by the doog on Sunday, March 30, 2008 10:03 AM
 bostonbruins34 wrote:

That looks good. Are you "pressing" the tip or making a groove by scratching in in? 

BB, I just sorta dragged the tip across--definitely NOT "pressing" it in. It works reallly quickly! Just like drawing lines with a pencil! Big Smile [:D]

I'm sure that tip you have would work, but the key seems to be the lenght of the tool, as hell as the heat level--this tool doesn't seem to go quite as hot as a standard soldering iron... 

  • Member since
    November 2006
  • From: Coastal Maine
Posted by dupes on Sunday, March 30, 2008 3:47 PM

Wow. Those are some great results! Smile [:)]

Figures I went right by AC Moore 30 miles away this afternoon...couldn't you have told me this yesterday, Doog? Laugh [(-D]

  • Member since
    February 2007
  • From: Bournemouth UK
Posted by Luftwoller on Sunday, March 30, 2008 3:53 PM

Let you know???? You were probably still winding the handle on your Broadband to get the pictures through LOL

...Guy

..'Your an embarrassment to the human genus, makes me ashamed to call myself Homo'.
  • Member since
    November 2006
  • From: Coastal Maine
Posted by dupes on Sunday, March 30, 2008 3:59 PM

Ahhhhhh....you got me there, Lufty. Sad [:(]

That's what I get for living out in the middle of nowhere. Meh. Ashamed [*^_^*]

  • Member since
    July 2006
  • From: San Francisco Bay Area
Posted by bufflehead on Sunday, March 30, 2008 7:54 PM

Hey doog, nice one!  That iron looks very similar to a woodburning one I bought last year.  Mine doesn't have that nice thin tip like yours, it closer to the one that's in bostonbruins34's photo.  What's the wattage on yours....I think the one I have is 17w.

BTW, I think Crockett, our resident hot knife zim expert, would approve!!

Ernest

Last Armor Build - 1/35 Dragon M-26A1, 1/35 Emhar Mk.IV Female


Last Aircraft Builds - Hobby Boss 1/72 F4F Wildcat & FW-190A8


  • Member since
    January 2007
Posted by the doog on Sunday, March 30, 2008 9:04 PM

Hmmm, not sure the wattage on this Bufflehead--I had it plugged in for a good half hour though, and it just didn't seem like it was up to soldering temp...I may be wrong though.

In any case, it doesn't melt the plastic as fast as the soldering iron tip--a lot of guys have to put a rheostat on soldering irons to make them work, but this one is just about perfect "melt speed"!

  • Member since
    December 2007
  • From: Newnan, Ga
Posted by bostonbruins34 on Sunday, March 30, 2008 9:29 PM

Hey Doog...

What is the wattage on that thing?? I found something on e-bay that is 30 watts and get hot enough to seal plastic without burning a hole in it...

Thanks

The existence of flamethrowers is proof that someone, somewhere, said to himself, "I want to set those people over there on fire, but I don't feel like walking over there to do it." Group Build
  • Member since
    January 2007
Posted by the doog on Sunday, March 30, 2008 11:53 PM
 bostonbruins34 wrote:

Hey Doog...

What is the wattage on that thing?? I found something on e-bay that is 30 watts and get hot enough to seal plastic without burning a hole in it...

Thanks

OH! Shock [:O] I found it! Propeller [8-]

9 watts! It says only "9 watts--apparently that's the perfect burning wattage! Big Smile [:D]

  • Member since
    December 2007
  • From: Newnan, Ga
Posted by bostonbruins34 on Monday, March 31, 2008 5:49 PM
WOW!!!  9 Watts...I looked at my wood burning tool and that cranks out 25...That's like holding a nightlite!! Thanks
The existence of flamethrowers is proof that someone, somewhere, said to himself, "I want to set those people over there on fire, but I don't feel like walking over there to do it." Group Build
  • Member since
    July 2006
  • From: San Francisco Bay Area
Posted by bufflehead on Monday, March 31, 2008 6:18 PM
WOW!! 9 watts is pretty low!  The Radio Shack soldering iron Crockett recommended was 15W!  My 17w can still melt pretty quick if not handled correctly.  You scored doog!!!  I gotta get me one of those!!

Ernest

Last Armor Build - 1/35 Dragon M-26A1, 1/35 Emhar Mk.IV Female


Last Aircraft Builds - Hobby Boss 1/72 F4F Wildcat & FW-190A8


  • Member since
    July 2003
  • From: Pensacola, FL
Posted by Foster7155 on Tuesday, April 1, 2008 3:27 PM

Thanks for the "heads up", Doog...

I picked one up today at Jo-Ann Fabrics where they are stocked in the craft area. It costs a bit more than where you got yours ($14.99), but it seems well worth the expense.

Thanks again!!!

Robert Foster

Pensacola Modeleers

  • Member since
    March 2007
  • From: NJ
Posted by JMart on Tuesday, April 1, 2008 5:52 PM
I think I have a "target" for my weekly Michaels 50% off coupon ;) thanks for the heads up!


  • Member since
    August 2007
  • From: The Plains of Kansas
Posted by doc-hm3 on Tuesday, April 1, 2008 6:34 PM

Doog, picked one up today at "Michaels" craft stores here in the Wichita,Ks. area. I gota find some old plastic, it's laying around here somewhere.

Now where can I find the correct size/widths  for the upper and lower "Zim" patterns for 1/35th?

All gave some and some gave all.

  • Member since
    January 2007
Posted by the doog on Tuesday, April 1, 2008 9:17 PM

WOW! I'll bet the company's stock just went up in the last few days! LOL! Laugh [(-D]

I'm not surprised to hear that you can find them at "Michael's"--they're practically cousins to "A.C. Moore's".

Cool beans! First one to do a model with one wins a prize! Tongue [:P]Big Smile [:D]

BTW, doc-hm3: don't worry too much about that "rivet counting" stuff--just "eyeball" it and you should be fine! Smile,Wink, & Grin [swg]

  • Member since
    August 2007
  • From: The Plains of Kansas
Posted by doc-hm3 on Friday, April 4, 2008 10:43 AM
 This was done on an old warhorse just for experimental evaluation, and as you can see I did it over the existing paint. Thanks to my friend Robert Brown for the donation of the close to 30 yr. old piece of armor. I think that I'll try this out on a new kit it looks rather impressive close up. Thanks for the idea Doog!This was fun and took around two hours. I was experimenting and screwed up above the cable on the first pic.

All gave some and some gave all.

  • Member since
    January 2007
Posted by the doog on Friday, April 4, 2008 10:55 AM

Hey that's cool, doc!

I would recommend that you try using a stiff wire brush on the burned-in areas to de-burr the zim edges a bit, and then maybe a light wash of a weak liquid glue like Testor's to smooth out the zimm a bit. and give it a little more of a rounded, worn appearance--but that sure is encouraging for a starting point!

I'll be curious to see what you do with taking your time and being careful with the scribing! 

  • Member since
    August 2007
  • From: The Plains of Kansas
Posted by doc-hm3 on Saturday, April 5, 2008 2:40 PM
I used a brass brush and liquid glue to meld.. I have never applied zimmerit before, would this be worth pursuing further or just try the putty method?

All gave some and some gave all.

  • Member since
    January 2007
Posted by the doog on Saturday, April 5, 2008 3:40 PM

Hi doc--

Hey, I think that looks really great! It loooks a little more used and smoother now! You know what might make all the difference in the world? Putting a paint job over it-it doesn't look like you tried to paint it yet? I think THAT will certainly "seal the deal" so to speak!

The question is, are YOU happy with it? Don't forget, we're all in this for enjoyment!

This style of zimmerit was not used on Jagdpanthers much, but I have to think if you did it on a regular Panther or Tiger, etc, it would look fine. YOu might want to just try it with a pattern pencilled on (vertical lines to stay within--or did you already do that here? It looks pretty close to neatly done?--but I would have to say that I will certainly be trying this on perhaps a Mobelwagen or other panzer!

Another thing you might want to consider--gluing a thin piece of styrene card to the model and then scribing in THAT--so that way you could actually show "chipped" zimmerit!

Looks great! Slap some paoint on that and see how she looks! 

  • Member since
    November 2006
  • From: Coastal Maine
Posted by dupes on Sunday, April 6, 2008 7:18 AM

Doog - good call on this one. Thumbs Up [tup] Picked mine up at A.C. Moore yesterday, then spent a couple of hours trying to replicate just about every type of zim I've ever seen (including waffle - heh)...this thing is cake! Can't wait to try it out for real! Have a Tiger Late I'll be doing for "Big Cats" so now I'm committed to putting it to the true test. Wink [;)]

One thing I've noticed - the tips that come included in the package get VERY soft after it's been running for a while - mine wasn't completely screwed in when I started, so I pushed it against my metal ruler to tighten it all the way down - and the tip bent! Word to the wise, make sure your tip is fully dialed down before you plug in. Whistling [:-^]

  • Member since
    December 2002
  • From: NYC, USA
Posted by waikong on Sunday, April 6, 2008 10:41 PM
Thanks for the tip, looks great! You think the tip would be too big on 1/48?
JOIN OUR COMMUNITY!

Our community is FREE to join. To participate you must either login or register for an account.

SEARCH FORUMS
FREE NEWSLETTER
By signing up you may also receive reader surveys and occasional special offers. We do not sell, rent or trade our email lists. View our Privacy Policy.