SEARCH FINESCALE.COM

Enter keywords or a search phrase below:

Monogram 1969 Camaro SS-PROJECT COMPLETED-07/20

13774 views
132 replies
1 rating 2 rating 3 rating 4 rating 5 rating
  • Member since
    June 2014
  • From: New Braunfels , Texas
Posted by Tanker - Builder on Thursday, January 26, 2017 8:03 AM

Mustang 1989 ;

   Now , question is , where do I find that product in New Braunfels or San Antonio ?

  • Member since
    March 2012
  • From: Corpus Christi, Tx
Posted by mustang1989 on Sunday, January 29, 2017 6:19 AM


 Forum | Modelers Social Club Forum (proboards.com) 

  • Member since
    March 2012
  • From: Corpus Christi, Tx
Posted by mustang1989 on Sunday, January 29, 2017 6:29 AM

Ok gang. It's been a little bit since I posted any updates here and I'm trying not to bore everybody to death with a picture of a floor mat here and a picture of foot pedals there so I'm waiting till I feel that I've got some substantial progress before posting. Additionally , if I spend all my time taking pictures then I don't get much done at the bench. I build slow enough like it is.

Here we are with the dash in place, carpet / flocking put down everywhere except where the seats go and floor mats down. Folks I'm doing the very best I can with what I have here so there was just no hope of getting the floor mat on the drivers side to go under the pedals unless I wanted to cut that area of the floor pan out and graph in a "blank" piece of styrene and drop the pedals down from the back side of the dash. That's more work than I wanted to do so I cut the floor mat just short of the pedals and did most of my fancy foot work with the pedals themselves to try to make up the shortcoming. I've got the shifter plate along with the shift pattern insert on the plate installed on the center console in this pic and will be adding the PE gauge bezels and gauges as well as the shifter lever soon to round out that console.

The two front seats with the chrome emblem picked out with that chrome pen:

and the back seat that I robbed from the spare kit since my original Camaro build did NOT have a back seat at all in it. Yeah ....the roll bars are going bye bye for the revamp and I'll be installing this seat along with seat belts for the front and rear seats. I'll also be filling in those openings for the roll bar with some sheet styrene.


 Forum | Modelers Social Club Forum (proboards.com) 

  • Member since
    August 2009
  • From: MOAB, UTAH
Posted by JOE RIX on Sunday, January 29, 2017 9:38 AM

Great progress Joe. All the detailing you are doing to the interior are really enhancing the appearance of realism. I think that the alterations you had to do to the  pedals and floor mat pass muster. I was curious to see how that chrome pen would work on more minute detail and it looks like it does well. Everything is looking excellent my friend.

"Not only do I not know what's going on, I wouldn't know what to do about it if I did". George Carlin

  • Member since
    March 2015
  • From: Streetsboro, Ohio
Posted by Toshi on Monday, January 30, 2017 8:18 AM

Amazing detail work, now I'm going to have to build a car too!

Toshi.

On The Bench: Revell 1/48 B-25 Mitchell


Married to the most caring, loving, understanding, and beautiful wife in the world.  Mrs. Toshi


  • Member since
    March 2012
  • From: Corpus Christi, Tx
Posted by mustang1989 on Monday, January 30, 2017 4:41 PM

Joe: Thanks buddy. I may end up giving the rest of that floor mat a shot yet. Thinking.............

Toshi: Thank you for the good word. All I can say about auto building is to be careful. This stuff is addicting.


 Forum | Modelers Social Club Forum (proboards.com) 

  • Member since
    August 2015
  • From: the redlands Fl
Posted by crown r n7 on Monday, January 30, 2017 6:31 PM

Looks  fantastic 


 Nick.

  • Member since
    August 2007
  • From: back country of SO-CAL, at the birth place of Naval Aviation
Posted by DUSTER on Monday, January 30, 2017 7:08 PM

Chevy key fob!?  Revised gages? New script?  And then

a CHROME pen.....

Joe you made a silk purse out of a sow’s ear and your haven’t even got to the outside !  

p.s. thanks for the lead on that pen. I have been using a similar type of pen but it's a ball point type, yours sounds more precise and manageable –seeing your pictures.


Steve

Building the perfect model---just not quite yet  Confused

  • Member since
    March 2012
  • From: Corpus Christi, Tx
Posted by mustang1989 on Monday, January 30, 2017 7:32 PM

Thanks Steve! Haven't seen you around in a while buddy. Hope all is going well for you.


 Forum | Modelers Social Club Forum (proboards.com) 

  • Member since
    August 2007
  • From: back country of SO-CAL, at the birth place of Naval Aviation
Posted by DUSTER on Monday, January 30, 2017 11:14 PM

mustang1989

Thanks Steve! Haven't seen you around in a while buddy. Hope all is going well for you.


Thanks,  All is well,   just been "out an' about".  Then decided to clear and clean off my bench, could only find a gigantic pile of “stuff” where I remember seeing it last.  The excavation is slowly moving along, so took a break to see what was going on and wow, here you are, creating another gem. 


Steve

Building the perfect model---just not quite yet  Confused

  • Member since
    March 2012
  • From: Corpus Christi, Tx
Posted by mustang1989 on Friday, February 3, 2017 8:13 AM

Thanks Steve.

This interior just keeps getting better with each addition. I've got the door handles and window cranks as well as the Camaro badges on the door panels and the console is finished. The shifter is a bobby pin that I bent and sanded the shifter ball to get rid of a seam it had. Center gauges are from the PE set I bought. I'm going to buy another set of floor mats so I can fix that drivers side floor area. I'm not happy with that but I'll fix it. Here we are so far guys:


 Forum | Modelers Social Club Forum (proboards.com) 

  • Member since
    August 2009
  • From: MOAB, UTAH
Posted by JOE RIX on Saturday, February 4, 2017 7:33 AM

Oh Yeah. The interior is shaping up very nicely. All the detail work is quite superb Joe.

"Not only do I not know what's going on, I wouldn't know what to do about it if I did". George Carlin

  • Member since
    March 2012
  • From: Corpus Christi, Tx
Posted by mustang1989 on Saturday, February 4, 2017 7:37 AM

Thanks Joe. Got a dang cold so I slept in this morning as it hit me freekin' hard last night. No bench time this morning. Crying


 Forum | Modelers Social Club Forum (proboards.com) 

  • Member since
    March 2012
  • From: Corpus Christi, Tx
Posted by mustang1989 on Sunday, February 5, 2017 6:20 AM

When this all started the interior didn't have a back seat. I think it was in the kit but for some reason I chose to omit it on the original build. When I got the spare kit it had one in it but it was notched out on the sides for the dang roll bar braces.


This is after stripping the white paint from it:


Here it is after filling in the cut outs with some Evergreen sheet styrene and filling and sanding everything smooth. Additionally, I made some small cut outs where the seat back and seat bottom meet for seat belts which are now installed with the PE seat buckles. Man I guess I need to fill the center "dot" in on those buckles. I'll also be working on the front seat finishes to match the rear seat. No biggie on that though.


 Forum | Modelers Social Club Forum (proboards.com) 

  • Member since
    August 2009
  • From: MOAB, UTAH
Posted by JOE RIX on Sunday, February 5, 2017 9:13 AM

Outstanding looking interior. I like this pic angle as it shows the really nice effects you were able to get on the trim with your chrome pen. Very impressive. By the way, I hope your feelig better and that you're on the recovery side of your cold.

"Not only do I not know what's going on, I wouldn't know what to do about it if I did". George Carlin

  • Member since
    March 2012
  • From: Corpus Christi, Tx
Posted by mustang1989 on Monday, February 6, 2017 4:46 PM

Thanks Joe. I managed to get most of the way recovered over the weekend. I'd rather be sick over the weekend than to either miss work or be sick at work.


 Forum | Modelers Social Club Forum (proboards.com) 

  • Member since
    March 2012
  • From: Corpus Christi, Tx
Posted by mustang1989 on Saturday, February 11, 2017 8:13 PM

Well guys, the floor mats came in the mail yesterday and I went right to work finishing the interior. All I have left at this point are the door lock rods/ knobs at each door but that'll be one of the last things to take care of with this model. I will, however, go ahead and drill the holes in the door panel. Here it is with floor mats at all four seating positions , the front seat belts installed and a Hot Rod magazine to round it all out.


001_zpsbjqaj6y1.jpg


I just hate these engines that are molded in two halves with the oil pan included. facepalm_zpsgaclnqrj.gif


001_zpsgewlndo4.jpg


 After taking care of the seam lines and priming , I carried the black basing over from the aviation side and applied it here.


007_zpswjllpjex.jpg


I went ahead and black based the intake manifold as well. I shot the block with some home mixed Chevrolet Engine Red and shot the coat on and then shot the intake with some "Aluminum". After that I applied a subtle wash to bring out the detail of both pieces. 


005_zpsyib34lqx.jpg


 Forum | Modelers Social Club Forum (proboards.com) 

  • Member since
    August 2015
  • From: the redlands Fl
Posted by crown r n7 on Sunday, February 12, 2017 9:20 AM

thats a work of art !


 Nick.

  • Member since
    March 2012
  • From: Corpus Christi, Tx
Posted by mustang1989 on Tuesday, February 14, 2017 6:33 AM

So I picked up this 1/25 scale Revell Camaro for any spare parts I might need along the way, a few of which I have used. I've gotten some commentary on how bad the old Monogram Camaro was in terms of size and overall accuracy in which I can say that those comments are right on in almost every sense of the word. Nevertheless, my original goal was to restore my first auto build and I will be staying true to that course. However there is a temporary set back with the engine.


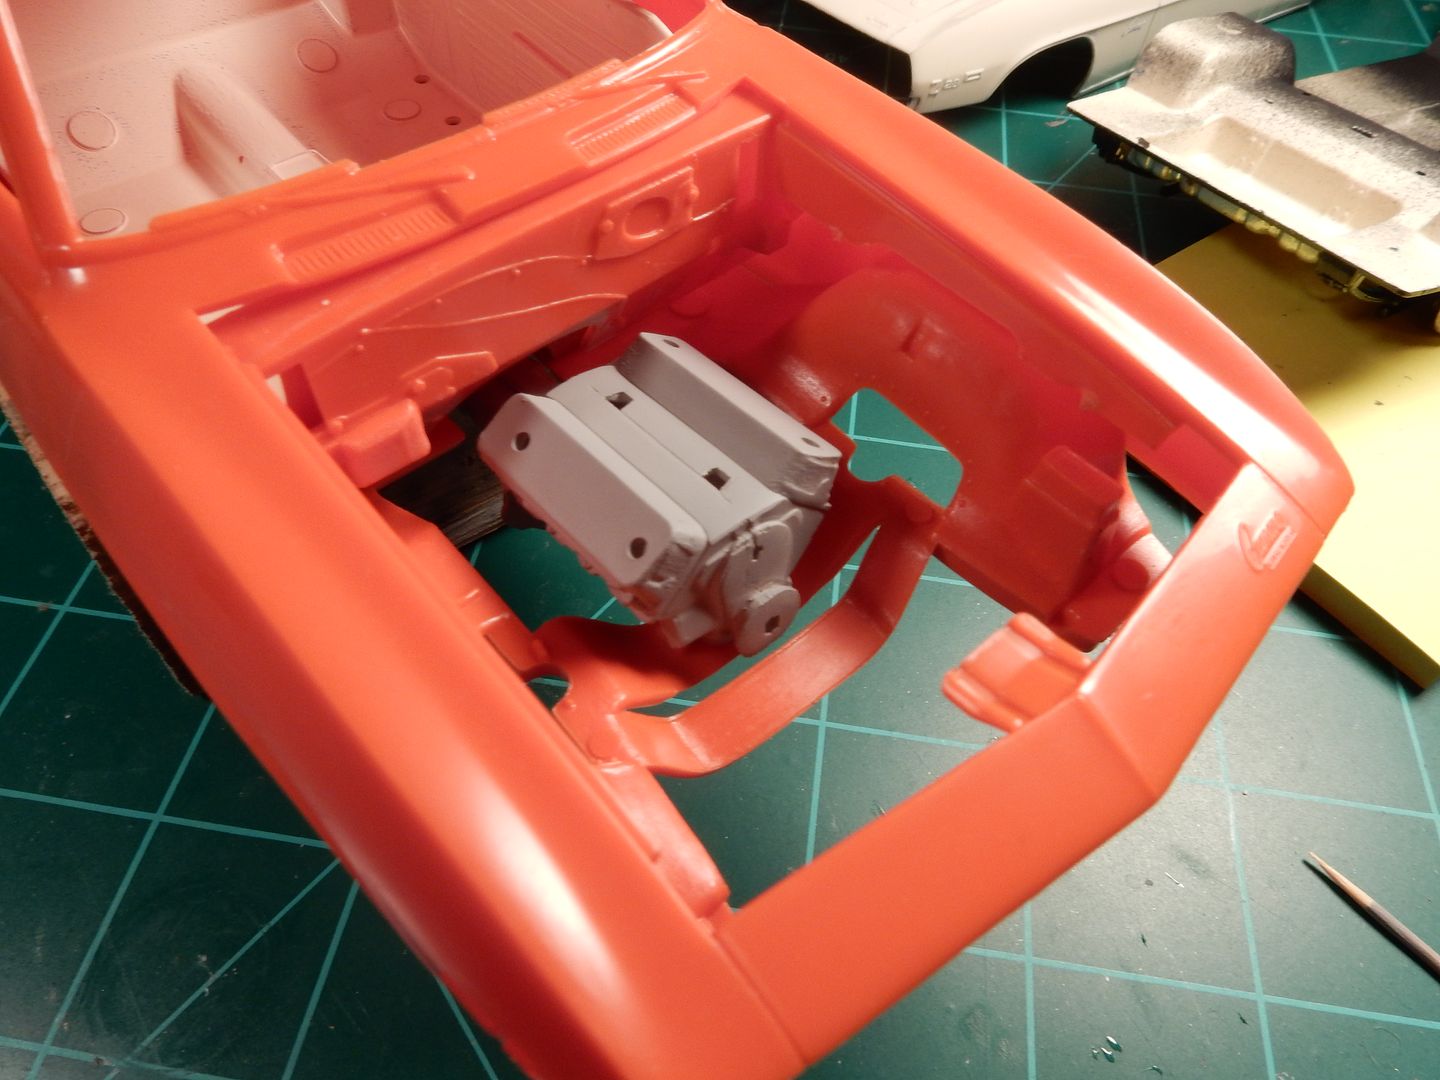
I test fitted the 396 that I've been building up into the mocked up build and I'm glad I did. Talk about what looks like a mouse motor looking 396 in there between the fenders!!!


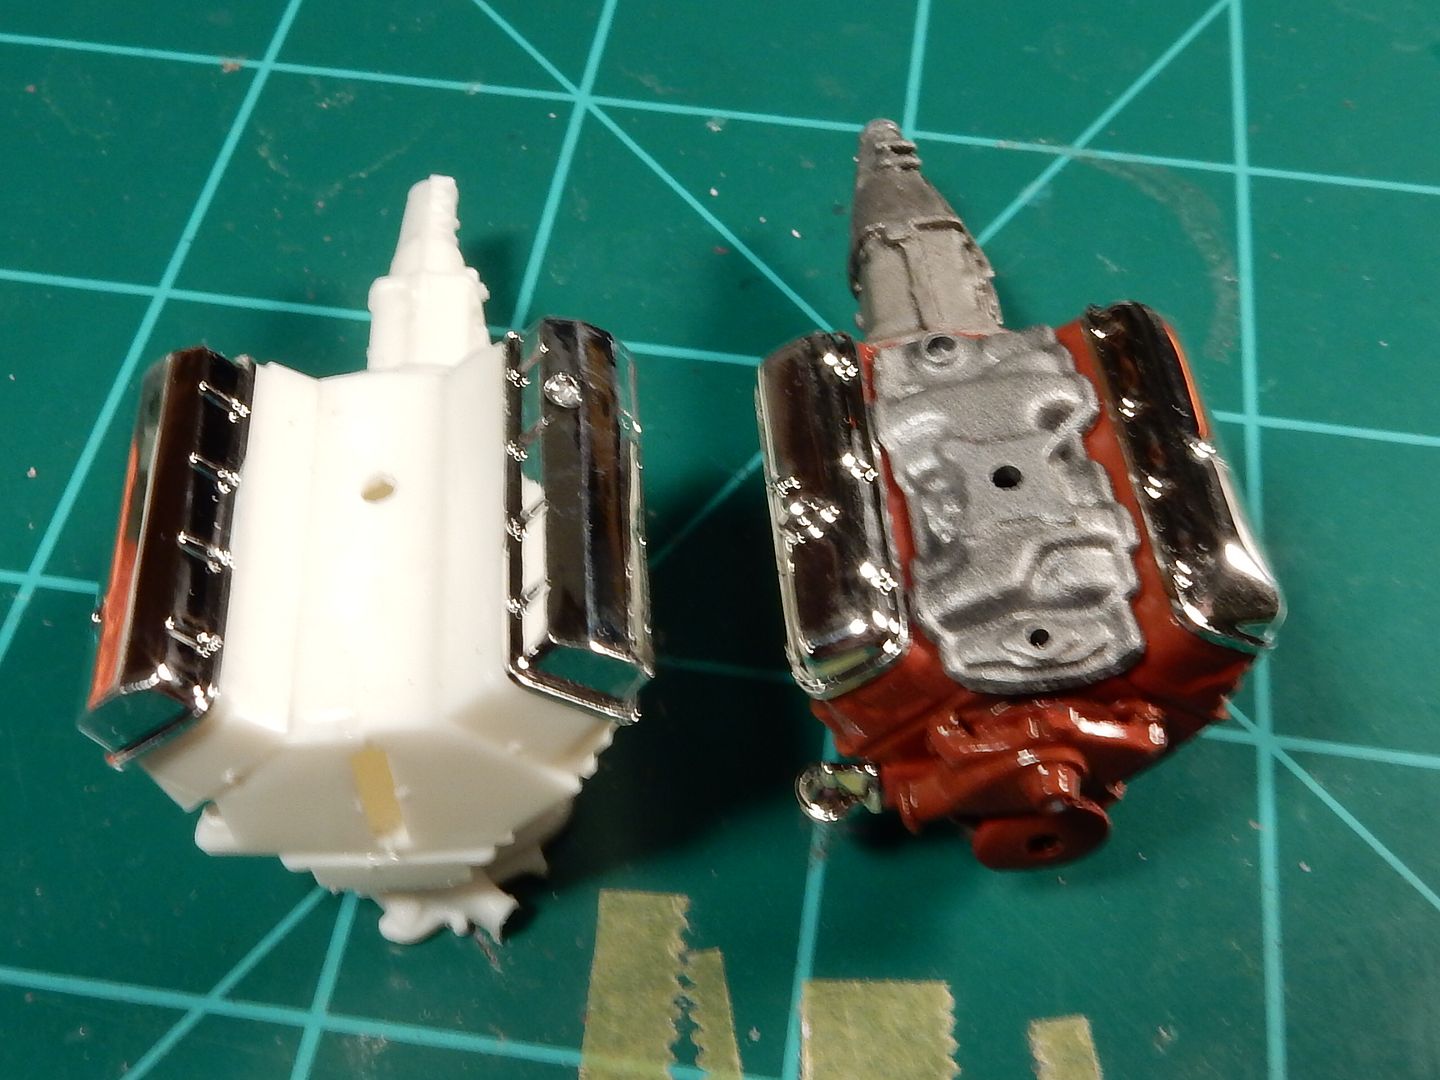
The more I looked at it , the more I saw a distinct difference in not only scale but from the last BB Chevy I built that went into my '54 Panel. So I turned right back to the AMT BB Chevy for an engine build. Both are the "same scale" at 1/25 but look how much bigger AMT's BB is as opposed to Revell's.


  I also grabbed a set of 1/24 scale rocker covers from the Pro Stock Camaro kit that I've got for extra "bulk". They fit perfectly.


Yeah..................a no brainer right?


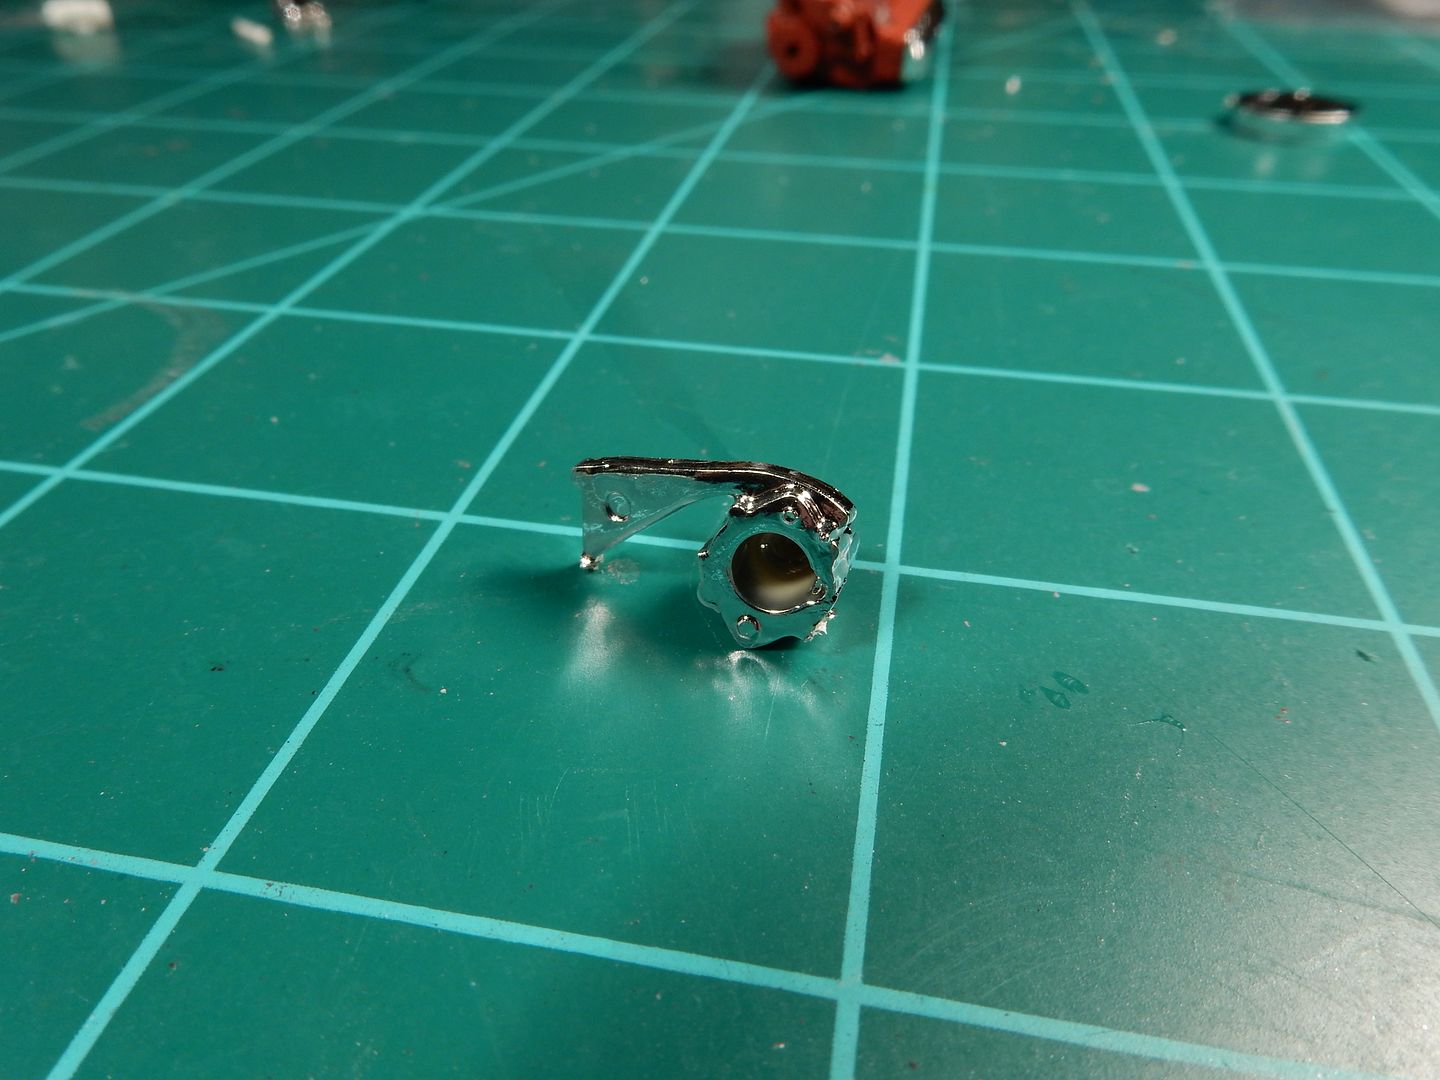
Another thing that I liked about AMT's BB is that it also comes with a bracket for that alternator so I don't have that "mysterious floating alternator" hanging off of the belt out there.


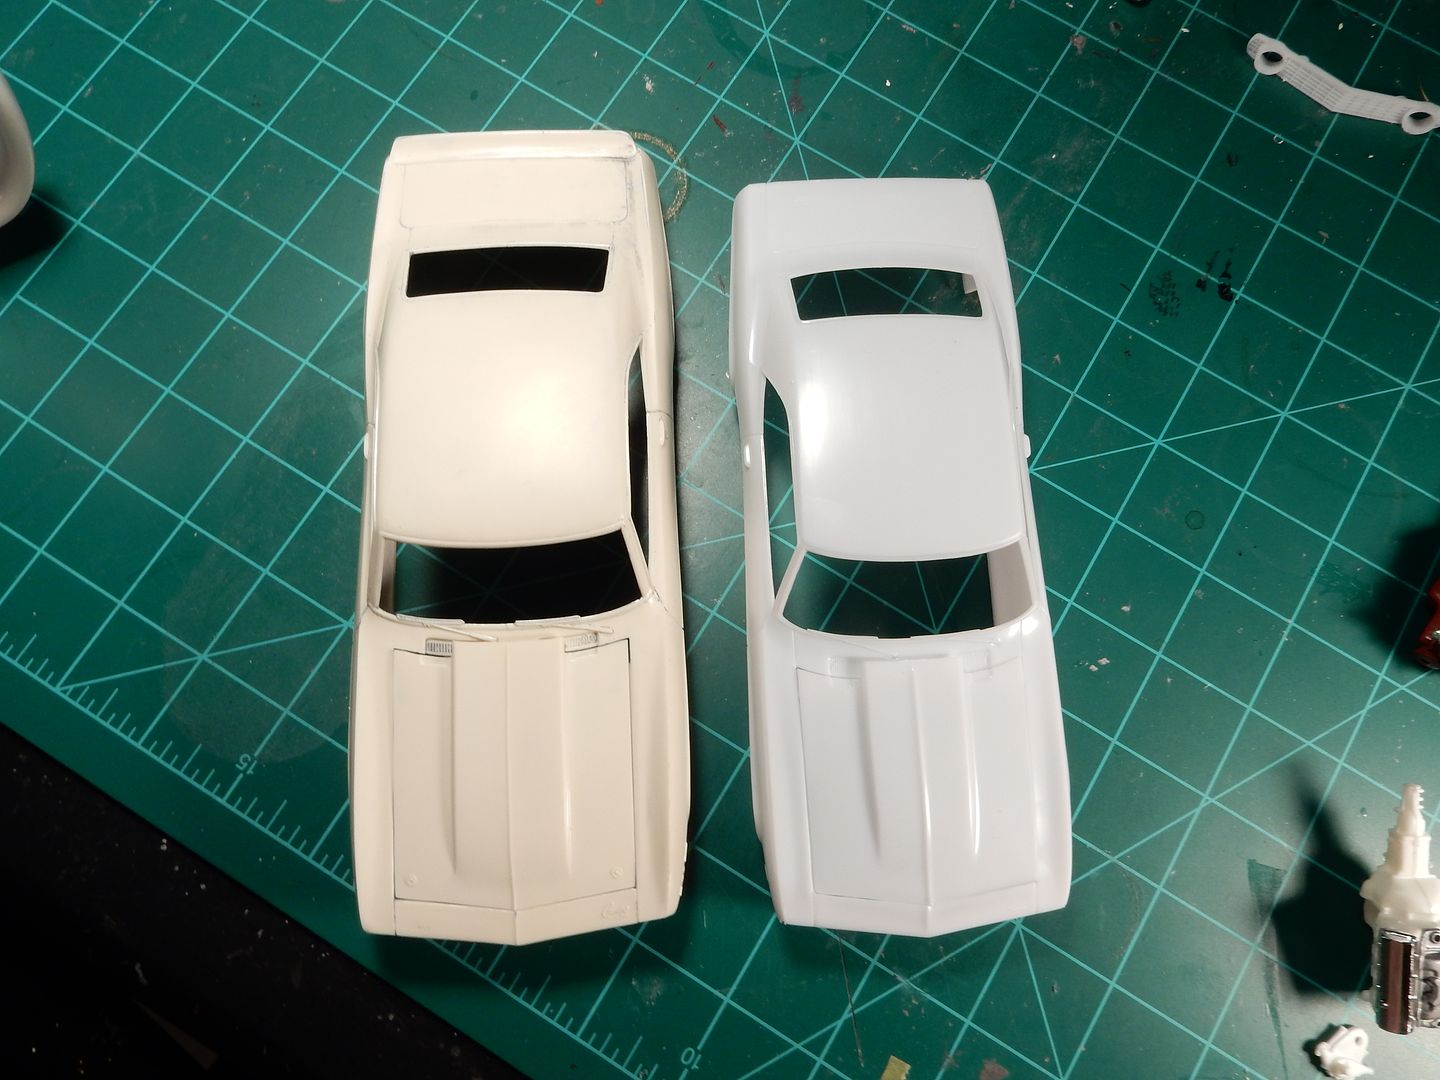
Just as a side note and as a defense to those who are telling me that the Monogram Camaro has some severe dimensional and accuracy issues. Here is the Monogram Camaro body on the left and the Revell one to the right. First off I just don't see how a 1/24th scale model could be this far off in size difference................but that's just me. Secondly there ARE some serious differences in the body lines and curves throughout the body on the Monogram one. Wow! Still................this is all about sentiments so forward with my original intent I go.....


 Forum | Modelers Social Club Forum (proboards.com) 

  • Member since
    April 2015
Posted by Mopar Madness on Wednesday, February 15, 2017 5:27 PM

Man that's a nice Camaro!  Let's see... a green light, 3,000 rpm on the tach, light off the clutch and heavy on the pedal would be just about right!  Might even overtake that 89 Fox body sedan in the next lane! Wink  

Chad

God, Family, Models...

At the plate: 1/48 Airfix Bf109 & 1/35 Tamiya Famo

On deck: Who knows!

  • Member since
    March 2012
  • From: Corpus Christi, Tx
Posted by mustang1989 on Wednesday, February 15, 2017 5:54 PM

Mopar Madness

Man that's a nice Camaro!    Might even overtake that 89 Fox body sedan in the next lane! Wink  


Thanks Chad. That thang with the takin' that Fox body.........it'll never happen. Wink


 Forum | Modelers Social Club Forum (proboards.com) 

  • Member since
    August 2009
  • From: MOAB, UTAH
Posted by JOE RIX on Wednesday, February 15, 2017 11:23 PM

Good to see you that you got the interior all trimmed out. It looks great. Pretty interesting the difference in size and shape between the two. Someone apparently needs some remedial math. So, let me get this straight, you have components from Revell, Monogram and AMT. Well then it seems that your "Frankenstein" wouldn't be quite right unless you have some more additions from, say, JoHan and Polar Lights. Wink (not sure if either of those make Camaros though)Embarrassed

"Not only do I not know what's going on, I wouldn't know what to do about it if I did". George Carlin

  • Member since
    March 2012
  • From: Corpus Christi, Tx
Posted by mustang1989 on Saturday, February 18, 2017 7:35 AM

LOL! Thanks Joe.

I had what I call lots of progress yesterday. I'm back in the fight again after re-hashing the engine size ordeal and am back on the road with this puppy. First off this thing had a nasty mount hole in the oil pan for the Chevelle that it was supposed to go in so I had to fill that in with super glue, sand flush and smooth out:


Then I had the sprue attachment points to contend with which always seem to show up in the most unwanted places like at the ends of cylinder heads, smack dab in the middle of the transmissions.........on the bottom nonetheless and places like this timing cover. This stuff bugs me so I got rid of that from the timing cover and the rest of the attachment points on the engine pieces:


I also got this cool decal sheet with a bunch of oil filter decals on it. Nice touch for the bottom end as well as the PE oil pan drain plug. I toned the engine paint down and brought out the molded in detail with an airbrushed coat of Tamiya Smoke.


I carried the fuel pump over from the other engine but replaced the starter with the AMT offering because it had better details than the Revell starter did.


I tried something new with the exhaust manifolds. I primed them in flat black and shot a very light coat of Alclad II Polished Aluminum on them to give them a true iron look. I was happy with the results but the pictures don't seem to capture the dark steel/ iron look that they actually are. Believe me, they aint this flashy:


 Forum | Modelers Social Club Forum (proboards.com) 

  • Member since
    August 2009
  • From: MOAB, UTAH
Posted by JOE RIX on Sunday, February 19, 2017 11:14 PM

That is some dynamite progress Joe. It is indeed sometimes head scratching why some kits are molded with attachment points in very disadvantageous spots. Whether it be on highly visible ones or very difficult to sand ones. Love the oil filter decals. That's a sweet touch. You're on a roll my friend. Keep it going. 

"Not only do I not know what's going on, I wouldn't know what to do about it if I did". George Carlin

  • Member since
    May 2013
  • From: Indiana, USA
Posted by Greg on Monday, February 20, 2017 11:13 AM

I missed a lot, catching up.....

That interior is absolutely awesome, Joe. YesYesYes

A belated thank you for the info on the Molotow Chrome Pens. Wow, they look too good to be true. Out of stock already at Art Primo, but they'll be back and in meantime they are in stock elsewhere.

As usual, your engine block finish looks real. I still don't know how you do that.

  • Member since
    March 2012
  • From: Corpus Christi, Tx
Posted by mustang1989 on Tuesday, February 21, 2017 8:19 PM

Thanks Joe and Greg. Yes

No problem there Greg on the the Molotow pens. Hope you get yours soon. As for the engine block finish...............I've got an idea.


 Forum | Modelers Social Club Forum (proboards.com) 

  • Member since
    March 2012
  • From: Corpus Christi, Tx
Posted by mustang1989 on Friday, March 10, 2017 10:09 AM

Been a while since the last update folks. I had a bit of trouble out of the paint. I actually had this thing primed and painted as of last Friday but then things went wrong...........REALLY wrong. I had sanded all of the molded emblems from the body and primed with Tamiya Primer. Using automotive paint (Mystic Teal Metallic) I began to shoot the color onto the body. It all looked superb! I mean it was the best coat of color I've laid down yet , and then.....................it went south................in a hurry! My emblems all came back but instead of being raised they were sunken in. I'll Illustrate:


Additionally there were small ripples in the plastic!!!!!!!!!! Dammit!! I've since stripped all of the paint from the body and have been sanding all dang week. I put some plastic sprue shavings in a jar and mixed some Tamiya thin cement with it to form a liquid plastic and applied it to all areas where the emblems were, let it harden and smoothed all of those back out. I still have some touch up to go but should be ready for AIRBRUSHING this paint on in thin layers by the end of the weekend. I just shot the paint on way to thick is all that happened and the bad thing is ...................I know better. I finally got it back in primer this morning:

So far so good there. I'll let it dry for a couple of days and try the base coat again with the airbrush.

While all that's going on I ended up switching out the rocker covers with a set of Baldwin Motion ones. I shot a coat of Tamiya Smoke over 'em and brought out the "Motion" letters. I drilled the holes out for the rocker cover "wing bolts" that I'll be installing at a later point in the engine build.  I also switched out the intake manifold and painted that this morning. Belt and alternator are now mounted and I'm fabricating an alternator mount for it so we don't have that mysterious floating alternator out there.

Still got some detailing to do the rocker covers but that's small stuff.


 Forum | Modelers Social Club Forum (proboards.com) 

  • Member since
    April 2015
Posted by Mopar Madness on Friday, March 10, 2017 12:35 PM

I love the rocker covers!  Those manifolds look quite convincing too! Nicely detailed.

Chad

God, Family, Models...

At the plate: 1/48 Airfix Bf109 & 1/35 Tamiya Famo

On deck: Who knows!

  • Member since
    December 2007
  • From: Eagle River, WI
Posted by PANZERJAGER on Friday, March 10, 2017 12:51 PM

Mopar Madness

I love the rocker covers!  Those manifolds look quite convincing too! Nicely detailed.


would look better with some bolt heads though...


 PANZERJAGER


JOIN OUR COMMUNITY!

Our community is FREE to join. To participate you must either login or register for an account.

SEARCH FORUMS
FREE NEWSLETTER
By signing up you may also receive reader surveys and occasional special offers. We do not sell, rent or trade our email lists. View our Privacy Policy.