SEARCH FINESCALE.COM

Enter keywords or a search phrase below:

NEW PICS--page 2--"improved" MPC Charger 500

10788 views
53 replies
1 rating 2 rating 3 rating 4 rating 5 rating
  • Member since
    January 2007
NEW PICS--page 2--"improved" MPC Charger 500
Posted by the doog on Friday, August 1, 2008 1:17 AM

Hi guys!

Well, go easy on me! I almost tore my hair out finishing up this very diffficult kit! Man, I got new respect for you car builders! If anyone has tried to build this, you know that it's a bear of a kit. Well, I originally started this as just a basic experiment to build and A/B the paint type against the other car on my desk right now. I painted this with acrylics; the Super Bee still in progress is being done with enamels.

But, dang it; you know me--couldn't let it go as just an OOB; besides, the Charger is my absolute favorite muscle car!!! Tongue [:P] So I rolled up my sleeves and...

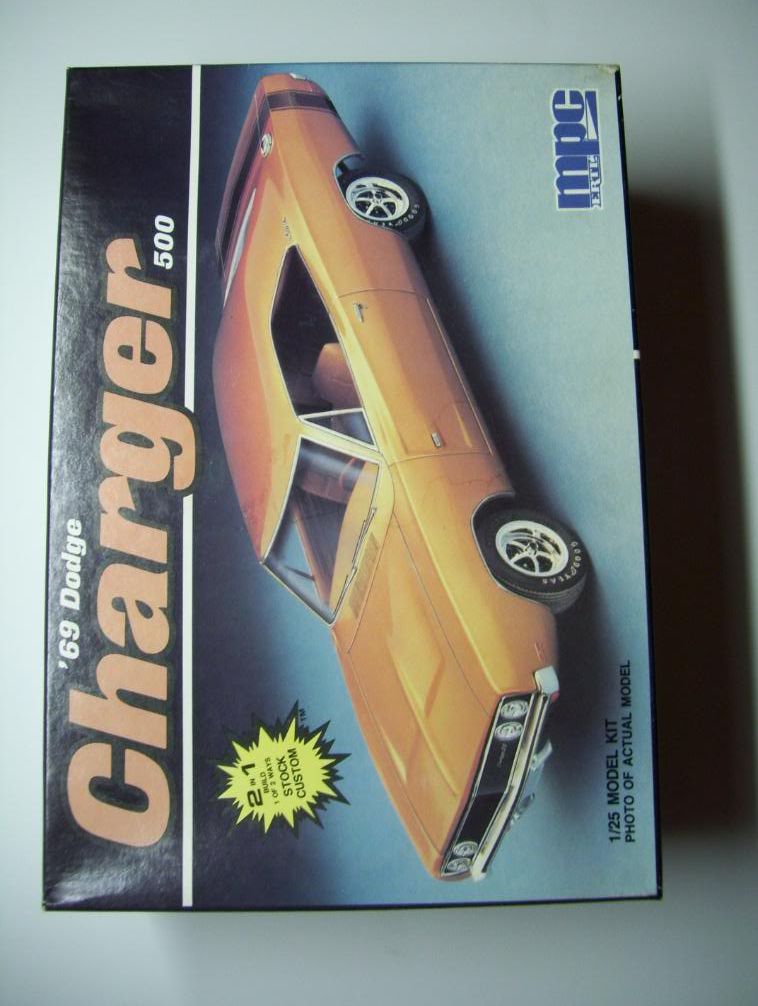
Here's the kit box: the old MPC 1/25 Charger 500. 

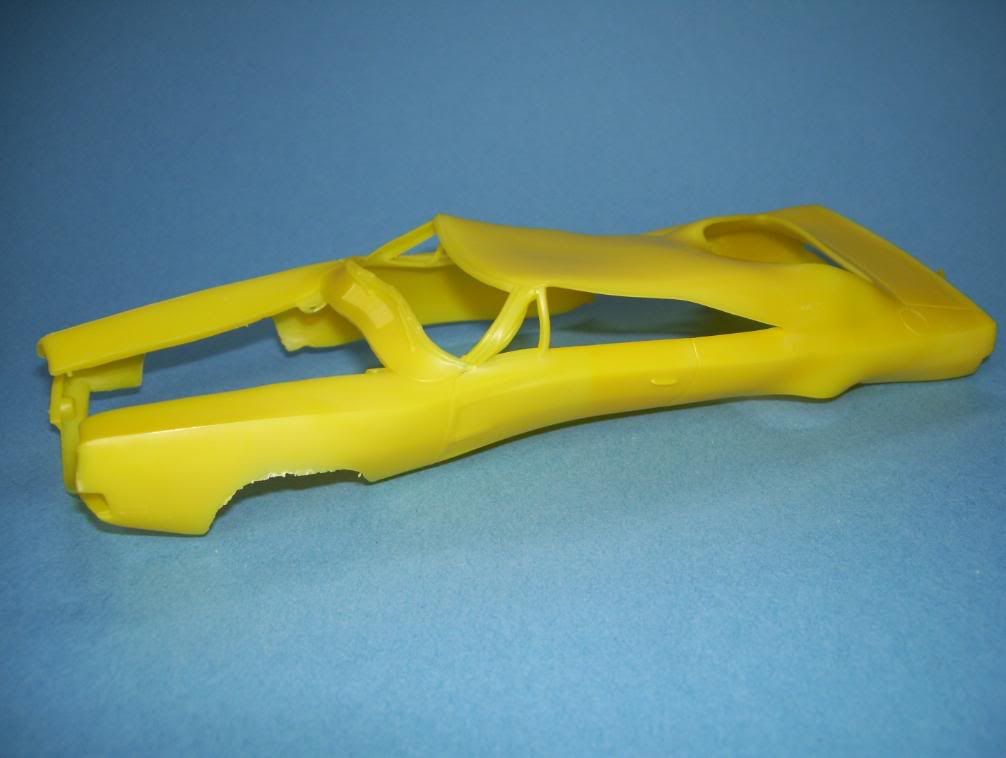
LOL! Here's how the first kit arrived from ebay! (The seller sent me a second one!)

The kit was built up, and painting was started with first a coat of Tamiya white primer, then a coat of flat Model Master Dark Green, and then MM Dark Green Pearl--about 5-6 coats in all, with MUCH sanding and polishing. UGH! WHile that was drying, I worked on the interior. 

I scratched some door handles and arm rests, added head rests, flocked the carpeting and then added fine black sandpaper matts; also painted in acrylics. The white coat is just the Tamiya primer, with a gray oil wash added for depth.

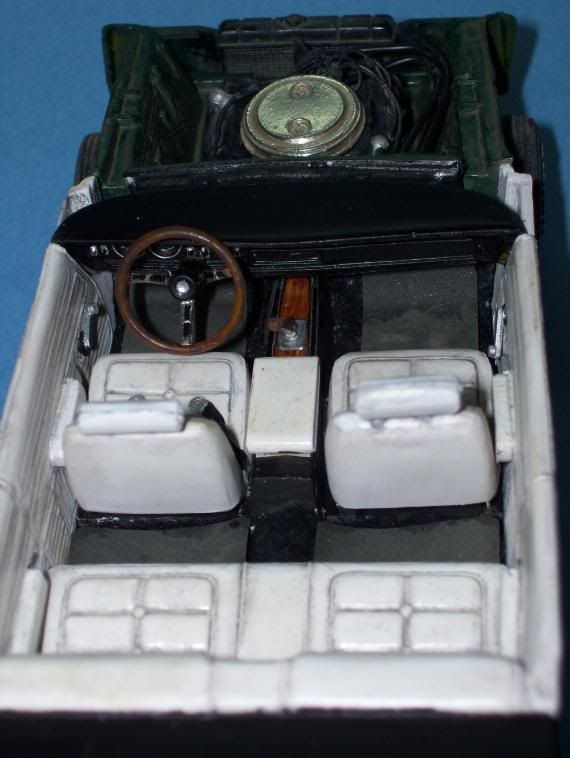
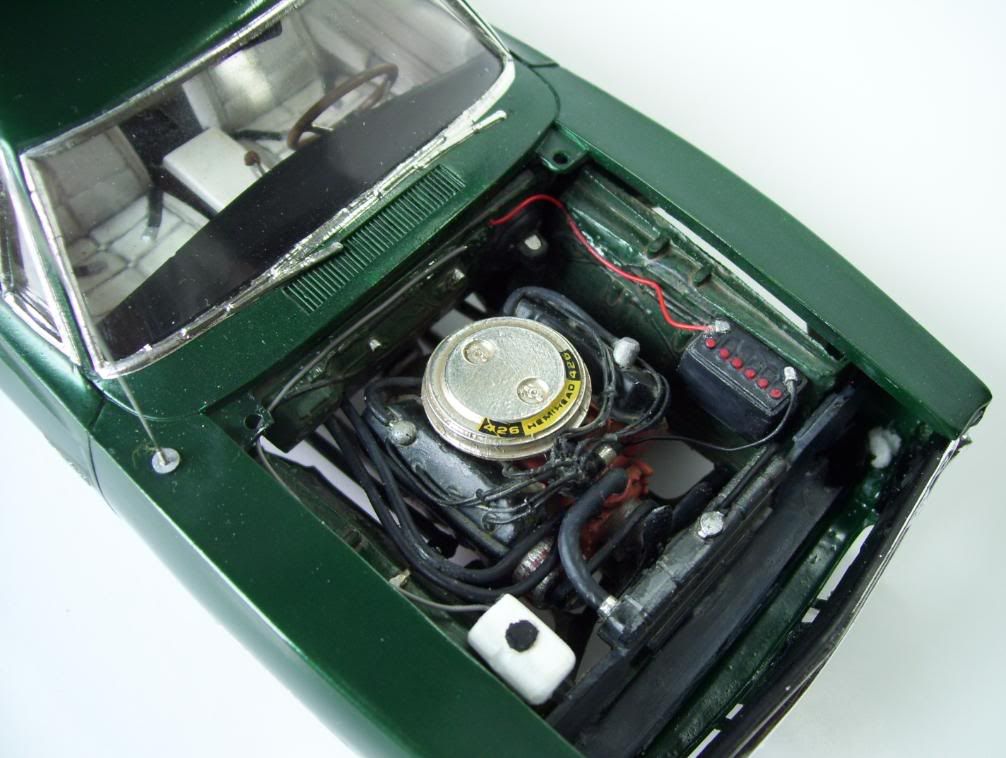
On the engine so far in ths photo, I have added Detail Master hoses, wiring, added foil to the air cleaner and an AM decal to the Hemi,  and I scratched those silver ducts n the Hemi covers; don't ask me what they are or what they do! Whistling [:-^]


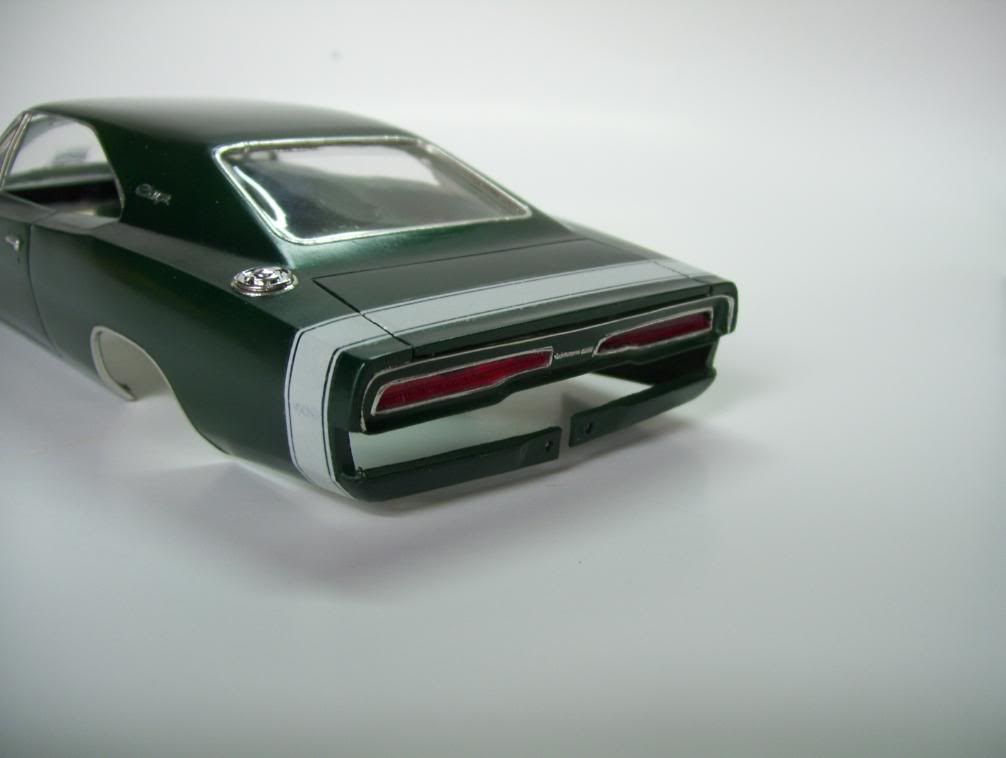
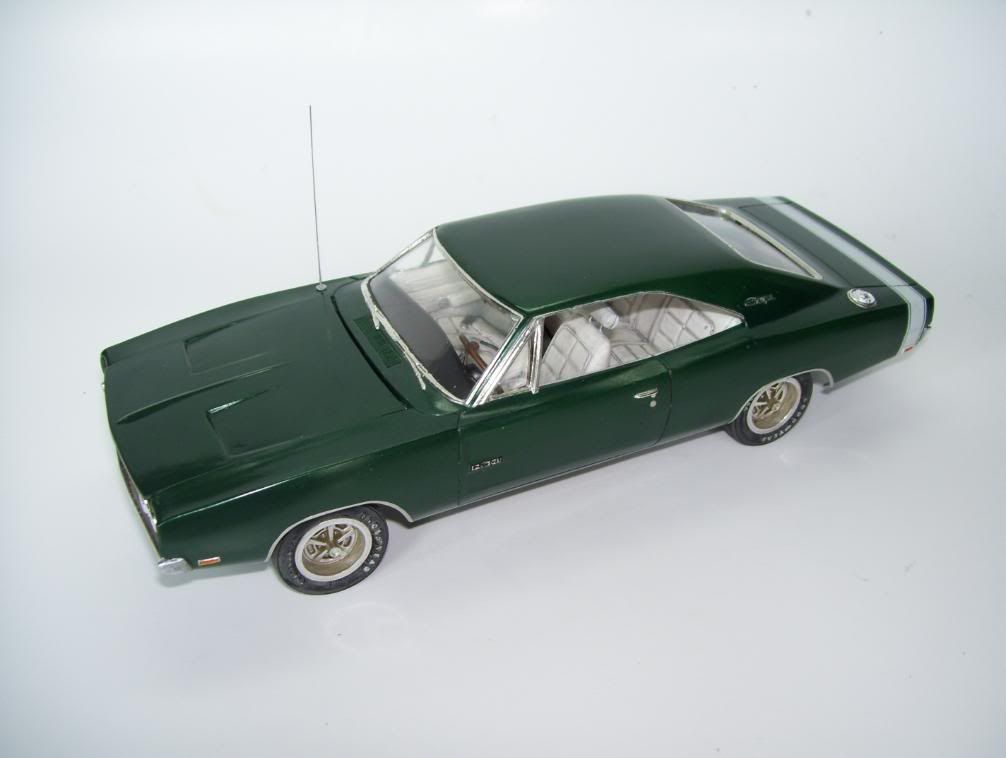
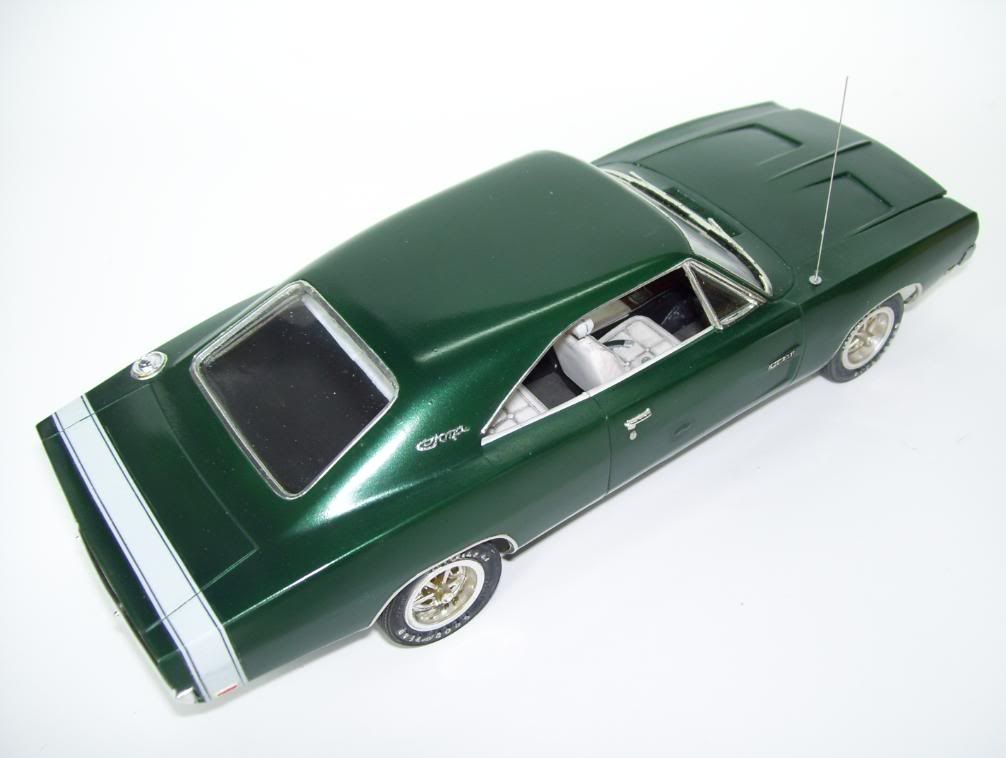
I then finished up the painting, foiled all the chrome parts, and applied the rear stripe decal--this was NOT fun! Before applying the decal, I noticed that the position of the molded-on rear side markers was such that they would never have lined up in the middle of the stripe decal--they were too far back. SO I cut them off and sanded the part smooth, carefully and patiently repainting a patch of the area...days tick by..I had an excellent AM decal that I'd got off ebay, which looked MUCH more realistic than the kit decals, but I ruined it by overzealous waxing--it was so thin it chipped!. The first kit decal went on and looked like crap; it was so old and thin that the color showed through! So I got the second decal from the first melted kit, and put the second decal on over the first as well, as the AM decals I had had are now OOP. It doesn't look anywhere as near as good as the AM did, but it looks much better than just the one semi-transparent one!

Headphones [{(-_-)}]One of these things is not like the other...notice the darned valance on the rear of the kit compared to a real one?--NO UPPER TRIM! How could I paint the black interior of the rear panel without the trim? THAT would look stupid!? Sigh....what to do? It's already been painted! Sigh [sigh]

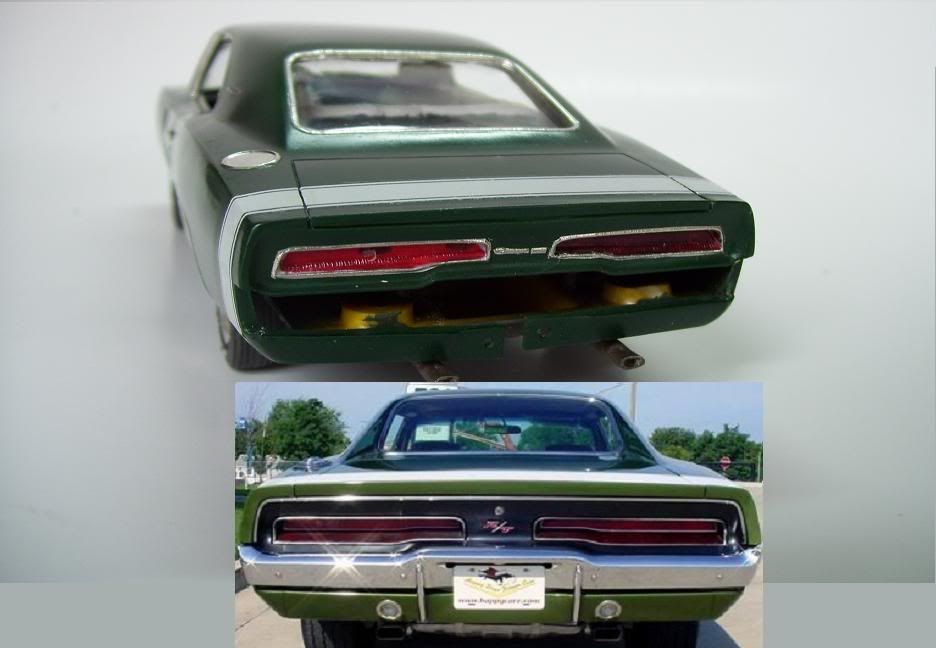
Oh well....get out the Exacto blade, and with the ol' Optivisor, scrape, scrape, scrape...then I took some .015 rod, and added it using Tenax R7 model glue. Here it is in-progress..

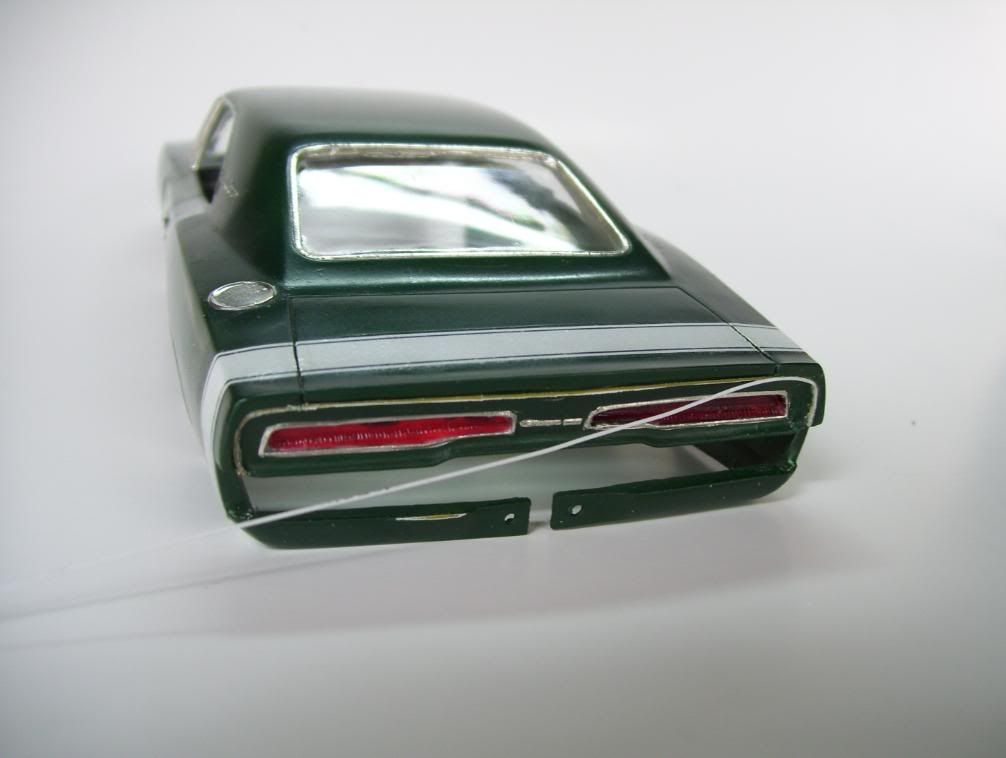
..and finito; again, note the missing side markers. The windows were added with 5-minute epoxy. (A special "THANKS!" goes out to a fellow modeler here who wishes to remain anonymous who helped me out with a spare after I ruined the first one with epoxy, and found that the melted kit's one was too warped to fit!)

To add the side markers, I very carefully cut the ones off the warped kit with a razor blade and glued them onto a scrap sheet of very thin plastic; I then painted them, cut them out of the sheet with a razor blade, and superglued them in place.

And here's the finished shots...my first "shiny" car model in over 10 years! The antenna was made from a guitar string...

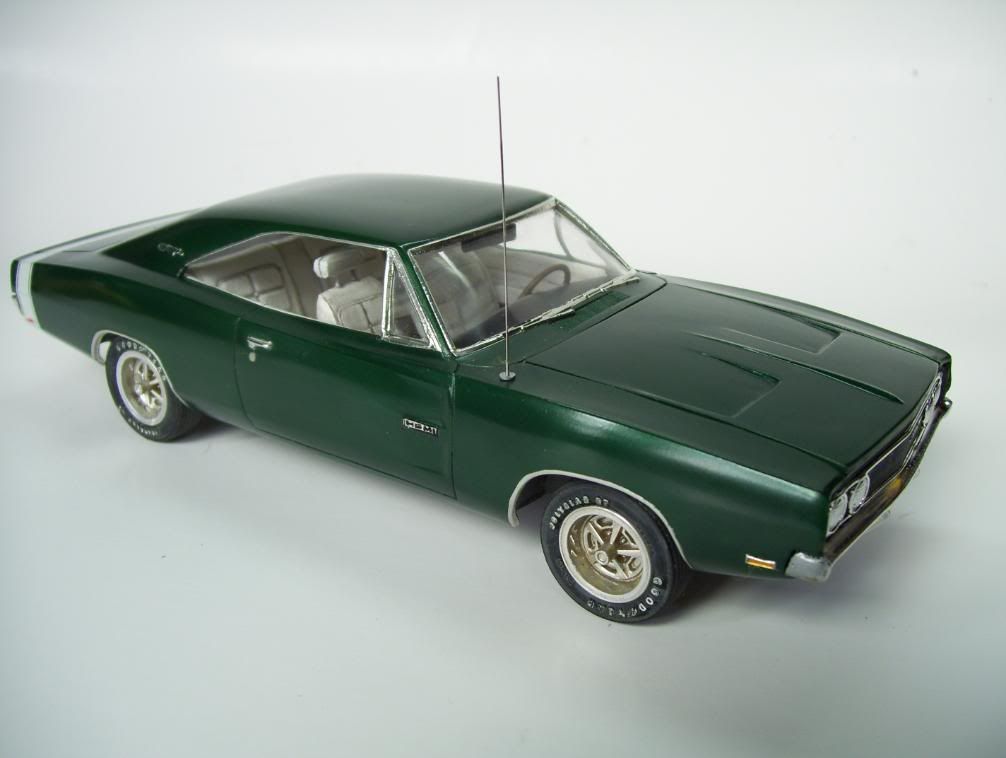
I also had added a scratched rear view mirror...


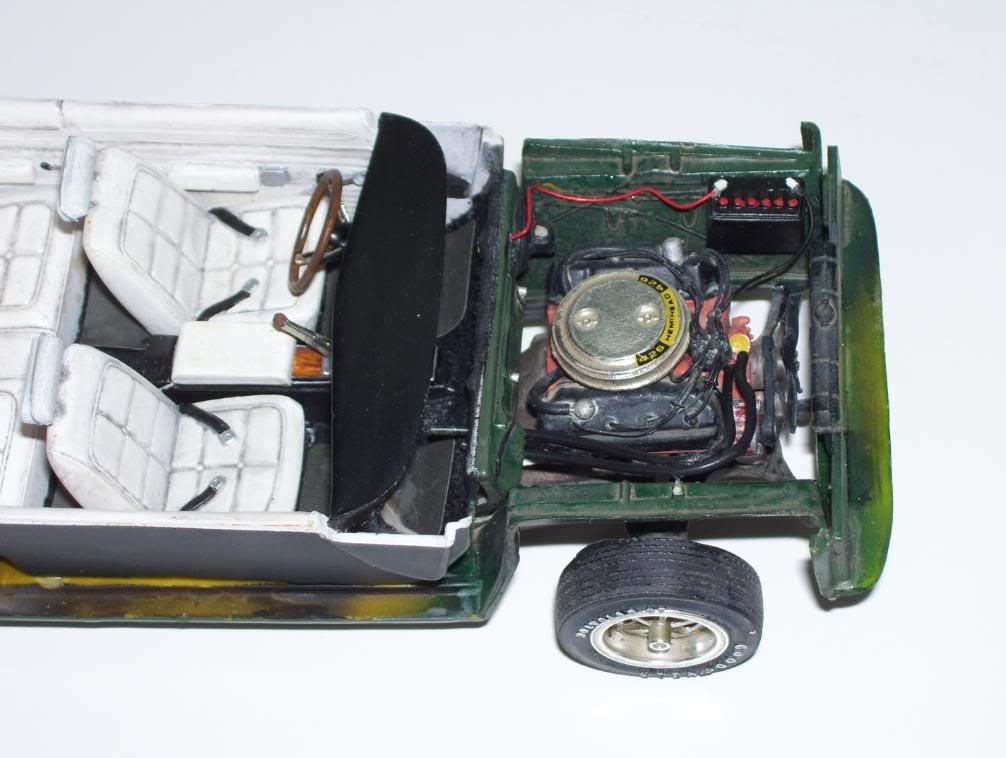
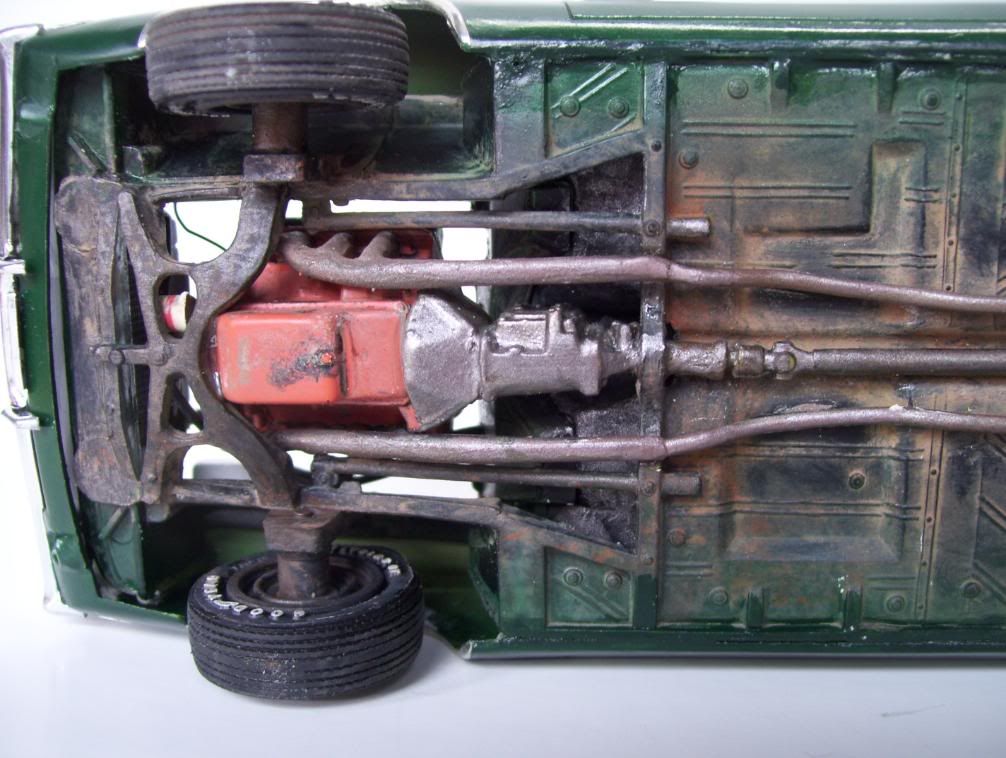
The engine turned out much better than I had planned, LOL! Laugh [(-D] I added some more stiff after mating the body/chassis...I scratched a cleaner fluid reservoir, added a radiator overflow hose, that little coil thingy on the front of the Hemi, a longer, more accurate hose to the radiator with foil clamps..I weathered the engine bay with a dirty oil wash. Hey, I gotta put some "Armor personality" into it!? Whistling [:-^]

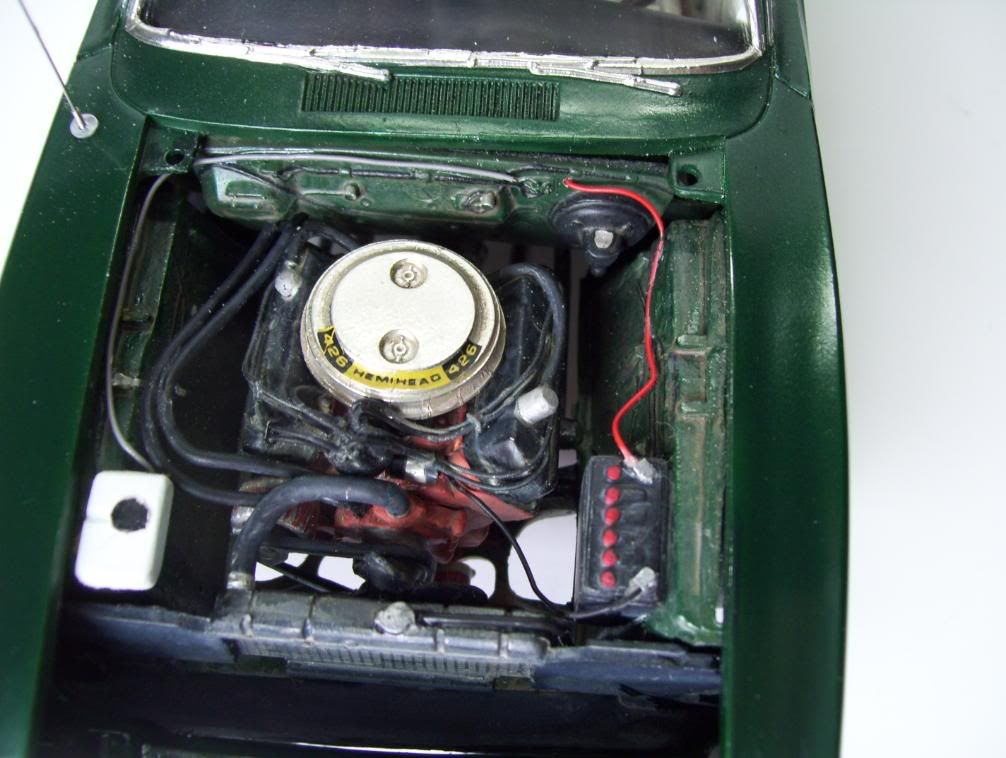
I'm willing to say that I'm not sure if all the plumbing goes where it's supposed to. "Hey man, I just build the things, I don't now how to make 'em run!"

The underside, weathered with pastel powders. The pipes were an absolute b**ch to get to meet--I actually had to add a .060 spacer! The engine is painted in my own Tamiya mix.

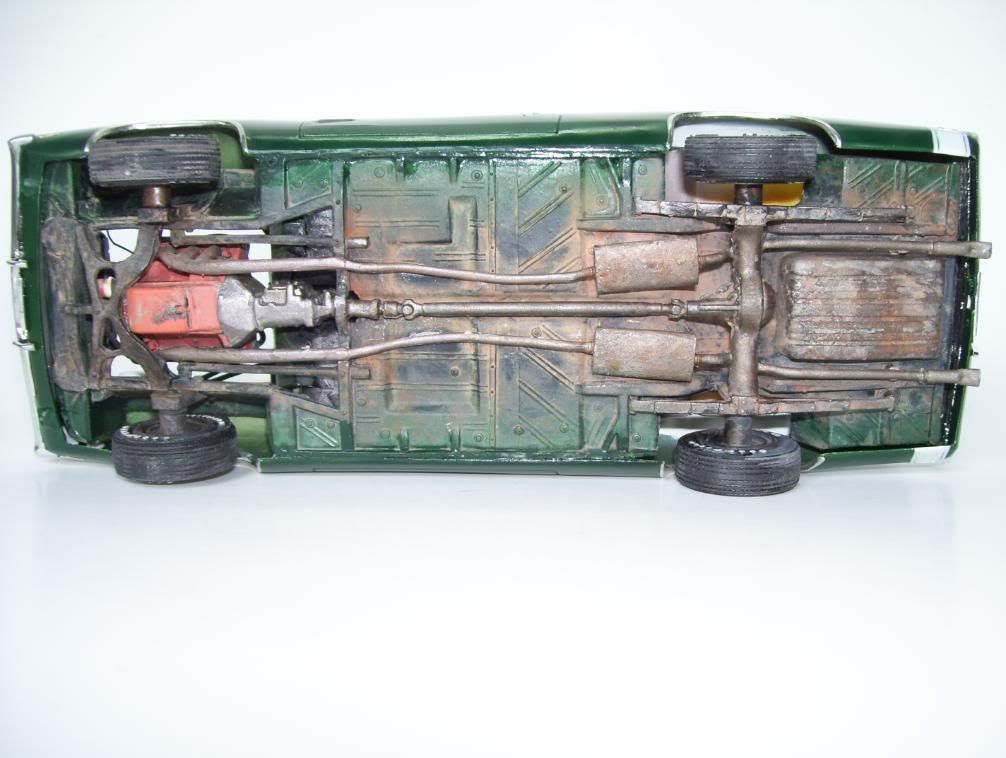
Stilll gotta weather the sides where I joined/glued the body on..


 And a last look--does the "sit" look correct? I may have lowered the rear a bit too much--It was a super PITA to get it to sit together correctly, so I had to lower the tub by a few millimeters. I may take it apart again and raise the rear a bit more...what do you think?

Well, be gentle on me guys! This was the hardest build Ive done in a while! I have to say that I now realize how spoiled we Armor guys are, with all the "slide molding", precise-fittting models; man, this one almost kicked my a**! I STILL hate gloss paints! Yuck [yuck] LOL!

Any comments, hints, suggestions or criticisms would be welcomed and appreciated!  

  • Member since
    August 2006
  • From: Cygnus X-1
Posted by ogrejohn on Friday, August 1, 2008 3:36 AM
Looks like you have done a very nice job with a difficult kit. Great job on the side markers and the trim work in the back! Weathering in the engine compartment and under the vehicle looks great. Thumbs Up [tup]
  • Member since
    November 2003
  • From: Nashville, TN area
Posted by bobbaily on Friday, August 1, 2008 6:12 AM

Very nice work Doog.  

Great attention to detail too.  One to be proud of.

Bob


  • Member since
    January 2008
  • From: Tulsa, OK
Posted by acmodeler01 on Friday, August 1, 2008 6:29 AM
That looks nice, Doog! Now that you've got the car thing down, try a racecar with all the decalsEvil [}:)]. I love the wiring, the daily driver look, and of course, the attention to detail. It is a nice change of pace whenever I see a "used" car. So many car modelers (myself included) build pristine, factory floor finishes. As a car modeler, I understand why: "All that elbow grease polishing the paint, only to put a coat of dirt and dust over it!? I don't think so, Tim!" But it is nice to see a worn and natural looking car. Well Done, and I look forward to some more. Hint, Hint.
  • Member since
    November 2005
Posted by Anonymous on Friday, August 1, 2008 10:45 AM
Doog, I don't care much for cars, but I must say this kix azz...extremely nice work on what appeared to be a dog of a kit...nice save on the rear bumper w/ the trim and very nice engine and interior work...the finishes on these car models are similar in complexity to aircraft to achieve...I mean, you can't get away with any imperfection on the surface---or any dust...fine looking finish!!! ...you 'da man !!!
  • Member since
    April 2005
  • From: Piscataway, NJ!
Posted by wing_nut on Friday, August 1, 2008 11:15 AM

HEY... WHERE"S THE GUN?????? 

One of my fav muslce cars too. And you did the kit justice that's for sure.  Very nicely done

But now it's time to come home... build a tank! 

You should have built that 1st one and titled it... "Dali's Ride" 

Marc  

  • Member since
    February 2008
  • From: ladner BC Canada
Posted by stick man on Friday, August 1, 2008 11:45 AM

This is my sceond time looking at the auto forum and I'm VERY IMPRESED GREAT job!!!!!!!! the weathering undernth is sweet but you forgot the tracks (Hint Hint).

Very nice job!!

Smile [:)] 


I'm 15 and I model I sk8board and I drum what could be better.
  • Member since
    January 2007
Posted by the doog on Friday, August 1, 2008 3:22 PM

Hey guys--thanks so much for the kind comments! It really boosts my confidence in building and finishing a car and seeing it pass the "forum test"! LOL! Laugh [(-D]

I've already got critiques from the "hard core" crowd over at Scale Auto forums: the rims need to be painted inside, trim added to the window bases, the incorrect foil on the side markers up front, the "sit" is indeed too nose-high;--I guess I'm not done yet!

That's what I love about these forums--the chance to improve and build a masterpiece! And to think this build started as a "trial build" for simply learning some techniques? 

Don't worry, fellow Treadheads! I'm not defecting to "the Shiny Side"!  LOL!  Just taking some time away in a different "motor pool"! Smile,Wink, & Grin [swg]

Thanks again, all! Big Smile [:D]

  • Member since
    July 2005
  • From: Dayton, Ohio
Posted by warhorse3 on Saturday, August 2, 2008 2:37 PM
Doog, nice job ! I like the daily driver weathering. One question though, judging by where you routed the positive (red) battery cable did you put the starter under the dash?Whistling [:-^]
Regards, Bill
  • Member since
    January 2007
Posted by the doog on Saturday, August 2, 2008 2:58 PM

 warhorse3 wrote:
Doog, nice job ! I like the daily driver weathering. One question though, judging by where you routed the positive (red) battery cable did you put the starter under the dash?Whistling [:-^]
HA HA! LOL!

I swear, warhorse--this just proves how totally ignorant I am about cars! 

Where should the wire go to?! I just "eyeballed" it, and in my reference photos it looked like that's where the wire went? I honestly haven't a clue!

Thanks fo rthe compliments, and please, tell me where to re-route the wire? I'm in the middle of re-doing some stuff to it anyhow, so I can correct that also! 

  • Member since
    February 2007
Posted by wreklund on Saturday, August 2, 2008 3:09 PM

Hey Warhourse; I was wondering the same thing!

But after seeing some of "Doogs" work, I am in no position to criticize any of what he does.

I'm a GM guy so what Chrysler may have done in the 60's & 70's really is nothing I'm familiar with. Although, I must admit, if you look colse, it appears as though the positive cable doog has routed seems to go into what could have been mistaken for a remotely mounted starter solenoid on the firewall.(like a ford) then another cable exits from the other side and routes itself to the right side of the engine compartment. I though maybe that was the way these Hemi's were configured??? But WTF do I know??

Nice build Doog 


"Anything worth doing...is worth doing right"
  • Member since
    February 2007
Posted by wreklund on Saturday, August 2, 2008 3:14 PM
Oh yeah, I forgot to mention, the positive(red) battery cable should eventually find it's way to the starter motor. (the starter solenoid actually)
"Anything worth doing...is worth doing right"
  • Member since
    January 2007
Posted by the doog on Saturday, August 2, 2008 3:17 PM

 wreklund wrote:
Oh yeah, I forgot to mention, the positive(red) battery cable should eventually find it's way to the starter motor. (the starter solenoid actually)

...which would be.....where?

I swear guys; I haven't a clue what the parts are called, or where they are!

I can redo a top end in a dirt bike, swap out the power valve, port it, and analyze the bottom end and crank runout, but I haven't a clue about cars!

Where would the starter be? Whatzit look like? 

  • Member since
    February 2007
Posted by wreklund on Saturday, August 2, 2008 3:38 PM

Photobucket" border="0" />

Not sure about a Chrysler, but I think this is it.

"Anything worth doing...is worth doing right"
  • Member since
    January 2007
Posted by the doog on Saturday, August 2, 2008 3:45 PM
 wreklund wrote:

Photobucket" border="0" />

Not sure about a Chrysler, but I think this is it.

WOW, cool, wreklund! Thanks for that great photo! LOL! Smile,Wink, & Grin [swg]

It figures; this kit doesn't even come with one! LOL!

I'll have to recheck my references and re-route that; maybe I can scratchbuild a rudimentary starter to wire it in to?

Thanks a million! That knowledge will come in handy in the future!

YOU DA MAN!!!! Cool [8D]Thumbs Up [tup]

  • Member since
    February 2007
Posted by wreklund on Saturday, August 2, 2008 3:55 PM

I'll be snapping some photos tonight. I'll take one of an engine with a starter attached and post it for you. It should be very easy to scratch build. 2 short pieces of styrene, one about the size of a pencil, about 1/2 inch long and another about 1/8 inch in diameter and 1/4 inch long welded side by side should do it.

Go out and climb underneath that S-10 of yours and look underneath the passenger side of the engine. You'll see one bolted to the bottom of that intake leaking, 4.3 V-6. And yes, you'll find the positive battery cable attached to it as well!

Might be Sunday morning before I get things loaded and posted. Sit tight.

ps, I love the guitar string tip. I had a "rocker" buddy from work bring me in some old strings the other day. Thanks for the tip.

"Anything worth doing...is worth doing right"
  • Member since
    January 2007
Posted by the doog on Saturday, August 2, 2008 3:59 PM

Cool, man! Thanks!

I'll check that out in my S10--oh and, it's fixed by the way. Smile [:)]

Guitar strings should be an integral part of any serious modeler's parts box! Wink [;)] 

EDIT--Ok, I searched the net, and is THIS waht we're talking about?

This is the starter? Here?


And can you tell me too--why are there TWO different red wires coming out of that terminal? Where's the other one go?

  • Member since
    April 2007
  • From: Canada
Posted by JTRACING on Saturday, August 2, 2008 10:45 PM

Great looking build!! i really love the underside!


only thing i would say is the antenna looks a bit to tall

  • Member since
    January 2007
Posted by the doog on Saturday, August 2, 2008 11:03 PM
 JTRACING wrote:

Great looking build!! i really love the underside!


only thing i would say is the antenna looks a bit to tall

Thanks so much, James--safter eeing some of your builds, I really appreciate the  comments from a prolific builder of your skill level! Tongue [:P]

I agree with ya on the antenna--I'm going to chop that....

Thanks again for the Thumbs Up [tup]!!!

  • Member since
    February 2007
Posted by wreklund on Saturday, August 2, 2008 11:04 PM

Yep doog, you got it!

If you look close, I think the other wire is purple. It is on this wire that voltage from the ignition switch is sent to the solenoid when one turns the key so as to engage the starter.

Also, any other wires coming from the battery cable connection are carrying battery voltage to other areas of the vehicle. this is a good source of battery voltage. In years past, most circuits were fed from this connection point. (at the starter) However, todays vehicles use a much easier accessible UBEC (underhood-bussed-electrical-center) to distribute battery voltage to the many circuits used today. So, most cars today only have two wires at the starter, one cable from the battery and one smaller "signal" wire from the ignition switch, which is usally purple in color.

If you look close, you will see a third wire showing from the bottom of the starter as well. This is a fusible link. There are other wires that feed your ignition switch and have bulit in fuse protection. should the circuit become overloaded, the fuse section of the wire will melt near the starter, thus preventing damage to the internal wiring of the vehicle.

So, in all actuallity, there really is more than just the positive battery cable attached to the starter solenoid. but these are so small that you would probably have to pluck hair from your head and use that to keep things in scale. know what I mean??Shock [:O]

So, just getting the positive cable attached to the small cylinder(solenoid) of the starter, will be more than adequet for this scale.

"Anything worth doing...is worth doing right"
  • Member since
    February 2007
Posted by wreklund on Saturday, August 2, 2008 11:29 PM
Photobucket" border="0" />
"Anything worth doing...is worth doing right"
  • Member since
    January 2007
Posted by the doog on Sunday, August 3, 2008 5:07 AM

Got it, wreklund!

That's "golden" information; just what I need!!!!--my sincerest thanks! I'm gonna try to get the two wires in there, as most of my shots really show that prominently. Thanks again for that great info and for taking the time!

If I can ever help you build a tank....Whistling [:-^]............Laugh [(-D]

Thanks again!!!!! Big Smile [:D]

  • Member since
    August 2007
  • From: The Plains of Kansas
Posted by doc-hm3 on Sunday, August 3, 2008 9:26 AM
 Karl, She's a beaut'y. Are the keys in the ignition? Thumbs Up [tup]

All gave some and some gave all.

  • Member since
    February 2003
  • From: Niagara Falls NY
Posted by Butz on Monday, August 4, 2008 11:31 PM

Hey Doog,

 All I have to say is that is one mean green lookin machine... I really like the "used" look!! I too will be doing a fast target I mean a Ferriari FXX by Tamiya soon..

 Again great build and the attrention to detail is top notch my friend

Flaps up,

Mike

Rangers Lead The Way

  If you would listen to everybody about the inaccuracies, most of the kits on your shelf would not have been built Too Close For Guns, Switching To Finger

  • Member since
    January 2007
Posted by the doog on Monday, August 4, 2008 11:38 PM

Thanks, doc and Butz!

I'll be posting updated photos soon! I've corrected even more items, and it should be a pretty accurate Charger 500; certainly more so than the kit give you. Watch this space! Tongue [:P]

  • Member since
    October 2004
  • From: League City, Texas
Posted by sfcmac on Tuesday, August 5, 2008 12:11 AM
Sorry I'm late but Iam glad I took the time to look. Really nice looking car. That brand of kit can be compared to building the Ertl Demag. A real beast of a build and cars are a tough build and painting is even crazier. You pulled it off and it looks fantastic. Once you fix the small battery wire issue and the antenna all you need is one of Manny's girl figures to get that Hot Rod Magazine look! Thumbs Up [tup]Tongue [:P]
  • Member since
    June 2006
  • From: AusTx, Live Music Capitol of the World
Posted by SteveM on Tuesday, August 5, 2008 6:08 AM

I'm wondering if the negative cable, from the battery, is supposed to be grounded on the chassis, not the engine.

Not a correction, just a question. Excellent build, btw. I've been looking for a '66 Charger to build for my dad.

Steve 

Steve M.

On the workbench: ginormous Kharkov dio


  • Member since
    June 2007
Posted by squeakie on Tuesday, August 5, 2008 1:26 PM
 SteveM wrote:

I'm wondering if the negative cable, from the battery, is supposed to be grounded on the chassis, not the engine.

Not a correction, just a question. Excellent build, btw. I've been looking for a '66 Charger to build for my dad.

Steve 

the ground wire is normally attached to the closest intake manifold bolt to the battery. In other words when looking at the engine over the radiator it will be the first bolt on the right side of the intake manifold. If you need a picture email me.

    Also if you add a starter, it should be painted gloss black. The transmission should be painted a rusty black as it was a cast iron case. Alloy cases were not used for road cars till in the mid seventies (although race cars used an aluminium case in the late hemi (1965 or later)

gary

  • Member since
    January 2007
Posted by the doog on Tuesday, August 5, 2008 2:16 PM
 squeakie wrote:
 SteveM wrote:

I'm wondering if the negative cable, from the battery, is supposed to be grounded on the chassis, not the engine.

Not a correction, just a question. Excellent build, btw. I've been looking for a '66 Charger to build for my dad.

Steve 

the ground wire is normally attached to the closest intake manifold bolt to the battery. In other words when looking at the engine over the radiator it will be the first bolt on the right side of the intake manifold. If you need a picture email me.

    Also if you add a starter, it should be painted gloss black. The transmission should be painted a rusty black as it was a cast iron case. Alloy cases were not used for road cars till in the mid seventies (although race cars used an aluminium case in the late hemi (1965 or later)

gary

Hey Gary--I was wondering when you would weigh in?!

Thanks for that good info there! I believe that the ground wire is adequate where I have it located; it's directly from a reference photo that I have. I think this kit also has a rudimentary starter; I found a blob  that looks like one, LOL! I can easily weather the tranny a little more--thanks for the info--I should have some new update pics real soon!

  • Member since
    June 2007
Posted by squeakie on Tuesday, August 5, 2008 2:33 PM
 the doog wrote:
 squeakie wrote:
 SteveM wrote:

I'm wondering if the negative cable, from the battery, is supposed to be grounded on the chassis, not the engine.

Not a correction, just a question. Excellent build, btw. I've been looking for a '66 Charger to build for my dad.

Steve 

the ground wire is normally attached to the closest intake manifold bolt to the battery. In other words when looking at the engine over the radiator it will be the first bolt on the right side of the intake manifold. If you need a picture email me.

    Also if you add a starter, it should be painted gloss black. The transmission should be painted a rusty black as it was a cast iron case. Alloy cases were not used for road cars till in the mid seventies (although race cars used an aluminium case in the late hemi (1965 or later)

gary

Hey Gary--I was wondering when you would weigh in?!

Thanks for that good info there! I believe that the ground wire is adequate where I have it located; it's directly from a reference photo that I have. I think this kit also has a rudimentary starter; I found a blob  that looks like one, LOL! I can easily weather the tranny a little more--thanks for the info--I should have some new update pics real soon!

I just got back home last night from a veterans reunion. Found out just how lucky I was, nad others found out I'm alive and well.

gary

JOIN OUR COMMUNITY!

Our community is FREE to join. To participate you must either login or register for an account.

SEARCH FORUMS
FREE NEWSLETTER
By signing up you may also receive reader surveys and occasional special offers. We do not sell, rent or trade our email lists. View our Privacy Policy.