SEARCH FINESCALE.COM

Enter keywords or a search phrase below:

'55 Chevy Step Side "WOW" (What Once Was) ** Finished! 02/20/09 **

16602 views
33 replies
1 rating 2 rating 3 rating 4 rating 5 rating
  • Member since
    September 2007
  • From: Fredrikstad, Norway
'55 Chevy Step Side "WOW" (What Once Was) ** Finished! 02/20/09 **
Posted by Stampede on Sunday, January 4, 2009 4:36 AM

I'm usually located over at the dark side in the armor forum, but being an old car modeller I was in need of a "therapy project" so I picked up a '55 Chevy Step Side from the stash with the idea of making it a "WOW" car. 
The idea that has been growing in my head a while is a rat/original/semi-show truck. A truck that once was a show car but now is totally degraded. Busted air ride at medium height, steelies with skinny white side tires due to the owners bad economy Wink [;)] and so on, you get the idea.

Picked the wheels and tires from an AMT '49 Ford. Moved the kit supplied front axle a bit further up and just did some basic work on the chassis so far.


Figured I had to equip the car with som Mexican rugs for the bench seat and floor. So while a couple of painted items where drying i started with one of them.
Picked up some sewing thread in various colors from the wifes sewing cabinet, duct tape and white glue.
I need to dirty it up quite a bit but the result so far I find pleasing.

Modified the filler tube a bit. I plan to add rag instead of the fuel cap so I needed a little more detail than just the basic hole.


I also opened the glove compartment so I can add some junk in there. I just used some Evergreen to make the box.


Recon I'll use the Mexican something like this...


After prepping the body I primed it with Tamiya primer and loaded my AB with matte black for the engine compartment. Then I loaded it with Vallejo Tank Brown which has a nice rusty color. I dusted this color slightly from a long distance into the engine bay to get a slight rusty tint down there.
I didn't bother to cover the black overspray on the fenders and cowling completely with the Tank brown, this will just add more contrast to the top coat like I want it to do. I got some nice variations in the rusty color around the hood area, and I didn't bother much about full coverage on the rest of the car either, more variations in the top color coat will be the result, and that's my goal.
The top color will be  some kinda turqois '50's color and an all white roof.


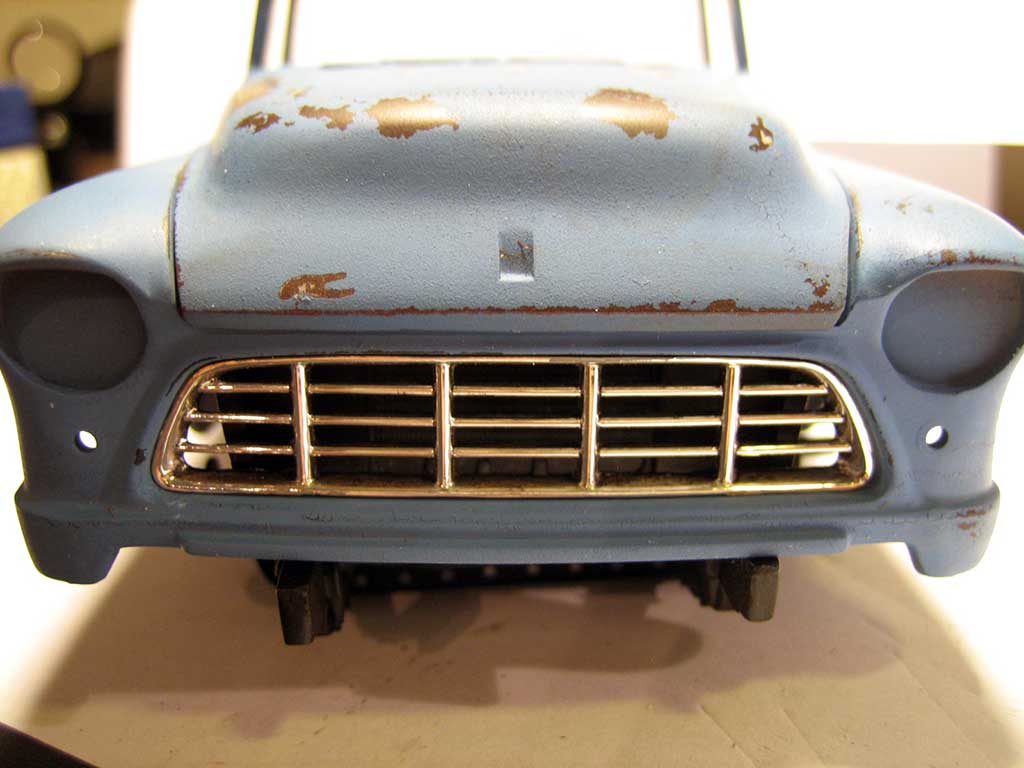
I opened up the grille from behind with a Dremel. I think this looks much better on this type of grille than just a blackish wash.


I also prepped the body for further "treatment" with a couple of coats of hair spray and set it aside for a few days.
The darker spots you can see in the pics are Mr. Masking Sol.


Here's the color coat on.
I mixed Vallejo Panzer Aces Stencil White, Tamiya X-4 Blue and a drop of Vallejo Panzer Aces Splinter Blotches I(!) to get a slight green tint in the color.
The roof is painted in plain Stencil White.
I AB'ed three coats and let it dry for about 10 minutes and started scrubbing in various places with some cut down paint brushes and water. Excess water was dabbed of with a Kleenex tissue. I also used Fine og X-Fine Flexi-File in various places to get another kinda wear.

Here's some shots....and no, the hood is not positioned properly... Wink [;)]


Great improvement opening up the grille I think...


The bed is covered with wood taken from a small orange crate. The metal profiles are "thingys" originally used in telephone centrals for arranging the internal cables in them...brilliant product Thumbs Up [tup]
Scratched the wood with a #11 blade and gave it a couple of coats of MIG Neutral Wash and one coat of  Vallejo Sephia Shade Wash. Ended the wood treatment with some MIG Ashes White pigments that I just rubbed into the wood. I'll be doing some more work on the wood later to get it a bit darker and dirtier.


That's it so far folks...

/P Smile [:)]
If electricity comes from electrons, does morality come from morons?
  • Member since
    August 2006
  • From: Cygnus X-1
Posted by ogrejohn on Sunday, January 4, 2009 7:32 AM
Beautiful work!
  • Member since
    May 2005
  • From: Left forever
Posted by Bgrigg on Sunday, January 4, 2009 7:57 AM

Stampede, the only thing I can say is:

"DOOG, watch your six! It's a STAMPEDE coming!!"

So long folks!

  • Member since
    June 2007
Posted by squeakie on Sunday, January 4, 2009 1:00 PM

I've always loved the body style of those old trucks! But have never seen a kit for one. Can I ask who made it?

gary

  • Member since
    December 2005
  • From: DSM, Iowa
Posted by viper_mp on Sunday, January 4, 2009 2:09 PM
Ouch.  It hurts my eyes.  I did a '55 Ford a while ago, but it was done up nice and restored. Although the full size 55 did look similar to this when the GF's dad started on it.

Rob Folden

Secretary / Webmaster- IPMS Plastic Surgeons Member at Large-IPMS Hawkeye Modelers

fox
  • Member since
    January 2007
  • From: Narvon, Pa.
Posted by fox on Sunday, January 4, 2009 3:40 PM

My My 2 cents [2c]. Bow [bow]Bow [bow]Make a Toast [#toast]Make a Toast [#toast]Thumbs Up [tup]Thumbs Up [tup]

Like Bgrigg said "Doog, watch your six".

JimCaptain [4:-)]

 Main WIP: 

   On the Bench: Artesania Latina  (aka) Artists in the Latrine 1/75 Bluenose II

I keep hitting "escape", but I'm still here.

  • Member since
    January 2007
Posted by the doog on Sunday, January 4, 2009 4:28 PM
Looks great, Stampede! Brilliant work on that "Mexican rug", LOL!
  • Member since
    September 2007
  • From: Fredrikstad, Norway
Posted by Stampede on Monday, January 5, 2009 5:01 PM

@ogrejohn: Thank you!

@Bgrigg: He he! Big Smile [:D]Thanx, but I recon I've got a few steps to climb before I reach the doogs level.

@squeakie: This is produced by AMT, kit #6004

@viper_mp: That's why model building is so great, you don't have to mess up 1/1 cars. Wink [;)]

@fox: Thanx! Smile [:)]

@doog: Thanx Karl, and glad you like the "rug"! Smile [:)]


If electricity comes from electrons, does morality come from morons?
  • Member since
    April 2008
  • From: Kristiansund, Norway
Posted by Huxy on Monday, January 5, 2009 5:08 PM
That's just awsome..   Entering this too in IPMS?   Really, you'll get 1st in all categorises....   That truck is just brilliant!

"Every War Starts And Ends With An Invasion".

  • Member since
    October 2007
Posted by Custom 56 F-100 on Tuesday, January 6, 2009 10:21 PM

 Huxy wrote:
That's just awsome..   Entering this too in IPMS?   Really, you'll get 1st in all categorises....   That truck is just brilliant!


Agree

  • Member since
    February 2003
Posted by Jim Barton on Wednesday, January 7, 2009 2:21 PM
Explain further: How did you get that rug to look so terrific?

"Whaddya mean 'Who's flying the plane?!' Nobody's flying the plane!"

  • Member since
    January 2009
  • From: San Diego, CA
Posted by samdiego on Thursday, January 8, 2009 10:52 AM
Just one suggestion, mi amigo, based on my having had a lot of experience in the 1:1 with that style of custom upholstery. We usually went with one larger blanket laid across the entire bench seat, tucked into the crack and sometimes held in place with a length of pvc pipe looped through the blanket where you tilt the seat forward, the rest was thrown over the back. We used to be able to get the blankets from vendors on the beaches in Rosarito for $7-$10. The good ones are pretty durable and I always kinda liked the look. Yours looks great.
Broadcasting from the California Institute for the Used to be Alright
  • Member since
    September 2007
  • From: Fredrikstad, Norway
Thanx...
Posted by Stampede on Friday, January 9, 2009 6:00 PM

@Huxy & Custom 56 F-100: Thanx! If I get i done in time it'll show up at IPMS Norway Nationals.
@Jim Barton: I'll do a How-To when I make rug number two. Smile [:)]
@samdiego: Hola! Thanx for the kudos and the info, I'll definately make a bigger one to cover the whole bench seat. Did you use'em for floor mats too, can I do that?

*********************************************************

Had a slow start on the engine detailing tonight. I won't do a superdetailing project outta this one but some wires and hoses are needed. Wink [;)] The engine is a good old 265 cid with just a 4bbl carb as a custom feature. Wink [;)]
Here's some pics so far...

Here's some fuel and vacum lines to the carb. The Velocity stack is just mounted with tack temporarily. (For photographic purposes only. Wink [;)] )


Here I've prepared for heater hoses in and out...


The coil and distributor, plus the dip stick. I used an ignition wire, removed the insulation and flattened the end and made a loop. I also tried to "ceramic coat" the headers, a little touch up on'em and I'll recon they'll be ok. Some more details will be added to the carb in the near future...


Top view and another one from the side...


Now, here's a slight dilemma. I found a set of some old classic Cragar wheels in the stash and kinda think they fit quite well accompanied by the WW tires.

Waddaya think, should I stick to the original idea with the painted steelies and chrome trim ring or should I go with the Cragars?

I'm a bit in doubt at the moment... Confused [%-)]  Here's a pic that'll hopefully give you an idea.

Now it's soon time to get down to the nitty gritty and make the engine dirty, I've started with baby steps on the transmission just to check how it'll look...

Per-Erik Smile [:)]

If electricity comes from electrons, does morality come from morons?
  • Member since
    January 2009
  • From: San Diego, CA
Posted by samdiego on Saturday, January 10, 2009 10:07 AM
No, I've never seen anybody use them as floor mats, They are durable but not that durable. The stuff that gets tracked into cars here is more abrasive than muddy and I imagine they would wear through quickly. The last one I used as a seat cover lasted 6 years on the front bench of a '67 Ranchero, hiding the green Mercury bench from the maroon exterior. It actually outlasted the truck, I still have the $7 blanket.
Broadcasting from the California Institute for the Used to be Alright
  • Member since
    January 2007
Posted by the doog on Tuesday, January 13, 2009 10:41 AM

WOw, per-Erik; That engine is sweeeeeet! Beautiful work!

I have to say that it took me a little by surprise though--I guess I didn't understand what you were going for here, exectly--I thought this ws going to be a rusted-out junker?

The whole project is very compellling! It's looking great!

  • Member since
    September 2007
  • From: Fredrikstad, Norway
Posted by Stampede on Thursday, January 22, 2009 3:37 PM

@samdiego:Thanx for the info, amigo!

@the doog: Thanx Karl, I appreciate it! glad you like the engine. I guess the tread can be a little confusing with the shabby paint job and all. But I'm aiming for the cool rat / ruff rod custom style.
Again, thanx... Smile [:)]

**************************************************************************************************

I think I'll call it quits with the engine detailing now, I said it shouldn't be a very detailed project but it seems like I have a problem stepping on the brakes... Wink [;)] The only thing left on this engine will be the weathering and some washes I guess.

Mounted the alternator on a couple of Model Car Garage brackets. Used a couple of 1/35 scale brass bolts to mount the brackets to the engine. I made the fan belt from Tamiya masking tape and painted it in a rubber color mixed with some black.


Drew some wires from the alternator, and made a condensator(? not sure if that's the correct word)


Hooked up the heater hoses and made some "pinch type" hose clamps out of thin wire.


The rest of the wires and hoses will be hooked up when the engine is dropped into the chassis.


If electricity comes from electrons, does morality come from morons?
  • Member since
    January 2009
  • From: Richfield Wi.
Posted by Bob-o on Saturday, January 24, 2009 2:14 PM
may i ask what gauge wire you use for the detailing of the engine?? plugs, hoses, ect;ect?
  • Member since
    September 2007
  • From: Fredrikstad, Norway
Posted by Stampede on Tuesday, January 27, 2009 6:30 PM

 Bob-o wrote:
may i ask what gauge wire you use for the detailing of the engine?? plugs, hoses, ect;ect?

I'll measure the different wires and get back to you on that...

***************************************************************

Been working on the interior for the last couple of days.
Just need to do some minor touch up and get the mexican rug over the bench seat, then I recon I'll call it quits.
Basically I've just been "dirtying" and made some wear and tear, here and there. A couple of photo etch pieces for the window cranks and door handles, a BMF piece on the horn button and a black floor mat.
The inside color is the same as the outside, and the bench seat and arm rests are painted in Vallejo Stencil. Some Tamiya sticks, MIG pigments and washes are in charge of the dirty work, Wink [;)] looks kinda lived in I think.


Oh, I also got the throttle return spring made and mounted tonight. Used some core wire from a speaker wire to make the spring.


If electricity comes from electrons, does morality come from morons?
  • Member since
    September 2007
  • From: Fredrikstad, Norway
Posted by Stampede on Friday, January 30, 2009 7:04 AM

Small update...

Kinda sloppy detailing on the battery bracket from the lit producer, just a base and nothing else, so I made my own.
Copied the look af a '55 Chevy battery bracket I found in a picture in my archives. Wink [;)]

I used thin aluminium that I bent with my FenderBender and used thin piano wire for the mounting rods and topped it of with a couple of PE wing nuts.

Here's the final product... Smile [:)]


Every 50's custom with a little respect for itself has got to have headlight half moons, so I made a set.
Kinda altered the look of the front, but the look is quite "right" IMO. Cool [8D]

...the pic.


Thanx for looking!

If electricity comes from electrons, does morality come from morons?
  • Member since
    September 2007
  • From: Fredrikstad, Norway
Update 02/11/09...
Posted by Stampede on Tuesday, February 10, 2009 6:03 PM

Starting to close in on the finishing stages on this one.
Got the chassis finished so now she's on all four...
Just did some simple washes with MIG Neutral, Brown and Dark wash and I slapped some GM blue onto the shocks. Did some minor pin washes on the nuts and bolts to but thats barely visible in the pics.


Dropped the completed and weathered engine into the chassie too.


I ended up with the Cragar mags 'cause I think they're cool and they fit good with the theme I'm after. Gave'em a couple of washes with black and som rusty color in minor spots. The white walls also got the grease and grime treatment.


The tail lights were detailed with a thin wire for the electrics and painted Clear red over silver, and a BlueDot in the centre painted Clear blue over silver.


The bed did get some more "smudge" and stuff applied and is nearly finished.

The interior is just about done. The rug is laid down, I chose to just cover the bench of the seat to get a nice grimy white contrast to the rug from the seat back. Made some interior junk too consisting of a Kleenex box, some CD's, ELO and ZZ Top among others, Wink [;)], a pizza box and I put the rear view mirror in the glove box.


...and I also made a license plate with Acme License Maker... Wink [;)]


Here's a quick mock-up of the truck so far...


And here's the result of this evenings work. I felt the truck needed a logo on the door so I painted one with a couple of 1/0 and 10/0 brushes. Quite satisfied with this logo myself and I feel it blends right in with the look I want for the truck.


If electricity comes from electrons, does morality come from morons?
  • Member since
    January 2007
Posted by the doog on Tuesday, February 10, 2009 6:32 PM

Per-Erik; I honestly can't say enough about this spectacular build! I looks fabulous!

The only thing I wish would be to either age those shiny wheels, or swap the hubs for something a littleless shiny. I know you're going for an old "show truck" or the like, but they don't really "fit" for my taste?---but it's your model! :)

The weathering is excellent! And all that interior accessory/garbage is just superb!

Can you tell me how you managed to make the pizza box and the other stuff? Is that just a matter of printing the images out?

  • Member since
    September 2007
  • From: Fredrikstad, Norway
Posted by Stampede on Friday, February 20, 2009 8:50 AM

Thanx Karl, I really appreciate the fact that you like my build! I'll send you a PM regarding the pizza box. Wink [;)]

**********************************************************************


Finally got this one togheter last night. Added some stuff to the bed, an old Keystone Classic wheel and some old movie posters.
Toned the chrome down a bit and got the bumpers, trailer hitch, chains for the tail gate and so on mounted...

Here's the finished pics of the truck.


If electricity comes from electrons, does morality come from morons?
  • Member since
    February 2009
Posted by Bakken on Tuesday, February 24, 2009 9:41 AM

Nice work as usual P.E this was lookin awsome when i saw it on the table in Oslo


Greetings

Terje

  • Member since
    January 2009
  • From: Ontario, Canada
Posted by Aceman on Wednesday, February 25, 2009 6:19 PM
WOW, WOW and WOW   you did an awesome job. Thumbs up from me.Thumbs Up [tup]
  • Member since
    August 2006
  • From: Cygnus X-1
Posted by ogrejohn on Saturday, February 28, 2009 12:13 PM
WOW is right! Looks great!
  • Member since
    July 2008
  • From: PBG, FL
Posted by John31388 on Saturday, February 28, 2009 10:23 PM
WOW amazing work
  • Member since
    January 2007
Posted by the doog on Sunday, March 1, 2009 7:00 PM

Again, Per-Erik; I have to say; I love everything about this build--but for the wheels. I just think that they look incongruous with the rest of the build. It kinda necessitates you having to explain what the concept is/was behind it, and that weakens the impact of it when you're not around to do that. It would look more like a "sleeper" if it had just regular, unimpressive wheels, in my opinion. Either that, or distress the wheel rims a little more; maybe add some rust to them? Just my My 2 cents [2c]

The engine looks great. And the weathering is superb!

The only two small things I would recommend would be some MIG pigments in the bed, and maybe in the engine bay. A little bit of dust and old dirt in there would look even more realistic! And those posters in the back would go flying out just as soon as you got over 20mph on a road somewhere==slap some weight of some kind on 'em!

All in all I give it a 98/100---minue .2 for the wheels!

  • Member since
    September 2007
  • From: Fredrikstad, Norway
Posted by Stampede on Monday, March 2, 2009 6:11 AM

Thanx guys, I really appreciate the fact that you like my build! Smile [:)]

@Karl: Thanx for the kudos on my build, I really appreciate the 98/100.

I see where you're coming from in terms of me having to explain the concept of the build. I got quite a few comments regarding the wheels on the Norwegian IPMS forum too. Smile [:)] I posted this pic to try and explain which road I wanted to go down.

Bling wheels, "semi" bling engine compartment, and a ratty overall finish on the rest of the car.

I also agree with you when it comes to the posters in the back. Driving a pick up myself I've lost a couple of "light" items once in a while. Wink [;)]  I just put the posters in the back for a bit of visual interest on the contest table. I'm with ya regarding the pigments too.

Overall I'm very happy with this build, since it was just a "therapy" project that kinda went overboard. Wink [;)] I took Gold in the Light Commercial class in the Norwegian IPMS Nationals last weekend with this car, I'm very pleased with that. Party [party]

Per-Erik Smile [:)]

If electricity comes from electrons, does morality come from morons?
  • Member since
    January 2007
Posted by the doog on Monday, March 2, 2009 8:28 AM
 Stampede wrote:

Per-Erik,

Well, I can see where you got the inspiration from then; you can't blame yourself for that owner's stupidity! LOL! (God, I just HATE those style wheels on ANYTHING!...honestly, I don't know why, but I do?)

Congrats on the gold! You certainly did nail the look of the truck--unfortunate wheels and all!

And thanks for the PM too--that page will come in very handy! Big Smile [:D]

  • Member since
    January 2009
  • From: San Diego, CA
Posted by samdiego on Monday, March 2, 2009 10:45 AM

Even without the photo of the Bapst truck, I would recommend not messing with the rims. One explanation is right on the door. Cooter would have access to all sorts of second hand parts in his business. I've bolted nice rims to ratty vehicles before and it never required a paint job. And, yes I would just wipe off the rims from time to time in leau of washing the entire beater. I can visualize that rig pretty much anywhere in the Soutwest US being used as a daily driver.


Broadcasting from the California Institute for the Used to be Alright
JOIN OUR COMMUNITY!

Our community is FREE to join. To participate you must either login or register for an account.

SEARCH FORUMS
FREE NEWSLETTER
By signing up you may also receive reader surveys and occasional special offers. We do not sell, rent or trade our email lists. View our Privacy Policy.