SEARCH FINESCALE.COM

Enter keywords or a search phrase below:

Britten V1000

27272 views
21 replies
1 rating 2 rating 3 rating 4 rating 5 rating
  • Member since
    November 2012
Britten V1000
Posted by dioramator on Tuesday, March 17, 2009 11:11 PM

Hi all

I have an interesting build happening at the moment, and thought i'd share it with you

the kit is a Britten V1000 motorcycle.
What makes this kit unique is that it is cast in pewter in New Zealand

I have removed the casting marks and mould imperfections from all the pieces, had to do a bit of work on the front end to get the guard to fit. and have finished all the major assemblies, and done a dry fit. so it is almost ready to go into the spray booth for a coat of primer.

Photobucket" border="0" />

Ill keep you posted on the progress


  • Member since
    January 2003
  • From: Washington State
Posted by leemitcheltree on Thursday, March 19, 2009 4:00 AM

Whoa, mate...you've got your work cut out for you...

Jim Wylie in New Zealand did an amazing job on the brass masters for this kit...he's a class act, and incredibly talented...but it's certainly not a Tamigawa "shake and bake", lemme tell you...

It takes a lot of TLC to turn it into a stunning model...but it's worth the time - John Britten sure made one incredible bike, and the model is certainly unique.

The first time I saw one of these things was in a BEARS race at Phillip Island...this unidentifiable and LOUD purple and pink thing screamed past us...then about 5 seconds later came the rest of the field, vainly trying to catch up.  LOL...what a hoot that was!

Whatever you do, DON'T use the self adhesive vinyl "stickers" that come with the kitset...Britten realised they sucked rocks (and they did!!), and made a beautiful set of waterslide decals as a replacement, and they used to send a set to whoever bought the kit (if you asked nicely).  The decals were in the later boxings of the kit, and were of a very high quality.  Which do you have?

I built one of these beasts a few years ago - but heavily modified it - actually, I fixed rough castings, made molds and cast copies in resin - so my model is a resin copy (and no, it's not for sale!), which allowed me to really go to town on things like the brakes, the clutch basket, suspension, exhaust (it REALLY made a difference with the exhaust) and handlebars...it was worth it...you've seen my thread, I think....

/forums/387830/ShowPost.aspx

There's lots of pics around of various versions of the bikes as they evolved...the model is supposed to be of the bike when Andrew Stroud won at Daytona, but I couldn't find any pics of the bike during that time wearing the larger lower fairing and the AP/Lockheed brakes, so I stole some Brembo Goldlines from a Tamiya Ducati 888.

If I can help in any way, don't hesitate to ask, mate - I'd be happy to help in any way I can.


Cheers, LeeTree
Remember, Safety Fast!!!

  • Member since
    November 2012
Posted by dioramator on Thursday, March 19, 2009 7:58 AM

thanks for that LeeTree, it seems you and me are the only people in the world who have made the kit (or at least those of us that read the FSM forum.)

you are right the original motorcycle is a work of art, I've seen the footage from Daytona... showing the factories how to build a real motorcycle, pity about the electrical gremlin creeping in and spoiling the show. (the first time anyway)

I have reference photos taken at different times during the early to mid  90's. It went through a number of changes over the years, most indentifyibly by the front brakes, and lower fairing. but I'm sticking with the kit as it was supplied.

there is a realy interesting documentry on youtube http://www.youtube.com/watch?v=QM_aNwaodd4

anyway back to the build
the pewter is an interesting material to work with, some properties of plastic, some properties of metal. and I am a stickler to attention, (I have even been called anally retentive by my friends) and second-best is not an option, I plan on doing justice to the kit.

the kit came with 2 sets of decals, and note advising me to use the 2nd set for the number markings. I'll see how I go, decals are not my strong point, but if I stuff them up, I'm sure the manufacturers will be happy to $upply me another set. (only water slide decals were supplied, there were no self adhesive vinyl).

 Just out of intrest, aren't you tempted to put all those metal bits together? As you said, the casting are a work of art. I'm not surprised you were offered that kind of money for your finished replica.
It's nice to be able to say "I'm one of the few people in the world who has worked on a Britten motorcycle".

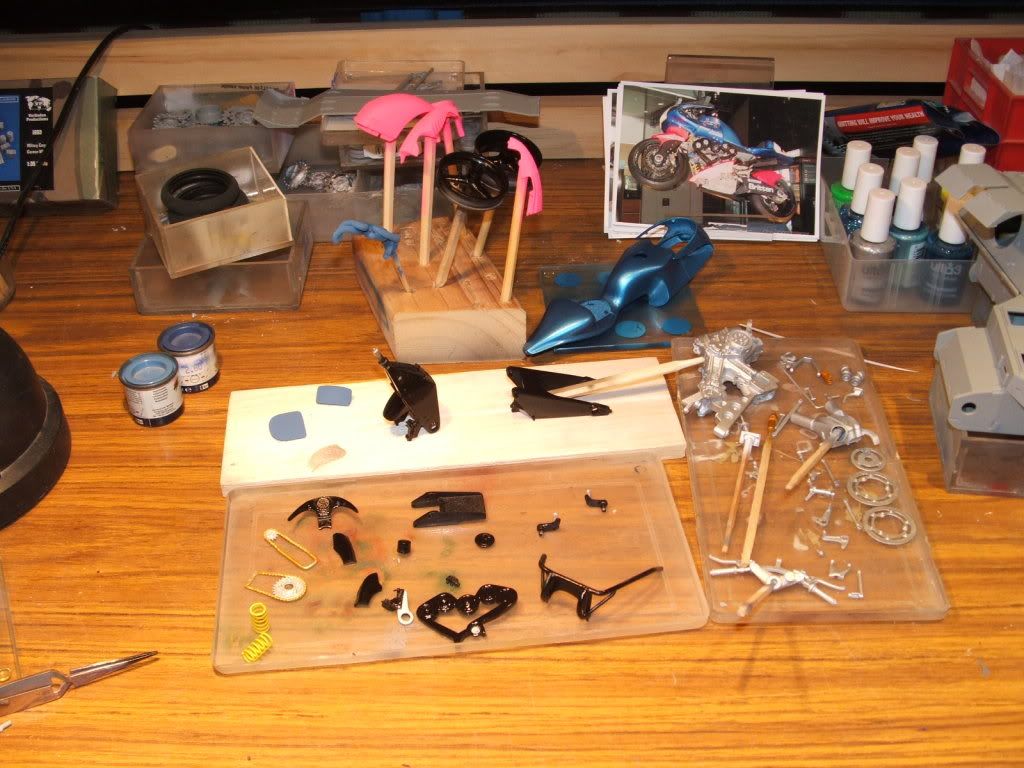
We had a bit of hot weather here in Adelaide this year, (10 consecutive days over 40c (104F for those that speak latin)). the heat wave meant I could not get paint through the airbrush for most of the first two months of the year, the paint was drying mid flight, and landing dead flat (most of it was bouncing back off). (that formed a bit of a bottle neck at the spray booth)
Once it cooled down, I put it in primer, (2 coats), that showed up a few more flaws in the casting and joins; then filling, sanding, more primer, more sanding, and a final coat of primer, and sand with 2000. finally I have been laying down the colours.
It took me a while to get what I consider a decent gloss on the black (especially the wheels, because I couldn't sand the primer as flat as I would have liked, and had to fill the surface irregularities with underlying coats of paint). Wasn't happy with the first attempt at the fluoro pink (Kustom Kolor neon pink). It went on a bit dry, and landed dead flat, so I re-sanded that, and got it spot on the second time round.
The metallic blue (Tamiya TS-54, decanted into the airbrush) has been sprayed and looks fantastic.
The aluminium went down a treat (Tamiya XF 16), I decided to spray flat alumininum rather than use the original cast metal colour; a). so it would have a more even appearance, and; b). so I could cover the filler I have used. I started using automotive filler, but found this dried harder than the metal, which was difficult to sand, so switched back to squadron grey, that seemed to work a treat.
I have just finished spraying the flat blue (exhaust and seat) tonight.

Photobucket" border="0" />

Thats about where I am at right now, it may take a few weeks before my next post, as I have a number of project currently on the go, and my wife keeps hasseling me to mow the lawn!!!


  • Member since
    January 2003
  • From: Washington State
Posted by leemitcheltree on Friday, March 20, 2009 1:54 AM

Looking good so far!

By the way - how the heck did you get the tires off the rims?  My tires were rock hard and try as I might, I couldn't budge them...I thought I was going to bend the rims trying to get them off - I just made molds of the tires and rims together - left it at that.

Notice that your decal for the front numberbox is too short in the vertical - John Britten and Jim Wylie discussed this and decided to make the decal shorter to make it easier to finish the model - it fits between the top of the intake to meet the windscreen - but the numberbox on the real bike actually extends to below the intake.  I cut the yellow stripe off the bottom of mine, painted white right into the cold-air intakes, and then laid the lower bit of the decal under the intake and hand painted the missing yellow stripe - worked a treat.

Yeah, I remember that hot week - 10 days over 40 degrees...I live in Melbourne, and we had more that 5 days at 45+...the hottest day was 48 degrees (118F) then the place burned - and burned hard...entire towns and most of their populations just disappeared - scariest thing I've ever seen - a 30 metre wall of flame travelling at 45 km/h...terrifying.  Even hardened CFA veterans were terrified.

LOL...am I tempted to put the original model together?  Well, not really...the model, out of the box, just doesn't compare to the 12 months of scratchbuilding I did...and the model I built sits here in the display case next to the 'puter desk, so I get to see it every day.

If you bugger up the decals, I've got a spare set you can have - the number boxes are a little yellowed, but the sun can slowly bleach them to a whiter shade...or just paint the areas on the bike white and cut the yellow stripes and the number off the decals and use those - I've done that, too.

I should have known that Youtube would have stuff on the Britten...that link you posted is an excerpt from the video "One Man's Dream", produced by The Britten Motorcycle Company...the guy was amazing.

Anyhooo...look forward to seeing the rest of your model...good luck!!

Cheers, LeeTree
Remember, Safety Fast!!!

  • Member since
    November 2012
Posted by dioramator on Friday, March 20, 2009 7:56 AM

The tyres came off the rims without a problem, they must be using a softer compound now, they are about as soft as tamiya tyres. (although the rear tyre does have a small split in it)

thanks for the heads up regarding the decals, thats interesting that they have shortened them up like that, sacrificing realism for the sake of ease of build, but I suppose they must cater for all types of skill level, no amount of microsol would get them sitting flat inside the air intakes, and still have them looking good on the front of the fairing. I'll probably do what you did and trim the bottom, and fill in the intakes with paint, then paint the pinstripe.

Anyway, I'll get some more done, and let you know how I get on.

  • Member since
    March 2009
Posted by Zoolander on Thursday, March 26, 2009 11:34 PM
Hey bro I am also building this kit. I am in Christchurch so I can pop into Britco whenever I need to. And I have needed to lol. I have access to the bikes also as there is one in there and a few others around Ch Ch. It is a very hard model to build but it looks great. I have not finished mine yet as I run into a few problems, mainly with paint. You see I am using the exact colour blue that I got mixed that the Britten was painted with instead of the Tamiya blue. I am also using the exact pink that I got from the guy who painted the real bike. The colours are actually pretty different from the tamiya colours! Anyway I am not a hard core modeler (made a few when I was a kid) so it has taken me a little longer. I didn't paint the engine block as the alloy pewter looks exactly the same as the cast block that John made. The build was not to hard (a few parts were a little tricky to fit) but man was it TIME consuming!!! Filing filling and sanding to get it prefect is where the time goes!
  • Member since
    November 2012
Posted by dioramator on Friday, March 27, 2009 12:26 AM

Good to see another one being built.

Your not wrong about the filling and sanding etc. in hindsight if I was to build another one I would defiantly us a high fill primer on the bodywork.

A couple of other things I have encountered...

everything to be painted must first be painted with etch primer (not the normal primer) or the paint wont stick to the metal. Then prime the etch primer with primer, and let it set fully (a couple of days) before applying colour coats. (or you will encounter solvent boil)

the slip on aluminium tubing for the mufflers, doesn't slip on, so I have replaced that with 9/32 X .014 aluminium tube (from the hobby shop).

Drilling the holes in the suspension pull/ pushrods should be done slowly and gradually, they are really easy to distort.

The upper fairing blades must be bent to the correct angle, or the handlebars will not fit. But the windscreen must still line up.

I'm currently still painting the gloss coats, getting the thing looking spot-on. Decaling and final assembly are not too far away. (but as I stated previously, I have a number of projects currently on the go).

I'll keep you posted.

  • Member since
    November 2012
Posted by dioramator on Thursday, April 9, 2009 8:40 AM

ahhhh... yes it's coming along nicely, just about finished the bike except the bodywork/ fairing.

just a few more finishing touches here and there

Photobucket" border="0" />


Photobucket" border="0" />

all the decals have gone down a treat so far, fingers crossed for the last of them.


  • Member since
    November 2012
Posted by dioramator on Wednesday, April 29, 2009 8:59 PM

I have finally finished the build

i must say this is definantly not a model for the faint hearted, but a very interesting material to work with, and a unique subject


  • Member since
    March 2008
  • From: london-uk
Posted by ludwig113 on Thursday, April 30, 2009 9:46 AM

i love that bike,i saw it many times at the isle of man TT and i sat on one over there as well.

you could hear it coming from a couple of miles away,at first you'd think it was the britten and then a ducati would come into view,then the sound of something like a spitfire would howl out........flat out it was a fantastic sound.

such a cool concept,engineering feat and alround top bloke.

  • Member since
    March 2009
Posted by Zoolander on Wednesday, August 26, 2009 7:34 PM
Hi great finish! what did you use to finish the front number board. I am thinking of extending mine down lower also. The number board seems to be a sort of an off white colour. Did you just paint it then clear coat over top? What colour and brand of paint did you use as it seems to be a very good match. Thanks.
  • Member since
    January 2007
Posted by the doog on Wednesday, August 26, 2009 7:44 PM
WOW, that is a beautiful bike, and a superb job of modeling it! Great paint job!
  • Member since
    November 2012
Posted by dioramator on Wednesday, August 26, 2009 8:09 PM

 Zoolander wrote:
Hi great finish! what did you use to finish the front number board. I am thinking of extending mine down lower also. The number board seems to be a sort of an off white colour. Did you just paint it then clear coat over top? What colour and brand of paint did you use as it seems to be a very good match. Thanks.

Hi Zoolander

this one sure is a challanging build

For the front number plate, I applied the decal, let it set, then trimmed off the overhang from the air duct. I then painted the intake and below using Tamiya flat white (XF2) because it has good opacity; and because the colour is not a hardline match, it seems to blend ok. I then brushed in the pinstripe using Tamiya flat yellow (XF3), once again because it has good opacity, and the colour is not too far from the yellow used on the decal. (and we (as humans)do not have very good colour perception when it comes to yellows). The final clearcoats bought the matt paint up to a gloss.

While on the subject of the decals. mine were very thick, and microsol had no effect on them, I ended up using a hot flannel (flannel cloth dipped in very hot water, and wringed out) on them to get them to conform to the shape.

I'm interested to see how your build goes. If you need anymore information, let me know.

 thanks for that Doog, much appreciated

Brett


  • Member since
    March 2009
Posted by Zoolander on Wednesday, August 26, 2009 10:09 PM
Thanks mate. Not sure yet if ill extend the number board or not, but just want to know how if i do. Ill keep you posted. I have almost finished. It has taken ages as I had a break from modeling for a while but am anxious to get this bike finished now.
  • Member since
    October 2009
Posted by Outamyhead on Friday, October 9, 2009 10:13 AM
I remember seeing a Top Gear documentary about this bike and John Britten, where did you get the model from, I would like to try and build one?
  • Member since
    November 2012
Posted by dioramator on Friday, October 9, 2009 5:30 PM


Gidday Outamyhead,

the kitset is available from Britten Motorcycles

the price is $320.00 (NZ) (around $235 US). expect to pay a fair bit for postage, as it weighs alot.

they are available on order only, I believe they only do a limited run of 300 kits at a time, once the demand is there.

Here's the link


  • Member since
    September 2010
Posted by obooth on Sunday, September 19, 2010 6:06 AM

Hey guys, great posts, thanks for all the observations and tips. I heard recently they are discontinuing this model, just putting in last run now. I decided to nab one before it was too late. I haven't done a model for about 20 years, so this was a bit of a blast from the past, and one hell of a challenge to start back with.

The tip to use ETCH primer was much appreciated, and I too found normal primer was ineffective. I work for metroglasstech here in Christchurch, and operate their unique Ceramic Digital Printer that prints directly onto glass, and is then fired in a furnace to give a permanent picture that outlasts other finishes by decades.

I decided to try printing the Black Beauty version of the Britten for the purpose of demonstrating the product, and because I've been a Britten fan, like so many, for a long time. I contacted Giovanni Cabanassi in Milan after finding a fairly decent resolution picture of CR&S's bike on the internet. I sought his permission to use the image, which he kindly accepted on the proviso I send three of the finished pictures to him over there. He just received them a fortnight ago, and now wants to purchase further units, which is a good result!

Anyway, it is from these communications, and my personal preference for the Paint scheme, that I'm trying to model the Black Beauty. I'm obviously going to have to be creative in coming up with the detailed bodywork paint scheme of the black and white finish flag design that runs the length of the body, but I'll find a way. I've found using a loupe, and a new scalpel that I was able to pare away a tight adhesive decal for the tyres, wheel logos, and main Britten text for the swingarm without any transarent edge to ruin the look. I'll put a decent picture of the Britten printed onto glass soon, you've really got to see it to believe it. You get some natural light behind it, and it'll blow you away!

RRP NZ$300 plus GST for a 670x1000mm picture printed onto 6mm low iron. Only five in existence, 3 in Italy, one at our work showroom, and one in my own home (perks)

cheers again,

regards,

owen

Ps. How do I insert a picture without using the URL?


Tags: britten
  • Member since
    August 2009
  • From: Borlando Fla home of the rat
Posted by TREYZX10R on Sunday, September 19, 2010 7:56 PM

outstanding job, nice matching the colors,I got to see this bike in person at Daytona you did it justice!!! I've been trying to find this kit glad to hear they re still a few to be had.

  • Member since
    November 2012
Posted by dioramator on Sunday, September 19, 2010 8:07 PM

TREYZX10R

outstanding job, nice matching the colors,I got to see this bike in person at Daytona you did it justice!!! I've been trying to find this kit glad to hear they re still a few to be had.

HI TREYZX10R

If you are after one you had better be quick, they only make 100 kits per production run, and if this is the last batch, they will quickly become a collectors item (Although I do believe they have already attained that status).

Brett

  • Member since
    November 2012
Posted by dioramator on Friday, September 24, 2010 12:54 AM

Like this?


Yes

Brett

  • Member since
    September 2010
Posted by obooth on Saturday, September 25, 2010 7:22 PM

mmmmm, not bad, but more like this...

http://www.youtube.com/watch?v=wgrnWnEROnk

  • Member since
    February 2011
Posted by Thanoszx7r on Sunday, February 6, 2011 12:52 AM

I am a Britten fan too, I bought the model and built it. I liked it but I was always unhappy with the level of detail. So I disassembled the model and now I am making new parts that I want more detailed.

I am building them in a computer program (Solidworks) and having them printed on a 3D printer.

So far I have built: Front rotors, rotor carrier, rear rotor, chain adjusters, wheel nuts, the rear shock made of three pieces, the shock remote, front sprocket, rear sprocket, rear sprocket carrier, clutch and brake levers (These should move like the real thing), the rearsets/foot controls, the front master cylinder, clutch basket, clutch plates, clutch outer plate, cam sprockets, cam belt tensioner wheels, cam belt covers (Two as per the newer bikes)

I plan to build: Front brake calipers, front shock, steering stabilizer, suspension rods, the exhaust collector box and a much more detailed engine with cleaner lines.I am thinking of building a separate link chain also so it would flex and turn like a real one.

I thinned out many of the parts, especially that thick rear wheel guard.

I need pictures of the engine though. I have a few, but if someone who is close to one of the machines could get me some pics I would really appreciate it. I am more than happy to share my work. I can send you the links and you could have them printed at Shapeways.com.

This is my first post here or I would add some pictures. Please reply and let me know if you can help me with a few pictures. Thanks


thanoszx7r (AT) Yahoo.com

JOIN OUR COMMUNITY!

Our community is FREE to join. To participate you must either login or register for an account.

SEARCH FORUMS
FREE NEWSLETTER
By signing up you may also receive reader surveys and occasional special offers. We do not sell, rent or trade our email lists. View our Privacy Policy.