SEARCH FINESCALE.COM

Enter keywords or a search phrase below:

Italeri 1:12 FIAT Mefistofele

34533 views
89 replies
1 rating 2 rating 3 rating 4 rating 5 rating
MJH
  • Member since
    April 2005
  • From: Melbourne, Australia
Posted by MJH on Sunday, April 26, 2015 8:02 AM

Hi Nick;

Have to admit mine has hit a wall too (No, I haven't actually thrown it at the wall!Wink).  To be honest I was delaying permanently fixing the suspension with the plastic pins just in case I had second thoughts, or someone came up with a better solution.  However, now I've had a break I'm happy with it the way it is and will continue.

I take your point about the screws; in my opinion Italeri should have made more of an effort to see how the kit would build up using the original screws with the new plastic parts.  I wonder if they even bothered to build a sample to see if there were any problems, they certainly didn't see the errors in the instructions.    I will continue to use the screws where they're up to the task but I'll replace any that seem superflous or inadequate.

Speaking of superflous, I have now cemented the rims of all the wheelsand removed the four screws that 'secured' them together, but I've left the two long screws that hold the hubs together.  I know it's early days but have you thought about using the two silver rims for the back wheels?  The instruction book (Italeri's version - not Protar's) indicates not to use them and they don't appear on any photo of the real thing that I've seen to date so I wonder what they're for....

Michael

!

MJH
  • Member since
    April 2005
  • From: Melbourne, Australia
Posted by MJH on Sunday, April 26, 2015 8:20 AM

Hi Ken and welcome;

I certainly wouldn't want to have hauled that big box across Europe!  Yes, the original car has an international feel about it (well, Italo-British anyhow) and the kit certainly has been taken up by a variety of builders on the net - French, German, UK, Australia (even if not actually Australian...).

This is my first big car kit for decades, though I have a collection of old Imai kits, including their incredible Bianchi, and also a Bandai Duesenberg Boattail, both of which are slated for building - eventually...

Hope to see your build here soon;

Michael

!

  • Member since
    October 2006
  • From: Lakewood, CO
Posted by kenjitak on Sunday, April 26, 2015 9:01 AM

I have to admit to pulling it out and looking at the parts and instructions. It really looks like it's going to be a fun build. Don't want to leave Paris yet but at the same time I'm looking forward to getting back to my desk and start it!

Ken

  • Member since
    March 2015
Posted by NickD on Monday, April 27, 2015 2:22 PM

Just a quick note. My intention is to 3D print some bolts. Best would be brass but that woudl cost the thick end of 40 Euros so it will have to be nylon. Not ideal. I am not sure either paint or glue will stick. Drawing the bolts should be easy. Just a shaft and a hex head. Proved a bit more difficult. I wanted to do rivets at the same time and in a number of sizes. Seems to be taking a bit more thought than I bargained for. Watch this space....

Wheels. Undo the screws, now that's a good idea! I ground the ends that protruded off with my Dremel, very carefully. Why are the screws to long in the first place.

Wheel trim. I'd assume discard. They are not shown in the instructions or any photos.

For a bit of light relief I started on the engine!

  • Member since
    March 2015
Posted by NickD on Wednesday, May 6, 2015 2:58 PM

This is a most frustrating model. I printed some bolts, nominally 1.2mm shaft size in nylon. Came out slightly undersize. 1.4mm would probably have been better. Still they look OK though nothing like as crisply moulded as the ones on the chassis of the model. I have photos but not time to upload yet. Assembly is going to take some thought as it is all a bit floppy with rods rather then screws. But I can see a way to make this work.

So far so good.

Then I tried to push the axle through the hole in the rear spring carrier. 2 layers of undercoat and a couple of topcoat had closed the tolerences down so that it would no longer push through. In trying to work it in I then broke the lug on the spring carrier.

So tonight I repaired the damage. But then took another step backwards.

I seem to have lost the rear spring rear mounting somewhere in the garage. The problem with my printed studs is that they do not retain things like screws. So now I fear I have to make a new rear mounting from scratch but don't currently have any 2.5mm tube.

Hey ho! and only the other day I was feeling good because I actually managed to get a consistent paint finish on some bits.

More soon

MJH
  • Member since
    April 2005
  • From: Melbourne, Australia
Posted by MJH on Thursday, May 7, 2015 9:06 AM

Hi Nick;

Sorry to hear of your difficulties.  Can you fix the nylon 'bolts' by using epoxy?  I don't know if it will secure nylon.  Now that I've settled on using the plastic rivets I made I'll simply cement them in.  I'd be very interested in seeing a picture of your 3D printed parts.  I don't have access to a 3D printer but it seems it might revolutionize our hobby.

I know you don't intend to use the silver rims on the rear wheels but, just for interest, here's a pic of the original Protar instruction book showing their fitment.  One curious thing is the way they distort the rubber tyre's outer profile in the drawing at centre right.  I can't for the life of me work out what function they'd serve.

Michael

!

  • Member since
    October 2006
  • From: Lakewood, CO
Posted by kenjitak on Saturday, May 9, 2015 1:50 PM

I'm really curious to see how the 3D print stuff works out, NickD. Started some work on this kit, and after seeing how clean a build the posted photos showed, I now have a new appreciation for the work. This kit has enormous gates on the parts that need to be sawed rather than clipped which really adds to the part preparation time. That and the pits in the parts really adds to the assembly time!

Ken

Ken

  • Member since
    March 2015
Posted by NickD on Saturday, May 9, 2015 3:33 PM

OK so, having perhaps over-hyped the 3D printing, I'd better show you. The picture below shows a set of bbolts on the left and rivets on the right. I drew the shapes in a free but very very versatile package called BBlender (https://www.blender.org). Drawing bolts is relatively straightforward though the interface is really quirky. Still you can do much more than bolts. My avatar was drawn entirely in blender. I drew the bbolts full sized with a nominal diameter of 1mm. I then scaled them to 1.2mm and 1.4mm. The picture bbelow is the set 1.2 mm set. With hindsight probably the 1.4mm would have been better. They were printed by Shapeways (http://www.shapeways.com/). A great service, though for little things the relative cost of the post is a bit steep. So I printed off a selections of bolts and rivets to make it worth doing. One can pick from a wide variety of materials, from nylon to platinum. These, needless to say are black nylon. When printing things there are a number of practical considerations to take into account. These bolts may not be spectacular but one of the things I wanted to explore was the level of definition. Minimum dimension in this material is 1mm and minimum feature size is .2mm. So these are right on the limit. They were produced using a laser sintering process, i.e. using a fine powder. They therefor arrive with a very rough texture. As a consequence, the heads on the fasterners lack definition but they  are so small (as the photo, taken through my magnifier, suggests) that that is not surprising. Practically, the technique Michael suggested with rod and a candle probably yields results that are not too dissimilar, are cheaper and probably easier to produce. This is getting a bit long but there are still some points worth noting, so please forgive me. I would like to have printed it them in brass. I think this would have been smoother but the cost is about 5 or 6 times greater so I did not bother. Maybe next time. Main concern with nylon is stickability. The rough surface probably helps. I put auto primer on as a base and then black over. It seems to be OK. So far I have used the time honoured (for this model at least) soldering iron method to fix permanently in place. The only problem is that the undercoat burns off leaving smooth plastic which is not ideal but all the ends are out of sight. so hopefully the poorness of the paint finish should not be too obvious. So thats probably more than you need or even whant to know. If you are interested have a go. It costs very little and is very versatile..

  • Member since
    March 2015
Posted by NickD on Saturday, May 9, 2015 3:46 PM

Michael on the subject of wheel trims, There are a few old pictureson the web of the car. None have shiny trims so who knows what they were thinking when they designed the model.

The thing I found interesting was the number different variants of exhaust. The chord seems to have been a modern innovation.

  • Member since
    March 2015
Posted by NickD on Saturday, May 9, 2015 3:47 PM

Ken

Severall things on this kit are annoying. As you say, cutting from the sprues is a bit time consuming. The ones that worry me are the long thin wires. Breakage looks inevitable. Not happened to me but it's only a matter of time. My next challenge are the body and simulated wood componts.

All the best

Nick

MJH
  • Member since
    April 2005
  • From: Melbourne, Australia
Posted by MJH on Saturday, May 9, 2015 8:47 PM

Nick;

Thanks for the comprehensive info on the 3D printed bolts, I look forward to seeing them in-situ.

I don’t expect to use the wheel trims but I’m intrigued as to their purpose.  I think they may have been on the car in the 70’s when the model was designed so Protar included them – there don’t appear to be many photographs of the car in that period.

I imagine you could build the exhaust with, or without, the rope lagging and be equally accurate.  It probably got changed quite often too.  I’ve assembled the manifold and pipe but I won’t cement them together until the time comes to fit them on the car just in case they need adjusting to fit to the engine and the rear bracket.  This might complicate the fitting of the rope as I want it to cover the joint, but we’ll see.  The end of the exhaust pipe needed a lot of reaming out too.

!

MJH
  • Member since
    April 2005
  • From: Melbourne, Australia
Posted by MJH on Saturday, May 9, 2015 8:50 PM

Ken;

What I’ve found when removing parts from the long sprue gates is that the actual joint is quite thin and on one side there’s a ‘valley’.  If you run a sharp blade along this a couple of times the parts will separate with a gentle folding action.  I know it goes against the grain but I’ve removed the sprue from many parts already like this, including the body sections, and they separate very cleanly, requiring only a light sanding to remove the remaining edge.

I’d recommend not using an Excel-type No.11 blade, they break too easily.  A Swann-Morton No.11 scalpel works well but I use a Japanese snap-blade knife with 30 degree blades.  

!

  • Member since
    March 2015
Posted by NickD on Sunday, May 10, 2015 1:08 AM

I love the thought that someone might have thought this great old car would be even better with more chrome!. Very 70s.

MJH
  • Member since
    April 2005
  • From: Melbourne, Australia
Posted by MJH on Sunday, May 10, 2015 6:48 AM

Ahhh, the Seventies - muscle cars, the RX-3, the Monaro, the RX-7, the GTHO - those were the days!  Actually Nick, my present car sports more chrome than anything I've ever driven, let alone owned, in 40-odd years, but I take your point. 

!

  • Member since
    October 2006
  • From: Lakewood, CO
Posted by kenjitak on Monday, May 11, 2015 10:21 PM

I've been working on this kit and even though I have complaints, I'm also enjoying it. I've been using a razor saw, a JLC razor saw and my trusty, No. 11 knife to cut through the sprue gates. My 3M putty is also getting used for the sink holes. So I'm slowly working through this kit. It's such a cool car. When I get tired of working on this kit, I look at the various videos of this car on Youtube, and seeing the subject of this kit in action is inspirational!

Ken

  • Member since
    March 2015
Posted by NickD on Tuesday, May 12, 2015 3:59 PM

Ken,

Glad you are enjoying it. Mine seems to be a bit up and down. Mostly self-inflicted.

For example, I discovered yesterday, that I had put the cross-beam that supports the floor on upside down! As it was all cyano'd on I had to saw through both sides and turn the cross-beam over and then get it all square again. Probably a low point really.

Like you the thing that keeps my interest is the insight into how this fabulous machine was put together. From the glorious engine to the wacky rotary dampers. Great. A bit different from a Ferrari, or Mclaren or Red Bull

MJH
  • Member since
    April 2005
  • From: Melbourne, Australia
Posted by MJH on Friday, May 15, 2015 4:49 AM

I think I put that same crossmember upside down too Nick!

I intended painting the 'wood' parts to resemble a woodgrain even though I've never been really successful in getting the right effect and then Nick pointed out that the lay of the planks on the firewall was wrong so I had a rethink. I went to a model boat place and purchased a few lengths of 0.5mm thick, 8mm wide strip and experimented in adding a veneer to the floor and firewall parts glued with contact cement.  It's gone quite well I think so now I'm looking for suitable stains to get the colour right, or at least close.  The strips are a bit too narrow in themselves but I'll add a darker line every two strips to represent the original's planks.

I was going to cut off the three caps on the main floor and glue them on top but it turned out to be simpler to just cut around them.  I haven't drilled the holes for the seat yet.

The firewall is layered on both sides but I've only done the top of the floor parts as the bottom of the floor won't be visible when my model's done.

!

  • Member since
    March 2015
Posted by NickD on Friday, May 15, 2015 2:40 PM

That wood looks really neat. There's a german build where somone used wood that's worth a look. His build is probably the best I've seen. The stage that the built for the car is outrageous.

Before I saw your post I assumed I would use plastic car and paint. I might still do that for the firewall (which will need to be scratchbuilt). The only bit that bothers me is the surround. Don't feel that confident about cutting to fit but if you don't try you don't learn. How hard can it be.

I think you might have persuaded me about the floor. BTW, pictures of the floor show all the fixtures to be recessed so I think your treatment actually makes it better than it was originally, and it's less work. Bonus!

Sorry you also put the part in the wrong way round. It would not be that difficult to and it so that it only fits correctly. Having sawn the thing off, it's glued back OK. Scruffy but not visible so it probably does not matter.

MJH
  • Member since
    April 2005
  • From: Melbourne, Australia
Posted by MJH on Saturday, May 16, 2015 6:36 AM

I was fortunate in that I noticed the upside-down component before the cement had thoroughly hardened!

I have seen that German site - I thought he'd cut new pieces from solid wood but on closer inspection it appears he may have used veneer in a similar manner to mine.  He's rather over-the-top for me with all the work on the bonnet hinges, rivets etc. but to each his own, we all make our own interpretation of the basic kit I suppose.  I couldn't match his skills in any case.

I don't know if you've been watching the Italian build or not.  "Maurillo" has finished his model but though he's done a nice job I'm not sure I like the artistic wear and tear he's introduced; again, each to his own.

I've stained my wood parts now and I don't think I'll do much else to them beyond a coat of gloss varnish.  I'm happy enough to use them as they are.  The yellowish stain sort of matches the aged varnish on the real thing.  By the way, I think you're right about the three items on the floor, they just looked moulded-on before but now give the impression of separate parts.

!

  • Member since
    March 2015
Posted by NickD on Sunday, May 17, 2015 1:27 AM

Certainly looks a pretty good colour. I'm not quite there yet.

I had seen "Maurillo" and had the same view about the weathering. On the other build, I was awed by the attention to detail, the ambition and the speed (and amount of time he must have available) with which it all came together. It just takes me ages.

MJH
  • Member since
    April 2005
  • From: Melbourne, Australia
Posted by MJH on Sunday, May 17, 2015 8:53 AM

Nick, I meant to ask you about your mentioning your firewall would be scratchbuilt.  Why do you intend to to scratchbuild it?

!

  • Member since
    March 2015
Posted by NickD on Monday, May 18, 2015 3:24 PM

Michael, The concern I had was one of fit. Adding a layer to either face would make it thicker and might mess up the fit. So I thought I would build it from scratch and be done with it. However, maybe that was a bit hasty. The only other thing was the flange that allows the bonnet to fit. I did not want it to be flush wiht the surface. After seeing your build though, I think I will revisit that plan and see if there is an easier route. That said I am still not confident in my ability to work plastic car to give a very tidy fit.

MJH
  • Member since
    April 2005
  • From: Melbourne, Australia
Posted by MJH on Tuesday, May 19, 2015 9:13 AM

I did consider that adding the wood layer might lead to difficulties with fit later down the track but as it's only about 1mm altogether on the firewall (even less after sanding) and 0.5mm on everything else, I'm confident I can adjust things as necessary.  In any case I always was one to charge in bull-headed!

I did the wooden chassis rails last night.  I've only covered the top and outside as I don't expect the inner sides to be visible when in place.

!

  • Member since
    March 2015
Posted by NickD on Monday, May 25, 2015 1:46 AM

Here's a couple of pictures of the bolts in position. In the end I replaced all the screws in the suspension.They aren't as crisp as the bolts moulded to the chassis but are much better than screws, too small if anything. A couple of other things. Tamiya Aluminium is the wrong colour for the damper ends! Needs to be much duller. I used semigloss black for the chassis which still needs a wash of something to break it up. The picture of the front also shows the chassis infill I added. Might still do something with the bottom pickups at the front. Finally The bolts were straightforward to work with. CA seems to work quite well. I guess it could key to the roughness.

MJH
  • Member since
    April 2005
  • From: Melbourne, Australia
Posted by MJH on Monday, May 25, 2015 8:04 PM

Excellent work Nick.

I was also considering using semi-matt black for the chassis - gloss black is way too much so and I never use full matt black for any purpose.

I like your chassis infills and looking at that makes me think it might be worthwhile to do likewise.

From what I can see of those dampers in various photos perhaps a gunmetal would be closer.

!

  • Member since
    March 2015
Posted by NickD on Tuesday, May 26, 2015 3:23 PM

Michael,

Thanks for the kind words. Yes gunmetal or aluminium mixed whith gunmetal would be much better if I can work up the enthusiasm for a rather tricky paint job.

On a different subject, I just had to post this.

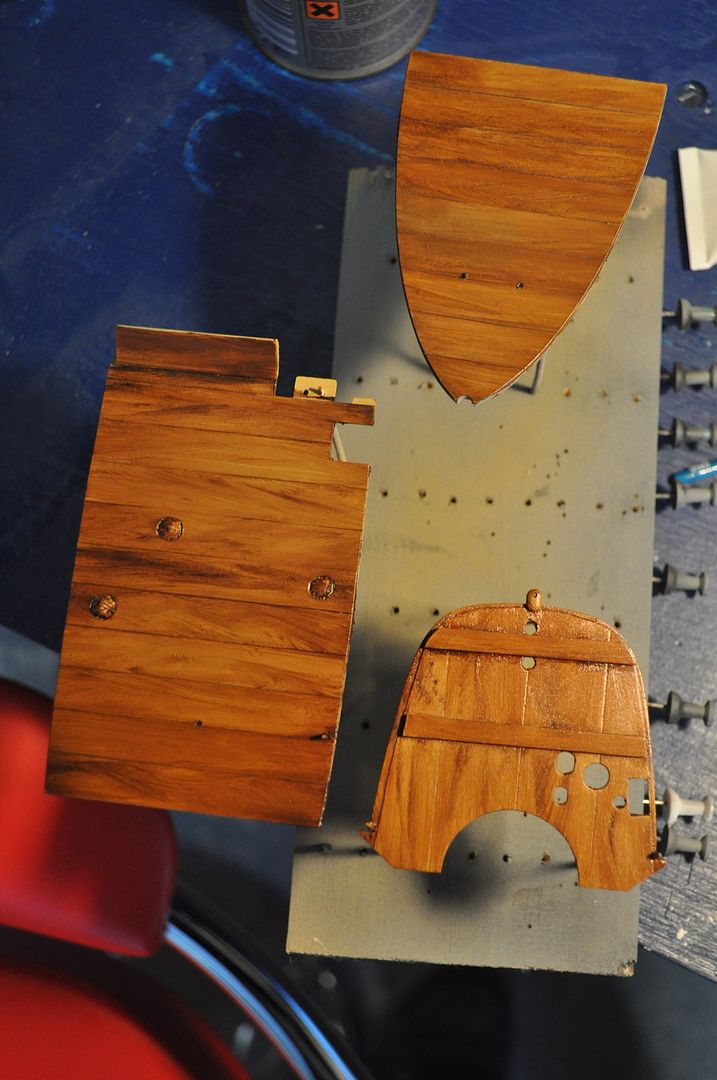
One of my original reasons for wanting to do this model was the wooden bits. Your use of veneer almost changed my mind. I thought it really effective, and very close to the colours you see in the photos. I wasn't sure I had the skill or courage to do the sort of paint effects I had seen but if you don't try you won't know. So today I took the plunge and had a go using the techniques described on this link:www.agapemodels.com/.../simulating-wood-grain.

Clearly the technique is pretty much idiot proof. I have seldom felt so pleased with myself doing modelling than with the results shown below - more typical of me is throwing half a  bottle of liquid cement across my bench (yesterday's drama)  - skill.

It worked very well, though the colour is more teak than pine but I'm not going to be that fussy. There's still a layer or two of varnish to add. Unfortunately it means I there is little more to do (just the other side of the front bulkhead and the two rails). Maybe a WW1 subject beckons or a completely unpainted Mosquito...

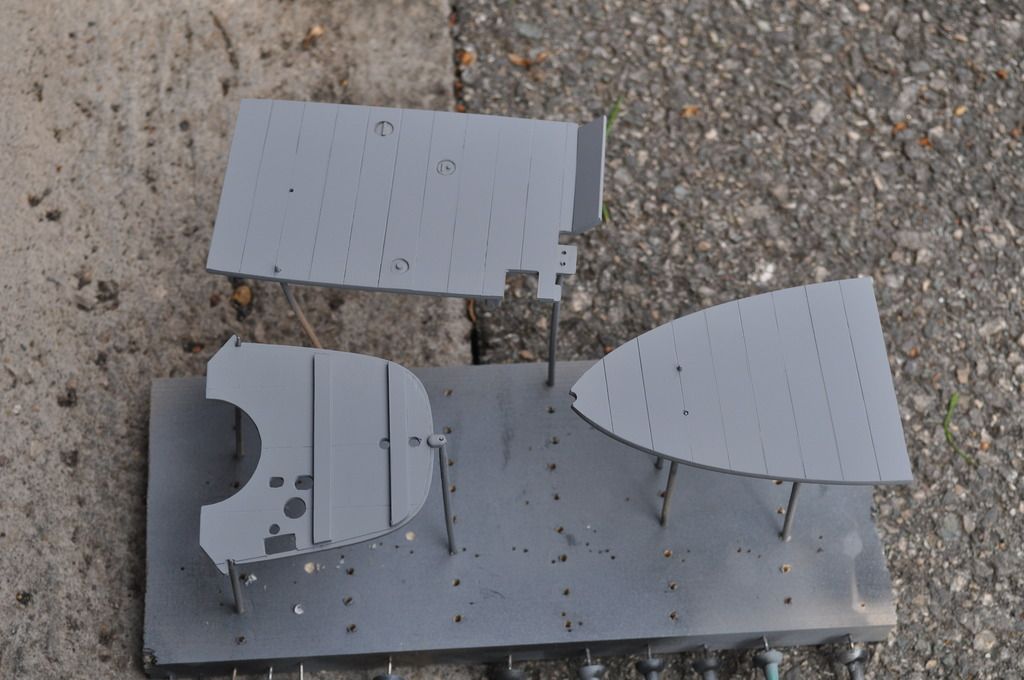
Before (just Halfords primer)...

After X59 Desert yellow and an assortment of Umbra and Sienna oils. Now just need to patiently wait for it to dry...

MJH
  • Member since
    April 2005
  • From: Melbourne, Australia
Posted by MJH on Wednesday, May 27, 2015 7:38 PM

Very impressive Nick!  Are you sure you've never done this before?  If I hadn't already used the wood I'd have given that a go.  I've heard of the technique but didn't know much about it so thanks for the link.  It also avoids any the fit issues that I may encounter - I have to trim a little wood of the edges of the firewall to ensure it mates with the rib inside the body shell for example.

!

  • Member since
    March 2015
Posted by NickD on Thursday, May 28, 2015 11:17 AM

Michael,

Thanks for the feedback. Yep first go. Clearly a truely idiot proof technique. Now if I could only spray gloss without splats, pools and orange peel, I might be getting somewhere. Needless to say, spraying the gloss coats on the wood effect did not really enhance the surface finish. Good job it is supposed to be a hundred years old

  • Member since
    May 2015
Posted by JohnK UK on Saturday, May 30, 2015 9:05 AM

Hi Nick,

Did you remove the molded in surface detail detail on the "wooden" parts before priming/painting?

John

  • Member since
    March 2015
Posted by NickD on Monday, June 1, 2015 3:36 PM

John

I removed the detail so I would have a nice smooth surface. On the firewall, I scrapped the front face too to try to increase the amount the bonnet flange stood proud. I did not go mad because I still wanted it to be flat.

JOIN OUR COMMUNITY!

Our community is FREE to join. To participate you must either login or register for an account.

SEARCH FORUMS
FREE NEWSLETTER
By signing up you may also receive reader surveys and occasional special offers. We do not sell, rent or trade our email lists. View our Privacy Policy.