SEARCH FINESCALE.COM

Enter keywords or a search phrase below:

Monogram 1969 Camaro SS-PROJECT COMPLETED-07/20

13777 views
132 replies
1 rating 2 rating 3 rating 4 rating 5 rating
  • Member since
    March 2012
  • From: Corpus Christi, Tx
Posted by mustang1989 on Sunday, February 5, 2017 6:20 AM

When this all started the interior didn't have a back seat. I think it was in the kit but for some reason I chose to omit it on the original build. When I got the spare kit it had one in it but it was notched out on the sides for the dang roll bar braces.


This is after stripping the white paint from it:


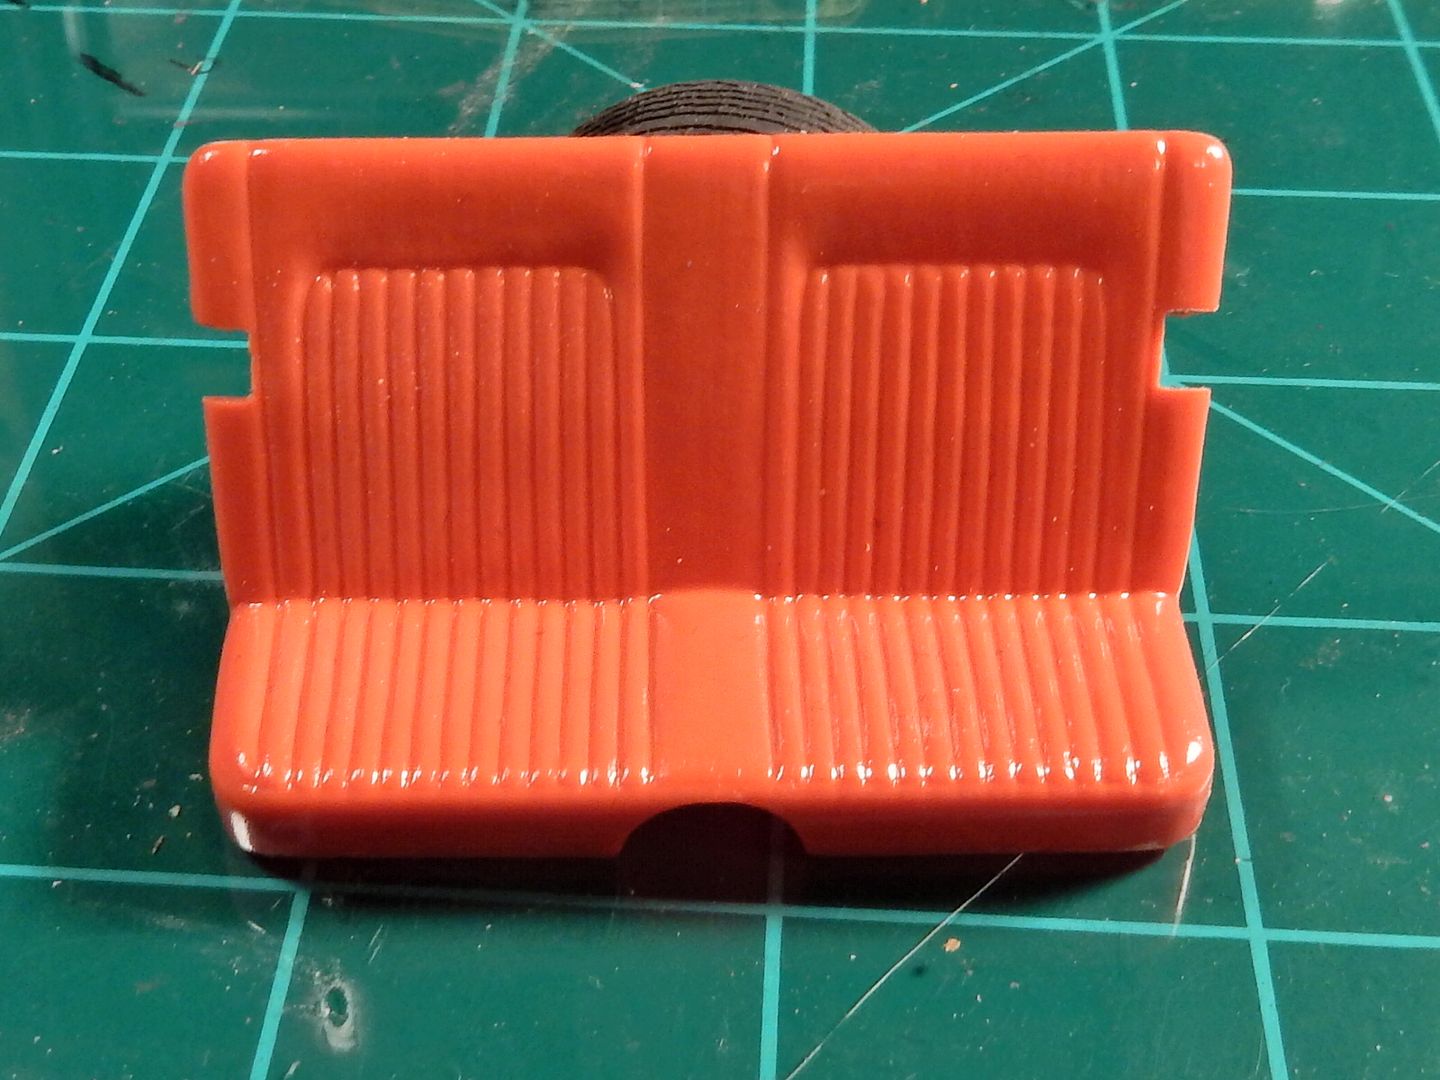
Here it is after filling in the cut outs with some Evergreen sheet styrene and filling and sanding everything smooth. Additionally, I made some small cut outs where the seat back and seat bottom meet for seat belts which are now installed with the PE seat buckles. Man I guess I need to fill the center "dot" in on those buckles. I'll also be working on the front seat finishes to match the rear seat. No biggie on that though.


 Forum | Modelers Social Club Forum (proboards.com) 

  • Member since
    March 2012
  • From: Corpus Christi, Tx
Posted by mustang1989 on Saturday, February 4, 2017 7:37 AM

Thanks Joe. Got a dang cold so I slept in this morning as it hit me freekin' hard last night. No bench time this morning. Crying


 Forum | Modelers Social Club Forum (proboards.com) 

  • Member since
    August 2009
  • From: MOAB, UTAH
Posted by JOE RIX on Saturday, February 4, 2017 7:33 AM

Oh Yeah. The interior is shaping up very nicely. All the detail work is quite superb Joe.

"Not only do I not know what's going on, I wouldn't know what to do about it if I did". George Carlin

  • Member since
    March 2012
  • From: Corpus Christi, Tx
Posted by mustang1989 on Friday, February 3, 2017 8:13 AM

Thanks Steve.

This interior just keeps getting better with each addition. I've got the door handles and window cranks as well as the Camaro badges on the door panels and the console is finished. The shifter is a bobby pin that I bent and sanded the shifter ball to get rid of a seam it had. Center gauges are from the PE set I bought. I'm going to buy another set of floor mats so I can fix that drivers side floor area. I'm not happy with that but I'll fix it. Here we are so far guys:


 Forum | Modelers Social Club Forum (proboards.com) 

  • Member since
    August 2007
  • From: back country of SO-CAL, at the birth place of Naval Aviation
Posted by DUSTER on Monday, January 30, 2017 11:14 PM

mustang1989

Thanks Steve! Haven't seen you around in a while buddy. Hope all is going well for you.


Thanks,  All is well,   just been "out an' about".  Then decided to clear and clean off my bench, could only find a gigantic pile of “stuff” where I remember seeing it last.  The excavation is slowly moving along, so took a break to see what was going on and wow, here you are, creating another gem. 


Steve

Building the perfect model---just not quite yet  Confused

  • Member since
    March 2012
  • From: Corpus Christi, Tx
Posted by mustang1989 on Monday, January 30, 2017 7:32 PM

Thanks Steve! Haven't seen you around in a while buddy. Hope all is going well for you.


 Forum | Modelers Social Club Forum (proboards.com) 

  • Member since
    August 2007
  • From: back country of SO-CAL, at the birth place of Naval Aviation
Posted by DUSTER on Monday, January 30, 2017 7:08 PM

Chevy key fob!?  Revised gages? New script?  And then

a CHROME pen.....

Joe you made a silk purse out of a sow’s ear and your haven’t even got to the outside !  

p.s. thanks for the lead on that pen. I have been using a similar type of pen but it's a ball point type, yours sounds more precise and manageable –seeing your pictures.


Steve

Building the perfect model---just not quite yet  Confused

  • Member since
    August 2015
  • From: the redlands Fl
Posted by crown r n7 on Monday, January 30, 2017 6:31 PM

Looks  fantastic 


 Nick.

  • Member since
    March 2012
  • From: Corpus Christi, Tx
Posted by mustang1989 on Monday, January 30, 2017 4:41 PM

Joe: Thanks buddy. I may end up giving the rest of that floor mat a shot yet. Thinking.............

Toshi: Thank you for the good word. All I can say about auto building is to be careful. This stuff is addicting.


 Forum | Modelers Social Club Forum (proboards.com) 

  • Member since
    March 2015
  • From: Streetsboro, Ohio
Posted by Toshi on Monday, January 30, 2017 8:18 AM

Amazing detail work, now I'm going to have to build a car too!

Toshi.

On The Bench: Revell 1/48 B-25 Mitchell


Married to the most caring, loving, understanding, and beautiful wife in the world.  Mrs. Toshi


  • Member since
    August 2009
  • From: MOAB, UTAH
Posted by JOE RIX on Sunday, January 29, 2017 9:38 AM

Great progress Joe. All the detailing you are doing to the interior are really enhancing the appearance of realism. I think that the alterations you had to do to the  pedals and floor mat pass muster. I was curious to see how that chrome pen would work on more minute detail and it looks like it does well. Everything is looking excellent my friend.

"Not only do I not know what's going on, I wouldn't know what to do about it if I did". George Carlin

  • Member since
    March 2012
  • From: Corpus Christi, Tx
Posted by mustang1989 on Sunday, January 29, 2017 6:29 AM

Ok gang. It's been a little bit since I posted any updates here and I'm trying not to bore everybody to death with a picture of a floor mat here and a picture of foot pedals there so I'm waiting till I feel that I've got some substantial progress before posting. Additionally , if I spend all my time taking pictures then I don't get much done at the bench. I build slow enough like it is.

Here we are with the dash in place, carpet / flocking put down everywhere except where the seats go and floor mats down. Folks I'm doing the very best I can with what I have here so there was just no hope of getting the floor mat on the drivers side to go under the pedals unless I wanted to cut that area of the floor pan out and graph in a "blank" piece of styrene and drop the pedals down from the back side of the dash. That's more work than I wanted to do so I cut the floor mat just short of the pedals and did most of my fancy foot work with the pedals themselves to try to make up the shortcoming. I've got the shifter plate along with the shift pattern insert on the plate installed on the center console in this pic and will be adding the PE gauge bezels and gauges as well as the shifter lever soon to round out that console.

The two front seats with the chrome emblem picked out with that chrome pen:

and the back seat that I robbed from the spare kit since my original Camaro build did NOT have a back seat at all in it. Yeah ....the roll bars are going bye bye for the revamp and I'll be installing this seat along with seat belts for the front and rear seats. I'll also be filling in those openings for the roll bar with some sheet styrene.


 Forum | Modelers Social Club Forum (proboards.com) 

  • Member since
    March 2012
  • From: Corpus Christi, Tx
Posted by mustang1989 on Sunday, January 29, 2017 6:19 AM


 Forum | Modelers Social Club Forum (proboards.com) 

  • Member since
    June 2014
  • From: New Braunfels , Texas
Posted by Tanker - Builder on Thursday, January 26, 2017 8:03 AM

Mustang 1989 ;

   Now , question is , where do I find that product in New Braunfels or San Antonio ?

  • Member since
    March 2012
  • From: Corpus Christi, Tx
Posted by mustang1989 on Thursday, January 26, 2017 7:27 AM

Thanks crown! Yes


 Forum | Modelers Social Club Forum (proboards.com) 

  • Member since
    August 2015
  • From: the redlands Fl
Posted by crown r n7 on Wednesday, January 25, 2017 4:58 PM

that looks awesome !!!!!


 Nick.

  • Member since
    March 2012
  • From: Corpus Christi, Tx
Posted by mustang1989 on Wednesday, January 25, 2017 12:20 PM

Tanker - Builder

You Know ;

 You make me afraid . I am so old school I never even thought to use a silver pen or pencil for detailing a dash or anything else . I have to try it ! T.B.


No worries TB. It's an actual chrome pen though. Not silver....and it works great!!


 Forum | Modelers Social Club Forum (proboards.com) 

  • Member since
    June 2014
  • From: New Braunfels , Texas
Posted by Tanker - Builder on Wednesday, January 25, 2017 11:21 AM

You Know ;

 You make me afraid . I am so old school I never even thought to use a silver pen or pencil for detailing a dash or anything else . I have to try it ! T.B.

  • Member since
    March 2012
  • From: Corpus Christi, Tx
Posted by mustang1989 on Wednesday, January 25, 2017 11:20 AM

Greg
Tell me about this chrome pen, should you feel the urge. Results on the steering wheel spokes look good.

Thanks Greg! Yes

I just got through buying a chrome pen from this company called Art Primo. They come in a variety of sizes and I got the smallest one since I do a lot of chrome trim work. I used it for the first time a couple of days ago on my Camaro steering wheel and dash trim and have to say that it works great!! It will also work great for stuff like aircraft landing gear oleo's.


Here's a short video if you are curious.


redirect.viglink.com/?format=go&jsonp=vglnk_148535903601811&key=bbb516d91daee20498798694a42dd559&libId=iyd48sw6010004m6000DAk6vzee2z&loc=http%3A%2F%2Fcustom-model-society.boards.net%2Fthread%2F497%2Fchrome-pen%3Fpage%3D1&v=1&out=https%3A%2F%2Fyoutu.be%2FmqZgAy6kRG0&ref=http%3A%2F%2Fcustom-model-society.boards.net%2Fthreads%2Frecent%3Fpage%3D2&title=Chrome%20Pen%20%7C%20Custom%20Model%20Society&txt=youtu.be%2FmqZgAy6kRG0


and where to buy one of these bad boys at:


redirect.viglink.com/?format=go&jsonp=vglnk_148535906951415&key=bbb516d91daee20498798694a42dd559&libId=iyd48sw6010004m6000DAk6vzee2z&loc=http%3A%2F%2Fcustom-model-society.boards.net%2Fthread%2F497%2Fchrome-pen%3Fpage%3D1&v=1&out=http%3A%2F%2Fartprimo.com%2Fcatalog%2Fmolotow-liquid-chrome-4mm-marker-p-4634.html&ref=http%3A%2F%2Fcustom-model-society.boards.net%2Fthreads%2Frecent%3Fpage%3D2&title=Chrome%20Pen%20%7C%20Custom%20Model%20Society&txt=artprimo.com%2Fcatalog%2Fmolotow-liquid-chrome-4mm-marker-p-4634.html


 Forum | Modelers Social Club Forum (proboards.com) 

  • Member since
    May 2013
  • From: Indiana, USA
Posted by Greg on Wednesday, January 25, 2017 9:50 AM

That dash is the spittin' image of your reference pic. Nice work.

But where's the woodgrain steering wheel rim? (Just razzing you, I read what you said about woodgrain. Yuck)

Tell me about this chrome pen, should you feel the urge. Results on the steering wheel spokes look good.

  • Member since
    March 2012
  • From: Corpus Christi, Tx
Posted by mustang1989 on Wednesday, January 25, 2017 9:30 AM

tempestjohnny
Gees when I'm through with all these plane GB's you're giving me the idea to start a car
 

Be careful. You might get hooked. Happened to me! Indifferent


 Forum | Modelers Social Club Forum (proboards.com) 

  • Member since
    November 2003
  • From: Naples, FL
Posted by tempestjohnny on Wednesday, January 25, 2017 9:15 AM
Gees when I'm through with all these plane GB's you're giving me the idea to start a car


  • Member since
    March 2012
  • From: Corpus Christi, Tx
Posted by mustang1989 on Wednesday, January 25, 2017 3:41 AM

Thanks Joe. I hear you on the AM stuff for autos. It blows me away sometimes at the amount of stuff that's out there.


 Forum | Modelers Social Club Forum (proboards.com) 

  • Member since
    August 2009
  • From: MOAB, UTAH
Posted by JOE RIX on Tuesday, January 24, 2017 6:33 AM

Your work on the dash is awesome. The steering column is great. Looks like the new chrome pen worked quite well. Seems that I'll have to be getting one of those myself. It really astounds me the amount and quality of AM stuff that is out there for autos. It's really terrific. Amazing stuff Joe. Keep it a comin'.

"Not only do I not know what's going on, I wouldn't know what to do about it if I did". George Carlin

  • Member since
    March 2012
  • From: Corpus Christi, Tx
Posted by mustang1989 on Tuesday, January 24, 2017 5:28 AM


As promised , I've been working on the steering column along with the dash for the better part of 3 days. First off I took the OOB steering wheel and cut out the spoke holes and shaved off the horn pad. I then drilled two holes in the column. One on the right for the ignition switch, key and key chain and the one on the left for a turn signal lever. I painted the steering wheel spokes with the newly acquired chrome pen that I just got in the mail and installed a PE "SS" horn pad. I then took a PE key along with a PE ignition switch bezel and a PE key chain with a "Bowtie" on it , made a scratch built key ring and put it all together and installed it into the column. The turn signal lever is made from a .019" needle I had in the spares box and I'll be painting a black knob on the end of it tomorrow morning. Any ways here it all is. I'll show the before picture (which I knew I should have taken a more clear "before" picture of the dash beforehand but this is all I've got) and then the improvement pics:

Before:

Image

After:

Image

Image

Image


 Forum | Modelers Social Club Forum (proboards.com) 

  • Member since
    March 2012
  • From: Corpus Christi, Tx
Posted by mustang1989 on Monday, January 23, 2017 2:46 PM

Thank you Joe. Hopefully the rest of the interior goes as smooth as this part did.


 Forum | Modelers Social Club Forum (proboards.com) 

  • Member since
    August 2009
  • From: MOAB, UTAH
Posted by JOE RIX on Sunday, January 22, 2017 9:43 AM

Very nicely done Joe. Superb work on refurbishing it and giving it a more detailed and realistic look.

"Not only do I not know what's going on, I wouldn't know what to do about it if I did". George Carlin

  • Member since
    March 2012
  • From: Corpus Christi, Tx
Posted by mustang1989 on Sunday, January 22, 2017 8:09 AM

Dash is complete. I got the film instruments and the "Camaro" script from the PE set. All dash trim was brought out with a silver lead pencil. While it's not the best dash you'll ever see, it's a far cry from what it was.

Image


 Forum | Modelers Social Club Forum (proboards.com) 

  • Member since
    March 2012
  • From: Corpus Christi, Tx
Posted by mustang1989 on Friday, January 20, 2017 9:45 AM

Thanks for the comments Joe and Pat!!

Sorry for the delay in updates everybody. I've been working on this thing but there are a lot of corrections to make. First off the PE bezels are NOT going to work with this dash ....................BUT I've got a different plan. Here's where we start this morning.....

Image

I drilled out the IP gauges and sanded down the back of them for the scale thickness factor and sanded the Camaro emblem off as well as cleaned up a bunch of flash and sinkholes that I found not only on top of the dash but the face of it as well. I also sanded that Camaro script from the dash.

We'll be slingin' paint on this thing about anytime now:

Image


 Forum | Modelers Social Club Forum (proboards.com) 

  • Member since
    August 2009
  • From: MOAB, UTAH
Posted by JOE RIX on Saturday, January 14, 2017 11:14 PM

Aww, you'll have that interior dressed up real nice and all real lookin' and such.

"Not only do I not know what's going on, I wouldn't know what to do about it if I did". George Carlin

JOIN OUR COMMUNITY!

Our community is FREE to join. To participate you must either login or register for an account.

SEARCH FORUMS
FREE NEWSLETTER
By signing up you may also receive reader surveys and occasional special offers. We do not sell, rent or trade our email lists. View our Privacy Policy.