SEARCH FINESCALE.COM

Enter keywords or a search phrase below:

Follow a beginner as he does his second build

1776 views
16 replies
1 rating 2 rating 3 rating 4 rating 5 rating
  • Member since
    August 2014
  • From: Willamette Valley, Oregon
Posted by goldhammer on Wednesday, July 22, 2020 11:12 PM

As to getting yellow to cover, most will lay down white first.  Seems it covers better than over the gray primer.

Looks great.  On your next one, think about adding plug wires and battery cables.  Not really hard, can do them with copper wire from a piece of stranded wire of the right size.  The copper strand will bend to shape easily.  Take a small drill bit and pin vise, make holes in the plug locations and the nubs on the distributor cap, secure with a touch of CA ( superglue), and paint in the color you want, either stock or aftermarket performance wires.

Battery cables are just a little bigger diameter.

Doing a great job for only a second attempt.

  • Member since
    April 2016
  • From: N. Burbs of ChiKawgo
Posted by GlennH on Wednesday, July 22, 2020 9:36 PM
Looks great and big thanks for posting to a site that lets you enlarge the pictures. I really dislike that one site many use.

A number Army Viet Nam scans from hundreds yet to be done:

https://www.flickr.com/photos/southwestdreams/albums/72157621855914355

Have had the great fortune to be on every side of the howitzers.

  • Member since
    June 2008
Posted by lewbud on Thursday, July 16, 2020 1:54 AM

Looking good!

Buddy- Those who say there are no stupid questions have never worked in customer service.

  • Member since
    July 2020
Posted by Alexander_the_great on Wednesday, July 15, 2020 10:47 AM

Here is a little update,


I am still painting the body, but I am getting close to the finish I am looking for. As I did that, I kept working on the chassis. I painted all the remaining parts for it.

Gloss black : Springs, rear axel, driving shaft

Gloss white : Shocks

Yellow : Traction bars

Aluminum : Fuel Pump

And glued everything together except for the shocks

Before putting the shocks and plated exhausts, I want to make some light touch up with my airbrush. Then,  the chassis will be done. 

Next step is working on the interior. 

  • Member since
    July 2020
Posted by Alexander_the_great on Wednesday, July 15, 2020 10:33 AM

mustang1989

This is lookin' swell so far Alexander. Will be watching this one.

Yellow is a hard color to apply. If you're having trouble with the coverage that you want, try applying in thin layers till you get a good color base. This can take a little time but it's worth the patience excercised throughout the process. After you get the coverage you're after then you can wet sand any imperfections/ debris out and then go for the clear coat.


That is exactly the conclusion that I came to. I'm working on it every day, I'm getting close to what I want now, then its stripes and clear coat !

  • Member since
    March 2012
  • From: Corpus Christi, Tx
Posted by mustang1989 on Tuesday, July 14, 2020 5:27 AM

This is lookin' swell so far Alexander. Will be watching this one.

Yellow is a hard color to apply. If you're having trouble with the coverage that you want, try applying in thin layers till you get a good color base. This can take a little time but it's worth the patience excercised throughout the process. After you get the coverage you're after then you can wet sand any imperfections/ debris out and then go for the clear coat.


 Forum | Modelers Social Club Forum (proboards.com) 

  • Member since
    July 2020
Posted by Alexander_the_great on Sunday, July 12, 2020 5:13 PM

Alright guys so here is what I did in the last two days.

First, I gave a second wet coat to the body pieces. 

I dont know if it's because it's my first time with a decent airbrush or yellow doesn't cover well ( probably both honestly), but I have a hard time getting an even finsih. I'll probably end up adding one more coat. I still have the interior and the stripes to do...

Then I finished the motor, happy with the result.

My next step was now the chassis. I airbrushed most of the part semi-gloss black.

Before putting everything together I want to paint the floor of the cabin which I'll do soon.  However I did put the motor on his rack. Now I'm letting everything dry overnight to manipulate the pieces freely tomorrow. 


  • Member since
    July 2020
Posted by Alexander_the_great on Sunday, July 12, 2020 4:52 PM

lewbud

Alexander,

I enjoyed your last build and this one is looking good as well.  The part on top of the engine is the intake manifold.  If you plan on building a lot of American cars and you live in the US or Canada (not sure about availability in Europe), I'd head over to your local auto parts house and pick up a spray can of Chevy orange.  There will be enough in one can to do many engines.  All of the Chevy muscle car engines will be this color, and you'll find Chevy engines in a lot of street rods and customs.  The reason for this is the same reason modern US custom cars and street rods use the LS motor today, Chevy made a lot of them, they were lightweight compared to their competitors, they made good power, were easy to work on, and performance parts were cheap.  The stripes were painted on so they would be glossy.  The interior was mostly vinyl, so there would be a sheen to it.  Look forward to more.


Alright, thanks for the info.

I plan on trying planes too, but if I end up making another car I'll definitly go look for a can ! 

  • Member since
    June 2008
Posted by lewbud on Saturday, July 11, 2020 11:06 AM

Alexander,

I enjoyed your last build and this one is looking good as well.  The part on top of the engine is the intake manifold.  If you plan on building a lot of American cars and you live in the US or Canada (not sure about availability in Europe), I'd head over to your local auto parts house and pick up a spray can of Chevy orange.  There will be enough in one can to do many engines.  All of the Chevy muscle car engines will be this color, and you'll find Chevy engines in a lot of street rods and customs.  The reason for this is the same reason modern US custom cars and street rods use the LS motor today, Chevy made a lot of them, they were lightweight compared to their competitors, they made good power, were easy to work on, and performance parts were cheap.  The stripes were painted on so they would be glossy.  The interior was mostly vinyl, so there would be a sheen to it.  Look forward to more.


Buddy- Those who say there are no stupid questions have never worked in customer service.

  • Member since
    July 2020
Posted by Alexander_the_great on Saturday, July 11, 2020 9:49 AM

Tanker-Builder

Hey!

 Now that looks like it will be nice. Have you decided on the opposing color yet? I still love that Split Bumper Front End!


The stripes and interior will definitly be black ( I want that transformers look :P), which one ? I dont know yet, stripes gloss and interior flat maybe..?  

  • Member since
    October 2019
  • From: New Braunfels, Texas
Posted by Tanker-Builder on Saturday, July 11, 2020 9:44 AM

Hey!

 Now that looks like it will be nice. Have you decided on the opposing color yet? I still love that Split Bumper Front End!

  • Member since
    July 2020
Posted by Alexander_the_great on Saturday, July 11, 2020 9:39 AM

Alright, so here's what I did yesterday.

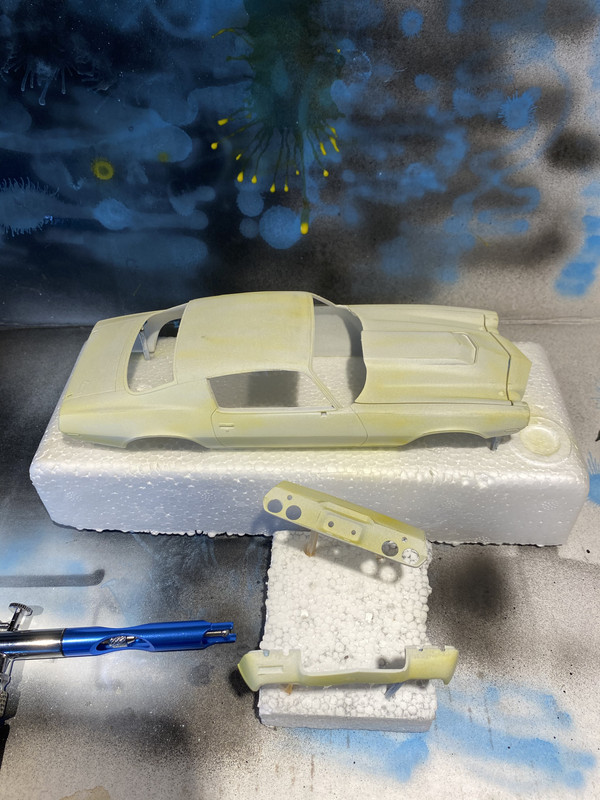
Like planned, I started with painting the body. I used a bright yellow and aibrushed it.

I usually work this way to paint these parts :

First I lay a mist coat over everything, not really caring if I cover the body perfectly.

I wait 20 minutes and put a second mist coat

And then a third after another 20 minutes

Then I let the final mist coat cure for about 2-3 hours and brush a wet coat. A thicker coat trying to cover everything.

After this wet coat I protect the pieces for half an hour from dust and then let them dry in the open.

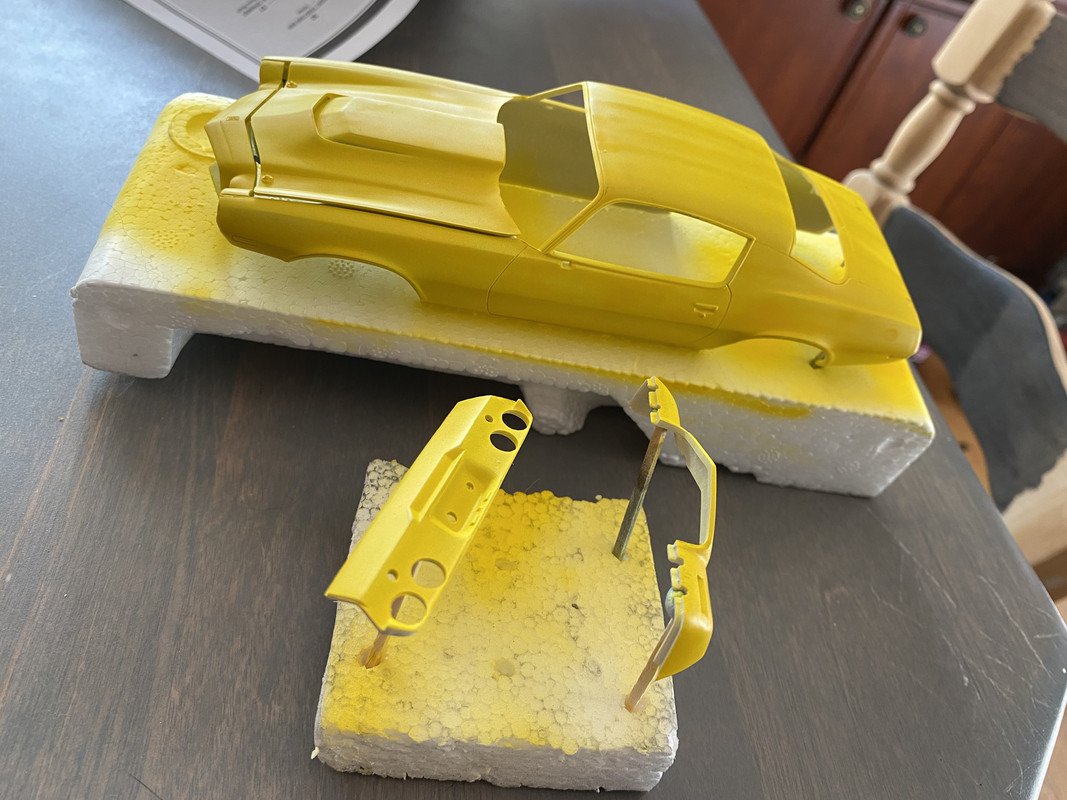
It's my first time with a ''professional'' airbrush, so we can see that the coat is a bit uneven and yellow doesn't cover a whole lot. I hope I'll be able to give it a nice final look with the second wet coat once this one has cured for 24 hours.

While the final mist coat dried, I started working on the motor. Everything went well, the first thing I did is paint the transmission aluminum and while this part was drying I painted a few others :

Aluminum for the starter and top part (forgot what it's called)

gloss black for the oil pan.

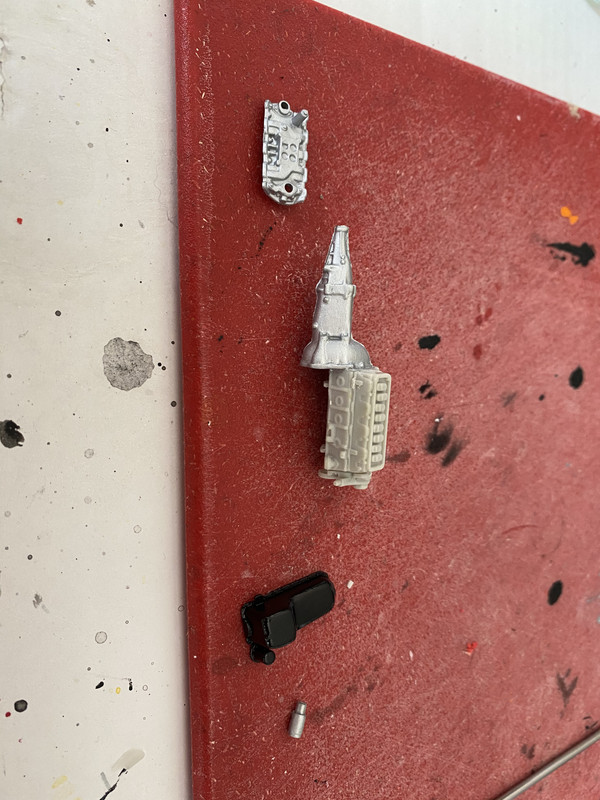
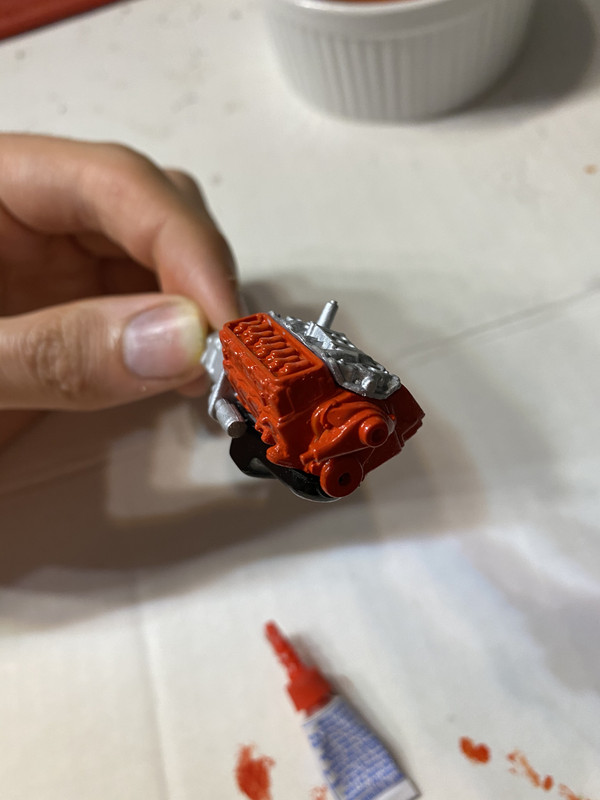
For the engine block, I taped the transmission and mixed some red with a bit of orange to achieve the color ''Chevy engine red'' in the manual. I compared it from pictures and I think I am pretty close to the real thing.

Here's everything put together :


  • Member since
    April 2003
  • From: USA
Posted by keavdog on Saturday, July 11, 2020 1:54 AM

Great choice.  Love the split bumper

Thanks,

John

  • Member since
    July 2020
Posted by Alexander_the_great on Saturday, July 11, 2020 12:52 AM

Tanker-Builder

Hello;

 Hey ! I think you picked the most attractive Camaro out there. Bodywise I mean.

 Now as to the stripes. I bought that when it came out over twenty years ago and it didn't have any then. I bought one three years ago to do a Black on Anthracite car and the kit had the stupid stripes. Go Figure!


Yeah It really sucks because these stripes are a main carateristic of the Baldwin motion.
I've seen them avalaible on ebay and I looked at the option of printing them, but I'll decide what I do once I analyse how complexe it is to paint them. 


  • Member since
    March 2003
  • From: Towson MD
Posted by gregbale on Friday, July 10, 2020 9:13 AM

Nice work so far! YesYes

If you're interested...you can usually find the stripe decals on Ebay.

Cheers

Greg

George Lewis:

"Every time you correct me on my grammar I love you a little fewer."
 
  • Member since
    October 2019
  • From: New Braunfels, Texas
Posted by Tanker-Builder on Friday, July 10, 2020 7:10 AM

Hello;

 Hey ! I think you picked the most attractive Camaro out there. Bodywise I mean.

 Now as to the stripes. I bought that when it came out over twenty years ago and it didn't have any then. I bought one three years ago to do a Black on Anthracite car and the kit had the stupid stripes. Go Figure!

  • Member since
    July 2020
Follow a beginner as he does his second build
Posted by Alexander_the_great on Thursday, July 9, 2020 8:34 PM


Hi, I recently discovered this hobby and I thought I would share with you my second build ( If you wanna see my first one, it's a 1953 ford flipnose and it's in the introduction part of the forum).


I'll describe how I work and my techniques as a beginner. I'm open to every comment or tricks you guys could give me and I hope you'll enjoy what I post. I currently have plenty of time with everything that is going on so you can expect quick updates.  


My second build will be a 1970 Baldwin motion Camaro by AMT

First thing I noticed when I opened the box was that there isn't any decals for the stripes. I'll have to pull my masking tape skills out to reproduce them. 

Then, as I went over all the pieces, I noticed that one was broken. With a bit of liquid cement and Tamya putty I managed to fix it. I just hope that the paint will cover everything up. 

After cleaning all the part I was ready to start. The first thing I did is prep most of the body part for painting. I removed all the flash, lightly sanded everything with 400 then primed with a spray can. When I prime, I put 3 light layers with 20 minutes of drying time between them. 

I let the primer dry for a couple of hours and meanwhile I did the four tires. Quite easy, I brush painted two coats of gun metal by tamya on the inside of the wheel and some homemade black accent on the chrome parts for a better look.


After 3 hours of drying time, I wet sanded (1500 grit) each body part and polished them with cheap toothpaste. Once the polishing was done I rinced them  off and called it a day.

Tomorrow I'll probably do the paint job, I'm still unsure of the look  I want. I'm thinking yellow or orange with black stripes. 

JOIN OUR COMMUNITY!

Our community is FREE to join. To participate you must either login or register for an account.

SEARCH FORUMS
FREE NEWSLETTER
By signing up you may also receive reader surveys and occasional special offers. We do not sell, rent or trade our email lists. View our Privacy Policy.