SEARCH FINESCALE.COM

Enter keywords or a search phrase below:

Model T 1913 Speedster WIP ( Done 4/30/22)

13109 views
192 replies
1 rating 2 rating 3 rating 4 rating 5 rating
  • Member since
    April 2003
  • From: USA
Posted by keavdog on Saturday, March 19, 2022 7:29 AM

That seems like a lot less work OMG.  Really like that green!

Thanks,

John

  • Member since
    November 2018
Posted by oldermodelguy on Saturday, March 19, 2022 6:42 AM

When I first tested Mr Primer Surfacer thinned with Mr Leveling thinner I found it to go down silky smooth.

When I had to stripe my 1/16 1911 Mercer I primed with light grey, sprayed with my Badger .25 in very close for minimum over spray Model Master Classic black in the areas to be striped. Then taped the stipes and reprimed the minimal over spray and shot the yellow in Model Master Chrome Yellow. This was a few years ago now but to this day still haven't assembled the kit. I've set it aside for a season while I work on a few other things. Anyway, all the paint work is complete and it looks very nice. I'll get back to it one day.

What paint are you using for your colors ?

  • Member since
    July 2014
  • From: Franklin Wi
Posted by Bakster on Friday, March 18, 2022 10:17 PM

Primed with Mr Finishing Surface Prime (White). It is my first time using this product and I like it. It sprayed and sanded well. I purchased this based on recommendations here on the forum, and it suited my wish not having to decant Tamiya. The product comes in good sized jars too.

So-- after the paint cured, I gave the model a light sanding. I did notice some sand pebble effect in areas specific to the inner corners of the fenders and where they meet the step rail. I think that this is the nature of the beast. I think even my beloved Tamiya Surface Primer would struggle with those areas too. 

I sprayed the model with MR Color 6. My first trying this brand, also a recommendation here, and again, the paint performed well. I was able to draw out a nice gloss finish. 


Major masking job and I feared it would be. I like the clean finish that airbrushing produces and it's why I go to these lengths. However-- hoping for an easier way, I purchased some paint pens thinking just maybe... I could draw a good line along those raised edges. I practiced on scrap, and I quickly found out, no way... jose. The issue? There is no control of the paint flow; the paint comes out too heavy.

I am glad I tested it first because it would have ruined the work already in place. What a bummer. And honesty, with how they performed, I can't even see a use for them. But that is me-- I am picky dude about such things.

The other thing I see people using is colored markers. I will one day explore that option before throwing in the towel. Maybe their felt tipped ink flows in a more controlled way.

If you guys have any tried-and-true methods-- I am all ears.

Anyway--I scrapped the idea and settled in for several hours of masking.

And that is it for tonights episode.

  • Member since
    July 2014
  • From: Franklin Wi
Posted by Bakster on Thursday, March 17, 2022 8:14 PM

Below:  Painted with MM Wood.

Below: I am no expert at simulating wood but here is what I tried. Using the stiff bristled brush shown, I brushed on Folk Art Raw Sienna to simulate wood grain. I tried to be mindful of not loading the brush with too much paint, being mindful of not applying too much pressure, and to always keep the grain flowing in consistent directions. 


Below: I brushed on a thin coat of Pledge FloorCare Finish. It gave me a slight sheen that I was looking for while locking in the paint.


End of update

  • Member since
    July 2014
  • From: Franklin Wi
Posted by Bakster on Wednesday, March 16, 2022 5:54 PM

Well-- like I said, my wiring is crude. That said -- as I progressed through this build, I grew to like them.

I was not interested in ordering modern looking plug wires and knowing I'd need to attach them to the firewall, I wanted something that I can fix a shape to them for easy gluing later.

My first go was with trying craft wire. The wire is pliable, it held the shape I set them at, and I had various gauges in stock. The problem? The wire did not stick well to the sparkplugs, and I was using CA even. Any slight adjusting that I did make them pop off. A few times of this and I knew-- I need to use something else before I make a mess of things. 

I thought, what sticks better than plastic to plastic. So, back to the Evergreen round stock. I think it is the .020 size. Bingo. They held perfectly and I could bend them to the shape I wanted.

Below: I mocked up the assemblies using tape so that I can form, cut, and attach the wires as I want them. 

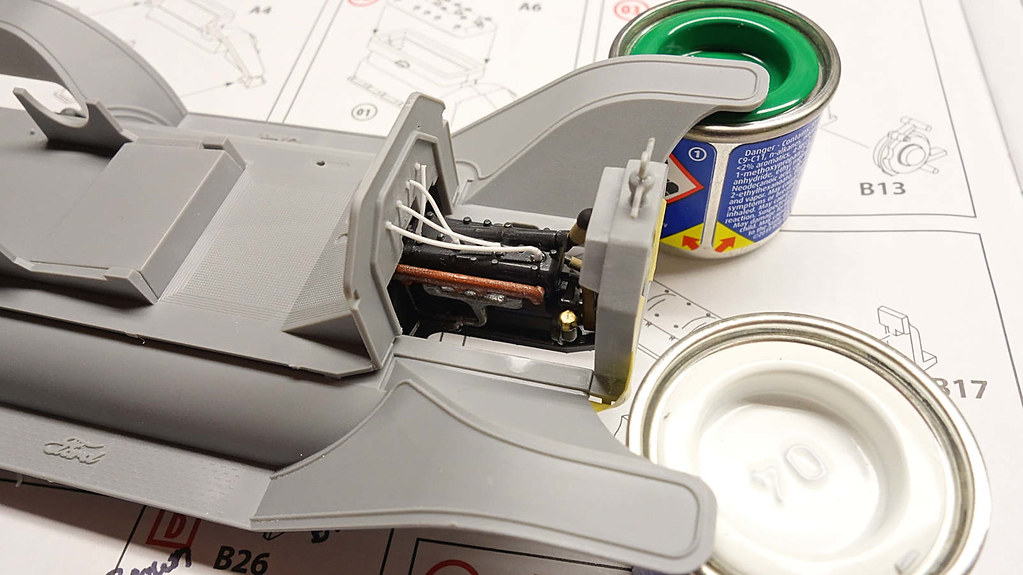
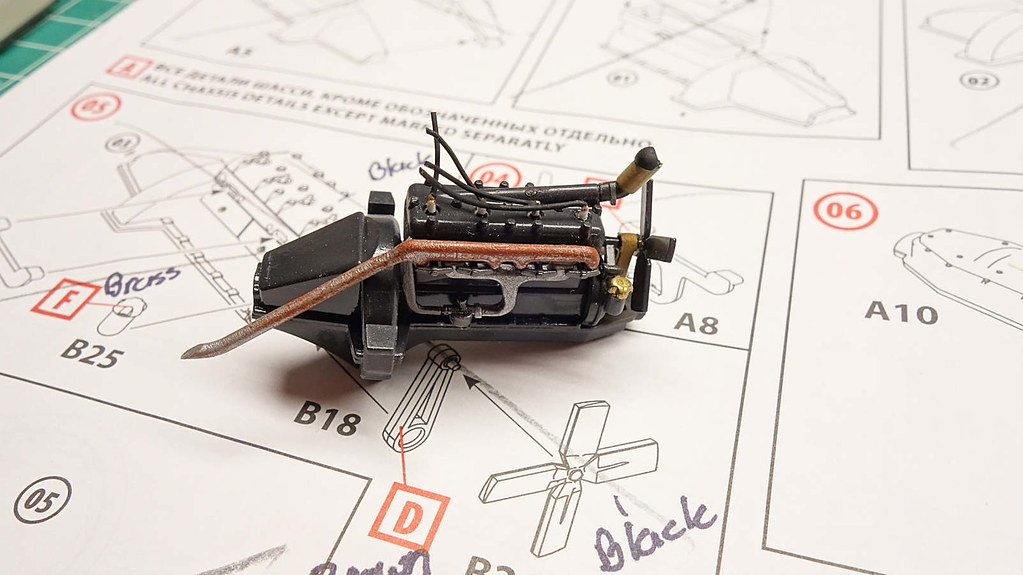
Below: Wires are painted with Tamiya Rubber Black. The connection points are painted with Alcad Copper to simulate copper wires or terminals.

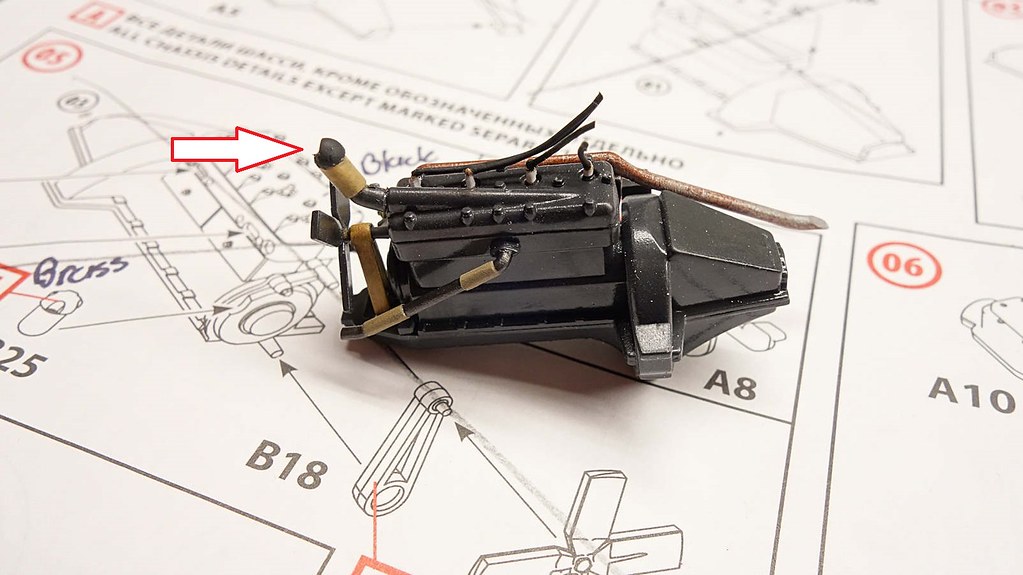
Below: The other side of the engine. Notice the arrow in the image. This pipe leads to the radiator. Unless I missed something, the model does not connect or even meet up with the radiator. It just hangs out there not connecting to anything. I could not leave it that way, so I made the rounded fitting out of sprue.

I could not find any images that show a clear concept of how the radiator ported up to the hose, so, I winged it. I thought that anything will look better than having a fitting going to nowhere. What turned out amazing is that a few weeks after I did that, I found a video where some guys were testing a 1:1 engine. The fitting I made looked pert near exactly like what was showing on their radiator. I don't think I could have guessed it better. Just a fun fact of the build.


End of update.


  • Member since
    March 2022
  • From: Twin cities, MN
Posted by missileman2000 on Wednesday, March 16, 2022 3:59 PM

keavdog

Imagine your average driver today being responsible for adjusting their timing in the cockpit of their car Surprise


Wasn't the timing the way you adjusted speed?  I've heard that the throttle was basically a run-idle setting, almost like a switch.  On some cars of that era you also had a mixture control.

BTW, planning to do another speedster, as a racing car.  Will lower the seats and move them back a bit (and tank too), and lower the steering column.  Also add some speed stuff to the engine.  Especially after the end of the war the speed equipment industry virtually exploded.  I also have a model T kit with a Fronty engine that I will do as a dirt oval racing car, with scratch body.  The modified speedsters led to the full racing dirt cars.


  • Member since
    July 2014
  • From: Franklin Wi
Posted by Bakster on Wednesday, March 16, 2022 2:03 PM

littletimmy

If I reach back in my mind , ( through the "Mist of time" )  I seem to recall that there was a lever on the steering wheel that adjusted/ advanced the spark.


Yeah if you read the manual that Rich linked to, they talk about that. It is a hoot.

  • Member since
    July 2012
  • From: Douglas AZ
Posted by littletimmy on Wednesday, March 16, 2022 1:48 PM

If I reach back in my mind , ( through the "Mist of time" )  I seem to recall that there was a lever on the steering wheel that adjusted/ advanced the spark.


 Dont worry about the thumbprint, paint it Rust , and call it "Battle Damage"

  • Member since
    July 2014
  • From: Franklin Wi
Posted by Bakster on Wednesday, March 16, 2022 1:12 PM

Tanker-Builder
Why, you even got a feeler guage for the coil contacts! 

Too funny. Did they provide a person to help push when all else fails? Lol.

Ah-- the good old days. I still love the car though. It is the dawn of automobiles; I love it.

  • Member since
    July 2014
  • From: Franklin Wi
Posted by Bakster on Wednesday, March 16, 2022 1:08 PM

keavdog

And now we're back to coil on plug ignition.  Guess they had it right to begin with.


Lol

  • Member since
    April 2003
  • From: USA
Posted by keavdog on Wednesday, March 16, 2022 12:14 PM

And now we're back to coil on plug ignition.  Guess they had it right to begin with.

Thanks,

John

  • Member since
    October 2019
  • From: New Braunfels, Texas
Posted by Tanker-Builder on Wednesday, March 16, 2022 12:11 PM

Aha!

        The reason for the four wires coming from the Firewall? Four small Plug-Centric Coils. The unified coil had not been applied to the early cars till 1920. The early cars had you set the Coils and the Timing from the passenger compartment. Why, you even got a feeler guage for the coil contacts! 

  • Member since
    July 2014
  • From: Franklin Wi
Posted by Bakster on Wednesday, March 16, 2022 10:01 AM

Egads, Dave. The stone age of autos.

  • Member since
    July 2014
  • From: Franklin Wi
Posted by Bakster on Wednesday, March 16, 2022 9:58 AM

keavdog

Imagine your average driver today being responsible for adjusting their timing in the cockpit of their car Surprise


Lol! That cracks me up. What a vision that is. But hey, they might be so busy with that they wont have time to text and drive. Could be a plus. 

  • Member since
    April 2003
  • From: USA
Posted by keavdog on Wednesday, March 16, 2022 9:08 AM

Imagine your average driver today being responsible for adjusting their timing in the cockpit of their car Surprise

Thanks,

John

  • Member since
    May 2013
  • From: Indiana, USA
Posted by Greg on Wednesday, March 16, 2022 8:57 AM

Bakster
I was playing with it in my parents car and left it on the dash. Came back later and the model was somewhat melted. I thought it looked cool.

Ha! Smile

  • Member since
    November 2018
Posted by oldermodelguy on Wednesday, March 16, 2022 8:53 AM

Bakster


I mentioned simplicity, but in reading the manual, running the car maybe not so simple. Lol. Still, what fun.


Back in the day you stepped miles ahead in going from a T to an A or even more so a B ( 1932 especially so with the Flathead V8). The T was labor intensive to keep running, from filing babbit bearings mid trip to even re pouring your own Babbit bearings at home. Not to mention in the early ones you could break your arm or rip tendons( literally) if you forgot to move the timing lever before hand cranking the engine to start it.

  • Member since
    July 2014
  • From: Franklin Wi
Posted by Bakster on Wednesday, March 16, 2022 8:13 AM

richs26

The points were on top of each coil shown here in this repair manual:

http://www.cimorelli.com/mtdl/servicemanual/1925smcolor.pdf

https://www.mtfca.com/books/1926Inst.htm

https://www.mtfca.com/books/1911Inst.htm

 Edit: it did have a very rudimentary distributor called a timer which broke the spark like a more modern distributor:

https://www.mtfca.com/phpBB3/app.php/gallery/album/9


Say Rich, this is an awesome find. I never thought a manual would exist. You have advanced my understanding by leaps and bounds of how these early cars worked. That is awesome. You get a gold star for the day!

I mentioned simplicity, but in reading the manual, running the car maybe not so simple. Lol. Still, what fun.

  • Member since
    September 2005
  • From: North Pole, Alaska
Posted by richs26 on Tuesday, March 15, 2022 10:12 PM

The points were on top of each coil shown here in this repair manual:

http://www.cimorelli.com/mtdl/servicemanual/1925smcolor.pdf

https://www.mtfca.com/books/1926Inst.htm

https://www.mtfca.com/books/1911Inst.htm

 Edit: it did have a very rudimentary distributor called a timer which broke the spark like a more modern distributor:

https://www.mtfca.com/phpBB3/app.php/gallery/album/9

WIP:  Monogram 1/72 B-26 (Snaptite) as 73rd BS B-26, 40-1408, torpedo bomber attempt on Ryujo

Monogram 1/72 B-26 (Snaptite) as 22nd BG B-26, 7-Mile Drome, New Guinea

Minicraft 1/72 B-24D as LB-30, AL-613, "Tough Boy", 28th Composite Group

  • Member since
    July 2014
  • From: Franklin Wi
Posted by Bakster on Tuesday, March 15, 2022 8:20 PM

oldermodelguy

Looking great ! 

Thanks, Dave!

oldermodelguy

And finally my last T was the Monogram Big T in 1/8 scale.  

My brother got that kit when we were kids. Such a cool kit. I was jealous. Wink

oldermodelguy
 With all the exotic cars out and old kits of the big classic cars of the 30's and all, there still is the little T that is aluring to this day. 

Amen! There is something to be said about simplicity and that is the allure it has over me. Imagine how simple it would be to diagnose a problem. Fuel delivery? Spark? I think that sums up the diagnosis and how simple it would be isolate the problem.


  • Member since
    July 2014
  • From: Franklin Wi
Posted by Bakster on Tuesday, March 15, 2022 8:09 PM

richs26

You are doing it correctly as that photo shows an aftermarket distributor added later as a hop-up part.  The other side of the firewall has the coil box next to the steering wheel.  The T used a wooden-boxed coil for each cylinder.

And, that is the T I am doing.  Have to move the steering wheel to the proper side, and will be farmerizing the rear by adding a truck box with cutting off the rear doors.


Thanks for explaining that. I suspected one of the boxes might hold a coil and you are saying there is one for each cylinder! Very interesting. Do you have any thoughts on how spark timing was controlled? I am probably missing something very basic. I am a curious sort. 

Your project sounds awesome. How far along are you?

  • Member since
    July 2014
  • From: Franklin Wi
Posted by Bakster on Tuesday, March 15, 2022 8:02 PM

keavdog
 it's way way more interesting. 

I 100% agree.

  • Member since
    April 2003
  • From: USA
Posted by keavdog on Tuesday, March 15, 2022 6:44 PM

Nice find!  Not only is it accurate according to rich but it's way way more interesting. 

Thanks,

John

  • Member since
    September 2005
  • From: North Pole, Alaska
Posted by richs26 on Tuesday, March 15, 2022 5:58 PM

You are doing it correctly as that photo shows an aftermarket distributor added later as a hop-up part.  The other side of the firewall has the coil box next to the steering wheel.  The T used a wooden-boxed coil for each cylinder.

And, that is the T I am doing.  Have to move the steering wheel to the proper side, and will be farmerizing the rear by adding a truck box with cutting off the rear doors.

WIP:  Monogram 1/72 B-26 (Snaptite) as 73rd BS B-26, 40-1408, torpedo bomber attempt on Ryujo

Monogram 1/72 B-26 (Snaptite) as 22nd BG B-26, 7-Mile Drome, New Guinea

Minicraft 1/72 B-24D as LB-30, AL-613, "Tough Boy", 28th Composite Group

  • Member since
    November 2018
Posted by oldermodelguy on Tuesday, March 15, 2022 5:12 PM

Looking great !

I built my first T when I was about 10yo,don't know the brand or scale but it was bigger than the 1/32 kits I had been building. That would have been 1960 or so. I also built a couple AMT T's, the pickup that was out back then around 1960ish, I may have been 11 so 1961. Then a roadster same brand. None of those got paint lol. But I built a couple T buckets that did. And finally my last T was the Monogram Big T in 1/8 scale. Thats it for Ts in my life, except one HO scale cab over truck I did 30 or so years ago.

With all the exotic cars out and old kits of the big classic cars of the 30's and all, there still is the little T that is aluring to this day.

  • Member since
    July 2014
  • From: Franklin Wi
Posted by Bakster on Tuesday, March 15, 2022 12:00 PM

Here is the next step in my wiring consideration. And this is where some of you might educate me. Below is an image of what is probably a very early model firewall. Wiring goes from the plugs to what appears to be insulated connection points mounted directly on the firewall. Any knowledge on how that system worked would be interesting to me. There must be a coil in there somewhere, perhaps on the passenger side of the firewall. And how was timing accompolished? In some other images I found they have a more modern distributor at the front of the engine. Perhaps a later adaption? Wires are then routed to the distributor. 

In any event, I am going with the firewall version. 

With distributor.

Below is how I am doing it. I cut and glued short pieces of Evergreen styrene rod. I will attach my wires to those as in the first image above.

  • Member since
    July 2014
  • From: Franklin Wi
Posted by Bakster on Tuesday, March 15, 2022 11:26 AM

Greg

Good to see you back at it, Steve. Yes

I seem to have become interested in vintage cars lately, so I'll look forward to watching your progress on this for sure.

I vaguely remember building a Model-T as a kid.


Thanks, Greg. It's good to be back. Nothing better to get a persons mind off trouble than to build a model.

I hope you enjoy the journey with me then.

Yeah as a kid I built a model T or maybe it was a model A. I remember the fenders were more rounded. I was playing with it in my parents car and left it on the dash. Came back later and the model was somewhat melted. I thought it looked cool.

  • Member since
    May 2013
  • From: Indiana, USA
Posted by Greg on Tuesday, March 15, 2022 10:59 AM

Good to see you back at it, Steve. Yes

I seem to have become interested in vintage cars lately, so I'll look forward to watching your progress on this for sure.

I vaguely remember building a Model-T as a kid.

  • Member since
    July 2014
  • From: Franklin Wi
Posted by Bakster on Tuesday, March 15, 2022 10:37 AM

missileman2000
Looks great!

Thanks Don!

missileman2000
I built that kit about a year ago, and was very satisfied.

I feel the same, satisfied.

missileman2000
  never mold a piece in one piece when you can mold it in three or four. 

That made me laugh.

missileman2000
their fit is excellent, as is detail.

Agreed!!

  • Member since
    July 2014
  • From: Franklin Wi
Posted by Bakster on Tuesday, March 15, 2022 10:26 AM

Tanker-Builder

Hi;

 Aha! You get it! The raised relief was used as a stiffener near fender edges. Would've been nice if they had done that down the center-front to back- on Pinto Front fenders


Hey TB. I forgot that you were alive back then. Lol. Just kidding!!! Had to throw that in there based on our other conversation.

Hey thanks for that tidbit. I did not know that is why they did that! And I thought it was just for looks. When I get to posting about my wiring you might educate me further on that. You will know what I am talking about when I post it.

JOIN OUR COMMUNITY!

Our community is FREE to join. To participate you must either login or register for an account.

SEARCH FORUMS
FREE NEWSLETTER
By signing up you may also receive reader surveys and occasional special offers. We do not sell, rent or trade our email lists. View our Privacy Policy.