SEARCH FINESCALE.COM

Enter keywords or a search phrase below:

1/32 Gee Bee R-2 - COMPLETED 12/24

11613 views
38 replies
1 rating 2 rating 3 rating 4 rating 5 rating
  • Member since
    September 2013
1/32 Gee Bee R-2 - COMPLETED 12/24
Posted by DeafAviator on Tuesday, October 8, 2013 3:52 PM

Made a little bit of progress today. Been stuck on trying to solve the issue of getting the engine mounted and figuring out where to put the battery box with the on/off switch. After several hours of trying different things, I finally got the electric motor shaft extended through the engine block and spacer and ready to mount - I think... Whistling

It's not a great job but I believe it will do. At least it is functional and seems to be stable. Now the real issue is solving where/how to mount the battery box (Too big to keep everything in the fuselage and no way to change the batteries if I did that). I am thinking about doing a diorama base of the aircraft sitting on a patch of grass with the battery box hidden behind the aircraft "underground" with just the switch exposed, and the wires, probably exiting the fuselage at the tail near the ground, hidden by tall grass at the tail. Will need to make sure the box is still somehow accessible to change out the batteries. 

Also did a little bit more work on getting the panels filled in to correct them from an R-1 model to an R-2. This is my first experience here with Mr. Surfacer - great stuff! 

And test fitting the wings/stabs

Wings fit pretty good - theres a little bit of an offset so I may end up chopping off the locating tabs and installing them flush. Not sure I want to do that though as that would mean much weaker wing roots. I may try carving away part of the tab instead. Anyways - starting to resemble something like a Gee Bee but the real prize will be when the cockpit and engine is installed and the two halves come together.


Todd Barker - Colorado Springs, CO

Current Projects:

  • 1/48 Beechcraft Bonanza - N51HM (Commission)
  • 1/48 B-25 Mitchell - Back Burner/Scheme TBD
  • Member since
    January 2005
  • From: Cave City, KY
Posted by Watchmann on Tuesday, October 8, 2013 5:58 PM

Nice!

  • Member since
    May 2004
  • From: Mount Bretherton Model Aircraft Observatory
Posted by f8sader on Tuesday, October 8, 2013 11:57 PM

Great work on the engine!  

Lon-ski

  • Member since
    November 2009
  • From: Twin Cities of Minnesota
Posted by Don Stauffer on Wednesday, October 9, 2013 8:50 AM

Looking great!

Don Stauffer in Minnesota

  • Member since
    January 2005
  • From: Cave City, KY
Posted by Watchmann on Wednesday, October 9, 2013 12:27 PM

Who makes this kit, DA?

  • Member since
    September 2013
Posted by DeafAviator on Wednesday, October 9, 2013 1:15 PM
Thanks guys!

The kit is Williams Brothers. Not a bad little kit at all! Worst issues, to me, are rough/out of scale panel lines, no instrument panel detail (single black/white decal, and a couple of sink marks. Not bad for what I think is a limited run kit.

Todd Barker - Colorado Springs, CO

Current Projects:

  • 1/48 Beechcraft Bonanza - N51HM (Commission)
  • 1/48 B-25 Mitchell - Back Burner/Scheme TBD
  • Member since
    January 2005
  • From: Cave City, KY
Posted by Watchmann on Wednesday, October 9, 2013 1:57 PM

I've got their Gee Bee Z partially complete.  I'm gonna have to redo my engine after seeing yours. :)

  • Member since
    August 2007
  • From: back country of SO-CAL, at the birth place of Naval Aviation
Posted by DUSTER on Wednesday, October 9, 2013 11:49 PM

DeafAviator

Wings fit pretty good - theres a little bit of an offset so I may end up chopping off the locating tabs and installing them flush. Not sure I want to do that though as that would mean much weaker wing roots. I may try carving away part of the tab instead. Anyways - starting to resemble something like a Gee Bee but the real prize will be when the cockpit and engine is installed and the two halves come together.

That would be your best bet, if possible, to make the stronger joint .

Another technique is to drill two holes in each wing root and wing,  insert brass tube or heavy gage copper wire to act as the support,  in place of the now missing tab. 

Steve

Building the perfect model---just not quite yet  Confused

  • Member since
    September 2013
Posted by DeafAviator on Thursday, October 10, 2013 9:32 AM
Would like to see that Z.

Duster, the more I think about it, I think I'm just gonna tweak the tabs and sand it flush.

Todd Barker - Colorado Springs, CO

Current Projects:

  • 1/48 Beechcraft Bonanza - N51HM (Commission)
  • 1/48 B-25 Mitchell - Back Burner/Scheme TBD
  • Member since
    September 2013
Posted by DeafAviator on Wednesday, November 13, 2013 1:28 PM

Hey guys! Now that I finished that Huey, my focus has shifted back to this fat little bird. Made a good chunk of progress over the past couple days on this. 

Bought a soldering iron and started teaching myself how to solder in order to do the wiring on the motor, and I learned that you can solder more than just wires - so I ripped apart the crappy little smash job I did on extending the prop shaft and re-did the whole thing by soldering tube & rod together to make a pretty nice little shaft extension. Okay so it looks a little mickey-moused, but it works really well and is pretty balanced and straight!

Next step was to come up with a mounting solution... which was accomplished with some foam core board...

With some more tweaking, here's the end-result of the silly-looking soldering attempt on my shaft extension, equally silly-looking engine mount, the engine with a brass rod lining for the shaft, all put together! (dry fit only at this stage). The mount will be installed just before closing up the fuselage, using epoxy.

Hole for the wires made with files - angled for a sleek exit of the wires. Fits my two wires like a glove!

Preliminary look at my "rough draft" of the base/diorama. Just going to do a very basic hangar wall - possibly with a door but I am not sure on that yet. Still trying to figure out how I will set up the switch/wiring at this point... but you can just barely see the wires behind the rudder.

I've come up with the solution for placement of the motor switch - I am going to install an electrical safety switch box with the plane's motor switch disguised as the electrical box's power switch.  Sort of like this one:

So here's what I came up with...

I know, I know... not exactly accurate for 1930's but I had to come up with something, and wanting to be creative, that's my best idea.

As for the wiring, which I have not started yet, what I think I am going to do is drill a hole through the base directly below the rudder of the aircraft, run the wires down, then through a channel to a battery box behind the hangar wall, then up to the electrical box. This way the only sign of wiring is about 1/8th of an inch or less directly underneath the rudder - however I am thinking of doing a grass layout, so I will probably just add a touch of tall grass around the wires to conceal them.

'Til next time, gents!


Todd Barker - Colorado Springs, CO

Current Projects:

  • 1/48 Beechcraft Bonanza - N51HM (Commission)
  • 1/48 B-25 Mitchell - Back Burner/Scheme TBD
  • Member since
    September 2013
Posted by DeafAviator on Wednesday, November 13, 2013 1:29 PM

Oh yeah and thanks to whoever had the suggestion of using those bread bag clips as small bits of spare styrene... that's what the electrical box is made out of!


Todd Barker - Colorado Springs, CO

Current Projects:

  • 1/48 Beechcraft Bonanza - N51HM (Commission)
  • 1/48 B-25 Mitchell - Back Burner/Scheme TBD
  • Member since
    November 2009
  • From: Twin Cities of Minnesota
Posted by Don Stauffer on Thursday, November 14, 2013 8:29 AM

That inflight shot is a beauty.  Was that  by hanging it in front of a photo backdrop, or done in software?

Don Stauffer in Minnesota

  • Member since
    January 2006
  • From: Grand Bay, New Brunswick ,Canada
Posted by MECHTECH on Thursday, November 14, 2013 9:53 AM

Todd, try running the motor with the prop on before you glue it all shut. I can see small globs of solder on the sides of your propeller shaft, and I am sure that the effect will lead to your plane bouncing/shaking while it  (The Motor) is running.  they really should be sanded smooth. It really doesn't have to be much to have a vibration created which will just get worse. This comes from working on things like that for thirty years in engineering. I do love your creativity. I have a couple of the Williams Brothers Kits, the  Curtiss Sparrowhawk and Wadell Williams Racer.

The fact that pilots were able to fly those GB racers and still live (like Jimmy Doolittle) goes to their attitudes and reactions for flying. You would hardlty get someone to try those out these days.

  • Member since
    September 2013
Posted by DeafAviator on Thursday, November 14, 2013 12:43 PM

Don - That would actually be the real thing... set against a real backdrop and with a real pilot installed in the cockpit ;)

Mech - That was the very first thing I did and its a good thing too - WAY out of balance as well as not being straight enough. However, lots of filing and hammering, it hums VERY smooth now although it does indeed look ugly. I will probably work it a little more but it is very well balanced now as it is.

The Gee Bee's lend so well to having a motor installed - the inside of the fuselage is cavernous! I just wish I knew how to install a small sound system so I could have a rumbling radial sound rather than a "weeeeeeeeeeee" electrical motor Hmm


Todd Barker - Colorado Springs, CO

Current Projects:

  • 1/48 Beechcraft Bonanza - N51HM (Commission)
  • 1/48 B-25 Mitchell - Back Burner/Scheme TBD
  • Member since
    December 2002
Posted by 7474 on Thursday, November 14, 2013 6:28 PM

Did the real airplane have a plug for a Ground Power Unit? If so maybe you can build a GPU with the wires (cables) that run into the airplane.

  • Member since
    September 2013
Posted by DeafAviator on Monday, November 18, 2013 4:06 PM

Major progress on the hangar and base!

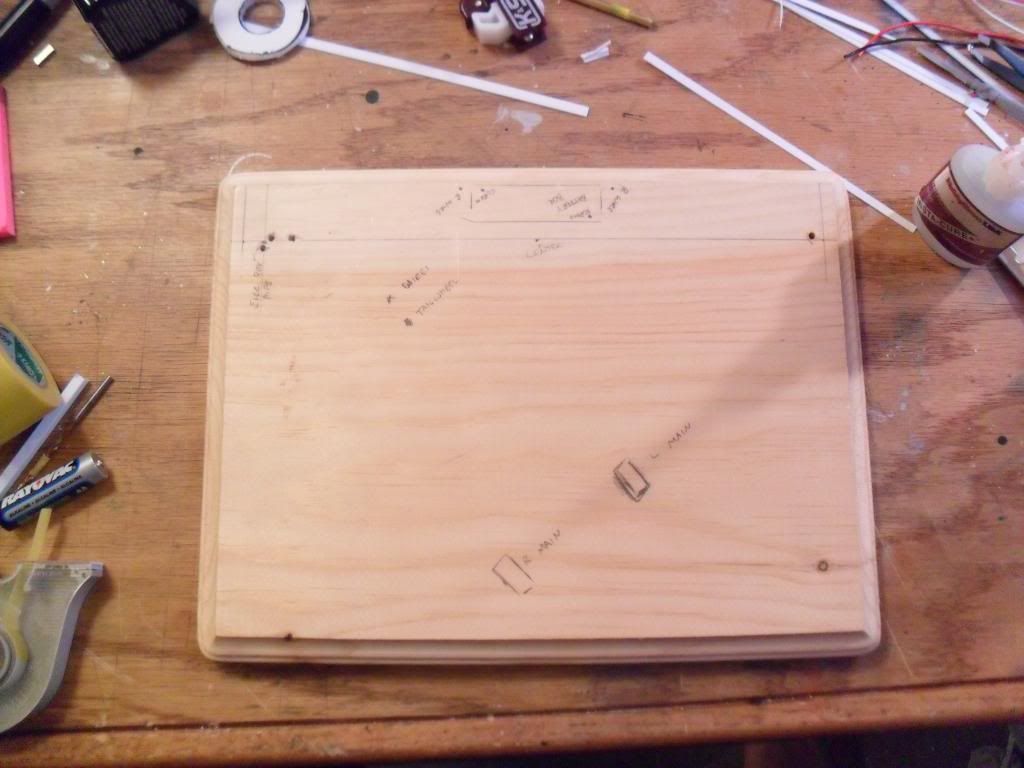
The construction of the hangar is essentially complete, and base has been drilled/carved as needed before sanding, staining, painting, and sealing.

As discussed in a previous post, I am building a hangar wall as a background for the base - which I guess you could just call a diorama at this point. 

A few firsts in this build, and big firsts for me - first scratchbuilding on anything larger than 1/48 throttle levers and the like... this is a major undertaking for me and I am truly enjoying it; first wiring/soldering project; and first diorama of any sort.

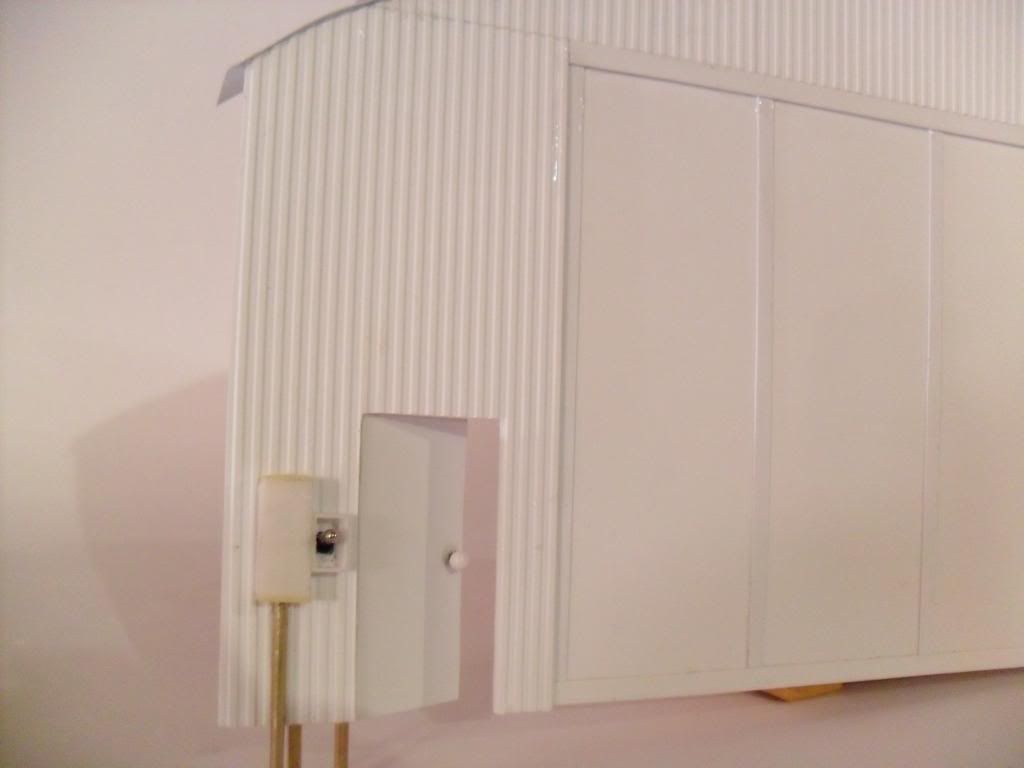
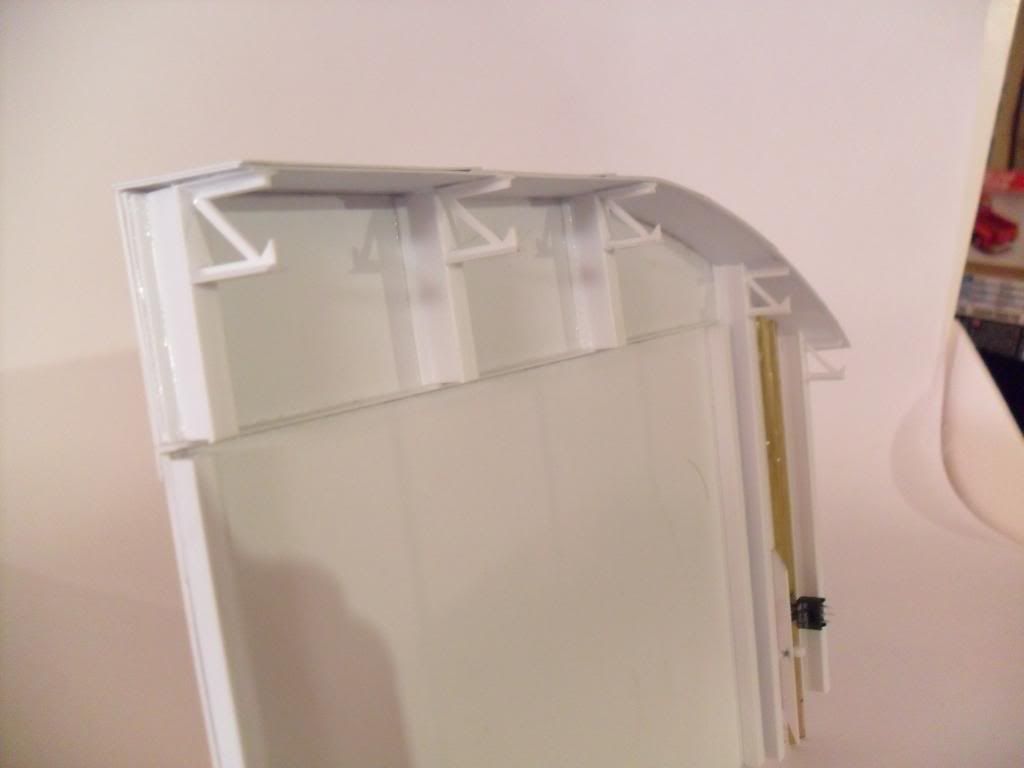
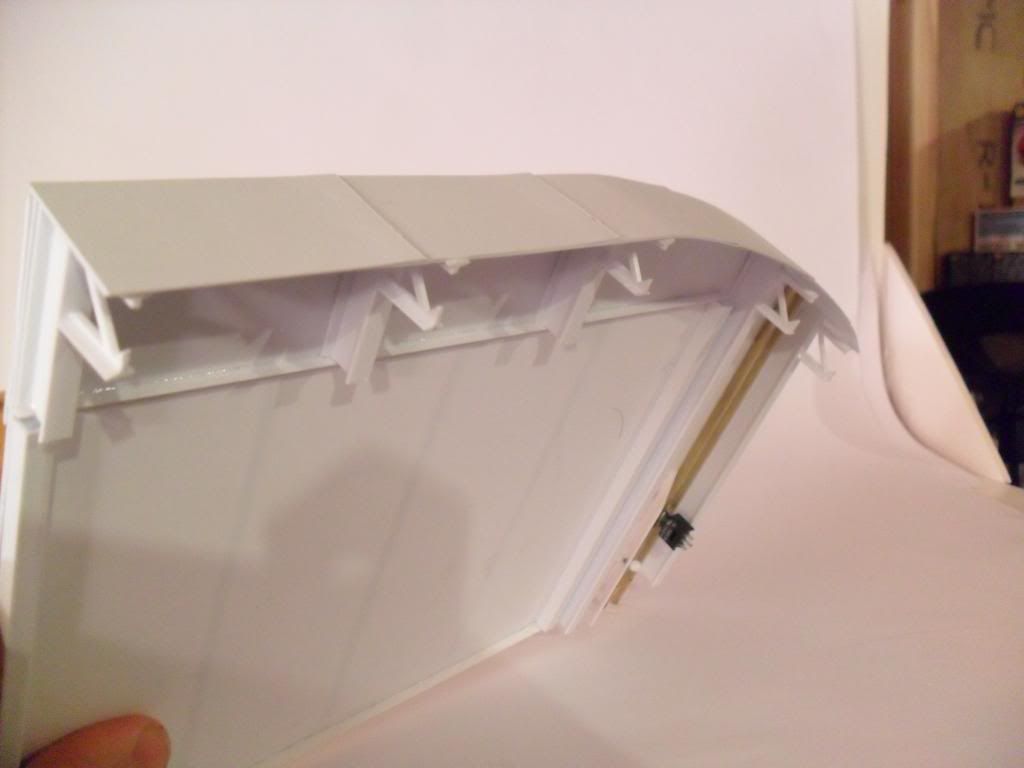
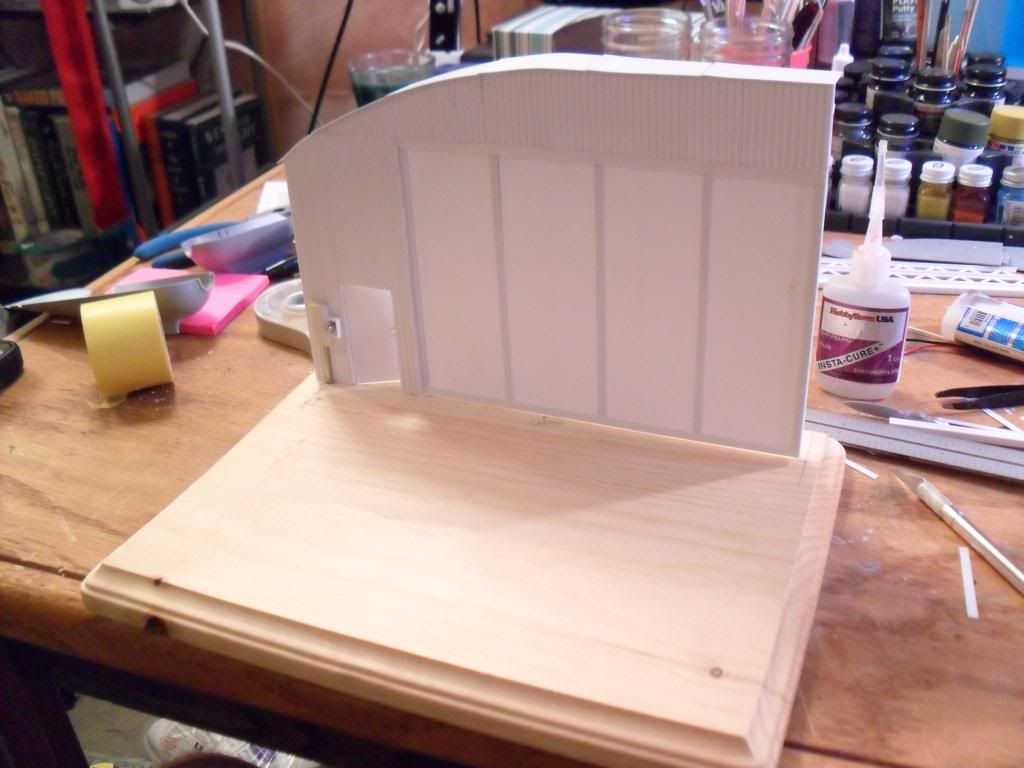
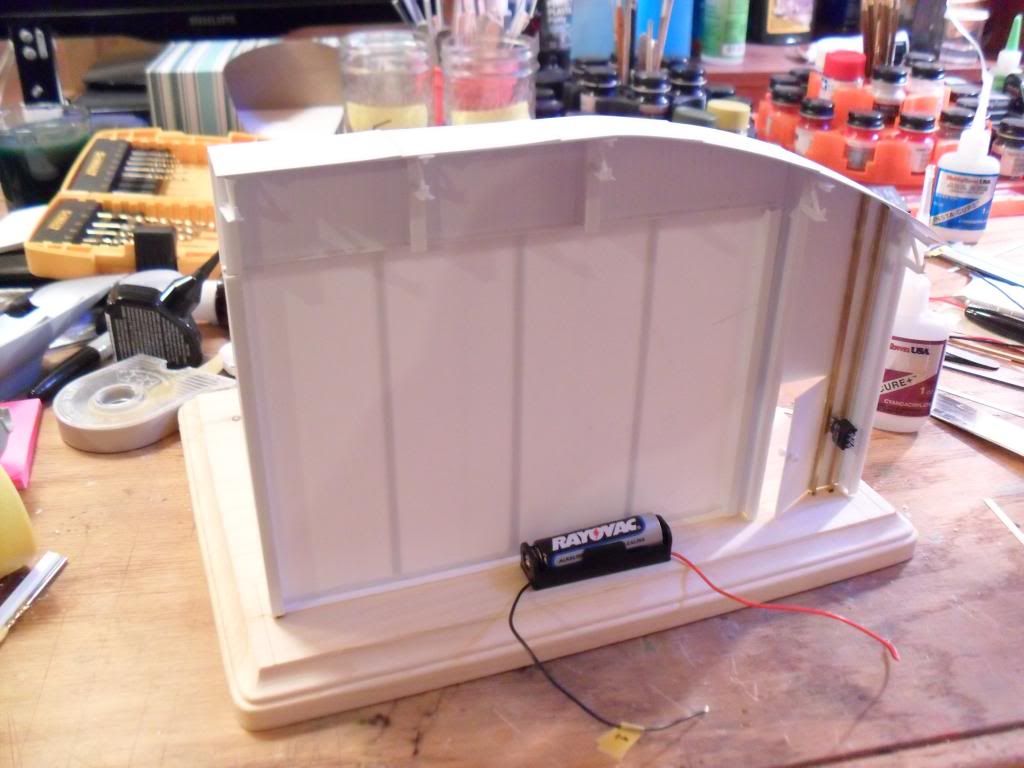
The hangar has transformed from a square foam core board cutout with scribbles on it into a full-fledged 3D hangar, thanks to lots of Plasticard and Evergreen. Couple of changes from the original draft on the foam core: Roof is now a curved one, hangar door is not "X" braced but now vertically braced, entry door added beside hangar door, and full structural details added on the backside of the hangar for an "interior" feel. 

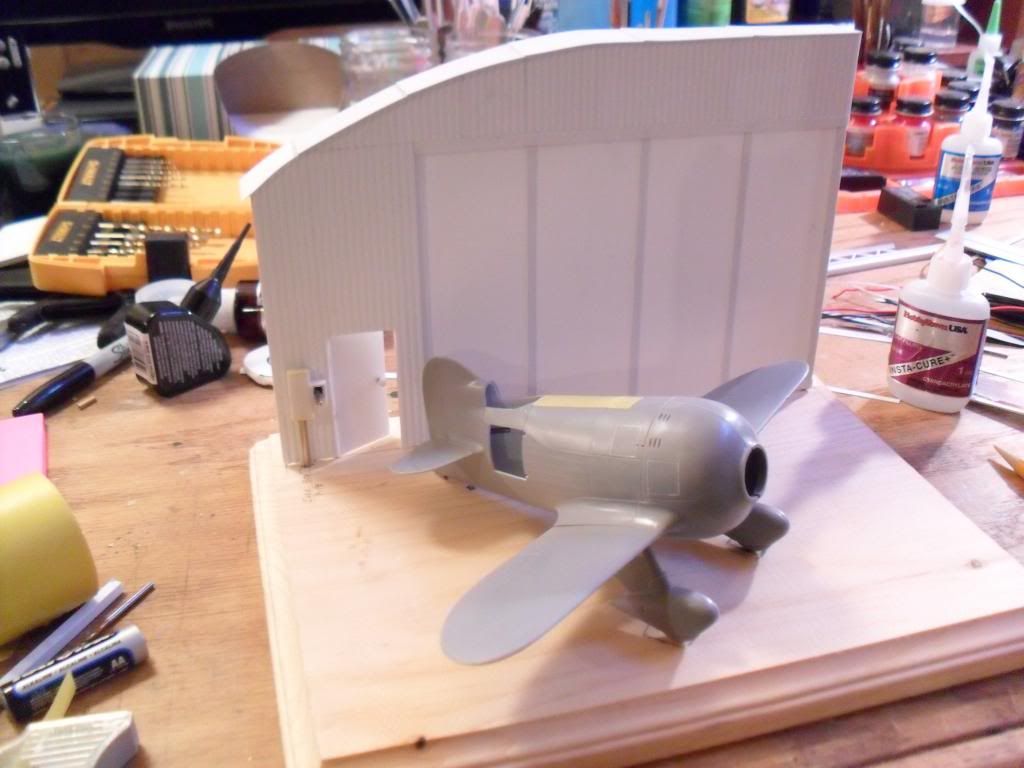
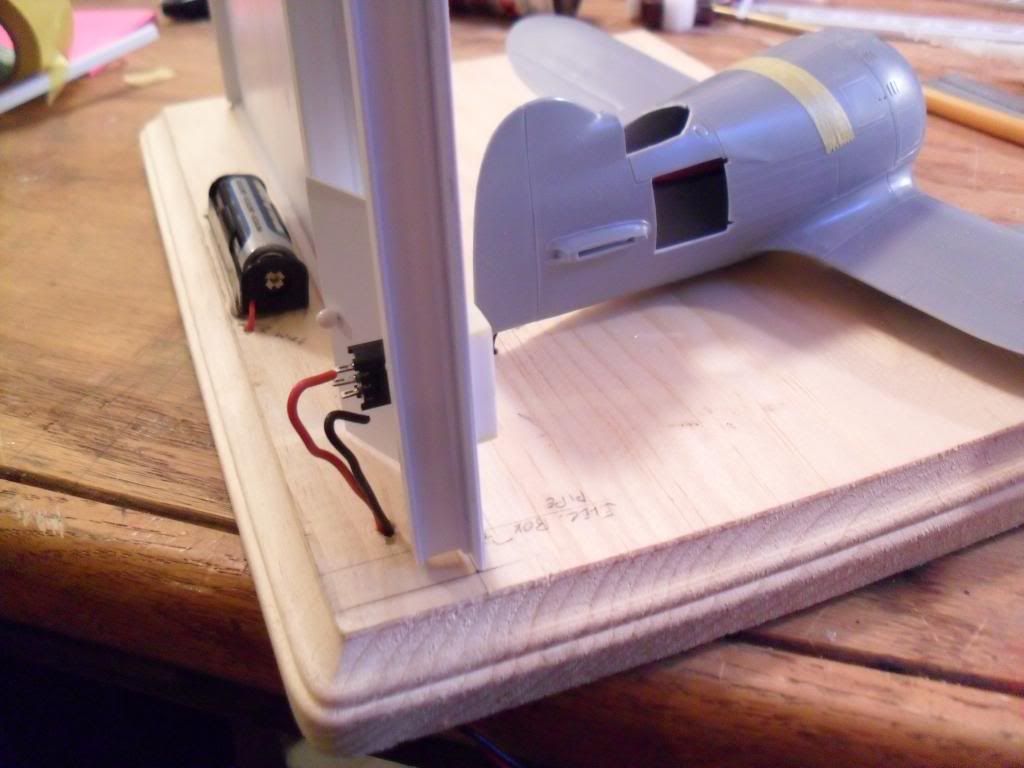
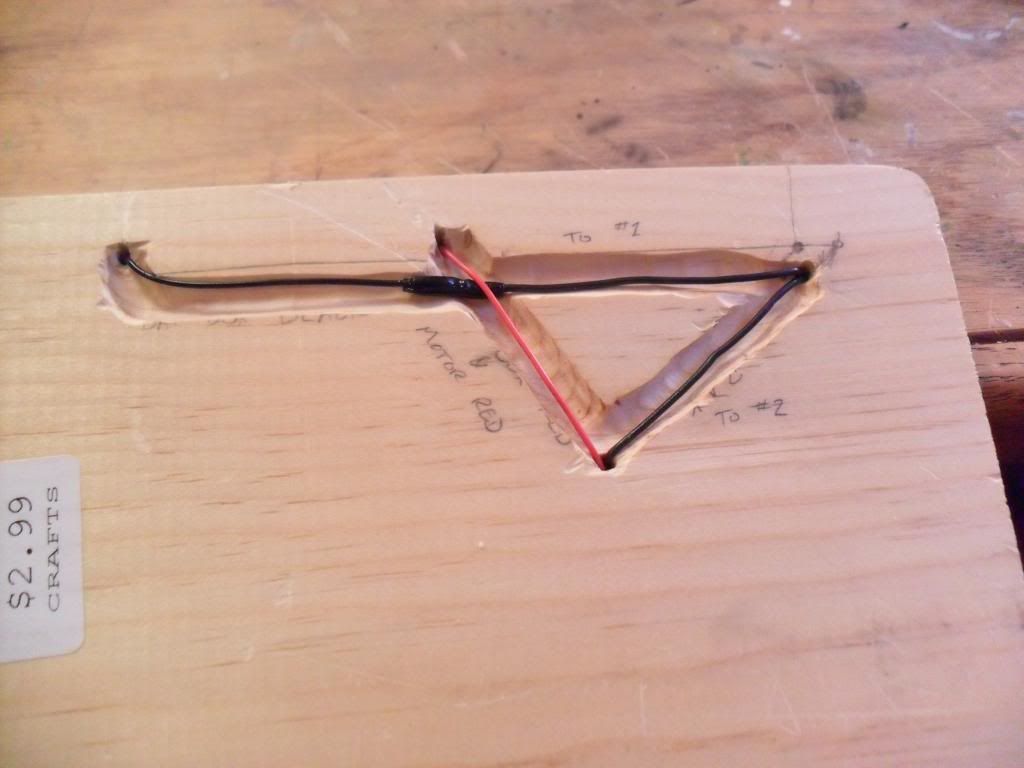
I also changed up the plans for the wiring - it is now going to all be underneath the base with the exception of the on/off switch on the hangar wall and the battery box behind the hangar door. The wiring exiting the tail of the aircraft is going straight down into the base so you only see a very small amount of wiring, and even then, only if you are looking for it.

Onto the pictures!

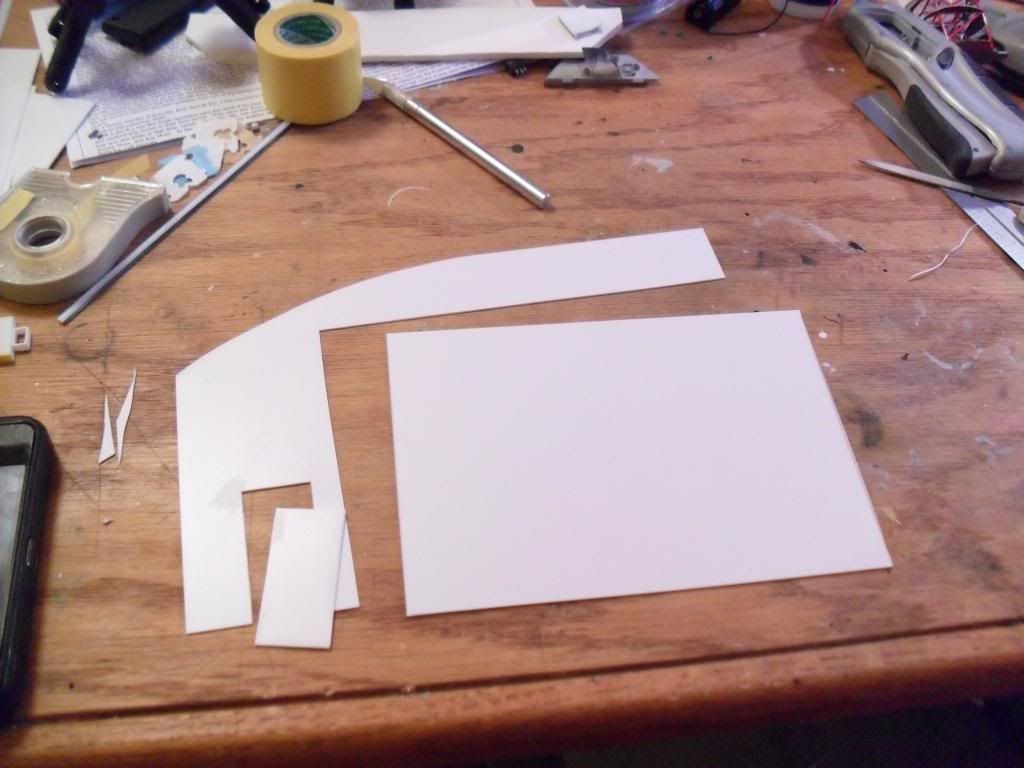
Intial cutout of hangar shapes from plastic sheet

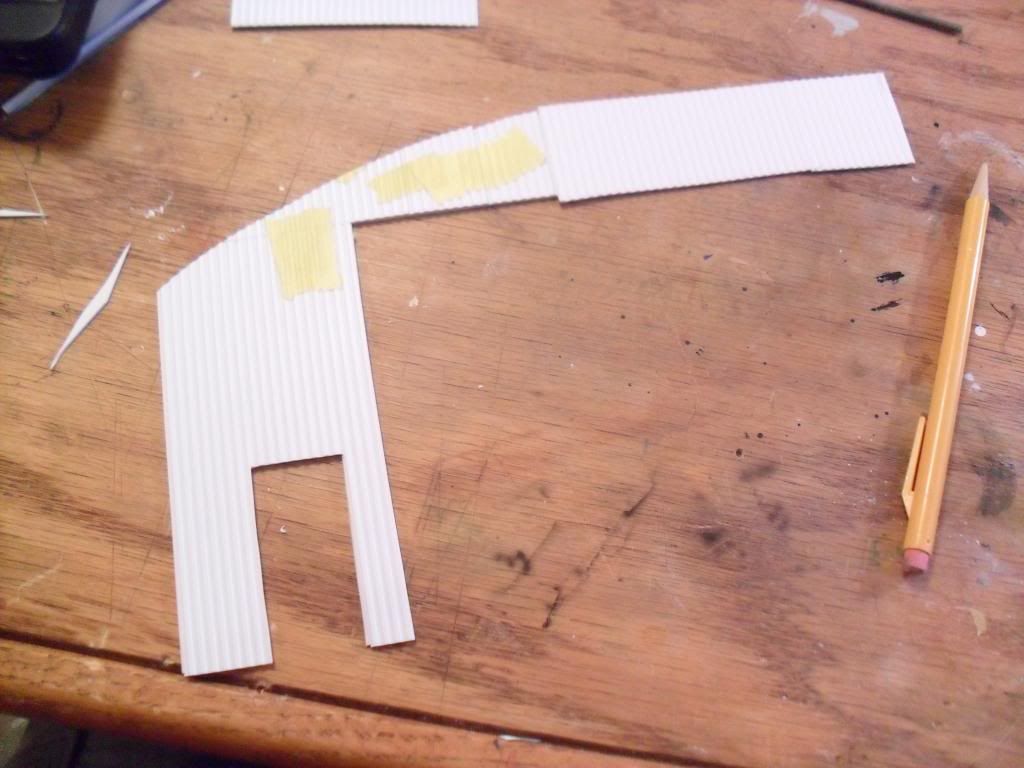
Inital application of (very expensive) Evergreen metal siding sheet:

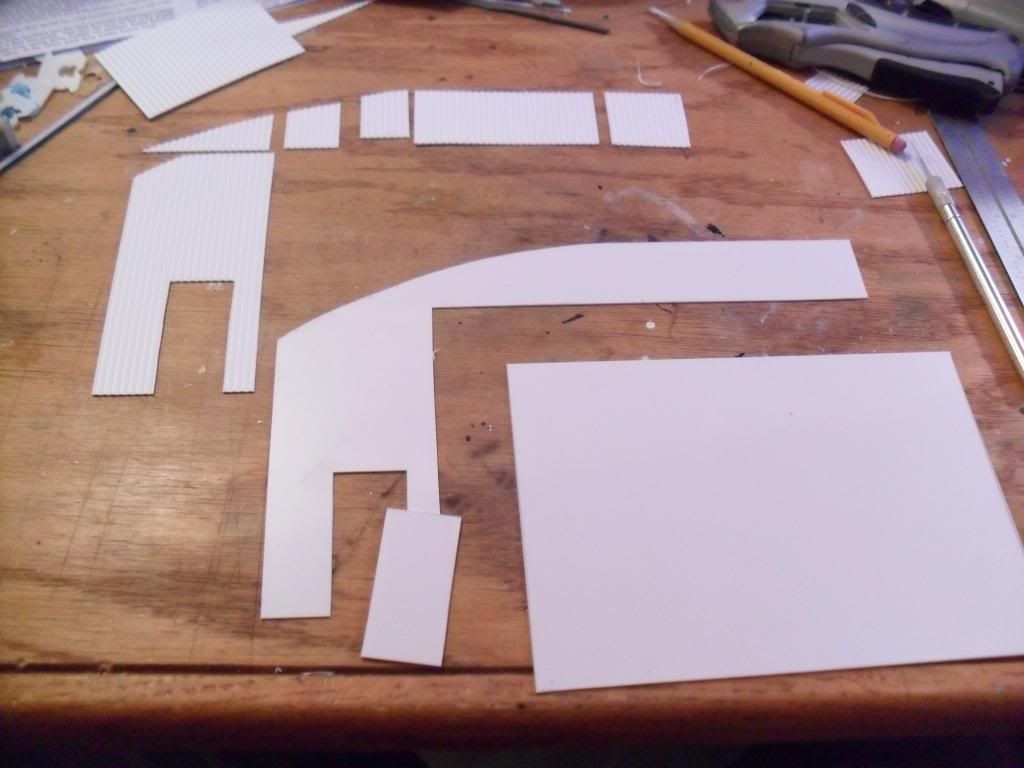
All the basic parts laid out:

Trial fit of I-beams and trusses to get an idea of my desired end result. I learned that trusses were mainly used in roof supporting roles and not wall support, so they were not used for the walls. I-beams will be used in those locations instead:

After a couple of days of cutting, filing, fitting, sanding, shaping, and LOTS of test fitting - here's what I was able to come up with:

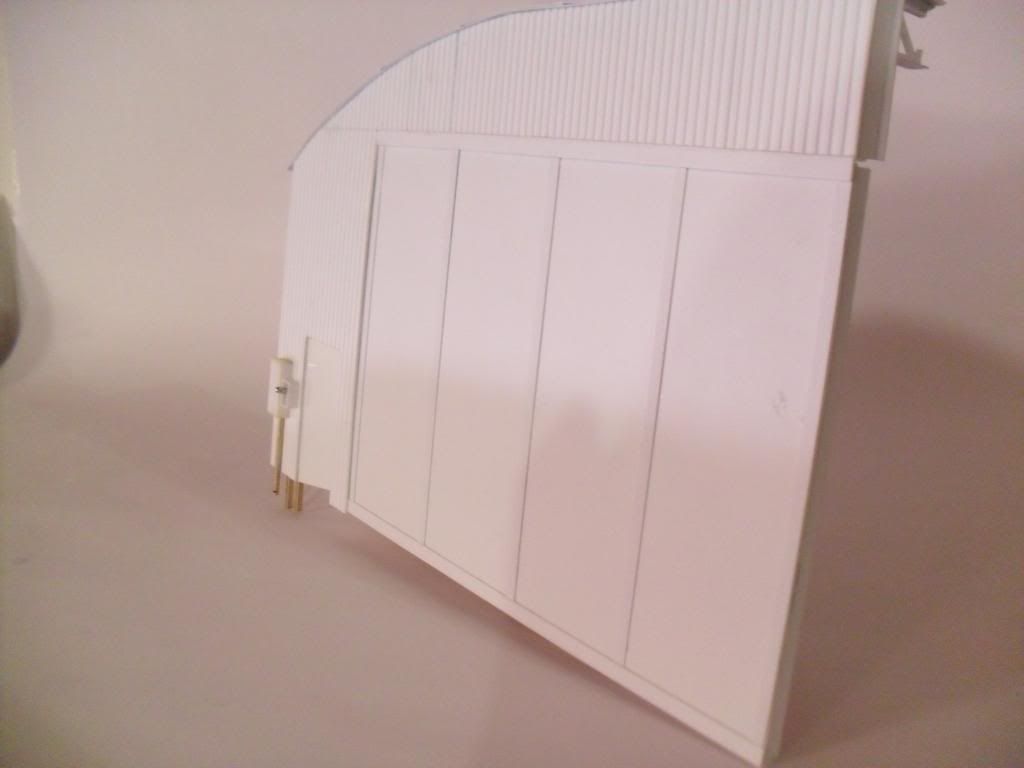
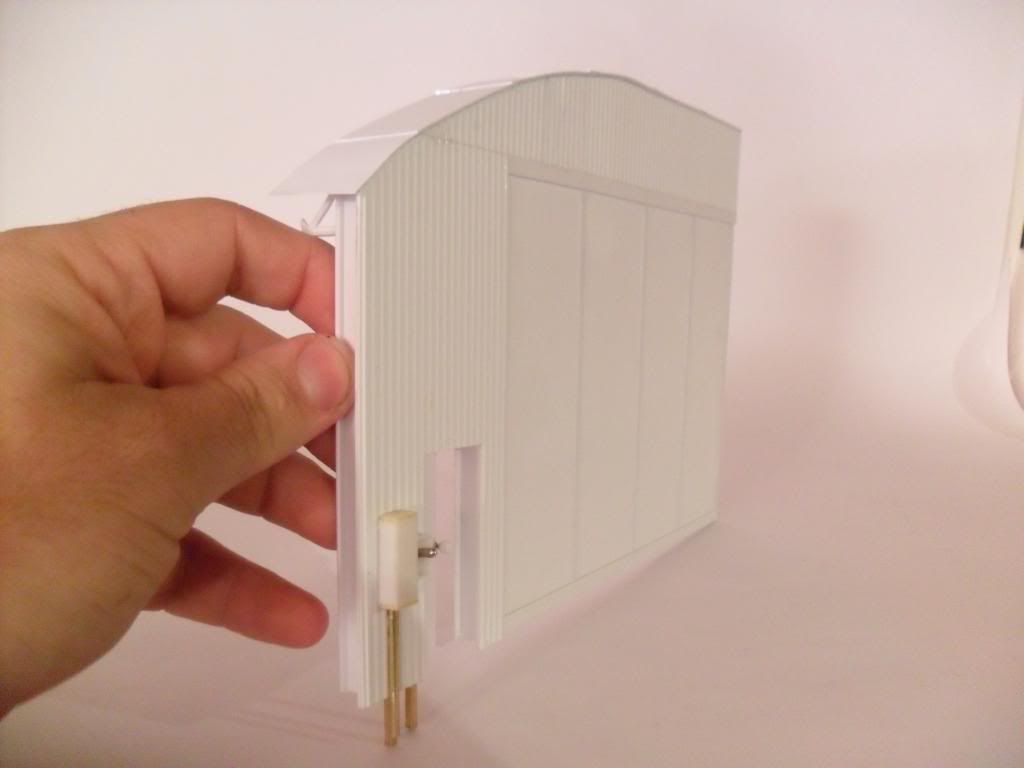
The brass rods are extended on purpose - they will serve as mounts for the wall. I added another rod at the other end of the hangar door after these pictures were taken.

After a bunch more drilling and test fitting, I got this thing mounted onto the base - dry fit only, of course.

Mock-up to check placement of the aircraft and determine wiring layout:

This stuff is FUN!! I have had so much fun scratch building this hangar - enough fun that I will be doing it again, for sure! 

Can't wait to finish this thing and see how it looks!


Todd Barker - Colorado Springs, CO

Current Projects:

  • 1/48 Beechcraft Bonanza - N51HM (Commission)
  • 1/48 B-25 Mitchell - Back Burner/Scheme TBD
  • Member since
    August 2007
  • From: back country of SO-CAL, at the birth place of Naval Aviation
Posted by DUSTER on Tuesday, November 19, 2013 4:31 PM

It looks like fun;  and you're doing an excellent job too.

Have you thought of a sign/placard for over your switch box like "Main Power"  or "Emergency Shut Off" or??

looking forward to your next update 

Steve

Building the perfect model---just not quite yet  Confused

  • Member since
    September 2013
Posted by DeafAviator on Wednesday, November 20, 2013 2:11 PM

Hola, Steve! Thanks for the compliment. I will probably do something similar to whats in that picture above - an On/Off label on the box itself with a "DANGER - HIGH VOLTAGE" sign above it.

Got a small update for y'all! Did a couple of things today: I built a cover for the battery holder, primed the hangar with a scary amount of Mr. Surfacer (scary because that was a lot of money shot through my airbrush!), and did some assembly on the Gee Bee (Installed the motors - the fake 550-hp Wasp and the real unknown-hp Wasp wannabe, along with the cockpit and motor wires. Electric motor and wiring installation looks uber-messy but its all hidden from view and more importantly, it is not going anywhere!

I also had some company today too... that was nice!

Battery Box - this will get a "HIGH VOLTAGE" treatment as well.

Hangar Wall:

And the Gee Bee! Wires have been painted white to help them blend in since there is no cockpit floor to run them underneath. Should be looking at putting the other half on tomorrow, or maybe even after work tonight (1:00AM) so it can dry overnight. And yes, the tail bulges very slightly with all that glue back there... I fixed it as much as I could but its a small enough of a gap that I can easily fix it. I know, it really does look crappy all over the thing, but it runs smooth as silk and is very strong which is the most important thing. It will look good in the end... I promise!!


Todd Barker - Colorado Springs, CO

Current Projects:

  • 1/48 Beechcraft Bonanza - N51HM (Commission)
  • 1/48 B-25 Mitchell - Back Burner/Scheme TBD
  • Member since
    September 2013
Posted by DeafAviator on Thursday, December 12, 2013 11:24 PM

Just a quick-n-dirty update on my progress... Snapped a couple quick pictures with my phone before leaving the house and am now posting this via my iPad so I do apologize for the brief update/bad pictures. I will add better pictures from my camera next week along with a thorough update.

I got the hangar painted up - I just need to tweak the color of the backside of it. I painted it Alclad Steel but it came out way darker than I was hoping for. I was aiming for more of a cross between this and Alclad Aluminum. I will probably lightly spray some aluminum to brighten things up back there. I also need to paint the door, the electrical box, and do all the other detail work and weathering.  Front side got a treatment of custom tan and green mixes (tan is MM Flat White with a bit of MM Leather, green is a mix of MM Green, MM Aircraft Interior Green, and a touch of MM Olive Drab to tone it down.) I did preshade but only the hangar door preshading came out well - everything else kind of disappeared. That's okay though I think it looks good. Also did a strip of Alclad Aluminum above the hangar door, along with the roof being done in the same with some Steel post shading.

The Gee Bee got assembled, re-shaped in a few areas, rescribed, and all gaps filled. This is one of those things that I will need to fill you guys in on the details later but I took a picture of how it is right now with the first layer of white base coat done. Will do some light sanding and then add a few more coats of white before letting that cure and then starting on the red. 


Todd Barker - Colorado Springs, CO

Current Projects:

  • 1/48 Beechcraft Bonanza - N51HM (Commission)
  • 1/48 B-25 Mitchell - Back Burner/Scheme TBD
  • Member since
    September 2013
Posted by DeafAviator on Saturday, December 14, 2013 2:27 AM

Okay here's the more thorough update I promised y'all! I wont rehash much of what I said in my previous post so I'll just get right to it.

The following are various pictures of the fuselage construction, wing/tail assembly, seam-filling/sanding, and rescribing of the panel lines as well as blanking out the R-1 specific panels and creating new panels for the R-2 model. 

Carved some new louver vents where the seam ran right through them. Came out kind of crappy but I guess it will have to do for my first attempt with that. Was hoping I could find PE vents but wasn't able to find any... anyone know where I can get some?

Fixed a gouge in the wing - not sure how that happened!

Installed the canopy. I love Future!! Such a miracle product. Dipped it in Future, marveled at how beatiful and clear it came out, then set it right in place and let that stuff, along with a couple drops of superglue, fasten the canopy to the airframe.

Just before masking off for painting. Wet tissue used for filling in the cockpit entry.

Primered with Mr. Surfacer 1200 - a quick swipe or two with some fine sandpaper and she's ready for some white!

Some better shots of the hangar:

That's all for now, folks! Off to bed for me... ZZZZZZ!


Todd Barker - Colorado Springs, CO

Current Projects:

  • 1/48 Beechcraft Bonanza - N51HM (Commission)
  • 1/48 B-25 Mitchell - Back Burner/Scheme TBD
  • Member since
    December 2002
  • From: Lyons Colorado, USA
Posted by Ray Marotta on Saturday, December 14, 2013 4:47 PM

Yes!  Battery box behind the "hangar wall".  Cable from wall mount power switch to "DC power converter"

on hangar floor, cable to GB's ground power plug-in...

 ]


  • Member since
    September 2013
Posted by DeafAviator on Friday, December 20, 2013 1:20 PM

Getting close to the end here - I can definitely see the light at the end of the tunnel!

The base is completed and I am wrapping up the Gee Bee.

All I have left at this point is decals, final clear coating, and final assembly. Very close to the end here. Good thing too as this is supposed to be given to my father the weekend after Christmas - hope I can stick to that timeline!

I did a do-over on the paint. After the first time around, I realized that scratches and marks that I figured would not be something to worry about were now something that bothered me, so I decided to put some more love into this thing and clean it up some more. Re-primered with Mr. Surfacer 1200 again, then re-shot the white. Came out VERY nice - I am very happy with it! Does have some very slight orange peel but this will be easily remedied with some sanding and clear coat after the red has been applied.


Time for scallops! I copied the kit plans/instructions with the intention of laying Tamiya 40mm tape over them, cutting out the scallops (the plans were identical in scale to the Gee Bee) then taping that onto the wing. However, I noticed that the ink came off the paper quite nicely so what I did instead was pull a "copy" off onto the tape, then cut that out with my knife, and laid that onto the wing. Worked VERY well!


Did the same thing for the wheel pants:


Once that was done I got right to shooting the red scallops, and peeled the tape off just when the paint dried to the touch (about 10 minutes)


After letting that dry for a day, I tackled the pinstriping with some great pinstriping tape I found at Hobby Lobby. Doesn't wanna lay down too well on tight curves but with some coaxing I was able to make it work. I shot a bunch of clear acrylic as soon as that was done to seal it in - It still isn't laying down all the way on some of the tight curves, especially on the outboard portion of the left wing, but it will just have to do for now. I might try shaving off the bits sticking up after the clear coat has cured and touching up with black but we'll see. I need to touch up all the points with black anyway.

Here's how it looks right now:


After this point I will sand down all the flaws once the clear has dried, give it one more coat of clear, then start on all the decals. After putting more clear on top of those, and assuming that comes out okay, then I will complete final assembly (Cowling, landing gear, prop, and rigging wires), unmask the canopy, and install this thing on to the base and get it wired up!


Todd Barker - Colorado Springs, CO

Current Projects:

  • 1/48 Beechcraft Bonanza - N51HM (Commission)
  • 1/48 B-25 Mitchell - Back Burner/Scheme TBD
  • Member since
    August 2012
Posted by JimNTENN on Friday, December 20, 2013 1:25 PM

That's beautiful.

Current project(s): Hobby Boss: 1/72 F9F-2 Panther

                                  Midwest Products: Skiff(wood model)


  • Member since
    September 2013
Posted by DeafAviator on Friday, December 20, 2013 5:57 PM
Thanks Jim!

Todd Barker - Colorado Springs, CO

Current Projects:

  • 1/48 Beechcraft Bonanza - N51HM (Commission)
  • 1/48 B-25 Mitchell - Back Burner/Scheme TBD
  • Member since
    December 2002
  • From: Northern California
Posted by jeaton01 on Friday, December 20, 2013 9:34 PM

Very nice!

John

To see build logs for my models:  http://goldeneramodel.com/mymodels/mymodels.html


  • Member since
    August 2007
  • From: back country of SO-CAL, at the birth place of Naval Aviation
Posted by DUSTER on Sunday, December 22, 2013 11:43 PM

Nice looking bird.  Great repaint  

It's too bad you couldn't find a real bright red to go on that subdued white

Steve

Building the perfect model---just not quite yet  Confused

  • Member since
    April 2006
  • From: Denver, Colorado
Posted by waynec on Monday, December 23, 2013 11:47 AM

very nice. you definitely need to come to the january meeting with the finished model.

Никто не Забыт    (No one is Forgotten)
Ничто не Забыто  (Nothing is Forgotten)


  • Member since
    September 2013
Posted by DeafAviator on Tuesday, December 24, 2013 1:40 PM

*********Completed!*********

Finished this Christmas gift to my father JUST in time - Christmas Eve!!

This was a very fun and challenging build and I have to say that I certainly learned a LOT as well as developed a lot of skills and really gave my confidence a boost. I can't hesitate to say that this is definitely my best build so far!

I think the best thing about this was how great the paint job turned out. The cowling did get messed up a little bit because I was struggling with my airbrush at 2:00 AM last night trying to get it to shoot well, but it's not too bad. Other than that, everything is like glass!! 

The electrical hookup works perfectly and what's more, the switch seems to have loosened up from the heat of soldering and now it throws very nicely, rather than being quite stiff like it was before.

Here's a summary of everything that went into this build:

Kit: Williams Brothers

Kit Modifications/Additions: Engine upgraded with wires and pushrods using electrical wire and .015 music wire; Pitot tube created with a cut-off push-pin; Control cables added with 2-lb monofilament line; Seat headrest changed from Square to Round; Rigging line from .015 music wire.

Glue Used: MM Liquid Cement, BSI Maxi-Cure, BSI Insta-Cure (Thin and Gap Filling), E6000 & Generic brand epoxies

Paint Used: Interior - Tamiya Red and White, MM Leather, MM Flat Black, and MM Chrome Silver; Exterior - Tamiya Red and White, overlayed with approximately 15 coats of MM Acryl Clear Gloss and 5 coats of Future. Trim line done with black trim tape.

Base Construction: Fully scratch built using Evergreen sheet styrene and Plastistruct materials, as well as square brass rod. Base wood from Hobby Lobby and finished with stain and polyurethane. Grass is sand material from Hobby Lobby painted dirt colors, and the grass itself is straight, unpainted grass material, also from Hobby Lobby.

Enjoy the pics!


And one last one showing my personal touch on this - a memento to the old "wrecked" Gee Bee R-1 that inspired this build. 


Thanks to all of you for your continuous support and encouragement - I really appreciate it!!


Todd Barker - Colorado Springs, CO

Current Projects:

  • 1/48 Beechcraft Bonanza - N51HM (Commission)
  • 1/48 B-25 Mitchell - Back Burner/Scheme TBD
  • Member since
    August 2012
Posted by JimNTENN on Tuesday, December 24, 2013 1:47 PM

That's beautiful. You did a superb job. The base is a really nice way to display it and the motorized prop is the icing on the cake.

Current project(s): Hobby Boss: 1/72 F9F-2 Panther

                                  Midwest Products: Skiff(wood model)


  • Member since
    November 2013
Posted by Radial on Wednesday, December 25, 2013 8:37 AM

Wow! Very good work. Glad you gave it to your father

JOIN OUR COMMUNITY!

Our community is FREE to join. To participate you must either login or register for an account.

SEARCH FORUMS
FREE NEWSLETTER
By signing up you may also receive reader surveys and occasional special offers. We do not sell, rent or trade our email lists. View our Privacy Policy.