SEARCH FINESCALE.COM

Enter keywords or a search phrase below:

How to build a paper airplane model - tips based on a 1/33 Il-2 Stormovik - FINISHED AT LAST!!

30889 views
71 replies
1 rating 2 rating 3 rating 4 rating 5 rating
  • Member since
    May 2009
  • From: Poland
Posted by Pawel on Tuesday, January 28, 2020 1:03 PM

Hello TB!

ORP Maly sounds very unlikely... The wartime destroyers taken over from the British were ORP Piorun (N-Class) and ORP Garland (G-Class) - both published by "Maly Modelarz" in the late eighties. Maly modelarz also did ORP Błyskawica, ORP Burza and ORP Grom, beginning from the sixties. So I still wonder what could it be...?

Have a nice day

Paweł

All comments and critique welcomed. Thanks for your honest opinions!

www.vietnam.net.pl

  • Member since
    May 2009
  • From: Poland
Posted by Pawel on Saturday, February 1, 2020 6:03 PM

Hello everybody!

Today I'd like to start writing about building the landing gear vor my Il-2. I've already shown you this one - how I started building the wheels by glueing together several cardboard disks and sanding them until they started looking like wheels with tires:

GPM 1:33 Il-2m3 Stormovik by Pawel

I also started making the struts by bending some 1mm steel wire. I have also rolled some thin paper to shape the struts. A package of biscuits served as a cheap source of silver foil that will make excellent oleos:

GPM 1:33 Il-2m3 Stormovik by Pawel

The parts of the landing gear from the kit look like on the photo below:

GPM 1:33 Il-2m3 Stormovik by Pawel

The 67P and 67L will be replaced with my tubes rolled from the thin paper like shown on the photo below:

GPM 1:33 Il-2m3 Stormovik by Pawel

I have also cut thin strips from the thin paper and made some rings to make the struts more detailed. After this was done I painted the struts light grey. I have also made the diagonal braces using mostly the kit parts. They will have to be touched up with the grey paint as well:

GPM 1:33 Il-2m3 Stormovik by Pawel

I will have to put some work to make the part of the landing gear that is hidden in the nacelles - the kit is pretty vague here... But you can see this is taking shape, right? Hope you like it, thanks for reading and have a nice day

Paweł

All comments and critique welcomed. Thanks for your honest opinions!

www.vietnam.net.pl

  • Member since
    February 2011
Posted by GreySnake on Monday, February 10, 2020 7:48 AM
It’s coming along nicely. Those landing gears turned out really nice.
 
 
My father used to build balsa wood aircraft and I think if he would have done a paper model he would have enjoyed them. It seems like some of the techniques you use and he used on his balsa aircraft are somewhat the same, such as the landing gear.
  • Member since
    May 2006
  • From: Batesville, IN
Posted by ggatt_2 on Tuesday, February 11, 2020 1:57 PM

Pawel, I'm very impressed with your work on the Stormovik. This type of modeling requires a whole other set of skills and I'm looking forward to seeing more progress. I followed the link you posted earlier in the thread and it appears there are a huge number of paper kits available, including many types we'd never see produced in plastic in the larger scales. Do you have any recommendations on who makes the best kits? Also, where can the vac canopies be found?

-Greg

  • Member since
    May 2009
  • From: Poland
Posted by Pawel on Wednesday, February 12, 2020 3:35 PM

Hello! Thanks a lot for your comments!

GraySnake - I'm glad you like my results! Many years ago I got to build a Guillows balsa aircraft and some of the parts there were supposed to be made out of cardboard, so I believe I understand what you are saying. And paper models and balsa models are a bit like a big scratchbuilding project, maybe with an exception that the kit gives you the basic dimensions to work with.

Greg - thanks a lot for your kind words. I agree with you about the wholly new skill set - that's why I recommend kits lkie this to plastic modellers - after building one their other models will get better, that's how I feel it.

As for my recommendations - the GPM company makes good models, they also sell vacu canopies for them. If you wish you can also get laser-cut bulkheads for most paper models. I can also recommend other companies like "Mały modelarz" (a veteran - older models are more simple), "Kartonowy arsenał/Haliński", "Modelik", "WAK". There are also others and if you're looking for a specific model, most of the time you can look at the parts and instructions on the internet and decide for yourself if they look good to you. If you need help with translation from Polish please let me know - I'll see what I can do.

And I've been working on the landing gear. On the photo below you can see how I used ice cream sticks for jigs to get the right stance on the landing gear struts:

GPM 1:33 Il-2m3 Stormovik by Pawel

That was a dry fit to see if everything fits - after that I have removed the landing gear and I have tried to re-create at least some of the internal structure of the nacelles and some hydraulic cylinders for lowering and raising the landing gear:

GPM 1:33 Il-2m3 Stormovik by Pawel

Next step will be to install the gear and it's doors. Thanks for looking and have a nice day

Paweł

All comments and critique welcomed. Thanks for your honest opinions!

www.vietnam.net.pl

  • Member since
    October 2019
  • From: New Braunfels, Texas
Posted by Tanker-Builder on Thursday, February 13, 2020 10:46 AM

Pawel!

   Thank You sir! It is indeed the ORP Grom! As I said I couldn't remember the proper name . Very intricate but satisfying model! And yes, Modelik are great too! My greatest group are the Wilhelmshaven Products followed by Schreiber and MALY Modelarz

  • Member since
    May 2009
  • From: Poland
Posted by Pawel on Friday, February 14, 2020 2:53 PM

Hello Doc!

Those older warship models from Maly Modelarz are nice - they have enough detail to keep you busy, but not so much as to drive you crazy or discourage you. But of course on can always go bananas and use modern modelling techniques like adding PE railings and so on to make them more accurate.

The most modern Maly Modelarz ships have parts so fine, that you start wondering how in the world are you ever going to cut them out... IMO it starts taking the fun out of building something like that.

Thanks a lot for your comment and have a nice day

Paweł

All comments and critique welcomed. Thanks for your honest opinions!

www.vietnam.net.pl

  • Member since
    February 2011
Posted by GreySnake on Saturday, February 15, 2020 8:57 AM

Coming along nicley. 

  • Member since
    June 2017
Posted by UnwaryPaladin on Wednesday, February 19, 2020 11:25 PM

Watching with interest. Really can't believe it is a paper kit, just amazing.

  • Member since
    May 2009
  • From: Poland
Posted by Pawel on Monday, March 16, 2020 3:41 PM

Hello!

GreySnake, UnwaryPaladin - thanks a lot for your kind words and sorry it took me so long to reply here - like they say, life! It's kinda obvious, but I'd just love to talk you into trying a nice paper model yourselves...

And it's high time I posted an update here, and I've got, among other things, the landing gear done.

First I had to finish the doors. When I started doing that I noticed that the inner and outer shells of the landing gear nacelles are mismatched - I mean the outer shell marked P (meaning right) matches a lot better to the inner skin marked L (for left). That means the nacelles would probably benefit from such a switch too - too late to try it out now. One has to watch for things like this constantly - it happens! - like Foorest Gump would say. Here are the parts:

GPM 1:33 Il-2m3 Stormovik by Pawel

And here's how I got around to building them: I have first glued the inner skin parts together using a strip of thin paper. At this point I have also tried to create the correct shape of the part. Then I glued the outer skin to it - and the additional layer of glue and paper has nicely strenghtened the doors and fixed their shape:

GPM 1:33 Il-2m3 Stormovik by Pawel

Then I have assembled everything watching for correct geometry. I have also touched up the edges of many parts in this area:

GPM 1:33 Il-2m3 Stormovik by Pawel


GPM 1:33 Il-2m3 Stormovik by Pawel


GPM 1:33 Il-2m3 Stormovik by Pawel

The landing gear is now complete - moving on to other detail.

Thanks for looking and have a nice day

Paweł

All comments and critique welcomed. Thanks for your honest opinions!

www.vietnam.net.pl

  • Member since
    February 2011
Posted by GreySnake on Wednesday, March 18, 2020 1:33 PM
Very nice work!  I imagine it’s going to be a good sized airplane once finished.
 
As for building a paper model I’m looking at picking up a model of the freighter Edmund Fitzgerald possibly. I’ve always wanted a model of it and the other only offering is a 1/700 resin kit that is out of my price range.
  • Member since
    May 2009
  • From: Poland
Posted by Pawel on Thursday, March 19, 2020 3:57 PM

Hello!

Thanks a lot for your comment! In 1/33 the model is about 350mm long and has a span of about 440mm. It's not so easy to find a display space for it any more...

If you like nice, big models and don't want to spand big bucks, paper models can be something for you. Plus, you can get a 1:33 B-52, C-130 or H-53!

Looks like the Polish model publishers thought of you:

1:400 S.S. Edmund Fitzgerald

OK, it could be more detailed - but at about 3$ you've got a lot of budget to add some more detail, right?

Thanks for looking and have a nice day

Paweł

All comments and critique welcomed. Thanks for your honest opinions!

www.vietnam.net.pl

  • Member since
    May 2009
  • From: Poland
Posted by Pawel on Sunday, April 12, 2020 4:22 PM

Hello!

It's been some time and though it wasn't easy, I was working on this one, so let me post some updates. The first one will be the construction of the oil cooler - the only part that had to be repaired on a 1:1 aircraft after a wheels-up landing...

The construction starts with two flat sides made of two layers of paper and the insides:

GPM 1:33 Il-2m3 Stormovik by Pawel

This part is a maybe little more "boxy" than in real life, but it's really easy to build this way. One thing to look for is the fit of the lower rear cooler (top left on the photo above) to the lower surface of the model - do it right now and you won't have to bother with it when fitting the cooler to the model.

GPM 1:33 Il-2m3 Stormovik by Pawel

On the photo below you see the cooler with two bits that provide a little streamlining between round fuselage and a square cooler. As always you have to check everything for fit often, but in this case the fit was OK:

GPM 1:33 Il-2m3 Stormovik by Pawel

GPM 1:33 Il-2m3 Stormovik by Pawel

And here's the cooler after fitting it to the model. White glue really is helpful here, gives you time for fine adjustments after the whole coooler is attached to the rest of the model:

GPM 1:33 Il-2m3 Stormovik by Pawel

GPM 1:33 Il-2m3 Stormovik by Pawel

One more look down the cooler - it's the one closer to the hull where it helped to look for the right fit:

GPM 1:33 Il-2m3 Stormovik by Pawel

That would be it for now - thanks for looking, stay healthy and have a nice day

Paweł

All comments and critique welcomed. Thanks for your honest opinions!

www.vietnam.net.pl

  • Member since
    May 2009
  • From: Poland
Posted by Pawel on Saturday, April 18, 2020 8:49 AM

Hello!

I have recently tackled the flaps - the kit gives you the option of building them extended, but the insides of the flaps aren't very detailed. I decided I'm going to add some reinforcement ribs, just to make the flaps appear more "busy" and not so empty. In the photo below you can see the kit supplied flap interior (top right) and the remaining ones are already modified by me. I took a strip of cardboard, painted it grey and cut pieces of equal length. Then each piece was cut diagonally giving me two ribs that were then glued to the flap interior:

GPM 1:33 Il-2m3 Stormovik by Pawel

And on the photo below you can see the flap interiors installed. I kinda regret that I didn't install the flap interiors earlier - because now they had the tendency to warp as the glue was setting. You can also see the interior of the oil cooler mentioned earlier:

GPM 1:33 Il-2m3 Stormovik by Pawel

That would be it for now - thanks for reading and have a nice day

Paweł

All comments and critique welcomed. Thanks for your honest opinions!

www.vietnam.net.pl

  • Member since
    May 2009
  • From: Poland
Posted by Pawel on Wednesday, May 13, 2020 5:32 PM

Hello!

This time I'd like to write about building bombs and rockets for my "storm bird". From what I read the bombs and rockets might have been the scariest things that the Il-2s carried, but their effectivity was very limited because the aircraft actually had no sight for neither bombs nor rockets (other than the white lines painted on the nose), so getting a hit was largely a matter of luck. The rockets were also said to generally have an unstable flight path...

Anyhow I started with the bombs. The kit gives you two old pattern FAB-250 bombs. You start each bomb with a cylinder made out of a rectangular piece of paper with two circular reinforced bulkheads. Of course you have to check them for fit before glueing them in place. The nose cone of each bomb is composed of several cones that you have to mate. I used about four thin strips of paper glued "radially". Luckily the cones fit nicely:

GPM 1:33 Il-2m3 Stormovik by Pawel

GPM 1:33 Il-2m3 Stormovik by Pawel

Each bomb has two fuses that are armed with a small propeller wheel. The kit would like you to cut out such wheels - well, I don't know how I could cut something like that b yhand and make it look good - so I scanned them wheels, processed them on my PC and then I put them out to my laser carver:

After that I had the wheels ready for glueing. I soaked them in CA to make them more resistent to handling.

GPM 1:33 Il-2m3 Stormovik by Pawel

Next step was to add the fins, the edges of the fins were touched up with dark grey, so that they looked purtier:

GPM 1:33 Il-2m3 Stormovik by Pawel

Last thing to add were the bomb racks:

GPM 1:33 Il-2m3 Stormovik by Pawel

GPM 1:33 Il-2m3 Stormovik by Pawel

I have holes in the wings where the bombs go, I already dry fitted them - they fir really nice and stay on without glue!

I also wanted to write about the rockets. The kit gives you four launch rails and parts for four rockets. I tried to build one, but it was disappointing. A little research showed that there were two families of rockets: RS-82 and RS-132. What was in the kit had the diameter of RS-82 (or less) but the length of RS-132. I decided to scratchbuild four of the RS-132. I started with a 4mm styrene rod that I turned using a power drill that grabbed the rod instead of a drill bit. I traced the outline of the fins on the cardboard using a laser carver, then cut them out traditionally. You can see the kit supplied rocket body in the photo below - compared to RS-132 rockets:

GPM 1:33 Il-2m3 Stormovik by Pawel

The rockets were painted using Humbrols and then put on launch rails (kit supplied, reinforced with thick cardboard):

GPM 1:33 Il-2m3 Stormovik by Pawel

Next thing I would like to work on would be all the small air inlets around the engine.

Thanks for lookin' and have a nice day

Paweł

All comments and critique welcomed. Thanks for your honest opinions!

www.vietnam.net.pl

  • Member since
    March 2003
  • From: Towson MD
Posted by gregbale on Wednesday, May 13, 2020 7:02 PM

Pawel:

It's a continuing pleasure to follow along with this wonderful build. It's a true master's class tutorial on the art of paper models...and a continuing source of real inspiration.

It's really a shame more of us can't be persuaded to make the leap and give paper models a try. There are so many options that the plastic manufacturers won't touch.

Keep up the good work!

Greg

Greg

George Lewis:

"Every time you correct me on my grammar I love you a little fewer."
 
  • Member since
    May 2009
  • From: Poland
Posted by Pawel on Thursday, May 14, 2020 2:52 PM

Hello Greg!

Thanks a lot for your kind words, they mean a lot to me!

Well, I'm trying my best to advertise for paper models - sure would like to see them more popular outside Poland, too. So dear readers - if you would like something inexpensive and at the same time building your scratchbuilding and general modelling skill - please try paper models!

Thanks for reading and have a nice day!

Paweł

All comments and critique welcomed. Thanks for your honest opinions!

www.vietnam.net.pl

  • Member since
    October 2019
  • From: New Braunfels, Texas
Posted by Tanker-Builder on Thursday, May 14, 2020 6:41 PM

Hey! Pawel! 

 Where you been? Paper models are popular outside of Poland. I have had model ship builders( Normally plastic freaks)ask how good are the Card models from Poland! I can't brag on them enough. I love mine. If I was about thirty years younger I would order paper models from all over the place and re-establish the likes of PaperModels International out of Beaverton ,oregon.

 I will say this much, your folks in Poland and Germany and the Czech republic are sure easier to deal with than most folks think, and Honest too! Plus ya'll have an understanding of what it really takes to be a modeler. If you can build anything out of paper, You can build anything out of anything!

       Just think, The things we learned about curling paper as kids in art class can come in handy. Fold paper and you can fold any P.E. If you can create a dome out of worked paper then metal or plastic will be a walk in the park.

 By the way. Was Richie valens thinking of those when he sang La Bomba? Those boomy thngies are the Cat's meow! In the future look into electronic parts. The spinning wheels look just teensy lock type washers for micro electronics. That's why I salvage any of that stuff.  You never know when you can use it! 

  • Member since
    October 2019
  • From: New Braunfels, Texas
Posted by Tanker-Builder on Thursday, May 14, 2020 6:58 PM

Hi Pawel;

    This is a late reply. Since the Stay-In orders from our Mayor and Governor took effect( They are easing now) I got involved in a Paper fishing boat model. Holy cow. Can you say. Complicated little rails? I tackled them anyway because there is an American Product that was the same way. The ( Two or Three) Friends tug from Florida. The actual boat was owned by Flagler who developed a lot of Florida.

 Anyway it's ( the Tug) all in white. The real tug burned clean Coal and the white color was to prove it feasible. Flagler made a bundle on that too! But the ships and boats in (Card or Paper) are simply to many to list and more are being added. 

AT6
  • Member since
    December 2005
  • From: Fresno
Posted by AT6 on Friday, May 15, 2020 3:35 AM

Looks as good as any plastic model could look in that scale. You're a great paper modeler and it will be a blessing to see the finished kit.

  • Member since
    May 2009
  • From: Poland
Posted by Pawel on Friday, May 15, 2020 2:48 PM

Hello!

Thanks a lot for your comments!

TB - I've been in Poland for some time now and I'm judging the popularity of paper models by the traffic I see on the 'net. Also by the availability of kits and their level of difficulty.

Sometimes the German paper ships from Hamburg annoy me a little because I see them use certain solutions that I know are unpractical, having tackled a few paper ships before.

Thanks for your kind words on the bombs. I think they'll look nice under the Ilyushin. As for the arming propellers - they are "teensier" than any lock washer I've seen so far. Trust me - if not for the laser engraver that is a fine tool for stuff like that I would probably make them by etching - and that would be going much further taht I'd like on this one.

I really have to photograph and post my rescue boat here - I'm really proud of it and I don't have any good photos! I have to fix that, it's just that the boat sits in a display case at my parents' house - so I have to visit them (not so natural nowadays) to take the pictures.

AT6 - thank you very much, you're just too kind! It's almost finished now, I just have an awful lot of work lately, otherwise I think I could finish it in two-three days of work.

Thanks again and have a nice day

Paweł

All comments and critique welcomed. Thanks for your honest opinions!

www.vietnam.net.pl

  • Member since
    October 2019
  • From: New Braunfels, Texas
Posted by Tanker-Builder on Saturday, May 16, 2020 8:06 AM

You Know:

 I would just once like to be able to go back to the continent, starting in Neustadt, Austria! That's where my forebears are from. Just think a paper model search from there to Normandy!

 Bet I could find lots. Oh! there's a British Training Model that's come up on the web now. Originally it was a training aid for British Merchant Marine officers . It's about  7 feet long when you put the three sections together!. And It is made from File Stock.

 I believe between buildings and trains and planes and ships that I'd get blown away! Plus, there's larger scale construction equipment you don't see here. One more comment on the SD14 ( The British Model) You have to build it just like the real ship. No kidding! Double Bottoms and all.

  I have to agree with you on the German kits. I have many times modified the construction to get a better curve or joint, than what they had you do. On the Bomb Spinners. I have some little washers like that .They are only1/8 of an inch across. I got them from a Flatscreen T.V. I salvaged! I count 7-1/2 squares on your mat. Is that inches or M.Ms Long? 

P.S. The Microflota "Edmond Fitzgerald" looks a little better in some ways than the one available from a company here in the States!

 P.P.S. Since I wrote this I stumbled on a sie that advertised UMBUM paper models. Have you ever heard of them? They have quite a bit of Armor stuff. Didn't notice the scale though.

  • Member since
    January 2015
Posted by TheMongoose on Wednesday, July 29, 2020 6:06 AM

Pawel your a great paper model salesman! You've got so much detail here i feel like I was building it woth you. One of the guys in our local club has switched completely to paper. seeing them in person it amazes me how good they look. Knowing you've built different types what do you think the best would be for a beginner, ships or planes or something else by chance?

In the pattern: Scale Shipyard's 1/48 Balao Class Sub! leaning out the list...NOT! Ha, added to it again - Viper MkVii, 1/32 THUD & F-15J plus a weekend madness build!

  • Member since
    May 2009
  • From: Poland
Posted by Pawel on Wednesday, July 29, 2020 6:32 PM

Hello!

Thanks a lot for your comments and TB - sorry you had to wait so long for my reply... What can I say... Life sometimes gets in the way in really pesky ways!

I even thought I've already replied to your posting from may - I guess it must have got lost somewhere along the way from my brain to the net..

My cutting mat has a line every centimeter, that is 10 mm for those of you who are inch fans (1 inch = 25,4mm). Seven and half squares would be 75mm or 7,5cm.

UMBUM - my first reflex was to say I've never heard of them, but then I checked the 'net and now I remember I have seen a stock of their models many years ago in a shopping mall on a small stand selling "smart toys". Those models came from Russia or one of the former soviet republics. The name of the brand comes from Russian, Umnyy = smart, Bumaga = paper. Looks like the company doesn't operate anymore, so if you want to buy it's probably your last chance. Their models are die cut in such a way as to enable assembly without glue, and so you don't have to cut neither. That's why those babies are probably too simple for you - but they are elaborately printed and make surprisingly good looking models - from what I remember they tended to concentrate on railway topics. Chances are the scale was 1/87, but I can't say for sure.

Here's a video you might like:

Mongoose - Thanks a lot! Good to have you on my thread here. Now for a beginner I'd probably recommend a small building (architectural model), or maybe a simple aircraft (single engine fighter or something like that). It's important to choose a "kit" of good design and quality, otherwise even a simple model might be frustrating. Vehicles tend to be hard when it comes to building wheels or tracks, and ships have big hulls with complicated curves on the bottom - but even so I wouldn't rule them out as first models if the fresh modeller is strongly comitted to a subject. With paper models, even if you waste a kit you can mostly buy another one cheaply and start over using the first attempt for spare parts! After narrowing your choice down, it would be good to ask around about the possible candidates about their design, fit and quality.

Hope it helps, if you have questions please don't hesitate to ask - good luck and have a nice day

Paweł

All comments and critique welcomed. Thanks for your honest opinions!

www.vietnam.net.pl

  • Member since
    May 2013
  • From: Indiana, USA
Posted by Greg on Wednesday, July 29, 2020 7:22 PM

This is amazing.

No idea how I've missed this over such a long period of time. I've always been curious about paper models. Thank you for a really informative (if not a bit mind-boggling) thread, Pawel.

  • Member since
    May 2009
  • From: Poland
Posted by Pawel on Tuesday, July 27, 2021 4:07 PM

Hello Greg, everybody!

Thanks a lot for your kind words - and it's been almost exactly a year ago since I wrote here so Im sorry for letting you wait so long...

The last year has not been easy for many of us, and I was also a bit stuck with one detail of this model here - the rear gun. While this model has more than one weak spot I think the gun is most seriously effed up and if you know me you know I had a hard time living with that - I just had to fix it. As you will se it meant almost building the gun from scratch.

So here's what the gun is supposed to look like:

Berezin UB

We're talking Berezin UB 12,7mm machine gun here - and I tell you it's pretty hard to get a good picture of that mount, and of course there are variations - the early guns were cocked manually and the later guns had a compressed air cylinder to do that (U in UB stands for universal meaning the gun can be mounted in wings or in a flexible mount).

The UB is said to have a big punch but being a relatively crude, throw-away weapon. It is therefore surprising for me to find out the rear mount in an Il-2 had a reflex sight for the rear gunner (I expected something more along the lines of two pieces of metal welded on to be lined up)

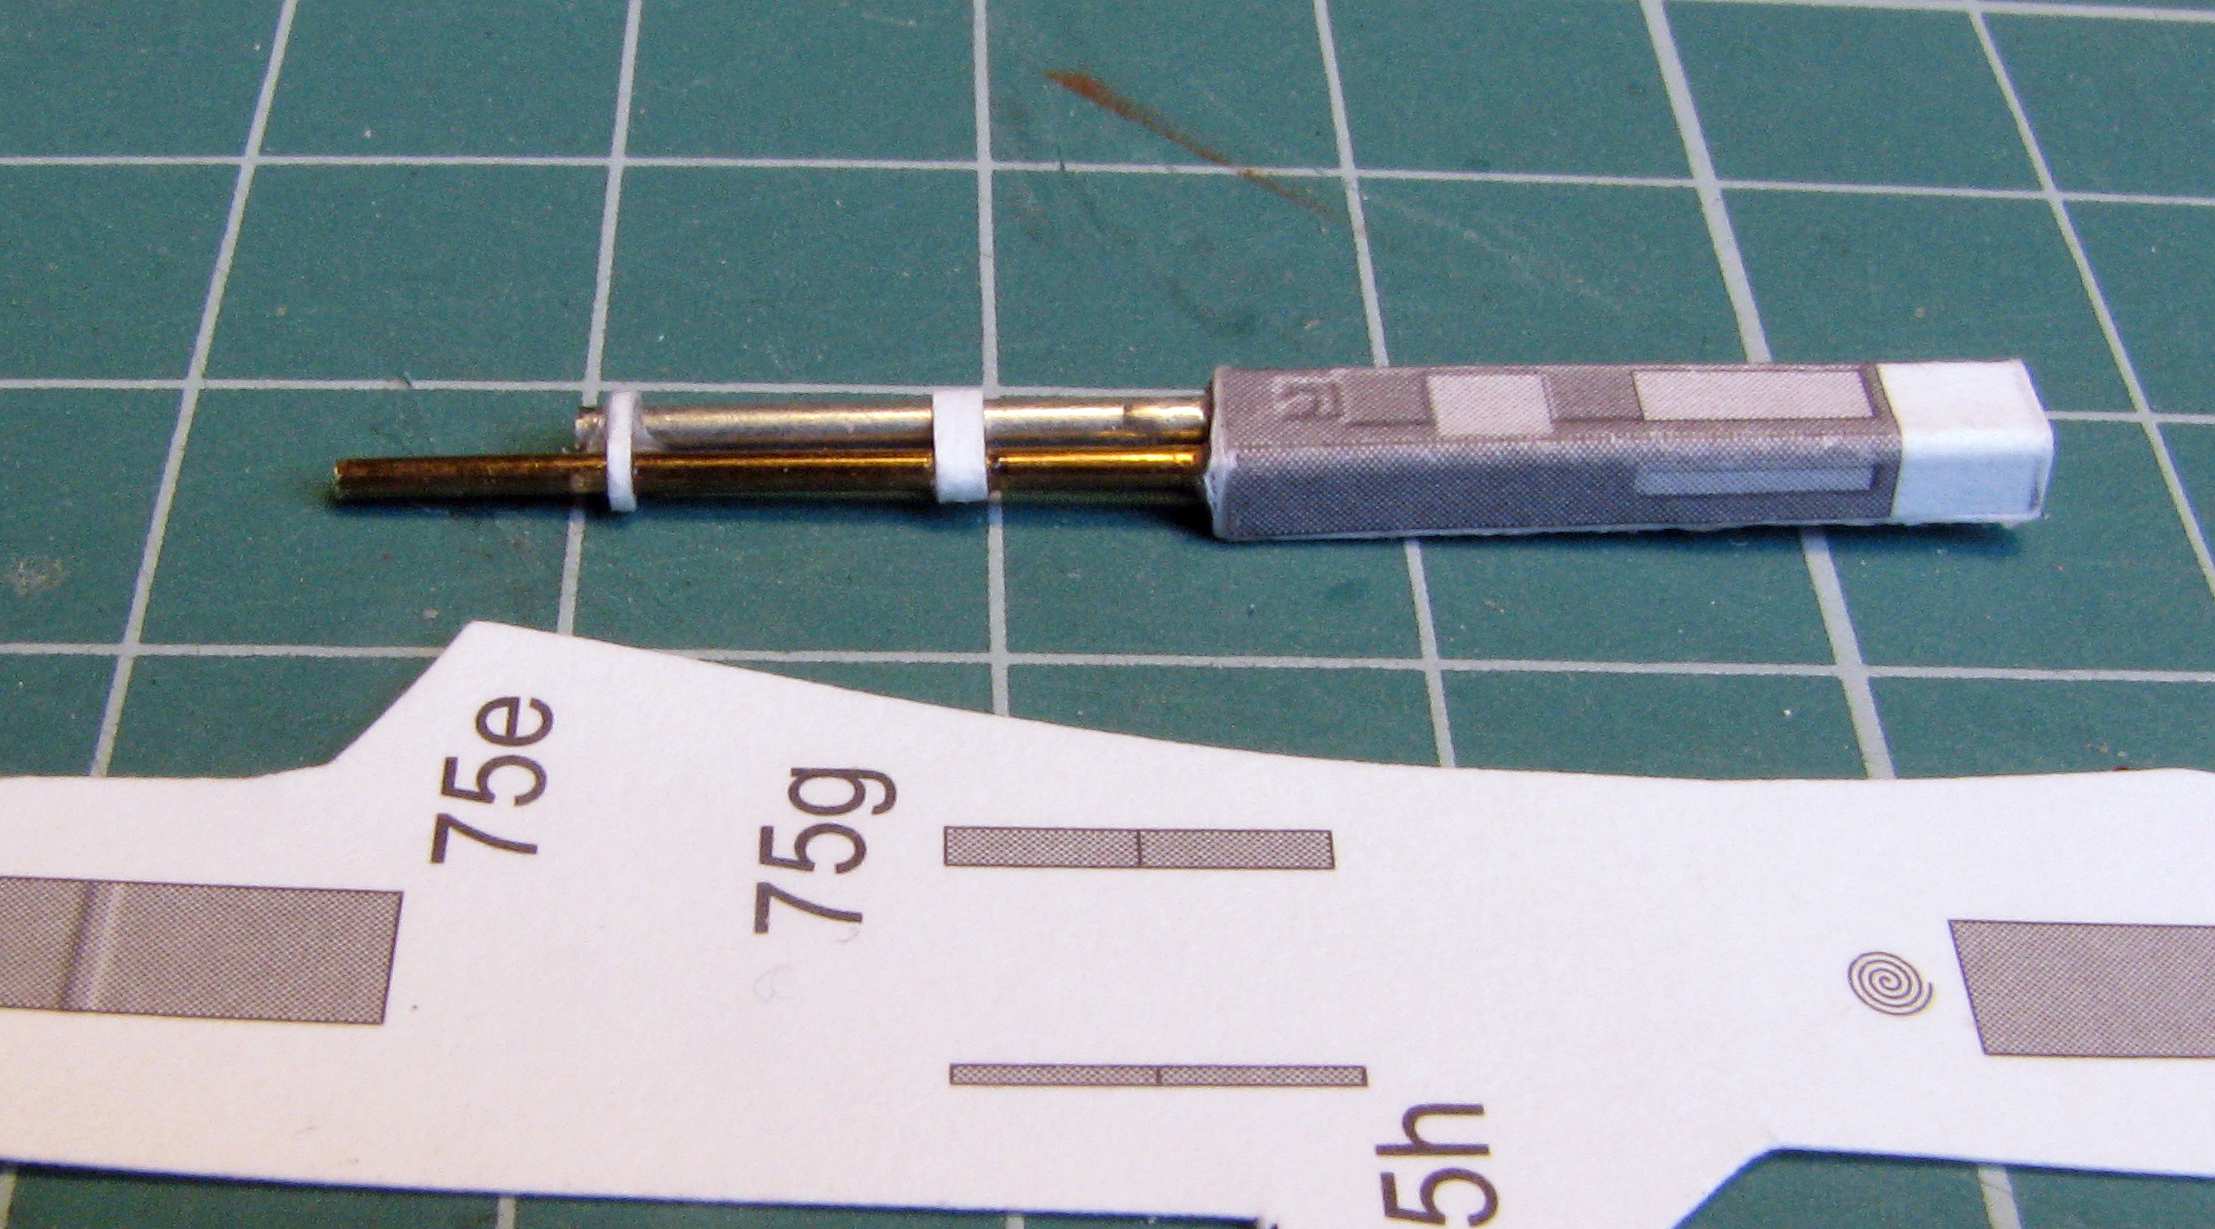
OK, so the model gives you a paper box to start with and you are supposed to make the barrel and the gas tube out of rolled paper. That doesn't work so well for small tubes. If you want to stick with paper you have to roll the tubes out of much thinner paper, but I just made the parts out of wire:

GPM 1:33 Il-2m3 Stormovik by Pawel

Then I started adding parts and correcting the kit's errors:

GPM 1:33 Il-2m3 Stormovik by Pawel

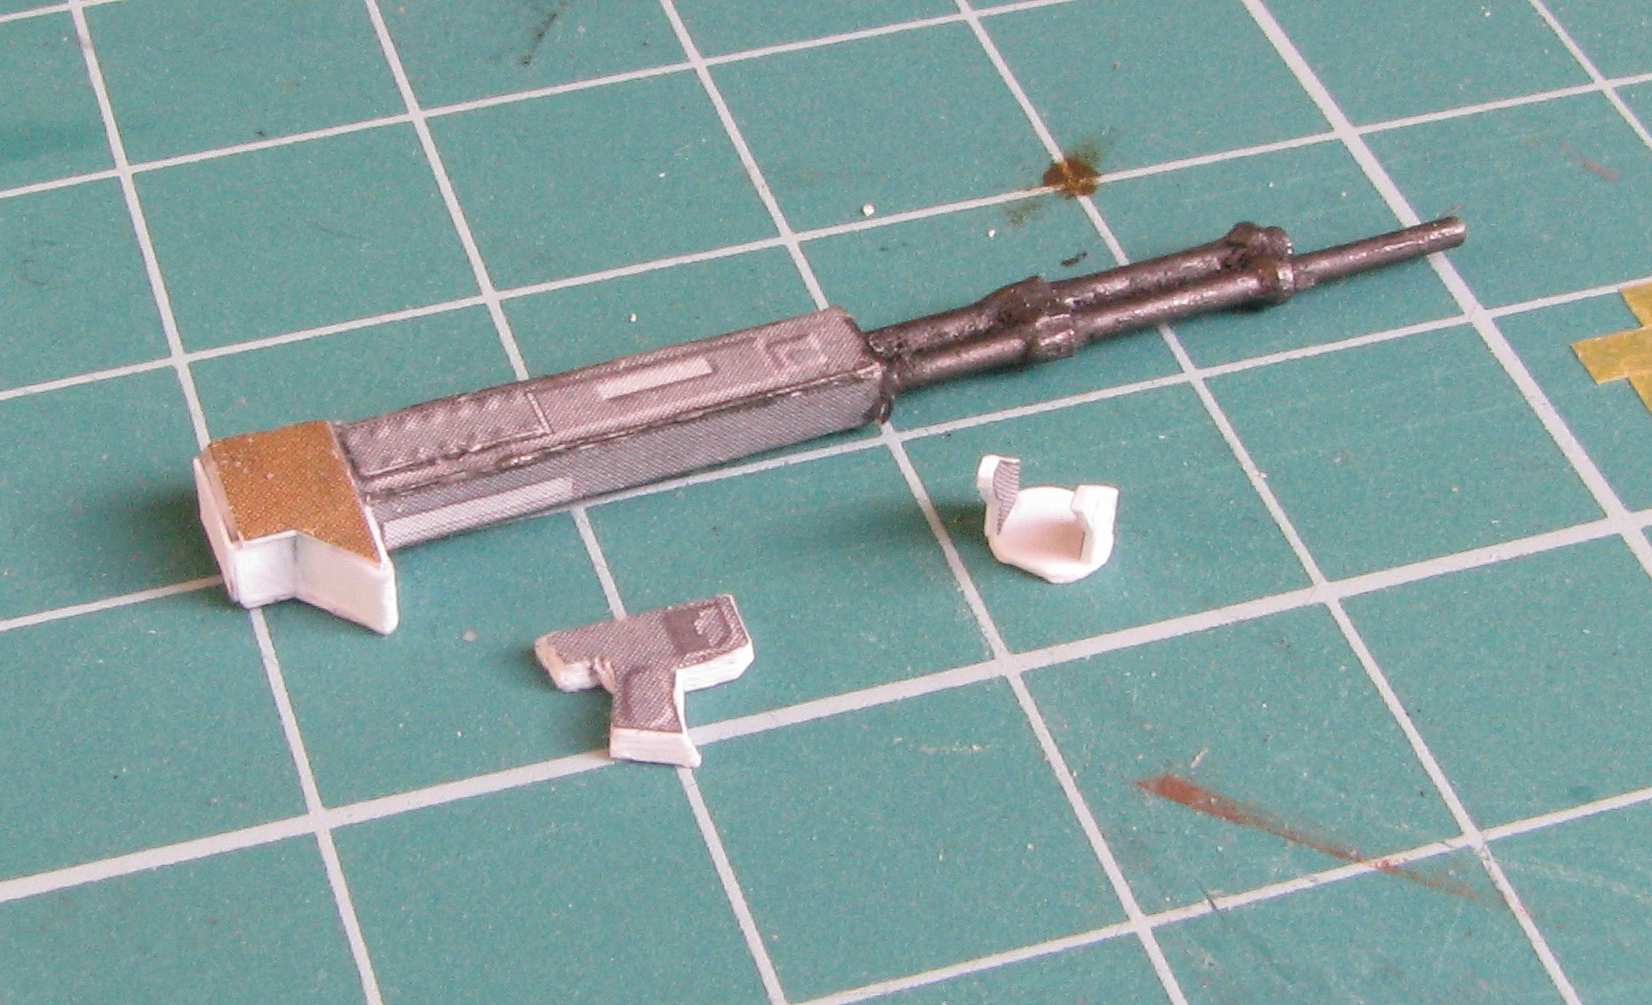
There's the gun mount made out of kit parts, but soon after I started researching I had to scrap it and make my own. In real life there's a curved rail along the edge of the opening where the gunner sits and a small bogey moves along the rail - and the gun itself is flexibly mounted to the bogey. This gives the gunner a lot better field of fire and an ability to shoot straight to the rear without hitting the tail, or to hit ground targets under the aircraft.

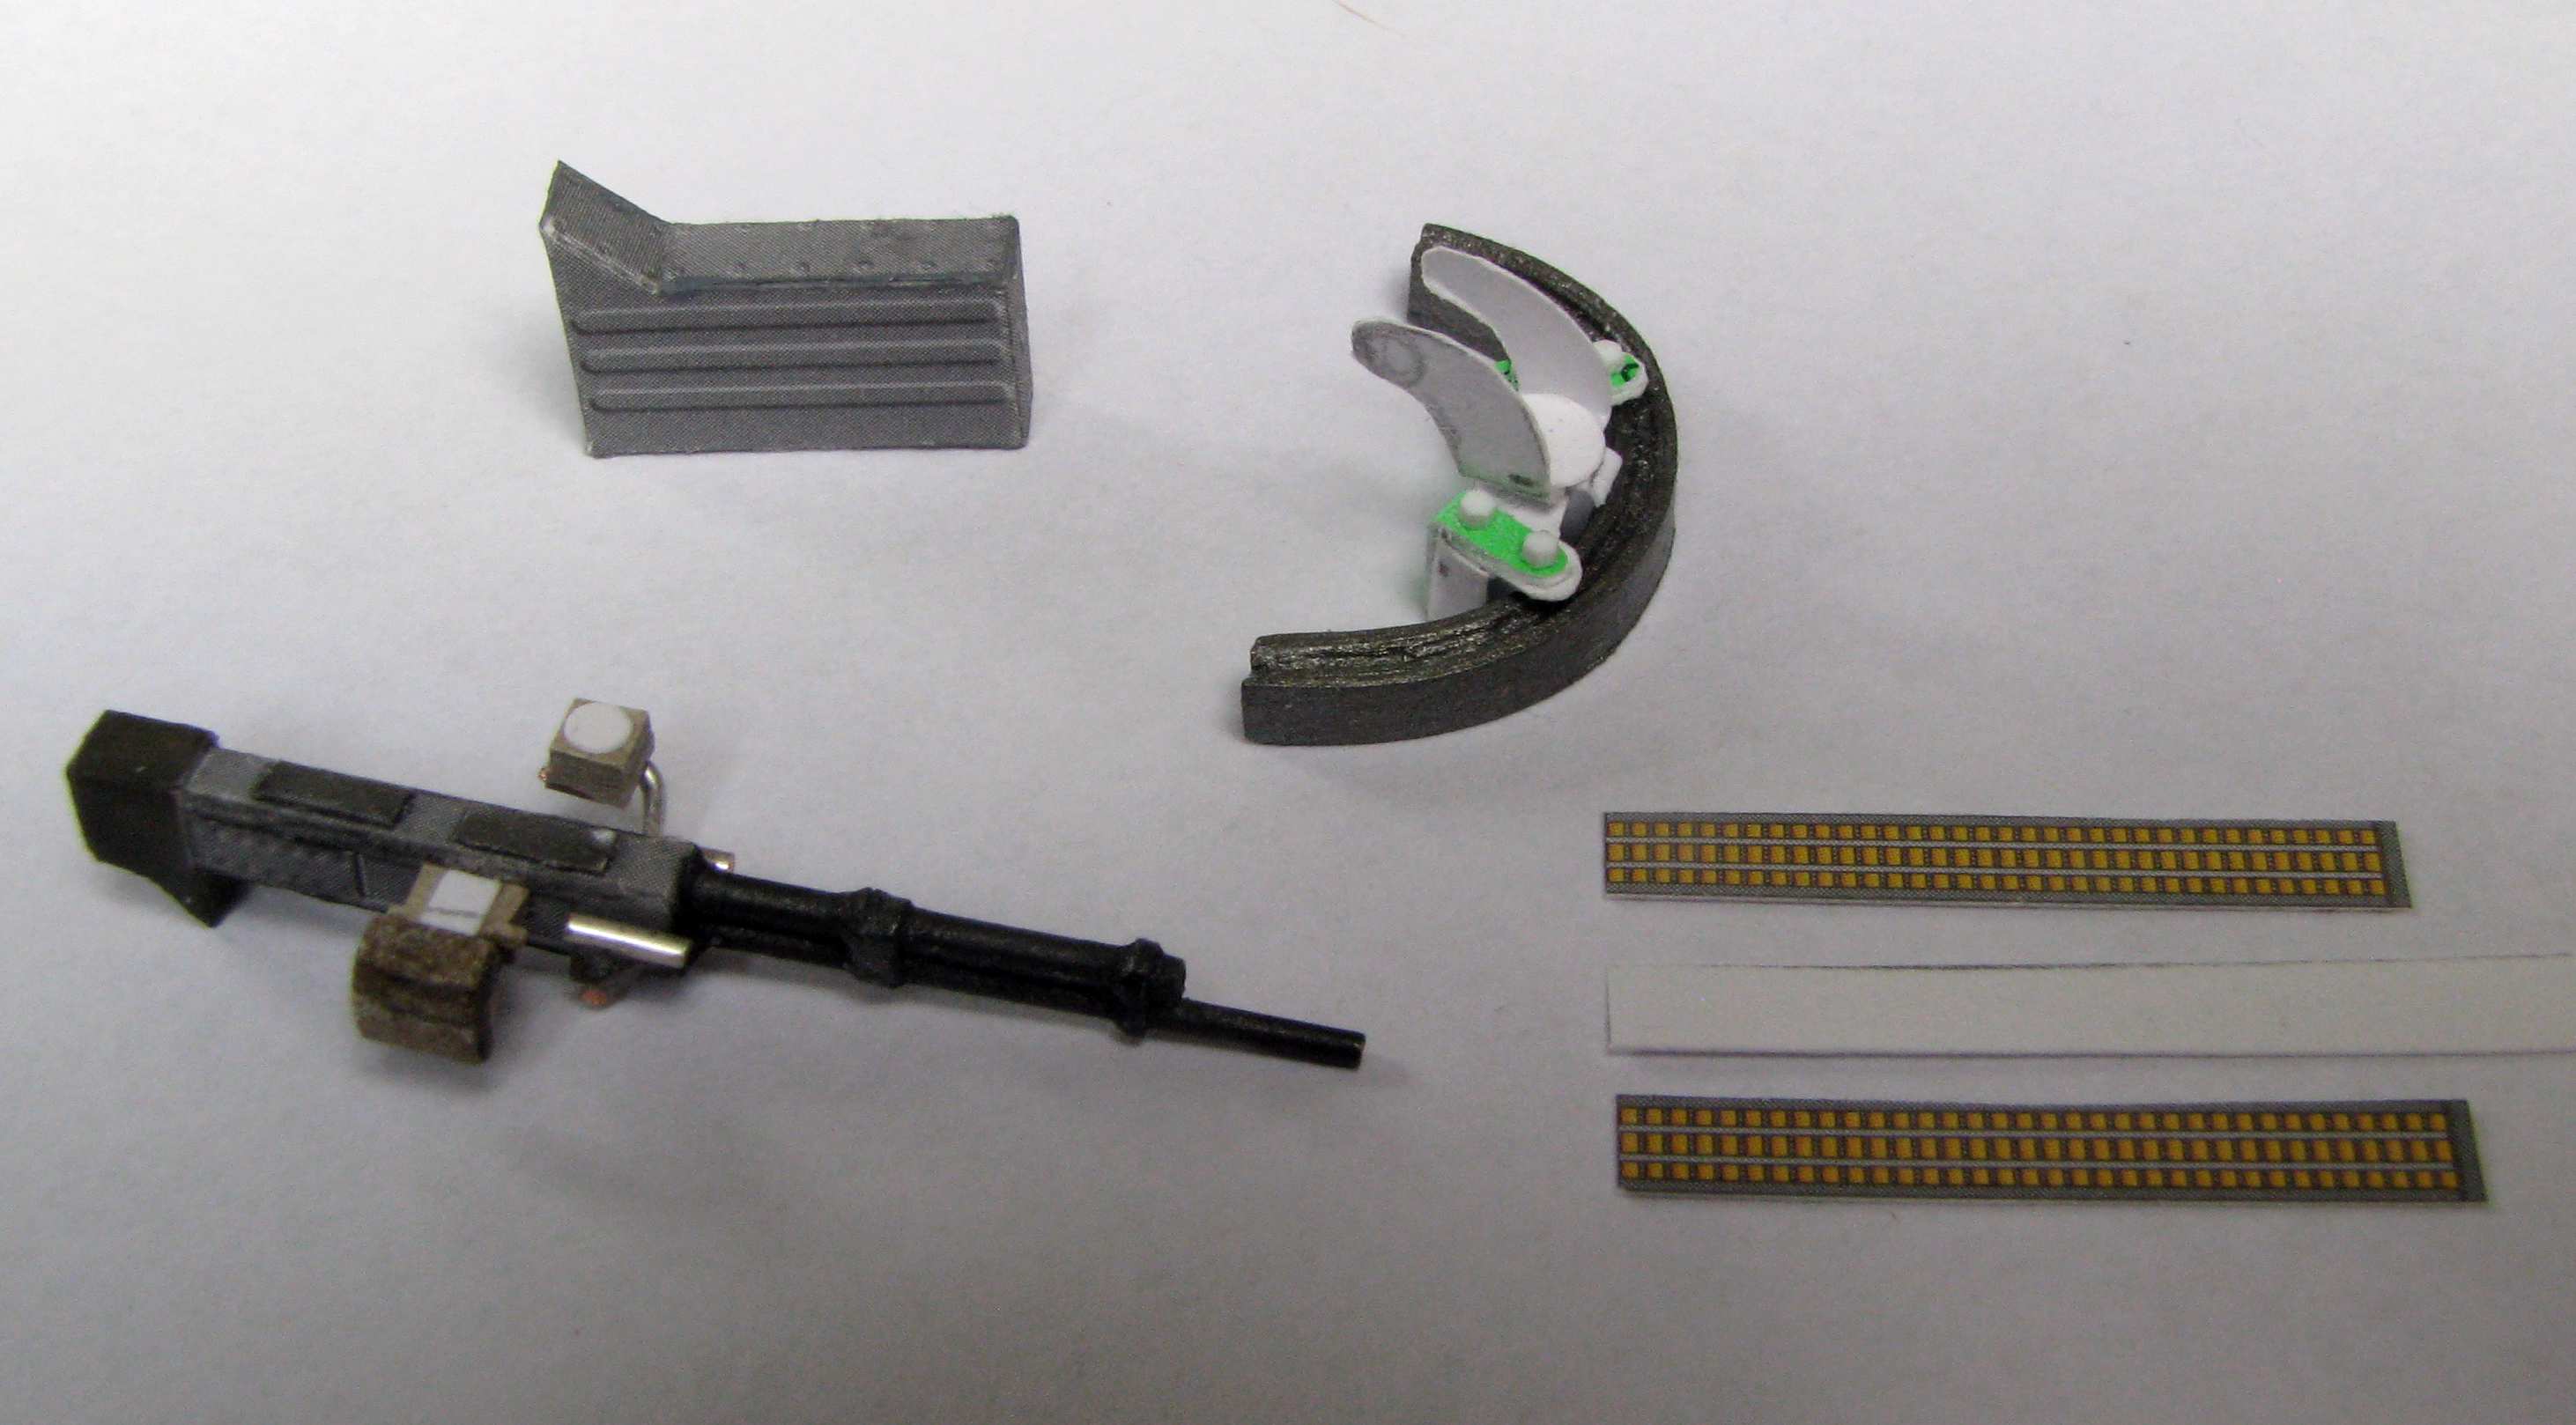
On the photo below I fabricated the rail and the bogey out of paper and I have added parts for the ammo feed and gun mount with the reflex sight. You can also see the kit supplied ammo box, which is basically OK, but the ammo chute has to be attached to it differently than the kit instructions say. As you see I started painting the parts:

GPM 1:33 Il-2m3 Stormovik by Pawel

And fast forward to yesterday when I took my man up pills and like Johnny Cash said "well up to then my plan went all right till we tried to put it all together one night". Here's the result:

GPM 1:33 Il-2m3 Stormovik by Pawel

GPM 1:33 Il-2m3 Stormovik by Pawel

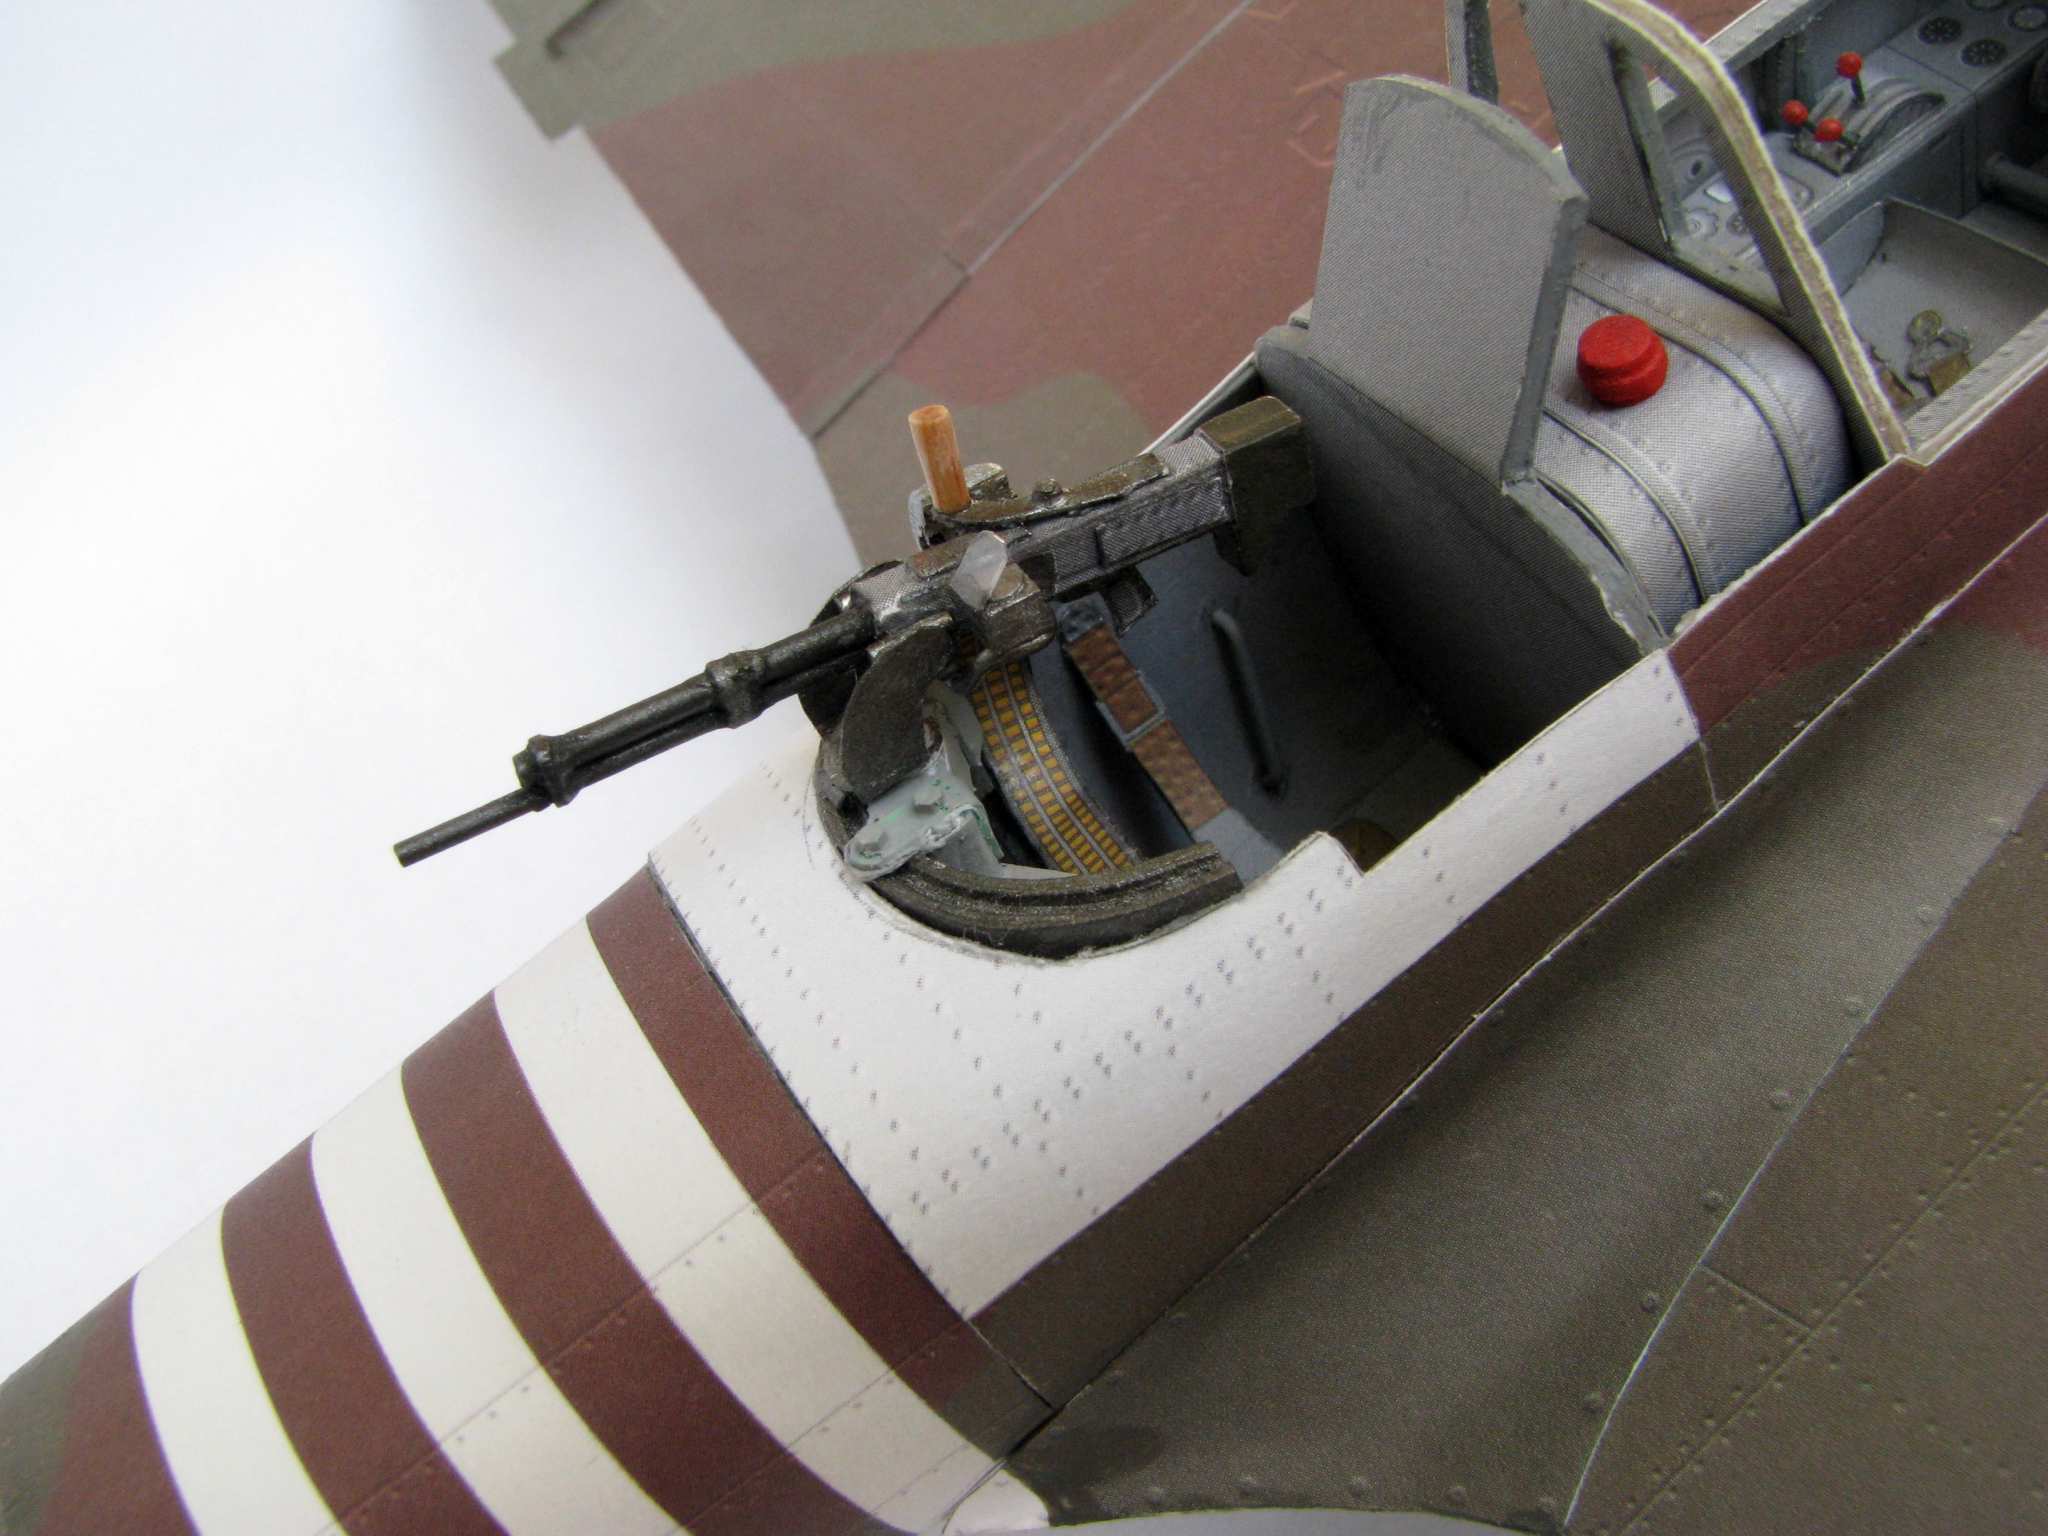
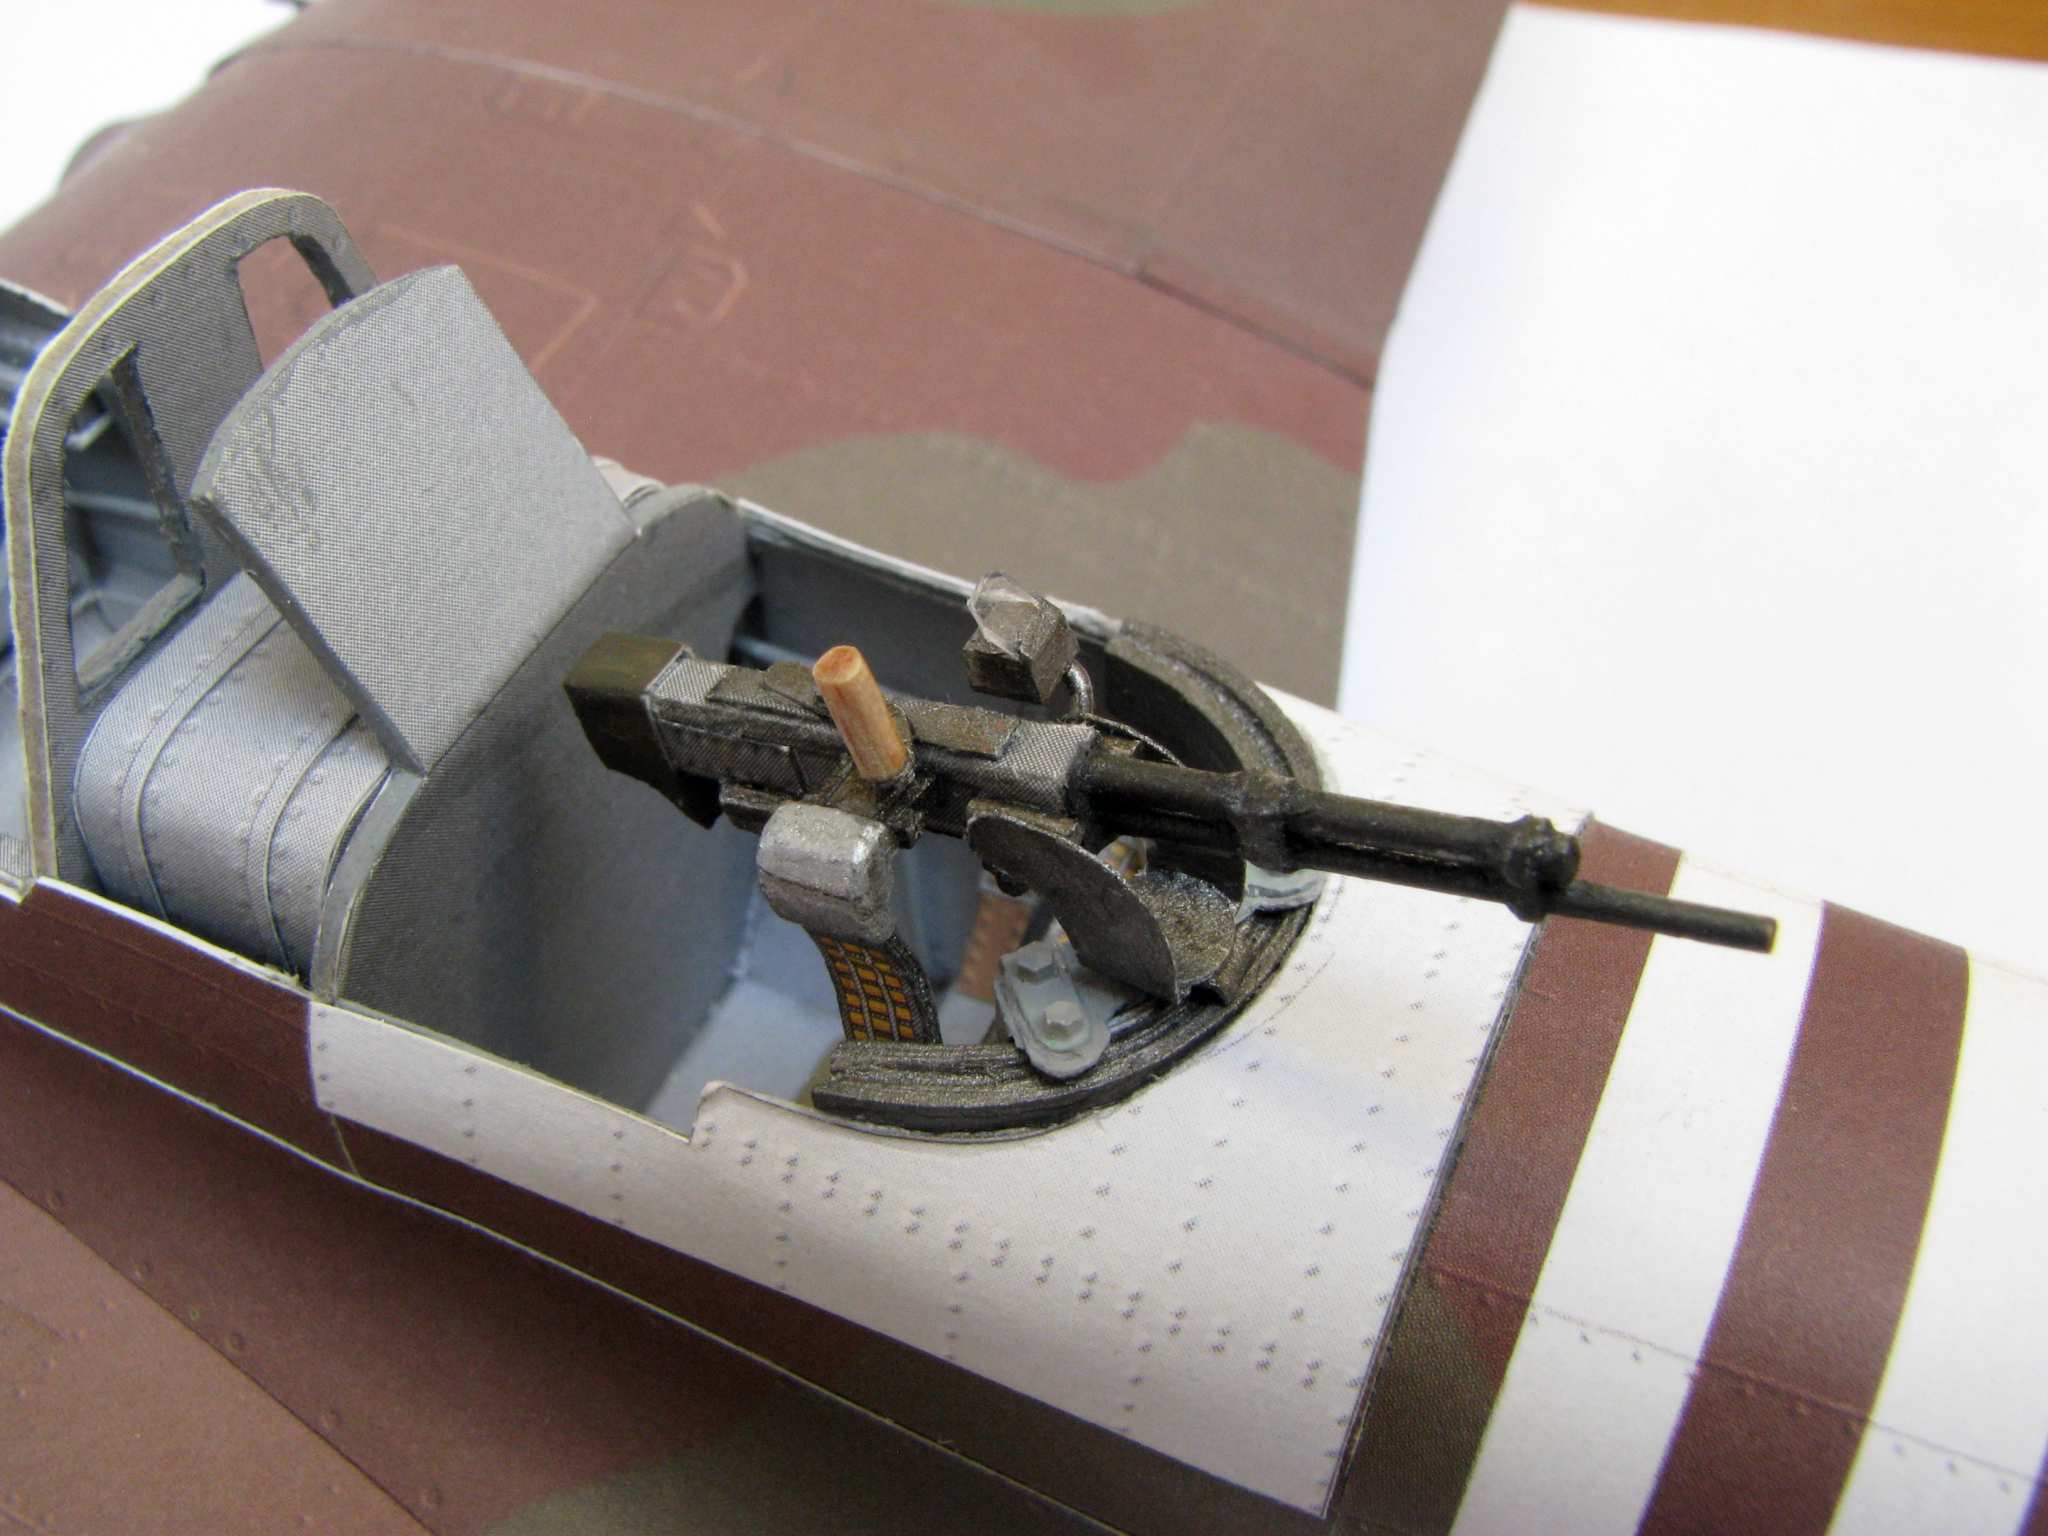
I hope you like it and the biggest burden is now off my chest - so I hope I can finish this model this year :-)

Thanks for looking and have a nice day

Paweł

All comments and critique welcomed. Thanks for your honest opinions!

www.vietnam.net.pl

  • Member since
    October 2019
  • From: New Braunfels, Texas
Posted by Tanker-Builder on Wednesday, July 28, 2021 11:52 AM

Pawel!

     Hey! it's good to hear from you! I am still struggling along on the RIO. Like you I have had to scratch build parts because the paper components wouldn't stop sagging where there spaces. So, Balsa and Plastic Parts were built and partially installed. I just had to get away from her for awhile. It was and is harder than the Andrea Doria and Stockholm together!

       That Gun-Now that looks great my friend. The RIO also got slowed down by Life jumping on me and letting me know I am an OLD Human. Who da Thunk? Dislocating a hip while sleeping? All I can say is OUCH ! ! !

  • Member since
    May 2009
  • From: Poland
Posted by Pawel on Wednesday, July 28, 2021 7:47 PM

Hello Doc!

Dislocating a hip? Definitely OUCH!! I hope you get well soon!

Thanks a lot for your kind words and good luck on the Rio, have a nice day

Paweł

All comments and critique welcomed. Thanks for your honest opinions!

www.vietnam.net.pl

  • Member since
    October 2019
  • From: New Braunfels, Texas
Posted by Tanker-Builder on Thursday, July 29, 2021 8:23 AM

Well Shoot; We missed ya Pawel! At least I did anyway!

  • Member since
    May 2009
  • From: Poland
Posted by Pawel on Saturday, July 31, 2021 9:02 AM

Thanks a lot TB! Nice to hear that!

And I'm trying to wrap this one up finally...

I have built the elevators:

GPM 1:33 Il-2m3 Stormovik by Pawel

On the left you can see the elevator skin. The other side is already cut out and shaped. Each elevator has a cardboard rib, spar and a reinforcement. They are glued together and sanded after thay had a chance to dry. Such inner structure is the checked for a proper fit and if it fits it's glued inside the skin.

Long time ago I have also made the propeller blades:

GPM 1:33 Il-2m3 Stormovik by Pawel

They are quite nice in this kit, printed to look like the black was sloppily oversprayed with green. I left the installation of the blades for later in order to avoid damage to a model that I started on a business trip so I anticipated a lot of unwanted handling - hence the blades stayed in the box. Each blade has a cre that I made out of a matchstick. You round one end of the matchstick to go to the base of the blade - it can be seen in the photo above. It's then handy for attaching the blades to the propeller hub. The other end of the matchstick is sanded to form a long slim wedge that ends a few mm short of the blade tip. Don't sand the phosphorus!!! :-) This core allows each blade to hold a nice pronounced airfoil and you can make many blades that are consistent this way. The edges are touched up with right color - that makes them look a lot better, too.

One more detail is the carburetor air intake:


GPM 1:33 Il-2m3 Stormovik by Pawel

GPM 1:33 Il-2m3 Stormovik by Pawel

As you can see it has a nice printed representation of a metal mesh and it demanded some care to make the slightly rounded front edge.

And finally the gun that I finally built allowed me to install the canopy. Here's what it looks like now:

GPM 1:33 Il-2m3 Stormovik by Pawel

I managed to make the funny "sights" by burning them out with a laser carver on a separate sheet of clear plastic and then glueing them on the inside of the canopy - now it's really a little "armored glass". I have also made the radio antenna mast by tapering a piece of wire by filing and then I fitted the kit part around my wire core.

Not a lot left to do now... I hope to have the finished pics soon - please stay tuned and have a nice day

Paweł

All comments and critique welcomed. Thanks for your honest opinions!

www.vietnam.net.pl

JOIN OUR COMMUNITY!

Our community is FREE to join. To participate you must either login or register for an account.

SEARCH FORUMS
FREE NEWSLETTER
By signing up you may also receive reader surveys and occasional special offers. We do not sell, rent or trade our email lists. View our Privacy Policy.