SEARCH FINESCALE.COM

Enter keywords or a search phrase below:

StarWars : MPC Y-Wing - - COMPLETED PICS - -

4893 views
17 replies
1 rating 2 rating 3 rating 4 rating 5 rating
  • Member since
    November 2005
StarWars : MPC Y-Wing - - COMPLETED PICS - -
Posted by Anonymous on Sunday, April 30, 2006 4:25 AM
MPC Y-Wing

Hi all,
I’m taking a break from my usual Formula 1 kits to indulge in a little StarWars fun. I managed to pick up an old 1984 odd MPC Y-Wing kit on ebay for about AUS$5.00…! It was partly built already, I think by a kid who had only half a clue, got glue everywhere, no paint, etc etc.

At first I thought it best to disect it all, but soon gave up with the mountain of glue on the thing. So I resorted to MUCH masking and careful painting, in the hopes of getting an eye-catching colour scheme. It may not be technically correct, but I’m not fussed about that, so please hold off on the “that’s not correct” comments. Just take it for what it is please.

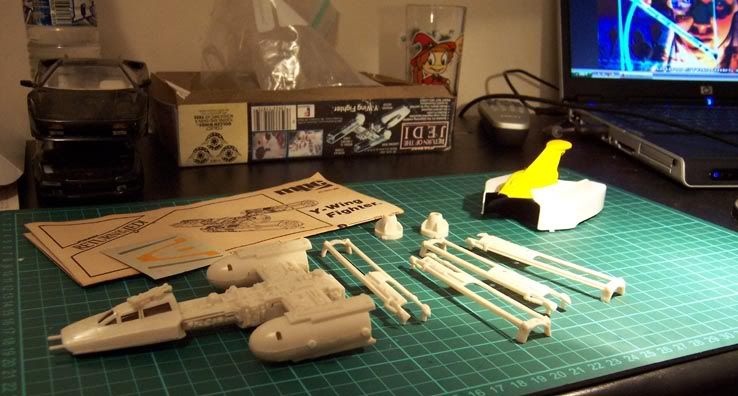
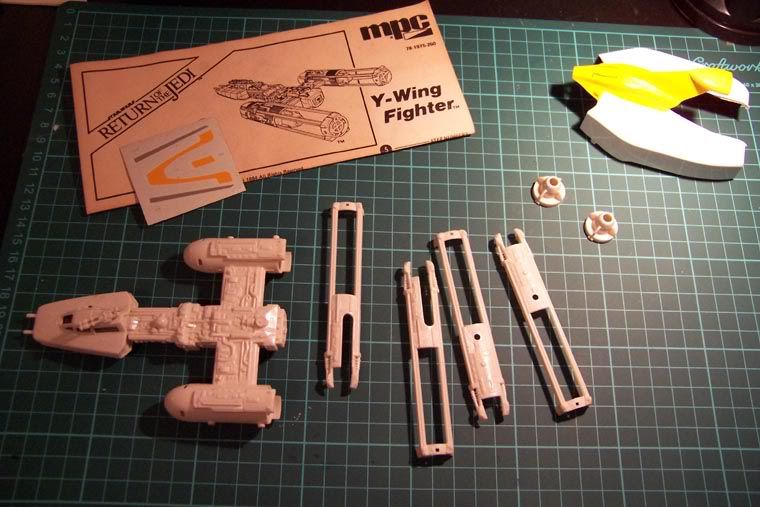
Anyway, first up a couple of pics of the kit as I received it. You’ll have to excuse the F1 engine cowling in the top right corner…


So it came time get started and first thing on the agenda was to fix all the seam lines, of which there weren’t many overly visible ones thankfully, and then get rid of the raised lines on the front fuselage/cockpit. Once this was accomplished I then primed the whole thing.

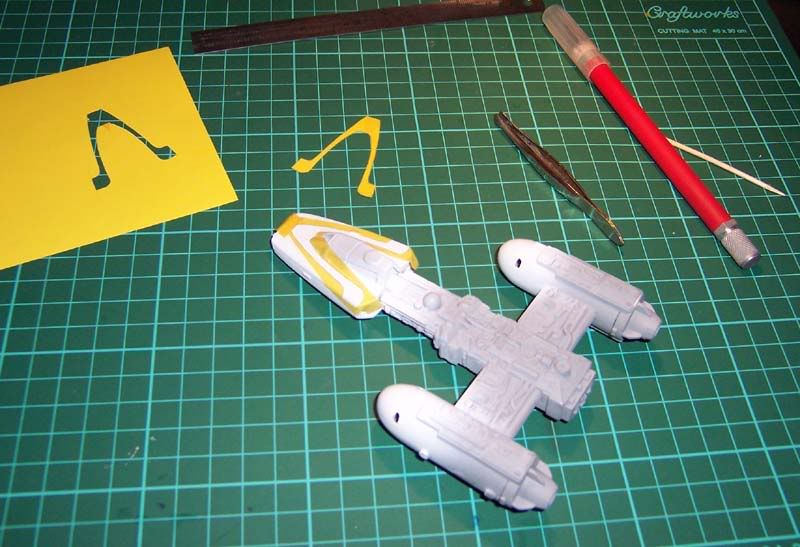
This is when the tricky stuff got started… masking. As you can see below it was very fiddly. I had to make a template from the decal, then lay Tamiya masking tape over the template, and cut the masking tape to size. It was certainly an exercise in patience, although I must admit I got it all done much quicker than expected. I think all the building is definitely starting to result in better masking and painting skills finally!


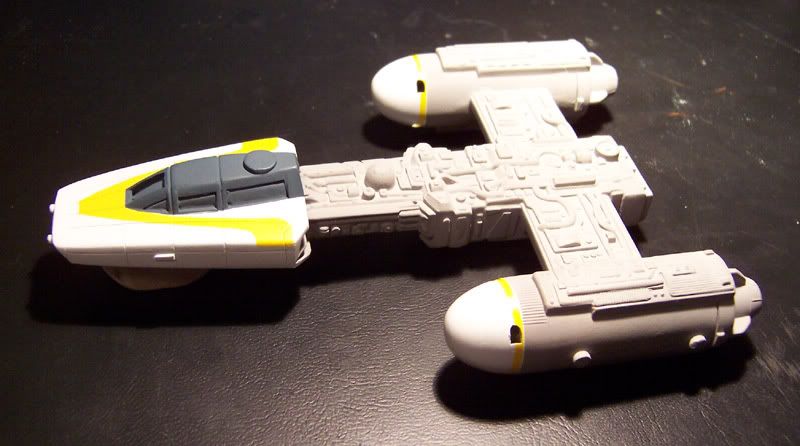
There’s a number of relevant points to make now that will hopefully be evident in the next pic.

You can see part of the scribing I did on the cockpit area once the raised panel lines were removed. I’ve never tried this before, and I’m amazed at the positive result I achieved! I really surprised myself – not perfect perhaps, but good enough for a first attempt. I actually used a VERY sharp pencil to draw the lines I wanted first, then used Scale Race Cars photoetch scribing blades, pulled gently along a ruler to scribe over the penciled lines.

It may not be very evident (I hope!), but there were some sections on the engines and main fuselage behind the cockpit that had terrible fit, or mould lines I couldn’t get to very well, so I simply covered them up. As there’s raised parts all over the place, I just got a lid from a butter container – the type that’s a very synthetic type of cardboard stuff. I then cut it to various shapes and sizes and simply glued it to the fuselage in various shapes, angles and levels. This also worked great, and I’m sure that without another kit to compare it to it would be hard to pick where I’ve done this. You can also see a small, easily visible example of this on the cockpit.

In this picture the fuselage painting is about 80% complete. For the eagle-eyed of you you’ll notice the cockpit windows are also blue. The very last thing I’ll be doing is the windows, once all the clear coats are done. The guy who built it half up before me put the clear parts in with no hope of extracting them. So I covered them with liquid mask, and just painted all over the top. When everything is done I’ll be pulling the liquid mask off, touching up any paint flakes with weathering (hopefully weathering is something I’ll pick up quickly as well!), and put dark coloured overhead projector film in, cut to size. That’s the plan anyway…


Below is just another example of the masking circus that goes on on my work desk from time to time… I find I start out impatient with it (one of my modeling vices), but I seem to make progress quickly, and I’m happy to say this masking effort turned out very well!
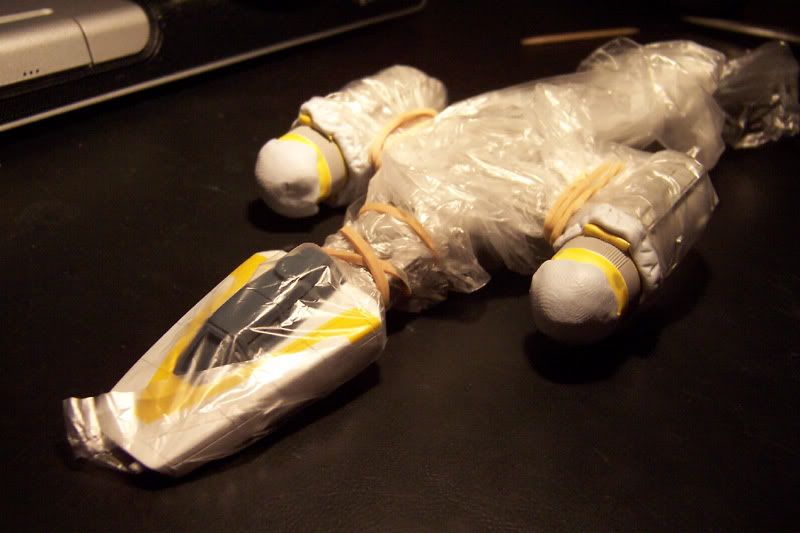


Well that’s it for now. I’m currently working on the directional fins, some additional piping/plumbing for the main fuselage, and then it’s on to weathering and washes… the scary bit! And seriously… I can’t have a clean Rebel Y-Wing can I… hehe. I’m aiming to have this one completed in 4 - 6 weeks. Oh, and as the R2 unit is woefully devoid of any reasonable detail, I’ve decided to take some chunks out of him, install some broken pipes and metal, and make him all shot up. Lets see if I can pull it off…!

Positive words and comments welcome.
Cheers all.
Mark

P.S. I'll be posting this same thread at www.starshipmodeler.com in case you notice it there too.
  • Member since
    November 2005
Posted by Anonymous on Sunday, April 30, 2006 6:08 AM
Its lookin good! Love that masking bro! especially with all the plastic and rubber bands! Big Smile [:D]
  • Member since
    November 2005
Posted by Anonymous on Sunday, April 30, 2006 7:26 AM
Luis: thanks - I found that masking large areas on any type of kit with tape and paper was just too time consuming.  So I've found the the best idea is to mask the edge, line the tape with blu-tack, then stick a lunch bag to the blu-tack so that the area to be painted is exposed.  It's been a very quick and very successful method for me!
  • Member since
    November 2005
Posted by Anonymous on Wednesday, May 3, 2006 2:35 AM
Love it bro! Keep up the good work, and post it when it's done! Good Luck!
  • Member since
    November 2005
Posted by Anonymous on Friday, June 16, 2006 7:02 PM
Hi all, update time.
I'm virtually finished except for some cleaning up on the windows and the base.
As I mentioned earlier, the R2 unit came devoid of almost any detail, so I shot him up a bit and stratchbuilt some wrecked piping nearby... it came out reasonably well I think.

Apologies for the lighting, it was quite bright and took away some of the detail.  I'll take some more/better shots when the kit is complete.


Cheers all.
Mark


  • Member since
    November 2004
  • From: Fukuoka Japan / Brisbane AUS.
Posted by Chris_in_Japan on Friday, June 16, 2006 7:29 PM
Excellent work Mark.. I love it.. I have one of those mpc Y-Wings for sale in its original plastic, but looking at yours, I can actually hear it calling out to me...Evil [}:)]

I did one of these little guys about 2 years ago for a collector here, and I too didnt know what to do about the R2 unit.. I then used the spare decals from my Fine Molds X-Wing kit and placed them on the R2 unit on the Y-Wing.. A little cutting here and there, and she looked great! Just an idea for you...

I have a few 1/48 resin kits from a local Japanese maker here comming my way next month if anyone is interested in getting thier hands on one....I had to grab them when I saw them...

How is Brisbane.. I took the family back in April for a few weeks to see my family, and have a bit of a holiday... Its getting harder and harder everytime that I get home to come back to Japan.. I dare say we might be heading back in the next year or so....

Cheers, Chris

On the bench:

                          1/48 RAAF 3 Sqn F/A-18B

                          1/150 /1/160 N Scale Japanese Rail diorama.

  • Member since
    July 2003
  • From: Pensacola, FL
Posted by Foster7155 on Saturday, June 17, 2006 10:28 AM

Sweet looking build, Mark.

You're definitely giving it the attention it deserves. Outstanding paint work and your wash has really brought out the details.

Thanks for sharing...

Robert Foster

Pensacola Modeleers

  • Member since
    June 2004
  • From: The House of Blues Clues
Posted by Griffworks on Sunday, June 18, 2006 12:56 PM

Sweet job, man!  I especially like how you came up w/the paint masks. 


The greatest measure of a man is his children and what kind of people they are.


  • Member since
    May 2004
  • From: Oregon
Posted by maxx1969 on Monday, June 19, 2006 9:56 PM
WOW! Way to turn that basket case of a kit into a work of art. Makes me want to get one now.


~Matt T Meyer
  • Member since
    November 2005
Posted by Anonymous on Saturday, June 24, 2006 10:51 AM
Lookin' Great bro! can't wait to see the thing finished!
  • Member since
    November 2005
Posted by Anonymous on Tuesday, June 27, 2006 4:46 AM
Hi guys,

Thanks all for the positive comments - they make me feel especially good given that this isn't the type of kit I'd normally challenge myself with.  Oh, and Chris, Brisbane is cold and dry... but otherwise we're doing fine thanks!

OK, I've finally finished the base.  I found it at the online shop at www.starshipmodeler.com , and it cost about US$10, and about the same again for postage to Australia.  It's made of resin and is a very good moulding.  I managed to fumble a few parts of it up... I had to spray the red on first, then cover the entire thing in black (I used Tamiya acrylics) and then use a rag dipped in turps to wipe the black off the raised areas to expose the red.  It took a LOT of trial and error, and some careful scrutineering to make sure I didn't damage the red too much, although in the end I had to settle for a base with some slight colour alteration caused by the turps.  After a few attempts, and reaching the end of my patience, I settled on the finished product you see below...


The base, arm, and kit ready to be all attached together and put on display (after some more photos of course!).


Hope you've all enjoyed the build thus far.  I'll be taking some outside 'completed build' photos hopefully this weekend which I'll post up asap.

Cheers all,
Mark
  • Member since
    March 2004
  • From: Kincheloe Michigan
Posted by Mikeym_us on Sunday, July 9, 2006 8:55 PM
ever think about doing a deathstar trench scene and having the Y-wing flying low ready to drop a proton bomb.

On the workbench: Dragon 1/350 scale Ticonderoga class USS BunkerHill 1/720 scale Italeri USS Harry S. Truman 1/72 scale Encore Yak-6

The 71st Tactical Fighter Squadron the only Squadron to get an Air to Air kill and an Air to Ground kill in the same week with only a F-15   http://photobucket.com/albums/v332/Mikeym_us/

  • Member since
    November 2004
  • From: Fukuoka Japan / Brisbane AUS.
Posted by Chris_in_Japan on Sunday, July 9, 2006 9:41 PM
ooow.. I like that base!

Chris

On the bench:

                          1/48 RAAF 3 Sqn F/A-18B

                          1/150 /1/160 N Scale Japanese Rail diorama.

  • Member since
    November 2005
Posted by Anonymous on Friday, July 14, 2006 8:20 PM
Hi guys,

I won't mess around with any detailed dialogue, just get straight into the finished pics.  Twelve shots in all, mostly downgraded so they load quicker.
Firstly, a very cool and sinister looking shot...


The R2 unit received a bit of damage, as you'll see...  scorch marks, broken piping, etc.


And finally, a good view of the base, which came out very nicely after a LOT of stuffing around.


I hope you all like it, I had a great time buliding it!
Comments welcome as always.
Cheers all,
M
  • Member since
    November 2004
  • From: Fukuoka Japan / Brisbane AUS.
Posted by Chris_in_Japan on Friday, July 14, 2006 8:51 PM
Nice!...

Chris

On the bench:

                          1/48 RAAF 3 Sqn F/A-18B

                          1/150 /1/160 N Scale Japanese Rail diorama.

  • Member since
    June 2006
Posted by Cpt.Sponder on Saturday, July 15, 2006 5:03 AM
looking good! very nice!
  • Member since
    January 2003
  • From: arizona
Posted by cthulhu77 on Saturday, July 15, 2006 8:25 AM

I like the way it is brightly coloured, yet still well worn...very, very nice finish.


                  greg

http://www.ewaldbros.com
  • Member since
    December 2002
  • From: Third rock from the sun.
Posted by Woody on Saturday, July 15, 2006 12:11 PM
You've really turned a poor kit into a work of art! Approve [^]Thumbs Up [tup]

" I wish to have no connection with any ship that does not sail fast; for I intend to go in harm's way." --John Paul Jones
JOIN OUR COMMUNITY!

Our community is FREE to join. To participate you must either login or register for an account.

SEARCH FORUMS
FREE NEWSLETTER
By signing up you may also receive reader surveys and occasional special offers. We do not sell, rent or trade our email lists. View our Privacy Policy.