SEARCH FINESCALE.COM

Enter keywords or a search phrase below:

Brass Mounting Studs ?

8720 views
15 replies
1 rating 2 rating 3 rating 4 rating 5 rating
  • Member since
    September 2012
Posted by GMorrison on Friday, February 26, 2021 10:32 AM

I think shipbuilder jake is no longer on the forum, having posed the question 11 years ago.

Good info though. Ed's method works on solid hulls such as resin or wood, as he noted in the earlier string.

He also made a good point to do this all at the beginning.

I can only add that I make sure my base is removable until I get to the finish stage.

My temp bases are a simple pine plank both longer and wider than my model.

At one end I screw on a shorter piece of the same plank.

This allows me to lay the model on its side to work on hull details.


Bill

 Modeling is an excuse to buy books.


  • Member since
    October 2019
  • From: New Braunfels, Texas
Posted by Tanker-Builder on Friday, February 26, 2021 8:34 AM

Hi;

    What I do If I don't use Clear Lexan rod is simple. I stop at the local Lighting Supply store  on the way home from San Antonio and stock up on them. The brass ones look good on the "Ye Olde Sailing Vessels"-mate. But, I have found the Modern ships look better on Lexan Rod. And remember there's different styles of that too.

    As to setting the rod I do something different than most of you I drill the holes in the hull dead center and as large as the Rod. Then I brace the rod inside the hull with a measurement as to fore and aft and port starboard for square. Glue a brace piece of .080 plastic in the hull with a socket created by a larger tube of Styrene under the plastic brace. The Rod then sockets in the brace. When finished with the ship I then remove it from the rod and using five minute epoxy slather the end, slide it home and Viola" one solid ship stand.

   I have also used on solid hulls, "Blind Bolts"?, drill the hole in your hull and then install the bolt hardware. The deck will cover it and remember you are not going to run the bolt all the way home. There will be a brass finish tube on the outside, Hiding the threads and the bolt head will tighten up just fine on the bottom in a recess you have provided. Just make sure to use a LOCK washer on the bottom of the stand plank! 

  • Member since
    November 2009
  • From: Twin Cities of Minnesota
Posted by Don Stauffer on Friday, February 26, 2021 7:26 AM

Ray Marotta

You might take a look around a Home Depot or a Lowes hardware.  Lots of brass lamp fillials and such that could be used as pedestals.

Ray


I used to use those before I went to plastic rods.  You have to saw off top and sometimes redrill. 

Now I keep some clear plastic rod in stock and glue rods to ship and base.  Cheapest way I have found, and I like the effect.


Don Stauffer in Minnesota

JHS
  • Member since
    February 2021
Posted by JHS on Thursday, February 25, 2021 10:33 AM

Shipbuilderjake

Anyone know a good source to get these.

Ebay

  • Member since
    August 2005
  • From: Mansfield, TX
Posted by EdGrune on Thursday, August 26, 2010 6:34 AM

DrWind

Could those who offered comments on this topic suggest the appropriate way to assure a straight drill into a hull for the ship-side of this process?

I have several Yankee Modelworks submarines that I'd like to mount this way, and am having trouble thinking of a jig that can accomodate a variety of sub hull sizes while also assuring I can drill straight into the bottom of the hull. 

Any suggestions?

I use a drill press with a drill press X/Y vice.     Measure to ensure that all is level,  plumb, and square.  Drill one hole then crank the drill center over to the next location.    I've also used a center-finding (Vee-shaped) cradle to hold the hull.  It's good for cylinders (sub hulls) but makes for problems if the shape isn't exactly cylindrical or there are projections (i.e. a towed array bulge).

I use brass thread inserts.   These are woodworker items which have a coarse thread on the outside and finer machine screw threads on the inside.   They are made to screw into wood and allow an attachment using a machine screw/bolt.   Get them in the screw & fittings bins at Lowes/Home Depot/Ace hardware stores.

I drill a hole slightly larger and longer than the OD of the insert.   Mix up some 5 minute epoxy.  Slather some petroleum jelly on the bolt and thread it into the insert.  It is now a handle and square measurement tool.  The petroleum jelly allows the bolt to be removed from the insert without the epoxy sticking.  Put the epoxy on the exterior threads and put the insert in the drilled hole.  Use a square to ensure that the bolt is at 90 degrees  fore/aft and left/right.  Maintain the position until the epoxy hardens (why use 5 minute epoxy?).   Once it sets up remove the bolt from the threaded insert.  

Of course you did all this prep before you began assembly.   If you've waited until you're done your're pretty much out of luck


  • Member since
    October 2006
  • From: Albany, New York
Posted by DrWind on Wednesday, August 25, 2010 9:03 PM

Could those who offered comments on this topic suggest the appropriate way to assure a straight drill into a hull for the ship-side of this process?

I have several Yankee Modelworks submarines that I'd like to mount this way, and am having trouble thinking of a jig that can accomodate a variety of sub hull sizes while also assuring I can drill straight into the bottom of the hull. 

Any suggestions?


Group Build (Shiver Me Timbers):

1:200 Trumpeter Arizona, 0% complete

1:700 3 Flight Deck Akagi, 10% complete

  • Member since
    December 2005
  • From: Seattle, Colorado
Posted by onyxman on Tuesday, July 27, 2010 11:54 AM

If you have access to a shooting range, brass  cases from .22 and pistol ammo can work well.

  • Member since
    March 2005
  • From: West Virginia, USA
Posted by mfsob on Tuesday, July 27, 2010 10:49 AM

One tip for when you cut the tubing (that I learned the hard way), besides using the appropriate-toothed hacksaw blade, if that is the route you go - wrap a piece of tape around the area where the cut will be, then mark the cut. The tape seems to help hold down the amount of burrs you have to deal with.

  • Member since
    April 2010
  • From: Bangor Trident Sub Base, Wa
Posted by Shipbuilderjake on Saturday, July 24, 2010 11:40 PM

Thanks everyone you all got the ideas really going. I also found some 1/8 x 1/8 aluminum square tubing. Think it wil really show off this Spru-Can and Kidd class well. Having personnally worked on Spruance before it was " Reefed " and the 4 Kidd class tin cans on the Tiawan conversion, all those boats are aluminum so I thought it fitting to use it.

  • Member since
    November 2009
  • From: Twin Cities of Minnesota
Posted by Don Stauffer on Friday, July 23, 2010 8:55 AM

While I still like the brass for period ships (I also use the lamp finials) , for modern ships I have standardized on clear acrylic posts.  Bought a length each of 1/2 and 1/4 plexiglas "dowel" stock.  Makes a nice, modern mounting post.  In solid hulls I just drill a hole about 3/4 inch deep. In plastic or POB I insert a block of wood or two blocks (either side of keel) before drilling.

Don Stauffer in Minnesota

  • Member since
    August 2005
  • From: Mansfield, TX
Posted by EdGrune on Friday, July 23, 2010 7:28 AM

Glad to help.

Sounds like you have the basics of my process down.   I first chuck the finial in my drill press vise by the topknot.  I ensure that it is plumb & square to the 1/8 drill bit.   I then drill through the bottom and out the top knot.

Next thread a 1/4-28 bolt with the hex head cut off into the bottom of the finial and chuck that in the drill press.  Turn it on and cut off the top knot using a hack saw.    Then lay a mill file flat on the drill press table and lower the turning finial onto it to smooth the cut.    Alternatively you can file a groove into the finial to accept a keel.  .

Then some fine steel wool is used while the finial is turning to polish the brass.  

A shot of Krylon clear seals the polished brass and prevents tarnishing.

I build resin ships.  I use brass threaded inserts to make the connection  (another hardware store item).   My favorite thread size is 6-32.    Drill a 1/4 inch hole about a half-inch deep on the bottom of the hull.   Epoxy the inserts into the hull.  Ensure that they are square and vertical before the epoxy hardens.  Fill any gaps arounf the insert with putty and sand smooth.   Any putty in the insert can be cleaned out with a thread tap. 

I have tried running a tap directly into the resin to make a threaded hole,  but the resin is too brittle and you run the risk of stripping the threads if thenut is too tight.

I drill a couple of holes in the base at the desired distance apart.   I elongate one of the holes slightly to account for any imperfections.  The bottom of the finial will cover the larger hole.    The hole on the bottom of the base is countersunk to allow for the head on the bolt.    If the thickness of the base allows it make the countersink about 1/4 inch.   The bolt that you will use to attach the ship to the base is then the thickness of the base plus the height of the pedestal.    The depth of the  countersink allows for the thread distance into the nut/insert on the bottom of the ship.  

One of the benefits of the threaded insert and nut method of attaching a ship model to a base is it allows for easy removal and reattachment.   I can use a building board to attach the model to the base.  It minimizes handling of the model.   Allows it to be painted easily.   I can stand it as I want or lay it over to allow reach to hard to reach areas


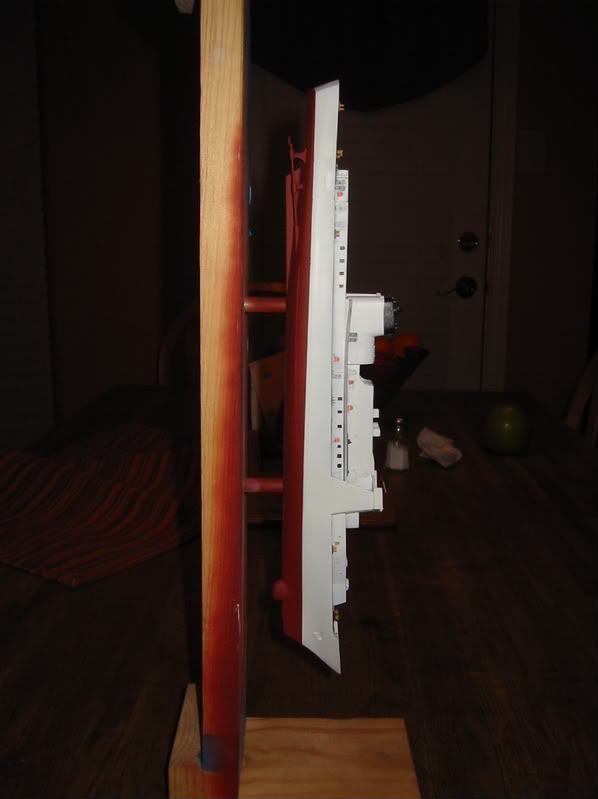
This is the ISW USCGC Hamilton standing on its nose on one of my boards.  The flange can be moved to the opposite end -- you don't need to swap the model.   When completed, swap bases and use finished finials.

  • Member since
    April 2010
  • From: Bangor Trident Sub Base, Wa
Posted by Shipbuilderjake on Friday, July 23, 2010 2:02 AM

Ran down to Ace after seeing your post and picked up the exact same thing your pic shows. Then ran to Michaels and got a couple of bases. Thanks for the info it really helped. I however chucked the up in my drill press and just bored the hole the rest of the way through. Then I tapped with an 8/32 thread. Broke out the Brass-O and dremmel and polished the up really good.

  • Member since
    August 2005
  • From: Mansfield, TX
Posted by EdGrune on Thursday, July 22, 2010 1:57 PM

Ray Marotta

You might take a look around a Home Depot or a Lowes hardware.  Lots of brass lamp fillials and such that could be used as pedestals.

Ray

Availability of polished brass lamp finials at Lowes/HomeDepot is spotty.   Most that I've been in do not carry the simple/elegant ones.  The ones carried are usually ornate/jeweled and totally inappropriate for a ship model (crystal teddy bear anyone?)

Lowes/Home Depot do carry lamp shade risers.  These have 1/4-28 (NF) threads on each end (male & female).   They seem to be less-polished finished than the risers.

Check Ace Hardware instead.   Go to the electrical aisle and check the parts bins.   You will find the simple finials there.  Thats were I get mine.

I've also made some from drawer pull handles.   Cut off the loop handle and through-drill the stand-offs.  

But most of all you need to prepare the hull before closing it up to attach the proper hardware (nut) that will accept the bolt.


An ACE hardware finial on the left, with the prepared version just to the right.   Next is a lampshade riser with a prepared lampshade riser all the way to the right.


  • Member since
    December 2002
  • From: Lyons Colorado, USA
Posted by Ray Marotta on Thursday, July 22, 2010 1:00 PM

You might take a look around a Home Depot or a Lowes hardware.  Lots of brass lamp fillials and such that could be used as pedestals.

Ray

 ]


  • Member since
    June 2010
  • From: Winchester,Va.
Posted by rcweasel on Thursday, July 22, 2010 12:37 PM

Try  http://www.modelexpo-online.com and http://www.bluejacketinc.com/  There are several types to choose from.

Bundin er båtleysir maøur - Bound is the boatless man

  • Member since
    April 2010
  • From: Bangor Trident Sub Base, Wa
Brass Mounting Studs ?
Posted by Shipbuilderjake on Thursday, July 22, 2010 11:59 AM

Been doing model ships for nearly 2 decades now, and I see these brass mounting studs and wooden bases for model ships. Anyone know a good source to get these. I've checked all the usual sites Squadron, Sprue Brothers, ScaleHobbyist, etc. with no luck. Google doesn't help much either. Bought the 1/350 Spruance, and Kidd class ships they both have holes in the bottom of the hulls for these, any help would be great.

JOIN OUR COMMUNITY!

Our community is FREE to join. To participate you must either login or register for an account.

SEARCH FORUMS
FREE NEWSLETTER
By signing up you may also receive reader surveys and occasional special offers. We do not sell, rent or trade our email lists. View our Privacy Policy.