SEARCH FINESCALE.COM

Enter keywords or a search phrase below:

Old Ironsides - Revisiting the classic Revell 1/96 kit

208891 views
510 replies
1 rating 2 rating 3 rating 4 rating 5 rating
  • Member since
    June 2010
  • From: Irvine, CA
Posted by Force9 on Wednesday, January 8, 2014 11:09 PM

Jayman - I tend to think the ammunition/powder estimates were reasonably accurate.  The math suggests that these numbers are in line with the expected output of a six week old crew firing double-shotted rounds every three minutes or so... I bet they kept good records of the powder and ammunition usage based on barrels used and remaining inventory.  There is nothing to suggest that these are way out of whack...

Nobody will know the entire truth except, as you say, the Constitution demolished the Guerriere.

  • Member since
    June 2010
  • From: Irvine, CA
Posted by Force9 on Wednesday, January 8, 2014 11:11 PM

For those who may not have seen this on the Constitution Museum website:

Old Ironsides endured the "Polar Vortex" along with much of the USA...

  • Member since
    February 2003
  • From: Lacombe, LA.
Posted by Big Jake on Thursday, January 9, 2014 7:01 AM

Thanks Force,

That is probably the one book I have not replaced since Katrina - they ain't cheap. In reading the history, Dahlgren modified his design for long range AND accuracy.  The Paixhans guns  has the power, but you could not guarantee exactly where they would hit - I bet wherever they hit, the damage was massive.

"Paixhans had so far satisfied naval men of the power of shell guns as to obtain their admission on shipboard; but by unduly developing the explosive element, he had sacrificed accuracy and range.... The difference between the system of Paixhans and my own was simply that Paixhans guns were strictly shell guns, and were not designed for shot, nor for great penetration or accuracy at long ranges. They were, therefore, auxiliary to, or associates of, the shot-guns. This made a mixed armament, was objectionable as such, and never was adopted to any extent in France... My idea was, to have a gun that should generally throw shells far and accurately, with the capacity to fire solid shot when needed. Also to compose the whole battery entirely of such guns." -  Dahlgren


  • Member since
    June 2010
  • From: Irvine, CA
Posted by Force9 on Thursday, January 9, 2014 10:56 PM

Cheers Jake - I'll need to learn more about the evolution of the Dahlgren guns... (Cottage Industries Models makes some nice resin versions for the Revell Kearsarge and Alabama kits...)

Jayman -  Regarding the use of sheet lead cartridges...

I confess to always being a bit perplexed about this claim and the relative advantages.  The implication of this is that the American gun crews somehow skipped the sponging step.  That certainly can't be the case - there could still be burning embers and powder residue in the tube that would need to be swabbed out.

We also see spongers still listed for the gun crews on Constitution under Bainbridge's command:

(This is interesting in that it also shows the gun crew divided into rotating teams so that the rate of fire can be maintained without everyone getting exhausted.  Also interesting is the designation of certain crew for the boarding parties - indicated by a B next to their names)

Constitution's log after the Guerriere battle notes the death of Robert Brice "through want of precaution in not sponging his gun being blown from the muzzle piece..."  If lead sheet cartridges were in use, it didn't help Bob.

It may be that normal gun crews had to sponge out the barrel multiple times between discharges and the American crews only needed to do it once, but I don't really know... It just seems that either lead cartridges were not actually in widespread use, or they didn't offer much of an advantage for the extra cost.

Evan


  • Member since
    February 2003
  • From: Lacombe, LA.
Posted by Big Jake on Saturday, January 11, 2014 6:45 AM

being blown from the muzzle piece.... ohhhh bet that left a mark!


  • Member since
    February 2014
Posted by Smitty on Monday, February 3, 2014 2:39 AM

I'm watching this topic with intense interest. Excellent work thus far! I love the research you have done.

I envy you for being able to actually visit the Connie in person. I was stationed in Groton, CT awhile back but never had the opportunity to visit her myself.

I'm looking forward to further updates!


Work in progress: Revell 1/96 USS Constitution

  • Member since
    June 2010
  • From: Irvine, CA
Posted by Force9 on Monday, February 3, 2014 11:41 PM

Smitty -

Thank you for popping in and following along... Hopefully you'll see some ideas that will inspire you to take some chances with your own build - I see you've begun your fourth!

I've been making steady progress with the painting of my gun deck - almost done.  I figure I'll get everything done before posting my progress - just have to blacken the brass details and position them on the decks (as well as glue a few more cannon balls into the shot racks).

Stay tuned!

Evan

  • Member since
    June 2010
  • From: Irvine, CA
Posted by Force9 on Saturday, February 22, 2014 4:29 PM

Paint!

Folks -

Apologies for the long gap between updates - I just got caught up in the flow and haven't paused to add to my log.

It may be hard to believe, but I've actually begun to smear some paint over some of the plastic...

I've got the gun deck and associated furniture mostly done with a few minor touch ups needed here and there:


Spare Anchor:

Camboose:

Capstan:


Chain Pumps:

I was a Floquil paint guy in the past, alas, we know how that has gone. I'm now trying Vallejo paint and I'm becoming a big fan.

Thanks for looking in
Evan

  • Member since
    June 2012
Posted by arnie60 on Sunday, February 23, 2014 12:35 AM

This was well worth the Wait Evan. Superlative! Stick out tongue

You said you used Floquil paints on this? Wondering what the "brown" is called. I haven't tried them yet, but have heard good things, and that brown is precisely a color that I have been looking for. Love the way the deck came out. Is that a trick of the camera or did you variegate the coloring of the planks? Highlighter or pencil for the caulking? And the stanchions around the hatch, scratch built or after market? If so, from where? I can hardly wait to see what you do w/ the spar deck.

  • Member since
    June 2010
  • From: Irvine, CA
Posted by Force9 on Monday, February 24, 2014 8:04 PM

Hello Arnie!

Glad you like the result.

I can elaborate a bit on the wood effect... The forums are full of terrific examples with detailed explanations - most of which have eleventy six steps ending with "simple"!  I'll add my method to the pile...

Real wood has tonal depth... I need to replicate that using different layers of color. Firstly, I always prime everything. No matter what. I used a rattle can of Tamiya gray primer, but I'm not too particular about the brand I use.

The Vallejo Air paints are terrific. No need for a dope like me to carefully replicate multiple blends of colors to pass properly through my cheap airbrush. The other nice thing is that the good folks over at MicroMark commissioned Vallejo to produce "MicroLux" acrylic versions of the most popular Floquil railroad colors that were going to disappear shortly. Many of these colors lend themselves nicely to period sailing ships. Several of the most used colors are made available in the larger 2oz bottles.

L1110908.JPG

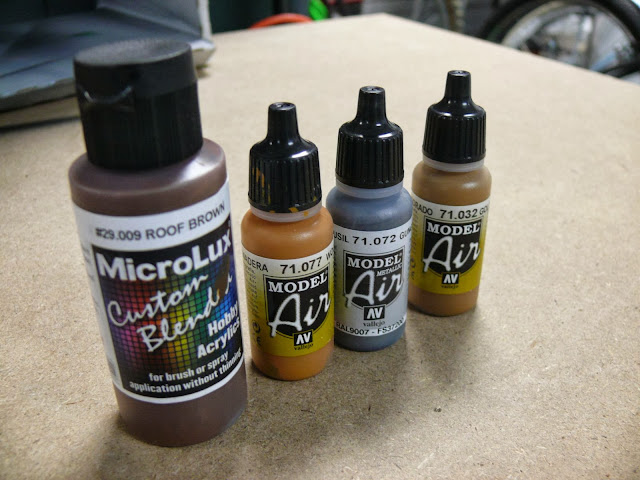
For all of the wood elements I start with a foundation coat of Vallejo Air "Aged White" applied with an airbrush. This gives the piece the underlying bright tone. At this point it would be normal to switch over to an oil based paint to add the next layer of darker wood tone. In this case I was able to use Vallejo Air "Wood" applied with a brush. No need to switch over to smelly oils and thinners with much more onerous cleanup. Since it is pre-mixed airbrush paint, the Vallejo Air paint will go on nice and thin and I can layer it up to get a good medium tone while still allowing the underlying bright tone to show through. The next layer was Vallejo air "wood" mixed with a small tad of MicroLux Air "Roof Brown". I just did one thin coat with a brush to give a final, deeper tone.

The last step is the critical part...

There have been many great ideas that have moved the human race forward through time. The wheel was a nice start... steam engines... the first airplane... landing on the moon. Penicillin was good too. But the guys in the white lab coats at Vallejo really made a contribution when they came up with this stuff:

L1110909.jpg

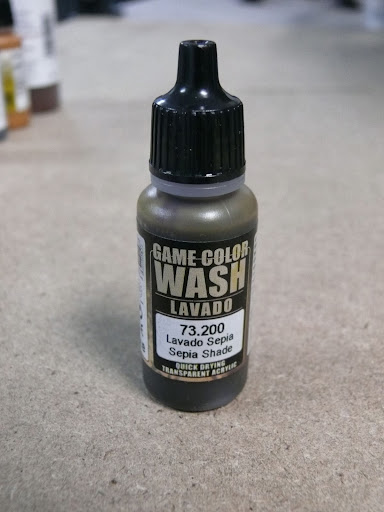
Acrylic wash that can be applied over acrylic paint. No smell, no need to mix paint and thinner... water clean up. This stuff belongs in the pantheon of great human achievements. As a final step, I smear this sepia wash over everything and immediately wipe it off with a soft cloth or cotton swab. Pretty similar to using a stain with wood. This final step imparts a nice woody sheen across everything and helps the colors blend. I should note that with Acrylics, I always allow the paint to dry overnight before adding the next layer. I did, however, wait only 20 minutes or so to add more paint within the same medium color layer whenever I was trying to deepen the tone.


Simple!

The deck was done similarly, but with only two layers. I varied the colors on the planking between Vallejo Air Aged White mixed with Vallejo Air Wood, Vallejo Sepia wash, and Vallejo dark wash. I did add a bit of Vallejo Air "Earth" to the Aged White on the first layer just to give the entire deck a slightly deeper tone. The sepia wash was applied and wiped off to give the nice wood-like sheen.  A dark gray .03mm pen was used for the lines between the planks.

For whatever else it may be worth, the camboose and anchor were both primed then air brushed with Vallejo Air "Gun Grey" with a thin coat of MicroLux (Vallejo Air) "Engine Black" over the top.  Some fine sandpaper was then used to expose the underlying gun grey along some of the edges.  The chain pump sprocket wheel was painted with gun grey and doused with the dark Vallejo wash.

The stanchions are brass micro-tubing with the smallest PE eyelets from Jotika inserted in the ends.  The tube gets pinched when snipped, but the tip of a common push pin will open up the end just fine.

I haven't done the spar deck yet - I can try to document the steps a little better.

I should note that the color of the chain pumps is not authentic... In fact, I have no idea how they were painted in 1812.  Likely colors would be black, white, red, or natural wood.  I wanted these pumps to look interesting, but not stand out too much on the deck.  I'm not using red anywhere else on the deck, so that was ruled out.  The red/brown of the gun carriages was considered, but tossed since it would look like a shortcut.  There were already several black items on the deck, so I ditched that idea.  I had mixed up a test "mahogany" color by blending roof brown and red with the idea of using that in the captain's suite for the paneling.  I elected not to go with that, so I went ahead and air brushed that color on the chain pumps.  Gives a nice neutral color without standing out too much or blending in too much... Purely artistic license.


Thanks again for staying interested in my efforts!

Evan

  • Member since
    February 2014
Posted by Smitty on Monday, March 3, 2014 2:11 AM

The long awaited update was definitely worth the wait, Evan. Phenomenal job! You and Arnie both make me feel like my work is paltry in comparison, but it forces me to push myself even further. Keep up the impressive work! She's going to be a beauty!


Work in progress: Revell 1/96 USS Constitution

  • Member since
    February 2014
Posted by Smitty on Saturday, March 15, 2014 9:08 PM

Quick question for you, Evan. How did you make the ropestops on the bitts and the rings on the deck for the cannon tackle? I've been wanting to add those to my build as well, but haven't quite figured out how to make them yet. Thanks in advance!

Jack


Work in progress: Revell 1/96 USS Constitution

  • Member since
    May 2003
  • From: Greenville, NC
Posted by jtilley on Sunday, March 16, 2014 4:52 PM

I must have missed something.  What's a ropestop?

Youth, talent, hard work, and enthusiasm are no match for old age and treachery.

  • Member since
    June 2010
  • From: Irvine, CA
Posted by Force9 on Sunday, March 16, 2014 10:09 PM

I think Jack is referring to the ring bolts on the riding bitts that have a small length of line tied to the anchor cable to secure it from paying out..."stoppers"

Jack - I'll try to post a description of my ring bolts ASAP

  • Member since
    June 2010
  • From: Irvine, CA
Posted by Force9 on Wednesday, March 19, 2014 10:15 PM

Smitty -

Regarding the ringbolts...

I used a combination of the small Jotika PE eyebolts and the 3/32 split rings available from Model Expo:

Slightly pull apart the split rings with the blade of a hobby knife and insert the PE eyelet, then squeeze the split ring back together with your tweezers.  I was particularly bad at this in the beginning - I think it took four or five minutes to do each of the first five or so, but then I found my rhythm and I clipped along at a fair pace.  All were dipped in a quick bath of acetone and then spent a few minutes in a pool of Blacken-It for color.

I cringe at what Prof Tilley will think of this... The truth is that creating your own eyelets and split rings is an easy exercise and can save a needless expenditure of hard earned cash.  Pour a glass of your favorite beverage and settle down in front of your TV and before you know it you'll have dozens of each.  I happened to have a stash of the split rings at hand from a fire sale years ago and I've got tons of the Jotika PE eyelets after having stocked up for my Heller Victory build (since suspended in favor of Constitution) and I thought the small time savings was worth it to regain momentum on my build.

Hope that helps.

Evan

  • Member since
    June 2010
  • From: Irvine, CA
Posted by Force9 on Thursday, March 20, 2014 11:17 PM

Folks -

I thought I'd turn some attention to the half hulls... Up next was the tedious task of filling in the holes for the port covers. I won't be fitting gun port covers on my build. I filled them in with .040 x .040 Evergreen strips cut oversized for ease. I then came along next day and snipped them cleanly along the edge. I'll cover with filler and sand flat before painting:

I also decided to improve the air ports along the berth deck. The Revell kit comes moulded with some small oval ports, but the credible sources suggest small scuttles instead. Note the air ports in the Corne painting:

Chappelle notes in his American Sailing Navy book that " the frigates were all fitted with air scuttles on the berth deck... The scuttles had solid covers hinged at the fore side..."

We know from Constitution's log dated September 1810 that the air ports were added:
"Caulking gun deck -- cutting air ports for the berth deck."

I simply glued some .010 x .080 strip over the existing ovals and added some of the small Jotika eyelets as hinges. The hinges are a bit too fiddly at this scale, hopefully these will look fine after primer and paint:

All fun stuff.

Evan

  • Member since
    July 2010
  • From: Tempe AZ
Posted by docidle on Friday, March 21, 2014 1:18 AM

Evan,

Beautiful work as usual!  I would love to see some of the Victory photos if you have them.  I like your idea using the brass eyelets and split rings which I think I'll use to finish my Nina/Pinta/Santa Maria builds.  I also have an Imai Chebec that DavidK and I started together and I need to finish sometime this century.  Anyway, I always learn something new from your posts so thanks!

Steve


  • Member since
    June 2010
  • From: Irvine, CA
Posted by Force9 on Saturday, March 29, 2014 5:57 PM

Cheers Steve!  I think you can search this forum using keywords Force9, Heller Victory, etc. and find my dormant log.

A bit of mindless fun:

A few months back I was having another look at the historical deck plan of the US Frigate United States and I noticed an interesting detail on the gun deck:

The items labeled "B" are listed in the legend as "Round Houses". Hmmm... I generally think of those as something external on larger ships a la Victory... I did a quick google search which found an article by Cmdr Tyrone Martin on the USS Constitution museum website that mentioned these in more detail. http://www.ussconstitutionmuseum.org/constitution-resources/the-captain-speaks/the-guns-of-constitution/

Apparently the crew referred to these as "Spice Boxes" (presumably because they resembled a common household item) and they were commonly included on the larger frigates for the convenience and privacy of the ships officers. It is tough to determine how permanent these were... You'd think they were flimsy screens that were easily removed when clearing for action. It seems that they might've been more solid fixtures... Captain Stewart ordered them removed prior to the battle with Cyane and Levant to give better clearance for the forward gun crews. They were not reassembled after the battle - probably because they were removed with an axe. On the cruise home the British officers began to grumble and get very vocal about the lack of private facilities for the gentleman. They felt that it was very undignified to have to relieve themselves using the leeward channels like common sailors. One of the American Lieutenants finally got fed up and remarked loudly to one of them something to the effect that the prisoners were well positioned to attest that American officers cared more about their gunnery than about their round houses... Presumably that ended the trouble.

I decided that including them would be a waste of my limited Units of Effort since they would not be visible once the spar deck was positioned. But just a few weeks later the Log Lines blog on the Constitution Museum website had a great article on these same round houses. http://usscm.blogspot.com/2014/01/head-lines.html I took this as a sign from the Goddess of Ship Models that I should include these in my build for thoroughness. There would be one on both port and starboard, but since I do not know if these were removed before the battle with Guerriere, I decided to only include one and split the difference.


More details soon.

Thanks again for following along.
Evan

  • Member since
    June 2010
  • From: Irvine, CA
Posted by Force9 on Wednesday, April 9, 2014 11:09 PM

Folks

I've made some more progress on the half hulls.

I could not find any contemporary reference that verifies the presence of the chesstrees that are included in the kit. The Corne paintings don't show them and neither does the Hull model:

I've elected to fill in the attachment points and smooth everything over:

I have also enhanced the hawse pieces around the hawse holes and filled in the sides of the knighthead. The kit uses a flimsy piece that has molded rings fore and aft. I think these could be a weak point and otherwise look like molded plastic. I'll insert my own rings or perhaps replace the entire knighthead assembly with something scratch built:

The hawse holes are a bit oversize and are molded in the wrong direction, but I've not tried to correct them yet...

I've filled and sanded the gun port hinge openings and the forward bridle ports. I'll hit these with some light primer to expose areas that need extra attention and then lightly scribe some planking lines.

Up next I'll need to start evaluating some of the rigging plans to determine appropriate openings, etc. that need to be added (or deleted) on these hull pieces. I'll also give consideration to adding the pin rails and cleats on the inner bulwarks with appropriate reinforcement for strength - I'll drill thru the bulwarks and insert some reinforcement pins.

Lots to think thru going forward...

Thanks for looking in...

Evan

  • Member since
    June 2012
Posted by arnie60 on Thursday, April 10, 2014 2:32 PM

Evan

I went ahead and used the Revell knighthead (after debating on replacing it as well) and it has worked out just fine so far. I haven't run the mainstays to it yet, but it worked out fine for the martingales.

I notice that you filled in two of the eyebolt holes of the cheeks, and I was wondering if you did so to replace them with brass ones or are planning to run the bowsprit shrouds to the stem as illustrated in Marquardt?

Looking forward to your next post.

  • Member since
    June 2010
  • From: Irvine, CA
Posted by Force9 on Sunday, May 4, 2014 6:48 PM

Arnie - I will move these eyelets a bit further back using guidance of Olof Erksen's book.  I will also fill in most of the other holes and reposition them slightly...

Some not very glamorous progress...

The pin rails have been added to the spar deck bulwarks.

I do not have a drill press with enough precision for micro pin holes, so I needed to do these by hand. First, a simple jig was cobbled together to encourage consistent results... I made starter holes with a simple push pin, then came back with the micro-drill. I had to remember to place the holes on the outboard edge of the strip and attempt to drill straight with a steady hand (not always successful, but darn close).

I laid in some small support ledges underneath to increase the surface area in hopes of a solid connection to the bulwarks. I also drilled small holes so that I could insert thin steel pins for additional strength:


It was not easy to determine the proper layout for all of the pin rails - no two sources agree. It does seem obvious, however, that there does need to be more rails than provided by Revell. My solution is a combination of the Bluejacket guidance and Olof Eriksen's version with some allowances made for the reality of the kit bulwarks. I elected to not include rails over the knighthead above the bowsprit... I probably have a few more pins than needed, but better too many than too few.

Some additional progress on the channels:

I should be ready to mount these after a bit more cleanup and filler in some of the small seams.

Evan

  • Member since
    July 2010
  • From: Tempe AZ
Posted by docidle on Wednesday, May 7, 2014 5:14 PM

Evan,

Thanks for posting the update.  She is coming along beautifully.

Steve


  • Member since
    May 2003
  • From: Greenville, NC
Posted by jtilley on Wednesday, May 7, 2014 5:35 PM

I do hope you've added some sort of powerful reinforcement to the pintails inside the bulwarks.  If you rely on adhesive, the rigging lines are extremely likely to pull them loose - and, in accordance with Murphy's law, the line that gives the decisive yank will be the last one you rig.  I'd suggest steel pins through the bulwarks.

Youth, talent, hard work, and enthusiasm are no match for old age and treachery.

  • Member since
    June 2012
Posted by arnie60 on Thursday, May 8, 2014 12:23 PM

I did much the same mods to the channels as you, but I did not add that curious little brass flange(?). The one that sticks out and has an up curve to the end, what is it for?

  • Member since
    June 2010
  • From: Irvine, CA
Posted by Force9 on Sunday, May 11, 2014 7:08 PM

Thanks Steve for following along.

Prof. Tilley - I have heeded your sound advice and there are small steel pins inserted thru holes pre-drilled thru the outer bulwark and secured with CA.  Hopefully that last line will NOT pop everything loose!

Arnie - I've begun to mount the channels... This affords the opportunity to show why I added those brass brackets to the channels.  Per an earlier post regarding some research - the spare topsail yards are stored on brackets hung from the main and mizzen channels:


I rather like the effect.

I needed to break up the tedium of the pin rails, so I started in on some of the boats. Here is the smallest boat (punt) outfitted with the keelson (.040 x .040 Evergreen) and ribs (.030 x .030). I had some small half-round .040" Evergreen that I stretched around the outer gunwale for the rub rail:


The transom was built up with .040 x .100 Evergreen and shaped with a few strokes of the file.

Thanks again for keeping track of my build
Evan

  • Member since
    July 2010
  • From: Tempe AZ
Posted by docidle on Monday, May 12, 2014 12:07 AM

Evan,

Amazing work.  I have a question about the tie down rings around the bow grate in the Officer's Jake picture.  I might have missed it in an earlier post, but I was wondering how you made them?

Thanks,

Steve


  • Member since
    June 2010
  • From: Irvine, CA
Posted by Force9 on Friday, May 16, 2014 1:08 PM

Steve - thanks for the kind notice.

Back up one page and towards the bottom you'll see an entry about making the ring bolts.

Cheers!

Evan

  • Member since
    July 2010
  • From: Tempe AZ
Posted by docidle on Saturday, May 17, 2014 12:18 AM

Evan,

Thank you for pointing me in the right direction.  I cannot believe I actually missed it.  I also wish that I had seen that post before I finished the Thomas, I would have used it on the cargo hatch.  I ended up drilling holes at the tail end of the molded rings and then used brass jackstays that were blackened and then bent, inserted and glued.  Not bad, but your method is so much better.

I have to say that I love the interior of your small boat, if you don't mind, can I swipe the idea for one of my future builds?

Thanks again,

Steve


  • Member since
    June 2010
  • From: Irvine, CA
Posted by Force9 on Thursday, May 29, 2014 10:58 PM

Steve - I'm glad you like my progress on the small boat.  Please feel free to incorporate something similar in your future builds... Heck, I'm sure I stole that idea from another modeler (or two)!

All...

A bit of miscellaneous progress.

I've added the channels and I think I've got them on very firmly.  I took the liberty of reinforcing them with a small strip of .040 x .040 Evergreen underneath to increase the surface area when gluing to the hull.

L1110983.JPG

I've also reinforced the pin rails by drilling thru the bulwark and inserting small still pins.  They were snipped to size, covered with some blobs of filler, and sanded smooth.

L1110984.JPG

I did some spot primer in key locations to help determine areas in need of improvement then gave the two half hulls a complete coat.  Still a bit of touch ups and tuning needed, but I'm getting closer to the painting phase.

L1110991.JPG

Additionally, I decided to change course on the berth deck ventilation scuttles and gun deck scuppers.  Originally I did not like the large openings for the scuppers and elected to cover them up and treat them as the ventilation scuttles.  It gnawed at me enough that it wasn't a correct representation that I finally went ahead and popped off the previous work to expose the scupper holes and built new ventilation doors lower down in a more proper location.  I even depicted one of the doors swung open to add some dimension:

L1110990.JPG

L1110988.JPG

A note to add regarding the ship's boats... I got pinged by Arnie who is also building the Revell Connie using some of the Bluejacket parts (and doing terrific work!).  He was wondering if I was using the BJ resin whaleboats.  I did purchase a couple of the whaleboats along with the resin pinnace.  I was a little disappointed that they came with pre-molded floor boards - I would've preferred to add my own interior details:

L1110987.JPG

Mine came in good condition - I know sometimes resin parts can be full of air pockets and blemishes, but these can be easily improved.  My original pinnace came very warped and I wasn't able to correct the shape under warm water.  The folks at Bluejacket cheerfully sent me a replacement.

Unfortunately, it looks as though I can't use these on my build.  Apparently the whaleboats did not appear on Constitution until AFTER the Guerriere fight.  Receipts and invoices indicate that Commodore Bainbridge first purchased whaleboats from local New England sources to replace some of the boats lost or damaged in the Guerriere battle. They've been associated with the ship ever since.  The USS Constitution museum Log Lines blog had a nice article about this: http://usscm.blogspot.com/2012/09/whaleboats-for-constitution.html

I think that catches me up on my current progress.

Thanks for looking in...

Evan

  • Member since
    June 2010
  • From: Irvine, CA
Posted by Force9 on Sunday, June 22, 2014 7:39 PM

Hello all...

I have the basic painting and most of the details done on the spar deck - just a bit of touch ups and fine tuning remain.

Here are some sample views:


The spar deck was given a base coat of aged white (no tinting like the gun deck) and individual planks were picked out with Vallejo Wood mixed with Vallejo aged white, Vallejo Aged White mixed with Microlux Reefer White, and straight up Vallejo gray wash. After 24 hours everything then got a quick smear with Vallejo Sepia wash that was immediately wiped down with a soft clean cloth leaving a nice wood tone and coloring the seams between the planks.

Nothing is glued down and the brass is yet to be blackened, but I can now move on to painting the half hulls.

Hope folks are still following along!

Evan

JOIN OUR COMMUNITY!

Our community is FREE to join. To participate you must either login or register for an account.

SEARCH FORUMS
FREE NEWSLETTER
By signing up you may also receive reader surveys and occasional special offers. We do not sell, rent or trade our email lists. View our Privacy Policy.