SEARCH FINESCALE.COM

Enter keywords or a search phrase below:

1/350 USS Indianapolis CA-35 (Academy) COMPLETE

25272 views
125 replies
1 rating 2 rating 3 rating 4 rating 5 rating
  • Member since
    February 2007
  • From: Brunswick, Ohio
Posted by Buckeye on Tuesday, May 5, 2015 11:33 AM

That is some excellent work there, well done! Toast

Mike

  • Member since
    July 2014
Posted by modelcrazy on Tuesday, May 5, 2015 11:14 PM

Got some more done on the aft superstructure, added the second deck, crane, quad bofors and the 5" guns (not glued yet). Tomorrow night I'll paint it and maybe get some time to install the halyards. Once this is added to the hull deck, I'll add the hanger doors, which will be closed with the scout planes stowed securely inside due to the moderate to heavy seas she will be sailing through.

Steve

Steve

Building a kit from your stash is like cutting a head off a Hydra, two more take it's place.


http://www.spamodeler.com/forum/

  • Member since
    August 2010
  • From: Beaverton, OR
Posted by Ghostrider114 on Wednesday, May 6, 2015 2:27 AM

Awesome looking superstructure you've got there.

  • Member since
    July 2014
Posted by modelcrazy on Wednesday, May 6, 2015 11:48 PM

Here's tonight work. I painted the structure and antennas and installed the guns and halyards. Next, I'll work on a minor structure aft of this one and install all the sub assemblies onto the hull.

I was thinking of making some tarps for the guns since she will be in some spray. I saw some pictures of her in the Mare Island drydock in '45 with tarps over the guns. I suppose they were to keep foreign matter and welding slag off, but it got me to thinking. What do you guys think?

Steve

Steve

Building a kit from your stash is like cutting a head off a Hydra, two more take it's place.


http://www.spamodeler.com/forum/

  • Member since
    November 2003
  • From: Virginia
Posted by Mike F6F on Thursday, May 7, 2015 9:02 AM

Steve,

I wouldn't cover your excellent work with tarps even if it makes sense with your planned display.  While knowlegable ship types will know what is covered and why, any casual viewers of you model will miss the fact that there were guns mounted all over the ship.  That of course, is one of the distinguished characteristics of a WW II USN ship anyway.

Besides, the ship was on a special mission and may have been at a constant high state of readiness and may not have had anything covered at all.

I more of a CV guy and don't know all the particulars of the ship, mission, etc., but I'd show her as a fast ship going in harm's way...

Mike


"Grumman on a Navy Airplane is like Sterling on Silver."

  • Member since
    July 2014
Posted by modelcrazy on Thursday, May 7, 2015 10:39 AM

Wow Mike,

You make an excellent argument against it. I like your logic, especially regarding being in a heighten state of awareness while transporting such valuable cargo. I'll leave them uncovered.

Thanks.

Steve

Building a kit from your stash is like cutting a head off a Hydra, two more take it's place.


http://www.spamodeler.com/forum/

  • Member since
    July 2014
Posted by modelcrazy on Thursday, May 7, 2015 11:03 AM

This is what I'm thinking regarding the seas. You shipoard guys know what I'm talking about.  

I realize these are all destroyers, but you get the idea.

Steve

Building a kit from your stash is like cutting a head off a Hydra, two more take it's place.


http://www.spamodeler.com/forum/

  • Member since
    December 2003
  • From: Charleston, SC
Posted by sanderson_91 on Saturday, May 9, 2015 9:31 PM

Steve,

Just read through you build.  You are doing a great job!!  Can't wait to see more!!

Steve


  • Member since
    July 2010
  • From: Tempe AZ
Posted by docidle on Saturday, May 9, 2015 10:01 PM

Steve,

Just wanted to let you know that you are doing an excellent job on the Indianapolis. I cannot wait to see the next installment.

Steve


  • Member since
    July 2014
Posted by modelcrazy on Saturday, May 9, 2015 10:47 PM

Thanks Steve's

I will be posting soon, I'm painting the hull now and will be installing the sub-assemblies.

Steve

Steve

Building a kit from your stash is like cutting a head off a Hydra, two more take it's place.


http://www.spamodeler.com/forum/

  • Member since
    July 2014
Posted by modelcrazy on Sunday, May 10, 2015 8:27 PM

A little more done this weekend. I painted the Hull (I still need the black boot top stripe) and sat the sub-assemblies on the deck to see how everything fits. I am' very pleased with the results. I'll take everything back off and do some more deck and hull painting, install AA guns, the catapult , rigging and railings, but I just wanted to give an update.

Steve

Steve

Building a kit from your stash is like cutting a head off a Hydra, two more take it's place.


http://www.spamodeler.com/forum/

  • Member since
    November 2003
  • From: Virginia
Posted by Mike F6F on Monday, May 11, 2015 8:53 AM

Steve,

Looks good.

Isn't camo Measure 12 fun?  How much trouble did you have marking the demarcation line?

Mike


"Grumman on a Navy Airplane is like Sterling on Silver."

  • Member since
    July 2014
Posted by modelcrazy on Monday, May 11, 2015 10:43 AM

Mike F6F
 How much trouble did you have marking the demarcation line?

Non at all. The kit/ship has a "line" from the 01 deck half way to the bow that is easily masked. The two piece hull is sectioned at the boot top so that's no problem. All in all, it's a very nice kit, although I'm glad I got the PE set as I don't think it would look half as good without it.

Steve

Steve

Building a kit from your stash is like cutting a head off a Hydra, two more take it's place.


http://www.spamodeler.com/forum/

  • Member since
    June 2013
Posted by RobGroot4 on Monday, May 11, 2015 6:09 PM

She looks great!  It's amazing how much a good PE set can improve a ship model when the PE is so well done.

Groot

"Firing flares while dumping fuel may ruin your day" SH-60B NATOPS

  • Member since
    October 2004
  • From: NE Oklahoma
Posted by Allen109 on Tuesday, May 12, 2015 5:11 PM

Awesome work!

However,you have scare me a bit with the photo-etch. I bought the Trumpeter Baltimore in 1/700, along with the Tom's Modelworks pe set. One of the radars has nine(9) bends in it,and its as small as the width of my pinky finger nail.

  • Member since
    July 2014
Posted by modelcrazy on Tuesday, May 12, 2015 5:28 PM

It just looks scary. If you have an optivisor and a pair of needle nose tweezers, it's not too hard. I place a white bed sheet under my work area so WHEN I drop a piece, it's easy to find. I also set a drop of medium CA on a piece of scrap plastic or something and just touch the piece to the drop to attach it. Alternatively, I will use a toothpick to apply the slightest amount of CA if needed.

I'm really glad I got the PE set. It really makes a difference.

Steve

Steve

Building a kit from your stash is like cutting a head off a Hydra, two more take it's place.


http://www.spamodeler.com/forum/

  • Member since
    July 2010
  • From: Tempe AZ
Posted by docidle on Tuesday, May 12, 2015 10:37 PM

Steve,

She is really coming together now. Beautiful work and thanks again for posting the WIP. I have the Trumpeter 1944 version of the Indie that hopefully I can build as nicely as yours.

Steve


  • Member since
    July 2014
Posted by modelcrazy on Saturday, May 16, 2015 8:21 PM

Hi gents,

Here's the latest on the Indy. I will be able to get  a bit done this weekend, but I just wanted to post an update. I will install the superstructures, rigging and railing next.

Steve

Steve

Building a kit from your stash is like cutting a head off a Hydra, two more take it's place.


http://www.spamodeler.com/forum/

  • Member since
    July 2014
Posted by modelcrazy on Sunday, May 17, 2015 7:55 PM

I have completed a considerable amount of work to The Indy this weekend.  I added the superstructures, railings,  small boats and weathering.  I still need to add the Low Frequency long wire antennas and HF whip antennas. After, I will start on the base.

I have to say, I am really pleased with it.

I will hold off on pictures of her until I'm finished so I don't ruin the final reveal.

Steve

Steve

Building a kit from your stash is like cutting a head off a Hydra, two more take it's place.


http://www.spamodeler.com/forum/

  • Member since
    March 2005
Posted by philo426 on Monday, May 18, 2015 8:57 AM

Yeah!You dont want to spoil the surprise!

  • Member since
    July 2014
Posted by modelcrazy on Monday, May 18, 2015 9:17 AM

I'll show the making of the base and water and some close-ups of the ship, but it may diminish the impact of the whole thing to show the finished ship out if it's base. It does look good though, and I'm never impressed with my work. I was putting some final touches to the weathering last night with my optivisor on, you know how you don't see the whole picture with those on, I took them off to look at the whole thing and Bamm! I was thinking to myself, I did that? Too bad some of it will be hidden by the water and spray.

It won't be long now, the hard part is finished, Yea!

Steve

Building a kit from your stash is like cutting a head off a Hydra, two more take it's place.


http://www.spamodeler.com/forum/

  • Member since
    March 2005
Posted by philo426 on Monday, May 18, 2015 4:17 PM

Great!Looking forward to seeing the completed model!

  • Member since
    July 2006
  • From: Philippines
Posted by constructor on Monday, May 18, 2015 11:55 PM

A photo etch bender would come in handy with the small and long stuff..

  • Member since
    July 2006
  • From: Philippines
Posted by constructor on Tuesday, May 19, 2015 12:03 AM

It is indeed some piece of work!

  • Member since
    July 2006
  • From: Philippines
Posted by constructor on Tuesday, May 19, 2015 12:08 AM

did you hand paint the small decks?

  • Member since
    July 2014
Posted by modelcrazy on Tuesday, May 19, 2015 8:09 AM

constructor
did you hand paint the small decks?

Yes. I sprayed the hull and deck first, and pre sprayed the superstructure decks and bulkheads, although I had to go back and touch-up with a brush. The small decks were hand painted with Vallejo. That stuff really brushes nice, I hate to spray with it though.

With the weathering, any brush strokes, if any, were covered up.
I see that your building the Missouri. Good luck with it, I don't know what scale it is, but it should be a fun build. 

Steve

Steve

Building a kit from your stash is like cutting a head off a Hydra, two more take it's place.


http://www.spamodeler.com/forum/

  • Member since
    June 2013
Posted by RobGroot4 on Tuesday, May 19, 2015 5:17 PM

I really like the hull weathering you showed above.  It looks just right for a ship that's been at sea for a little bit.  What did you use for the dry brushing and dark streaking?

Groot

"Firing flares while dumping fuel may ruin your day" SH-60B NATOPS

  • Member since
    July 2014
Posted by modelcrazy on Tuesday, May 19, 2015 7:56 PM

Thanks Groot,

I went over the Hull with a combination of  gray and rust pastells.The streaks were created with an oil wash of burnt umber.

I didn't want to go too far with the weathering as she just came out of repair/refit. The diorama will depict her in late July, after she delivered parts for the Little Boy bomb at Tinian . As you know, one month in the Pacific will do a job on a paint job.

Steve

Steve

Building a kit from your stash is like cutting a head off a Hydra, two more take it's place.


http://www.spamodeler.com/forum/

  • Member since
    July 2014
Posted by modelcrazy on Tuesday, May 19, 2015 11:23 PM

OK, here I go with the base, this will be the first time I try this method.

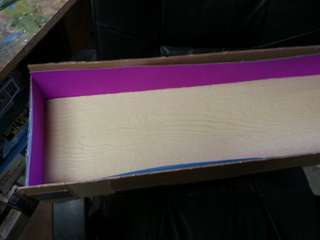
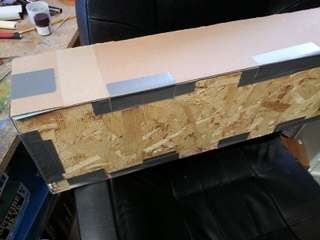
First I made the base out of an old piece of house siding and made poster board walls and used hot glue to attach them to the sides. I also stiffened the walls with some cardboard backing.

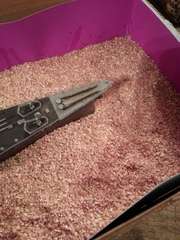
Then I placed the ship inside the box and laid in sawdust, and formed some crests and troughs. I then squirted some thin CA onto the sawdust to stabilize it. That worked remarkably well but use an enormous amount of glue. 

Once dried, I applied Mod Podge for a base for the acrylic gel.

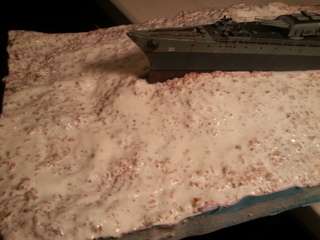
I will use the acrylic gel to form the wave peaks and smooth the texture. After the gel will be applied, I'll paint dark blue mixed with turquoise at the foam. After the paint will come the cotton, but I'll show that when I get there.

That's all for now.

Steve

Steve

Building a kit from your stash is like cutting a head off a Hydra, two more take it's place.


http://www.spamodeler.com/forum/

  • Member since
    June 2013
Posted by RobGroot4 on Wednesday, May 20, 2015 4:59 PM

MC,

 I haven't used it before, but is the acrylic gel medium clear?  If you paint your blue and turquoise on top of the Mod Podge and then apply the acrylic over it, it might give a nice appearance of water depth, then paint the acrylic white for the foam at the top.  Just a thought.  I can't wait to see how this turns out!

Groot

"Firing flares while dumping fuel may ruin your day" SH-60B NATOPS

JOIN OUR COMMUNITY!

Our community is FREE to join. To participate you must either login or register for an account.

SEARCH FORUMS
FREE NEWSLETTER
By signing up you may also receive reader surveys and occasional special offers. We do not sell, rent or trade our email lists. View our Privacy Policy.