SEARCH FINESCALE.COM

Enter keywords or a search phrase below:

Musashi wreck.

36828 views
172 replies
1 rating 2 rating 3 rating 4 rating 5 rating
  • Member since
    June 2013
Posted by RobGroot4 on Friday, May 29, 2015 3:52 AM

MC, I can't wait to see how this progresses.  I don't think I've seen any modeled wrecks other than Arizona as she sits now and Bismarck.  Someone pass the popcorn!

Groot

"Firing flares while dumping fuel may ruin your day" SH-60B NATOPS

  • Member since
    July 2014
Posted by modelcrazy on Friday, May 29, 2015 7:55 AM

I hope it's worth the price of admission.

Steve

Building a kit from your stash is like cutting a head off a Hydra, two more take it's place.


http://www.spamodeler.com/forum/

  • Member since
    August 2008
Posted by tankerbuilder on Friday, May 29, 2015 8:58 AM

Well ;

   Now that is a daunting task . Did I really fire up this kind of reaction ? It's gonna be a winner I think !    T.B.

  • Member since
    November 2003
  • From: Virginia
Posted by Mike F6F on Friday, May 29, 2015 9:34 AM

There was a nice Edmund Fitzgerald wreck diorama I remember seeing somewhere.  It may have been at a Mariner's Museum exhibition 10+ years ago.  Since that ship wrecked in separate bow and stern sections and if you can find photos of that model, I imagine it would be a reference since you are trying something similar.

Enjoy it Steve.

Mike


"Grumman on a Navy Airplane is like Sterling on Silver."

  • Member since
    February 2011
Posted by Hokey on Friday, May 29, 2015 9:37 AM

Google "Edmund Fitzgerald wreck diorama" and you'll find images.

  • Member since
    July 2014
Posted by modelcrazy on Friday, May 29, 2015 10:06 AM

Here is another interesting bit of information I found on http://www.ussflierproject.com/tags/musashi/.

It shows the hits the ship took after 6 waves of Avengers, Hellcats and Helldivers. Each "mark" is numbered in correspondence to the attack wave and the key denotes a bomb, torpedo or a miss. Looking at the bow section of the initial "live feed" video, I didn't see any damage to the deck, although the ROV didn't fly directly over that area, I would have thought I would see something. There is however, a nasty dent just behind the bulbous bow were a near miss bomb hit was. It just tells you the power of a shockwave in the water.

The Bow apparently broke off just aft of the #1 main turret, so there will be quite a bit of damage on the port side forward to the dent. 5 or 6 torpedo strikes on the port and 3 on the starboard. after wave 6 however, there was probably nothing left of the port side mid section, although oddly enough, when survivors came up from the aft bowels of the ship for the first time to abandon ship, they had thought the torpedo hits were their own main guns firing. WOW, just to be in those massive ships while the main guns were firing must have been incredible.
The aft section will be much easier as it is burred upside down and broke off just fore of the flight deck. All that will be needed there will be to scratch the interior decks. There is some damage to some of the props, probably from the initial near miss's form the third wave, or from the impact of hitting the bottom, but that will be easy.


It is very difficult to distinguish the actual photos of the Musashi with either Tamiya's Yamato build (labeled as the Musashi), or artists conception or pictures of other ships, again labeled as the M.
The debris, field, as far as I can tell from the side scan sonar, is a fair distance from the bow/stern resting places, but i'm confident there are some twisted pieces near the bow/stern. Unfortunately there doesn't seem to be any main, secondary or tertiary guns anywhere near my target area.
So, the first thing I will need to do is some drastic surgery on my Yamato, which was packed and has moved with me at least 5 times in the last 20 years. Maybe this is a fitting tribute to that old model as well. Better in a wreck dio than in landfill.

Thank you for the interest guys. Just like my Indy project, it's all of you watching that makes me want to do my best and keeps me motivated.

Steve

Steve

Building a kit from your stash is like cutting a head off a Hydra, two more take it's place.


http://www.spamodeler.com/forum/

  • Member since
    July 2014
Posted by modelcrazy on Friday, May 29, 2015 11:30 AM

tankerbuilder
Did I really fire up this kind of reaction ?

Yes, yes you did. It's all your fault.

Actually, I've wanted to do a wreck for a while. I just needed a little push. And, at least for now, I won't be in competition with all those museum built models.

Steve

Building a kit from your stash is like cutting a head off a Hydra, two more take it's place.


http://www.spamodeler.com/forum/

  • Member since
    March 2004
  • From: Spartanburg, SC
Posted by subfixer on Friday, May 29, 2015 11:45 AM


Wink

I'm from the government and I'm here to help.

  • Member since
    March 2003
  • From: Towson MD
Posted by gregbale on Friday, May 29, 2015 11:47 AM

Like the others, I'm looking forward to seeing how you handle it. It's the sort of project I've always intended to do, but never quite got around to. Rock on!

Greg

George Lewis:

"Every time you correct me on my grammar I love you a little fewer."
 
  • Member since
    July 2014
Posted by modelcrazy on Friday, May 29, 2015 11:53 AM

Subfixer,

That is funny LOL.

Steve

Building a kit from your stash is like cutting a head off a Hydra, two more take it's place.


http://www.spamodeler.com/forum/

  • Member since
    August 2008
Posted by tankerbuilder on Friday, May 29, 2015 3:27 PM

I am slowly coming around to my own suggestion .

       Oh ! Fiddlesticks ! I guess I better Find a ship or boat that can be a candidate ! Hmmmmm.  T.B.

  • Member since
    August 2014
  • From: Willamette Valley, Oregon
Posted by goldhammer on Friday, May 29, 2015 3:58 PM

TB-  Franklin after the fires were out might be a good candidate with all the damage and still getting home.

  • Member since
    March 2003
  • From: Western North Carolina
Posted by Tojo72 on Friday, May 29, 2015 6:00 PM

Looking forward to this one.

  • Member since
    July 2014
Posted by modelcrazy on Friday, May 29, 2015 9:29 PM

Here's the start.
After studying the side scan radar, I realize that there's far more of the stern remaining than I originally thought. It looks like the hull, while torn off, extends along the keel to at least under the aft superstructure. Since the stern is buried in the mud, this won't pose any problems. I will need to recreate more torpedo damage though. This out to be interesting, and fun, especially since I've never scratch build damage before.

 .

Steve

Steve

Building a kit from your stash is like cutting a head off a Hydra, two more take it's place.


http://www.spamodeler.com/forum/

  • Member since
    March 2004
  • From: Spartanburg, SC
Posted by subfixer on Saturday, May 30, 2015 9:29 AM

The folks in the aircraft forums might be able to help you out with hole damage. They use foil and plastic thinning techniques to achieve amazing results.

I'm from the government and I'm here to help.

  • Member since
    August 2008
Posted by tankerbuilder on Saturday, May 30, 2015 9:33 AM

Hey !

   I got one I messed up too ! Cool ! Thanks !

  • Member since
    August 2011
  • From: Earth, for now
Posted by BashMonkey on Saturday, May 30, 2015 9:33 AM

Ambitious! I've seen wreck models of the Titanic, Arizona, Bismarck, and Yamato. The trouble with ships like Musashi was that they self destructed on sinking, makes modeling such very challenging. Good luck with it ;-)

 ALL OF YOUR BASE ARE BELONG TO US!

  • Member since
    August 2008
Posted by tankerbuilder on Saturday, May 30, 2015 9:33 AM

Subfixer ;

     We use that on model cars and trucks too !

  • Member since
    August 2008
Posted by tankerbuilder on Saturday, May 30, 2015 9:37 AM

Steve ;

   Bear in mind , There wasn't any main or tertiary guns around much of the Bismark either  .Gun Mounts are NOT fastened down like so many folks think they are  .Mostly besides drive rings and seals it's their own weight that keeps them in place .

 Turn the ship upside down and yes they will fall  out  ,sometimes a mile or so in a line following the debris field . Stacks and Masts usually do to because the pressure of the water pushing on the stuff in the downward spiral some take .

     I do know of a ship that sank and hit the bottom stern first ! The stern  half stayed upright ( pointing up that is ) and the bow and the rest collapsed around it !

  • Member since
    July 2014
Posted by modelcrazy on Saturday, May 30, 2015 10:20 AM

Guys, Thank you for the help. I will accept any ideas on how to make damage look real.

The advantage I have is the wreck is covered in silt and sealife, so my detail will not have to be a precise as it would if I were building a damaged tank or aircraft. Learning how to though will be an advantage for future projects, so thank you for the suggestion to look for advice in the airplane and car forums

This will be a new experience to me and allow me to stretch my comfort zone. There are several areas of the bow and stern which still remain a mystery to me, and I will refer to to Yamato and Bismark which had similar torpedo damage.

TB,

I used to think turrets were attached, until the Bismark was found, then my paradigm was changed.

I think the first place to start, will be to research the deck layout and scratch the interior decks to insert into the bow and stern.

Steve

Steve

Building a kit from your stash is like cutting a head off a Hydra, two more take it's place.


http://www.spamodeler.com/forum/

  • Member since
    April 2013
Posted by KnightTemplar5150 on Sunday, May 31, 2015 9:27 AM
I'm probably late to your party, Steve, and I've managed to echo the replies to your thread in the planes section - but, have you taken a peek at some of the stuff posted to both the web and YouTube by modelers who have built dioramas of the Titanic? There's a few out there depicting the ship breaking up and others showing her laying on the seabed. A lot of great ideas there for internal structures, damage, and weathering.
  • Member since
    September 2012
Posted by GMorrison on Sunday, May 31, 2015 9:34 AM

Suggestion- build a scale model or two of your scale model. Work out the general arrangement of the pieces and the major assemblies you need.

As you know, this thing left the surface relatively intact (full of holes) but blew up underwater and fell 3,800 feet onto a hard surface, no doubt twisting and turning all the way. Probably bounced some and flopped around.

 Modeling is an excuse to buy books.


  • Member since
    July 2014
Posted by modelcrazy on Sunday, May 31, 2015 10:21 AM

KT,

You are certainly not too late. I read your response to my inquiry.

Groot,

Now that I'm on the right thread, I'll continue my thought.

This is what I accomplished last night (the "deck" is not glued in at this time) I still have quite a bit to do here. You can see the torpedo belt area and the inner hull. I will need to remove this inner hull piece temporally to motor tool the side to open a hole, then install the twisted metal for the damage. There seems to be only one torpedo hit from wave 6 on the port side that i will need to simulate. There also looks like there are 3 near bomb misses on the starboard side the may have caused some dents.

Looking at the "hit: chart, the majority of the torpedo damage was on the port side, just about where I looks like the stern broke off, or blew off.

This is a cutaway of the mid-section I found which is the basis on my work so far.

Here is what I built last night. Most of this will be cut away and bent. Like I said, I still have a lot to do here and add more decks and bulkheads.

Thanks for following.

Steve

Steve

Building a kit from your stash is like cutting a head off a Hydra, two more take it's place.


http://www.spamodeler.com/forum/

  • Member since
    January 2013
Posted by Souda99 on Sunday, May 31, 2015 11:02 AM

MC,

Looking awesome, I can't wait to see more.

  • Member since
    July 2014
Posted by modelcrazy on Sunday, May 31, 2015 5:42 PM

This is what I accomplished today.

I ground the starboard side of the stern to help simulate the possible dents from the near misses (I'm assuming that there are dents after seeing the dent in the bow from a near miss). I thinned the side in squares to try to show the bulkheads. I don't have any idea if this is correct or it will work, but I'm giving it a try.
  

Next I thinned a section on the port and made a hole for a torpedo strike. I will overlay this with alumium for the outward damage. I will also make some inward damage on the inner wall of the buldge.

Now I know this looks bad, but this is the seafloor and the dio base. I took a piece of styrofoam and heated it up with my plumbers torch (that's why it's blackened and yes, there's a hole in it). Not to worry though, as this will be covered in paper strips and acrylic medium, similar to what I did for the Indy. Once the pieces are laid in their spots, I will add some more medium and something for the silt. I'm not sure just yet what I'm going to use, but I'm sure the model railroading community has something that will work just fine. The base is quite large, but to keep this somewhat to scale, it needs to be.

Steve

Building a kit from your stash is like cutting a head off a Hydra, two more take it's place.


http://www.spamodeler.com/forum/

  • Member since
    November 2009
  • From: SW Virginia
Posted by Gamera on Sunday, May 31, 2015 6:54 PM

Very cool Steve, good luck!

"I dream in fire but work in clay." -Arthur Machen


  • Member since
    June 2013
Posted by RobGroot4 on Monday, June 1, 2015 3:45 AM

MC,

 This is looking cool already.  I like the bulkhead idea with the thinning, if you are trying to simulate dents from a near miss, are you going to push the thinned sections inward?  If the miss was external it should buckle the metal plates between the support beams for the hull.  The work you've done for the decks and bulkheads already looks great.  I'm gonna need more popcorn!  Toast

Groot

"Firing flares while dumping fuel may ruin your day" SH-60B NATOPS

  • Member since
    July 2014
Posted by modelcrazy on Monday, June 1, 2015 9:10 AM

Thanks Groot,

I was messing around with a piece of soda can last night, cutting, bending, poking, trying to make it look real, then I thought, the 4th is coming up (fireworks are still legal here in Boise) why don't I put a firecracker next to a piece, or inserted into a hole of  a piece of soda can to see what the damage would look like. I may do that, depending on weather I could get away with it safely. Fireworks will go on sell here very soon.   Hmm

Steve

Building a kit from your stash is like cutting a head off a Hydra, two more take it's place.


http://www.spamodeler.com/forum/

  • Member since
    March 2005
Posted by philo426 on Monday, June 1, 2015 9:25 AM

After you light the fuse ,make sure you back away.Shrapnel can be damaging!

  • Member since
    March 2003
  • From: Towson MD
Posted by gregbale on Monday, June 1, 2015 9:38 AM

philo426

After you light the fuse ,make sure you back away.Shrapnel can be damaging!

I second that! Not good losing a vital part in the name of modeling.

Thanks for sharing your thought process while working through this. Both the technique and inspiration are very motivating.

Greg

George Lewis:

"Every time you correct me on my grammar I love you a little fewer."
 
  • Member since
    July 2014
Posted by modelcrazy on Monday, June 1, 2015 9:50 AM

Yeah, I was thinking of placing the "device" in a medium cardboard box to absorb any flying shrapnel.

I played this song before when I was about 14 during summer break.

I had the brilliant idea to see what a firecracker would look like inside a 5 gal water jug (they were glass back then). So I placed the jug in the middle of the garage as my parents were gone at work, lit a firecracker with and exceptionally long fuse, I think I even attached another fuse to make it longer. I then dropped the explosive device into the jug and, here's the good part, screwed down the lid. Luckily for me I had at least one brain cell working at the time and got behind the door to the house and watched around the corner.

KA-BOOM, the jug explodes into a zillion pieces (I must have been sleeping through the physics lecture which explains compression). Needles to say, I spent the next several days of my summer vacation clearing and cleaning the entire garage so there was not one sliver of glass left. I think secretly my parents were glad they had a reason to make me clean the garage.

I learned my lesson and will be careful if I try it, thanks.

It would be interesting to see the results. I'd just have to do it when my wife is gone.

Steve

Building a kit from your stash is like cutting a head off a Hydra, two more take it's place.


http://www.spamodeler.com/forum/

  • Member since
    July 2014
Posted by modelcrazy on Monday, June 1, 2015 11:59 AM

Thanks Greg,

I was researching some torpedo damage pictures and, of coarse, found a ton. This one seems to be one of the clearest, although I'd like to find and example of what our aerial torpedoes would do instead of one of those Japanese nightmares.

Steve

Building a kit from your stash is like cutting a head off a Hydra, two more take it's place.


http://www.spamodeler.com/forum/

  • Member since
    December 2002
  • From: Bury St Edmunds, Suffolk, England
Posted by Bish on Monday, June 1, 2015 12:15 PM

Steve, after seeing your last ship build, this will be one to follow. Looks like your doing plenty of research for this, I like it.

I have seen a dio of a sunken Sherman before, but I don't think a ship. The Sherman was set is clear resin, or something like that, for the water. Will you be doing that or will you leave out the water.

I am a Norfolk man and i glory in being so


On the bench: Airfix 1/72nd Harrier GR.3/Fujimi 1/72nd Ju 87D-3

  • Member since
    July 2014
Posted by modelcrazy on Monday, June 1, 2015 12:25 PM

Bish, thanks for following.

I've seen that Sherman dio, it was done very well.

I will be leaving the ship out of "water" as It would take huge amounts of resin to cover this size diorama. What I've seen on Titanic and Bismark dioramas though, is what appears to be an algae green or blue sprayed on the set to try to simulate an underwater look, like you were looking at it with artificial lighting from an ROV. I was thinking of doing something like that, but haven't decided yet.

Steve

Steve

Building a kit from your stash is like cutting a head off a Hydra, two more take it's place.


http://www.spamodeler.com/forum/

  • Member since
    December 2002
  • From: Bury St Edmunds, Suffolk, England
Posted by Bish on Monday, June 1, 2015 12:27 PM

Well, sounds like your got a plan. I'll certainly be following along.

I am a Norfolk man and i glory in being so


On the bench: Airfix 1/72nd Harrier GR.3/Fujimi 1/72nd Ju 87D-3

  • Member since
    July 2014
Posted by modelcrazy on Monday, June 1, 2015 9:17 PM

What do you think?

Here is the dented starboard side. I have some smoothing to do, but it will also be covered with silt .

And the torpedo hit. The outer plates are blown out, while the interior side and bulkheads are pushed in. Looking at the damage on the video, the sides are blown out, but let me know what you guys think. It is easily changed at this point.

A different view of the damage. I drilled holes into the "framing" in the torpedo bulge to try to dress it up a little. You can see the inner bulkhead.

And finally the framing structure and the engine room. Maybe I can come up with something to replicate the engines. This will be totally cut away and collapsed along with the keel. Studying the side scan sonar, it looks like the keel collapsed, probably during the impact with the sea floor.

Comments are wanted.

Steve

EDIT,

And here's the sea floor with the acrylic gel and paper.

Steve

Building a kit from your stash is like cutting a head off a Hydra, two more take it's place.


http://www.spamodeler.com/forum/

  • Member since
    March 2005
Posted by philo426 on Tuesday, June 2, 2015 11:42 AM

Looks really good!

  • Member since
    July 2014
Posted by modelcrazy on Tuesday, June 2, 2015 9:58 PM

Here's the stern in it's resting place. I still need to add some twisted metal at the break and work a little on the props and rudder.

Steve

Steve

Building a kit from your stash is like cutting a head off a Hydra, two more take it's place.


http://www.spamodeler.com/forum/

  • Member since
    July 2004
  • From: Sonora Desert
Posted by stikpusher on Tuesday, June 2, 2015 10:12 PM

Wow... this is a bold project and you are really pulling it off.


F is for FIRE, That burns down the whole town!

U is for URANIUM... BOMBS!

N is for NO SURVIVORS...

       - Plankton

LSM


  • Member since
    April 2013
Posted by KnightTemplar5150 on Wednesday, June 3, 2015 12:15 AM
You're moving right along there, Steve - things are looking good!
  • Member since
    March 2003
  • From: Towson MD
Posted by gregbale on Wednesday, June 3, 2015 9:48 AM

Steve, both the build and the groundwork are very impressive so far. Really glad you're sharing this with us.

Greg

George Lewis:

"Every time you correct me on my grammar I love you a little fewer."
 
  • Member since
    July 2014
Posted by modelcrazy on Wednesday, June 3, 2015 11:27 AM

Thanks ST, KT and Greg,

I was a little hesitant at first to put this thread out there as I'm just winging most of it. I'm collaborating with a very nice lady, Rebekah,  at USSFlyerProject.com who is the Exhibit Designer at the Great Lakes Naval Memorial and Museum. I have gleaned most of the final moments of the Musashi's career from her website  http://www.ussflierproject.com/tags/musashi/. The problem here is that there are so few publicly released pictures that it is difficult to make an accurate representation of the wreck, therefore I do my best, and add a little "artiest conception" to the mix.

I appreciate everybody's following along and your encouragement. I am very happy with the results of my experimentation so far, and as always, I'll will continue to try to justify the steps I'm taking and why.

Steve

Steve

Building a kit from your stash is like cutting a head off a Hydra, two more take it's place.


http://www.spamodeler.com/forum/

  • Member since
    December 2002
  • From: Bury St Edmunds, Suffolk, England
Posted by Bish on Wednesday, June 3, 2015 11:36 AM

For someone who is winging it, you are not doing half bad.

You asked about the Torpedo damage, well I am no expert, but it looks good to me, even before painting it defiantly looks like bent metal.

You post as many progress pics as you like, this is a joy to watch.

I am a Norfolk man and i glory in being so


On the bench: Airfix 1/72nd Harrier GR.3/Fujimi 1/72nd Ju 87D-3

  • Member since
    July 2014
Posted by modelcrazy on Wednesday, June 3, 2015 12:14 PM

Thank you Bish.

The stern is easy, The bow on the other hand.....11 torpedo strikes and 13 bomb hits by my count on the area from turret 1 to the bow, not to mention numerous near misses, which cause their own kind of damage. I envision the bow as a mess of twisted metal below the main deck. I'm going to have do drink a whole lot of soda to come up with that much aluminium.

Steve

Building a kit from your stash is like cutting a head off a Hydra, two more take it's place.


http://www.spamodeler.com/forum/

  • Member since
    March 2015
Posted by CallSignHuck on Thursday, June 4, 2015 9:41 AM

Hi MC, I'm late rolling in but this looks great!

H

On the bench: 1:700 USS California BB 44

Next up: 1/48 A-10C MDANG

Would love to do: USS Samuel Robert DE 413

  • Member since
    July 2014
Posted by modelcrazy on Friday, June 5, 2015 9:45 AM

Thanks Huck,

I wasn't able to get to it last night, but should be able to get some progress done tonight. I'm almost finished with the stern, I think. There's always something to add to something like this.

Steve

Building a kit from your stash is like cutting a head off a Hydra, two more take it's place.


http://www.spamodeler.com/forum/

  • Member since
    June 2013
Posted by RobGroot4 on Friday, June 5, 2015 6:16 PM

modelcrazy

Thank you Bish.

The stern is easy, The bow on the other hand.....11 torpedo strikes and 13 bomb hits by my count on the area from turret 1 to the bow, not to mention numerous near misses, which cause their own kind of damage. I envision the bow as a mess of twisted metal below the main deck. I'm going to have do drink a whole lot of soda to come up with that much aluminium.

You could always switch to beer... 

You mentioned the engines in the stern section in a previous post.  Speaking of U.S. Navy ship here, but the engines are usually toward the center of the ship so I think all you'd see at about that point of the ship would be the shafts, IF the Japanese used a similar armored citadel approach.  The armored citadel is basically an extra layer of really thick armor plating all around the central portion of the ship (superstructures, engines, turrets, magazines, etc.).  You can see this on the WWII battleships, even below decks there are some hatches going through really thick (10+ inches) bulkheads.  If you google "Iowa Class Armored Citadel" there are plenty of images that explain it.  There's also a nice image (can't share from the computer I'm on) with a blue highlighted portion and you can see where the engines are.  That is of course Iowa Class, but I think the Japanese followed the traditional thinking in terms of design and just made them bigger.

This is really looking awesome as it comes together.  Your torpedo hole and buckling looks great!


Groot

"Firing flares while dumping fuel may ruin your day" SH-60B NATOPS

  • Member since
    August 2014
  • From: Willamette Valley, Oregon
Posted by goldhammer on Friday, June 5, 2015 6:19 PM

If your fireworks/can works out, don't neglect to make a years supply while the explosives are available.  Looks great so far.

  • Member since
    July 2014
Posted by modelcrazy on Friday, June 5, 2015 11:54 PM

Thank you Groot for the information, that is very helpful.

The engine room was beneath the stack, which from studying the side scan image and doing some rough measurements, it looks as though the stern broke off right in the area of the stack

As far as the citadel, I imagine most of the interior bulkheads were not damaged in the attacks, while the outer sections were compromised. This flooding would have caused the list, so the crew probably counter flooded to try to stabilize the ship. When the ship capsized and went down, at around 100 feet or so the citadel probably imploded which would be the reason for the incredible devastation of that area. The Yamato and Musashi didn't have a 8 or 16" hull. They had 1" hull with 16" armor plates attached. When it comes to implosion, it's the 1 inch hull and the girders behind them that is providing the resistance, not the 16" armor plates affixed to them.

Anyway, here's tonight's work.
I added some thicker metal to the sections where one would see the thickness of the armor. I hope it makes a difference. Anyway, I believe I'm finished with the stern. I'm not concerned about the non smoothness. The wreck will be covered with silt, some sea life, rust and a greenish color.

Some pics of the actual wreck.

Bow and starboard anchor. Notice the cable above the anchor and below the Chrysanthemum which was used for degaussing.

Bow with the deteriorated Chrysanthemum.

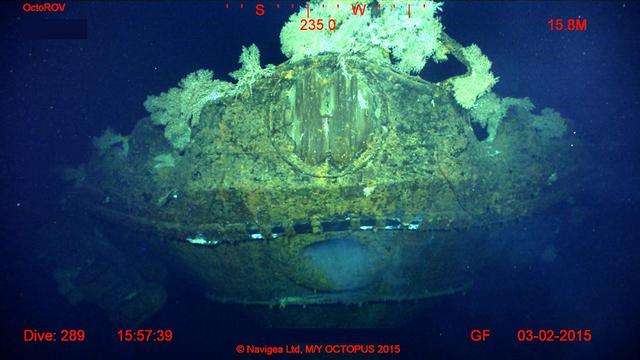
Bow deck with starboard anchor chain. Again, notice the degaussing cable just to the left of "Musashi Expedition"..

Here is my completed stern. The sea floor will be filled up to and bury some of  the hull.

And the screws and bent main rudder. The outer port screw has a broken shaft.

The actual ship.

That's all for now. I will start on the bow tomorrow.

Steve

Steve

Building a kit from your stash is like cutting a head off a Hydra, two more take it's place.


http://www.spamodeler.com/forum/

  • Member since
    December 2002
  • From: Bury St Edmunds, Suffolk, England
Posted by Bish on Saturday, June 6, 2015 1:38 AM

I am amazed at how well detailed the scans of the real ship are. I think you have got the broken prop shaft perfectly and that whole section is looking really nice.

I am a Norfolk man and i glory in being so


On the bench: Airfix 1/72nd Harrier GR.3/Fujimi 1/72nd Ju 87D-3

  • Member since
    June 2013
Posted by RobGroot4 on Saturday, June 6, 2015 3:27 PM

MC,

I hate to say it, I think you have the props on the wrong shafts (look at the direction the blades pitch in the actual photo).  

Your stern section looks awesome.  I'm intrigued to see how you tackle the growth on the parts you are modeling.  

Groot

"Firing flares while dumping fuel may ruin your day" SH-60B NATOPS

  • Member since
    December 2002
  • From: Bury St Edmunds, Suffolk, England
Posted by Bish on Saturday, June 6, 2015 3:32 PM

Steve, I think Groot might be right. The two on the inner shafts should be on the outside.

I am a Norfolk man and i glory in being so


On the bench: Airfix 1/72nd Harrier GR.3/Fujimi 1/72nd Ju 87D-3

  • Member since
    July 2014
Posted by modelcrazy on Saturday, June 6, 2015 4:50 PM

By golly your right. I'll just fix that right away, thanks.

Steve

Building a kit from your stash is like cutting a head off a Hydra, two more take it's place.


http://www.spamodeler.com/forum/

  • Member since
    December 2002
  • From: Bury St Edmunds, Suffolk, England
Posted by Bish on Saturday, June 6, 2015 5:16 PM

Well that's the advantage of doing a WiP. Someone is bound to spot what you missed, happens to me all the time.

I am a Norfolk man and i glory in being so


On the bench: Airfix 1/72nd Harrier GR.3/Fujimi 1/72nd Ju 87D-3

  • Member since
    July 2014
Posted by modelcrazy on Saturday, June 6, 2015 5:22 PM

Just fixed it. Thanks guys. When it was pointed out and I looked at it.....DOGH!! How could I miss something so obvious?

Steve

Building a kit from your stash is like cutting a head off a Hydra, two more take it's place.


http://www.spamodeler.com/forum/

  • Member since
    November 2009
  • From: SW Virginia
Posted by Gamera on Saturday, June 6, 2015 5:23 PM

She looks awesome Steve, I love the crumpled up decks. And good eyes there Groot, I'd never have caught it.

"I dream in fire but work in clay." -Arthur Machen


  • Member since
    July 2014
Posted by modelcrazy on Saturday, June 6, 2015 10:58 PM

RobGroot4

 I'm intrigued to see how you tackle the growth on the parts you are modeling.  

Groot

Groot, I'm not sure yet, I have several ideas witch include utilizing minute pieces of those dried pieces of vegetation one can purchase at craft stores and repainting them. Other ideas include tying fly tying thread into a knots to simulate some of the sea life. I working on it.

Experimentally, I painted the stern with a mix of highly diluted acrylic Raw Umber, followed up with an application of water mixed with Rust colored pastels. I will spray over that with a light coat of pale yellow and a light coat of interior green. The prop shafts will retain their silver color as reflected on the actual ship. This assembly, and the sea floor, will be covered with dirt which has be pulverized into a talcum form to simulate silt. I hope it works, I'm making it up as I go along.

And to the bow. I marked X's here there were hits. Obviously the hits on the deck were bomb hits and the hits on the hull were torpedos. The only exceptions to these are near bomb misses at either side of the extreme forward bow. This thing is going to be a mess. My only dilemma is on Mr Allen's video, the only damage I saw was a torpedo strike and a dent on the port side. As the ROV flew over the fore deck, I didn't see any damage at all. The only thing I can figure is the ROV had a very narrow field of view and it didn't go over any damaged areas.

Here's the bow before I have fun.

Steve

Steve

Building a kit from your stash is like cutting a head off a Hydra, two more take it's place.


http://www.spamodeler.com/forum/

  • Member since
    July 2014
Posted by modelcrazy on Monday, June 8, 2015 10:06 AM

Here is the internal structure for the bow. It is constructed from cardboard instead of sheet styrene. I's a whole lot easier to cut and form, not to mention much cheaper. My wife's idea Confused. Another of my wife's ideas, is the #1 turret barbette made form a paper towel tube. I was wondering how I could bend the cardboard without making a bunch of creases. Boy, I'm glad I have her.
Sorry for the fuzzy image. I still have to install the bulkheads on the upper deck and a considerable amount of work to do to the barbette to make it look plausible, before I start to destroy everything I made.

Steve

Building a kit from your stash is like cutting a head off a Hydra, two more take it's place.


http://www.spamodeler.com/forum/

  • Member since
    March 2005
Posted by philo426 on Monday, June 8, 2015 10:33 AM

Hey,whatever works!Should be a great diorama when completed!

  • Member since
    August 2008
Posted by tankerbuilder on Monday, June 8, 2015 1:19 PM

Yeah ;

   Down at the bow and all the topside broken stuff . Gonna work the heck out of my parts box. That's a good suggestion , that ship isn't coming out as good as I want, so , I guess I've got a candidate !

  • Member since
    August 2008
Posted by tankerbuilder on Monday, June 8, 2015 1:24 PM

Note;

  Where you've got your torpedo hole is good . Just remember the real force of the explosion would dent the bottom outward and the subsequent decks upward and inward some ! T.B.

  • Member since
    June 2013
Posted by RobGroot4 on Monday, June 8, 2015 5:10 PM

The cardboard looks really good too, and it might be easier to bend and shape the way you want it, particularly if you go for ragged edges.  Great idea with the paper towel roll!

Groot

"Firing flares while dumping fuel may ruin your day" SH-60B NATOPS

  • Member since
    March 2005
Posted by philo426 on Monday, June 8, 2015 5:52 PM

Yes this is going to be a good one!

  • Member since
    July 2014
Posted by modelcrazy on Tuesday, June 9, 2015 11:02 PM

Thanks guys,

I did some more work on the bow tonight. I'ts still bothering me why I didn't see more damage on the video than I did. Maybe, as I said before, the ROV just didn't fly over the area, or maybe the hit locations were reported wrong, or there were some dud bombs, or the bombs just didn't do that much damage, or all of the above. The same goes for the torpedos. So with this in mind, I've decided to compromise. I do know there was the torpedo damage an dent on the port, and a crease on the starboard side from the bow slamming into the sea floor, so those I will show. The bomb strikes I will show as dents and some penetration outside of the citadel forward of turret 1. The deck on the port side will have been blown outward by the weakening of the bomb strikes, and the concussions from the torpedos. Of course, one day more pictures will come out and show me to be totally inaccurate, but oh well.
So here are tonights pics. After thinning the plastic, I used a heat gun and made a crease for the impact damage.


Thinning in the same manner, I cut through the hull for the torpedo hit and heated and dented the hull for the near miss dent. I kinda heated it up too much and blew through the plastic, so I glued a piece of sheet styrene behind it and added some filler. It should turn out alright. I'm trying a different idea for the metal this go around, and am gluing the aluminum to the inside of the hull instead of the outside. Well see how this works out. By the way, any interior bulkheads that will be seen will have more work to them yet.

The deck has similar work done to it, I just don't have any pics of it right now. I also added some interest to the barbette by making an inner sleeve and cutting out a piece which will act as the roller bearing plate. I need to come up with something to duplicate the roller bearings, and probably use some left over watertight doors from my PE set to throw in there to make things interesting.

Steve

Steve

Building a kit from your stash is like cutting a head off a Hydra, two more take it's place.


http://www.spamodeler.com/forum/

  • Member since
    July 2014
Posted by modelcrazy on Friday, June 12, 2015 10:44 PM

Another update, I a almost finished with the damage, just a few more things to do. I'm also going to add some wires to simulate cabling and conduits. I need to hurry. My computer just told me I had 14 minutes before restarting. Boy it didn't even ask if I was doing anything important.

Steve

Steve

Building a kit from your stash is like cutting a head off a Hydra, two more take it's place.


http://www.spamodeler.com/forum/

  • Member since
    March 2005
Posted by philo426 on Friday, June 12, 2015 10:51 PM

Great work!

  • Member since
    July 2014
Posted by modelcrazy on Friday, June 12, 2015 11:04 PM

Ok, now that it has rebooted, Thanks Philo.

Like I was saying, I still want to add some interest in the form of cabling and conduits. Also, I want to find something to simulate the roller bearings for the turret to place in the barbette, any ideas?

Steve

Building a kit from your stash is like cutting a head off a Hydra, two more take it's place.


http://www.spamodeler.com/forum/

  • Member since
    August 2008
Posted by tankerbuilder on Saturday, June 13, 2015 3:32 PM

M.C.;

   I replied to your post in autos . If there is an area that is visible as a flat vertical surface , you can cut out " Windows "  in the sides and then super- glue a piece of roaster foil over the hole  . You come back with a piece of window screen and press it into the foil before weathering .

 What this does is give an " Oil - Canned " effect to the hull sides from the gun and blast concussion denting the sheet steel between the frames and stringers .

  • Member since
    August 2008
Posted by tankerbuilder on Saturday, June 13, 2015 3:35 PM

M.C;

. Computers never do the " Right Thing " You know that ! Now as to those pictures . Holy Horse - Poop ! ! That is one darned fine bunch of work .You are definitely going in the right direction ! ! T.B.

  • Member since
    December 2002
  • From: Bury St Edmunds, Suffolk, England
Posted by Bish on Saturday, June 13, 2015 5:09 PM

That's just keeps getting better Steve. I really do like the look of those decks. What are you planning on using for the cables.

I am a Norfolk man and i glory in being so


On the bench: Airfix 1/72nd Harrier GR.3/Fujimi 1/72nd Ju 87D-3

  • Member since
    July 2014
Posted by modelcrazy on Saturday, June 13, 2015 9:34 PM

Thanks TB,

I'll certainly have to try that idea. I used a felt wheel in a mototool to try to simulate the oil canning, the results were.... fair.

Bish

I am using small 30 ga wire strands and its insulation. I pull out the strands out of the insulation. I'm also using fine solder.

Steve

Steve

Building a kit from your stash is like cutting a head off a Hydra, two more take it's place.


http://www.spamodeler.com/forum/

  • Member since
    July 2014
Posted by modelcrazy on Monday, June 15, 2015 10:45 AM

I've got some picture updates from the weekend,

The completed bow and stern with the rust.

The completed bow and stern with the algae green.

And the bow and stern in their final resting places.

Next, I will get some expanding foam to fill the sea floor under the bow and stern, smooth it with acrylic gel, and apply the dirt/silt to the entire thing. I will apply the sea life after that.

Steve

EDIT, I still have a little more painting to do here and there, as well as scatter some debris along the floor.

Steve

Building a kit from your stash is like cutting a head off a Hydra, two more take it's place.


http://www.spamodeler.com/forum/

  • Member since
    November 2009
  • From: SW Virginia
Posted by Gamera on Monday, June 15, 2015 11:12 AM

WOW, she looks fantastic Steve! Love how the rust and algae came out!  

"I dream in fire but work in clay." -Arthur Machen


  • Member since
    December 2002
  • From: Bury St Edmunds, Suffolk, England
Posted by Bish on Monday, June 15, 2015 11:14 AM

Now that looks really different. How did you do the algae, that does look really nice.

I am a Norfolk man and i glory in being so


On the bench: Airfix 1/72nd Harrier GR.3/Fujimi 1/72nd Ju 87D-3

  • Member since
    July 2014
Posted by modelcrazy on Monday, June 15, 2015 11:45 AM

Bish,

After the "rust", which is a wash of acrylic Burnt Umber, followed up with a wash of highly diluted rust colored pastels, I sprayed light cotes of Tamiya J.A. Grey, which looks more like pale green, and Interior Green.

The silt should top it all off nicely. I will probably use 3M spray glue to attach the silt to the bow and stern, and a thin coat of Mod Podge over a painted surface to attach the silt to the sea floor.

Steve

Steve

Building a kit from your stash is like cutting a head off a Hydra, two more take it's place.


http://www.spamodeler.com/forum/

  • Member since
    December 2002
  • From: Bury St Edmunds, Suffolk, England
Posted by Bish on Monday, June 15, 2015 11:52 AM

Right, got it.Its worked nicely.

Sorry if you mentioned this earlier. But its clear that there is a large chunk missing in the middle. did that settle much further away from the 2 ends or was it just blown apart.

I am a Norfolk man and i glory in being so


On the bench: Airfix 1/72nd Harrier GR.3/Fujimi 1/72nd Ju 87D-3

  • Member since
    July 2014
Posted by modelcrazy on Monday, June 15, 2015 11:58 AM

Bish
But its clear that there is a large chunk missing in the middle. did that settle much further away from the 2 ends or was it just blown apart.

Well both actually.

Here is the side scan image. The guy is pointing near the stern. The bow is to the left of the stern, and the rest of the ship is the debris field in the upper left area of the image. I was pretty devastated after it went under, probably from implosion since a lot of the Citadel was still watertight.

Steve

Building a kit from your stash is like cutting a head off a Hydra, two more take it's place.


http://www.spamodeler.com/forum/

  • Member since
    December 2002
  • From: Bury St Edmunds, Suffolk, England
Posted by Bish on Monday, June 15, 2015 12:08 PM

WOW, that must have been some bang. I have heard of that while watching documentaries on other ships, so I did think it might have been that. But for such a big chunk to go like that, I would not have expected that.

I am a Norfolk man and i glory in being so


On the bench: Airfix 1/72nd Harrier GR.3/Fujimi 1/72nd Ju 87D-3

  • Member since
    October 2008
  • From: Georgia
Posted by Rigidrider on Monday, June 15, 2015 12:16 PM

MC (Steve) Man... you sir are doing an AMAZING job here. I am in awe, and anxiously wait the new progress pics... Bravo sir!

Doug

When Life Hands You A Bucket Of Lemons...

Make Lemonade!

Then Sell It Back At $2 Bucks A Glass...

  • Member since
    July 2014
Posted by modelcrazy on Monday, June 15, 2015 12:20 PM

Bish
WOW, that must have been some bang.

The survivors thought it was a magazine explosion, but I guess the "experts" believe it was more likely implosion. The magazines would have been flooded at the time she broke up.

Doug, thanks.

It is coming together much faster than I anticipated.

Steve

Steve

Building a kit from your stash is like cutting a head off a Hydra, two more take it's place.


http://www.spamodeler.com/forum/

  • Member since
    December 2003
  • From: 37deg 40.13' N 95deg 29.10'W
Posted by scottrc on Monday, June 15, 2015 1:05 PM

Steve,

Looking at your bow and stern sections gives me the creeps knowing what carnage had to have taken place within those passageways.  That is a compliment to how well the affect you are doing at creating this display.

Scott

  • Member since
    July 2014
Posted by modelcrazy on Monday, June 15, 2015 1:09 PM

Yeah, it was a little creepy making it and trying to imagine what it looks like.

Steve

Building a kit from your stash is like cutting a head off a Hydra, two more take it's place.


http://www.spamodeler.com/forum/

  • Member since
    September 2012
Posted by GMorrison on Monday, June 15, 2015 5:11 PM

I will freely admit that I was skeptical when you proposed this. I've just seen it done many times with little regard to the scale and attention to all of the minute details.

You've really blown this one out of the water!

Ha, been waiting to say that...

A most excellent job, really well done.

Is there going to be a tiny little RUV with an LED spotlight shining on the hull?

 Modeling is an excuse to buy books.


  • Member since
    July 2014
Posted by modelcrazy on Monday, June 15, 2015 5:25 PM

GMorrison
Is there going to be a tiny little RUV with an LED spotlight shining on the hull?

You know, I honestly gave that some thought. A wee little RUV with a tiny LED spotlight.

Steve

Building a kit from your stash is like cutting a head off a Hydra, two more take it's place.


http://www.spamodeler.com/forum/

  • Member since
    July 2014
Posted by modelcrazy on Monday, June 15, 2015 5:29 PM

When I take the final pictures, there will be a dark blue background with low light. That should give the impression of depth and darkness. I wasn't sure I could pull it off either, but I must admit, I'm pretty happy with the results.

Still thinking of the RUV.

Steve

Building a kit from your stash is like cutting a head off a Hydra, two more take it's place.


http://www.spamodeler.com/forum/

  • Member since
    August 2008
Posted by tankerbuilder on Monday, June 15, 2015 5:32 PM

Oh , Goody !

You gotta do the R.O.V. , you gotta . Now , must you be so good ? My comments on all of this is again , Holy Horsepoop , whatta darned fine job ! !

  • Member since
    March 2003
  • From: Towson MD
Posted by gregbale on Monday, June 15, 2015 9:17 PM

Steve, this is really a work of art! Very impressed with your work.

{And my vote also is for the tiny ROV. That would be really cool.)

Greg

George Lewis:

"Every time you correct me on my grammar I love you a little fewer."
 
  • Member since
    July 2014
Posted by modelcrazy on Monday, June 15, 2015 11:37 PM

I was working on the theory and I believe I can do it. The video shows the ROV pretty good as they pull it out and show the audience. It will be pretty small, no more than maybe 4mm in that scale. I believe I can find an LED that size and connect it to an umbilical that disappears toward the surface. The trick will be making it look like it is floating and supplying power to the LED. But I'm an electronic technician after all and work on micro components,  so I should be able to come up with something.

Steve

Building a kit from your stash is like cutting a head off a Hydra, two more take it's place.


http://www.spamodeler.com/forum/

  • Member since
    June 2013
Posted by RobGroot4 on Tuesday, June 16, 2015 3:17 AM

Steve,

 This is really looking awesome!

Groot

"Firing flares while dumping fuel may ruin your day" SH-60B NATOPS

  • Member since
    October 2008
  • From: Georgia
Posted by Rigidrider on Tuesday, June 16, 2015 5:01 PM

Steve... That will look very cool! Can't wait to see it!

When Life Hands You A Bucket Of Lemons...

Make Lemonade!

Then Sell It Back At $2 Bucks A Glass...

  • Member since
    July 2014
Posted by modelcrazy on Tuesday, June 16, 2015 11:12 PM

Thanks Doug,

Here is a surplus LED I got for the ROV. It puts off a yellow light, but  I'll say that will just enhances the depth and the particulates in the water.

The stiff wire will let the ROV "hover". Now I need to recreate the ROV and disguise the wire as an umbilical.

Steve

Steve

Building a kit from your stash is like cutting a head off a Hydra, two more take it's place.


http://www.spamodeler.com/forum/

  • Member since
    September 2012
Posted by GMorrison on Wednesday, June 17, 2015 12:34 AM

I've done before, on a much larger scale- hide the second conductor as a very short piece of black copper that holds the light engine up from the base.

 Modeling is an excuse to buy books.


  • Member since
    April 2013
Posted by KnightTemplar5150 on Wednesday, June 17, 2015 10:49 AM
Nice work, Steve - I'm truly impressed at how quickly this has all come together! Really looking forward to seeing the completed scene!
  • Member since
    November 2009
  • From: SW Virginia
Posted by Gamera on Wednesday, June 17, 2015 11:20 AM

I love the idea of ROV, fantastic work Steve! One of the guys in our club did something similar with a recreation of the Titanic wreck.

"I dream in fire but work in clay." -Arthur Machen


  • Member since
    July 2014
Posted by modelcrazy on Wednesday, June 17, 2015 11:31 AM

Thanks guys.

My idea for the ROV is to use heat shrink on the single strand wires to the LED. The power wires will exit the heat shrink at a point where they can enter into the bow at a hole at the forward most part. I will insert some single strand wire into the rest of the heat shrink and let it then head up in the direction of the surface. The power wires, which are now inside the bow, will exit through the bottom of the hull, into the Styrofoam and attach to my circuit board and switch. The ROV will be so small and light that the single strand wires should be sufficient to hold it up. The umbilical will trail from the ROV, past the hole in the bow then up. The ROV will be surveying the bow deck, as shown in the video.

Steve

Building a kit from your stash is like cutting a head off a Hydra, two more take it's place.


http://www.spamodeler.com/forum/

  • Member since
    July 2014
Posted by modelcrazy on Wednesday, June 17, 2015 2:08 PM

Here's the idea.

The heat shrink has the 2 power wires which lead from the LED to the hole in the heat shrink. The wires will go from the hole to the supply. The other part of the heat shrink has a 28 ga solid core wire for stiffness and will continue heading up to the surface. I realize the umbilical will be a little out of scale, but that can't be helped.

Steve

Building a kit from your stash is like cutting a head off a Hydra, two more take it's place.


http://www.spamodeler.com/forum/

  • Member since
    July 2014
Posted by modelcrazy on Thursday, June 18, 2015 10:42 AM

I made up the little ROV using some left over PE, looking at the actual ROV and some artistic licence. I will still need to do a little touch up painting.

That should do the trick I think.

I also applied some expanding foam to the sea floor with the Bow and stern in their places and wrapped in plastic wrap so I can remove them for painting.

Steve

Building a kit from your stash is like cutting a head off a Hydra, two more take it's place.


http://www.spamodeler.com/forum/

  • Member since
    May 2013
  • From: Indiana, USA
Posted by Greg on Thursday, June 18, 2015 11:27 AM

What a great project. Thanks for sharing your thought processes and progress with us, Steve.

Truly impressive work, and a joy to watch.

SUV is looking very cool so far.

  • Member since
    March 2005
Posted by philo426 on Thursday, June 18, 2015 11:36 AM

Yes the ROV is a nice touch and adds additional interest to an already outstanding project!

  • Member since
    July 2014
Posted by modelcrazy on Thursday, June 18, 2015 11:43 AM

Thanks guys,

This project is really a kick. I had no idea it would be so fun and it really makes me stretch outside my bubble.

I think I'll take this to the IPMS contest here in Boise as well.

Steve

Building a kit from your stash is like cutting a head off a Hydra, two more take it's place.


http://www.spamodeler.com/forum/

  • Member since
    May 2013
  • From: Indiana, USA
Posted by Greg on Thursday, June 18, 2015 12:10 PM

modelcrazy

I think I'll take this to the IPMS contest here in Boise as well.

You should do that!

  • Member since
    September 2012
Posted by GMorrison on Thursday, June 18, 2015 12:27 PM

modelcrazy

Oh my!!!

 Modeling is an excuse to buy books.


  • Member since
    July 2014
Posted by modelcrazy on Thursday, June 18, 2015 11:15 PM

I covered the bow and stern with plastic wrap, sprayed expanding foam under them and allowed it to expand out to simulate the mud, which would have piled up at impact. I then covered the expanded foam with paper and acrylic gel. After this dries, I will paint the sea floor with brown and algae green, similar to the hull, except the rust of course. The ROV will be placed at the bow and surveying the anchor chain, as in the video

Steve

Steve

Building a kit from your stash is like cutting a head off a Hydra, two more take it's place.


http://www.spamodeler.com/forum/

  • Member since
    August 2008
Posted by tankerbuilder on Friday, June 19, 2015 8:52 AM

M.C.;

   I have run out of expletives , " Holy Horse Poop  "doesn't come close . " Wholly Dinosaur Poop !  "LOL.LOL. You are doing a super great and interesting job .This is truly a work of art !

  • Member since
    August 2008
Posted by tankerbuilder on Friday, June 19, 2015 8:53 AM

Hey Greg !

   You know what ? If he does , He'll blow them away !   T.B.

  • Member since
    May 2013
  • From: Indiana, USA
Posted by Greg on Friday, June 19, 2015 11:12 AM

tankerbuilder

Hey Greg !

   You know what ? If he does , He'll blow them away !   T.B.

Agreed, TB.

  • Member since
    July 2014
Posted by modelcrazy on Friday, June 19, 2015 11:20 AM

Thank you so much Greg and TB, the praise is much appreciated,

Steve

Building a kit from your stash is like cutting a head off a Hydra, two more take it's place.


http://www.spamodeler.com/forum/

  • Member since
    November 2009
  • From: SW Virginia
Posted by Gamera on Friday, June 19, 2015 1:12 PM

tankerbuilder

M.C.;

   I have run out of expletives , " Holy Horse Poop  "doesn't come close . " Wholly Dinosaur Poop !  "LOL.LOL. You are doing a super great and interesting job .This is truly a work of art !

Lol, I'm just going to say WOW, COOL!!! 

"I dream in fire but work in clay." -Arthur Machen


  • Member since
    October 2008
  • From: Georgia
Posted by Rigidrider on Saturday, June 20, 2015 4:59 PM

Steve... I am dying to see this one done!!! Excellent work so far, and very creative!

When Life Hands You A Bucket Of Lemons...

Make Lemonade!

Then Sell It Back At $2 Bucks A Glass...

  • Member since
    July 2014
Posted by modelcrazy on Saturday, June 20, 2015 10:48 PM

Thanks again guys,

I worked on the seafloor today. I sprayed Loctite spray adhesive, then sprinkled some dirt, which was pulverized into dust, onto it. I sprayed it again and repeated the process. Next, I'll add some debris from the spare parts box, run the wires for the ROV and install the bow and stern. I'll then sprinkle some silt onto the parts and add some seafife. I think I'll spray the whole thing with an acrylic gloss to simulate wetness, which should darken the silt.
I'm almost done.

Steve

Building a kit from your stash is like cutting a head off a Hydra, two more take it's place.


http://www.spamodeler.com/forum/

  • Member since
    October 2008
  • From: Georgia
Posted by Rigidrider on Sunday, June 21, 2015 8:06 AM

Very Cool!  Question please... What was the expanding foam you used? Wasn't Great Stuff was it?

When Life Hands You A Bucket Of Lemons...

Make Lemonade!

Then Sell It Back At $2 Bucks A Glass...

  • Member since
    July 2014
Posted by modelcrazy on Sunday, June 21, 2015 10:31 AM

Rigidrider
What was the expanding foam you used? Wasn't Great Stuff was it?

It was "Touch N Foam Home Seal" minimally expanding. The cheapest off brand I could.

Steve

Building a kit from your stash is like cutting a head off a Hydra, two more take it's place.


http://www.spamodeler.com/forum/

  • Member since
    May 2003
  • From: Greenville, NC
Posted by jtilley on Sunday, June 21, 2015 2:45 PM

You made a wise decision - if inadvertently. Quite a few years ago I bought a can of Great Stuff to plug up several leaks in the house where the Orkin guy and I thought roaches might be getting in (around the sink  pipes in the kitchen and bathrooms, the washer line, the vent pipe in the roof, etc.). I started by  getting under the kitchen sink. The can of Great Stuff let out a huge gusher of...stuff, which immediately expanded to at least three times its original size. Then the valve stuck in the On position.

That...stuff isn't cheap, so I was put in the embarrassing position of running around the house with that gushing can in my hand, yelling at everybody to get out of my way, while I made my way to all three bathrooms and up the ladder to the attic. Needless to say, when I was done I threw the can away.

I hate Great Stuff.

Amazing model. It shows a rare combination of research, scale modeling, ingenuity, and artistry. I'm looking forward to the finished product. And I can't believe how FAST you've done it!

Youth, talent, hard work, and enthusiasm are no match for old age and treachery.

  • Member since
    October 2008
  • From: Georgia
Posted by Rigidrider on Sunday, June 21, 2015 6:10 PM

LOLOL...Sorry JTilley, but I can picture that happening! I've used it several times but you never know how much to start with, and the last time I used it, I replaced a walk in door to my garage, and used it to fill in around the door before putting the trim on. the next morning I came out and there were huge blobs of the stuff that had oozed out all around the door trim! LOLOL... had to scrape and retrim dry wall and sand before being able to paint. What a mess...

Doug

When Life Hands You A Bucket Of Lemons...

Make Lemonade!

Then Sell It Back At $2 Bucks A Glass...

  • Member since
    July 2014
Posted by modelcrazy on Sunday, June 21, 2015 6:28 PM

Thank you Mr Tilley,

I'm hopping  to have some completed pics soon. I have both sections installed, everything wired, and the silt spread. I am now working on attaching the sea life.

Steve

Building a kit from your stash is like cutting a head off a Hydra, two more take it's place.


http://www.spamodeler.com/forum/

  • Member since
    July 2014
Posted by modelcrazy on Sunday, June 21, 2015 6:39 PM

By the way. When I was a contractor, I was roughing in a soaker bathtub in a house. My partner had just sprayed a couple cans worth of the stuff under the tub for insulation purposes. So it starts it's expanding trick, and bulges out about a foot, which was typically fine as we would just cut away the excess the next day. Well I dropped my brand new 30' tape measure into the goop and watched it swallow it like the blob. I wasn't about to stick my hand t in there, so when we cut it away the next day, I retrieved my measure but couldn't get the stuff off it. I still have that tape measure, and it is still mostly covered with Great Stuff.

Steve

Building a kit from your stash is like cutting a head off a Hydra, two more take it's place.


http://www.spamodeler.com/forum/

  • Member since
    July 2014
Posted by modelcrazy on Monday, June 22, 2015 1:49 PM

This is where I'm at so far. I need to attach some sea life to everything, and set the lighting mood in my "studio" (garage) to take final pictures, but here's a small taste. The ROV is lit, but you can't really see it with the ambient light. I wish I could make the ROV umbilical a little smaller. I'll hit it with a heat gun again to see what I can do.

Steve

Building a kit from your stash is like cutting a head off a Hydra, two more take it's place.


http://www.spamodeler.com/forum/

  • Member since
    August 2008
Posted by tankerbuilder on Monday, June 22, 2015 4:56 PM

Yo !

  Don't ruin all that beautiful work now . If it won't get smaller , Well , So What ? You are doing some kind of fantastic job . In my imagination I can just barely see the umbilical for the R.O.V. , so there ! !

  • Member since
    June 2013
Posted by RobGroot4 on Monday, June 22, 2015 6:34 PM

Yes I can't wait to see the whole thing.  This is such an interesting project, particularly adding the ROV!


Groot

"Firing flares while dumping fuel may ruin your day" SH-60B NATOPS

  • Member since
    June 2003
  • From: Cavite, Philippines
Posted by allan on Monday, June 22, 2015 9:02 PM

Darned it I cant believe that ROV!  Fantastic, just fantastic! You really are "Model Crazy."

No bucks, no Buck Rogers

  • Member since
    July 2014
Posted by modelcrazy on Monday, June 22, 2015 11:20 PM

LOL thanks guys.

I took some pictures of the finished build tonight, but I was completely unhappy with the sea life I added. There was too much contrast with the dark color of the ship, and the scale was way off. I removed them but need to go back over the places where they were and repaint. I also waited too long to take the pictures and it was too dark for the camera to focus.

Anyway, I will take some new ones tomorrow.

Steve

Steve

Building a kit from your stash is like cutting a head off a Hydra, two more take it's place.


http://www.spamodeler.com/forum/

  • Member since
    September 2012
Posted by GMorrison on Tuesday, June 23, 2015 12:11 AM

No sea life! Remember the point of a diorama is to tell a story. In this case you've chosen the discovery of the wreck.

Good that, and do not let your audience have their attention waver.

I'd consider spraying a little black on the areas not in the vicinity of the ROV.

The big Aha! moment...

 Modeling is an excuse to buy books.


  • Member since
    September 2012
Posted by GMorrison on Tuesday, June 23, 2015 12:13 AM

This is a really fine thing you've done.

 Modeling is an excuse to buy books.


  • Member since
    March 2003
  • From: Towson MD
Posted by gregbale on Tuesday, June 23, 2015 7:07 AM

This is so incredibly cool. You've done a masterful job.

Greg

George Lewis:

"Every time you correct me on my grammar I love you a little fewer."
 
  • Member since
    August 2008
Posted by tankerbuilder on Tuesday, June 23, 2015 9:01 AM

Hey !

Don't forget , at that depth except for what you already have , there ain't much in visible plant life to see , just the normal pile of lichens ( underwater types ) and rusticles . Don't go putting a shark in there or sumpin .You have it nailed .

  • Member since
    July 2014
Posted by modelcrazy on Tuesday, June 23, 2015 1:32 PM

Thanks for the vote of confidence guys. I was very unhappy with the sea life, and in 1/350 scale, the tiny creatures I was attaching would have been anywhere from 4 to 6 feet tall. I'm going to do some minor fixes and take some better shots tonight. I have a better idea for lighting as well.

And no TB, I'm not putting a shark in there at 3000 + feet. Now a Sperm Whale.......Confused Just kidding.
I wish  I had kept my best (fair) picture from last night to at least show you something, but I deleted them all.

Steve

Building a kit from your stash is like cutting a head off a Hydra, two more take it's place.


http://www.spamodeler.com/forum/

  • Member since
    August 2008
Posted by tankerbuilder on Tuesday, June 23, 2015 5:46 PM

Ah , Well ;

   I got the feeling  you won't let us down though . P.S. Whale Sharks can go down to 2000 ft they think !

  • Member since
    July 2014
Posted by modelcrazy on Tuesday, June 23, 2015 8:58 PM

Here it is.

I'm going  with these pictures.

There's a lot of them so you may want some some popcorn.

This is what it looks like without the "special effects"

Steve

Steve

Building a kit from your stash is like cutting a head off a Hydra, two more take it's place.


http://www.spamodeler.com/forum/

  • Member since
    June 2003
  • From: Cavite, Philippines
Posted by allan on Tuesday, June 23, 2015 9:37 PM

Well that gave me the goosebumps.  Absolutely convincing. This could be used for movie ala Titanic.

No bucks, no Buck Rogers

  • Member since
    September 2012
Posted by GMorrison on Tuesday, June 23, 2015 9:48 PM

This is incredible stuff. Way over on the art side! Very very well done!

Bow DownBow DownBow DownBow DownBow DownBow DownBow DownBow DownBow DownBow DownBow DownBow DownBow DownBow Down

 Modeling is an excuse to buy books.


  • Member since
    July 2014
Posted by modelcrazy on Tuesday, June 23, 2015 10:00 PM

Thank you so much guys!!!!!!!!!!

And thanks go to Tanker Builder for the idea of a ship in trouble.

Steve

Building a kit from your stash is like cutting a head off a Hydra, two more take it's place.


http://www.spamodeler.com/forum/

  • Member since
    April 2015
Posted by Scarecrow Joe on Tuesday, June 23, 2015 10:04 PM

Impressive, must impressive!!

  • Member since
    April 2013
Posted by KnightTemplar5150 on Tuesday, June 23, 2015 10:39 PM
Congratulations on completing your build, Steve. Thanks for taking all of us along on the ride with you - it's been a lot of fun watching this all come together!
  • Member since
    March 2003
  • From: Western North Carolina
Posted by Tojo72 on Wednesday, June 24, 2015 6:38 AM

Very interesting build,great idea.

  • Member since
    November 2009
  • From: SW Virginia
Posted by Gamera on Wednesday, June 24, 2015 8:04 AM

Absolutely fantastic Steve!!! Love everything about what you've done here!

"I dream in fire but work in clay." -Arthur Machen


  • Member since
    August 2014
  • From: Willamette Valley, Oregon
Posted by goldhammer on Wednesday, June 24, 2015 9:16 AM

Get together with Gamera and see if he will accept her in the Japanese GB.  Absolutely stunning pics and work on all the damage.

  • Member since
    May 2013
  • From: Indiana, USA
Posted by Greg on Wednesday, June 24, 2015 9:30 AM

Bravo!!!  YesYesYes Excellent photography too, truly captured the mood.

This has been a joy to watch, and I must say I've looked forward to seeing what you've been up to each morning with my coffee. Thanks for the WIP, Steve.

Now all you need to do is build a specially lit darkroom to display it in. Stick out tongue

  • Member since
    March 2004
  • From: Spartanburg, SC
Posted by subfixer on Wednesday, June 24, 2015 10:34 AM

YesYesToast  Well done!

I'm from the government and I'm here to help.

  • Member since
    November 2009
  • From: SW Virginia
Posted by Gamera on Wednesday, June 24, 2015 10:37 AM

goldhammer

Get together with Gamera and see if he will accept her in the Japanese GB.  Absolutely stunning pics and work on all the damage.

Lol, great idea but Steve is already cross-posting his work on both threads Wink

"I dream in fire but work in clay." -Arthur Machen


  • Member since
    July 2014
Posted by modelcrazy on Wednesday, June 24, 2015 11:32 AM

Greg
Now all you need to do is build a specially lit darkroom to display it in.

Thanks everybody, I'm truly humbled Embarrassed

Greg, It would be great if I could find a museum to send it to.

Steve

Building a kit from your stash is like cutting a head off a Hydra, two more take it's place.


http://www.spamodeler.com/forum/

  • Member since
    December 2002
  • From: Bury St Edmunds, Suffolk, England
Posted by Bish on Wednesday, June 24, 2015 12:23 PM

That is just brilliant. Its just so realistic and so well done. And that ROV cable looks real nice once you pull back. It would be nice if it could be shopped onto a seabed image.

Thanks for sharing this.

I am a Norfolk man and i glory in being so


On the bench: Airfix 1/72nd Harrier GR.3/Fujimi 1/72nd Ju 87D-3

  • Member since
    September 2003
  • From: AandF in the Badger State
Posted by checkmateking02 on Wednesday, June 24, 2015 12:55 PM

Exceptionally realistic!  


  • Member since
    June 2013
Posted by RobGroot4 on Wednesday, June 24, 2015 7:11 PM

Simply incredible.  Thanks for sharing all of this with us!

Groot

"Firing flares while dumping fuel may ruin your day" SH-60B NATOPS

  • Member since
    December 2013
Posted by CodyJ on Wednesday, June 24, 2015 7:32 PM

Wow, how did I miss this?   Just insane Steve!   That is beyond impressive!  SUPERB!  

  • Member since
    July 2004
  • From: Sonora Desert
Posted by stikpusher on Thursday, June 25, 2015 11:03 AM

Absolutely fabulous! I can't really say more than everybody else already has. Simply put, WOW!


F is for FIRE, That burns down the whole town!

U is for URANIUM... BOMBS!

N is for NO SURVIVORS...

       - Plankton

LSM


  • Member since
    August 2008
Posted by tankerbuilder on Thursday, June 25, 2015 12:20 PM

Hey !

   As my little neighbor kid says when he likes something . M.C. You Are Da Bomb ! !  When do you need to lease my Underwater Exploration surface fleet ? we'll go find another and see if you can duplicate that  .Wow ! Words don't describe my feelings on such unusual craftmanship !

 I even have a converted Minesweeper from Lindberg painted like one of Clive Cussler's N.U.M.A. ships ! With a Triton 3-3300 on board !       T.B.

  • Member since
    July 2014
Posted by modelcrazy on Thursday, June 25, 2015 1:07 PM

Thanks TB and Stick, It's appreciated.

Ya know TB, this wouldn't have happened if you hadn't made me think of it.

Steve

Building a kit from your stash is like cutting a head off a Hydra, two more take it's place.


http://www.spamodeler.com/forum/

  • Member since
    May 2013
  • From: Indiana, USA
Posted by Greg on Thursday, June 25, 2015 4:53 PM

modelcrazy

Ya know TB, this wouldn't have happened if you hadn't made me think of it.

I'd been wondering about that. Geeked

  • Member since
    July 2014
Posted by modelcrazy on Thursday, June 25, 2015 11:14 PM

Greg,

TB had a thread he started at the end of May called "Ships in Trouble"                     http://cs.finescale.com/fsm/modeling_subjects/f/7/t/165706.aspx,     TB poses the question as to why more people don't try their hand at building a damaged ship. That got me to thinking. And since I had an old unfinished Yamato just laying around, I came up with this dio idea.

Steve

Steve

Building a kit from your stash is like cutting a head off a Hydra, two more take it's place.


http://www.spamodeler.com/forum/

  • Member since
    May 2013
  • From: Indiana, USA
Posted by Greg on Friday, June 26, 2015 8:44 AM

modelcrazy

Greg,

TB had a thread he started at the end of May called "Ships in Trouble"                     http://cs.finescale.com/fsm/modeling_subjects/f/7/t/165706.aspx,     TB poses the question as to why more people don't try their hand at building a damaged ship. That got me to thinking. And since I had an old unfinished Yamato just laying around, I came up with this dio idea.

Steve

Ahah, I misunderstood. I didn't realize TB provided the idea to you in general. That's very cool, and also cool that you mentioned it.

Me, I was confused. Was thinking TB gave you the idea for the SUV but that was GMorrison.

  • Member since
    August 2008
Posted by tankerbuilder on Friday, June 26, 2015 8:57 AM

Yeah Greg :

I had posted that you see damaged tanks , planes , and autos , but rarely if ever a ship . the degree of trouble would be up to you of course . Now , Model Crazy did a Musashi that really got into trouble ! Beautiful work isn't it ?     T.B.

  • Member since
    May 2013
  • From: Indiana, USA
Posted by Greg on Friday, June 26, 2015 9:09 AM

Now that you mention it, I read that thread and it slipped my mind.

Beautiful indeed. If it makes it's way to a museum, you should insist on an "inspired by TB" tag. :)

  • Member since
    July 2014
Posted by modelcrazy on Friday, June 26, 2015 9:56 AM

You know it.

Steve

Building a kit from your stash is like cutting a head off a Hydra, two more take it's place.


http://www.spamodeler.com/forum/

  • Member since
    July 2014
Posted by modelcrazy on Wednesday, July 29, 2015 7:30 AM

Well I have fantastic news! The wreck was accepted by the Lexington museum in Corpus Christi TX. Rebekah Hughes, from the USS Flyer Project at the Great Lakes Naval Memorial and Museum, contacted them and the Lexington museum is interested in displaying the build, since the Lex was involved in the Musashi's sinking. This is beyond my hopes for this humble project.

I just wanted to share the news.

Steve

Steve

Building a kit from your stash is like cutting a head off a Hydra, two more take it's place.


http://www.spamodeler.com/forum/

  • Member since
    November 2009
  • From: SW Virginia
Posted by Gamera on Wednesday, July 29, 2015 7:39 AM

That's awesome Steve!!! Congrads!!!

"I dream in fire but work in clay." -Arthur Machen


  • Member since
    May 2013
  • From: Indiana, USA
Posted by Greg on Wednesday, July 29, 2015 10:11 AM

That is simply awesome, Steve!!!

Congratulations! Toast Wow

  • Member since
    September 2012
Posted by GMorrison on Wednesday, July 29, 2015 10:27 AM

What a great story.

 Modeling is an excuse to buy books.


  • Member since
    October 2008
  • From: Georgia
Posted by Rigidrider on Wednesday, July 29, 2015 10:49 AM

Steve... Thats great! Well deserved interest, for a amazing display of skill. Congratulations!  If you should get some pictures of yourbuild on display that would be incredible. Great news man...

Doug

When Life Hands You A Bucket Of Lemons...

Make Lemonade!

Then Sell It Back At $2 Bucks A Glass...

  • Member since
    December 2002
  • From: Bury St Edmunds, Suffolk, England
Posted by Bish on Wednesday, July 29, 2015 1:27 PM

That's great news Steve, thanks for sharing that.

I am a Norfolk man and i glory in being so


On the bench: Airfix 1/72nd Harrier GR.3/Fujimi 1/72nd Ju 87D-3

  • Member since
    May 2013
  • From: From the Mit, but live in Mason, O high ho
Posted by hogfanfs on Wednesday, July 29, 2015 3:47 PM

Congrats, Steve!!!

Haha, from shelf queen to museum piece! That is outstanding!!

 Bruce


 On the bench:  1/48 Eduard MiG-21MF

                        1/35 Takom Merkava Mk.I


  • Member since
    June 2013
Posted by RobGroot4 on Wednesday, July 29, 2015 4:28 PM

That's awesome!  Congratulations!

Groot

"Firing flares while dumping fuel may ruin your day" SH-60B NATOPS

  • Member since
    July 2014
Posted by modelcrazy on Wednesday, July 29, 2015 5:55 PM

hogfanfs
Haha, from shelf queen to museum piece!

Right? That just blows my mind. I was going to throw her away until TB had the idea of ships in trouble. I am so proud I could just burst. This is my first museum piece, and to think it started out as junk. Now it's exhibit junk.

thr Lexington museum will be in touch with me in a few days about how they want it shipped.

Thanks to everyone who followed my posts and gave incouragement

Steve

Steve

Building a kit from your stash is like cutting a head off a Hydra, two more take it's place.


http://www.spamodeler.com/forum/

  • Member since
    July 2014
Posted by modelcrazy on Wednesday, July 29, 2015 5:56 PM

hogfanfs
Haha, from shelf queen to museum piece!

Right? That just blows my mind. I was going to throw her away until TB had the idea of ships in trouble. I am so proud I could just burst. This is my first museum piece, and to think it started out as junk. Now it's exhibit junk.

thr Lexington museum will be in touch with me in a few days about how they want it shipped.

Thanks to everyone who followed my posts and gave encouragement

Steve

Steve

Building a kit from your stash is like cutting a head off a Hydra, two more take it's place.


http://www.spamodeler.com/forum/

  • Member since
    June 2003
  • From: Cavite, Philippines
Posted by allan on Wednesday, July 29, 2015 8:59 PM

Well if you ask me your work really belongs in a museum, so more people can appreciate it.  Congratulations Steve!

No bucks, no Buck Rogers

  • Member since
    July 2014
Posted by modelcrazy on Wednesday, September 23, 2015 2:40 PM


I received this email today from the Lexington Museum.
Good afternoon Steve,
 
We received your model and it is awesome. The detail is incredible….. and even more incredible was that it arrived in one piece. This will be an accessioned item in the museum so Cecil will be getting ahold of you for information and documentation. Also a brief bio of yourself as the model maker and an outline of how you actually did the build and what prompted you to build this model……. And how long it took to construct.
It will be displayed in a prominent spot….. don’t know exactly where yet because I am trying to figure a way to make it appear as if it were under water………
Anyway, thanks very much for your donation I’m sure it will fascinate visitors for many, many years.
 
Rusty
 
I will have to give credit to TB for the inspiration.
 
One day when I get some pictures from them I'll post them. This is my first museum exhibit so I am very excited. And just think, I just did this on a whim and was originally going to throw the Yamato away.

Steve

Building a kit from your stash is like cutting a head off a Hydra, two more take it's place.


http://www.spamodeler.com/forum/

  • Member since
    March 2003
  • From: Towson MD
Posted by gregbale on Wednesday, September 23, 2015 4:14 PM

Well done, Steve!

Greg

George Lewis:

"Every time you correct me on my grammar I love you a little fewer."
 
  • Member since
    June 2003
  • From: Cavite, Philippines
Posted by allan on Wednesday, September 23, 2015 8:07 PM

Im not surprised. That masterpiece is both impressive and sobering.

No bucks, no Buck Rogers

  • Member since
    August 2008
Posted by tankerbuilder on Saturday, September 26, 2015 6:54 AM

Oh No !

     I finished her about a year ago and it took four months to build the flight deck with windows ( Free-Form )  to show off the hangar deck . First carrier I,ve built in years , trying for the Midway .To many mods to go there . Will try this with another though .The ship came with two decks and the clear one is toast .

  • Member since
    May 2016
Posted by Xena on Sunday, May 22, 2016 4:35 AM

wow! Thanks for sharing, it looks great!

  • Member since
    July 2014
Posted by modelcrazy on Monday, May 23, 2016 9:45 AM

Thanks Xena!

Steve

Building a kit from your stash is like cutting a head off a Hydra, two more take it's place.


http://www.spamodeler.com/forum/

  • Member since
    December 2015
  • From: providence ,r.i.
Posted by templar1099 on Monday, May 23, 2016 12:59 PM

MC, this just popped up in the ships forum that says you responded 3 hours ago, didn't see a current posting but I went through the post to see the finished build. All I can say is that, to me, this work epitomizes  the best of all aspects of this hobby. National Geographic comes  to mind. Stupendous job.

"le plaisir delicieux et toujours nouveau d'une occupation inutile"

  • Member since
    July 2014
Posted by modelcrazy on Monday, May 23, 2016 1:11 PM

Thanks Templar,

I completed it back in June 2015 and it's at the Lexington Museum now. I don't know if they are displaying it yet though. They said that wanted to build a separate case for it to make it look like it was under water. 

Steve

Building a kit from your stash is like cutting a head off a Hydra, two more take it's place.


http://www.spamodeler.com/forum/

JOIN OUR COMMUNITY!

Our community is FREE to join. To participate you must either login or register for an account.

SEARCH FORUMS
FREE NEWSLETTER
By signing up you may also receive reader surveys and occasional special offers. We do not sell, rent or trade our email lists. View our Privacy Policy.