SEARCH FINESCALE.COM

Enter keywords or a search phrase below:

Liberty Ship Complete

7801 views
89 replies
1 rating 2 rating 3 rating 4 rating 5 rating
  • Member since
    December 2010
  • From: Salem, Oregon
Liberty Ship Complete
Posted by 1943Mike on Tuesday, September 15, 2015 11:43 AM

I've read lots about Liberty Ships color(s) to the point where I'm nearly back to square one Huh?. This discussion ten years ago:

http://cs.finescale.com/fsm/modeling_subjects/f/7/p/33023/342444.aspx

would seem to indicate that the entire ship was painted gray - including the weather deck. Others have said that the weather deck was painted deck blue. I am of a mind to paint the whole ship gray. I've three shades of gray in my paint stash and would like your opinions as to which of the three is the most acc urate (or, from a modelers' perspective, the most attractive) choice.

http://s36.photobucket.com/user/1943Mike/media/_9150553_zpsr7gvp6au.jpg.html


As my model currently stands she's been primed, had some filling and sanding done, has some deck furniture attached and, because I might like a hint of darker color beneath should I choose to "weather" the weather deck with a few scrapes and chips, the weather deck has been painted an undercoat of deck blue.

I'm building her as a waterline model and have a base ready to use Sculpey to make the waves but I want to have the hull (and the smaller deck pieces) painted before I permanently attach the ship to the base. So I'm ready to air brush but would like opinions before proceeding.

Pictures as she sits in my home made paint booth.

Mike


Mike

"Le temps est un grand maître, mais malheureusement, il tue tous ses élèves."

Hector Berlioz

  • Member since
    August 2008
Posted by tankerbuilder on Tuesday, September 15, 2015 1:16 PM

Hi;

   Most of the Liberties and Victorys I have seen were all one shade of grey unless brand spanking new ! Now many of the Victorys never went to war . But were built , then Mothballed . So small shipping lines Bought them and painted the decks either Deck Blue or Deck Red (a dark rust red ).

 Most of the Libertys that did survive for a while including the well known ones , were painted with deck Grey But , I believe a lot of them in Atlantic service that did survive the war were gray ( one shade ) all over . I do hope this helps you .I do know for fact that the " Ocala Victory " a ship owned by Olympic Steamship of Seattle in the late 60s had Dark Grey decks and Haze Grey overall .     T.B.       P.S. The first color looks closest to what I remember . Oh ! Don't forget there was a lot of salt scrubbing on them so you sould have a mess of color down low and around the stem . Just light variances to indicate sea time .

  • Member since
    August 2005
  • From: EG48
Posted by Tracy White on Tuesday, September 15, 2015 2:29 PM

Liberties were operated by the Maritime Commission and not the US Navy, so the Navy refused to give them paint or access to the new camouflage colors at first. It wasn't until maybe mid 1943 that enough commercial paint manufacturers had the paint formulas that they threw up their hands and gave up on keeping the formulas secret.  So, until that point at least Navy Deck Blue is not likely on a non USN operated ship. After that it's more possible, but I'm not sure how likely. Not really what you were asking for, but I wanted to throw it out there.

Tracy White Researcher@Large

  • Member since
    September 2012
Posted by GMorrison on Tuesday, September 15, 2015 2:42 PM

My understanding is the 5 O Ocean Gray is generally a good match. I'm not saying they were painted that color, as Tracy notes it was a commercial product.

And yes they were held by their ankles and dipped in Gray.

 Modeling is an excuse to buy books.


  • Member since
    December 2010
  • From: Salem, Oregon
Posted by 1943Mike on Tuesday, September 15, 2015 3:53 PM

Tankerbuilder, Tracy, and GMorrison,

Thanks for the thoughts.

I also have some 5O Ocean Gray in addition to several bottles of 5H Haze Gray. I think I'll just go with a combination of both of them. Perhaps make up two batches - one more on the "haze" side and the other more of the "ocean" tint and use them to create a little variation in the colors here and there on the weather deck. I'll try to keep the hull. boat deck, bridge deck and the top of the house consistent.

Thanks again for your input,

Mike

Mike

"Le temps est un grand maître, mais malheureusement, il tue tous ses élèves."

Hector Berlioz

  • Member since
    September 2012
Posted by GMorrison on Tuesday, September 15, 2015 4:23 PM

And NO Shermans on the hatches!

 Modeling is an excuse to buy books.


  • Member since
    December 2005
  • From: Seattle, Colorado
Posted by onyxman on Wednesday, September 16, 2015 8:19 AM

...nor any tanks hanging from the 2.5 ton SWL booms. When you see how much soot staining runs out of the deck scuppers, which are different from the big freeing ports, it's clear to me that wasting a lot of effort on getting deck color correct is futile. Decks were gray-ish, rust, soot and dirt colored.

  • Member since
    December 2010
  • From: Salem, Oregon
Posted by 1943Mike on Wednesday, September 16, 2015 10:34 PM

Hatches were covered with canvas over wood planks. The wood might hold some jeeps but I'm not sure. It certainly would not hold an M4 Sherman Tank which weighed over 33 tons. I don't think I'll have any tanks being hoisted by a ship's boom either Smile.

Mike

Mike

"Le temps est un grand maître, mais malheureusement, il tue tous ses élèves."

Hector Berlioz

  • Member since
    September 2012
Posted by GMorrison on Wednesday, September 16, 2015 11:03 PM

I've seen 6x6 trucks and p-47s. Even then I would guess beams were added.

 Modeling is an excuse to buy books.


  • Member since
    December 2005
  • From: Seattle, Colorado
Posted by onyxman on Thursday, September 17, 2015 8:00 AM

Back in the day I saw forklifts break a wheel through those wooden hatch boards. Dunnage was usually necessary to distribute weight for trucks or cars.

  • Member since
    December 2010
  • From: Salem, Oregon
Posted by 1943Mike on Thursday, September 17, 2015 11:18 PM

onyxman and GMorrison, 

I am planning to put jeeps and a couple of different kinds of WWII trucks over the hatches with the assumption that beams would have been added to hold their weight. I haven't been able to find any 1/350 scale WWII aircraft at a reasonable amount of $ but, considering all the other aformentioned vehicles that I do have, I'm not too concerned - I've plenty of cargo to put on the weather deck. I'll be portraying her as she set out on her maiden voyage with lots of war materiel. 

This is the most comprehensive article I've found on her - the S.S. Stephen Hopkins:

http://www.armed-guard.com/hoppy.html

It's a rather long article so read only if you're very interested in the subject matter or if you're simply bored to tears Sleep

My friend's dad, George Cronk, was the only officer to survive. He was one of the 15 crewmen aboard the lifeboat who made it to Brazil - drifting for 2,200 miles. Four of the 19 who originally were on the lifeboat did not make it. Quite a story. 

Mike

Mike

"Le temps est un grand maître, mais malheureusement, il tue tous ses élèves."

Hector Berlioz

  • Member since
    July 2010
  • From: Tempe AZ
Posted by docidle on Thursday, September 17, 2015 11:28 PM

Mike,

Sorry I cannot add nothing to the discussion but I did want to let you know how nice your ship is coming along. Are you going to make a diorama or just build her as a waterline model? Please post more pictures as you progress, I have been thinking about picking one of these up but I do not think I have seen a WIP on a Liberty ship on the forum, although if I remember correctly, Marcus built one before he started his Dreadnought.

Steve


  • Member since
    December 2010
  • From: Salem, Oregon
Posted by 1943Mike on Thursday, September 17, 2015 11:51 PM

Thanks Steve.

I'm kind of leaning toward just the chunk of Walnut I bought and a sea base. A few days ago though I ordered a WWII Navy tug in 1/350 scale so....I'm just not sure. I don't really think I want to present her with the dock and loading cranes, etc. Just too much for my miniscule skills and I'd have to get a larger piece of Walnut. If I end up using the tug it'll be as if she were just shoving off but with no dock on display. I don't know if there ever would have been a Navy tug working with a Merchant Marine vessel but, if I think it looks good and there's enough room on my board.... who knows.

Mike

 P.S. I airbrushed the hull and deck today. I also airbrushed the hatch covers on their sprues. I wasn't going to post more pictures until I'd gotten a little further along but if you're interested I'll post a few when I've attached the hull to the base in the next week or so.


Mike

"Le temps est un grand maître, mais malheureusement, il tue tous ses élèves."

Hector Berlioz

  • Member since
    December 2005
  • From: Seattle, Colorado
Posted by onyxman on Friday, September 18, 2015 8:23 AM

That is a great article. The photos with the article show one of the rare cases where the decks are considerably darker in color than the hull. 

BTW, WWII merchant mariners now have official veteran status. My father will get a burial plot out of it. 

  • Member since
    December 2010
  • From: Salem, Oregon
Posted by 1943Mike on Sunday, September 20, 2015 6:15 PM


Onyxman,

Although that picture clearly shows the deck a darker shade than the rest of the ship I've decided to paint everything the same shade of gray. I do believe that in many of the Liberty Ships, both vertical and horizontal surfaces were painted a homogenous shade of gray.

Delighted to know that the WWII merchant marine sailors will have veteran status! They certainly deserve it.

Here's a small update. I've not yet decided on whether or not to include the tugboat but I've placed the ships on my board just to see how the spacing would work out if I do include the tug. I've now painted the Liberty Ship hull and deck and attached and painted the hatch covers. I've heard lots of different opinions as to what color the canvas was on board but I decided to mix my own interpretation of WWII canvas, accurate or not.

As an aside, I'm now out another $25.00 for another tug kit. In my zeal to emulate what a Brit modeler did with his tug - he did a fabulous job of cutting out the front and side square windows on his model - I attempted to do the same but botched it beyond repair Sad. Live and learn. My new tug will get painted windows!!Big Smile I also broke off the top deck overhang on the tug. I did glue it back but noticed that there seemed to be some structure missing underneath the overhang by way of curved supports on either side. I can't see where they came with my model but the supports are obviously in the pictures on the Alliance Modelworks site as well as the photos by that Brit modeler. If the new kit doesn't have any then I'll just assume they were made from scratch?

Mike


Mike

"Le temps est un grand maître, mais malheureusement, il tue tous ses élèves."

Hector Berlioz

  • Member since
    September 2012
Posted by GMorrison on Sunday, September 20, 2015 6:36 PM

I think your ship looks great.

The canvas cover is bent down over the sides of the hatch coaming as you show. The lower half of the coaming could/ should be hull color as it's exposed structure. Those ribs over the hatches are Trump's overscaled versions of steel bands that were cinched down over the canvas to hold it all down. I think in reality they where maybe 9" wide by less than 1/4" thick. I'm with you- there isn't much one can do about it, but I plan to paint the top surfaces of mine gray.

Good clean modeling there, and I see you have a small pile of my favorite modeling tools.

 Modeling is an excuse to buy books.


  • Member since
    December 2010
  • From: Salem, Oregon
Posted by 1943Mike on Tuesday, September 29, 2015 11:52 AM

GMorrison,

Thanks for the information regarding the canvas covers. I've now painted the edges the same gray as the rest of the ship and have, whether accurate or not, painted the "ribs" a metallic gray hoping to represent stronger steel structure than "bands" which will carry the weight of trucks and aircraft placed on them.

I've also been working on the little tug. It's giving me fits. It seemed so simple that I figured I'd have it finished in a week. Well, that was wishfull thinking on my part. I've managed to mangle a few things and, hopefully, I'll be able to repair my mistakes. Anyway here are a couple of pictures showing how the two ships stand as of the moment.

Mike


Mike

"Le temps est un grand maître, mais malheureusement, il tue tous ses élèves."

Hector Berlioz

  • Member since
    September 2012
Posted by GMorrison on Tuesday, September 29, 2015 5:18 PM

You finish that tug, sir and I will buy you a rum. Tugs are curious little beasts- you won't find a straight line on them.

 Modeling is an excuse to buy books.


  • Member since
    December 2010
  • From: Salem, Oregon
Posted by 1943Mike on Thursday, October 1, 2015 1:21 PM

After a disasterous air brushing experience with the gray I almost threw this little guy in the trash. Then I thought to myself it's so small that it'll hardly look terrible when viewed as a whole with the Liberty Ship ... so, with the exception of having to seal the decals and "rust" (which probably wouldn't be on a Navy tug but I'm taking artistic license here Big Smile) I'm calling this little tug done. I've taken a few more photos with both ships placed loosely on the board which I'm attaching here.

Mike


Mike

"Le temps est un grand maître, mais malheureusement, il tue tous ses élèves."

Hector Berlioz

  • Member since
    May 2010
Posted by amphib on Sunday, October 4, 2015 6:08 AM

Lets backup for a minute. The hatches had removable steel beams running across them probably on five foot centers. These support the hatch boards which were removable heavy plank probably 2 1/2'x5' made of pieces of lumber banded together. Over this went the canvas which was carried down the vertical sides of the hatch coming and wrapped around a batten. This was held in place with wedges in a groove in the coming. Remember the expression "batten down the hatches"? There were no steel bands over the top of the hatch cover. Light vehicles such as a jeep or car could have been stowed on the hatch but there was no real way to tie them down.

The pictures you see of amphibious ships -AKAs and APAs- with boats stowed on the hatches don't show the whole story. They were stowed OVER the hatches on cradles at the sides of the hatches.

I am speaking of course from the practice of the Navy what civilian shipping lines may have done after the war is a differnt story.


  • Member since
    December 2010
  • From: Salem, Oregon
Posted by 1943Mike on Sunday, October 4, 2015 10:13 AM

Amphib,

So, if I understand you correctly - which I think I do, I should represent the top of the hatch covers as canvas with, of course, the outlines of the beams visible under the canvas. That being the case all I have to do is paint over those "outlines" which I'd painted a metallic color so that the covers are entirely the canvas color I wish to represent. Is this correct?

I suppose I could use a wash of some darker shade to bring out the beams more but they're already too thick for scale.

I've seen pictures of Liberty ships with aircraft on the hatch covers. Were there reinforcement beams of some kind placed under the canvas? I bought some 1/350 Douglas SBD-3's to put on top of one of the hatches.

In any case thank you very much for the information! I haven't progressed much farther in my build since I've been staring at a bunch of jeeps and trucks that I'll have to paint soon with the idea of putting them on top of some hatches as well.

Mike

Mike

"Le temps est un grand maître, mais malheureusement, il tue tous ses élèves."

Hector Berlioz

  • Member since
    May 2010
Posted by amphib on Sunday, October 4, 2015 12:18 PM

Mike

Not quite. The hatch beams were I beams with a thin vertical strip of steel welded to the top like say 1/4"x2". This acted as a guide as the hatch boards were slid in place. Therefore all you would see is the gray surface of the tarpaulin canvas hatch cover with out the beams telegraphing through.

As I said before you could have placed something fairly light like a jeep on the hatch cover if you could figure a way to tie it down. I suppose aircraft would qualify as something light or maybe extra dunnage was placed over the top of the hatch cover to spread the load.

  • Member since
    December 2010
  • From: Salem, Oregon
Posted by 1943Mike on Sunday, October 4, 2015 1:29 PM

Amphib,

OK, so I will file down the hatch covers as represented on the kit so they're flat. I've read several variations on WWII canvas color. Some say the hatch cover canvas was brown, others - like yourself - suggest gray. Do you know definitively? I'm still at a stage where changes in this area are easily done.

Here is a picture of a hatch cover (without the canvas) on the Jeremiah O'Brien along with a link of the page I took it from. Please note the green looking canvas to the left.  I'm also including a picture my search engine came up with of a Liberty Ship with aircraft on her hatch covers. That picture may be slightly deceiving though since I can't really tell if they've put some dunnage on top of the hatch covers for the planes.

Mike

http://www.thepirateslair.com/7-jeremiah-obrien.html


Mike

"Le temps est un grand maître, mais malheureusement, il tue tous ses élèves."

Hector Berlioz

  • Member since
    May 2010
Posted by amphib on Sunday, October 4, 2015 1:59 PM

Mike

You are on the right track. You must remember that what you are looking at is the backside of a modern tarp folded back. I said gray only because the ones we had on our ship were gray (think Navy). I can't tell you the proper color for WWII but gray would be appropriate. A bright brown or tan would stand out from the air.

Google liberty ship cargo loading and you will find several examples of cargo stowed on the hatches. In one they are tanker trailers and they definitely have dunnage over the canvas on the hatch. In the other planes are being loaded with special stands under the wings and some sort of framework over the hatch.

Hope this helps


  • Member since
    December 2010
  • From: Salem, Oregon
Posted by 1943Mike on Sunday, October 4, 2015 5:02 PM

Amphib,

Your input helps a lot. Thanks!

I may concoct a grayish olive drab kind of color for the canvas. It won't stand out much from my combination of haze and ocean gray I've painted the rest of the ship. I'll put some of what I would hope is reasonable bracing for aircraft over the hatch covers. No tanks on the hatch covers Big Smile.

Mike

Mike

"Le temps est un grand maître, mais malheureusement, il tue tous ses élèves."

Hector Berlioz

  • Member since
    September 2012
Posted by GMorrison on Sunday, October 4, 2015 11:22 PM

Aircraft rode on a structure, the name of which escapes me right now. It spanned over the hatches but was supported on the deck. It was not the kind of thing you'd combine with other loads, but would be semi permanent on a ship dedicated to carrying aircraft.

As for the canvas, it was three layers, so nothing shows through it. I'll stand bt my comment about steel bands, but in any case if there were, they looked nothing like the Trump bumps. Best to get rid of them. it would probably be easier to just make new covers.

On another type of ship, I made them with Sculpey.

 Modeling is an excuse to buy books.


  • Member since
    December 2005
  • From: Seattle, Colorado
Posted by onyxman on Monday, October 5, 2015 7:06 AM

Whoa! Hold off on sanding those thwartship bands off. Although they are too thick to be scale, there ARE steel bands, not beams, across the hatch covers on top of the canvas, These are to hold everything down, not to support any loads that may be stowed on top of the hatch.

To sum up, starting with an open hatch:

Steel beams fit into notches inside the hatch coaming.

Wooden hatch boards cover the opening, supported by an edge on the steel beams and an edge all along the inside of the hatch coaming.

Canvas over the wood

Steel bands over everything, hooked onto the edge of the hatch coaming.

Will look for some pictures to illustrate.

Fred 

From a ship in 1950 but the set-up is the same. Note the steel bands on the hatch. The canvas is probably dark green but looks darker because it's wet.

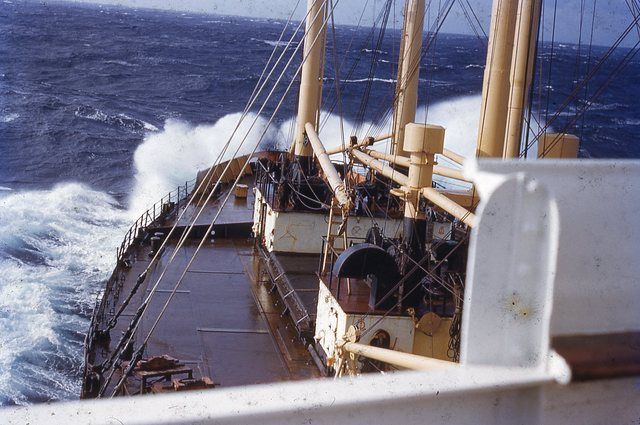
Note the steel bands over the canvas hatch cover. The canvas is probably dark green, but looks darker because it's wet.

  • Member since
    December 2005
  • From: Seattle, Colorado
Posted by onyxman on Monday, October 5, 2015 7:22 AM

As for stowing aircraft on deck, here is another photo. The special structure that GM mentioned is probably a Meccano Deck, which was used on tankers to stow planes and boats over the cargo piping. On a frieghter you want to stow them as shown here:

  • Member since
    December 2005
  • From: Seattle, Colorado
Posted by onyxman on Monday, October 5, 2015 8:10 AM

Anything stowed on the hatch covers would be on a decking built of wooden dunnage, OVER the canvas. It would be tied down with wire or strapping to pad eyes on the steel deck alongside the hatches.  

  • Member since
    September 2012
Posted by GMorrison on Monday, October 5, 2015 10:14 AM

Thats a nice photo, Fred.

There are at least two aircraft in the photo. The near one is mid air being hoisted, while another one behind it is resting on the trestles set up for the main landing gear. Neither have a tail. There's a sort of V strut attached to the fuselage behind the cockpit.

One thing for sure, they are resting on the deck, not  hatch cover.

Eduard I know includes hatch cover bands in their Liberty PE set. I don't know about GMM, theirs is in a box somewhere with my unfinished JOB.


 Modeling is an excuse to buy books.


JOIN OUR COMMUNITY!

Our community is FREE to join. To participate you must either login or register for an account.

SEARCH FORUMS
FREE NEWSLETTER
By signing up you may also receive reader surveys and occasional special offers. We do not sell, rent or trade our email lists. View our Privacy Policy.