SEARCH FINESCALE.COM

Enter keywords or a search phrase below:

Revell 1/144 Type VII C/41 U-boat

7008 views
51 replies
1 rating 2 rating 3 rating 4 rating 5 rating
  • Member since
    July 2010
  • From: Tempe AZ
Posted by docidle on Friday, January 8, 2016 11:06 PM

Wow Steve, that is amazing! Stunning work not only on the sub but also the water!

Steve


  • Member since
    September 2005
  • From: Groton, CT
Posted by warshipguy on Friday, January 8, 2016 3:18 PM

I am stunned by your work!

Bill

  • Member since
    October 2003
  • From: Canada
Posted by sharkbait on Friday, January 8, 2016 12:09 PM
Amazing work! Well done! WOW factor 10+

You have never been lost until you've been lost at Mach 3!

  • Member since
    December 2003
  • From: 37deg 40.13' N 95deg 29.10'W
Posted by scottrc on Friday, January 8, 2016 10:38 AM

Excellent tutorial Steve, hope you can publish it.  

  • Member since
    November 2008
  • From: Central Florida
Posted by plasticjunkie on Thursday, January 7, 2016 9:58 AM

Steve

Im off to a dentist appointment but will pm you on how to do it later.

 GIFMaker.org_jy_Ayj_O


Too many models to build, not enough time in a lifetime!!

  • Member since
    December 2006
  • From: N. Georgia
Posted by Jester75 on Thursday, January 7, 2016 9:55 AM

I can only echo the awe that has been stated before me! I would love to be able to replicate your water effects, some of the best I've seen. Awesome work Steve!

Eric


  • Member since
    July 2014
Posted by modelcrazy on Thursday, January 7, 2016 9:51 AM

How would I go about doing that? I have sent in several Reader Gallery photos which 3 or 4 were accepted, but an artical is a completly diffrent monster all together. Do I just write one and contact the editor, or do I get the go ahead from them first?

Steve

Steve

Building a kit from your stash is like cutting a head off a Hydra, two more take it's place.


http://www.spamodeler.com/forum/

  • Member since
    May 2013
  • From: From the Mit, but live in Mason, O high ho
Posted by hogfanfs on Thursday, January 7, 2016 9:28 AM

Steve,

It looks real! Absolute perfection! I agree with Stik, you need to contact FSM!

 Bruce


 On the bench:  1/48 Eduard MiG-21MF

                        1/35 Takom Merkava Mk.I


  • Member since
    November 2008
  • From: Central Florida
Posted by plasticjunkie on Thursday, January 7, 2016 9:24 AM

Steve

I would like to suggest something to you. I have submitted several articles to FSM and some of them were published. This is one of those articles that FSM will grab from you and will get some $ in return and get your work on the magazine along with your name. This is an excellent execution of artistic talent and the use of several mediums to come up with what looks to be pictures of an actual U Boat in heavy seas. The color blending and wave shapes are awesome. 

Wow, I'm trully blown away with this display. Bow Down  

 GIFMaker.org_jy_Ayj_O


Too many models to build, not enough time in a lifetime!!

  • Member since
    August 2014
  • From: Willamette Valley, Oregon
Posted by goldhammer on Thursday, January 7, 2016 9:16 AM

Yeah, feeding the wolf to keep it from clawing down the door does crimp our style somewhat.

  • Member since
    July 2014
Posted by modelcrazy on Thursday, January 7, 2016 8:40 AM
Thanks GH. My build speed will decrease drastically next week when I go back to work.
Steve

Steve

Building a kit from your stash is like cutting a head off a Hydra, two more take it's place.


http://www.spamodeler.com/forum/

  • Member since
    August 2014
  • From: Willamette Valley, Oregon
Posted by goldhammer on Thursday, January 7, 2016 8:00 AM


Another absolute beauty........only can hope my water comes out 5% as good as your scene.

You are starting to build on Toshi's schedule now Bow Down

  • Member since
    July 2013
Posted by steve5 on Thursday, January 7, 2016 3:53 AM

mate , that is absolutely awsome , way above what I could accomplish , and you did it so fast


  • Member since
    July 2014
  • From: Franklin Wi
Posted by Bakster on Wednesday, January 6, 2016 11:48 PM

Steve, that looks absolutely awesome. Fantastic work. I would love to see it in person. I bet it looks even better than in the images.

Thanks for sharing!

  • Member since
    April 2006
  • From: ON, Canada
Posted by jgeratic on Wednesday, January 6, 2016 11:33 PM

Steve, that is some serious ocean swell happening here.  Hats off to you, I think you were very successfull with your creation here. Yes

regards,

Jack

  • Member since
    July 2014
Posted by modelcrazy on Wednesday, January 6, 2016 11:25 PM
U-boat complete. Picture heavy
I wasn’t happy with the cotton whitecaps, so I removed them, reapplied the acrylic gel and repainted the blue. Once dry, I blinded and airbrushed turquoise and white. I then drybrushed white for the whitecaps. I like it better.
The Indianapolis was sailing through gale force winds and needed the cotton whitecaps, the U-boat while in high swells, is not in a gale.
Anyway, I believe I’m done, so here it is.
As always comments and critiques are welcome.


Steve

Steve

Building a kit from your stash is like cutting a head off a Hydra, two more take it's place.


http://www.spamodeler.com/forum/

  • Member since
    May 2013
  • From: From the Mit, but live in Mason, O high ho
Posted by hogfanfs on Tuesday, January 5, 2016 7:47 PM

Wow, Steve! That build is fantastic! The water looks real! Outstanding job! And I can't believe how fast you put this together!

 Bruce


 On the bench:  1/48 Eduard MiG-21MF

                        1/35 Takom Merkava Mk.I


  • Member since
    July 2014
Posted by modelcrazy on Tuesday, January 5, 2016 6:44 PM

Thanks Bish and PJ,

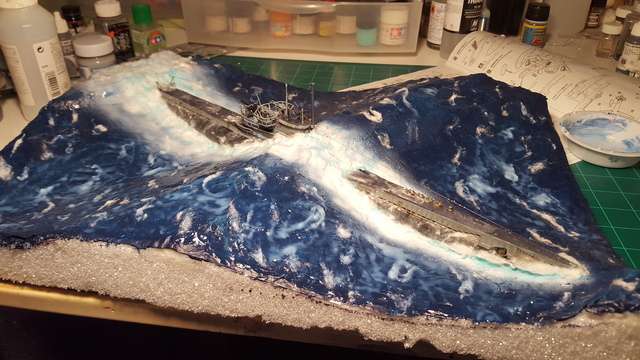
Well another update. I attached the cotton using the pouring medium to form the bow wave and churn. It is also used to form the drainage from the Limber Holes and flow from the deck. At this point you would say to yourself, oh no I screwed this up, but no worries, once this is dry I will go back over the churn and spray with more white, both dry brush and air brush. The white caps will also be sprayed white and I may add to them, it depends.


More to come tomorrow after this has dried.


Steve

Steve

Building a kit from your stash is like cutting a head off a Hydra, two more take it's place.


http://www.spamodeler.com/forum/

  • Member since
    November 2008
  • From: Central Florida
Posted by plasticjunkie on Tuesday, January 5, 2016 4:32 PM

Holy cow Steve, I'm truly impressed!Toast

That looks freaking fantabulous !

 GIFMaker.org_jy_Ayj_O


Too many models to build, not enough time in a lifetime!!

  • Member since
    December 2002
  • From: Bury St Edmunds, Suffolk, England
Posted by Bish on Tuesday, January 5, 2016 1:59 PM

Steve, first, thanks for the explantion on the products.

Second, o WOW, that looks amazing already. I am so impressed with the look of that water, almost makes me feel sea sick.

I am a Norfolk man and i glory in being so


On the bench: Airfix 1/72nd Harrier GR.3/Fujimi 1/72nd Ju 87D-3

  • Member since
    July 2014
Posted by modelcrazy on Tuesday, January 5, 2016 1:39 PM
Here's the U-boat at the moment, I mixed up and painted some acrylic turquoise and painted it around the boat for the wake. I then mixed some blue, gray and green acrylic to make the bluish gray water color, painted and blended the blue with the turquoise. I then sprayed white on the wake.
Next I will add some cotton for spray and water drainage after the paint has dried.
 
Steve

Steve

Building a kit from your stash is like cutting a head off a Hydra, two more take it's place.


http://www.spamodeler.com/forum/

  • Member since
    July 2014
Posted by modelcrazy on Tuesday, January 5, 2016 12:07 AM

I purchased some Golden regeular (medium) gloss gel today to complete the water effects. I bought Golden because it was what Michaels had in stock and I had a 40% coupon. Liquitex works just as well. I spread it on, filling any gaps and working it to make peaks and ripples. The trick is to work it so you dont leave brush strokes. When this dries I will paint the water blueish grey.

Steve

Steve

Building a kit from your stash is like cutting a head off a Hydra, two more take it's place.


http://www.spamodeler.com/forum/

  • Member since
    December 2010
  • From: Salem, Oregon
Posted by 1943Mike on Sunday, January 3, 2016 11:48 AM

Steve,

I think you're doing a swell job. (pardon the pun Huh?)

Mike

Mike

"Le temps est un grand maître, mais malheureusement, il tue tous ses élèves."

Hector Berlioz

  • Member since
    July 2014
Posted by modelcrazy on Sunday, January 3, 2016 10:53 AM

Bish,

The difference is consistency. The pouring medium is similar to a thin white glue, in fact I could use a thinned whit glue instead.
The medium gel will not spread as well and is consistency of toothpaste. It is easier to form into lumps and peaks like water.
Thick gel is similar to shortening like Crisco. It will hold its peaks well, almost too well. It can be hard to smooth out.
All of these products are intended to use for canvas painting and can be found in that section in arts and craft stores.


Steve

Steve

Building a kit from your stash is like cutting a head off a Hydra, two more take it's place.


http://www.spamodeler.com/forum/

  • Member since
    December 2002
  • From: Bury St Edmunds, Suffolk, England
Posted by Bish on Sunday, January 3, 2016 3:27 AM

Steve, thnaks for posting those photo's. Its really handy to see how this works.

Whats the differance between the pouring medium you used under the paper and the gel you are waiting for.

I am a Norfolk man and i glory in being so


On the bench: Airfix 1/72nd Harrier GR.3/Fujimi 1/72nd Ju 87D-3

  • Member since
    December 2006
  • From: N. Georgia
Posted by Jester75 on Sunday, January 3, 2016 12:36 AM

Dang!! IndifferentWow

Eric


  • Member since
    July 2014
Posted by modelcrazy on Sunday, January 3, 2016 12:18 AM
For those who are trying to keep up, this is as far as I'm getting until I can get some medium acrylic gel, probably tomorrow. To get to this point I used acrylic pouring medium and paper strips to form the swells. Once I get some medium gel I'll shape the chop on the swells and paint the water, bow wake and churn.

Steve

Steve

Building a kit from your stash is like cutting a head off a Hydra, two more take it's place.


http://www.spamodeler.com/forum/

  • Member since
    October 2013
Posted by infofrog on Saturday, January 2, 2016 6:54 PM
Nice job Rick

  • Member since
    July 2014
Posted by modelcrazy on Saturday, January 2, 2016 6:48 PM

I started finishing the water after installing the rigging. I added the shavings from the trough cut outs to the crests and applied some heavy acrilic gel. I will allow this to dry and then add strips of paper for texture.
I know it looks bad now, but after the paper and gel has been added to the base it will look better.

Steve

Building a kit from your stash is like cutting a head off a Hydra, two more take it's place.


http://www.spamodeler.com/forum/

JOIN OUR COMMUNITY!

Our community is FREE to join. To participate you must either login or register for an account.

SEARCH FORUMS
FREE NEWSLETTER
By signing up you may also receive reader surveys and occasional special offers. We do not sell, rent or trade our email lists. View our Privacy Policy.