SEARCH FINESCALE.COM

Enter keywords or a search phrase below:

By the deep 17 ...

9346 views
105 replies
1 rating 2 rating 3 rating 4 rating 5 rating
  • Member since
    April 2016
  • From: Ludwigsburg Germany
Posted by dafi on Monday, June 13, 2016 11:02 AM

Thank you Sirs, very appreciated!


Going Bananas ?
 
Going Bananas !
 
Going Bananas !!!
 
:-)
 
Bananas-140608_3764.jpg
 
Yes, it has to do with my build :-) But what is it ?!?
 
XXXDAn
 
https://www.youtube.com/watch?v=pHthhhPxHfo
  • Member since
    December 2010
  • From: Salem, Oregon
Posted by 1943Mike on Monday, June 13, 2016 9:54 AM

Clever, meticulous craftsmanship of professional ilk.

Bow Down

Mike

"Le temps est un grand maître, mais malheureusement, il tue tous ses élèves."

Hector Berlioz

  • Member since
    July 2013
Posted by steve5 on Monday, June 13, 2016 4:30 AM

you never cease to amaze me dafi , I would love to have half your skill .Bow Down


  • Member since
    May 2016
Posted by Xena on Monday, June 13, 2016 4:08 AM

Bow Down brilliant,   absolutely brilliant!!!

  • Member since
    April 2016
  • From: Ludwigsburg Germany
Posted by dafi on Friday, June 10, 2016 11:21 AM
Old chaps never change ...
 
... already looking a long time at the gunport lid lanyards ...
 
... usually I tend to do the details a tad smaller than a tad too big ...
 
... but this time it was just a little bit toooooooo much under dimensioned, as I took the thinnest yarn ...
 
... first looking already much toooooo thin and then on top I got a big blop on the ring as it is too thin to do a decent splice ...
 
... and here we have mark 1 on the right and the new mark 2 on the left ...
 
Victory-140530_3639.jpg
 
... already looking better.
 
Victory-140530_3641.jpg
 
Just eleven more to replace ...
 
Then it started with the unhappiness about a ball of glue ...
 
Victory-140601_3647.jpg
 
... but also the 2 cored 0,15 mm lanyard appeared too thin, was too unstable and did not allow a decent splice without breaking the material. 
 
The new 4 cored 0,2 mm looks much better and is easy to splice. That is why I went down the road again ...
 
... this was already shown, a blackend wire around a needel and cut open for the rings.
 
deep17_130525_7557.jpg
 
To fix the rings I used two pointed pliers (less carpetmonster-danger than tweezers!) opened the ring and in the same go - without letting go - hooked into the eyebolt and closed it.
 
Victory-140601_3649.jpg
 
Now I continued differently: Pierced the 4 cored lanyard with a sharpened needle ... 
 
Victory-140601_3652.jpg
 
... pushed the needle through down to the eye, put the short end through the ring on the eyebolt ...
 
Victory-140601_3654.jpg
 
... and then through the eye and pulled it through. Took the thread out of the needle to be more free, pierced the lanyard from the other side, pushed the needle in down to the eye, introduced the free end ...
 
Victory-140601_3655.jpg
 
... and pulled again and the splice is done.
 
Victory-140601_3658.jpg
 
Secured with a drop of glue, cut neatly and things are done.
 
Victory-140601_3662.jpg
 
After taking down the old lanyards I realised that the old tube was stuck with glue and junk, inner Diameter smaller than 3 mm, but my smallest drill 3 mm and did not fit.
 
Victory-140601_3664.jpg
 
So I sanded a square point onto the drill which worked marvelously on the tiny tubes :-)
 
And things looked much less messy than before :-)
 
Victory-140601_3670.jpg
 
Some touch-ups on the paint will follow with time.
 
 
And then finally all the lanyards replaced :-)
 
While doing this I felt a bit observed untill I remembered a long forgotten detail :-)
 
Victory-140607_3740.jpg
 
XXXDAn
  • Member since
    April 2016
  • From: Ludwigsburg Germany
Posted by dafi on Friday, June 3, 2016 6:48 AM
And once things are moving ...
 
... keep things moving :-)
 
Set up both second backstays ...
 
Victory-140529_3581.jpg
 
... now just missing the *** (*) backstay.
 
Victory-140529_3574.jpg
 
And holy Impatience, wanted to see the anchors in place ...
 
Victory-140529_3564.jpg
 
... the lead is thrown ...
 
Victory-140529_3561.jpg
 
... and *enjoy*
 
Victory-140529_3569.jpg
 
XXXDAn
 
 
LOL!!!
(*) Hillareous, the forum software edits the nautical term :-) :-) :-)
Just find another word for female bust ...
 
  • Member since
    June 2014
  • From: New Braunfels , Texas
Posted by Tanker - Builder on Thursday, June 2, 2016 2:42 PM

Hello;

  I won't tell you , but I think this it out of our depth in fact . LOL.LOL.  T.B.

  • Member since
    April 2016
  • From: Ludwigsburg Germany
Posted by dafi on Tuesday, May 31, 2016 1:28 PM
I ran into troubles, almost ...
 
... stealing some hair clamps from the admirality  and shortening them so they are less heavy and less lever action is taking it´s toll.
 
Victory-140529_3517.jpg
 
The foremost shroud is served but unlike the Vic in P. the serving stops atop the deadeye so it fits better the literature.
 
Victory-140529_3547.jpg
 
The clamps are fixed with a drop of CA and then bound with fly fishing yarn.
 
Victory-140529_3533.jpg
 
And here I have a small stage win :-)
 
Victory-140529_3531.jpg
 
Victory-140529_3525.jpg
 
Cheers, Daniel
  • Member since
    April 2016
  • From: Ludwigsburg Germany
Posted by dafi on Tuesday, May 31, 2016 6:04 AM

Mining was my guess too and ...

... burials - 1 fathom deep means 6 feet under at land.

And what I learnd in this context, to bury the dead in the sea, six fathoms were required, hence the exclamation "to deep six" to be able to discard someting. Luckily this thread is called by the deep 17 ;-)

  • Member since
    September 2012
Posted by GMorrison on Monday, May 30, 2016 6:21 PM

Tanker - Builder

Hmmmm.

 All this nice work and still , I have to ask . Does anyone know what measurement is used for a " Fathom "? Hint; It's still used somewhere today .  T.B.


I know you know the depth part. I don't fathom your question though.

Mines? Old hydrography charts?

 Modeling is an excuse to buy books.


  • Member since
    May 2003
  • From: Greenville, NC
Posted by jtilley on Monday, May 30, 2016 2:35 PM

A fathom is six feet.

Some years ago my father and I took a vacation trip to Charleston, South Carolina. Dad and I were both baseball fans, so one nice summer evening we went out to the Charleston ballpark to watch the town's A-level minor league team. Nice little stadium, down near the waterfront.

I was baffled by the numbers painted on the outfield fence in the corners, the center, and the power alleys. They seemed ridiculously low for a professional field - whether in feet or meters. I said something to Dad about it; he couldn't make sense of the numbers either. A lady sitting behind us overheard the conversation and revealed the secret: "They got a Navy guy to paint the numbers, and he used fathoms."

I wonder if any other baseball stadium in the world has outfield fences marked in fathoms.

For what little it's worth - the very best ratline material I've ever found is nickel-chromium wire. It's stiff enough to be "sagged" gently between the shrouds, but soft enough to be tied in a clove hitch. More than thirty years ago a friend gave me a spool with several miles of the stuff on it. I won't use it up in this lifetime. It's what I used for the ratlines on my 1/128 Hancock; I'm pretty satisfied with the results. Here's a link: http://cs.finescale.com/fsm/modeling_subjects/f/7/p/155391/1678665.aspx#1678665 .

Bluejacket sells some fine copper wire that's almost as good for the purpose. I've tried tying it in a clove hitch too; it works fine. Here's a link: http://www.bluejacketinc.com/fittings/fittings11.htm . It's listed as "stanchion wire." I'm sure some similar material is easily available in Europe.

Dafi, could you tell us where you get your figures? I think I recognize at least one of them as a deserter from a Revell kit (those early Revell figures were masterpieces of the miature sculptor and the pantograph machine), but what about the others?

Youth, talent, hard work, and enthusiasm are no match for old age and treachery.

  • Member since
    June 2014
  • From: New Braunfels , Texas
Posted by Tanker - Builder on Monday, May 30, 2016 2:23 PM

Hmmmm.

 All this nice work and still , I have to ask . Does anyone know what measurement is used for a " Fathom "? Hint; It's still used somewhere today .  T.B.

  • Member since
    April 2016
  • From: Ludwigsburg Germany
Posted by dafi on Friday, May 27, 2016 7:17 AM
And finally was able to use the new clamps from my etch sheet ...
 
Victory-140527_3486.jpg
 
... and finished the first two big dead eyes.
 
Victory-140527_3492.jpg
 
Ship shape und Bristol fashion enough for the scale?
 
But as always, there is the easy road and there is dafi`s way ...
 
... could have adjusted the clamps so easily before putting the shrouds in place ...
 
... so had to fiddle the eleven clamps in on the display ...
 
... to make it sufficiently hard, I also replaced the first two fixed ones by the smaller size ...
 
Victory-140528_3498.jpg
 
... easy way - kiddies way ...
 
... I´m no kiddy!
 
XXXDAn
  • Member since
    April 2016
  • From: Ludwigsburg Germany
Posted by dafi on Friday, May 27, 2016 5:33 AM

Yes the middle line from the befor last picture is 2 lines of Caenis. I have a small rope walk and it actually gives a good effect to make a two stranded "rope" out of it. All the fly fish yarn has the same appearence as tooth floss, means being flat and uneven. By making rope out of it, it becomes much more even but does almost not gain thickness in the appearence.

Also it is to be handled much more controled than the caenis "à la nature", so it is easier to knot, to make slacks into it and the overall look is much more realistic.

But as the Caenis 20/0 is only available in black and white, I will use normal 8/0 fly fishing yarn as the naked eye does not really see the difference in thickness in this 1:100 case.

Doing so I can mix the colors of the strands in the colors tan, rusty dun, camel and black, suiting the wanted degree of tarring.

Hope this helps. 

XXXDAn

  • Member since
    February 2011
Posted by cerberusjf on Friday, May 27, 2016 5:09 AM

Hi Dafi,

this is a most interesting build, I was wondering about the caenis, is it made from 2 strands of 20/0 wound together?  I think it looks very good :)

  • Member since
    April 2016
  • From: Russia, St.Peterburg
Posted by kirill4 on Thursday, May 26, 2016 5:06 PM

Hi Daniel,

rattling...Very familiar matter to me! :))) recently was busy with it as well... You did Good job!!! looks nice!!!

Good luck!

All the best!

Kirill

  • Member since
    April 2016
  • From: Ludwigsburg Germany
Posted by dafi on Thursday, May 26, 2016 3:15 PM
 
Here comes the next goody ...
 
... changed the orientation of the z-twist-ropes, used the heavy tools to fiddle the bits as ship shape as possible ...
 
Victory-140517_3457.jpg
 
... got happy about the results ...
 
Victory-140517_3464.jpg
 
Next came the never ending discussion about the ratlines ...
 
... and off we go ...
 
Victory-140518_3470.jpg
 
... as I am doing all my rigging out of fly fishing yarn, I was free to try ratlines in different sizes and colors.
 
Victory-140518_3471.jpg
 
Seen by scale, the one in the middle it should be. But done out of 2 x Caenis 20/0 it is a bit too stiff for the job and only available in deepest black.
 
Underneath for comparison my usual 4-thread- 8/0 yarn, good to mix color and great to put in form, but too thick for my taste.
The two lines on top are 2-thread-8/0and fits much better size wise, ok to fit but more restricted color wise.
 
Still having the old discussion in my ear about the tarred ratlines, I believe most of them are either to dark or too light, I would personally expect in this case a much lighter brown from the stockholm tar. Already my shrouds have a dark brown touch for that reason, the lines should be more light.
 
So still have to try a bit to get the right tan ...
 
Victory-140527_3476.jpg
 
Cheers, Daniel
  • Member since
    April 2016
  • From: Ludwigsburg Germany
Posted by dafi on Monday, May 9, 2016 1:19 PM
And slowly one can guess what direction this build is going to take :-)
 
Victory-140517_3436.jpg
 
And please enjoy the exquisite collection of clamps ... 
 
Victory-140517_3437.jpg
 
XXXDAn
  • Member since
    April 2016
  • From: Ludwigsburg Germany
Posted by dafi on Monday, May 9, 2016 3:39 AM

After some lenghty but fruitful discussion in our german forum about the orientaion of the shroud´s free end´s orientation to the left left or right, forth or aft we found that almost all literature shows it the way that it is displayed:


- for the cable-laid shrouds - Starboard pointing foreward, larboard aft :-)

- for plain- or hawser-laid shrouds - Starboard pointing aft, larboard foreward :-)


The only one showing it vica versa is Marquardt in his Eighteenth Century Rigs and Rigging, funnily, his other book Schoner in Nord und Süd shows it the "usual" way.

 
Some other information coming the way was incorporated immediately
- Max. distance of the big deadeyes twice diameter
- Tackle about half the diameter of the shroud
- Shroud not too tight around the deadeye
- free end of the tackle passes through the gap of deadeye and shroud
- free end shorter
 
And here we go Mark 2:
 
before:
Victory-140504_3316.jpg
 
After 
Victory-140508_3335.jpg
 
And one backstay more and it is getting tighter and tighter ...


Victory-140508_3341.jpg


... but still have to clear and belay the tackles to look less messy :-)
 
XXXDAn


  • Member since
    April 2016
  • From: Ludwigsburg Germany
Posted by dafi on Sunday, May 8, 2016 2:42 AM
As the bower is only displayed by half on this small vignette, I jumped at this point over to my main build with coplete hull and had some hanging trials for the anchor to see where and how it really sits ...
 
Victory-140503_3269.jpg
 
... just to realise that it is the point of the fluke and not the side resting in the shoe.
 
Then finally on the way for some rigging :-) 
 
*enjoy*
 
As usual, not happy with the provided holes on the suppiers dead eyes, I prepared some new holes this time not using toothpicks but using thin battens from the draw plate to close the old ones ... 
 
Victory-140502_3262.jpg
 
... drilled fresh ones and painted them black. Tried something new for the rigging procedure ...
 
Victory-140504_3273.jpg
 
... a round stick with the external diameter of the deadeye with a slot ...
 
Victory-140504_3280.jpg
 
... 4 times round and secured, taking down the ring ...
 
Victory-140504_3283.jpg
 
... and forced over the deadeye.
 
Victory-140504_3289.jpg
 
Then prepared a new template ...
 
Victory-140504_3294.jpg
 
... stuck the deadeye into the hole and clamped it ...
 
Victory-140504_3299.jpg
 
... and made the two seizings.
 
And what for ?!? Simply for that the last shroud does look good beside topgallant backstay, shifting backstay and royal backstay :-)
 
Victory-140504_3316.jpg
 
And this is how it looks ...
 
Victory-140504_3331.jpg
 
Victory-140504_3324.jpg
 
And for Kirill: To get different appearences on the anchor in between iron and wood, I addes plenty of rust onto the shaft :-)
 
Cheers, Daniel
  • Member since
    April 2016
  • From: Russia, St.Peterburg
Posted by kirill4 on Saturday, May 7, 2016 6:25 PM

Finaly it should sounds like in this link of ELP you gave ... 9:45 -9:50 ?

Big Smile

  • Member since
    April 2016
  • From: Russia, St.Peterburg
Posted by kirill4 on Saturday, May 7, 2016 6:15 PM

Good!

no... between Good and VERY GOOD... close to the last one!

Big SmileBig SmileBig Smile

like your painting jobs! 

  • Member since
    April 2016
  • From: Ludwigsburg Germany
Posted by dafi on Saturday, May 7, 2016 8:23 AM

Thank you, much more brain salad surgery, still trying to find my way through like those honorables gents ...

https://www.youtube.com/watch?v=E2Rq6s0InLc

XXXDAn

  • Member since
    December 2015
  • From: providence ,r.i.
Posted by templar1099 on Saturday, May 7, 2016 8:06 AM

This is like watching surgery. Absolutely fascinating.

"le plaisir delicieux et toujours nouveau d'une occupation inutile"

  • Member since
    April 2016
  • From: Ludwigsburg Germany
Posted by dafi on Saturday, May 7, 2016 5:49 AM

Thank you ejhammer, captfue and Kirill, very indulgent!

Thank you for the remark Kirill, that is the reason to do test shots like this small vignette.

It is mentioned (by Steel?) that the netting should be tarred, but it lets free how dark the outcome was. Since a while I already came of the black and white prime directive for rigging, soon to be seen, but here I didi not want to tar the netting to strong, but seeing your pictures, I think I could have done more :-)

Some more easy tinkering was also done.
 
Anchors and hammock crane interaction.
 
800_Victory_focstl_9063.jpg
 
800_Victory_focstl_9073.jpg
 
XXXDAn
  • Member since
    April 2016
  • From: Russia, St.Peterburg
Posted by kirill4 on Friday, May 6, 2016 5:36 PM

Daniel,

suggestion...did You consider to shadow a little bit netting color...probably it wiil effect on hammock,made them more visible/contrast "white", and netting ...less ...such kind of visualization as we can see here...pictures from Budriot book...????

URL=http://vfl.ru/fotos/b9c7a51612570141.html] [/URL]


  • Member since
    April 2016
  • From: Russia, St.Peterburg
Posted by kirill4 on Friday, May 6, 2016 5:15 PM

Oh Yes!

Very good!....

this ...nail clipper...magic staff, new it when did ratling...

All The Best!!!

Kirill

  • Member since
    April 2007
  • From: Amarillo, TX.
Posted by captfue on Friday, May 6, 2016 3:52 PM

Fantastic work...

Rules are overrated
  • Member since
    May 2008
  • From: Wyoming Michigan
Posted by ejhammer on Friday, May 6, 2016 2:08 PM
That is simply amazing work!

Completed - 1/525 Round Two Lindberg repop of T2A tanker done as USS MATTAPONI, USS ESSEX 1/700 Hasegawa Dec 1942, USS Yorktown 1/700 Trumpeter 1943. In The Yards - USS ESSEX 1/700 Hasegawa 1945, USS ESSEX 1/700 Dragon 1944, USS ESSEX 1/700 Trumpeter 1945, USS ESSEX 1/540 Revell (vintage) 1962, USS ESSEX 1/350 Trumpeter 1942, USS ESSEX LHD-2 as commissioned, converted from USS Wasp kit Gallery Models. Plus 35 other plastic and wood ship kits.

  • Member since
    April 2016
  • From: Ludwigsburg Germany
Posted by dafi on Friday, May 6, 2016 1:44 PM

Thank you Scott, now you made me worried ...

*lookingaroundcarefully*

...and Kirill, yes there we go :-)


Next intoduced was the top line for holding the netting.

Victory_130721_8743.jpg


Victory_130721_8750.jpg

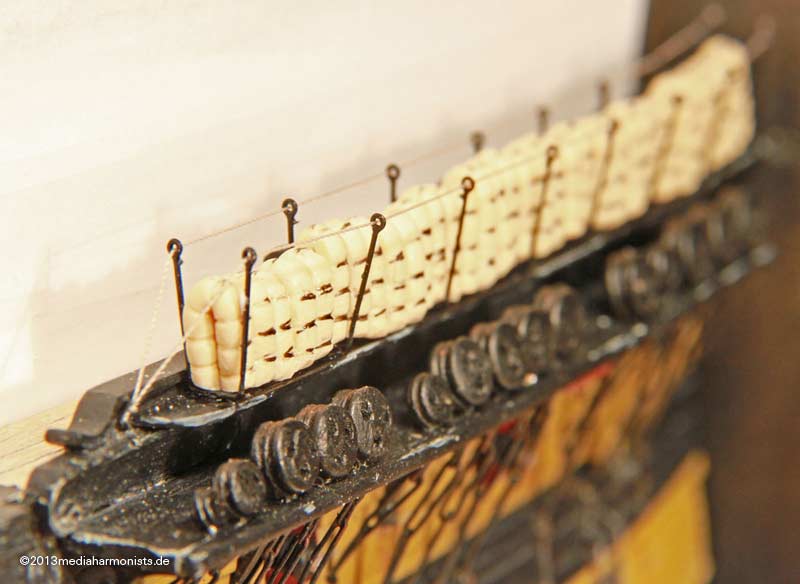
The cranes are bend open for easier handling and black lines of the lashing are mere orientation for me and are not meant to stay.

So far so good, but the next part was a bit scary ...
 
... on the heads and in the fighting tops of my other build I already tried some netting. But it was quite ridgit and I knew not what would come out now with mor complex forms.
 
So put the gaze into a cardboard frame  ...
 
Victory-130723_8781.jpg
 
... and painted nicely with beige, added some plain white and dirtied it with very diluted black ink.
 
Victory-130723_8783.jpg
 
Easy to see how the appearance became more homogenous.
 
Then did a test fit and realised how the holes got stuck on the hammock cranes ...
 
Victory-130723_8784.jpg
 
... but it looked ok so far.
 
Victory-130723_8786.jpg
 
Some test handling on the outside ...
 
Victory-130723_8788.jpg
 
... proved that the netting should curl outside instead of inside.
 
Then introduced some papers as introduction help and introducing the netting was no subject of getting stuck any more :-)
 
Victory-130723_8789.jpg
 
Got the front paper out, adjusted the height towards the rope ...
 
Victory-130723_8795.jpg
 
... and glued with CA the netting onto the rope .
 
Then used the hammocks to press down the netting ...
 
Victory-130723_8798.jpg
 
... pulled out the back paper and also the hammocks, used pincers to hold rope and netting together and used CA to fix.
 
Victory-130723_8851.jpg
 
Then cut the side length ...
 
Victory-130723_8849.jpg
 
... and the most tricky, cleaning up the top edge with some fine and sharp nail scissors - without cutting the top rope!
 
Victory-130723_8862.jpg
 
Looks intriguing enough :-)
 
Victory-130723_8863.jpg
 
Victory-130723_8870.jpg
 
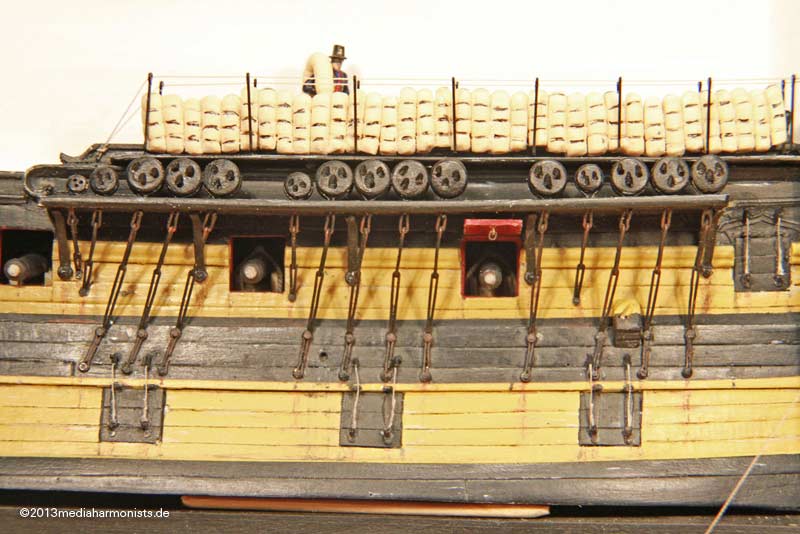
And another fascinating task, painting the hammocks using my beloved casein paints with all kind of whiter shades of pale ...
 
Victory-130723_8876.jpg
 
... looking if the colors work if hidden behind the netting ...
 
Victory-130723_8878.jpg
 
... some differentiation with some 50 more different shades of ochre ...
 
Victory-130725_8899.jpg
 
... put in place ...
 
Victory-130725_8907.jpg
 
... gently and pushed in :-)
 
Victory-130725_8910.jpg
 
Fascinating!
 
Victory-130725_8916.jpg
 
Victory-130725_8925.jpg
 
And as you see on the left - my reference Tic-Tac would even not fit in :-)
 
Good night and sleep well,
 
Daniel
JOIN OUR COMMUNITY!

Our community is FREE to join. To participate you must either login or register for an account.

SEARCH FORUMS
FREE NEWSLETTER
By signing up you may also receive reader surveys and occasional special offers. We do not sell, rent or trade our email lists. View our Privacy Policy.