SEARCH FINESCALE.COM

Enter keywords or a search phrase below:

Trumpeter 1/350 U.S.S. San Francisco CA-38 - Finished

8513 views
78 replies
1 rating 2 rating 3 rating 4 rating 5 rating
  • Member since
    December 2010
  • From: Salem, Oregon
Posted by 1943Mike on Wednesday, January 25, 2017 2:45 PM

OK, I'm finally done. I worked several hours this morning getting a few things attached (leadman platforms; accommodation ladder; finishing the rigging; touch up paint, etc.) and while doing so managed to knock off several parts, unrig a few lines, and break the stand which I stepped on while trying to photograph the finished model.

On the whole I like the final product. It's very sloppy compared to most of those who post on this site but, what the heck, I feel like I represent those who, although not super competent modelers, still enjoy the hobby and are pleased with the end result.

 I issued forth a multitude of expletives to none but me in my frustration and anxiety when I was breaking off parts, ripping off rigging and stepping on the stand, I need to go work out at the gym. When I get back home, after I've showered and eaten a late lunch, I'll work on posting some pictures.

Mike

"Le temps est un grand maître, mais malheureusement, il tue tous ses élèves."

Hector Berlioz

  • Member since
    May 2009
  • From: Poland
Posted by Pawel on Sunday, January 22, 2017 4:47 AM

Hello Mike!

That superstructure looks really good! Good luck with your build and have a nice day

Paweł

All comments and critique welcomed. Thanks for your honest opinions!

www.vietnam.net.pl

  • Member since
    December 2010
  • From: Salem, Oregon
Posted by 1943Mike on Sunday, January 22, 2017 12:09 AM

Jim,

It's a Trumpeter kit. I'd say, with the little 1/350 experience I've had, that it's at the same level as the Dragon 1/350 USS Buchanan which was a very, very nice kit. I've used a lot of the GMM PE on both this kit and the Buchanan and I feel it adds to the look of the finished model (in spite of my clumsy, far from perfect techniques Smile). As to flash, none. Some sink marks but mostly in places that are going to be hidden. The superstructures fit on the deck perfectly.

The main problem I had with this kit is the hull. It's a two piece - top and bottom. The kit comes with a flat section as the waterline bottom should you wish to build it that way. I am building this kit (as you can see) with full hull and found it difficult to line up the top and bottom sections of the hull. I ended up doing way, way more sanding, filing, filling and repainting than I expected. Such is life in the modeling world Big Smile.

I hope this info helps.

Mike

"Le temps est un grand maître, mais malheureusement, il tue tous ses élèves."

Hector Berlioz

  • Member since
    December 2010
  • From: Salem, Oregon
Posted by 1943Mike on Saturday, January 21, 2017 11:52 PM

MC,

Thanks.

Yeh, I just used my toenail clippers to snip the excess line above the yard - unfortunately I also nipped off a little plastic thingy that was so small I didn't notice it at first. I'd glue it back but I'm afraid it's lost - at least for the moment. I don't think it'll take away from the overall effect though.

I also tightened the forward line below the battle lookout.

Mike

"Le temps est un grand maître, mais malheureusement, il tue tous ses élèves."

Hector Berlioz

  • Member since
    July 2014
  • From: Philadelphia Pa
Posted by Nino on Saturday, January 21, 2017 11:48 PM

Mike,

 I was wondering your impression of this Dragon kit. How is the fit of the deck/superstructure. Since it is a pretty new kit I would guess very little flash but are there alot of mould seams to scrape off?

MC,

I was having similar issues with Rigging using streched Sprue. I had been unable to get it consistently thin and cutting it close to the Yard on the mast was impossible. However, I am getting  better on my 4th model, a 1/700 Arliegh Burke after reading Jim Baumann's method at http://www.shipmodels.info/mws_forum/viewtopic.php?f=4&t=37536

     Jim M.


  • Member since
    July 2014
Posted by modelcrazy on Saturday, January 21, 2017 11:04 PM

Looking great Mike,

I hate trying to snip off the ends of the rigging. That's where I screw thing up.

Steve

Building a kit from your stash is like cutting a head off a Hydra, two more take it's place.


http://www.spamodeler.com/forum/

  • Member since
    December 2010
  • From: Salem, Oregon
Posted by 1943Mike on Saturday, January 21, 2017 8:48 PM

Another update.

I'm 99% done with the forward superstructure. I still have some snipping, touch up painting, and some other minor things to do that I always notice in my close up photography. But, I'm satisfied so far.

Onward and upward.

Mike

"Le temps est un grand maître, mais malheureusement, il tue tous ses élèves."

Hector Berlioz

  • Member since
    May 2009
  • From: Poland
Posted by Pawel on Wednesday, January 18, 2017 1:59 AM

Hello Mike!

It's starting to look really neat! Good luck with your build and have a nice day!

Paweł

All comments and critique welcomed. Thanks for your honest opinions!

www.vietnam.net.pl

  • Member since
    December 2010
  • From: Salem, Oregon
Posted by 1943Mike on Wednesday, January 18, 2017 12:29 AM

A little more progress:

Mike

"Le temps est un grand maître, mais malheureusement, il tue tous ses élèves."

Hector Berlioz

  • Member since
    December 2010
  • From: Salem, Oregon
Posted by 1943Mike on Tuesday, January 10, 2017 11:38 PM

MC,

There's still a bit more rigging once the main foreward and aft structures are in place but I thought it would be easier to work on it as a separate unit rather than when it was in place on deck.  My modus operandi is to do it the easiest way I can imagine - which doesn't always work out for the best but in this case I see no problems.

Mike

"Le temps est un grand maître, mais malheureusement, il tue tous ses élèves."

Hector Berlioz

  • Member since
    July 2014
Posted by modelcrazy on Tuesday, January 10, 2017 10:14 PM

Mike, I like the idea of rigging prior to instalation, I going to try that. 

Steve

Building a kit from your stash is like cutting a head off a Hydra, two more take it's place.


http://www.spamodeler.com/forum/

  • Member since
    December 2010
  • From: Salem, Oregon
Posted by 1943Mike on Tuesday, January 10, 2017 8:29 PM

Well, I finished up the aft hanger/superstructure today. Some touch-up work needs to be done but I'm satified with it.


Mike

"Le temps est un grand maître, mais malheureusement, il tue tous ses élèves."

Hector Berlioz

  • Member since
    December 2010
  • From: Salem, Oregon
Posted by 1943Mike on Monday, January 9, 2017 8:03 PM

Thanks Mark.

Some painting and a bit more progress on the aft island/hangar. Started adding the PE yards to the fore and mainmasts. Up to steps 13, 14, and 15 of 25. Need to go back to add some parts to both sides of the hull in step 4 that I left off for fear that I'd break them off while handling the model.

Mike

"Le temps est un grand maître, mais malheureusement, il tue tous ses élèves."

Hector Berlioz

  • Member since
    March 2009
  • From: brisbane australia
Posted by surfsup on Monday, January 9, 2017 7:32 PM

THat is some nice work you have done so far my Friend.....Cheers mark

If i was your wife, i'd poison your tea! If Iwas your husband, I would drink it! WINSTON CHURCHILL

  • Member since
    December 2010
  • From: Salem, Oregon
Posted by 1943Mike on Sunday, January 8, 2017 10:45 PM

Today I worked on the 20mm (got four more done, four more to go) and part of the rear superstructure (not sure what it's called). I also attempted to put together the PE Mark 3 radar. In the picture I'm posting of that radar I did see the out of kilter brace and I've straightened it out as best I could - no picture of that yet. I spent way more time on it than I thought I might. I hope it looks better than the plastic kit part. All ready for more deck blue (20B) airbrushing. That'll be tomorrow.

Mike

"Le temps est un grand maître, mais malheureusement, il tue tous ses élèves."

Hector Berlioz

  • Member since
    May 2009
  • From: Poland
Posted by Pawel on Saturday, January 7, 2017 3:44 AM

Revenant


Pawel
... 1:300 paper model of the USS Belleau Woods...


...is that the Princeton???


Hello Manny!

Like I wrote, it's USS Belleau Woods. the next ship in the Independence Class after the Princeton.

Have a nice day

Paweł

All comments and critique welcomed. Thanks for your honest opinions!

www.vietnam.net.pl

  • Member since
    December 2010
  • From: Salem, Oregon
Posted by 1943Mike on Saturday, January 7, 2017 12:10 AM

Modelcrazy,

Thanks for the empathy. I know my PE work is not the greatest but, from a reasonable distance it will look passable.

I have another step that I've created for myself that will also test my patience - since I'm substituting the GMM PE depth charge racks for the kit parts, I have to create some depth charges to put in them. I ordered (and received today) some 3/64" (1.2mm) evergreen styrene rod which I've cut up and painted. Tomorrow while I watch the ice forming on the steep inclined alleyway where my garage apron is located, I'll be glad to be housebound for a day or two until the rains come on Monday (Tuesday in your world). I may actually get a few of the depth charges installed in each rack.

Mike

"Le temps est un grand maître, mais malheureusement, il tue tous ses élèves."

Hector Berlioz

  • Member since
    December 2010
  • From: Salem, Oregon
Posted by 1943Mike on Saturday, January 7, 2017 12:00 AM

Steve,

I spoke on the phone to my cousin in Greymouth, NZ a couple of hours ago and forgot to ask her about the weather. Weather.com shows she's got about a week of rainy/showery weather ahead with daytime high temps around the mid 60's (F) or 16° or 17° C. I guess I can't conclude anything about similarities weather-wise between Australia and New Zealand except they're both upside down Big Smile.


Mike

"Le temps est un grand maître, mais malheureusement, il tue tous ses élèves."

Hector Berlioz

  • Member since
    May 2016
Posted by Revenant on Friday, January 6, 2017 11:30 PM

Pawel

Hello Mike!

Thanks for posting that WIP. Your PE work looks really good!

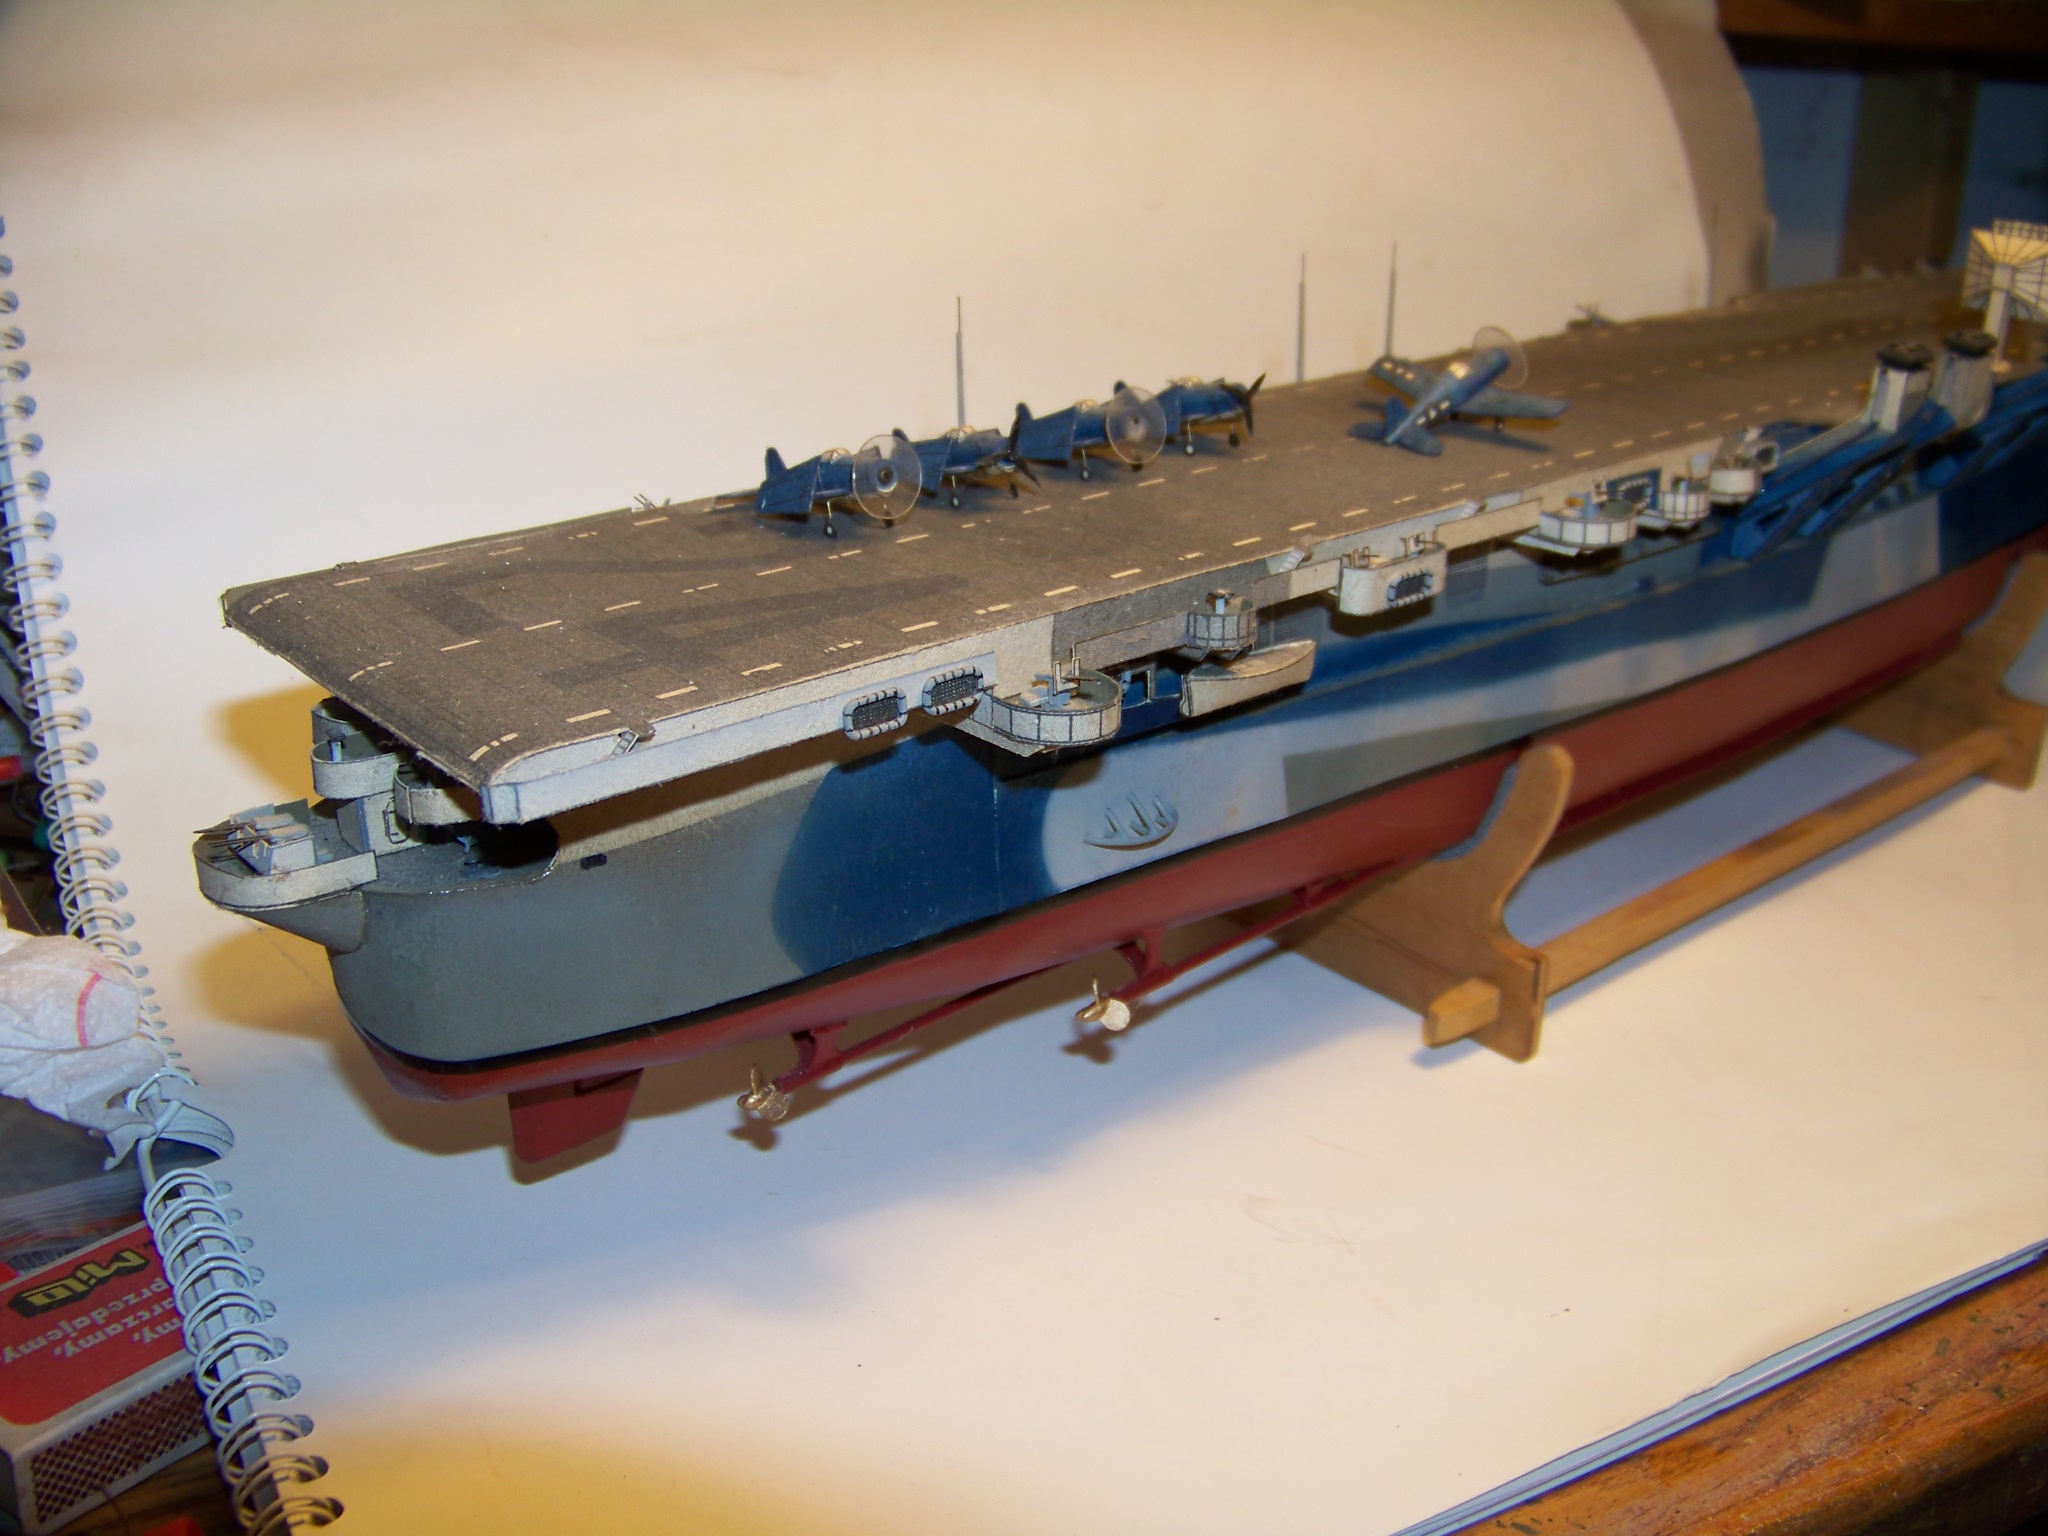
I'd like to encourage you to try to redo those prop guards. Once I have made similar guards for my 1:300 paper model of the USS Belleau Woods. I mean they can be built from scratch easily, what you need is some fine wire. Then the trick to attaching them is to drill holes in the hull, matching the wire diameter. This way you can get a nice clean and strong attachment points, even without glue at all.

Here's how my ship turned out:

Good luck with your build and have a nice day

Paweł


...is that the Princeton???

  • Member since
    July 2014
Posted by modelcrazy on Friday, January 6, 2017 10:44 PM

Hi Mike, yeah those PE guns will drive a guy nuts! I can't do but just a few per daymyself, in fact that's why I stoped on the Fletcher for now. Those tiny 20 mm Oerlikon's are hard.

Looks good!!

Steve

Building a kit from your stash is like cutting a head off a Hydra, two more take it's place.


http://www.spamodeler.com/forum/

  • Member since
    July 2013
Posted by steve5 on Friday, January 6, 2017 9:54 PM

that is some very nice work mike , we have a balmy 30 degree's here , in your lingo that's about 87 F .


  • Member since
    December 2010
  • From: Salem, Oregon
Posted by 1943Mike on Friday, January 6, 2017 6:47 PM

OK, I'm going very, very slowly! The 20mm AA guns I'm putting together with the GMM PE are taking me much longer than I had thought they might. C'est la vie. That's the nature of the modeling game. I have twelve to put together (4 PE parts, a small bit of surgery on the original plastic parts, and some bending of two of the PE parts per gun) and these minuscule rascals are trying my patience. I can do about two per day or I'll go nuts. However, I should have another update before the weekend is through - my car's in the body shop until Monday, we have snow and freezing rain coming in tonight and tomorrow morning, so I wouldn't have any use for my handsome steed anyway for a few days. (2013 Subaru Outback Big Smile).

Mike

"Le temps est un grand maître, mais malheureusement, il tue tous ses élèves."

Hector Berlioz

  • Member since
    December 2010
  • From: Salem, Oregon
Posted by 1943Mike on Monday, January 2, 2017 1:20 PM

Slow progress. Some hours spent putting together the 1.1 inch machine guns and adding the GMM PE. They look OK from a distance but not so great close up. I'm just not that talented when it comes to assembling these little parts. Nonetheless, it's progress.

I also attached the 5" guns to the deck and added the props, shafts, and rudder.

Please don't laugh too hard about my method for protecting the forward flag staff Embarrassed.

I really should have left it off until near the end of the build.

Mike

"Le temps est un grand maître, mais malheureusement, il tue tous ses élèves."

Hector Berlioz

  • Member since
    May 2009
  • From: Poland
Posted by Pawel on Sunday, December 25, 2016 4:20 PM

Hello Mike!

That's just why posting a WIP is a good thing on many levels - helps you build a better model! Good luck with your build and have a nice day

Paweł


All comments and critique welcomed. Thanks for your honest opinions!

www.vietnam.net.pl

  • Member since
    December 2010
  • From: Salem, Oregon
Posted by 1943Mike on Saturday, December 24, 2016 2:38 PM

Another brief update. After what seems like a loooong time trying to get the hull halves sanded/filed to my satisfaction and patiently (for me) waiting on some 2mm masking tape to finish painting the boot stripe and the rest of the hull, I've managed to get steps #1 and #2 completed Smile.

I also painted the 5" guns.

Not a major update but it will have to do for now.

As an aside, I'm always nervous about displaying close ups - they show all my mistakes and sloppiness to a degree about which I'm grateful (for the information in order to correct/redo) but embarrassed by the less than stellar work. Oh well, that's the way this works when I do a WIP.

Mike

"Le temps est un grand maître, mais malheureusement, il tue tous ses élèves."

Hector Berlioz

  • Member since
    July 2014
Posted by modelcrazy on Friday, December 16, 2016 7:35 AM
Your PE work is top notch. PE and AM for ships REALLY make a difference.

Steve

Building a kit from your stash is like cutting a head off a Hydra, two more take it's place.


http://www.spamodeler.com/forum/

  • Member since
    August 2014
  • From: Willamette Valley, Oregon
Posted by goldhammer on Thursday, December 15, 2016 6:49 PM

The little fiddley bits that generate large swear words look great!  Two steps back and three forward, she will get there, doing well.

  • Member since
    December 2010
  • From: Salem, Oregon
Posted by 1943Mike on Thursday, December 15, 2016 5:57 PM

Well it's going rather slowly. I've had my problems with the join between the two hull halves - they kept coming apart on one side. I finally used good old Testors Plastic Cement to weld the section of join area that would not stay together. So far, so good. Keeping my fingers crossed.

I also realized that I was not happy with the obvious join area of the hull halves - that is to say it was too visible. I've since sanded and filed a lot in the areas that were annoying me. It's not perfect now but it's better and I'm satisfied.

I've had a rough time trying to do the boot stripe on this model. I suppose I can lay part of the blame for that on the armor plating, the join line, and the imperfect fit I created for the stern section of the mating of the two hull haves. I've ordered some 2mm Tamiya masking tape which won't be here until the end of next week. I'll paint a swath of black along the hull which will extend a bit higher and lower than the width of the actual boot stripe. When that's cured I'll run the 2mm tape around the hull at it's proper position and make sure it's burnished down really well. At that stage I'll mask off the hull from the middle of the 2mm tape either up or down and paint either the Navy Blue or the Hull Red and then, when that's dry, mask the opposite side and paint it.

In the mean time I've been working on several other small (but, for me, time consuming) things on this model. I bought two boxes of the Veteran Model 1/350 5"/25 single gun (open mount) resin guns (Four sets in each box) to replace the eight guns the kit provides. I'm not sure why I wanted to do that other than the pictures I saw on the 'net looked as if they were really detailed. They've been a little bit of a hassle for me to put together but after a few days of working a little bit on them they're done. Not painted yet but as good as I can make them.

I also put together the GMM PE for the depth charge racks and finished building the stacks with the GMM PE. Again, not painted yet.

That's about it for now.

Mike

"Le temps est un grand maître, mais malheureusement, il tue tous ses élèves."

Hector Berlioz

  • Member since
    June 2014
  • From: New Braunfels , Texas
Posted by Tanker - Builder on Thursday, December 8, 2016 8:37 AM

Hey Mike !

 Good save , guy ! T.B.

  • Member since
    May 2009
  • From: Poland
Posted by Pawel on Thursday, December 8, 2016 1:43 AM

Hello!

Cool, now it looks even better! Good luck with your build and have a nice day

Paweł

All comments and critique welcomed. Thanks for your honest opinions!

www.vietnam.net.pl

JOIN OUR COMMUNITY!

Our community is FREE to join. To participate you must either login or register for an account.

SEARCH FORUMS
FREE NEWSLETTER
By signing up you may also receive reader surveys and occasional special offers. We do not sell, rent or trade our email lists. View our Privacy Policy.